Blog

  • Leica introduces silver version of the APO-SUMMICRON-M 50mm F2 ASPH

    German camera manufacturer Leica has announced that it is to introduce a version of its premium f/2 standard lens for the M system finished in anodised silver. Until now the lens, which was first announced in 2012, has only been available in a black finish. Leica claims this manual focus 50mm is the best quality lens it produces for the M system, which perhaps goes some way to explaining its $ 7795/£5600 price tag.

    The new silver version of the lens however will cost a little extra, at $ 7995/£5900.

    The lens is classed in the company’s ‘fast and compact’ series, and uses eight elements in five groups including three APO elements and two that have what the company describes as a ‘high refractive index’. The lens weighs 10.58oz/300g and measures 1.85in/47mm in length and 2.09in/53mm in diameter.

    The new silver APO-SUMMICRON-M 50mm f/2 ASPH will be available at the end of the month. For more information visit the Leica website.


    Press release

    LEICA APO-SUMMICRON-M 50mm f/2 ASPH.

    Sharpest ever standard lens now available in silver anodised finish

    Leica Camera has today announced that the APO-Summicron-M 50mm f/2 ASPH. is now available in a silver anodised version. Thanks to its meticulous optical design, high quality materials, and sophisticated manufacturing and finishing process, this high-performance lens is considered to be the reference lens among standard focal lengths.

    With its combination of exceptional sharpness and imaging performance that captures and resolves even the finest details, the APO-Summicron-M 50 mm f/2 ASPH. is characterised by extremely high contrast rendition from corner to corner of the image – at maximum aperture and throughout the aperture range. The use of a floating element in its design ensures that this is also maintained at close shooting distances.

    Eight lens elements are employed to achieve this outstanding optical performance. Three of the lenses are made from glass types with anomalous partial dispersion or apochromatic correction, and two have a high refractive index. The specially-formulated glass employed is based on original developments from the former Leitz glass laboratory, and the use of this particular glass requires extensive effort and many years of experience. Thanks to continuous advancements in optical technology, processes have since been refined and perfected to achieve the best possible image quality.

    As with all other Leica lenses, the Leica APO-Summicron-M 50 mm f/2 ASPH. was designed and developed by Leica specialists in Wetzlar and represents the perfect combination of optical and technical expertise. Exceptionally reliable with enduring value, and with the ‘Made in Germany’ quality guarantee, the lens is manufactured from the finest materials and is meticulously assembled by hand. This combination of cutting-edge technology and precise manufacturing procedures ensures consistent excellence at all times.

    Pricing and availability

    The Leica APO-Summicron-M 50 mm f/2 ASPH. (silver anodised) is scheduled to be available at the end of July 2016 at a suggested retail price of £5,900 including VAT.

    Articles: Digital Photography Review (dpreview.com)

  • 5 Tips for Getting Started with Wildlife Photography for Beginners

    There is just something about the natural world that seems to touch us humans to the very core of our being, especially when it involves wildlife of any form. When we hear the words “wildlife photography”, wide open planes of the African Savannah with herds of zebras, wildebeests and antelope come to mind.

    But that is just one part of the natural world pie! Don’t get me wrong, visiting Africa and going on safari are really high on my bucket list of places to visit and things to photograph, but I get equally excited when I am hiking in a national park that is frequented by bears, bison, eagles and pronghorn deer. There are several brilliant wildlife photographers out there, and every image they produce has a jaw-dropping reaction from most of their fans and followers. If you spend some time and really study their work, you will notice a consistent method to their approach. There are some simple basic guidelines that budding wildlife photographers can follow to creating their own Kodak moments!

    Here are a few things to keep in mind for a safe, productive, and exciting wildlife photography trip.

    1 – Research and planning

    Memorable Jaunts Getting started with wildlife photography-5

    I spent three hours of the afternoon exploring the wonderful forest lodge at Jim Corbett National Park in India because the park roads closed in the afternoon hours to allow animals to move about freely in the jungle without the noise created by countless jeep safaris – something that is not mentioned in most guide books.

    Traveling itself is one of those tasks that needs an incredible amount of planning and research. So it is no surprise that when you are planning a wildlife photography expedition, you need to add a lot more to the mix. Scope out the best places to photograph animals, the best time of day, travel times to and from, as well as any permits and paperwork needed, well ahead to time to avoid any disappointments once you get to the location.

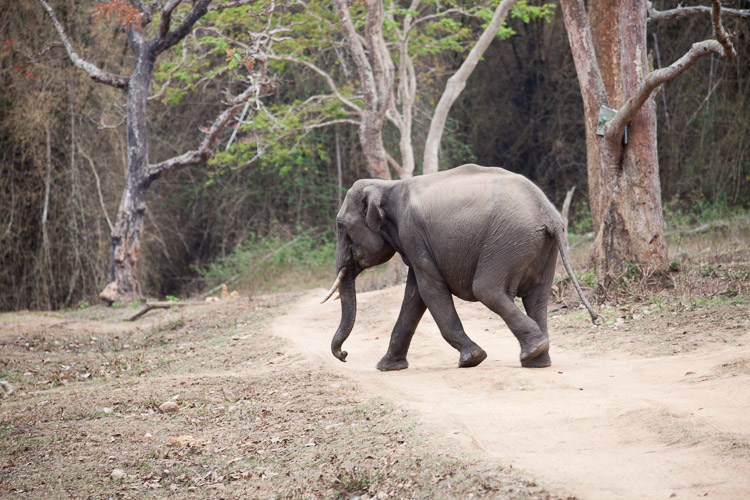
    Memorable Jaunts Getting started with wildlife photography-15

    Once we were back in the park on our safari, I was able to see this juvenile elephant walk across the path on his way to the deep jungle.

    2 – Selecting the right gear

    This is a very important part of any photographic expedition and quite possibly an article in itself. Choosing the right gear for your wildlife excursions is key. A lot of factors will determine what lens and cameras you need to carry with you.

    Are you primary going to be traveling in a car? If so, you could bring more than one camera, and a long telephoto lens. Are you going hiking/camping, and will you be constantly on the move while looking for animals? If so, then maybe you’ll need to limit yourself to one camera, and a medium telephoto lens to reduce your load. Is there a possibility for you to get up-close and personal with the animals? Then, carry a smaller focal length like an 85mm or 50mm lens.

    Are you planning on photographing landscapes too? You may need a wide angle lens if so. Will you have access to your computer frequently? If not, you may need a portable external hard drive to backup your images. How many batteries do you need?

    As you can tell, having a plan for where, and what you are looking to photograph, is really critical in determining what gear you pack.

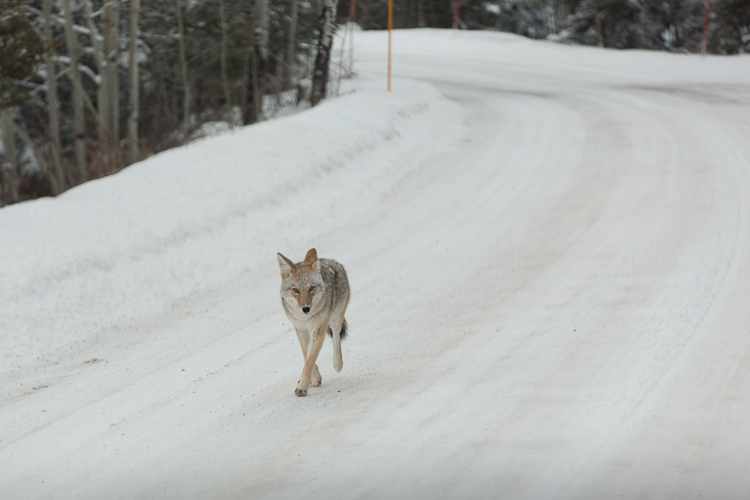
    Memorable Jaunts Getting started with wildlife photography-3

    Driving around in Yellowstone National Park one December morning found me face to face with this coyote (above) – who was simply enjoying his morning run. I was too surprised to remember the appropriate lens choice, camera setting, etc. I just took the snap, and while it may not be technically perfect, it is one of my favorite images. Just look at the trot in his paws.

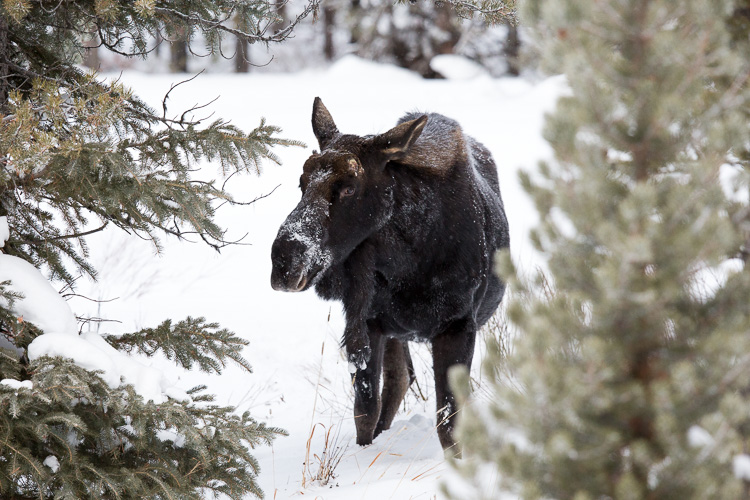
    Memorable Jaunts Getting started with wildlife photography-8

    On the other hand, a photographic expedition into Yellowstone National Park a few days later gave me a chance to use a 400mm super telephoto lens to capture this moose feeding along the hillside.

    3 – Safety

    When doing wildlife photography, it is very important to keep safely in mind. It doesn’t matter if you are going on safari, or hiking alone in national parks. Wild animals by nature are unpredictable, and it would behoove us to remember that we are in their space, and we need to be respectful of that.

    Rules and guidelines in wilderness areas are there for a reason – your safety and security. Make sure you follow them so that you, or others around you, don’t get hurt or injured. Whenever possible, travel in a group, or at least with one other person. There is security in numbers, and that can work to your advantage.

    Seek help from experts who have made the journey before you and listen to their advice. Hiking a nesting area or denning area is never a good idea, for a reason! Take care of your gear. Especially if you are away in remote locations, you don’t want to be careless and risk your gear malfunctioning just when you need it. Dust and dirt are difficult to clean when you are out in the field.

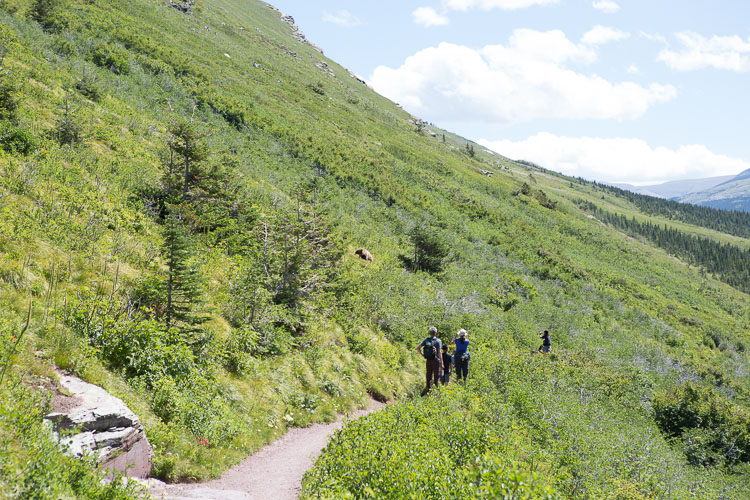
    Memorable Jaunts Getting started with wildlife photography-10

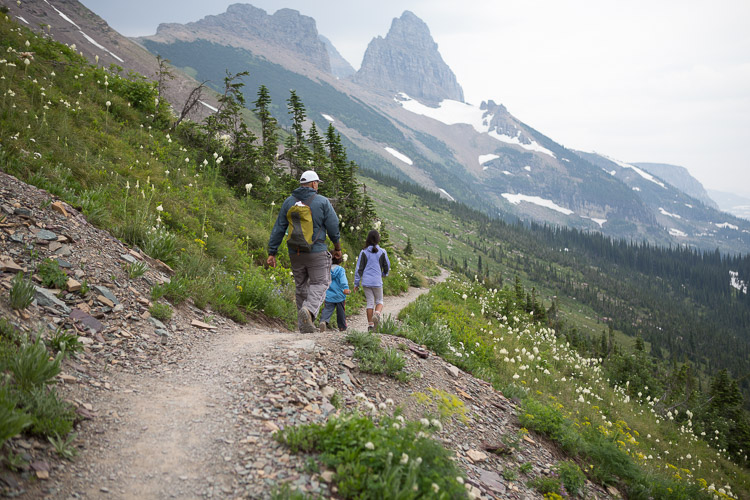
    On a 10 mile alpine hike in Glacier National Park in Montana, USA, the only gear I could comfortably carry was my 24-70mm lens and I was able to snap this picture. Not the closeup I really wanted, but this conveys a message unlike any closeup shot I could have gotten. Bonus points for spotting what everyone was looking at!

    4 – Practice and patience

    Wildlife photography, like most other genres, needs a lot of practice, and an even greater amount of patience. People spend hours and hours to get the perfect shot – often in less than perfect conditions like the cold, rain, and even overnight in a bind waiting for the sunrise shot. So depending on what you are looking to photograph, be prepared to be patient and wait it out.

    Practicing is a little harder to accomplish unless you happen to live close to a national park or wildlife frequented area. A good alternative may be to spend time at the local zoo and try to capture photographs of animals there. A lower cost alternative to testing out your gear as well as playing around with settings.

    You could also try this – Guide to Attracting Critters to Your Garden for Backyard Wildlife Photography

    Memorable Jaunts Getting started with wildlife photography-12

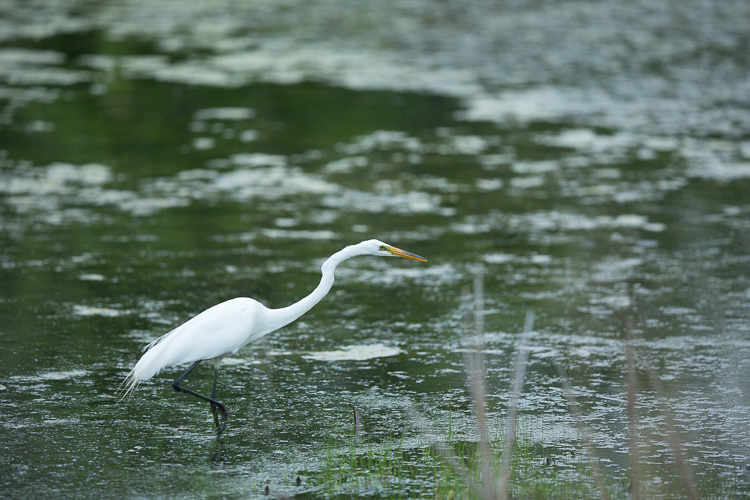
    A pond close to my house is a watering hole for many birds during the spring and summer months. I am always out there practicing trying to get a clear shot of these cranes feeding. Perhaps one of these days, lady luck will be on my side!

    5 – Enjoy the experience beyond the camera LCD

    I don’t know about you, but I absolutely hate experiencing my vacation through the back of my camera. My life is quite busy and hectic with kids, family, and a full time business. Vacations are always a welcome, and much needed break to get away from it all, and time to do the things we all enjoy.

    Yes, I absolutely want to capture moments through my camera, but I also want to be physically, and emotionally present with my family. I am just as happy seeing that exotic bird or that elusive wild animal with my own eyes, as I am getting a shot of it – I don’t need to prove it to the world!

    Memorable Jaunts Getting started with wildlife photography-9

    While we were hiking in Glacier National Park in Montana, we saw a wolverine – yes, we truly did! About 10 minutes after this photo was taken, the path turned really narrow with a steep incline, so I did the most sensible thing I could do, and put the camera away. A few minutes after that, we saw a brown patch of fur run along the path! A ranger later confirmed that a wolverine was frequenting the area we had just hiked. Yes, I have no photographs to prove it, but I have the most wonderful memory of seeing one of the rarest (to see) animals in the wild! Wolverines are a shy species, so don’t expect to see one out in the wild. They live in dens made out of snow tunnels, rocks and boulders and can be found in remote forests and tundra.

    What are some of the most interesting wild animals you have photographed? Share your experiences in the comments below.

    googletag.cmd.push(function() {
    tablet_slots.push( googletag.defineSlot( “/1005424/_dPSv4_tab-all-article-bottom_(300×250)”, [300, 250], “pb-ad-78623” ).addService( googletag.pubads() ) ); } );

    googletag.cmd.push(function() {
    mobile_slots.push( googletag.defineSlot( “/1005424/_dPSv4_mob-all-article-bottom_(300×250)”, [300, 250], “pb-ad-78158” ).addService( googletag.pubads() ) ); } );

    The post 5 Tips for Getting Started with Wildlife Photography for Beginners by Karthika Gupta appeared first on Digital Photography School.


    Digital Photography School

  • Adobe ACR 9.6.1 update supports Fujifilm X-T2

    Adobe has updated its Camera Raw application to make it compatible with Raw files created by Fujifilm’s new X-T2 camera. The latest version, 9.6.1, also fixes some reported bugs that prevented the opening of uncompressed DNG files that had been converted from Fuji X-E2 RAF format files, and an issue that meant panoramas couldn’t be created from two HDR DNG images.

    This version of Camera Raw, and the fixes that it brings, are available now to users of Photoshop CC and the Creative Cloud application.

    For more information and to download the update see the Adobe Lightroom Journal blog.

    Manufacturer information:

    Camera Raw 9.6.1 now available

    Camera Raw 9.6.1 is now available through the update mechanism in Photoshop CC and the Creative Cloud application. Our focus with this release was to fix reported customer issues.

    Thank you for all your feedback and passion for Camera Raw.

    Bugs Fixed in Camera Raw 9.6.1

    • Uncompressed DNGs files converted from Fuji X-E2 RAF source images were are unable to be read
    • Errors that preventing customers from creating a panorama from two HDR DNG source images.

    New Camera Support in Camera Raw 9.6.1

    • Fujifilm XT-2

    Installation Instructions

    Please select Help>Updates to install the update. See Keeping Photoshop & Camera Raw up-to-date.

    Please note – If you have trouble updating to the latest ACR update via the Creative Cloud application, please refer to the following plugin installation:

    http://helpx.adobe.com/x-productkb/multi/camera-raw-plug-in-installer.html

    DNG Converter Links: Win | Mac

    Articles: Digital Photography Review (dpreview.com)

  • Branco Ottico creates world’s biggest contact print at 24 square meters

    Do you lie awake at night wondering how big the world’s largest contact print is? Wonder no more. It turns out Branco Ottico, an Italian photography group, created the largest contact print in the world during Phototrace Florence in September 2015. The project involved a 24 square meter (about 258 square feet) photo negative stitched onto an equally large sheet of canvas, and enlisted the help of strangers who placed their hands on the print for the nearly 13-minute exposure.

    Their efforts resulted in a successful – and massive – cyanotype print. According to the group’s website, the print now holds a Guinness World Record. The whole process has been documented in the newly published video below. Additional photos of the project are available on the group’s Instagram.

    Via: PetaPixel

    Articles: Digital Photography Review (dpreview.com)

  • Flickr ownership changes hands as Verizon acquires Yahoo

    Telecomm giant Verizon will acquire Yahoo and its web properties, including Flickr and photo blogging site Tumblr, for $ 4.83 billion. It seemed possible that Yahoo might sell its photo-sharing sites separately, as the company announced in March that it was accepting bids for its web properties. Today’s announcement confirms that both Flickr and Tumblr will remain a part of Yahoo as it changes hands to Verizon.

    Verizon owns AOL and Huffington Post, a point that Yahoo CEO Marissa Mayer spins as a positive for her company’s outlook. In a statement published on Yahoo today, Mayer emphasized that joining forces with AOL could help strengthen Yahoo’s mobile offerings.

    Regulators must approve the sale before it can be finalized, which is expected to be early next year.

    Articles: Digital Photography Review (dpreview.com)

  • Stylized Techniques for Editing Portraits Using Lightroom

    This is the promised follow-up to my article on Creating Compelling Wide-Angle Portraits Using One Off-Camera Flash. While part one discussed equipment, composition, lighting and posing, this article focuses exclusively on post-processing.

    1 Romanian Woman

    Let me start by stating the obvious. Everyone has their own unique preferences regarding post-processing. Just read the comments below a posted image that is somewhat heavy on processing and you will see the variety of opinions out there. Personally, I like creating portraits that look somewhat surreal. I achieve some of this look by lens choice and composition and the rest in Adobe Lightroom and Photoshop.

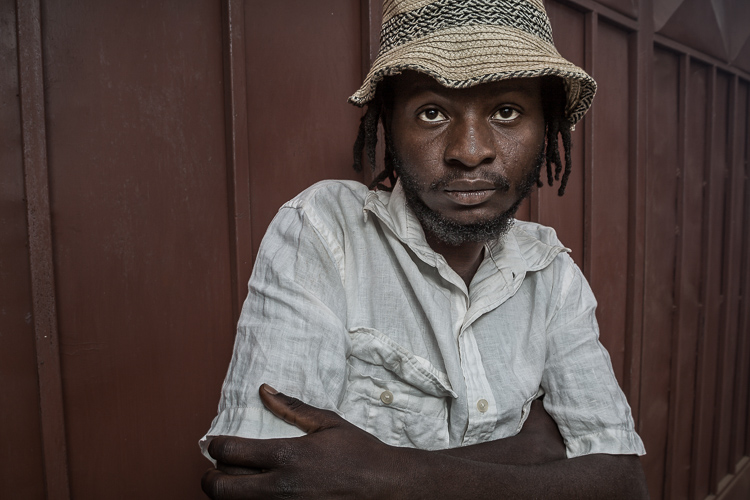
    2 Malawian Guy

    Rather than go through my entire workflow, I’ll focus on five steps in Lightroom that form the foundation for my portrait processing. If you also like portraits that look a bit surreal, my hope is that you will learn a technique or two here that you find helpful.

    This article assumes that you already have some familiarity with the menus and tools in Adobe Lightroom or Bridge.

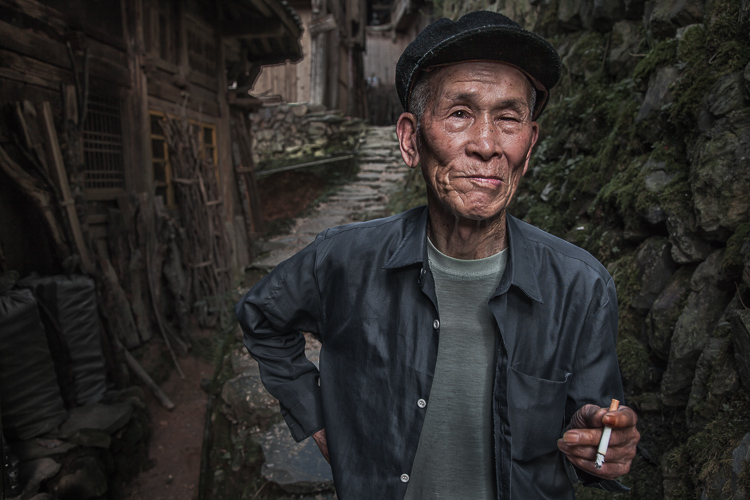
    3 Chinese Guy Hat

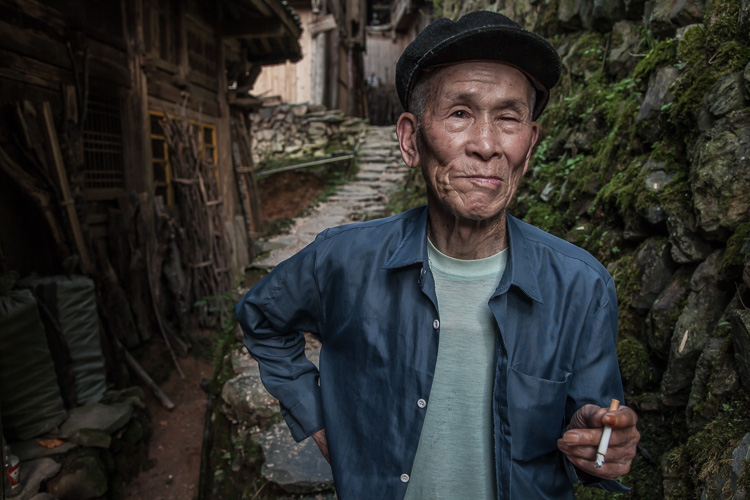
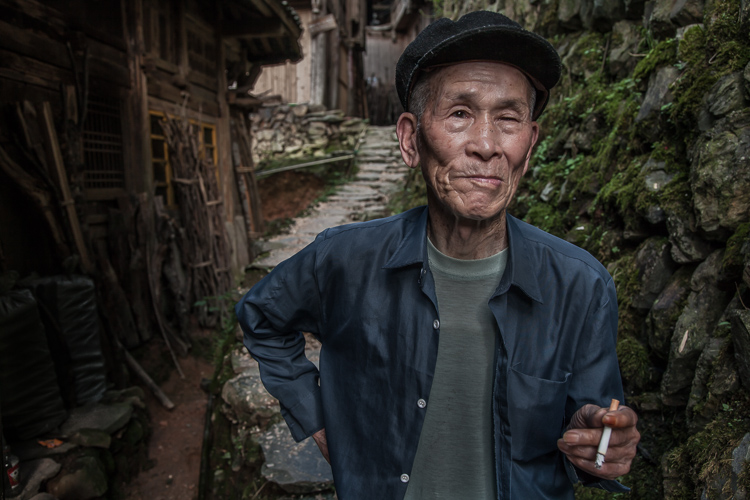
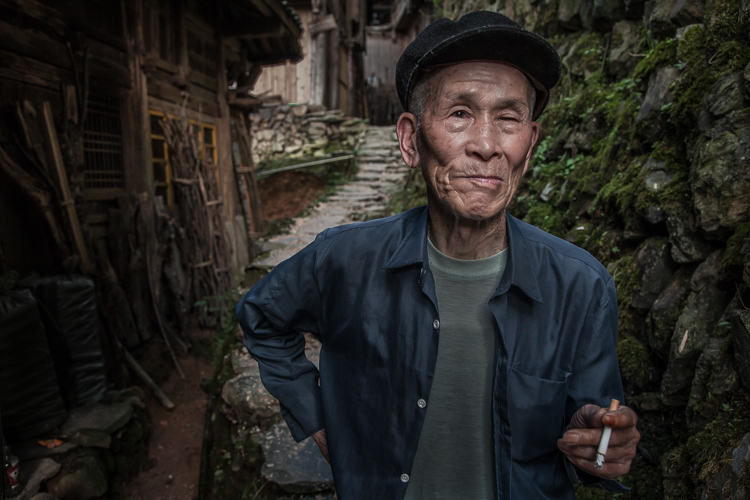
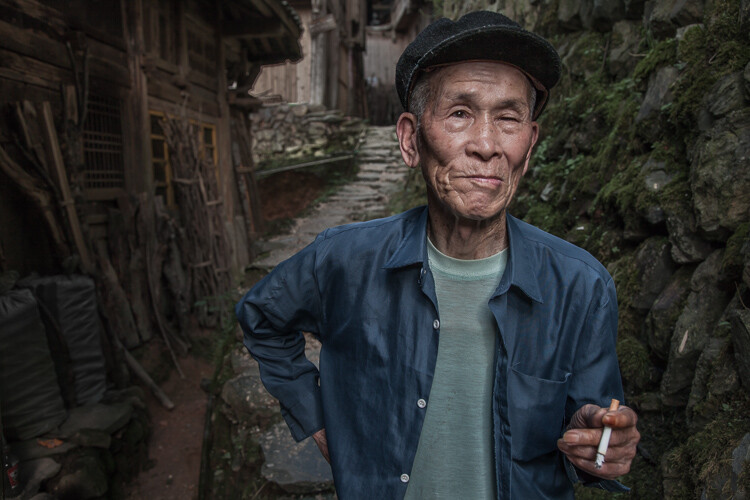
    Let’s look at the work I did in Lightroom for the above portrait, shot in rural China. First, here is the image right out of camera.

    4 Out Of Camera

    Step 1. Move the contrast to the mid-tones

    One of the first steps was to reduce the overall contrast in the image using the Highlights, Shadows, Whites and Blacks sliders. The image is fairly contrasty, but weighted more towards dark tones. I moved the Highlights and Whites sliders left (only a minor adjustment to Whites) to reduce some of the highlights (bright areas) in the background. I then moved the Shadows and Blacks sliders right (only a minor adjustment to Blacks) to make sure detail can be seen throughout the image, even in the gentleman’s hat.

    These initial adjustments gave the image a flat (non-contrasty) look as a starting point. This was intentional, as I planned on building contrast back into the image.

    Notice in the image below that the light area in the background is somewhat less distracting, and that there is more visible detail in the background shadows.

    5 Global Luminosity

    While I removed some contrast at the outer ends of the spectrum, I then added contrast into the midtones by pushing up the Clarity slider. This varies by image, but in this case I moved it to +60 in Lightroom, in order to accentuate facial features. The Clarity slider focuses on the mid-tones while mostly leaving the luminosity of the brighter and darker areas of the image as is. Here are the results:

    6 Clarity

    Step 2. Reduce saturation globally

    For my portraits, I always make an initial global reduction (applies to the entire image) to Saturation and Vibrance. In this case, I reduced Saturation to -10, and Vibrance to -5. The shirt is still too blue in my opinion, but I’ll target that in the next step.

    7 Reduce Saturation

    Step 3. Make local adjustments using the Adjustment Brush

    Using the Adjustment Brush, I made changes to luminosity, saturation and sharpness in targeted parts of the image:

    Adjustments to Luminosity – Your eyes usually gravitate towards the brightest areas of an image. So, I used the Adjustment Brush to draw more attention to the subject, especially his face, and less attention to other areas.

    I started by brushing over brighter areas that were competing with his face, and darkening them slightly using the local Exposure and Highlights sliders. I also brushed over some darker areas that were missing detail, and pulled the local Shadows slider up slightly. Lastly, I added some overall brightness to the face and a little more to the eyes.

    Adjustments to Saturation – I used the Adjustment Brush and local Saturation slider to further desaturate the man’s t-shirt. In this case, I also darkened it, while de-saturating.

    Adjustments to Sharpness – I added a bit of additional sharpness to the eyes, eyebrows, and hair using the Adjustment Brush with the local Sharpness slider.

    After these local adjustments, here is the image at its next stage:

    8 Local Adjustments

    Step 4. Create a vignette using the Gradient Tool

    In photography, when someone speaks of a vignette, they are usually referring to the darkening of the outer areas of the image, relative to the center of the image. The standard vignette darkens the outer edges equally, usually in an oval shape. However, using several gradients allows you to control the direction, size and strength of the vignette on each side independently.

    I clicked on Lightroom’s Gradient Tool, then clicked and dragged from outside the image towards the center, overlapping the subject slightly. Then, I pulled the local Exposure slider down, until I created a subtle edge vignette. I then added a gradient from the opposite side, and a very subtle one from the bottom. Conversely, if the edge of your image is darker than you’d like, you can also increase exposure with the gradient.

    Here is the image after adding a subtle gradient vignette:

    9 Vignette

    Step 5. Create a virtual copy of the RAW file for the background

    To add more dimension to this image, I used a different processing treatment between subject and background. I created a virtual copy of the file in Lightroom (Photo > Create Virtual Copy, or use the keyboard shortcut CMD/TRL+’) and named it “Background”. If you use Adobe Bridge, you can create a copy of the RAW file instead. Then, for this second copy, I simply pulled the Clarity slider back to zero, and backed off on the global Sharpness slider as well. No other changes were made.

    I then opened both of these file copies into Photoshop as layers, with the sharper rendition as the top layer. With the top layer active, I made a careful selection of the subject and created a mask so that the less sharp bottom layer becomes visible in the background areas. This adds a bit more dimension and helps keep your focus on the subject, as seen below.

    10 Imported Photoshop

    Background edits applied in Photoshop

    4-Out-Of-Camera.jpg

    Original out of camera for comparison

    Note: If you do not have Photoshop, you can also use the Adjustment Brush inside Lightroom to paint in less Clarity and Sharpness to the background areas.

    Although it is beyond the scope of this article, I continued on with processing in Photoshop, including additional adjustments to luminosity and contrast.

    3-Chinese-Guy-Hat.jpg

    I hope this short overview of my five steps in Lightroom has been helpful and that there was a technique or two that will help you in your workflow.

    googletag.cmd.push(function() {
    tablet_slots.push( googletag.defineSlot( “/1005424/_dPSv4_tab-all-article-bottom_(300×250)”, [300, 250], “pb-ad-78623” ).addService( googletag.pubads() ) ); } );

    googletag.cmd.push(function() {
    mobile_slots.push( googletag.defineSlot( “/1005424/_dPSv4_mob-all-article-bottom_(300×250)”, [300, 250], “pb-ad-78158” ).addService( googletag.pubads() ) ); } );

    The post Stylized Techniques for Editing Portraits Using Lightroom by Ken Koskela appeared first on Digital Photography School.


    Digital Photography School

  • Nikon D500 versus D750: Which one is right for you?

    Nikon D500 versus D750: Which one is right for you?

    The Nikon D500 and D750 scored 91% and 90% respectively when we reviewed them. They both received gold awards. They’re about the same size, pretty much the same weight and currently, they both cost about the same amount of money, too. So if you’re a Nikon shooter looking to upgrade your camera, which one is right for you?

    Join us, as we take a look at the main differences between the D500 and D750.

    Sensor size

    The largest difference – no pun intended – between the Nikon D750 and the D500 is in terms of sensor size. There’s a small disparity in resolution (the D750 offers 24MP whereas the D500 lags a little, at 21MP) but more significant is the fact that the D750’s sensor is full-frame. The D500, by contrast, is built around a smaller, DX format (APS-C) sensor, which introduces a 1.5X crop factor, meaning that a 50mm lens on the D500 offers a field of view equivalent to a 75mm lens on the D750.

    Leaving aside the effect of the crop factor, typically, we’d expect full-frame sensors to offer better image quality in poor light, at high ISO sensitivity settings, and broader dynamic range, compared to APS-C and smaller sensors. The D500’s sensor is very good, but physics is physics, and at any given ISO sensitivity, the D750′ noise performance is about one stop better than the D500.

    In terms of dynamic range, the D750 offers around 0.8EV more dynamic range at base ISO than the D500, which might not seem like a lot, but it’s enough to make a difference in some shooting scenarios (like the scene above, which was exposed in Raw mode for highlights, with shadows and mid-tones brightened in post). On the flip side, the D500 provides an electronic first curtain shutter option, which allows landscape photographers to ensure vibration-free images – something that can be a challenge with the D750. 


    Verdict: Both cameras offer excellent image quality, but if you need the extra dynamic range, the D750 is the best choice.

    Crop factor

    We’ve already mentioned the crop factor inherent to shooting with the DX-format D500, but there are other consequences of the smaller sensor. For one thing, it’s slightly harder to achieve shallow depth of field with APS-C sensors compared to full frame (you would need a 16mm F1.2 lens to achieve the same DoF as Rishi’s 24mm F1.8 FF shot above).

    This is because an F1.4 lens on APS-C is equivalent in DoF terms to an F2.1 lens on full-frame (and so on – F2.8 becomes equivalent to F4.2, F4 becomes equivalent to F6…). This might not matter much in everyday shooting, but if you’re a fan of very shallow depth of field portraiture, the effect is both easier and cheaper to achieve on full-frame, if you consider the typical price (and size) difference between F1.4 primes and F1.8 equivalents. 

    This is the reason why lens manufacturer Sigma introduced its 18-35mm and 50-100mm F1.8 zoom lenses – they’re intended to provide a fast maximum aperture for APS-C users equivalent to the unofficial professional standard F2.8 on full-frame. 

    There is a plus side to shooting on a DX-format camera though – the 1.5X increase in effective focal length is very handy for telephoto shooting. 


    Verdict: If you need shallow DoF, go for the D750, if you want extra reach, the D500 is a better choice.

    Lens choice (part 2)

    Still on the topic of lenses, another thing to consider when weighing the D500 against the D750 is the fact that lenses designed specifically for the smaller APS-C format of the D500 won’t work very well on full-frame. Nikon’s DX and FX lens ranges are technically cross-compatible with all FX and DX format Nikon DSLRs, but most DX lenses vignette heavily on full-frame, greatly reducing the usable image area.

    Also bear in mind that Nikon has a considerably better developed range of FX lenses than DX, and we strongly suspect that this won’t change any time soon. As such, given that FX lenses can be used without any technical limitations on DX, if you’re inclined towards the D500, you might still be better off investing in FX lenses – especially if you think you might move up to full-frame in future. The downside is that you might start off with some weird equivalent focal lengths (i.e., a 24-70mm will behave like a 36-105mm).


    Verdict: We’re calling this one a draw.

    Speed

    When it comes to speed, the D500 is a clear winner. In many respects a scaled-down D5, the D500 is significantly faster than the D750 and much better equipped to cope with the demands of action photography. A maximum frame rate of 10fps and seemingly infinite buffer (200 Raws) leaves the D750 in the dust.

    It’s not just about frame rate though. The D500 (pictured above) can also accept faster XQD memory cards, capable of data transfer rates up to 8 Gbit/s.

     A USB 3.0 interface and 1/8000sec maximum shutter speed (compared to USB 2.0 and 1/4000 respectively) cement the D500’s action-shooting credentials.


    Verdict: D500 wins, by a mile.

    Autofocus

    It’s a similar story with autofocus. While the D750’s 51-point AF system is extremely capable, and more than a match for pretty much any competitor in the sub-pro full-frame market segment (including the D810), the D500’s AF system is in a different league.

    The D500’s AF system features 153 AF points, of which 99 are cross-type. Of this total of 153, 55 points can be manually selected, and the center point is sensitive down to -4EV. The D500’s smaller sensor actually benefits its AF system, because it means that frame coverage is much broader than the D750 (and any other Nikon full-frame DSLR).

    Combine an AF array that covers almost the entire imaging area with a huge degree of AF customization and 3D AF tracking (the D500’s 180,000-pixel RGB metering sensor significantly boosts the performance of an already market-leading system) and you get an autofocus powerhouse.


    Verdit: D500 wins.

    Video

    On paper, the D500 roundly beats the D750 in terms of video specification, thanks to the addition of 4K video – a feature that Nikon only offers on two DSLRs (the other being the flagship D5). But as good as the D500’s 4K output is, using this mode does come with one big limitation.

    In 4K video mode, the D500’s crop factor increases from 1.5X to 2.25X. This is pretty limiting when shooting anything that requires a wide field of view, purely from the standpoint of finding a wide enough lens. Even Nikon’s super-wide 10-24mm DX format zoom becomes an pretty standard 23-55mm equiv. (with a maximum aperture equivalent to F8-10 in depth of field terms). In HD video mode, there’s not much to separate the two cameras. The D500 and D750 offer an extremely similar specification and deliver similar-looking video footage. The addition of a touchscreen on the D500 makes AF point positioning easier, but that’s about it (and bear in mind that AF in video mode is pretty poor on both cameras, so you might find that you don’t make use of this function much anyway), 


    Verdict: If you need 4K, go for the D500 – just make sure you have a wide enough lens.

    Flash

    Nikon is pitching the D500 as a ‘professional’ DSLR, despite its sub full-frame sensor. As such, like the flagship D5, it lacks a built-in flash. This cuts down on weight, and also means a theoretically increased resistance to dust and water incursion. The downside is – well, there’s no built-in flash.

    We actually really like the small built-in flashes on cameras like the D750 and D810, not because they’re particularly useful as flashes, but because they can be used to wirelessly trigger groups of Speedlites off-camera. That’s conventional optical triggering, but unlike the D500, the D750 is not compatible with Nikon’s WR-A10 wireless controller ($ 200), which allows off-camera flashes to be radio triggered (important when line-of-sight won’t cut it).


    Verdict: D750’s built-in flash offers greater versatility (unless you need radio control), at the expense of reduced environmental sealing.

    Ergonomics

    Ergonomics and handling are pretty subjective. One person’s ideal control system might be maddeningly complex to someone else. Some people really like touchscreens, some people can’t see the point of them. Some members of the DPReview editorial team (who shall remain anonymous) actually like Olympus menu systems.

    The point being – ergonomically, which of these two cameras is better depends on your personal preferences. Their basic control layout is extremely similar, but they do feel somewhat different in the hand. Despite its smaller sensor, the D500 is actually the larger, heavier (by more than 100g) of the two cameras. The D750 is surprisingly svelte for a full-frame camera, but the D500 feels like it could be used to bang in a few nails.

    The D500 provides many more options for customization than the D750, available via a dedicated custom settings GUI. This makes it more versatile for a professional moving between different shooting scenarios.

    It also offers a couple of other pretty major features that the D750 doesn’t: a touchscreen, and backlit controls. We’ve found the D500’s touchscreen invaluable for things like AF point positioning in live view (especially from awkward low angles) and backlit controls are a huge benefit if you do a lot of shooting at night. 


    Verdict: D500 offers more. A touchscreen, more customization and backlit buttons.

    Nikon D500 versus D750: Which one is right for you?

    So if you’ve got a couple of thousand dollars burning a hole in your pocket, which camera should you buy? 

    The Nikon D750 (above) is one of our favorite DSLRs – ever. Its combination of refined handling, a highly capable autofocus system, a surprisingly small and light body and excellent image quality make it fantastic camera for everyday use. The D750 is one of those cameras that we consistently recommend to friends and family, and for most Nikon photographers, there are very few reasons to spend more on the D810.

    But then along came the D500. It’s an APS-C format camera, but not only is it more ‘pro’ than any previous DX format DSLR from Nikon, but it outperforms most of the company’s full-frame DSLRs, too. The D500 is designed for heavy professional use, with an emphasis on speed and reliability. As we’d expect from a camera that shares so much with the flagship D5, the D500 is a real workhorse, and in many respects (shooting speed, autofocus, video spec, to name just the obvious things) it outmatches the D750, sometimes very significantly.

    The D500 also offers 4K video, of course, but unless you really need it, we wouldn’t recommend deciding between these cameras purely on the basis of this feature. The aggressive 2.25X crop in 4K mode is pretty limiting, apart from anything else. 

    Final verdict

    At the end of the day, if it were our money, we’d probably recommend the D500 over the D750. For a photographer interested in capturing sports or fast-moving action it’s a no-brainer. The sheer speed and focus of the camera, combined with the telephoto-boosting 1.5X crop factor make it a superb tool for this kind of photography. And of course, if you can live with some awkward effective focal lengths, the D500 is fully compatible with all of Nikon’s current lenses. 

    If you’re not a keen sports photographer, you don’t need 4K video, and you don’t mind not having quite the latest and greatest AF system – go for the D750. You won’t be disappointed.

    • Read our full Nikon D500 review
    • Read our full Nikon D750 review

    Did we miss anything? Let us know in the comments.

    Articles: Digital Photography Review (dpreview.com)

  • Voyager 4 Drone comes with 16x optical zoom and 4G connectivity

    Most camera drones come equipped with wide-angle lenses. For most use cases this makes sense from an image framing point of view but it also helps keep camera shake at bay. That said, thanks to improved gimbal and stabilization technologies we are now seeing the first consumer drone cameras with optical zoom appear on the market. The recently released Zenmuse Z3, DJI’s first zoom camera, offers a 7x zoom. The new Walkera Voyager 4 drone is now more than doubling the DJI’s zoom range by offering a 16x optical zoom lens that tops out at 1500mm. 

    The camera records 1080p Full HD video, can rotate 360 degrees and is stabilized by a gimbal. Drone and camera can be controlled from up to a mile away via a mobile app using the drone’s built-in Wi-Fi network. In addition the Voyager 4 offers a new 4G connectivity feature which means it can, as long as a mobile network is available, be controlled across much larger distances. 

    Both new features, the 16x zoom and 4G connectivity, won’t help to alleviate the privacy concerns related to drone use, but we will have to wait and see how the new technologies will be used. The Voyager 4 also comes as a 4K version with wide-angle lens. At this time pricing information has not been released. A product video is available on the Walkera website.

    Articles: Digital Photography Review (dpreview.com)

  • Logos for Photography Business: 5 Trends to Use

    A well-designed logo is a must-have tool for any photographer and studio wants to be seen on the market. According to many analysts, a logo plays an important role in entrepreneur’s success. Especially, if it’s a part of a brand identity. Use the following trends and ideas to create a powerful logo for your photography business and grab the attention Continue Reading

    The post Logos for Photography Business: 5 Trends to Use appeared first on Photodoto.


    Photodoto

  • Tunnel of Books: Curved Shelves Wrap Bookstore Walls & Ceiling

    [ By WebUrbanist in Design & Fixtures & Interiors. ]

    book tunnel interior

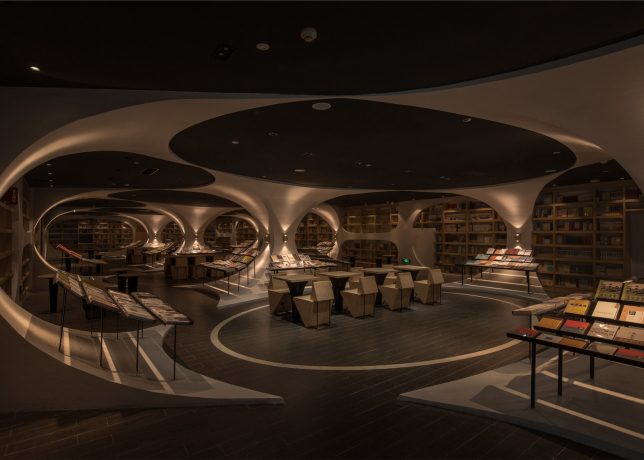
    Paired to fantastic effect, a series of arch-forming shelving units and a black-mirrored floor create a wraparound tunnel in a Chinese bookstore, punctuated by a fracture leading visitors through the resulting passageway.

    book tunnel front view

    book tunnel side view

    Designed by Shanghai studio XL-Muse (images Shao Feng), these floor-to-ceiling shelves in the Yangzhou Zhongshuge bookshop drew inspiration from the winding and reflective Zhen Yuan river nearby, as well as the area’s arched bridges.

    book cavernouse i interior

    book curved reading room

    book meeting space

    “In the past, guided by water, many literati and poets visited and gathered here,” said XL-Muse, and these regional infrastructural icons were “used to be the guiding factor of culture and commerce, and they represent that the bookstore is the bond between humans and books at the same time.”

    book wrapping volumes

    book side view

    book reader

    The tunnel opens up into a vast library-worth realm of further reading in the cavernous interior, with architectural elements echoing the arches of the entry corridor. The rounded-and-arched theme is carried through in thin pillars and sloping displays.

    book children reading

    book kids space

    Additional interior design dimensions come into play in themed reading spaces for children and adults, with starry ceilings and other humanizing elements. Here, furniture colors and shapes soften these spaces and make them more comfortable and inviting for longer-term occupation.

    Share on Facebook


    [ By WebUrbanist in Design & Fixtures & Interiors. ]

    [ WebUrbanist | Archives | Galleries | Privacy | TOS ]


    WebUrbanist