Blog

  • Leica improves Q functionality with firmware 2.0

    Leica’s Q compact camera has been given a functionality boost with a firmware update that adds the option to shoot Raw-only, and extends the longest shutter speed from 30 seconds to 120 seconds. Firmware version 2.0 makes a number of changes to the way the full-frame 24MP camera operates adding some new features and fixing issues that made handling difficult in some cases.

    The AF system functionality has been changed to allow different sized AF selection areas, while at the same time correcting an ability to focus on subjects outside the picture area when shooting in the cropped modes. Face detection also now reverts to multi-area AF when no face is detected in the scene. A useful new feature automatically switches the camera to use the rear LCD to display image review and menu navigation when the EVF is being used – for viewfinder photographers who prefer to see their images and menus in a larger format. Additionally, now user profiles can be accessed via the rather under-utilized Function button.

    Leica Q owners can download the new firmware via the Leica website.

    Press release: 

    Leica releases firmware update 2.0 for Leica Q

    Leica has released firmware update 2.0 for the Leica Q, bringing numerous new features to the highly successful full-frame compact camera. The update is available to download now from the Leica web site.

    Leica works continuously in close collaboration with Leica photographers on the development and optimisation of its products, and, as a result, a number of enhancements in this latest firmware update have been based on specific customer recommendations and suggestions.

    The first of several improvements, DNG format can now be selected as a separate option in addition to JPG and DNG + JPG, allowing photographers to save space on their memory card.

    An optimised EVF mode makes navigation even easier than before. With this firmware update, a press of the Menu or Play button now allows the user to switch straight to menu control / picture assessment on the LCD screen.

    The shutter speed range has been expanded and now includes speeds of up to 120 seconds.

    ‘User Profile’ is now directly selectable via the FN button, facilitating quick and easy access to all functions stored in a particular user profile.

    The spirit level display has also been improved, remaining visible when the shutter release is pressed.

    Three optimised autofocus functions bring further creative freedom:

    • The 1-field autofocus metering area can now be selected in three different sizes: small, medium and large.
    • AF motion in digital zoom mode for focal lengths of 35mm and 50mm has been limited to avoid focusing on objects outside the zoom range.
    • Face Detection has also been optimised: if no face is detected, AF now automatically reverts to multi-field autofocus mode.

    Furthermore, a fourth information screen has been added, with the option to display the lower bar separately. The touch-controlled magnification function in playback mode has been revised, whereby double-tapping calls up the maximum enlargement or reduces the image back to original size.

    Other new additions include a countdown display for long exposures / noise reduction, three modes available for the thumbwheel (Off/Auto/Exp. Comp.) and deactivation (Mode Lock) of the video button, if required. A change to WiFi password setting now allows the characters to remain visible when entered, and flash-unit compatibility has been extended to support the Leica SF 40 and SF 64.

    Leica Q owners can download the firmware update from the Leica web site, or visit their local Leica Store or Leica Customer Care in the UK, for a complimentary firmware update service.

    Articles: Digital Photography Review (dpreview.com)

  • Gold Infill: Japanese Pottery Repair Tradition Applied to Concrete

    [ By WebUrbanist in Design & Fixtures & Interiors. ]

    gold floor cracked resin

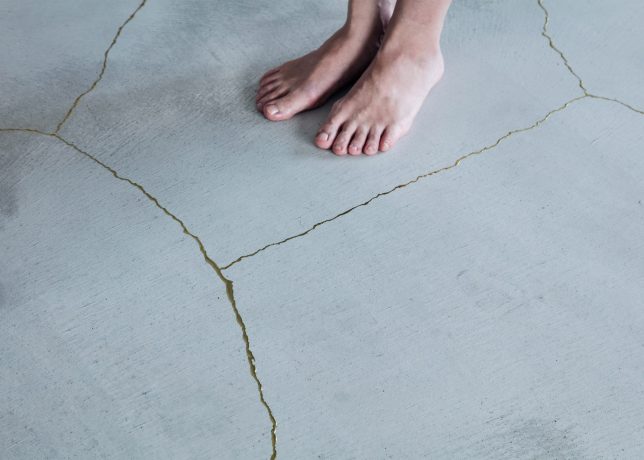
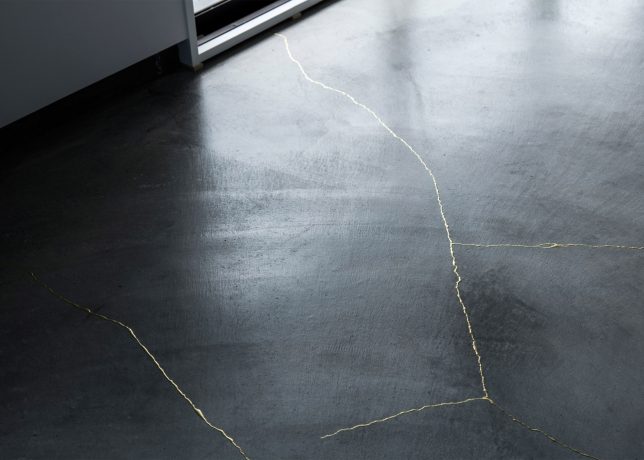
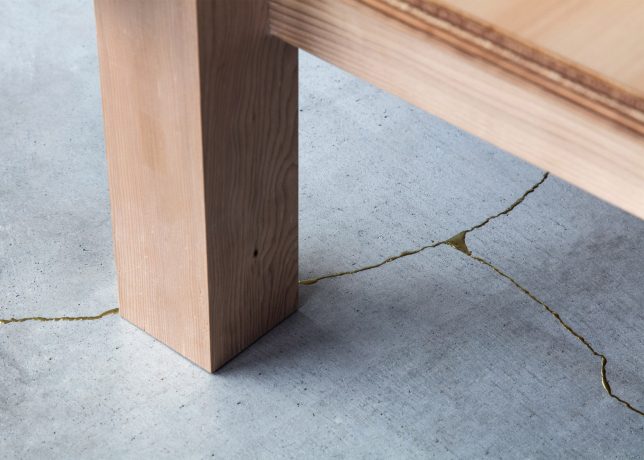
    Strands of gold fill the cracks of this apartment in Kyoto, replicating in architecture a longstanding tradition of repairing pottery in a way that tells a true history of its use and reconstruction. Mixed with resin, glittering gold dust sparkles against adjacent surfaces.

    goldinfill pottery

    Kintsugi, which translates as “to repair with gold,” is a philosophy as much as an artistic approach. It reflects the idea that breakage and reassembly is part of the life of an object. In this case, the cracks that almost invariably form in concrete were repaired in the same fashion.

    gold fills cracked floor

    When Kintsugi was first employed centuries ago by a Japanese shogun, others were so enamored with the effects that, as the story goes, they began breaking their own pottery just to have an excuse to patch it back together with gold-laced lacquer.

    gold concrete infill

    In this case as with pottery artifacts, the effect is dazzling. Cracks stand out as something intentional, artistic and organic rather than shied away from as simply damaged. Spearheaded by architecture studio Tank, this may in turn also become more of a bigger trend, if only in Japan.

    gold interior design

    “The Japanese have traditionally repaired broken ceramics by gluing fragments together with lacquer and gilding the seams with gold powder to enjoy the beauty of imperfection,” said TANK. “Using traditional mortar, we emulated the art of Kintsugi in the living room by joining the cracks, thus transforming what was considered imperfect into a subject of beauty.”

    raw interior design

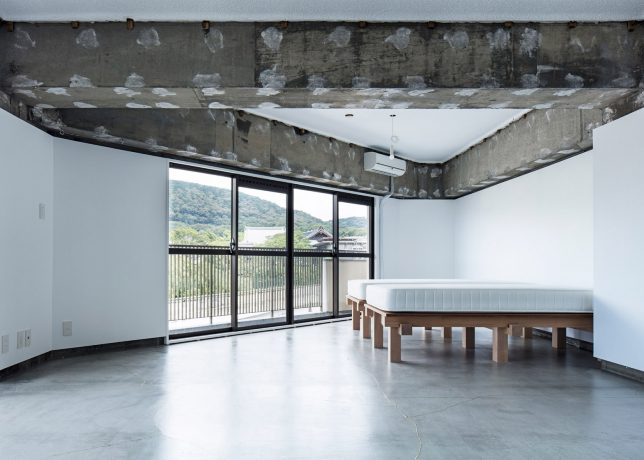
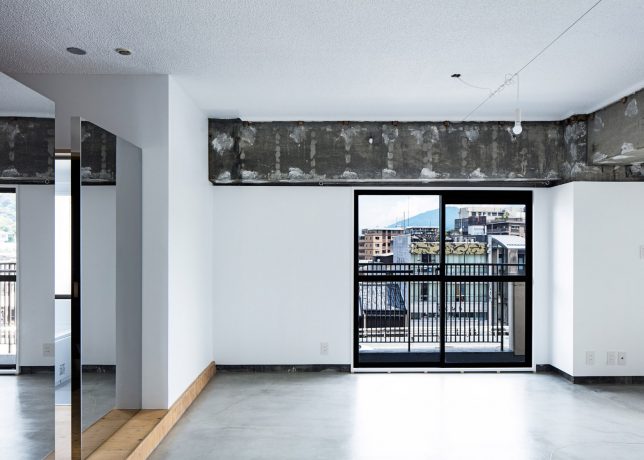
    Meanwhile, the winding gold cracks form part of a larger puzzle, elegantly juxtaposed against raw ceilings and reflected in a series of mirrored doors. The overall effect is minimalist, but with materials and textures adding life through creative details. Depending on the time of day and type of light, the gold blends in or stands out as lighter (or darker) against cementitious surrounding surfaces.

    Share on Facebook


    [ By WebUrbanist in Design & Fixtures & Interiors. ]

    [ WebUrbanist | Archives | Galleries | Privacy | TOS ]


    WebUrbanist

  • How to Use Upright Guided Tools in Lightroom’s New Transform Section

    In their latest release of Lightroom 6.6 (or CC 2015.6 if you are using the Creative Cloud subscription package), Adobe has added a new feature, allowing us photographers to straighten our images even easier than before.

    Dps LR Transform 01

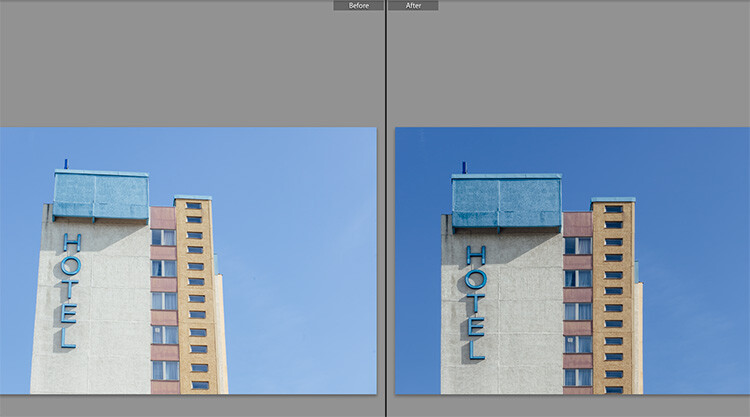
    The image above is a typical example of a photo that can use some straightening. A tall building, shot from the ground, will always look tilted or skewed (unless you have the budget to buy a tilt-shift lens, designed to overcome these issues right in camera).

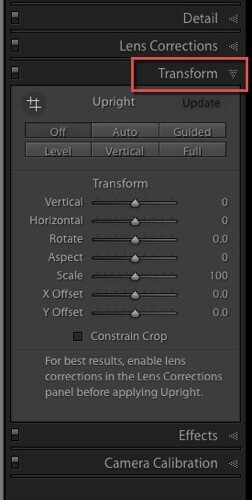
    The latest update of Lightroom comes with a new Transform section

    For these purposes, Adobe Lightroom had already offered an Upright feature within the Lens Corrections tab in its Develop module. In the newest version 6.6/CC 2015.6, this feature was extended, and is now in its own section called Transform.

    Tansform panel LR

    In this new Transform section, some of the known Upright features from the old Manual section can be found again. The image shown below is a good and easy sample to test the new features. I shot it slightly tilted against the wall, and there is also a slight barrel distortion visible, due to the mild wide angle lens used.

    Dps LR Transform 03

    Most interesting for us is the new Guided button, that allows us to show Lightroom which lines we want to have straightened. When you click on this button, Lightroom allows you to draw lines on the image, that show the software where and how you think your image is supposed to look straight.

    dps-LR-Transform-04c

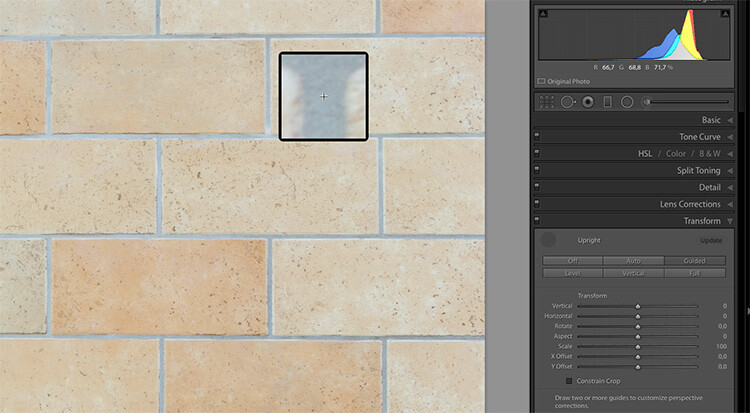
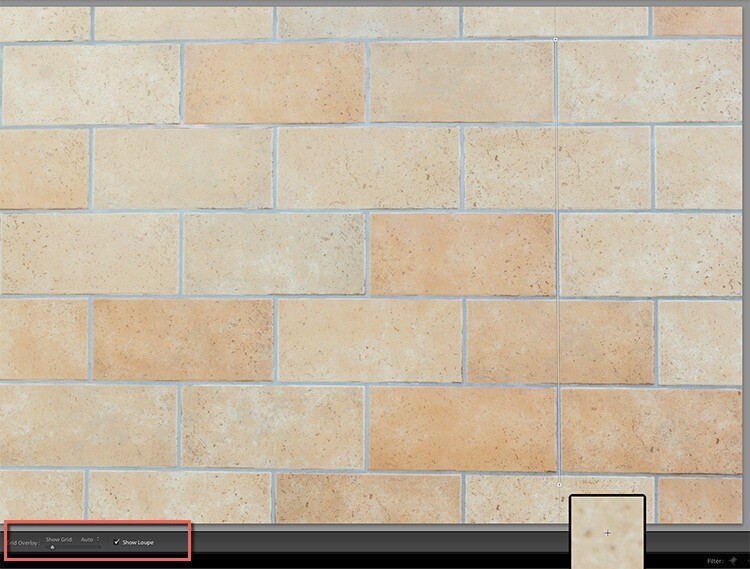
    When you turn on the Show Loupe checkbox below the image (if you don’t see that on your screen hit T on your keyboard to toggle the toolbar), you can now move the mouse over the image, and Lightroom will close in on the details you are hovering over. This can help you find the perfect spots to click on, and make your lines.

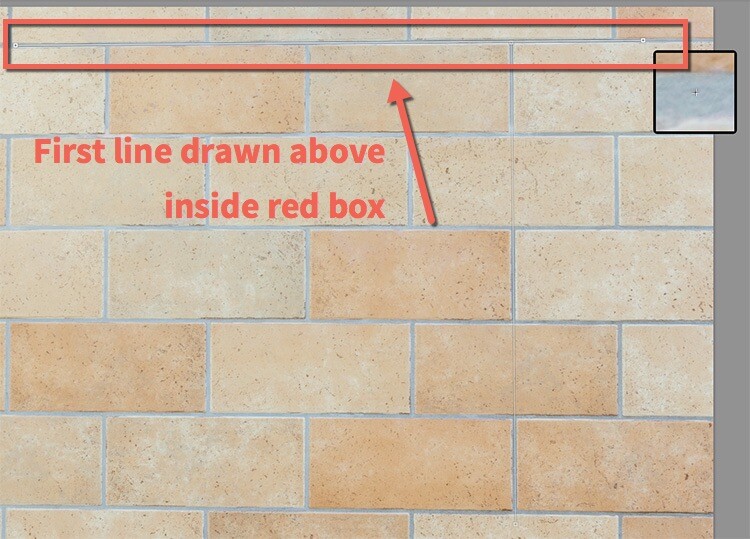
    The first click (click and hold it down) starts a new line that now moves along with your mouse. Move the line to a second spot in the image (and let go of the mouse) and Lightroom will have drawn the first line. You can click on both of the endpoints of this line if you want to correct it.

    dps-LR-Transform-05c

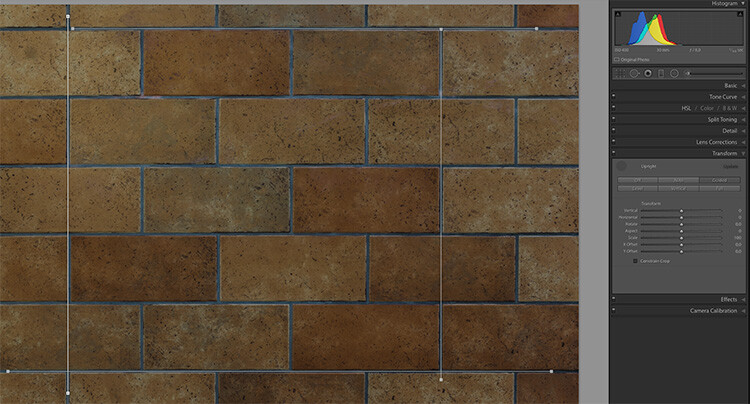
    As soon as you draw a second line, Lightroom starts correcting the image. The best way to use this tool is to draw one vertical, and one horizontal line at the start. You may notice the improvement already in this but if you look closely, not all of the tilt, nor the distortion, has been corrected yet.

    You can then draw two more lines (it accepts up to four guide lines in total) to help Lightroom catch the last perspective issues and resolve them.

    Dps LR Transform 06

    Bonus tip: To make the lines more visible, I have temporarily reduced the Exposure value for the image, as you may notice in the last image (above). As the lines are thin and white, I found it easier to use when I darkened the photo to allow for good contrast with the tool.

    Example image – correct a building tilt

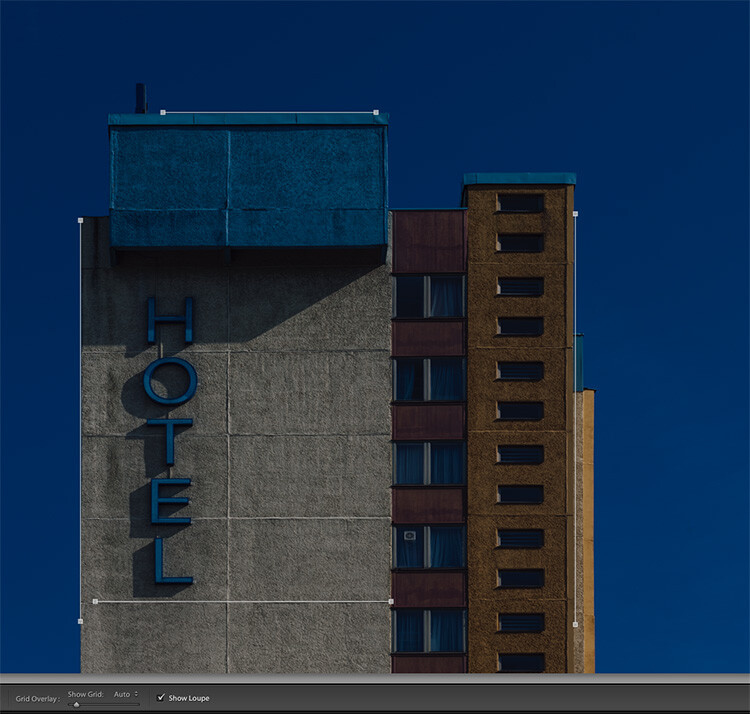
    Now, I will show you how I used the guides in the architectural image I showed on top of this article. Once again I have lowered the exposure to show the lines. As you can see, I have used two vertical and two horizontal lines, each of them way off the center of the image, to get the best results of this new feature.

    Dps LR Transform 07

    Finally, you might want to use the sliders to change the Aspect, Scale and the X and Y Offset to compensate for the changes in perspective that might turn the objects in your image into looking slightly wider or slimmer form, than would be seen in real life.

    Additional tool tips for using Guided Upright

    Adobe found the Guided Upright tool to be valuable enough to define a keyboard short cut for it. Shift-T will bring you to this tool directly from either the Develop module or even from the Library.

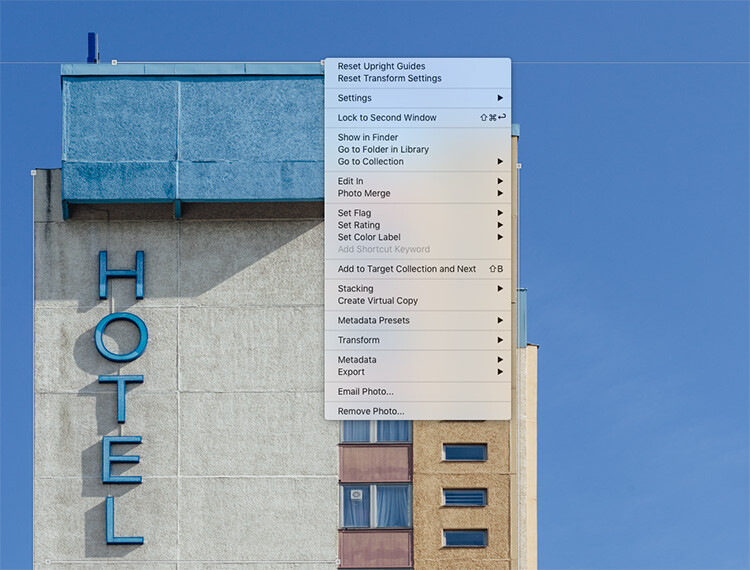
    If you ever wish to reset the upright guides, or the whole Transform section, you can right-click into the image while using this tool. Lightroom will show two settings on top of the context menu offering you the option to reset the guides only, or all Transform settings.

    Dps LR Transform 08

    Do you shoot architecture? Has this been a feature you’ve found useful? How have you applied it to your images? Let us know in the comments below. If you have any questions post them there as well.

    googletag.cmd.push(function() {
    tablet_slots.push( googletag.defineSlot( “/1005424/_dPSv4_tab-all-article-bottom_(300×250)”, [300, 250], “pb-ad-78623” ).addService( googletag.pubads() ) ); } );

    googletag.cmd.push(function() {
    mobile_slots.push( googletag.defineSlot( “/1005424/_dPSv4_mob-all-article-bottom_(300×250)”, [300, 250], “pb-ad-78158” ).addService( googletag.pubads() ) ); } );

    The post How to Use Upright Guided Tools in Lightroom’s New Transform Section by Michael Zwahlen appeared first on Digital Photography School.


    Digital Photography School

  • Popular Prisma photo app now available on Android

    Just when we thought filter apps were falling by the wayside, along came Prisma – a wildly popular iOS app now available for Android. Prisma uses a mix of neural networks, artificial intelligence and cloud-based machine learning to apply a range of filter effects, mimicking styles of artists such as Munch or Picasso, to your images. Since its launch a month ago for iOS it has become one of the year’s most popular imaging apps.

    Until now, Android users had been limited to a buggy beta-version app, but today Prisma Labs, the developers of the app, has finally released the production version on Google Play. As on iOS, the app creates dynamic brush strokes and pencil drawings based on your images. Filters are fine-tunable and the final results can be shared in a variety of ways. Prisma for Android is compatible with devices running version 4.1 or newer of the Google mobile OS and can be downloaded and installed for free from the Google Play Store now. 

    Articles: Digital Photography Review (dpreview.com)

  • This is what it looks like when Getty prepares for the Olympics

    Michael Heiman, Getty’s Director of Global Event Operations, has his work cut out for him in Rio. He’s been posting photos to his Instagram account showing the work going on behind the scenes as his team prepares to cover the Summer Olympics. From the not-so-glamorous task of installing cables, to the confusion caused when he wore a green shirt to a local hardware store, his posts have offered a fascinating look at what it takes to cover a colossal event like the Olympics.

    And of course, there’s the gear. Observe:


    It takes a lot gear to cover the Olympics. This is just some of our lens…. #mygettyriooffice #rio2016 #cps #thankscanon #lotsofglass

    A photo posted by Michael Heiman (@heiman225) on

    But what about the camera bodies? Glad you asked.


    You obviously need some camera bodies to go with all that glass. #rio2016 #mygettyriooffice #gearporn #lotsofcameras #eos1dxmarkii #cps #canon #thankscanon #gettysport

    A photo posted by Michael Heiman (@heiman225) on

    Not surprisingly, the table is loaded with Canon EOS-1D X Mark I and II bodies, with a couple of 5DSR bodies for good measure, and L-series glass as far as the eye can see. Just another day at the office, right?

    Articles: Digital Photography Review (dpreview.com)

  • How to Use Your On-Camera Speedlight to do Bounce Flash Effectively

    An on-camera flash (or speedlight) is the tool many photographers own, but few know how to use. Every day I see this amazing piece of equipment go to waste, slamming harsh light into a subject, when it could be caressing it with soft, directional illumination. The flash is a sculptor’s chisel, not a sledgehammer. You just need to know some basic technique.
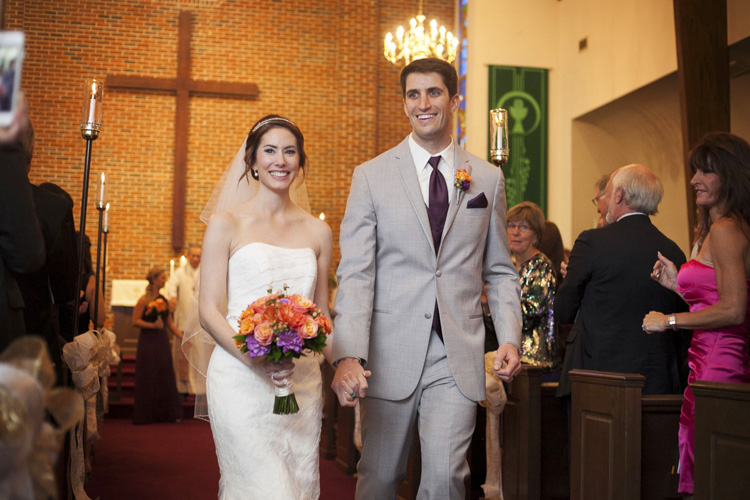
    Photo6

    In the 400-plus weddings I’ve photographed over the years, much of what I shoot indoors is lit with a speedlight. I have a trunk full of studio lights that I’ll set up and use sometimes at events, but more often than not, I end up preferring the photos from my little on-camera flash (not to be confused with the built-in one). You can create beautiful light bouncing your flash off of walls, ceilings, mirrors, professional wrestlers or herds of sheep.

    Let me illustrate with a few examples, using my favorite model, my wife Karen. Every photo below is taken with the same lens (50mm), shutter speed (1/180), and aperture (f/4). We also don’t move at all. We are about 10 feet in front of a gray paper backdrop, white walls to the left and right are about seven feet away. The ceiling is also white. The only thing that changes in these photos is that I am spinning my flash head into different positions.

    WHAT NOT TO DO

    Photo1

    In our first example, I’ve photographed Karen with direct flash. (She is laughing because she thinks I’m incompetent for having my flash in that position).

    This is harsh, flat light. There is a nasty shadow on the background. This is the opposite of bounce flash, and typically a last resort flash position. Let’s move on.

    A SLIGHT IMPROVEMENT
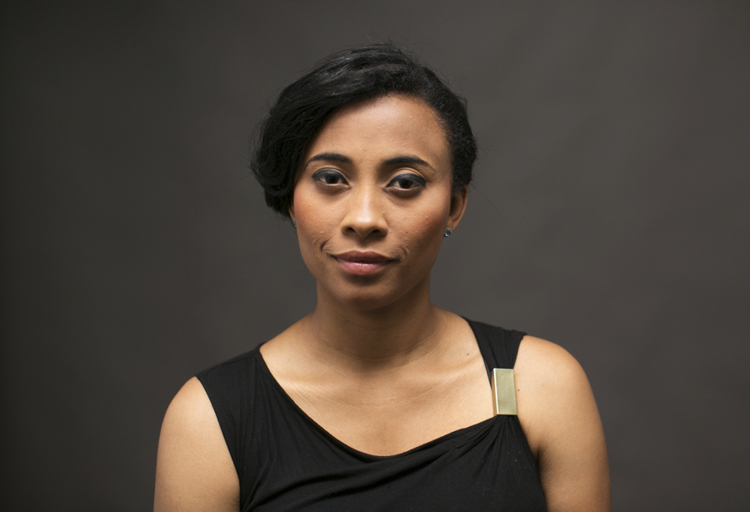
    Photo2

    Here I’ve improved things a bit by bouncing my flash off the ceiling. This has softened the light, but it is still coming from overhead, creating unattractive shadows under her eyes, and a lack of catchlights. We can do better!

    LOOKING GOOD
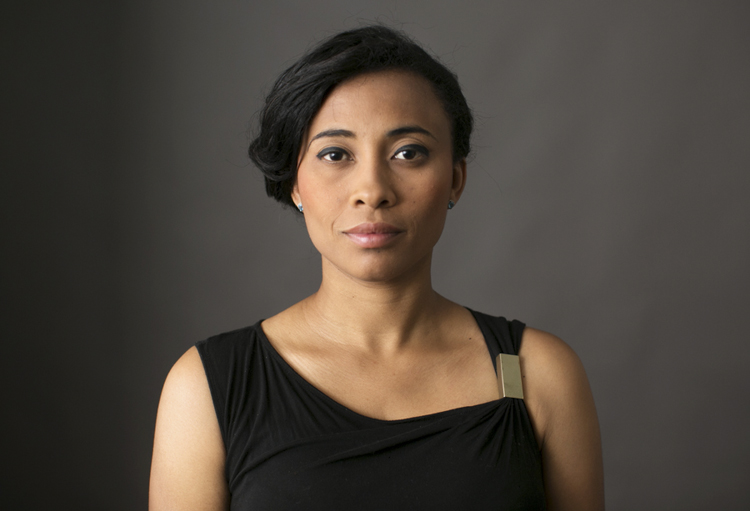
    Photo3

    Here I’ve pointed my flash to the side, so it bounces off the wall to my left, giving me some softness and better directionality and volume of light. I think this is a keeper!

    WHAT HAPPENED HERE?
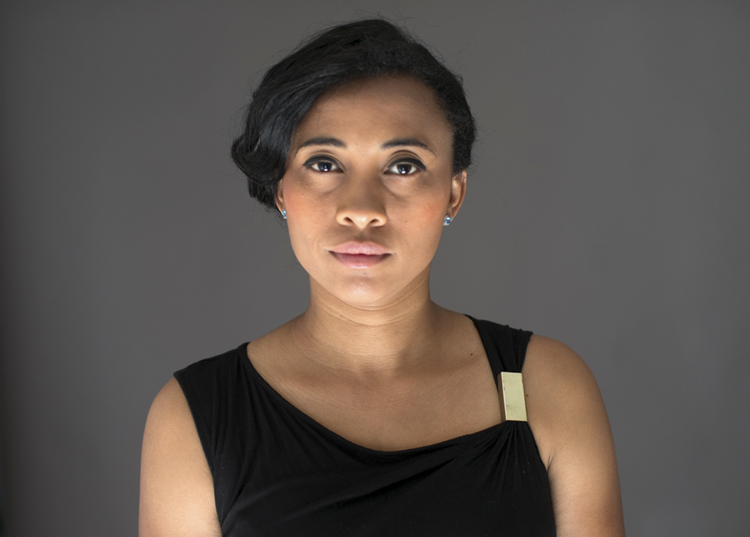
    Photo4

    Just for fun, I turned my camera upside down here and pointed the flash at the floor, so the light is coming up from below. We call this Franken-light (monster lighting). Not something you are going to do a lot, but if you ever get hired to photograph a vampire, this is a good one to have in your toolkit.

    All of these photos illustrate the two main factors I think about when shooting bounce flash: light direction and light quality (softness).

    LIGHT DIRECTION

    This just refers to the direction the light is coming from, something that is very easy to control with a bounce flash. If you point your flash up at the ceiling, it will hit your subject coming from above. If you bounce your light off a wall to the right, the light will come back from the right, etc.

    Photo5

    Check out this simple portrait of a wedding guest (above). She was looking to her right in the photo, so I bounced the light off a wall on that side to get some beautiful light into her face. If the next person I want to photograph is facing the other way, all I have to do it spin my flash 180 degrees and bounce it off the opposite wall. This sort of versatility is wonderful when shooting live events.
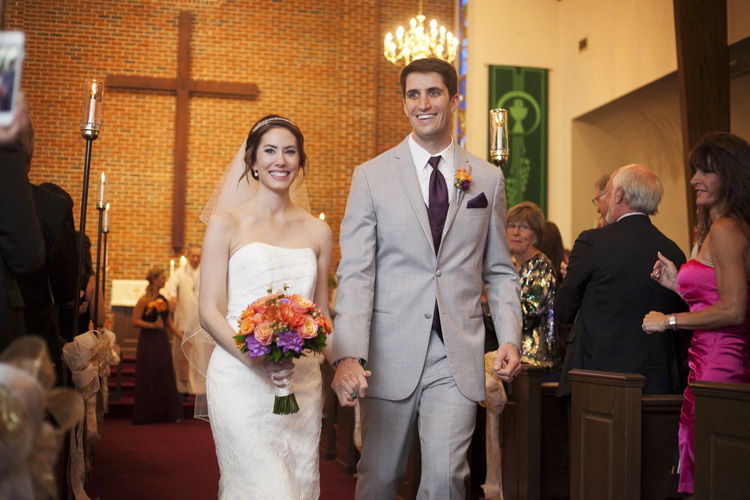
    Photo6

    In this photo of a just married couple walking down the aisle, I bounced my flash off a wall to the left again, to get some wonderful light on them. If you look at the people in the background, you can get an idea of the ambient illumination in the room.

    The nicest light often comes more from the side than from above. If you fire your flash 90 degrees to your left, the light will come back from the left at 90 degrees. Incidentally, this is a similar angle to the great light you can get at dusk and dawn.

    LIGHT QUALITY (SOFTNESS)

    The softness of your light is mainly affected by the size of your light source. With bounce flash that is the section of wall or ceiling illuminated by your flash. I think this is the hardest concept for people to get with bounce flash. Just think of your light source as the surface that is illuminated by your flash (rather than the flash itself).

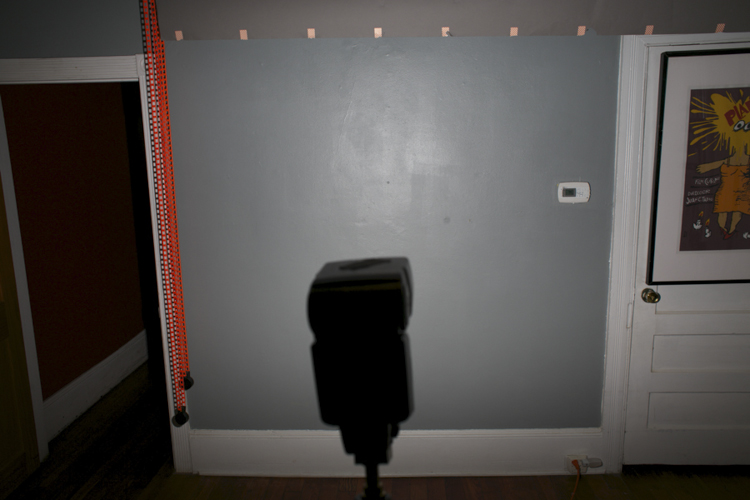
    The bigger the light source, the softer the light. In other words, the larger the area you cover with your flash, the softer the light coming back. To cover a larger area with bounce flash, simply move farther from your bounce surface, to allow the light from the flash to spread out more. A lot of flashes also allow you to zoom the flash head in and out, creating a narrower or wider beam (a wider beam allows the flash to spread out faster, and vice versa).
    Bounce sample 1

    This can be a little hard to visualize, so I’ve taken a couple of photos to help illustrate how it works. In the first photo (above), I have my flash head zoomed all the way out, to create the widest beam possible. I then fired it at a wall in my studio about 10 feet away. As you can see, the flash lights up most of the wall. This would makes for some nice soft light bouncing back towards us.

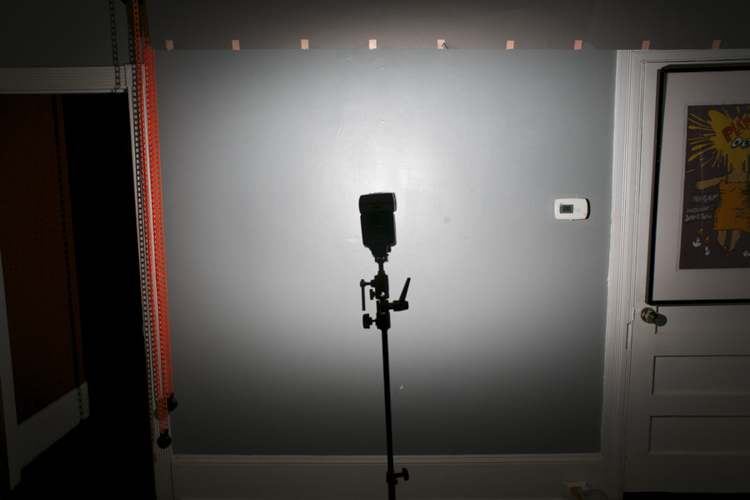
    In the second photo (below), I have moved my flash closer to the wall with the same amount of zoom. As you can see, it is lighting up less wall now, meaning the light source is getting a bit smaller (more harsh/hard – less soft).
    Bounce sample 2

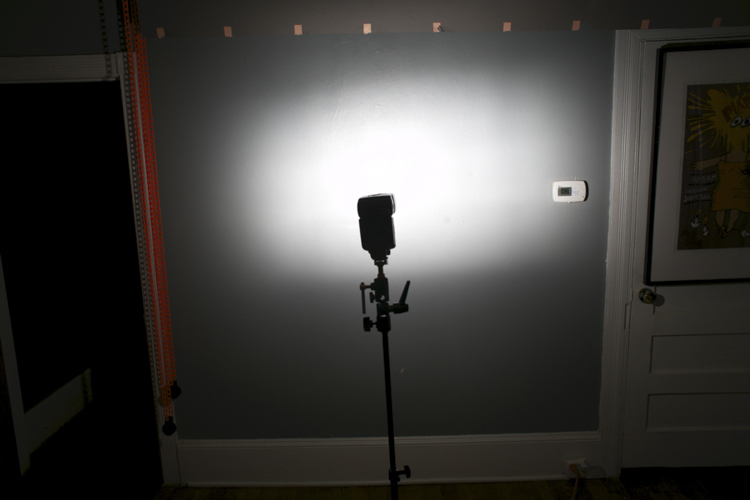
    In the third photo, I’ve kept the flash in the same position, but zoomed in the flash head all the way. So the light source is now smaller still (the area on the wall which is reflecting light is the light source).
    Bounce sample 3

    What you may not realize is that you can send your light all the way across a massive hotel ballroom, for example, and have it come back nice and soft. In the photo below of adoring parents listening to a wedding speech, the light from my flash is traveling 20 or 30 feet to the wall and back. The farther it goes, the more it spreads out, and the softer the resulting light. Beautiful!

    Photo7

    POWER ISSUES AND TRICKY LOCATIONS

    Now there is a limit to your flash power, and therefore, to how far away you can be from your bounce surface. Fortunately with digital cameras it’s easy to do some quick tests to see what you can get away with.

    For example, let’s say you find yourself in a huge convention space photographing the keynote speaker at the annual prune sellers convention. The lighting in the room is from horrible overhead spotlights, and if you don’t improve upon it you’ll never get another job from this plum client. So you try bouncing your flash off a wall to the speaker’s left, but your flash just isn’t powerful enough. Your image is underexposed and your camera batteries are straining to recharge the flash.

    In this situation, you can try a couple of different things to fix your problem:

    1. Ramp up your ISO as high as you can.
    2. Open your aperture up as much as possible.
    3. Zoom your flash head in as far as it will go, to narrow the light beam you are firing at the wall.

    If nothing works, you may have to resort to shooting direct flash, but that should be a last resort.

    Off course you won’t always be in white-walled rooms, but you can usually find something to bounce off if you look around. White ceilings and dark wood walls? Bounce off that ceiling (but try to point your flash slightly to one side or the other to give some better directionality to your light). You can also bounce off of darker surfaces. If the surface isn’t black, that means it is still reflecting some light and you can bounce a flash off it.

    I’ve bounced off of everything from brick to wood paneling, though admittedly these surfaces do suck up a lot of your flash output and drain your batteries faster, so they aren’t ideal (they will also add a color cast to your image).

    When I walk into a space where I’m going to use bounce flash, I immediately look around and think about what my bounce surfaces (light sources) could be. I’ll identify the surfaces that look good (generally light colored/reflective things), and position myself so I can use them to my advantage.

    Let’s look at some more examples:

    Photo8

    This wedding couple is having their first dance at the Peabody Library in Baltimore, a very large space that doesn’t even have complete walls to bounce off, just columns, because of the way the library stacks are arranged. But I cranked my ISO up to 4000 and was able to bounce my flash and get some nice light for the photo.
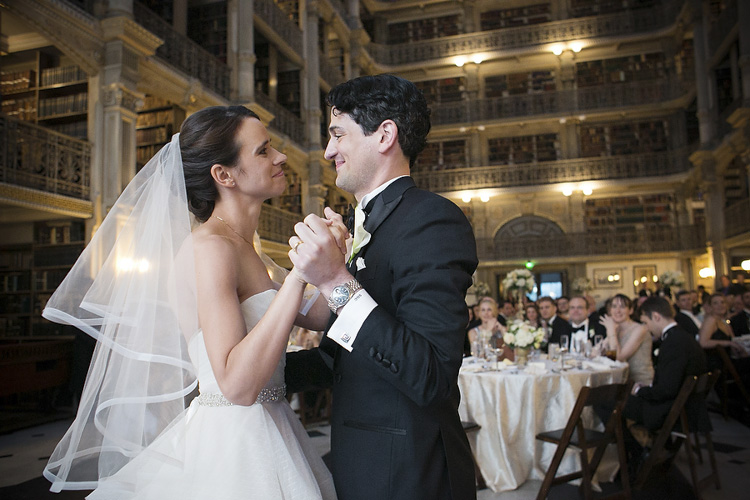
    Photo9

    I’ve also included a photo above showing the entire space so you can get a better idea what I was dealing with.

    Photo11

    This sleepy little girl was photographed at a wedding reception at a country club in Virginia. I bounced my flash off a wall about 30 feet to my left, and got a little help from the purple lighting in the background.

    Photo12

    This wedding portrait was made at night at Camden Yards baseball stadium in Baltimore. This was outside and there was nothing to bounce a flash off, so I had an assistant hold a white reflector behind me to camera left, and I bounced my flash into that.

    As I write this article, I’m sitting in a dark restaurant with a black ceiling, dark walls, dark carpet and dark furniture. It’s a real light-sucking pit, but there are a bunch of framed photos on the wall, and also a mirror. I’m pretty sure I could bounce a flash off of those and get some decent light if I needed to.

    You can get really good at bounce flash fast. Once you are aware of the possibilities, it’s just a matter of experimenting, and refining your technique. Look around your environment and ask yourself what you can use as a bounce surface. Look at your subject and think, “Where do I want the light to come from?”

    Then experiment, point your flash to the right, to the left, behind you. Before you know it, you’ll be a bounce flash master!

    Please share your bounce flash tips and images in the comments below.

    googletag.cmd.push(function() {
    tablet_slots.push( googletag.defineSlot( “/1005424/_dPSv4_tab-all-article-bottom_(300×250)”, [300, 250], “pb-ad-78623” ).addService( googletag.pubads() ) ); } );

    googletag.cmd.push(function() {
    mobile_slots.push( googletag.defineSlot( “/1005424/_dPSv4_mob-all-article-bottom_(300×250)”, [300, 250], “pb-ad-78158” ).addService( googletag.pubads() ) ); } );

    The post How to Use Your On-Camera Speedlight to do Bounce Flash Effectively by Dennis Drenner appeared first on Digital Photography School.


    Digital Photography School

  • First impressions review: Lenovo Moto Z Force shows promise

    The Moto Z Force is Lenovo’s brand new, top-of-the-line smartphone. Currently exclusive to the Verizon network in the US as the Moto Z Force Droid Edition, we expect an international launch of the device in the near future. 

    The device packs a 21MP image sensor with a 1.12 µm pixel size, an F1.8 aperture, on-sensor phase detection, laser-assisted AF and an optical image stabilization system into its camera module. The camera app offers full manual control and the Moto Z Force can save DNG Raw files with third party apps, such as Manual Camera.

    The metal and glass body is just under 7mm thin and comes with a shatterproof 5.5″ Quad-HD AMOLED display and a beefy 3,500 mAh battery. The Android 6.0.1 Marshmallow OS is powered by a Qualcomm Snapdragon 820 chipset and 4GB of RAM. Mobile photographers will also appreciate the microSD-slot for easy storage expansion. 

    In addition, Moto Z Force users can select from several Moto Mods accessory modules which connect to the back of the device magnetically and via 16 connection points. So far there are the InstaShare projector, a JBL Soundboost 6 Watt speaker and a 2220 mAh battery pack. The Moto team has promised more Moto Mods for the future and according to rumors, one of them could be a camera grip. For now we’ll have to make do without the latter, but that hasn’t stopped us from shooting with the brand new Moto device. Read on for our first impressions. 


    Image Quality

    In bright light conditions the Moto’s 21MP sensor resolves a good deal of detail. Under close inspection some smearing of fine detail and textures is noticeable, but on the other hand luminance noise is very well controlled. During our brief testing, exposure was reliable but in very bright scenes, such as the one below, the image processing’s strong contrast can results in some clipped highlights. That said, overall the Moto Z Force does well in these conditions.

     ISO 50, 1/760 sec

    Color tends to be quite saturated, but neutral and without any notable casts. This includes bright red tones which many smartphone cameras struggle with, especially under strong illumination.

     ISO 50, 1/452 sec

    At higher ISOs the camera finds a good compromise between noise reduction and detail retention. The ISO 320 shot below was captured in a fairly well-lit interior space and shows very good edge detail. 

     ISO 320, 1/33 sec

    The ISO 500 shot below shows some more luminance noise in the mid-tone areas of the frame but the noise pattern has a fairly fine grain and is not too intrusive. Chroma noise is well under control and the image still shows a very good amount of fine textures and detail.

     ISO 500, 1/25 sec

    The Moto Z Force maintains good exposure and color down to very low light levels. The challenging lighting conditions in the shot below lead to some channel clipping in the illuminated stage area, but overall the scene is captured very nicely. The slow shutter speed of 1/10sec results in some blur on moving subjects but the optical image stabilization does a very good job at counteracting camera shake. 

     ISO 1250, 1/10 sec

    Special modes

    The Moto Z Force comes with Motorola’s usual HDR mode which does an efficient job of protecting the highlights in high-contrast scenes, such as the one below. Using the standard auto exposure mode, some clipping occurs on the light colored elements in the frame. Using HDR mode, image clipping is noticeably reduced. Shadows are lifted very slightly but overall the image still looks pleasantly natural.

     ISO 50, 1/1468 sec, standard exposure
     HDR exposure

    Night mode is not a new feature for Moto devices but the latest incarnation works in a slightly different way than before. In low light scenes the camera automatically triggers multi-frame capture which produces clean images but struggles with moving subjects, which often show pronounced motion blur. On the new device, night mode now saves a standard exposure in addition to the night mode image, allowing the user to pick the version which best suits their purposes.

    The sample images below both report ISO 1000 and a shutter speed of 1/10sec in the EXIF data. However, as you can see at close-up view they look very different. The multi-frame night mode image on the left is cleaner but shows motion blur, even on slow-moving subjects. The accompanying standard exposure shows better edge definition on moving subjects but noticeably higher levels of luminance noise. 

    Night mode Standard exposure
    100% crop 100% crop

    In video mode the Moto Z Force is capable of recording both 1080p Full HD and 4K footage. The combination of digital and optical stabilization keeps things steady and allows for smooth panning. The 1080p video below shows similar tonal characteristics to the still images and decent detail but very occasionally we found the lens refocusing for no obvious reason.

    The 4K video mode offers noticeably better detail for those who need it. It also allows users to grab 8MP video stills for those occasions when the full 21MP still resolution is not needed.

    First impressions 

    With its solid build, large high-resolution screen and metal frame the Moto Z Force looks and feels like a premium device. The Snapdragon 820 chipset under the hood ensures the performance of the Android operating system matches the device’s high-end exterior and the 3,500 mAh battery lets you shoot, edit and share images for a long time away from a power outlet.

    The camera module’s 21MP captures a good level of detail and offers plenty of scope for cropping. There are the usual signs of smearing of fine textures at base ISO, but in low light the camera finds a good balance between noise reduction and detail retention. In addition, night mode lets you pick between a clean multi-frame image that works best for static scenes, and a standard exposure that shows more noise but is capable of freezing at least some motion. 

    Colors are mostly quite saturated and contrast is strong which can lead to some highlight-clipping in high-contrast scenes. However, HDR mode does a very efficient job of protecting highlight detail, and in addition the Moto Z Force allows for the capture of DNG Raw files with third party camera apps, such as Manual Camera. This allows you to apply your very own mix of contrast, saturation, noise reduction and other image parameters in post processing. Add the camera app’s full manual control into the mix, plus the potential of a camera-grip add-on module in the nearer future, and the Moto Z Force is one of the year’s most interesting mobile photography products thus far.

    Articles: Digital Photography Review (dpreview.com)

  • Beyond Chernobyl: 15 Design Concepts for a Post-Nuclear World

    [ By SA Rogers in Art & Drawing & Digital. ]

    Screen Shot 2016-07-25 at 8.51.52 AM

    30 years post-Chernobyl and 5 years after Fukushima, we still haven’t figured out how to deal with lingering radiation in the wake of a nuclear disaster or come up with a foolproof way to protect ourselves from similar incidents in the future. Nuclear disaster-focused concept designs address everything from repopulating Chernobyl and safeguarding against radiation-poisoned seafood from Japan to living in a dystopian post-apocalyptic future where mechanical dogs scout the streets.

    Self-Contained Fallout-Absorbing City for Chernobyl

    nuclear pripyat-self-contained-city

    nuclear pripyat-city-in-a-box

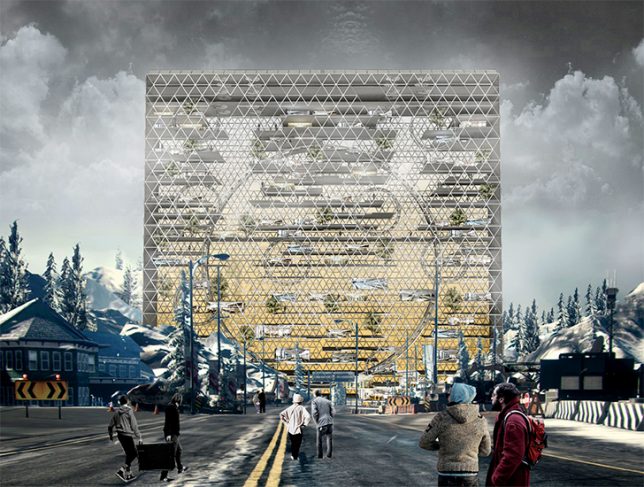
    nuclear pripyat-aurora-skyscraper-design

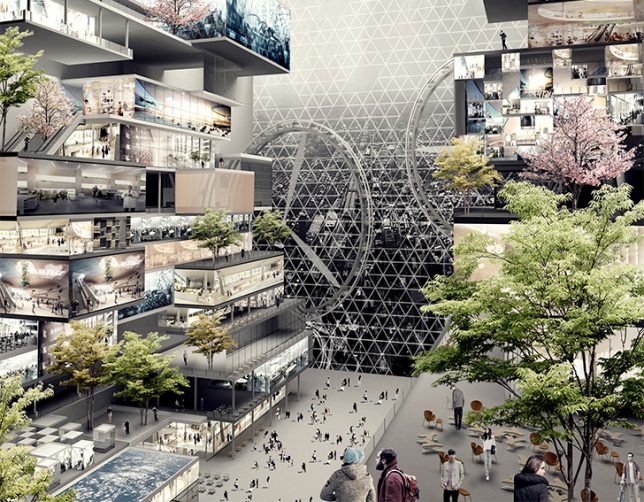
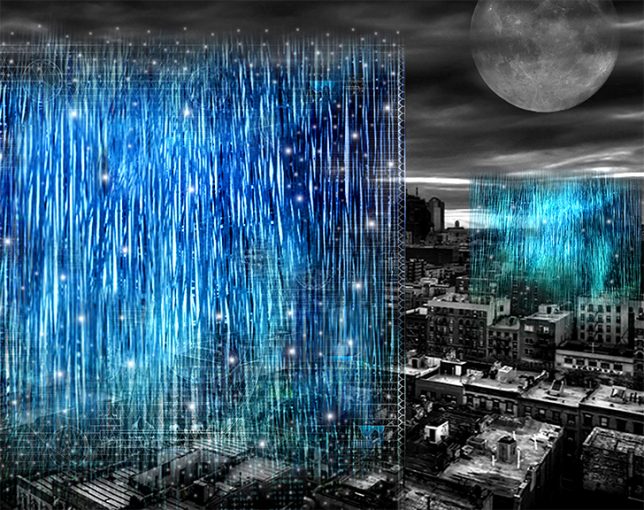
    People are beginning to resettle the post-Chernobyl nuclear wasteland surrounding Pripyat, Ukraine whether radiation reaches safe levels or not, and this skyscraper concept is an attempt to minimize harm, creating a sort of self-contained oasis among the fallout. The skin of the building essentially acts as an anti-radiation force field, and the ‘Unexpected Aurora’ building itself filters air and water and harvests solar energy.

    HAL Exoskeleton Turned Radiation Suit

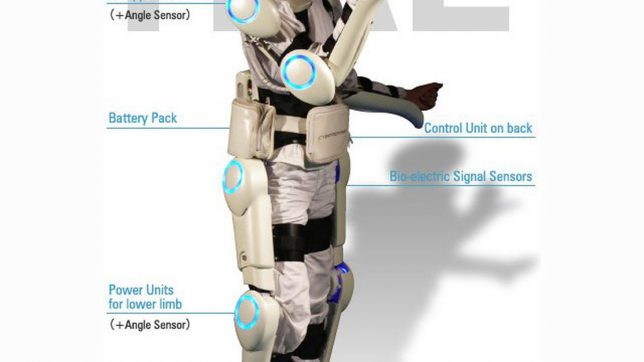
    nuclear HAL suit 2

    Originally designed to help people with muscle diseases, the Hybrid Assistive Limb (HAL) suit got a post-Fukushima upgrade to make it a radiation-proof suit for emergency responders. A typical anti-radiation tungsten vest weighs up to 132 pounds, making it very difficult to wear for long periods, but the HAL exoskeleton supports its weight, reducing fatigue and allowing greater access to hazardous sites.

    Revitalization of the Chernobyl Zone

    nuclear chernobyl revitalization

    nuclear chernobyl revitalization 2

    nuclear chernobyl revitalization 3

    nuclear chernobyl revitalization 4

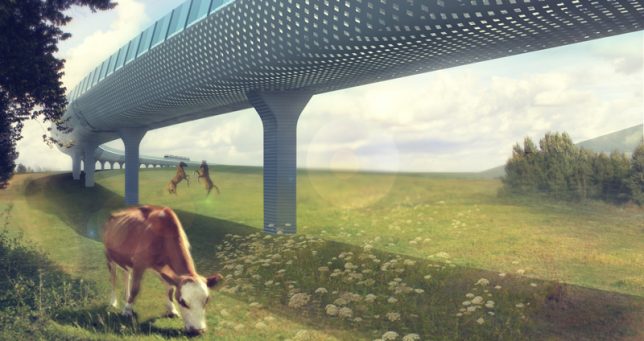
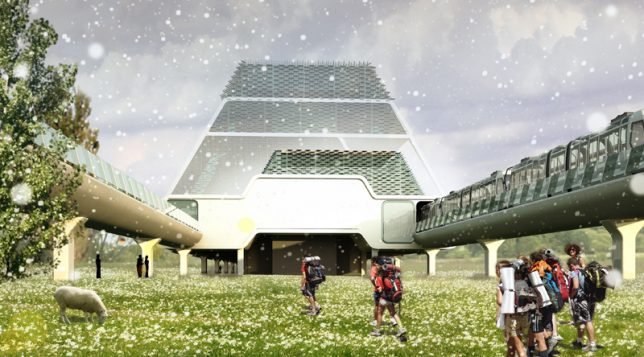
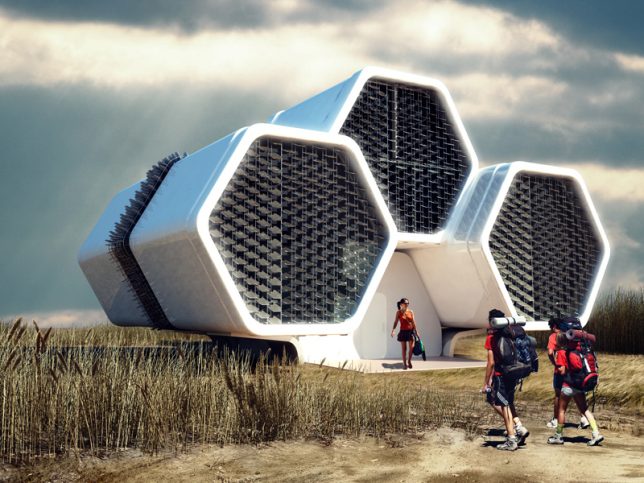
    Another proposal for repopulating the Chernobyl exclusion zone seeks not to be entirely self-contained, but act as a framework for further development of human activity in the area, with a mono-railroad as its backbone. This rail line leads to modular train stations with emergency shower cabins and a decontamination zone, as well as honeycomb-shaped modular housing and observation towers. The development accommodates stubborn residents and curious tourists alike, providing plenty of opportunities to observe Pripyat in its new form.

    Fukushima Plates Detect Radiation

    nuclear radiation plate

    nuclear radiation plate 2

    nuclear radiation plate 3

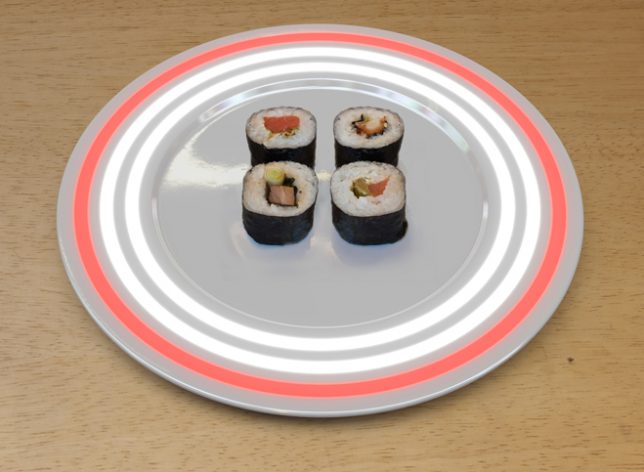
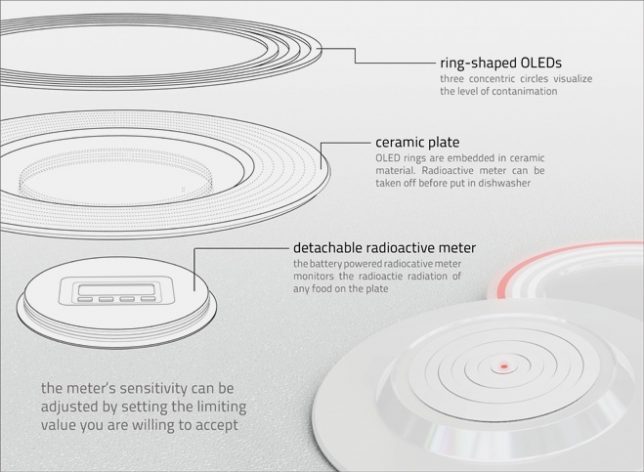
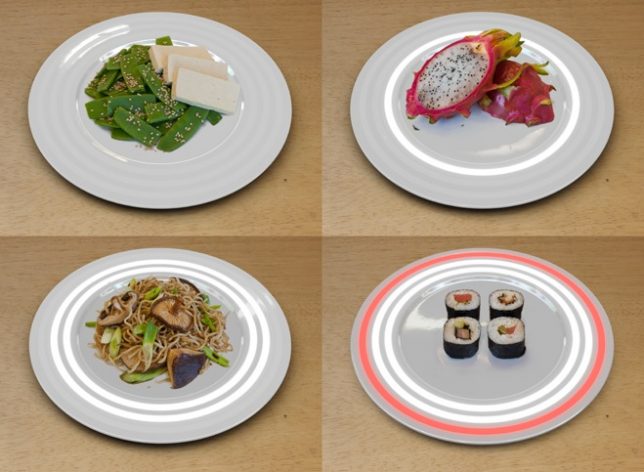
    After the Fukushima disaster in Japan, a lot of sushi lovers questioned whether seafood imported from the region was safe, hence this concept by German designer Nils Ferber. There’s a radiation meter built right into each plate, with LED lights to warn you if your food is dangerously radioactive. One glowing white light tells you your food contains low levels of radiation, two white lights advise caution while a large red ring tells you it’s not safe to eat. “In a society that sacrifices reason to profit, security becomes a luxury for those who can afford it,” says the designer. “The plate might become an indispensable tool of survival in the future.”
    Mech Suits, Chernobyl Patrol + More by Vitaly Bulgarov
    chernobyl black phoenix main
    Screen Shot 2016-07-25 at 8.52.41 AM

    nuclear bulgarov 1

    nuclear bulgarov

    nuclear bulgarov 4

    nuclear bulgarov 3

    nuclear bulgarov 5

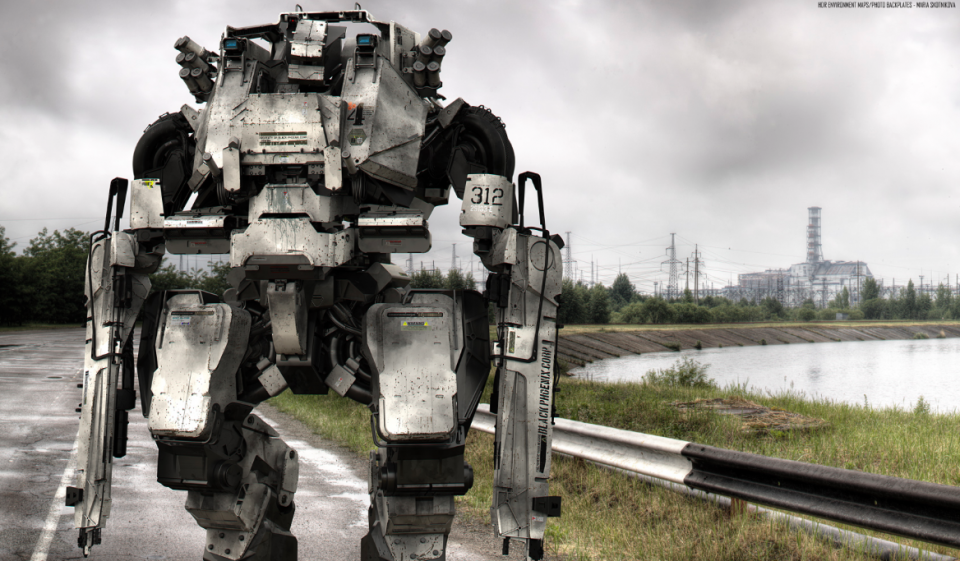
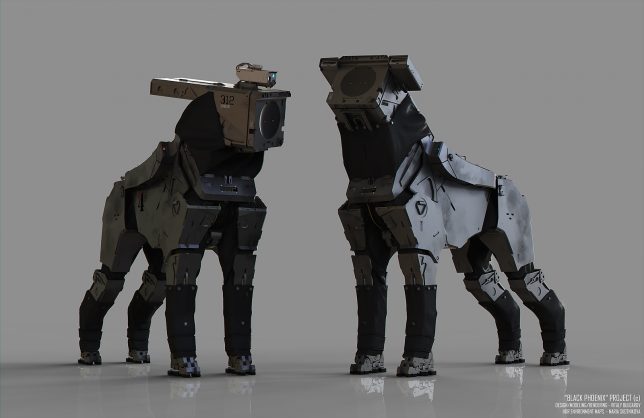
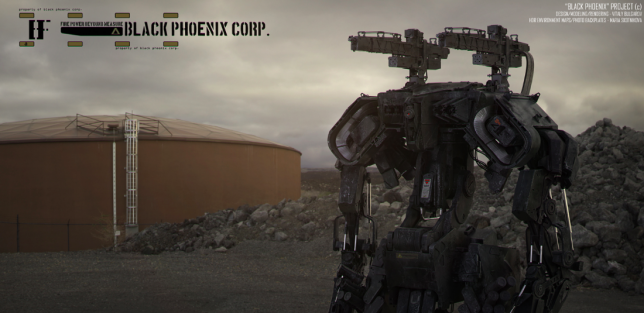
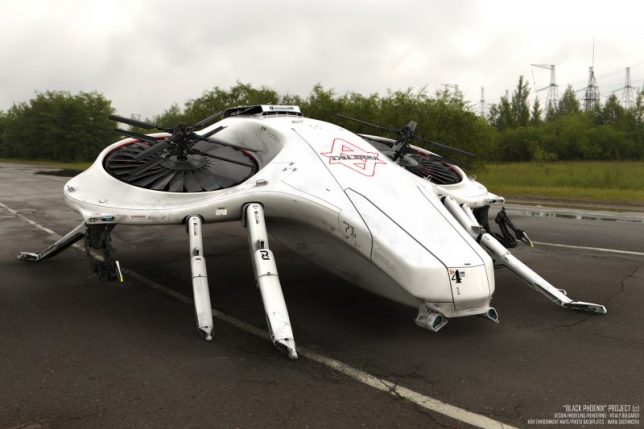
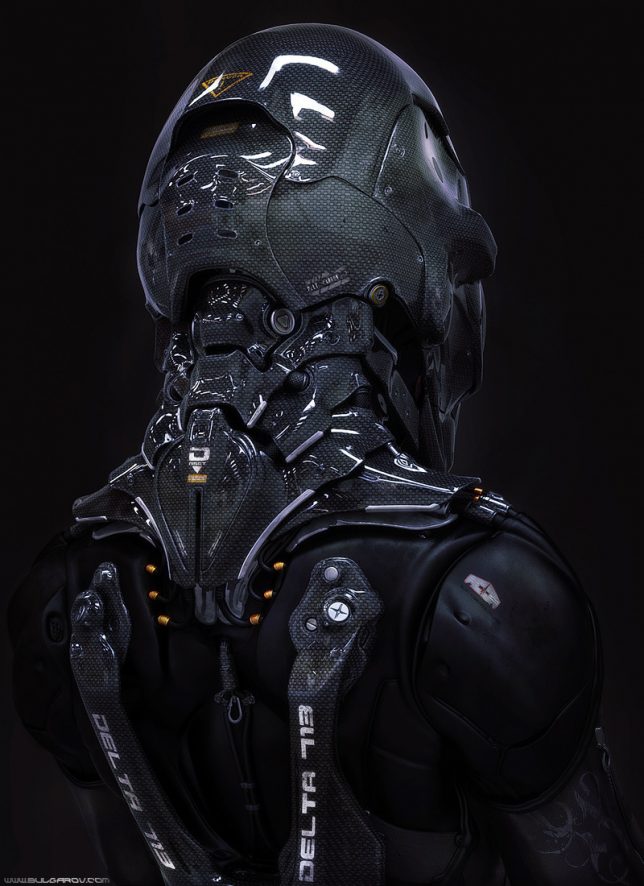
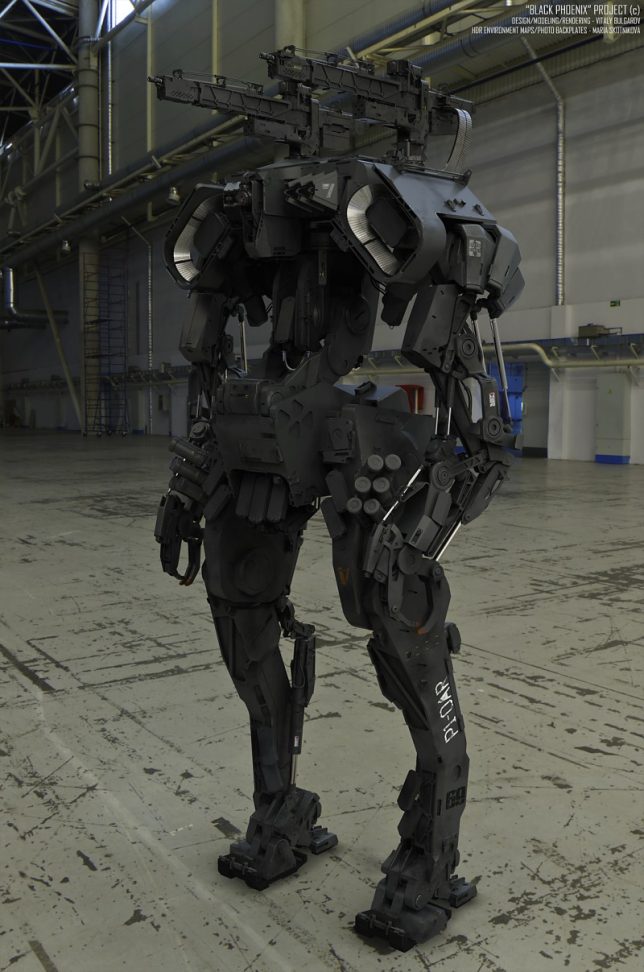
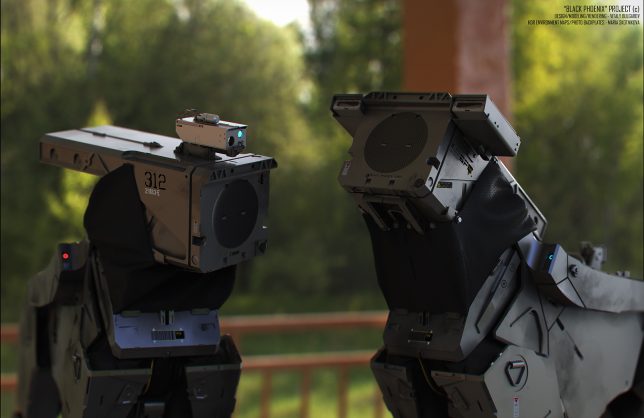
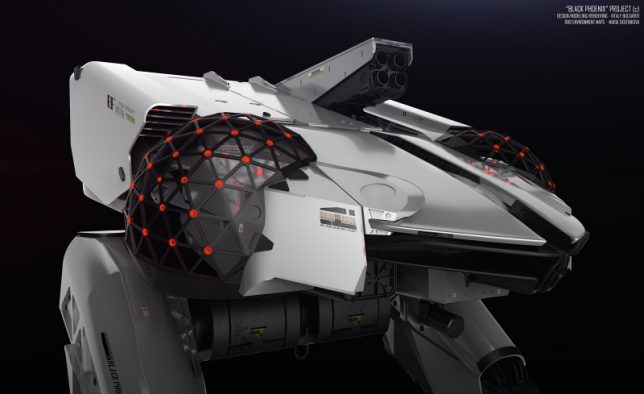
    Moscow-based concept designer Vitaly Bulgarov presents a series of digital proposals for ‘The Black Phoenix Project: Chernobyl Patrol,’ ranging from semi-civilian drones to advanced weaponry systems. The artist works for game developer Blizzard and created this 3D visualization as a demonstration on speeding up the process of creating concept art with design software like Brush and SoftImage XSI. The mech designs include robotic Scout Dogs, an ‘Arachnid Tank,’ a missile-launching ‘Public Protector,’ infantry bots and an ambulance/rescue robot, and they’re clearly oriented toward a post-apocalyptic, war-torn scenario in Chernobyl rather than just dealing with radiation.

    Next Page – Click Below to Read More:
    Beyond Chernobyl 15 Design Concepts For A Post Nuclear World

    Share on Facebook


    [ By SA Rogers in Art & Drawing & Digital. ]

    [ WebUrbanist | Archives | Galleries | Privacy | TOS ]


    WebUrbanist

  • Venus Optics to launch ‘world’s widest F2.8 rectilinear lens’

    Chinese optical manufacturer Anhui ChangGeng Optical Technology Company Limited, or Venus Optics, is preparing to introduce a 12mm lens that it claims will be the world’s widest F2.8 lens with fully corrected distortion. Going under the Laowa brand name the lens will be called Laowa 12mm F2.8 Zero-D and will be officially announced on July 30th via a Kickstarter campaign.

    Venus Optics says that the lens has almost no distortion, hence the ‘Zero-D’ in the name, and has loaned a test unit to a blogger Nicky Bay who has a preview with images on his website. The lens will be manual focus only, will feature an aperture range of F2.8 to F22 and is due to have a seven-bladed iris with clicking stops. The company is also said to be launching a Magic Shift adapter, according to Bay, that allows +/-10mm of shift while converting the lens to a 17mm focal length. The converter will be for Sony E-mount users only.

    Specification published on the Laowa Facebook page.

    Of course, this isn’t the world’s first rectilinear 12mm with a fast aperture, as F2 and F1.4 12mm lenses exist for the Micro Four Thirds system, and there are Zeiss F2.8 and F2 Samyang 12mm lenses for APS-C sensors, but this lens is designed for full-frame cameras.

    The lens, which will be made in Canon EF, Nikon F, Sony A, Sony E and Pentax K mounts, is expected to retail at $ 949, but supporters of the Kickstarter campaign will be able to get one from $ 649. The Magic Shift will cost $ 300 and a square filter adapter will be $ 50.

    For more information on Venus Optics see the company website. 

    Articles: Digital Photography Review (dpreview.com)

  • Glittering Wave-Shaped Concert Hall Placed Atop Old Warehouse Building

    [ By SA Rogers in Architecture & Public & Institutional. ]

    herzog de meuron concert hall 1

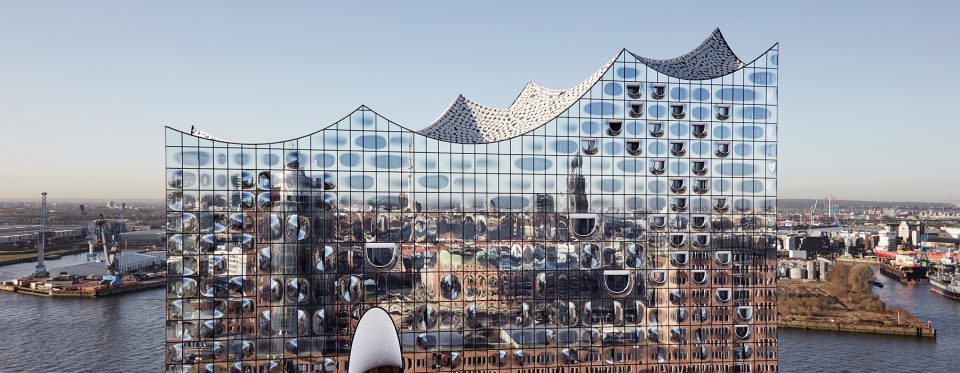
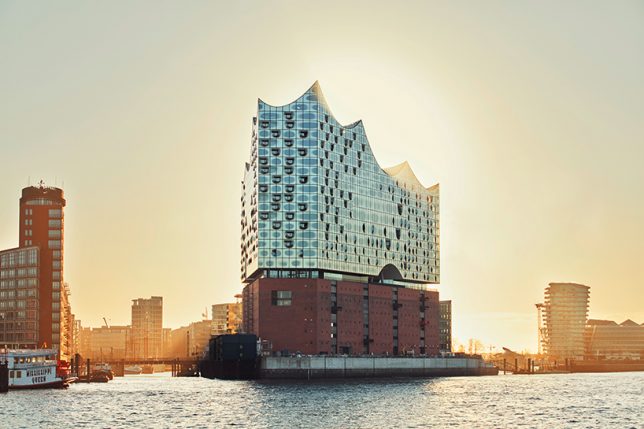
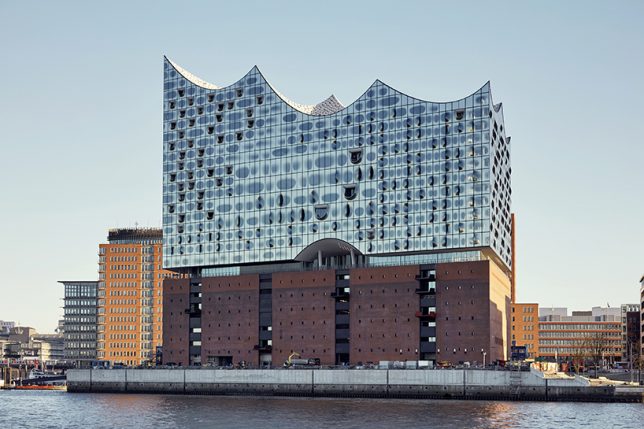
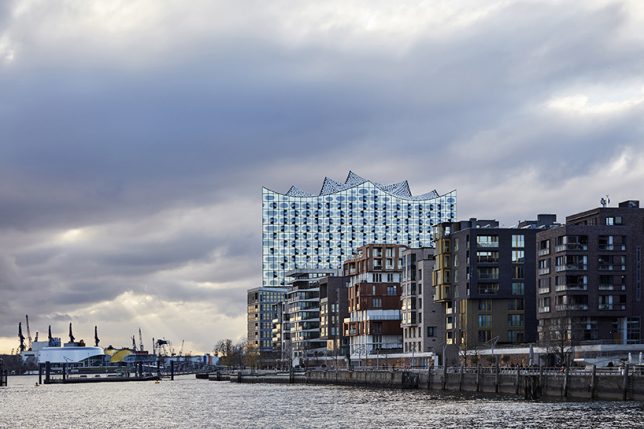
    German concertgoers are so excited about the stunning new Elbphilharmonie building in Hamburg by architecture firm Herzog & De Meuron, they’re already snapping up tickets for the first events scheduled after its inauguration on January 11th, 2017. The glittering wave-shaped addition is a bold ultramodern example of adaptive reuse, delicately hovering over an existing brick warehouse building to assist with soundproofing its 2,100-seat arena. The project is finally nearing its completion after nearly a decade of construction, with all of its interior fittings set to be in place in time for its handover to its operators on October 31st, 2016.

    herzog de meuron concert hall 2

    herzog de meuron concert hall 4

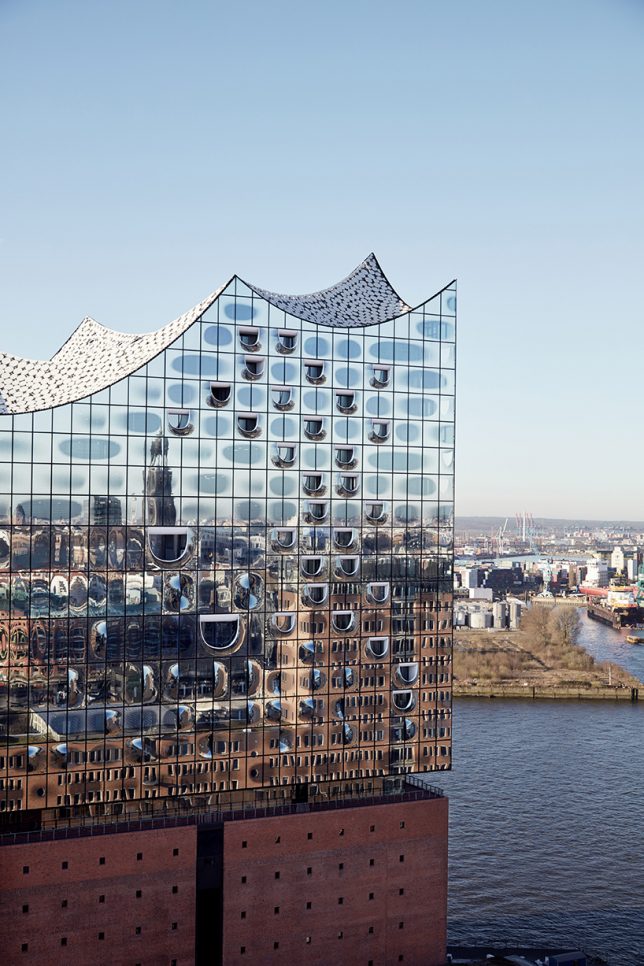
    With anticipation building for such a long time, it’s a good thing the final result is so impressive. Located in Hamburg’s Hafencity quarter on a peninsula jutting out onto the River Elbe, the complex not only mimics the adjacent surface of the water, it literally mirrors it with 1,100 panes of reflective cladding punctuated by convex elements and D-shaped windows reminiscent of fish mouths. Reflective basalt grey dots prevent the structure from overheating and add to the shimmering effect.

    herzog de meuron concert hall 3

    herzog de meuron concert hall 5

    The complex also houses a 250-room hotel, 45 private apartments, two additional concert halls and a public viewing area with panoramic vistas of the waterfront. Reusing the old building pays tribute to the neighborhood’s industrial past even as Hafencity – a new urban redevelopment scheme that enlarges the Hamburg City Center by 40 percent – blossoms as a cultural hub. The scheme is seen as a blueprint for Hamburg’s development into the 21st century, reestablishing it as a modern maritime city.

    interior 2

    interior

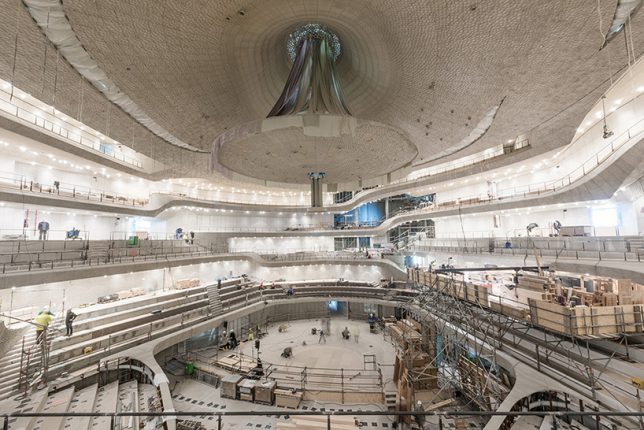
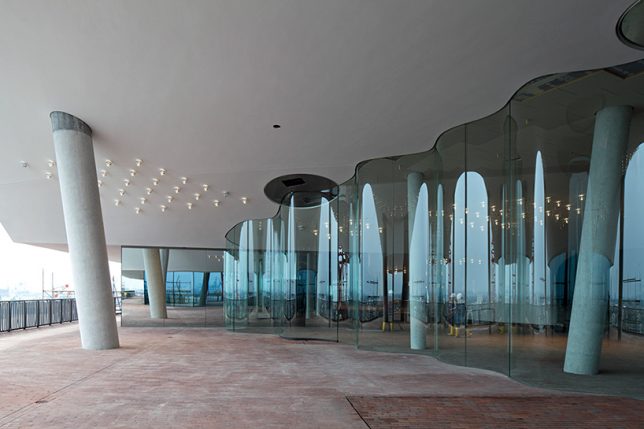
    Inside, the careful selection of state-of-the-art materials helps explain the long delay in construction, as an organically textured white ‘skin’ made of dense gypsum-fiberboard panels enhances acoustics and makes the space even more visually expansive. Other details, like a flowing glass wall on the panoramic ‘plaza,’ continue the aquatic theme.

    Share on Facebook


    [ By SA Rogers in Architecture & Public & Institutional. ]

    [ WebUrbanist | Archives | Galleries | Privacy | TOS ]


    WebUrbanist