Blog

  • Modular DIY Dome Kit: Flexible Connectors Join Geodesic Wood Structures

    [ By WebUrbanist in Design & Products & Packaging. ]

    diy-modular-dome

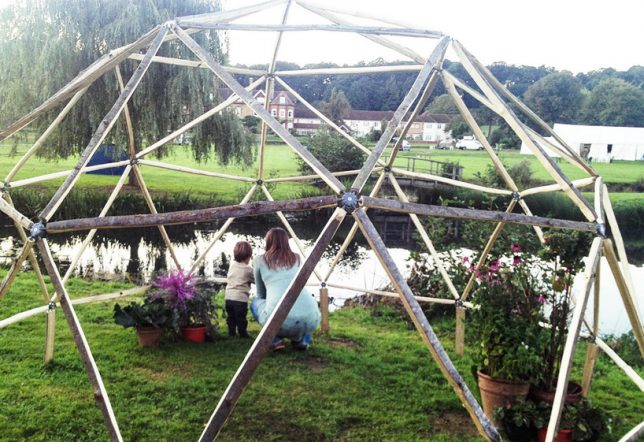
    Reducing complexity and difficulty for would-be geodesic dome builders, this series of connective ‘Hubs‘ makes it possible for do-it-yourself types and even kids to collaborate on creating stable architecture.

    diy-dome-hub-connector

    diy-dome-system

    Connector rods are joined at a hub that acts as a ball joint. The connector ball screws into a piece of lumber then attaches to the node. A simple structure can use materials on hand to build a working dome in a matter of minutes, all assembled by just a few people.

    diy-garden-wood-dome

    Building geodesic domes from metal parts can be laborious and frustrating – each piece has to be perfectly bent to join the rest, and the resulting structure is extremely heavy. The Hubs system is much cheaper than buying (or bending) a conventional dome.

    dome-scales

    hubs-system

    dome-uses

    Chris Jordan and Mike Paisley started work on this system a few years ago and recently made it available for purchase after a successful round of crowdfunding brought it to market. Their hope is to make dome-building a more accessible, cheap and easy process for everyone.

    diy-geodesic-dome-assembly

    diy-dome-design

    diy-garden-wood-dome

    While wood and plastic are technically more durable, this approach lends itself to organic settings, creating wood structures that look appropriate in backyard settings and for temporary purposes or as ersatz tree houses. It is also more adaptable: cutting different lengths of wood lets users scale their dome more easily than with metal or plastic. And it is more flexible, too: the joints can bend and give, as can the wood, making the construction more forgiving.

    Share on Facebook


    [ By WebUrbanist in Design & Products & Packaging. ]

    [ WebUrbanist | Archives | Galleries | Privacy | TOS ]


    WebUrbanist

  • Six Tips For Using Filters to Improve Your Landscape Photos

    One of the secrets to good landscape photography is the way in which you capture various elements of the scene. Sure, you can let your camera do the heavy lifting and figure out the exposure. But a landscape photo doesn’t have to be a literal interpretation of what you see, or of what your camera sees when left to its own devices. While post-processing can help make adjustments to an image so that it’s less literal than what you saw, making certain adjustments at the time of capture is more important, giving you something special to work with when the time comes to edit the image in post. Using filters such as polarizers, neutral density, and graduated neutral density filters can help you capture the scene in more creative ways. These tips for using filters can help you start making these adjustments and creating more dynamic images.

    Filter Tips

    The following tips can help you start making these adjustments and creating more dynamic images.

    1 – Use a polarizer to improve the sky

    Using filters - a polarizer to reduce haze in an image.

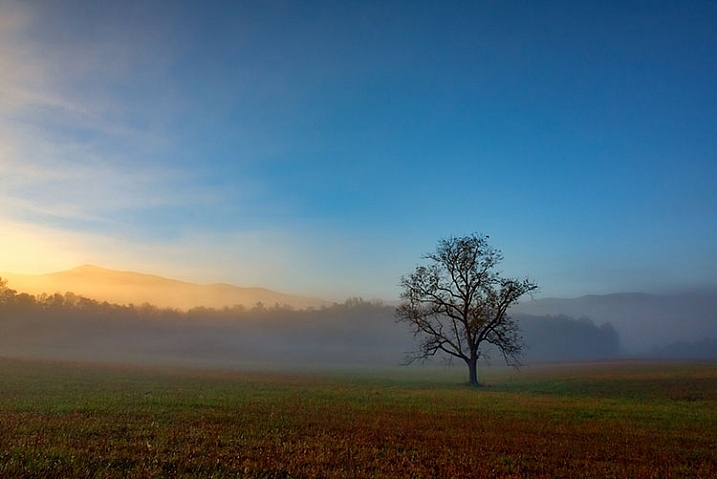
    A polarizer cut through the morning mist to reveal blue sky in this shot of Great Smoky Mountains National Park.

    I believe every photographer should have a polarizing filter in their camera bag because of how useful they can be. Polarizers work by filtering out light that is reflected directly toward the camera at specific angles. When photographing a landscape with a blue sky, haze can occasionally cause the sky to be less vibrant. Using a polarizer, you can minimize the haze and reveal the true blue of the sky. This will work best when aiming the camera at a 90° angle from the sun; in other words, with the sun to your side.

    By rotating the polarizing filter while composing your shot, you can see the effect the filter will have. Be sure you don’t go too far. It is possible to over polarize the scene, creating a darker blue splotch in the sky that will make the use of the filter obvious and the image appear unnatural. This is especially possible with ultra-wide angle lenses that take in a huge expanse of the sky. In the image above, a polarizer was used to reduce the amount of morning mist in the valley and show the blue sky behind the mist.

    2 – Use a polarizer to reveal what’s underneath the water

    Using filters - a polarizer cut down on reflections on the water's surface.

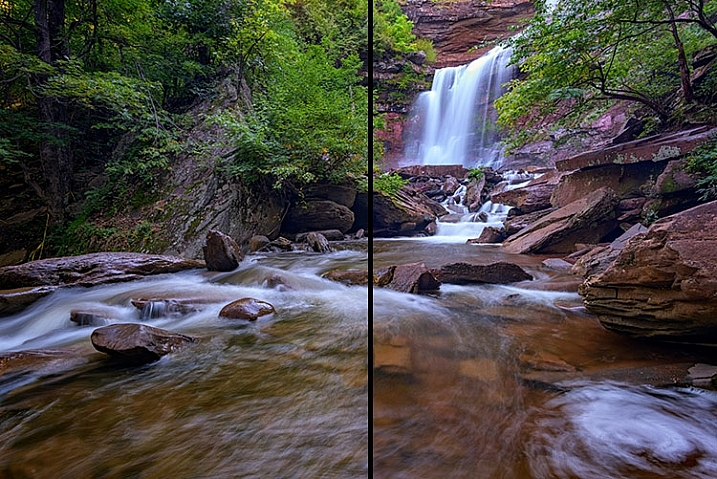
    A polarizer can reduce reflections on the surface of the water to allow you see what’s beneath the surface, and add visual interest to a scene.

    Often when photographing a stream or lake, the light may reflect off the water’s surface to such a degree that it’s impossible to see what’s below. However, there may be times when there is something of interest underneath the surface, such as rocks, fish, or logs from fallen trees. Using a polarizer, you can reveal as much or as little of what’s beneath the surface by eliminating the reflecting light.

    It doesn’t have to be all or nothing either. You can nuance the effect by rotating the filter just a little bit, to retain some reflecting light while still seeing beneath the surface. In the image above, on the left, no polarizer was used and the reflected light prevents you from seeing below the water’s surface. On the right, a polarizer was used to reduce the reflected light on the water’s surface, allowing you to see the rocks beneath the surface.

    3 – Use a polarizer to reduce reflections on wet rocks

    using filters - Photographing wet rocks

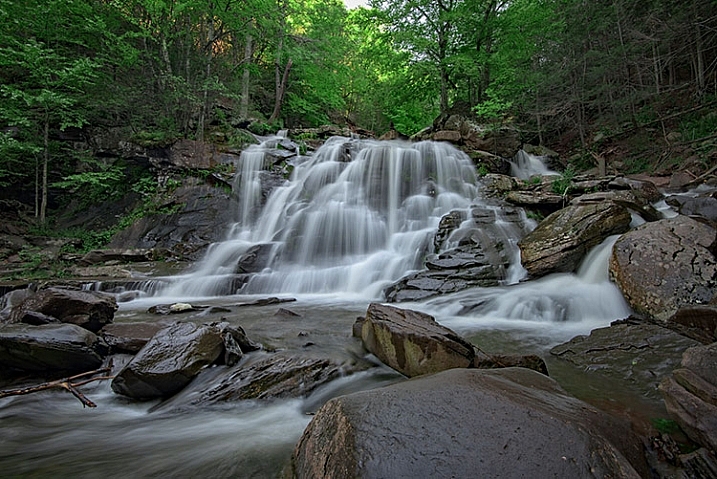
    In this image, light reflects off of the wet rocks by the waterfall.

    using filters - A polarizer can reduce the reflected light from wet rocks.

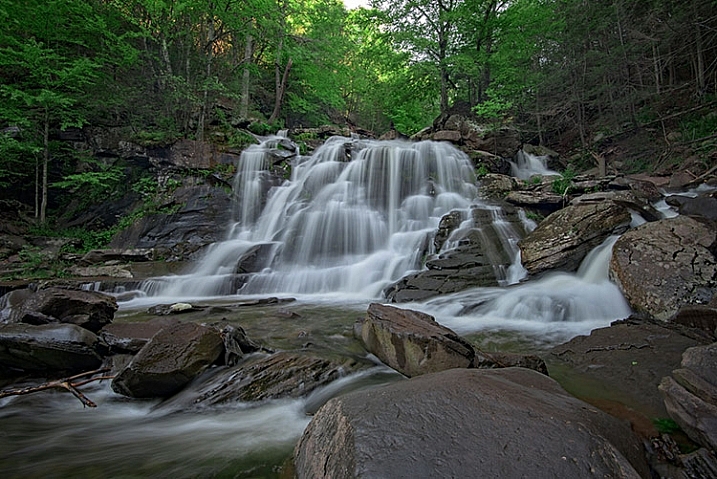
    In this image, a polarizer was used to reduce the reflected light from the wet rocks.

    When photographing a waterfall, where there are generally a lot of wet rocks, light can reflect off of them, making them appear shiny. On occasion, that reflected light may be so strong that it detracts from the image. Using a polarizer can reduce the reflected light and reveal more detail in the rocks, adding interest to the image.

    As with the water reflections discussed above, you can nuance the effect by rotating the filter to get the right balance of reflected light and detail underneath. In the images above, you can see how the highlights on the rocks can be reduced if desired by using a polarizing filter. Again, by rotating the filter as you look through the viewfinder, or on the live view screen, you can watch the effect happen and adjust it to your liking.

    4 – Use Graduated Neutral Density Filters to darken the sky

    Using filters - graduated neutral density filters for a better sky.

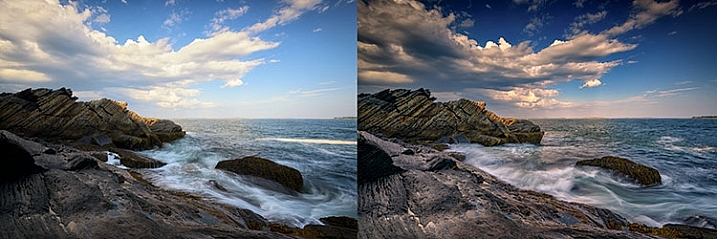
    The difference when using a graduated neutral density filter can be very apparent, as seen in the comparison of these two images.

    When photographing the landscape, especially at sunrise or sunset, there is often a high amount of contrast between the sky and the foreground. That forces you to make exposure choices to determine what will be exposed properly. While digital cameras are much improved with regards to dynamic range in recent years, nature can still push your camera to its limits in terms of how much can be captured in a single image.

    Graduated neutral density filters can help to reduce the dynamic range of an image, by darkening the brighter areas, like the sky, so that it falls within the range of what the camera can capture. Use Live View on your camera to see the positioning of the filter over the lens, especially when using a hard-edged ND graduated filter. Watch the way the foreground exposure changes in relation to the sky, as it is possible to overdo a good thing. If the sky gets too dark in relation to the foreground, try a less dense filter, for instance, a 2-stop ND grad rather than a 3-stop grad. Above, the image on the left was taken without the use of a graduated neutral density filter. On the right, a 3-stop,

    Above, the image on the left was taken without the use of a graduated neutral density filter. On the right, a 3-stop, soft-edged graduated neutral density filter was used to darken the sky. Notice it also has the effect of brightening the foreground in relation to the sky, bringing out more detail in the darker area in the bottom left.

    5 – Control the motion of water

    Using filters - an ND filter to control the motion of water.

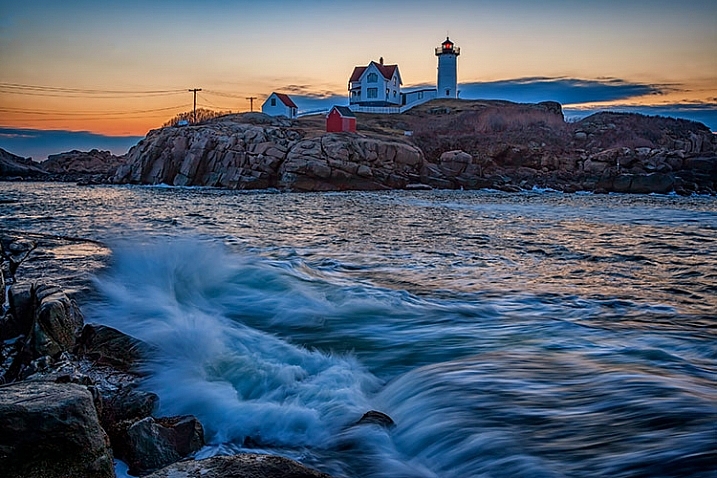
    A neutral density filter can be used to help capture the motion of water in a scene.

    Because of its nature, moving water is often the most dynamic part of an image. You can create a different mood simply by changing the way you capture water. Longer exposures tend to be more calm and peaceful, while shorter exposures can capture the violence of a crashing wave, or the power of a river going over the falls.

    Since shutter speed controls the effect of motion, by using neutral density filters you can evoke both moods by limiting the amount of light that enters your lens. Thus, you can adjust the shutter speed to give you the effect of motion that you want. You may not need a filter for faster shutter speeds, but if it’s a bright day and you want to slow things down, you’ll need a neutral density filter to do that.

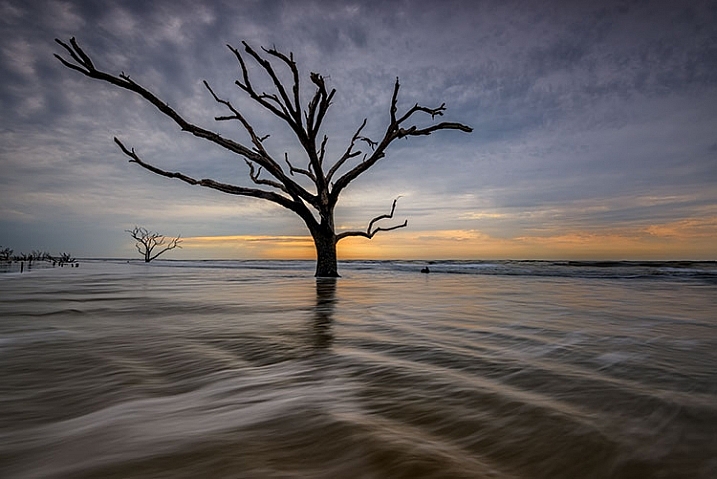
    Using a 3-stop ND filter is usually fine for waterfalls to slow them down just enough to get a nice creamy look to the falls, but when capturing waves on the ocean, it may not be enough to get the effect you need. Sometimes four or even five stops of neutral density is needed to get the exposure you need to slow it down to capture water the way you want. Adding a 10-stop neutral density filter will allow you to slow down your shutter speed to a minute or more, eliminating waves completely, creating a calm scene that feels quiet and peaceful as opposed to the crashing waves pounding the rocks or beach.

    In the image above, a 3-stop neutral density filter was used to slow down the exposure just enough to allow the water’s motion to be captured as it crashed on the rocks. In the image below, a 10-stop neutral density filter was used to slow down the exposure further, to a full 2-minutes, creating smooth water and a calmer looking scene.

    Using filters - a 10-stop ND filter to smooth water during a long exposure.

    Using a 10-stop ND filter, you can make water appear calm by using a long exposure. This is a two-minute exposure.

    6 – Create motion in clouds

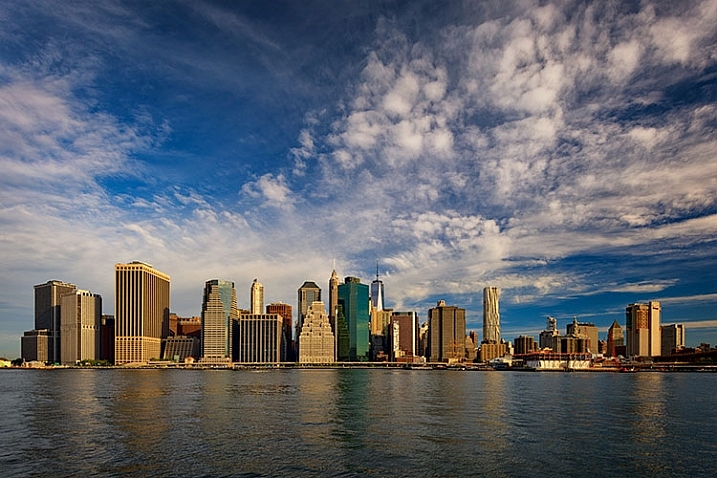
    Using filters - Clouds appear as normal when no ND filter is used.

    When no neutral density filter is used, clouds are captured as we see them.

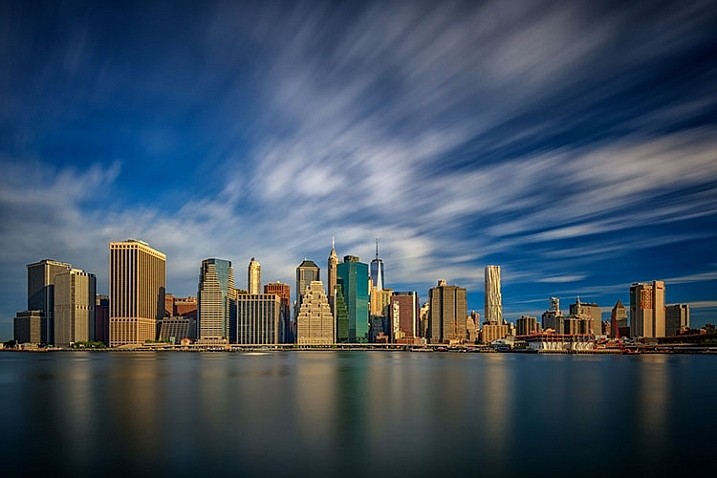
    Using filters - a 10-stop ND filter to achieve a slower shutter speed of 60 seconds, I was able to capture the motion of the clouds as they passed over New York City.

    Using a 10-stop ND filter to achieve a slower shutter speed of 60 seconds, I was able to capture the motion of the clouds as they passed over New York City.

    As a landscape photographer, clouds are often the focus of an image or at least a strong component in the composition. Clouds add depth and drama to a good landscape, creating background interest. But you can also manipulate the clouds to your creative advantage as well, capturing their movement and blurring them to create a sense of flight and speed in your scene. By using a strong neutral density filter, such as Lee’s Big Stopper 10-stop ND filter or Vü Filter’s 10-stop offering, you can slow down your shutter speed to allow the motion of the clouds to be captured.

    The proper shutter speed to capture cloud movement will vary, depending on how fast the clouds are moving. The longer the exposure, the more movement you will capture. An exposure of 30 seconds to one minute for fast moving clouds, such as in the image above, will result in a motion blur where the clouds still resemble clouds. An exposure of two or three minutes will result in the clouds becoming streaks of color across the sky, unrecognizable as clouds anymore.

    Conclusion

    One of the complaints I hear about using filters is that it takes too much time to put them on the lens, or it slows you down. I prefer to think of it as being deliberate about the shot I am trying to capture, and making sure that my camera captures exactly what I want.

    Do you use filters? What’s your favorite technique using on-camera filters? Please share in the comments below.

    googletag.cmd.push(function() {
    tablet_slots.push( googletag.defineSlot( “/1005424/_dPSv4_tab-all-article-bottom_(300×250)”, [300, 250], “pb-ad-78623” ).addService( googletag.pubads() ) ); } );

    googletag.cmd.push(function() {
    mobile_slots.push( googletag.defineSlot( “/1005424/_dPSv4_mob-all-article-bottom_(300×250)”, [300, 250], “pb-ad-78158” ).addService( googletag.pubads() ) ); } );

    The post Six Tips For Using Filters to Improve Your Landscape Photos by Rick Berk appeared first on Digital Photography School.


    Digital Photography School

  • Photoshop Elements 15 and Premiere Elements 15 released

    Adobe has updated its beginner-friendly Photoshop Elements and Premiere editing software. Elements 15 adds touchscreen editing, batch adjustments, enhanced search function and a tool to edit facial features.

    New Smart Tags help identify key features in images and are applied automatically – search for ‘dog’ or ‘birthday’ and Adobe claims its enhanced search will identify these photos in your collection. Borrowing from Photoshop CC’s face-aware liquify technology, Elements also gets a tool to help turn frowns into smiles and fix squinting eyes. Quick Edit and Organizer modes gain touch compatibility, and it’s now possible to apply ‘instant fix’ edits to a batch of photos.

    Premiere Elements 15, Adobe’s entry-level video editing software, offers the de-haze tool already offered by Photoshop CC and Elements and also gains touch functionality. A few other feature updates are also included, like the ability to create photo/video collages and a Remix feature to help match music and video clip length.

    Visit Adobe’s website to learn more about Photoshop Elements and Premiere Elements 15.

    Articles: Digital Photography Review (dpreview.com)

  • 2 Simple Methods for Adding Color to Your Images Using Photoshop

    Most of us have experienced photographing an incredible sunrise or sunset only to get home and realize that the colors in your images are not nearly as good as the colors you witnessed with your own eyes. There can be many reasons to this, such as camera limitations or mistakes you made in the field. However, that’s not what you will learn about in this article. Correcting the colors, or adding color, isn’t something you need to spend hours working on. In fact, it can be done in just a few minutes using Adobe Photoshop and you don’t need to be a Photoshop expert to do it.

    Enhance or adding color in Photoshop

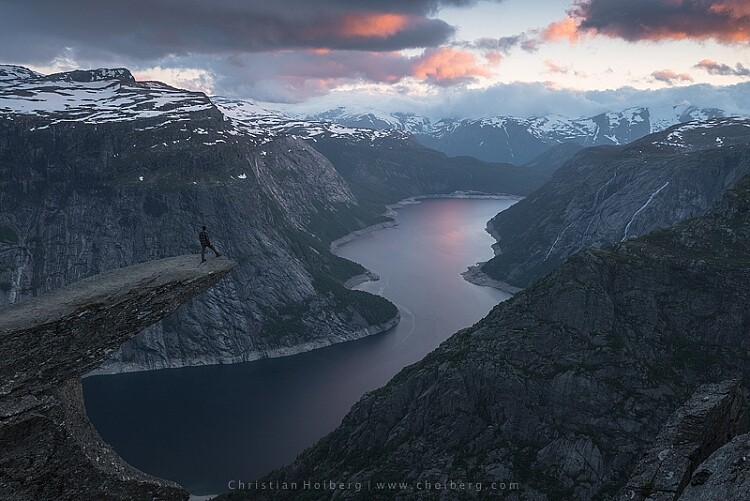
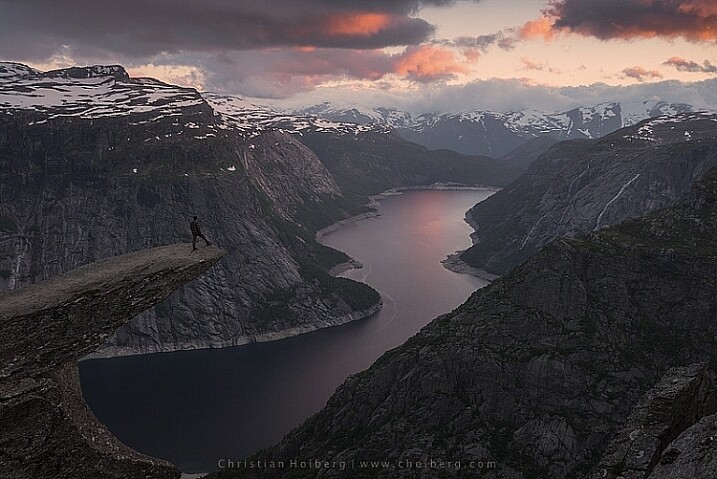
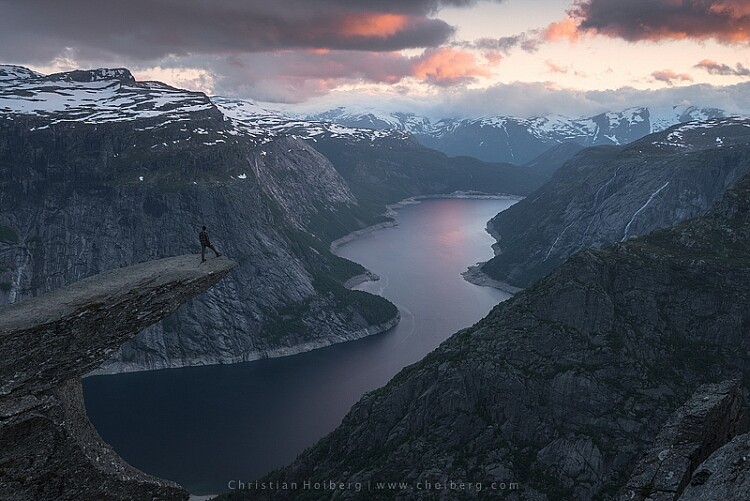
    Trolltunga, Norway – We will be adding color to this sky

    As we all know there are many ways to get to Rome, there  isn’t only one method of adding colors in Photoshop either. It can, as I mentioned above, be done fairly easy but the more detailed adjustments you wish to make, the harder it will become. In this article, we will be looking at two easy methods to add color in Photoshop.

    #1 Adding Color with a Photo Filter

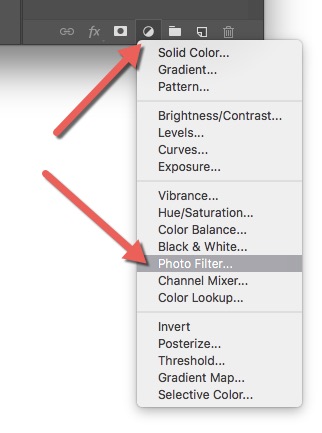
    The first method we will look at involves the Photoshop tool called Photo Filter. This is an Adjustment Tool which you can find by clicking the Adjustment Tool icon (the half-filled circle located below the layers palette, see screenshot below). This creates a new layer named Photo Filter 1, which we will be working on.

    photo-filter-ps adding color in Photoshop

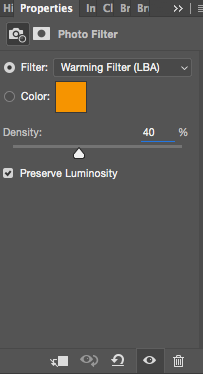
    Photofilter adding color in PhotoshopA warming filter is the default setting so, as you might see, the image now has an orange color cast. Personally, I prefer using Warming Filter (LBA) as I find this to have the most natural color that suits my images best (see screenshot on the right). Select this filter by clicking on the Filter dropdown menu. Alternatively, you can select a color manually that might suit your specific image better. If you find the adjustment to be a little too weak you can strengthen its appearance by increasing the Density. I rarely go above 40% Density as the colors then quickly become washed out and results in a look I don’t want.

    Photo filter applied to the whole image - adding color in Photoshop

    Photo Filter applied to the whole image at 40% 

    Photo filter - adding color in Photoshop

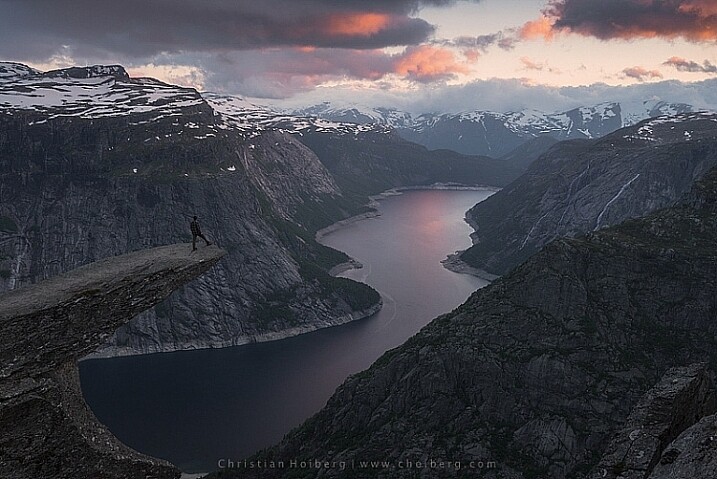
    Photo Filter applied to the whole image at the default 25%

    By using this filter we have brought back some of the color in the sky. There’s not a huge difference but we’ve managed to keep a natural look in the image while the sky still looks good. However, there’s one problem. We don’t necessarily want to add the extra color to the landscape itself, we only wanted the sky to be affected.

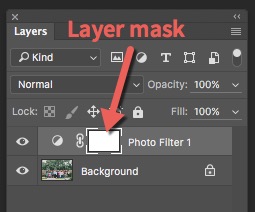
    layer-mask-ps - adding color in PhotoshopLeft of the Photo Filter text there’s a white box. This is the layer mask, basically telling Photoshop what area of the image should be affected by that particular layer. White means that it’s visible and black means that it’s concealed. By default the entire mask is white. To remove the adjustment from the landscape itself follow these steps:

    1. Select the Layer Mask by clicking on it (it will show square brackets around the mask when it is selected, see screenshot on the right))
    2. Select a black brush and set Hardness to 0%
    3. Reduce the opacity of the brush to 80%
    4. With the Layer Mask still selected, carefully paint on the areas you do not want affected by the filter. You’ll see the adjustment disappear from those places as you paint.
    adding some subtle color to the sky

    The Photo Filter layer masked to only affect the sky.

    This is the easiest way to manually choose where the adjustment will be visible. Unfortunately, it’s also the least accurate. You might see some haloing along the edges or perhaps the color bleeds onto the horizon at certain places. By zooming in on the image and using a smaller brush you’ll be able to reduce the amount of haloing or bleed. Other methods, such as Luminosity Masking, are more accurate but also demand a better understanding of Adobe Photoshop.

    #2 Add contrast with Curves Adjustment Layer

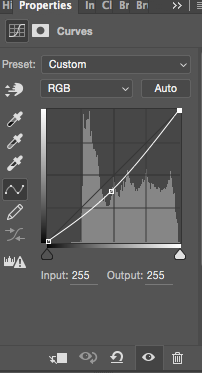
    Curves adjustment layerAnother easy method to add colors is by using the Curves Adjustment Layer. Unlike Photo Filter, we will be using Curves to add contrast in the sky. Follow these steps to do a Curves adjustment:

    Open a Curves Adjustment Layer by clicking on the Adjustment Layer icon again, and selecting Curves this time.

    You want to add some contrast and increase the colors slightly by darkening the sky. Do this by clicking in the middle of the line in your Curves layer and pulling it down gently. Make sure that you don’t go too far as that will lead to unwanted grain or color distortions.

    That’s it. To remove the adjustment from the landscape create another Layer Mask and follow the same steps as with the previous method above.

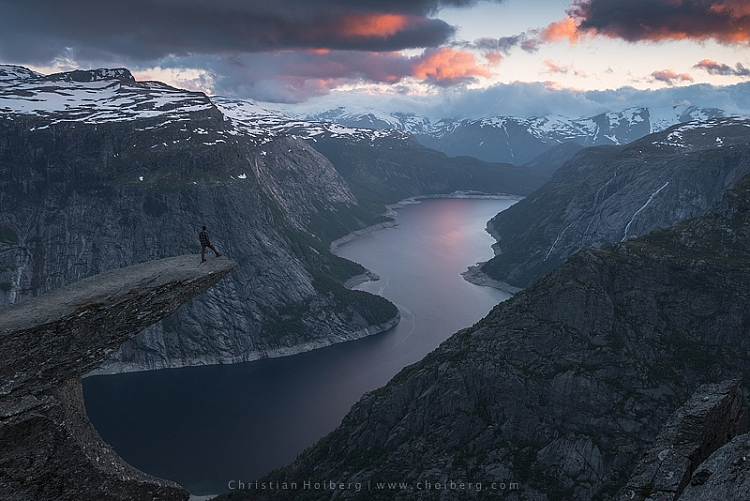
    adding color in Photoshop

    As you might have noticed these are two subtle adjustments. You won’t get a surreal sky by following these methods. Instead, you’ll maintain a natural look and still bring out some of the color you wanted to capture.

    googletag.cmd.push(function() {
    tablet_slots.push( googletag.defineSlot( “/1005424/_dPSv4_tab-all-article-bottom_(300×250)”, [300, 250], “pb-ad-78623” ).addService( googletag.pubads() ) ); } );

    googletag.cmd.push(function() {
    mobile_slots.push( googletag.defineSlot( “/1005424/_dPSv4_mob-all-article-bottom_(300×250)”, [300, 250], “pb-ad-78158” ).addService( googletag.pubads() ) ); } );

    The post 2 Simple Methods for Adding Color to Your Images Using Photoshop by Christian Hoiberg appeared first on Digital Photography School.


    Digital Photography School

  • Las Pozas: Surreal Concrete Sculpture Garden in the Jungle of Mexico

    [ By SA Rogers in Destinations & Sights & Travel. ]

    las-pozas-14

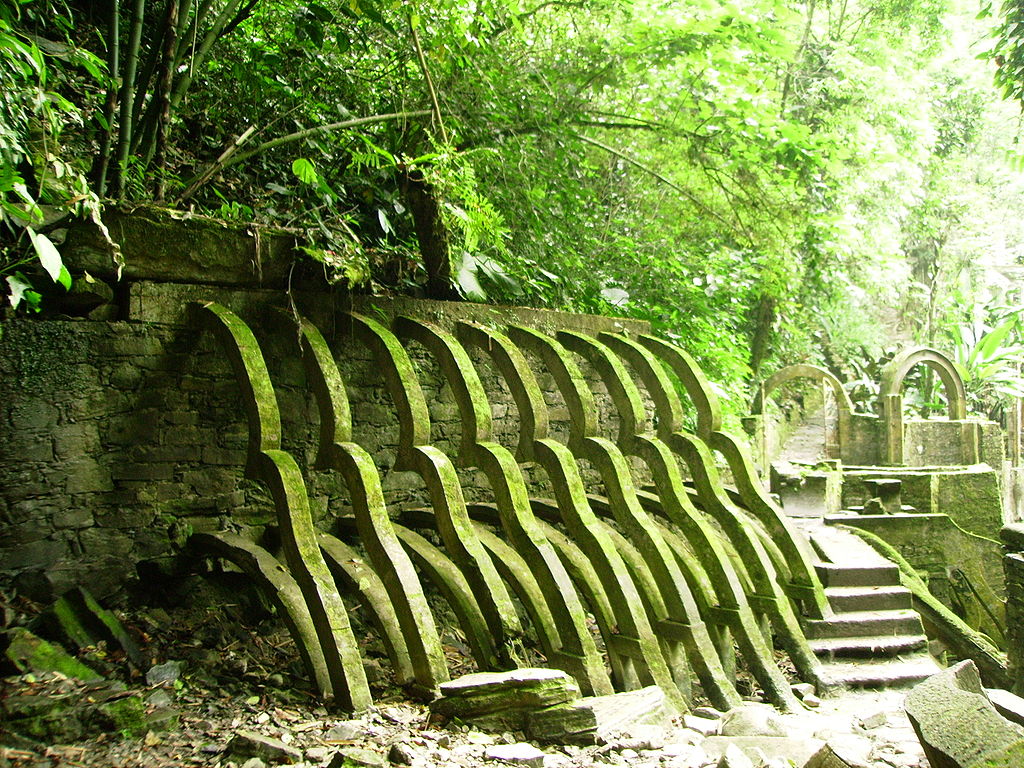
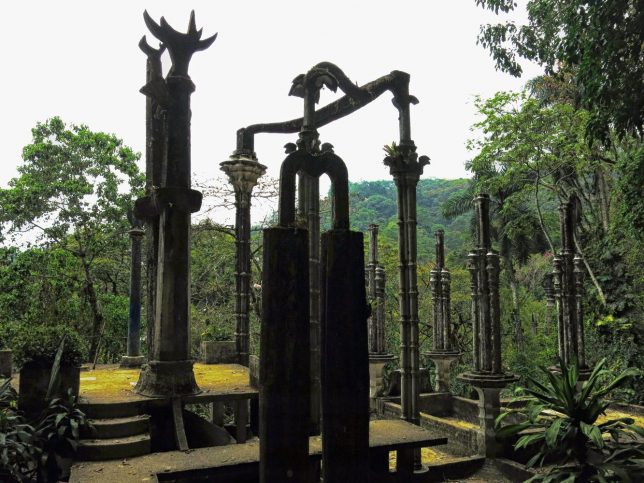
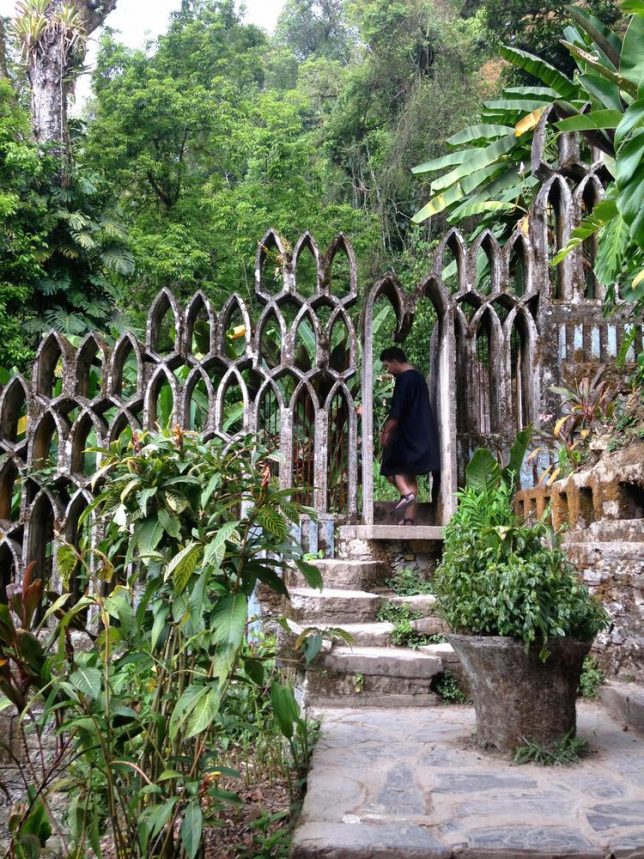
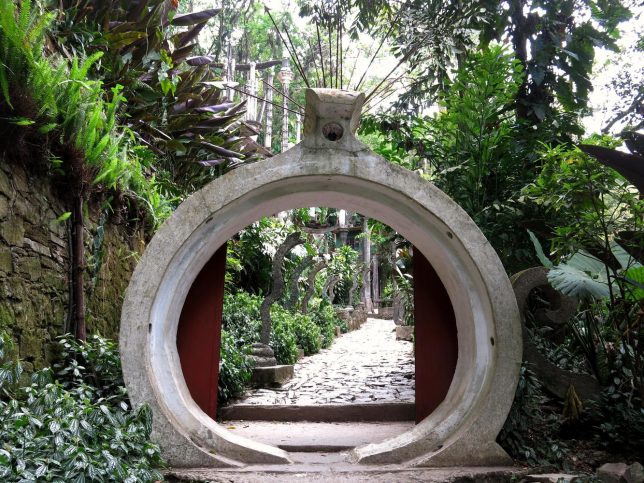
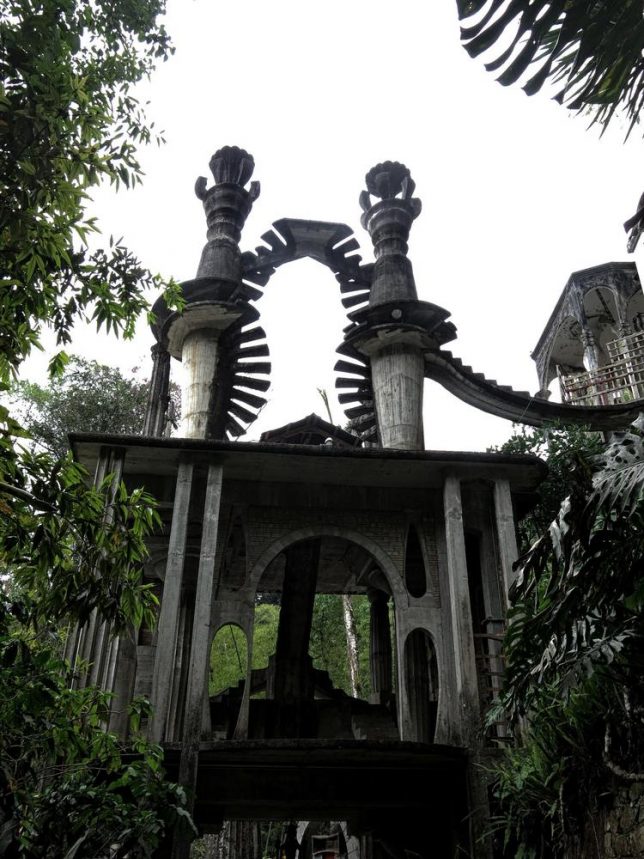
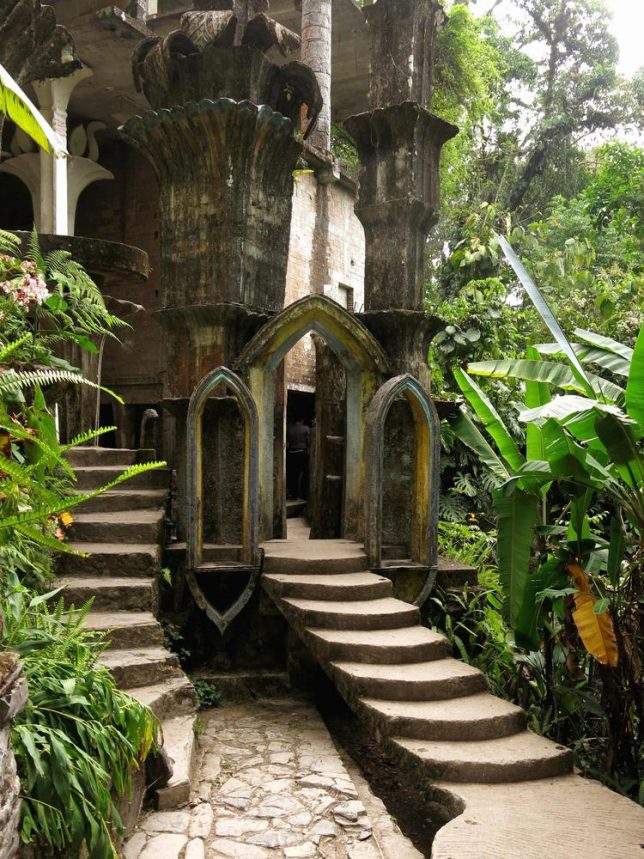
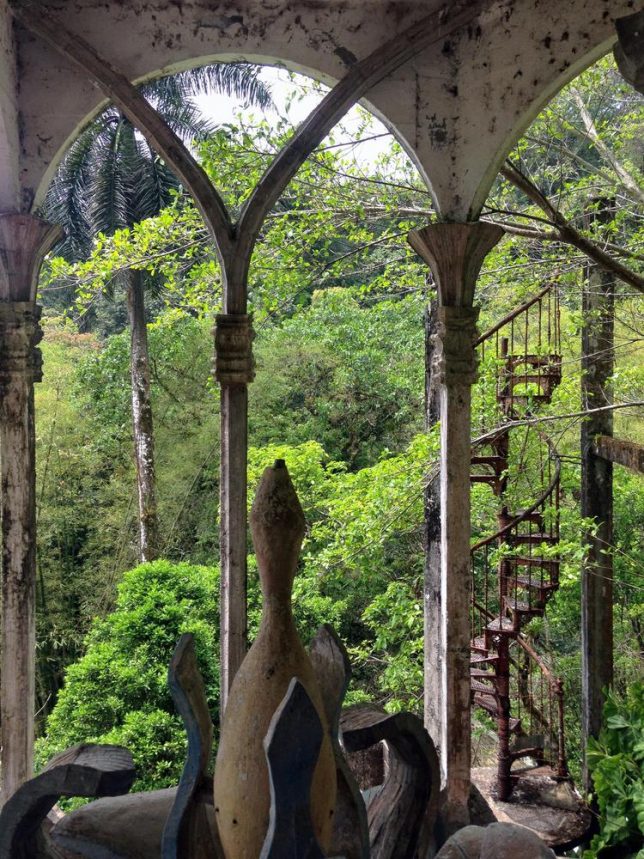
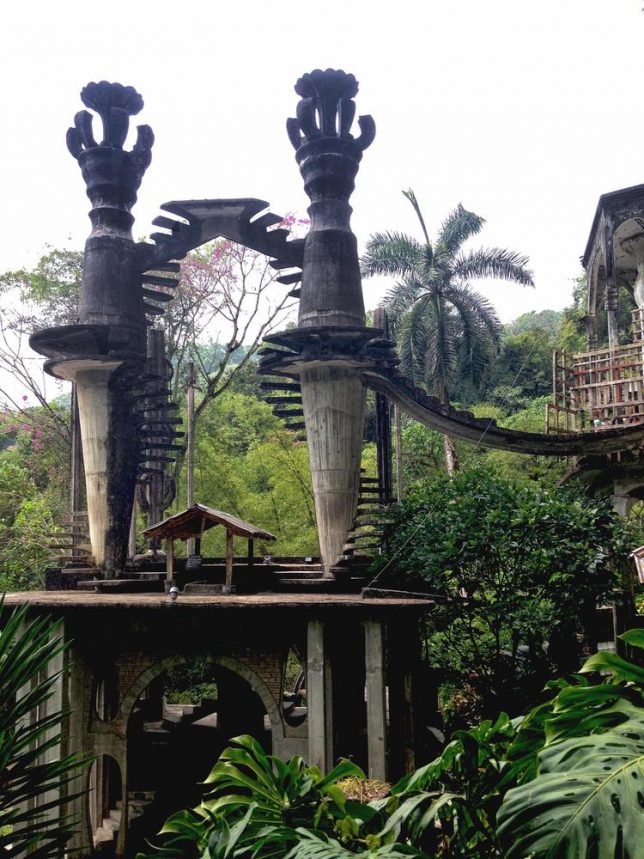
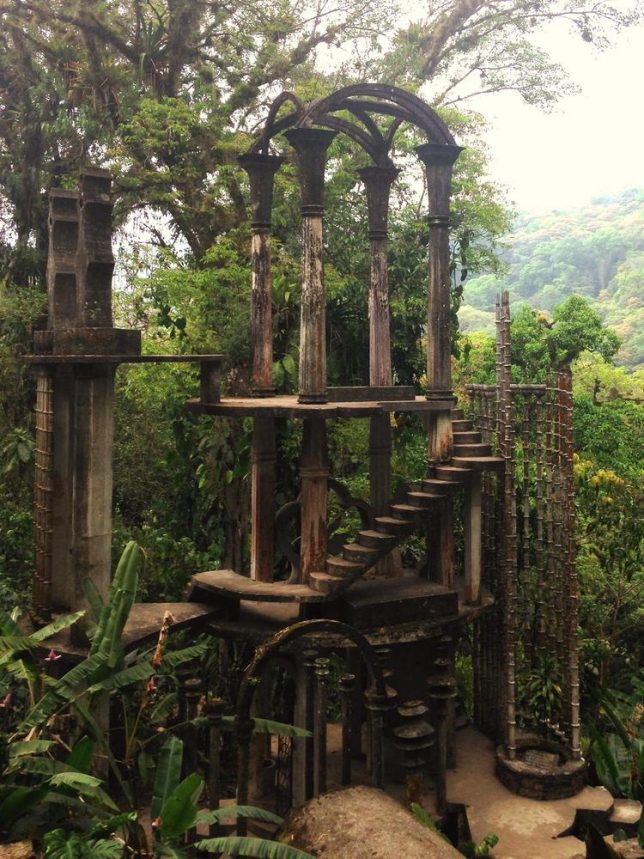
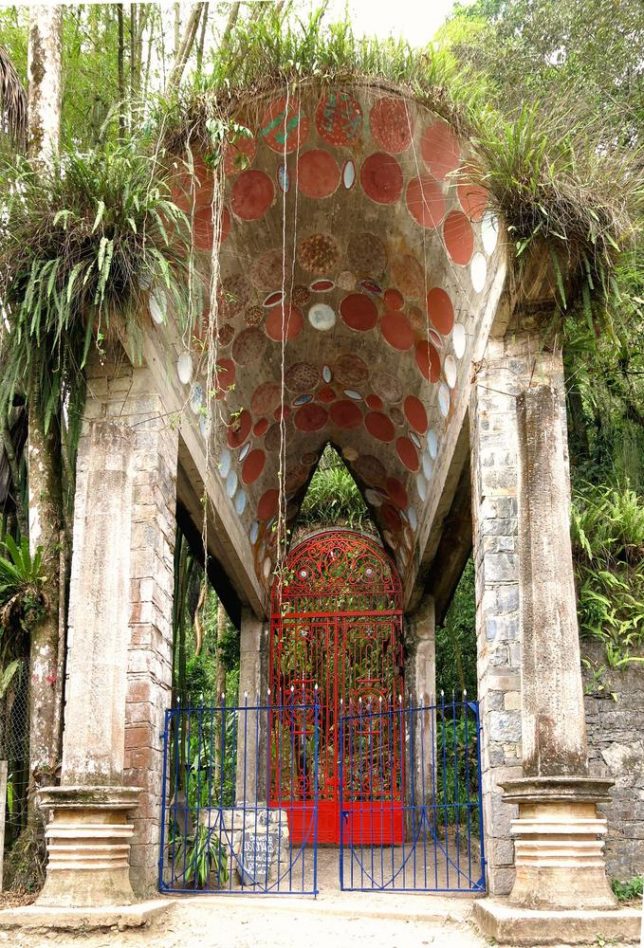
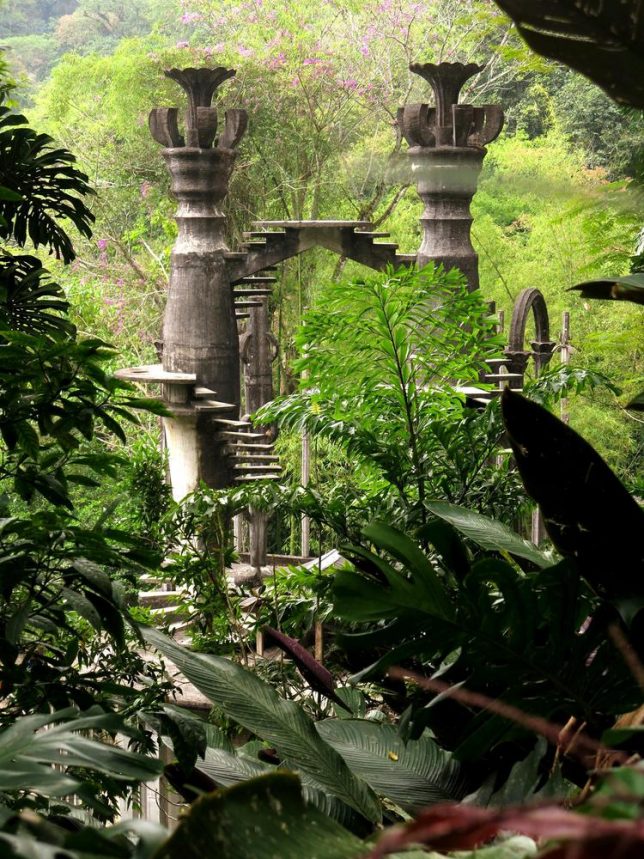
    Stairs spiral up to the sky in strange configurations, going nowhere, in a tangle of surrealist sculptural structures in a Mexican jungle. Why is this series of concrete wonders hidden within the lush vegetation of Xilitlha, and who put it there? The answer lies within the mind of Edward James, a 20th century art collector described by Salvador Dali as “crazier than all the Surrealists together.” If Dali is calling you crazy, that probably says something, and photos of James’ creations reveal a visionary thinker on par with the artists he so admired.

    las-pozas-9

    las-pozas-11

    las-pozas-12

    James, a poet and well-to-do heir who was once painted by René Magritte, was a passionate and early supporter of Surrealism, sponsoring Salvador Dali in a crucial early period of his career during which he produced some of his most valuable works. A 1978 documentary called “The Secret Life of Edward James” shows off some of his personal art collection, as well as his quirky refurbishment of Monkton House, a small 20th century house plastered with surreal interior designs. He was certainly an interesting character, which explains how Las Pozas came about.

    las-pozas-5

    las-pozas-6

    las-pozas-7

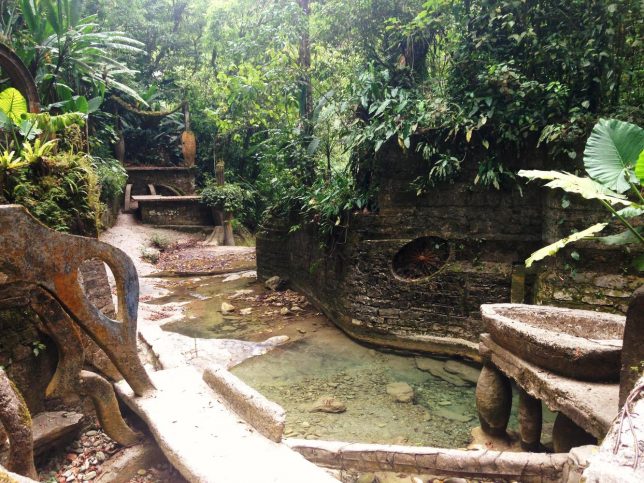
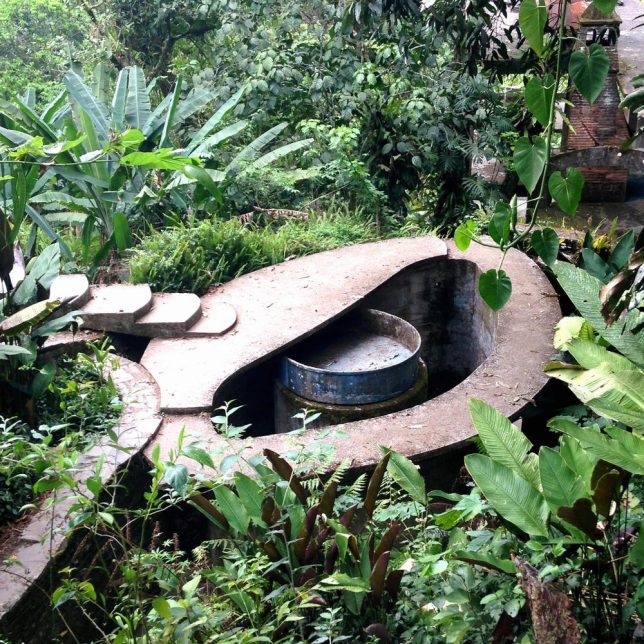
    Built more than 2,000 feet above sea level about seven hours (drive) north of Mexico City, ‘Las Pozas’ was named for the natural pools and waterfalls that characterize the site. James saw it as the ideal romantic spot for his vision of a “Garden of Eden set up.” Between 1949 and 1984, he built dozens of towering concrete structures around the pools, each of them given names like “The House on Three Floors Which Will in Fact Have Five or Four or Six,” and “The House with a Roof Like a Whale.”

    las-pozas-13

    las-pozas-8

    las-pozas-10

    The sculptures were conceived by James and his guide Plutarco Gastélum, who helped him scout the site, after his living orchid garden decades in the making was destroyed by a blizzard. The concrete ‘flowers’ would be everlasting, much hardier than anything organic he could grow. It took a crew of about 150 people to build them all. It cost more than $ 5 million to construct, a sum James raised by selling his collection of Surrealist art at auction.

    las-pozas-2

    las-pozas-3

    las-pozas-4

    After James’ death in 1984, Las Pozas was opened to the public, and it’s know owned by Fondo Xilitlha, a foundation overseeing its preservation and restoration.

    Top photo: Wikimedia Commons; all other photos: Victor DeLaqua, Julia Faveri and Herbert Loureiro/ArchDaily

    Share on Facebook


    [ By SA Rogers in Destinations & Sights & Travel. ]

    [ WebUrbanist | Archives | Galleries | Privacy | TOS ]


    WebUrbanist

  • Sigma 12-24mm F4 DG HSM Art real world sample gallery

    Hot on the heels of its Photokina announcement, the Sigma 12-24mm F4 Art arrived on our doorstep last week, meaning it was time to shoot wide. Just 1mm shy of matching the world’s widest rectilinear zoom, the Canon 11-24mm F4 L, the Sigma gives a large amount of the Canon’s focal range for a much lower price of $ 1599. To see if its images are as tempting as the specs are, we wasted no time getting it out in the real world mounted on the new Canon 5D Mark IV, the 5DSR, and a Sony a7R II with Sigma’s MC11 adaptor.  

    See our Sigma 12-24 F4 Art real world samples

    Articles: Digital Photography Review (dpreview.com)

  • Phase One XF IQ3 100MP update adds electronic shutter

    Danish medium-format manufacturer Phase One has released a firmware update for its XF camera system that introduces an electronic shutter function to its IQ3 100MP digital back as well as a menu screen for controlling Profoto flash heads via the Air Remote TTL radio communication network.

    This will be the third firmware update for the XF body since it was launched. The benefit of the electronic shutter is that it will be possible to record images with the 100MP sensor without involving any moving parts in the camera. Although previously the XF offered a mirror-up mode, the shutter unit still created some vibration during the exposure that could diminish the resolution of the final image. Phase One says that exposures of between one hour and 1/4000sec will be possible in electronic shutter mode.

    The new firmware also adjusts the function of the Profoto Air radio trigger that is built into the XF body. While previously the trigger just controlled when wirelessly connected flashes fired, now users are also able to control output directly from the camera’s back using a TTL metering system. This allows users to control and monitor up to six groups of heads directly from the back’s own display. The update has also brought an information panel that demonstrates how the flash duration and output curve correspond to the camera’s shutter synchronization so photographers can ensure they are optimizing the timing of the shutter to make the most of the period during which the flash is lit.

    The company has altered its 5-year warranty terms too, abolishing the limit on shutter actuations – presumably as the body no longer needs to trigger the mechanical shutter to make an exposure. Phase One has also officially introduced the vertical grip it had displayed ‘unofficially’ at Photokina. The V-Grip offers almost the same right hand control dials as the body’s own grip including, obviously, a shutter release button in the same place. The grip will be available from November at $ 1490, and the new firmware has been released today as a free download. For more information see the Phase One website and the firmware download page.

    Press release:

    Phase One Releases XF Camera System Feature Update #3

    Adding new functionality, new hardware and improved warranty

    COPENHAGEN, Oct. 3, 2016 – Phase One, the world’s leading medium format camera system provider, today released a major XF Camera System update. Available now and free to all XF Camera System owners, this update demonstrates Phase One’s commitment to the continuous upgrade and improvement of the XF camera platform.

    Feature Update #3 greatly advances the features of the world’s first full frame medium format CMOS sensor. The IQ3 100MP system now includes complete Electronic Shutter integration — the world’s first in medium format photography. With the ability to capture images without a single moving component, the IQ3 100MP is now even more versatile.

    The update adds significant improvements for studio and flash photography applications such as advanced flash controls with the in-camera Profoto Air Remote enabling Profoto TTL metering. Further, a post capture Flash Analysis Tool has been added to ensure unparalleled control.

    Phase One also today introduced the new XF V-Grip, providing advanced ergonomic capabilities and control options.

    The world’s best warranty becomes even better
    Phase One’s dedication to product quality, in combination with the maturity of the XF Camera System, provides professional photographers with the assurance they demand.

    “All XF IQ3 Camera Systems come with a five-year warranty that now includes unlimited shutter actuations, a warranty unprecedented in our industry,” says Stefan Sandor, VP Marketing and Product Management, Phase One.

    Phase One’s XF Camera System Feature Update #3 introduces

    Advanced Studio Hardware, Controls and Workflow:

    Flash Analysis and Rear Curtain Trim
    Review all aspects of the flash output just after the capture, directly on the XF Camera System and offset the flash sync to meet your requirements;

    Profoto Air
    Full functionality of the Profoto Air for up to six groups, now built directly into the XF Camera System;

    Profoto AirTTL
    Integrated with the XF Camera System’s Auto Focus sensor to provide active feedback and deliver accurate exposures with every capture, no matter the variables.

    V-Grip for the XF Camera System
    Providing advanced ergonomic capabilities and control options, the XF Camera System V-Grip ensures simplicity as well as dynamic improvements to handheld workflow applications.

    Advanced Technology, Tools and Customization:

    Electronic Shutter for the IQ3 100MP ?
    The IQ3 100MP now includes complete Electronic Shutter integration. With the ability to capture images without a single moving component, the IQ3 100MP is even more versatile.

    Additional New Customization and Workflow Options
    With Feature Update #3, the XF Camera System now includes Icon Control, Create, Load & Save System Setup, Advanced Tool Options for sequence tools, as well as several other new improvements and features.

    For all the details, please go to: www.phaseone.com/feature-update-3 or book a demo on: www.phaseone.com/demo

    Availability and Pricing

    Firmware for the XF Camera System Feature Update #3 is free and available for download here: www.phaseone.com/feature-update-3

    New XF V-Grip will be shipping in November and is available through Phase One photography partners worldwide: www.phaseone.com/partners?

    Prices for Phase One XF V-Grip – 1,490 USD

    Articles: Digital Photography Review (dpreview.com)

  • Step by Step Tutorial for How to Shoot Tethered

    Tethered shooting is a photography technique that has been practiced by many professional photographers for years. In short, tethering allows you to connect your camera to a computer or tablet and almost instantly view your digital images on the device within seconds after it is captured. Due to expense and accessibility, tethered-shooting was generally reserved for photographers who do a lot of studio work and high-end commercial photo shoots. However, as tethering technology became significantly cheaper and easier to use, tethered shooting as been practiced by professionals and enthusiasts alike.

    If you’ve ever been curious about tethered shooting, this article will give a brief overview of the process as well as some steps to easily get started.

    Tyler Ingram

    By Tyler Ingram

    What is tethered shooting?

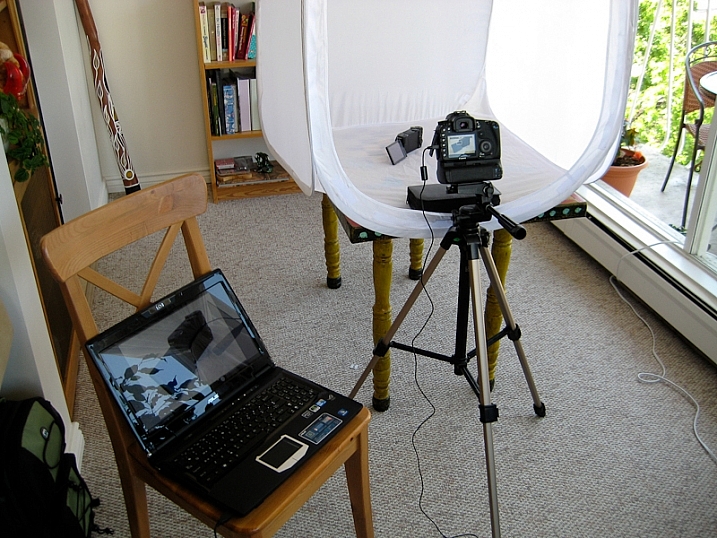
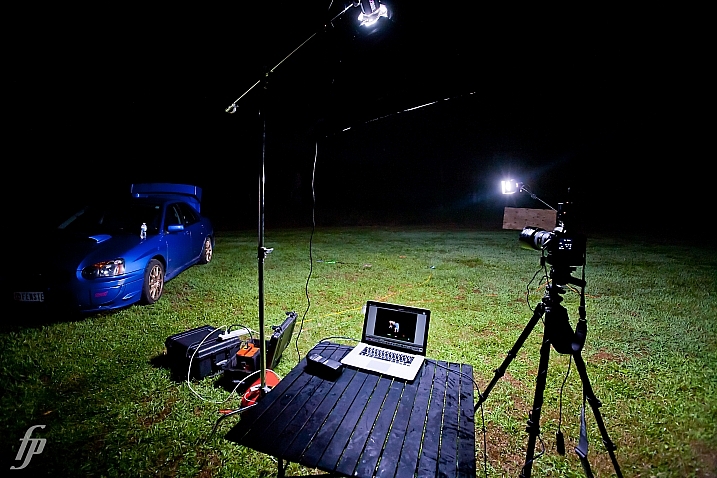
    Tethered photography is the process of connecting your camera to a computer, tablet, or even a smartphone using either a cable or wireless app. After a successful connection between the devices, any new image captured by the camera is then passed directly to the computer and saved in a pre-designated folder. You’re then able to see the image fully displayed on the computer screen and even do some post-processing to the image.

    Benefits of tethered shooting

    The main benefit of tethered shooting is the ability to quickly preview the image on a large monitor within seconds of capturing it with your camera. This allows both you and a client to scrutinize your images on a big screen, allowing you to make adjustments to the photo shoot as it’s taking place. Depending on the tethering software you’re using, you might even be able to do quick edits to the photo on-site. Both you and the client can see exactly what’s being photographed and can make sure your visions for the shoot are in alignment. Overall, this type of collaboration should lead to a better result.

    Photographer

    By Photographer

    Downsides of tethered shooting

    The ability to almost instantly preview photos as they’re being captured does come with a few downsides.

    First, either you or your client could get too caught up in little details while inspecting the photos, and this can stall a photo shoot. Thus, it’s important to set expectations with your client and be able to push forward without focusing too much on details. Second, tethering can suck the battery life out of both your camera and your connected computer. If your tethered photo shoot may take longer than an hour, you’ll want to have extra batteries on hand and be shooting near a wall socket in case you need to plug in. Lastly, tethering software can be notoriously finicky and is prone to not working for no apparent reason, so you’ll want to have a backup plan in case of an outage.

    What you need for tethered shooting

    The traditional and most reliable way to connect your camera to a computer or another device is by using a cable. There are a variety of different cables and ports available, so which cable you use will depend on your exact devices. Some DSLRs with built-in Wi-Fi even offer wireless tethering or remote shooting, but this is typically limited to being used on a tablet or mobile device only, not a laptop computer.

    In this particular instance, we’ll assume the camera is a DSLR and the connected device a laptop computer, as this is a very common tethered shooting setup. In this case, you’ll need:

    • An extra long (ie. 15 feet) USB cable to connect your camera to your laptop
    • Tethering software, such as Adobe Lightroom or Canon EOS Utility 3
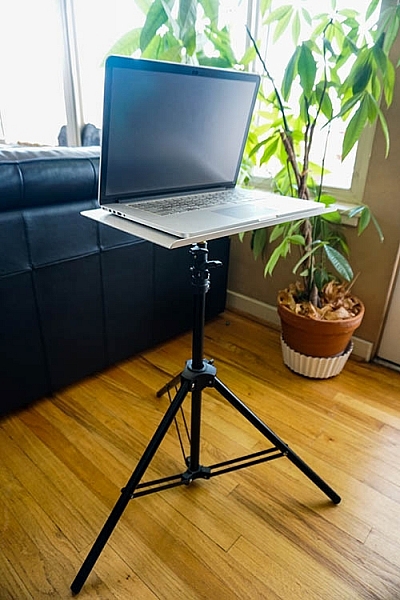
    • Optional – a portable table to hold your laptop such as Tether Tools’ Aero Table
    • Optional – a JerkStopper to prevent accidentally yanking your USB cable from your camera
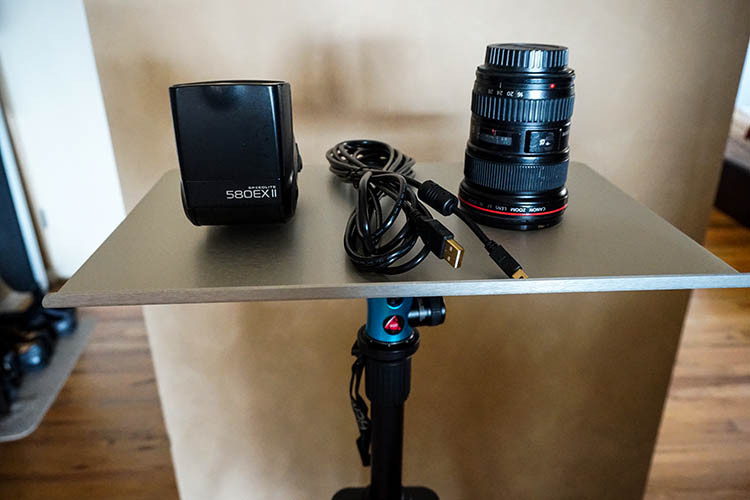
    Tether Table Aero for tethered shooting

    Tether Table Aero is a lightweight, durable aluminum platform that attaches to almost any tripod or light stand, turning it into a handy utility table for holding a laptop or extra camera gear.

    Tether Table Aero for tethered shooting

    To be clear, there are many tethered shooting programs available, but this article will highlight two low-cost, simple methods in particular: Adobe Lightroom and EOS Utility 3.

    Simple tethered shooting with Lightroom

    The quickest and arguably the easiest way to start tethered shooting is by using Adobe Lightroom’s Tethered Capture feature. Follow these steps to set it up:

    Step 1 – Connect the camera to the laptop

    Connect your DSLR to your laptop with a USB cable. Then turn the camera on.

    Step 2 – Start Tethered Capture in Lightroom

    Open Lightroom and navigate to File > Tethered Capture > Start Tethered Capture

    Step 3 – choose tethered settings

    In the Tethered Capture Settings dialogue box, you have the option of choosing a Session Name (e.g., “Tethered Shooting Test,” specifying the photo names, choosing a destination for your photos, and adding metadata and keywords. Be sure to pay particular attention to where the photos will be saved so you can find them later. After setting your options, click OK.

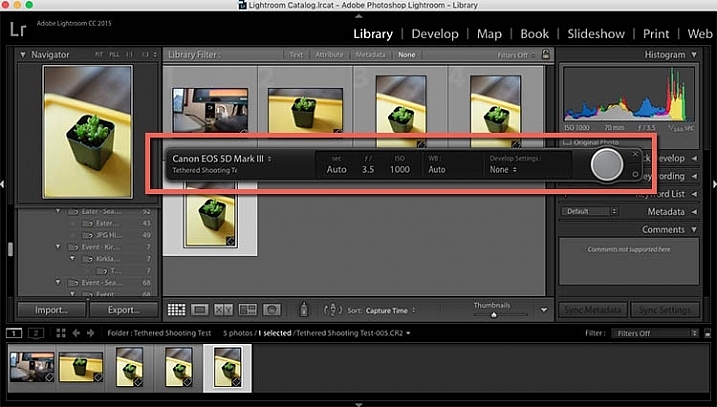
    If all goes well, the screen below will pop up, giving you a narrow control panel (outlined in red below) for some light remote shooting options, and a Library in which photos captured via the tethered shooting connection will populate.

    tethered-03b

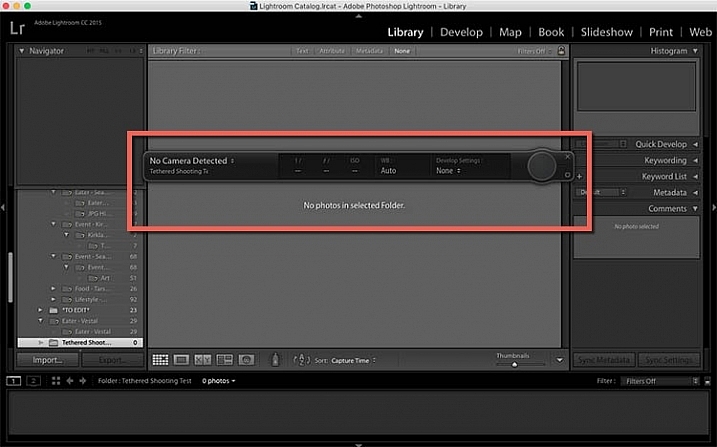
    However, it’s not uncommon for Lightroom to have difficulty detecting the connected camera. If you follow the above steps and still see this screen below, try troubleshooting by first making sure your version of Lightroom and your camera’s firmware are both updated. Also, check compatibility to ensure your camera can tether capture with Lightroom. Note: there are third party plugins available for other non-compatible cameras such as the Fuji X-T1, do a search for your camera model and you may find a solution (Pentax here, Sony here.

    Finally, try rotating through several different USB cables to make sure they’re working well. But if you’re looking for a more consistent way to tether shoot, check out the other option below.

    tethered-04b


    Reliable Tethered Shooting with EOS Utility 3

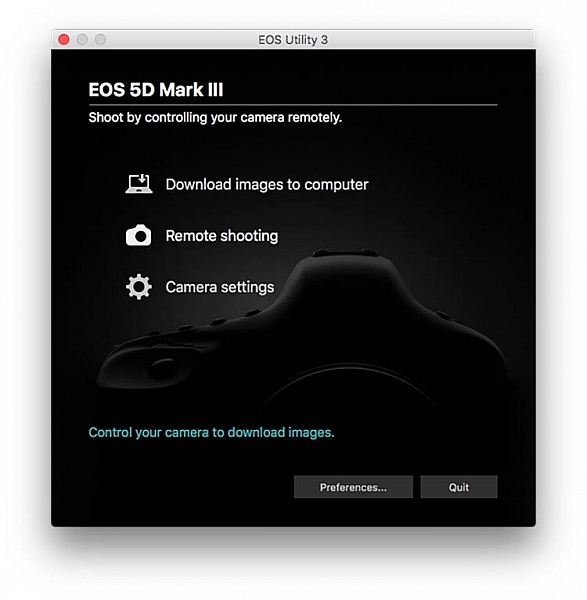
    If you shoot with a Canon DSLR, whip out that CD that came with your camera and install the EOS Utility 3 onto your computer. When your Canon DSLR is connected to your computer, you’ll be able to use this program to control your camera remotely and shoot tethered. This method is much more reliable and consistent than using Lightroom’s tethered capture option.

    Steps for using EOS Utility 3 for tethering:

    1. Start by downloading the EOS Utility 3 and opening it on your computer. Click on the “Remote shooting” option.Tethered shooting
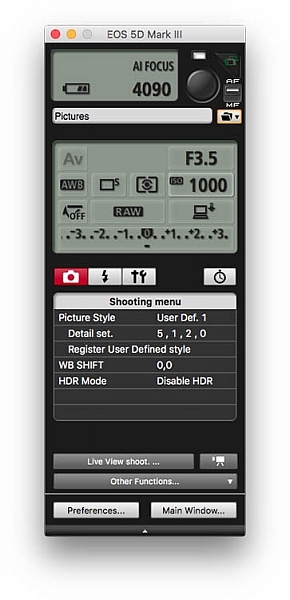
    2. Selecting that option will display the following interface. The display gives you the ability to alter some settings such as white balance or drive mode on your camera directly from this interface, but there are still some functions, such as lens zooming, that you’ll have to do manually.Tethered 05
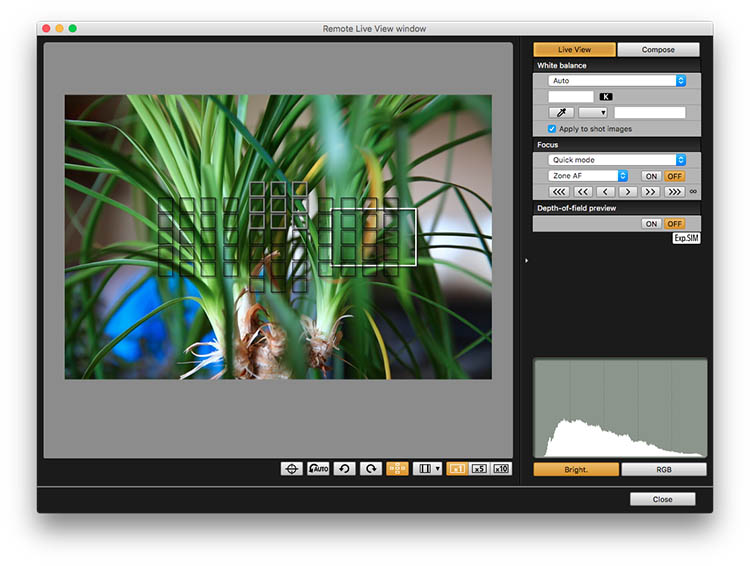
    3. While still in the Remote Shooting setting of EOS Utility 3, set your camera to Live View mode, and tethered shooting will be enabled. In this case, Live View will appear directly on your computer screen so you will see exactly what your camera sees. When you take a photo in tethered shooting mode, the captured photo will appear on your desktop.Tethered 09

    Over to you

    These are just two of many options available for tethered shooting. Do you frequently shoot tethered? If so, what types of programs do you use for reliable results? Please let us know your tethered shooting tips and tricks in the comments below.

    googletag.cmd.push(function() {
    tablet_slots.push( googletag.defineSlot( “/1005424/_dPSv4_tab-all-article-bottom_(300×250)”, [300, 250], “pb-ad-78623” ).addService( googletag.pubads() ) ); } );

    googletag.cmd.push(function() {
    mobile_slots.push( googletag.defineSlot( “/1005424/_dPSv4_mob-all-article-bottom_(300×250)”, [300, 250], “pb-ad-78158” ).addService( googletag.pubads() ) ); } );

    The post Step by Step Tutorial for How to Shoot Tethered by Suzi Pratt appeared first on Digital Photography School.


    Digital Photography School

  • Aura is a next generation digital picture frame

    Digital picture frames were all the rage around 2006, but since then have pretty much been relegated to the bargain basement. Instead of focusing on innovation, new features and better performance, frame makers decided to compete on price. As a result digital frames have always been regarded a low-quality product and the gadget community quickly lost interest.

    The team behind the new Aura frame is planning to change that and make the digital picture frame once again a product that technophiles across the globe are lusting for, with a design that combines a high-quality display with all sorts of digital bells and whistles. The Aura’s screen is pretty much identical to the 2048 x 1536 pixel Retina display in the iPad and the acrylic frame, which is edged in anodized aluminum, will be available in either ivory with rose gold trim or black with charcoal trim. 

    Premium finish aside, the Aura frame stands out thanks to its features. There is an accompanying mobile app for syncing manually created albums to the device. Alternatively, the app offers facial recognition and can be set to upload all images that have specific persons in them. There is also a filter that gets rid of blurry images, duplicates and those where subjects have their eyes closed. It even makes sure to only use images that crop well for the frame’s 4:3 format.

    Of course you can invite others to contribute to an album as well. In addition the Aura also comes with a set of sensors that can detect if you are in the room in order to make sure you always see a new image when you enter.

    The sensors are also used for the gesture control feature which lets you scroll through images from a distance. The Aura frame is not available yet but its makers just secured $ 6M Series A round funding from Spark Capital, so chances are you’ll be able to buy one in the nearer future. The projected retail price is $ 400 and you can register your email to be notified at launch. Watch the video below for a better idea how Aura works.

    Articles: Digital Photography Review (dpreview.com)

  • Tips for Taking the Torture out of Extended Family Portrait Sessions

    I have yet to meet someone who loves getting their picture taken with the whole extended family. The thought of getting all the dramatic aunts, crazy uncles, wild kids, and tired grandparents together and smiling all at the same time seems nearly impossible, and not at all fun. I know of many photographers who refuse to do big family portraits because they can be so unpleasant. I have grown to love big extended family portrait sessions throughout the years. You can too, whether you’re the photographer, or one of the silly cousins getting her photo taken.
    Extended Family Portrait Session

    Think of big groups as your own family

    The first thing that helped me love extended family sessions was the way that I thought of them. Instead of a difficult crazy session, I try to think of them as my own family, and take the photos with love. Let me share a story that may change your mind about extended family sessions too.

    A while ago I was asked to add a missing brother to an extended family photo. The entire family had been there when they had the photo taken, except for this one brother who couldn’t get off work. Months later, one of the other brothers tragically passed away. Their most recent family portrait wasn’t complete, and they’d never be able to get a new one.

    So, I took this working brother to the same location, took a photo of him, worked him into the photo through the magic of Photoshop. I matched everything the best that I could, so they could have the last most complete family portrait. It made me realize how fragile life is, and how fragile families are. If I have an opportunity to capture a family right now, today, as they are, I’m happy to do it. You never know when or why that portrait may become priceless to them.

    Not only are these photos precious and invaluable, but they can be a lot of fun, and not too difficult to pull off. Let me give you some tips to help.
    Extended Family Portrait Session

    Take charge, be bold, move fast

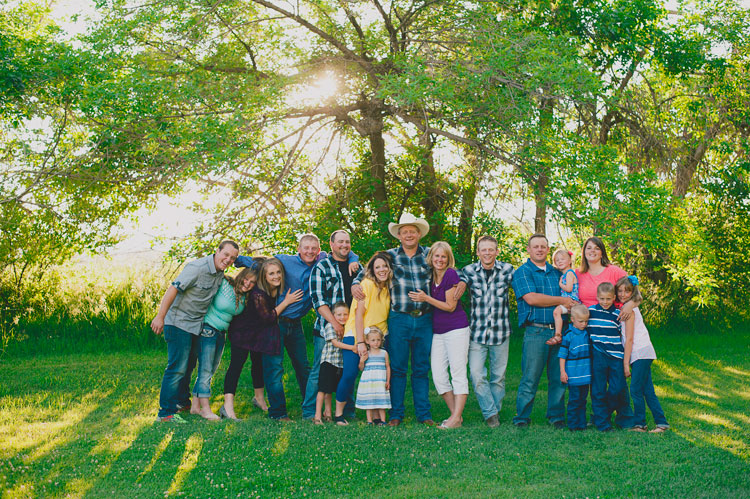
    When you’re working with a big group of people, someone has to be in charge. That person is you, the photographer. This is not a time to be timid and quiet, hoping things will fall into place. As soon as you’re ready to start, get everyone’s attention. Taking charge right away will let them know that you are confident, that you know what you are doing, and that they can trust you. Smile a lot, and if it works for you, throw in some humor. Tell your group that if they will listen to you closely, and do everything you say, that it will be quick, painless, and even fun. Everyone there likes to hear “quick, painless, and fun”, so you’ll have their attention right away.

    Don’t take a long time getting everything situated. Have everything scoped out beforehand, and have a firm idea of where and how you will place everyone. Know what order you will be photographing each group, and if you have any stragglers, kindly, but firmly move them toward the picture location. If there are a lot of small children, this is especially imperative. You will lose their interest and patience so quickly, so you need to take advantage of any time when they are even remotely cooperative. You won’t get any good photos when everyone is exhausted and sick of you, so you have to be done before that happens.
    Extended Family Portrait Session

    Add some personality

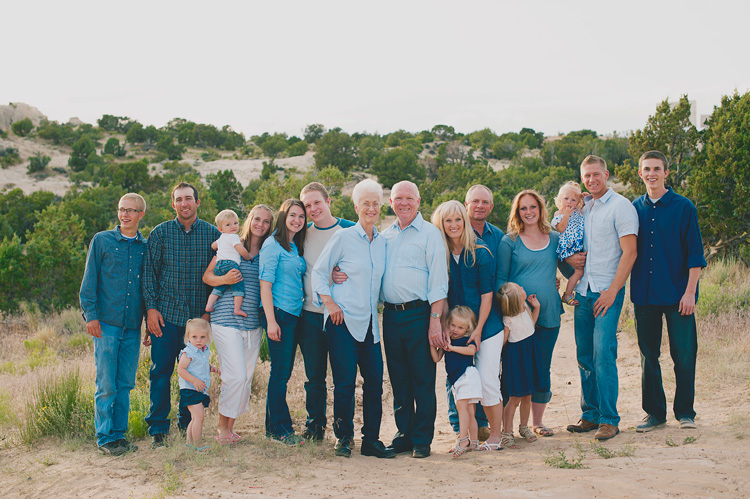
    With a big group, it seems like you might only have one option – get everyone to look at you, and hope they are smiling. Many clients do want a more traditional family photo, very posed, with everyone looking and smiling. But try giving them a few photos with a little bit of their family’s personality. When you are working with so many people it’s really hard to get a perfect traditional photo anyway. Most of my clients know that isn’t really my style, so they are happy with the more fun, casual photos.

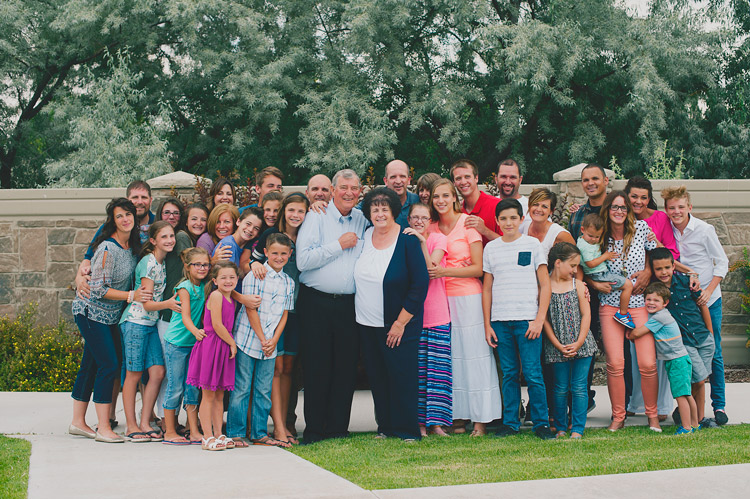
    My favorite thing is to ask everyone to hug in to Grandpa and Grandma, or hug someone next to them. Set everyone up for the more formal photo, and once you’ve captured that, just ask them all to hug. Usually it feels silly enough that they start to laugh, and you get genuine laughs and connection.
    Extended Family Portrait Session

    Try different poses and positions

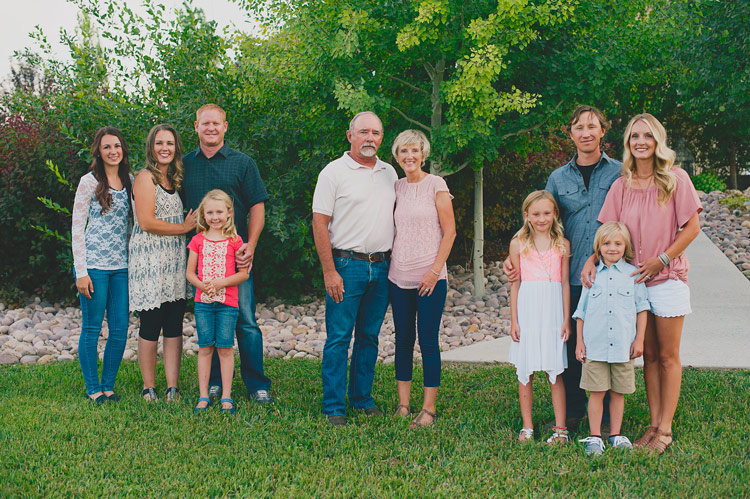
    It can be a challenge to know how to arrange a really big family group. You could easily have four generations in one photo, which can add even more challenges with arrangements. Some families like family photos where they are all squished in together, in one big family group. I’ve had some that want them completely mixed up, where nobody is grouped into separate families. This is okay, but I find that most families like to at least be able to tell which small families within the group belong together. You can do this by just having each family stand next to each other, or you can even put gaps in between each family. I usually do both, so they have options to choose from later.

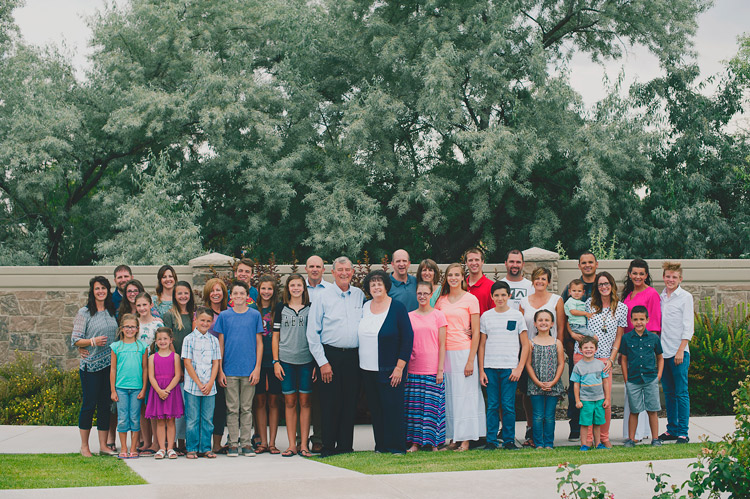
    I usually place Grandpa and Grandma in the center then evenly distribute their children’s families on either side.
    Extended Family Portrait Session

    My style doesn’t involve a lot of props, so you won’t notice a lot of chairs and stools in my family photos. They are an option if you’d like to create different levels, but it usually takes a lot of time to get that set up, and your subjects lose patience fast. I prefer a more casual, natural look to something that looks very precise and contrived. Sometimes worrying about those extra things can cause a lot of stress for you, and for your families, and make the whole process more of a chore. But feel free to use them if it’s your style and preference.
    Extended Family Portrait Session

    Find suitable locations

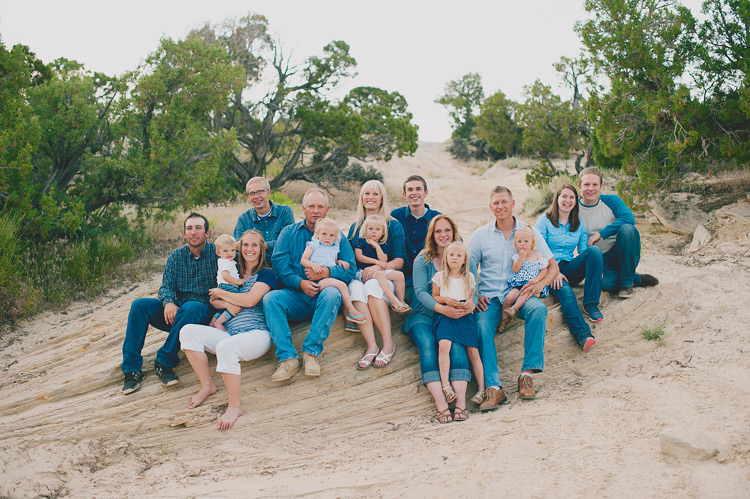
    If you want to have some seated photos, look for locations that have places to sit built in. I love rocks, logs, or even park benches. You can also have some people sit on the ground, some kneel, some stand, but again, be careful not to take so long over-posing that you lose their patience.

    It can be difficult to find a place that will work for such a large group. Try to find locations with simple backgrounds that don’t detract from the faces. If possible, schedule the session during the early morning or evening, to take advantage of better lighting. Look for places that have large trees or buildings to filter the light. It’s much harder to make difficult lighting situations work with 30 people than it is when you’re just photographing one.

    Don’t move around a lot with a large family once you’ve found a good spot. Find one or two good backgrounds, three if they’re really close to each other, and stick with them. This will keep their photo groupings more consistent with each other, and will make the session go much faster and smoother. Try getting 30 people to move quickly over to a different rock, and you’ll see what I mean.
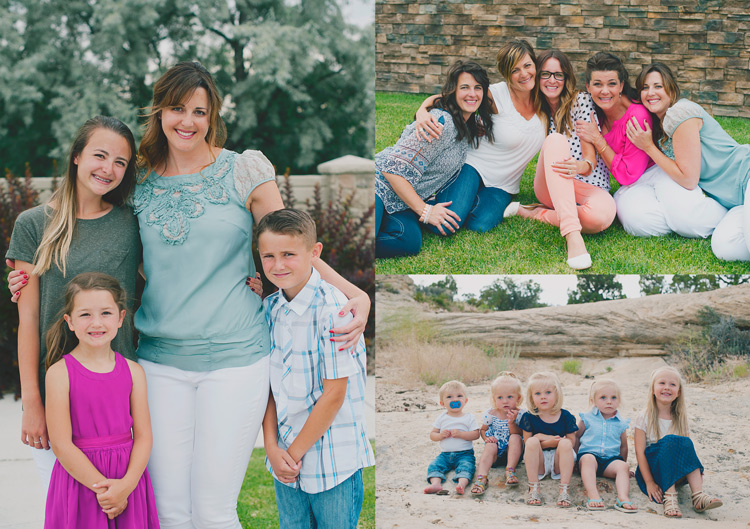
    Extended Family Portrait Session

    Get all the break-off groupings

    Once you’ve photographed the big huge family, it’s time to get all of the little groups. Keep this moving quickly, and be efficient moving from one group to the next. Here’s a list of the different groupings that I do:

    • Entire extended family
    • Grandpa and Grandma (Dad and Mom) alone
    • Dad and Mom with their children (siblings)
    • Dad and Mom with their children and children’s spouses
    • All the siblings
    • The siblings and their spouses
    • Grandpa and Grandma with the grandchildren
    • All the grandchildren
    • The sisters together
    • The brothers together
    • Each separate family

    I don’t do every one of these every time. It depends on what the family wants. Also, I know every family is different, and there may not be Mom and Dad, or any grandchildren, etc. This is just to give an idea of how you might break the groupings up.

    I try to do the whole family first, and then the smaller groupings. Because it’s hardest to get everyone paying attention and happy for the whole group, you want to get that in when everyone’s fresh. However, sometimes some of the families arrive before others. It’s a great use of time to take the photos of those families while you’re waiting for the entire group to get there. They’ll be happy that they’re finished early, and that they don’t have to sit around doing nothing while they’re waiting for the latecomers.
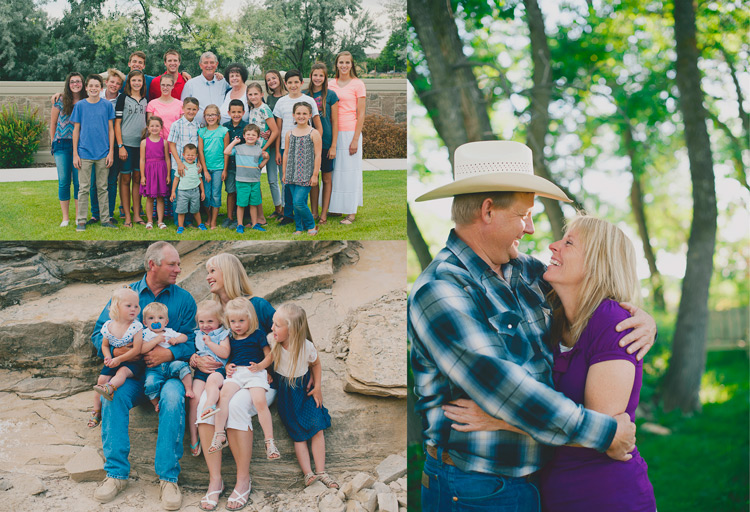
    Extended Family Portrait Session

    A few more tips

    Remember when you’re working with big families, that letting go of perfection can save you, and them, from a miserable experience. Kids often don’t cooperate, and sometimes some of the family is really grumpy about being there for photos. Do the best you can, and let the rest go. If there are little ones not looking at the camera, or even crying, you are still capturing that family at this moment in time, and giving them a gift. They may end up treasuring the silly faces, and loving the memories of when one grandchild was going through his never-sit-still phase.

    Direct the adults

    Tell the parents and grandparents to do their best to continue looking at you and smiling, even if you are trying to get their kids’ attention. Many a good photo is ruined by a parent looking down and lecturing their child right at the moment when the child finally does look up and smile. If the adults are picture-ready at all times, then you will have a chance at catching the split second that their kid smiles, and they’ll be smiling too.

    Extended Family Portrait Session

    Shoot lots of the big group

    Take LOTS of photos in a row with the big group. You may think that you have what you need, but then later when you look at the photos full size, you’ll realize that Uncle Bob blinked in every single one. If you take a lot of photos, one right after the other, you can do head swaps later if you need to open some eyes. If they’re taken at approximately the same time, it will be really easy to change the faces, because they’ll be in the same place in every photo.

    Love your families

    Lastly, remember to love the families you are photographing. They love each other, even through their faults and imperfections, enough to want to preserve a moment in their lives. This photo is so important to at least one person there. Important enough to go through all the hassle of gathering their entire family together in one place at one time. They are trusting you to give them this cherished gift. Consider yourself one of the family for that hour or so, and let your lens capture the love.

    googletag.cmd.push(function() {
    tablet_slots.push( googletag.defineSlot( “/1005424/_dPSv4_tab-all-article-bottom_(300×250)”, [300, 250], “pb-ad-78623” ).addService( googletag.pubads() ) ); } );

    googletag.cmd.push(function() {
    mobile_slots.push( googletag.defineSlot( “/1005424/_dPSv4_mob-all-article-bottom_(300×250)”, [300, 250], “pb-ad-78158” ).addService( googletag.pubads() ) ); } );

    The post Tips for Taking the Torture out of Extended Family Portrait Sessions by Melinda Smith appeared first on Digital Photography School.


    Digital Photography School