Blog

  • Hands-on with the Sony Cyber-shot RX100 V

    Sony Cyber-shot RX100 V

    Not surprisingly, the Mark V looks a whole lot like its predecessors. It continues to use a 1″-type 20.1MP sensor (more on that in a minute) and 24-70mm equiv. F1.8-2.8 lens, and sports the same pop-up viewfinder with 2.36M-dot OLED panel as the RX100 III and IV. The big improvements are all under the hood.

    Phase-detection autofocus

    The RX100 V’s sensor is of a similar stacked design to the Mark IV’s but gains 315 phase-detection AF points covering 65% of the frame. Combined with a front-end LSI chip, the RX100 V’s AF system is capable of acquiring focus in as little as 0.05 sec.

    The main benefit of phase detection elements on the sensor is that they give the camera an understanding of the depth and where your subject exists in the scene. This not only means faster focus but should also allow more reliable subject tracking, since the camera has additional information to help it determine your subject and its location.

    Deeper buffer

    That on-sensor phase detection isn’t only useful for continuous shooting but it should come into its own when the continuous AF and continuous drive are used in conjunction with one another.

    The camera can continue to use PDAF even at its top full-res burst speed of an impressive 24 fps. On top of this, its buffer is now deep enough that it can keep firing away for 150 shots, even with Raw.

    PDAF plus 4K

    The RX100 V’s 4K video mode certainly looks good on paper: the camera uses a 5028 x 2828 pixel region to create UHD video, meaning it oversamples by 1.3x in each dimension. And with faster sensor readout, there’s less rolling shutter to worry about.

    The ability to use phase-detection autofocus while recording 4K video is a benefit, since it reduces the risk of the camera missing focus and having to hunt (and ruining your clips in the process). Sadly, without a touchscreen it’s not quite as useful as it could be.

    There’s still plenty to make a video enthusiast happy: a 960 fps slow motion mode (that’s upscaled to 1080/30p) for up to 8 sec, 1080/120p and S-Log profiles are all here.

    Look but don’t touch

    On that note, here’s a look at the RX100 V’s LCD, and multi-tasking DPR staffer Carey Rose. The 3″ 1.3M-dot screen flips up to a selfie-friendly 180-degrees, and also tilts downward by 45 degrees. Like we said, it’s still not a touchscreen, and that’s a shame. 

    Wi-Fi on board

    Wi-Fi and NFC haven’t gone anywhere, but you’ll find a new way to initiate the connection between the camera and your mobile device: QR codes are available for those of us without NFC, or next-to-useless NFC (we’re looking at you, Apple.)

    Battery life

    All the advancements under the hood appear to have taken a toll on battery life: the RX100 V’s battery is CIPA-rated to 220 shots compared to the RX100 IV’s 280 shots. Most users will of course get much better performance than that in real world use (since the testing makes more use of flash and image review than most photographers). And there is good news – the RX100 V we’ve been using for initial shooting has performed way over the CIPA rating. Still, an spare battery wouldn’t be the worst idea with an RX100 V purchase.

    New waterproof housing

    Sony has also unveiled an underwater housing compatible with the entire RX100 series, called the MPK-URX100A for those keeping score at home. It’s rated to a depth of 40m/130ft and includes loads of control points to access settings with the camera locked safely inside. The housing will go on sale in November for $ 350.

    Innovation doesn’t come cheap

    A long feature list commands an equally impressive price tag – the Sony RX100 V will retail for $ 1000 when it goes on sale in October. For the moment that’s the same price as the Mark IV, but it seems highly likely that its price will come down before too long.

    Look for more soon on the RX100 V as we put it to work, including a sample gallery.

    Articles: Digital Photography Review (dpreview.com)

  • Bowens introduces Generation X studio and portable flash heads with TTL radio control

    UK flash manufacturer Bowens will use the PhotoPlus Expo to launch its new range of Generation X flash heads in the USA. The new range has a completely new design and features a portable model that is powered by an in-body rechargeable battery.

    There are four heads in the new range: the XMT 500, XMS 500, XMS 750 and XMS 1000, all of which offer radio controlled triggering and control via new on-camera transceiver XMSR Trigger. The XMS mono-block heads are designed for indoor and in-studio use while the XMT 500 takes a removable lithium ion cell that the company claims delivers up to 500 full power bursts per charge. This portable head also offers TTL control for Canon, Nikon and Sony users.

    All of the new heads have a high speed sync mode that allows shutter speeds as short a 1/8000sec, and the XMSR radio remote allows such high speed shooting with any brand of camera. The XMT 500 has a minimum flash duration of 1/10,309sec, and the XMS heads have shortest durations of 1/5180sec, 1/4800sec and 1/4400sec, which makes them all suitable for freezing action and moving subjects.

    The XMS 500 has 7 stops of adjustable power, while the XMS 750 and XMS 1000 offer 8 stops. The XMT can manage 9 stops and has a lowest output of just 2Ws. The battery-operated head has recycle times of between 0.01 and 2 seconds, and the XMS 1000 can also recover from a full power burst in 2 seconds. Bowens claims each of the heads has a flash-to-flash consistency of +/-30°K and +/-0.05 stops.

    Bowens is particularly proud of a new adjustment lever that allows the heads to be tilted very quickly without the user having to wind open a bolt. The new lever just flips open to allow the angle of the head to be adjusted and then flips back to lock the head in position.

    XMT 500            $ 1,799.99/£1199
    XMS 500            $ 1,099.99/£799
    XMS 750            $ 1,299.99/£899
    XMS 1000          $ 1,499.99/£999
    XMSR Trigger    $ 289.99

    For more information see the Bowens website.

    Press release

    Bowens Launches Game Changing Generation X Flash Range

    Upper Saddle River, N.J. (October 5, 2016) – Manfrotto Distribution, Inc., distributor of Bowens products in the United States, proudly announces the launch of the new Generation X flash range by Bowens. These innovative units will debut in the U.S. at PhotoPlus Expo in New York City later this month and mark a renaissance for the legacy lighting manufacturer.

    Generation X comprises two new flash systems: XMT – an all-in-one battery unit for location lighting and XMS – engineered to be the go-to system for photographers who need a function-rich and completely reliable flash in the studio.

    Announcing the launch, David Hollingsworth, Marketing Manager, said, “Generation X is just the first step in relaunching Bowens to the imaging world. These barrier-breaking new products combine state-of-the-art technology and cutting-edge design and are the result of many months of very intense market research and product development. They will be the vanguard of our plans for ongoing and regular new unit roll-outs in coming months and years.”

    Added Hollingsworth, “We believe these are simply the best lights in their class available on the market today. New-look Bowens is creating beautifully designed and engineered products, tailored to our customers’ needs.”

    John Gass, Technical Director said, “Generation X is the result of highly-focused analysis of our customers’ feedback through the years. These new units are revolutionary products which we believe are absolutely unbeatable in their class in terms of functionality, aesthetics and cost.”

    He added, “For decades, customers have frequently described our products as ‘workhorses’ in the studio and on location. Now the workhorse has been transformed into a stallion; we tested the XMS at full power every five seconds over consecutive days and we couldn’t force this product to overheat.”

    Generation X – at a glance:
    The all-new 500Ws XMT boasts TTL and high speed sync functionality (up to 1/8000s) compatible with Canon, Nikon and Sony cameras: 9-stops of flash power adjustment; flash durations as short as 1/10309s: faster recycle times than ever before (as rapid as 0.01s): easy swap lithium-ion battery provides up to 500 full power flashes per charge: rear curtain sync; sync delay and strobe mode allow creative set-ups on the move.

    The XMS, available in 500,750 and 1000Ws models (all fully controllable via the XMSR 2.4 Ghz radio control and trigger) features multi-voltage operation. These units offer outstanding specification with faster recycling times and flash durations. The XMSR model includes groundbreaking Bowens ‘Sync Offset’ functionality, enabling photographers to embrace any brand of camera to shoot at high sync speeds – up to 1/8000s.

    The following models will be available this fall:
    XMT 500 $ 1,799.99
    XMS 500 $ 1,099.99
    XMS 750 $ 1,299.99
    XMS 1000 $ 1,499.99
    XMSR Trigger $ 289.99

    For additional information or to learn more about Bowens products, visit: https://www.manfrotto.us/bowens.

    Articles: Digital Photography Review (dpreview.com)

  • Tips for Getting Started with Coastal Photography

    Many of us start out treating coastal photography the same as landscape photography. There are a lot of similarities. For both, you head out into the great outdoors, often to remote locations. You need a tripod and a remote shutter release for stabilization. You are capturing an entire scene rather than a discrete item or person. You want a deep depth of field. And so on.

    But there are also differences between the two. In fact, treating coastal photography the same as landscape photography could leave you woefully unprepared when you head out. It could also lead to confusion as to how to set up and expose your photos. This article will help you get started with coastal photography, even if you are already familiar with outdoor shooting generally.

    Mullaghmore-1

    What to bring with you

    There are two items you’ll need to add to your kit before you head out to do coastal photography. Both are filters, and you may have one of them, but they are both critical.

    Neutral density filter

    The first is a neutral density filter. In fact, you will probably want more than one since they come in different strengths. If you are not familiar with these filters, they restrict the amount of light allowed into your camera. Why would you want to do that? So you can slow down your shutter speed and allow the waves or the clouds to move through your frame while you are exposing the picture. That will smooth things out for you.

    We’ll talk more about using them later, but for now just know that you’ll need one. I would start with a 10-stop neutral density filter, which is about as powerful as you will ever need. You can then add lesser strength filters like 6-stop and 3-stop filters later.

    Graduated neutral density filter
    VFH100_FilterGroup

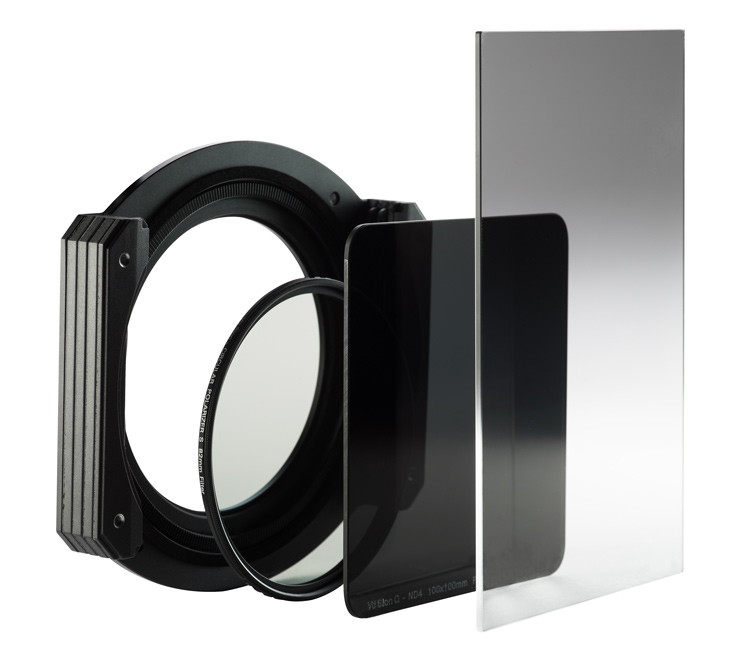
    Drop-in style filter system with a graduated neutral density filter on the right.

    The second item you will need is a graduated neutral density filter (aka grad ND). You may already have this one since it is also useful for landscape photography. However, it is remarkably useful in coastal photography and you will use it all the time. In landscape photography, you may have trees, mountains, or other items sticking up into the sky such that you cannot use the grad ND.

    In coastal photography, however, very often the horizon line is clear and unbroken in your picture. It makes is easy to use the grad ND in a lot more situations. For this reason you will use it all the time. In addition, the sky is often a significant portion of your picture in coastal photography. So making the sky look its best is incredibly important.

    Acadia-6

    Where to go

    Now that you have the right gear, it is time to head out. Before you do, spend some time thinking about where you will go. When you first get started in coastal photography, you will have a tendency to go one of two places: either a scenic overlook or a beach. Both have problems though, so let me explain a bit.

    A great view does not always translate into a great picture. Therefore, just going to a scenic overlook will often not result in great photos. It can, so I’m not saying to avoid them, but just be aware of a few problems you are going to face. The primary problem is that you will have difficulty establishing any sort of foreground. You are up too high, and there is usually nothing to use to bring the viewer into the picture. We’ll talk more about composition in a minute, but for now just understand that you often need to get down near the coast and sometimes even get right behind something to set up an interesting composition.

    On the beach

    When you do manage to get right next to the coast, often that will be on a beach. Beaches are great, but they have their own problems when it comes to composition. After all, a beach is just a bunch of sand, and that’s hardly something that is going to look great in your picture. You need to find something to use as a subject or at least a center of interest. Sometimes that’s a physical object in the sand (boulder, boat, moss, etc.), or it might be a pattern in the sand itself.

    The best places to go are where there are interesting features to use as foreground, and you can get down to the coast. While I just warned about beaches, very often they are the best place. They allow you access to the coast, easy parking, etc. Just don’t stay in the middle of the beach. Look for interesting features, walk to the periphery, or even go beyond the beach.

    Cheeca-Sunrise-5

    When to go

    Next you need to decide when to go take your coastal photos. This one is easy. You want to go before sunrise or at sunset.

    While this tip is easy, it is also absolutely critical. The sky will often take up a healthy chunk of your picture, so you need it to be interesting. Further, if you go in the middle of the day, you will face harsh contrasts that will ruin your picture. Avoid doing that whenever possible.

    This leads to another problem, which is access. Many beaches and scenic coastal areas are closed and blocked off until sunrise or even later. You’ll miss the best light waiting around for them to open. Pay attention to opening hours and access to make sure you can get your shot.

    Green-Rocks

    How to compose your coastal photos

    When it comes to composing your pictures, you always want to think about the foreground, subject or center of interest, and the background. You’ll generally want to set these up in your picture according to the Rule of Thirds.

    Background

    Let’s start with the easy one first, the background. In coastal photography, the background of your picture will usually be the sky. That’s one of the reasons why heading out before dawn or at sunset is so important. The sky just looks better at those times. When it comes to composition, the background will be determined by how the sky looks. Therefore, you hardly need to think about the background of your picture.

    Foreground

    That leaves the foreground and some sort of subject or center of interest to worry about. The subject is very important, but it varies dramatically from person to person and scene to scene. It can be a physical thing like boulders or plants, or it can be a man-made item like a boat or a lighthouse. Your subject can even be an intangible thing like a leading line or a shape. Just make sure there is something tying the picture together. If you don’t, you will be left with a mere snapshot.

    And finally we get to the foreground. This is often the hardest part of the picture to set up, but at the same time it is also the most important. You want to use foreground to create a sense that your viewer can walk into the picture. If you are on the beach, look for interesting sand patterns to use. Otherwise, look for rocks, boulders, or vegetation that can serve this purpose. Of course, the water and waves will often serve as your foreground. How this looks will depend largely on how you expose the picture, we’ll cover that next.

    El-Matador-4-2016-05-10

    How to expose your coastal photography

    In coastal photography, your exposure controls affect more than just how bright or dark your picture looks. Your exposure controls also affect much more than just depth of field (aperture) or digital noise (ISO). How you expose your picture will also control things like the the subject and mood. That is partially true in other forms of photography, but it is especially true in coastal photography.

    This is because your exposure settings will control how the water and waves appear in your picture. Specifically, how fast or slow you set your shutter speed will change the look of the water. If you want to stress the power and harshness of the sea, use a fast shutter speed (faster than 1/250th of a second). That will stop the action of the moving water. To create a sense of movement, use a slower shutter speed (between 1/8 second and 1 second). For a more serene scene, you can blur out the water entirely by using a very slow shutter speed (longer than 10 seconds). This is just a introduction to this concept, but to see the full range of options, check out this article: 7 Tips to Help Improve Your Seascape Photos by Controlling the Waves.

    To go about using these different shutter speeds you can start by making sure you are in Manual mode and moving your aperture and ISO. To use a faster shutter speed, make your aperture a little larger (a smaller f-number) and your ISO a little higher. More often, however, you’ll want to use a slower shutter speed, for which can you should stop down your aperture to a small setting (f/16 – f/22) and use your lowest native ISO (usually ISO 100).

    El-Matador-5

    Using the neutral density filter

    Frequently, however, there will be too much light to use the slow shutter speed you want. That’s where the neutral density filters come in. When you attach one of these filters to the front of your lens, it will restrict the amount of light allowed into your camera. That will allow you to use a slower shutter speed to achieve a proper exposure (without overexposing your picture).

    Let’s make this a little more concrete with some specific numbers. Let’s say you have your shot set up with a correct exposure and you are at 1/50th of a second for your shutter speed, and your aperture is set at f/16 with an ISO of 100. You have a 6-stop neutral density filter in your bag, and you want to use a much slower shutter speed to create some blur in the water. In that case, attach the neutral density filter to your lens and now the amount of light coming into your camera is restricted by 6 stops. If you do nothing else, your picture will be severely underexposed (probably pitch black). This allows you to increase (i.e., slow down) the shutter speed by 6 stops to achieve a proper exposure, and the slow shutter speed desired.

    Okaloosa-2

    Let’s walk through the process of slowing down the shutter speed by 6 stops, which you will do manually.

    • Remember that a stop is a doubling of light, so slowing the shutter speed by the first stop from our starting point of 1/50th of the second will move it to 1/25th of a second.
    • After that, moving it another stop will get you to 1/13th of a second.
    • Next is 1/6th of a second.
    • 4 stops is ? or 0.3 seconds.
    • 5 stops is ? of a second
    • Finally, slowing the shutter speed by 6 stops will result in a shutter speed of 1.3 seconds.

    Take the picture with that shutter speed and your picture should be properly exposed with a nice blur to the water.

    Variations

    This is just one example, and there are a lot of variations you can do on that. For example, you could use a 10 stop neutral density filter instead. That would allow you to set your shutter speed as slow as 20 seconds in our scenario above. That would really blur out the water. You can also adjust the aperture and ISO to bring the shutter speed in exactly where you want it.

    You’ll note in our example above, we could have made our aperture smaller (to f/22 in most lenses) and restricted the amount of light by another stop. Or we could have increased the aperture or the ISO to increase the exposure and use a slightly faster shutter speed. Think of these controls as fine tuning after you have your neutral density filter on your lens.

    Destin-Wave

    Getting started with coastal photography conclusion

    Hopefully you now have a little better sense of where to go, when to go, and how to set up your shots for coastal photography. Armed with this knowledge, just head to the coast when you can and put these tips to work.

    But be careful – the coast can be a harsh and unforgiving environment for both your equipment and for you. That said, I think you’ll find there is no better place to be than on a coast at sunrise or sunset.

    googletag.cmd.push(function() {
    tablet_slots.push( googletag.defineSlot( “/1005424/_dPSv4_tab-all-article-bottom_(300×250)”, [300, 250], “pb-ad-78623” ).addService( googletag.pubads() ) ); } );

    googletag.cmd.push(function() {
    mobile_slots.push( googletag.defineSlot( “/1005424/_dPSv4_mob-all-article-bottom_(300×250)”, [300, 250], “pb-ad-78158” ).addService( googletag.pubads() ) ); } );

    The post Tips for Getting Started with Coastal Photography by Jim Hamel appeared first on Digital Photography School.


    Digital Photography School

  • Hands-on and in-depth with the Sony a6500

    Sony announces Alpha 6500

    Sony has announced the a6500, its top of the line APS-C E-mount mirrorless camera. It may look a lot like the a6300 but it’s a higher spec (and more expensive) sister model.

    It’s based around the same copper-wired 24MP CMOS sensor as the a6300 but it adds several key features: most notably in-body image stabilization and touchscreen control.

    An even faster Alpha

    The a6500 still features the same 425 on-sensor phase detection elements as the a6300 and still shoots at at same 11 frames per second maximum burst rate, but a deeper buffer and additional processor allow it to shoot over 300 JPEG frames in a burst (or 100 frames when shooting Raw + JPEG).

    The buffer and additional processing power also allow faster image review after having shot a burst, the company promises, which should avoid the frustrating ‘camera busy’ warnings that previous Sonys have been prone to give.

    The camera’s shutter mechanism has been updated and has now been tested to (though not necessarily guaranteed to) 200,000 cycles. Maximum shutter speed remains 1/4000th of a second.

    5-axis in-body image stabilization

    The a6500 manages to squeeze a five-axis image stabilization system into a camera that’s just 5mm deeper than the a6300. The system is rated as offering 5 stops of improvement when tested to CIPA standards using a 55mm lens.

    This system recognizes the presence of Sony lenses with OSS stabilization and passes responsibility for correcting pitch and yaw to the lens. Sony does not claim any additional effectiveness for this approach but we’d expect it to help maintain the 5-stop figure when using long lenses, since lens correction is able to correct for a greater degree of movement than sensor shift stabilization can.

    Touchscreen focus

    One of the biggest additions to the a6500 over existing models is touchscreen control. Previously reserved for the company’s more point-and-shoot orientated models, the touchscreen makes it quicker to specify the AF point position (a significant frustration with the a6300).

    The touchscreen is solely used to set the AF point with no option to control settings or navigate the menus.

    This touch-to-focus ability extends to video mode and video focus speed can be adjusted to provide slow, smooth autofocus pulls. However, the camera won’t touch-and-track in video mode: only the older ‘Center Lock-On AF’ system that locks onto the subject at the center of the frame is available.

    Touchpad AF

    Like Panasonic cameras and the recent Canon EOS M5, the a6500’s touchscreen can still be used as a touchpad to specify the autofocus point when shooting through the camera’s electronic viewfinder. The control of the AF point is always relative, rather than absolute, so you swipe to move the AF point from its current position, rather than touching exactly where you want it to be.

    The camera lets you select whether both the touchscreen and touchpad modes are available, letting you disengage the touch sensitivity if you only want to use it with the camera to your eye or only want it active when using the rear LCD.

    There’s also the option to disable either the right or left-hand side of the touchscreen, to avoid accidental nose focus, depending on whether you shoot left or right eyed. The touchpad can again be set to disable when you turn the camera into the portrait orientation.

    Revised menus

    In addition to the touchscreen, Sony has made several other adjustments to the camera’s operation and control.

    The menus have been rearranged to cluster related features together and are now color-coded to make it easier to recognize and remember where a setting lives.

    In addition the camera gains a second custom button on the top plate, taking the total number of customizable function buttons to 10.

    4K Video

    The a6500 offers the same UHD 4K capabilities as the a6300. It can shoot 4K/25p and 24p from the full width of its sensor, meaning 1.56x oversampling in each dimension. This gives very highly detailed footage, compared to taking a ‘native’ crop from the sensor. 30p 4K is taken from a smaller crop.

    Sony has said nothing about changes in thermal management, so it’s likely the camera won’t be able to shoot for the full 29 minutes in warm conditions or similarly long clips back-to-back. However, with the latest firmware, we haven’t encountered overheating as a problem if you’re shooting clips to edit together, so it’s only extended shooting that’s likely to be a problem.

    We’re more concerned about any interaction between the camera’s fairly high levels of rolling shutter and the movement of its 5-axis image stabilization system. Stabilized 4K video could be a hugely valuable capability of the camera but we’ll wait to see the footage before getting too excited.

    Video capabilities

    Like the a6300, the a6500 has a built-in mic socket but no headphone port for audio monitoring.

    It also continues to offer the in-depth ‘Picture Profile’ video response modes including ITU 709 and both S-Log2 and S-Log3 gamma curves. The camera records internally at up to 100Mbps for 4K recording and requires you us a U3-rated UHS-I card. It’s happy to record to either SDXC or SDHC cards.

    Internal recording is 8-bit 4:2:0 while HDMI out is 8-bit 4:2:2.

    In summary

    The a6500 is a very well specced camera: 5-axis stabilization, 11 fps shooting with AF, 4K UHD video capture with S-Log options, a comprehensive AF tracking system, weather-sealed body…

    There are still a few things missing, though. Although the camera includes two command dials (one on the shoulder, one on the rear face of the camera), it has the same drawbacks as the a6300: both need to be controlled with the thumb. Worse still, it’s likely that you’ll have to shift your grip on the camera to reach from one to the other.

    Still, the addition of a touchscreen and an even greater level of customization over the controls should give quick access to most of the features you need to change in-the-moment.

    There’s a price to be paid for these additional capabilities, though. The a6500 will sell for around $ 1400 or €1700 in Europe. As always, bear in mind the European price is likely to include VAT whereas the US price is usually quoted without sales tax. This makes it 40% more expensive than the a6300’s list price and over twice the launch price of the more modest a6000.

    So, while the technologies and capabilities of these three models are very different, the visual similarities risk causing customer confusion.

    Articles: Digital Photography Review (dpreview.com)

  • Hybrid Graffiti: Black-and-White Stencils Bring Colorful Tags to Life

    [ By WebUrbanist in Art & Street Art & Graffiti. ]

    stencil-tags

    Nearly photo-realistic figures stenciled in place make bright surrounding tags all the more vibrant in this series of street art juxtapositions by artist Martin Whatson of Norway.

    graffiti-revealed-mural

    graffiti-mural-context

    The characters, generally rendered in black and white, are sized and scaled like residents and passers by in the built environment. The tags, rich and overlapping, look more like what most people would call “graffiti.” The anti-artist Gray Ghost comes to mind, famous for painting over the works of other artists, like Banksy.

    graffiti-cleanup

    graffiti-in-situ


    On their own, each component is somewhat predictable, but in their interactions these works come to life. The characters look through windows surrounded by color, or sweep up street graffiti, or pull back walls to reveal it. The tags, in turn, add light and life to the scenes, points of color in a drab and dreary city.

    graffiti-dander

    graffiti-cyclist

    graffiti-sailboat

    Much of his work breaks this format as well, but generally still finds itself at the interaction of urban spaces and imaginary worlds. Below, a figure painting clouds on the wall gives depth and dimension on both fronts: the clouds seem to go back and the painter appears to stand out.

    graffiti-clouds

    graffiti-cover

    graffiti-window

    More about the artist and his approach: “Martin has a continuous urge to search for beauty in what is commonly dismissed as ugly, out of style or simply left behind. He looks for inspirations in people, city landscapes, old buildings, graffiti, posters and decaying walls. This interest for decay has helped develop his style, motives and composition and he enjoys creating either unity or conflict between materials, backgrounds, motives and human intervention” (via Colossal).

    Share on Facebook


    [ By WebUrbanist in Art & Street Art & Graffiti. ]

    [ WebUrbanist | Archives | Galleries | Privacy | TOS ]


    WebUrbanist

  • Beginner’s Guide to Doing DSLR Video Clips

    The video function on your camera is probably one that you don’t play with very often. It’s often disregarded – after all, DSLR cameras are not exclusively video cameras are they? But did you know that some big budget films, including The Avengers, have scenes shot on DSLR cameras? In fact, The Avengers used the Canon EOS 5D Mark II and 7D cameras on the set!

    Dave Dugdale

    By Dave Dugdale

    Understanding your camera’s video mode opens a world of opportunities to you. Filming is great for recording a developing scene, rather than trying to record a sequence in a still image. As a wildlife photographer, I use film to record sequences of behaviour with wildlife. For obvious reasons, it’s much easier to convey something that occurs over time with moving images. Whether you work with wildlife or not, I hope the following guide to taking DSLR video helps you to unlock the potential of your camera’s video mode.

    #1 Understand frame rates

    When you’re shooting a video, you’re actually recording images at a very fast frame rate. These are then played back so quickly that the human brain sees one moving image. Depending on where or what you are shooting, the frame rate you go for will vary. It’s worth noting that the frame rate your camera can shoot video at is different to the frame rate at which it can shoot still images.

    Movies are shot almost exclusively at 24 frames per second. Television doesn’t have an internationally accepted frame rate. For example, in Europe and many other countries, videos are shot in PAL format at 25 fps. In North America, and also Japan, videos are shot in NTSC format and at 29.97 fps (often written as 30 fps).

    Steven Worster

    By Steven Worster

    #2 Choose your shutter speed

    Big movie cameras will likely have rotary shutters. They are semicircular and spin around to expose the sensor for each frame. Filmmakers would then adjust the shutter angle to alter the amount of motion blur in a video and how smooth the movement appears to the eye.

    DSLR cameras almost exclusively use curtain shutters. You don’t need to worry too much about the workings of the shutter for this. Just remember that to convey normal motion in your video, and avoid static uncomfortable viewing of your video, you should shoot at 1/ double the frame rate.

    So, if you are shooting at 25 frames per second, then you should choose a shutter speed of 1/50th second. You can balance the exposure using the aperture or ISO. The following video illustrates the differences in motion blur with different shutter speeds.

    #3 Do both wide and close-up shots

    It can be easy to train your camera on an event, set it to record and leave it alone. But how many films or videos have you watched where the camera angle or composition never changes? Very few, if any. One of the best ways to keep the viewer’s attention, and add a professional touch to your videos, is to shoot one scene in a number of different compositions.

    This is why shooting video with a zoom lens is so handy. You can zoom out to record your wide shots, and then zoom in to record close-ups that highlight the details of whatever you are filming. It allows you to jump between clips, keeping the viewer’s attention.

    If you were to just show one clip for 30 seconds solid, it is likely that the viewer would become bored. If you cut between compositions, then their interests are peaked. It also allows you to skip through time, cutting between more interesting parts of a sequence (although you need to be careful that the scene looks the same and flows – that’s known as continuity).

    Take a look at this example:

    #4 Focus manually

    It’s super tempting to use autofocus when you first start filming, especially if you’re recording a moving subject. But autofocus makes the lens search for the focus, and once it starts trying to refocus in your video then it looks very amateur. Instead, pull the focus manually.

    You’ll need to practice this technique, but it’s not as hard as it sounds. Using a smaller aperture helps too. In big film productions, there are entire jobs for focus pullers – this is a guy who manually focuses the lens for the cameraman.

    #5 Take filler shots

    Make sure you record the little details around your subject of the film. It might be water hitting a leaf, or the wind blowing through trees. It could be anything. But filler clips let you pad out your final film with extra details, meaning that you don’t require footage of your target throughout the whole film.

    This is particularly useful in wildlife films, as it helps to transition time and events more easily by breaking up different clips. It works in a similar way to the wide and close-up shots mentioned in tip #3 above.

    #6 Record sound externally

    Big productions never record sound directly from the camera. They’ll have a sound man with a boom pole, holding it over people talking. This removes the interference of you actually working the camera, but it also ensures sound receives the attention it deserves. A film without sound is often a bad film, but a film with only sound can paint a picture easily.

    For wildlife, we record sound at a later date. Very rarely is it recorded at exactly the same time. Instead, it is dubbed onto the footage during editing. Here’s an example:

    Notice how it helps the clips to flow into one another? I am definitely not a sound expert, but it helps to make a conscious effort to improve your sound recordings.

    In Conclusion

    Video is a fantastic medium, I love it. There is a reason we are transfixed by film and television. Quality film production is an art, just like photography, and it is great fun to try your hand at it. So switch over to the video mode of your camera and see what you can put together.

    If you’ve made any DSLR films yourself, please share them in the comments below.

    googletag.cmd.push(function() {
    tablet_slots.push( googletag.defineSlot( “/1005424/_dPSv4_tab-all-article-bottom_(300×250)”, [300, 250], “pb-ad-78623” ).addService( googletag.pubads() ) ); } );

    googletag.cmd.push(function() {
    mobile_slots.push( googletag.defineSlot( “/1005424/_dPSv4_mob-all-article-bottom_(300×250)”, [300, 250], “pb-ad-78158” ).addService( googletag.pubads() ) ); } );

    The post Beginner’s Guide to Doing DSLR Video Clips by Will Nicholls appeared first on Digital Photography School.


    Digital Photography School

  • Throwback Thursday: Canon EOS D30

    In the year 2000 (somehow, living in it never felt as futuristic and cool as saying it), I enrolled as a first-year undergraduate student1 at the University of Durham. For many among the student body, the most exciting thing that happened that year was the use by Warner Brothers of parts of the Cathedral grounds and cloisters for filming ‘Harry Potter and the Philosopher’s Stone’.

    But while my fellow undergraduates occupied themselves with daily games of ‘Where’s Alan Rickman Getting Coffee Today?’2 I was trying to work out how to become a photographer. Back then, the most expensive component of photography was materials. Film, chemicals, paper and of course the associated hardware. An enlarger with a decent lens, tanks, trays and the physical space required to set it up. I didn’t have a darkroom at home, so I made full use of the facilities both at my college and later, when studying abroad in France.

    Over the course of my first year at Durham I took thousands of photographs, experimenting with different styles, different film stocks, and different ways of processing and creating images. Serious digital imaging was still out of reach to all but the wealthiest of enthusiasts at that point, but our student-run website bought a Canon Digital IXUS V in 2001 which I shot with a lot. Although it only offered 2 million pixels, had a crappy battery life and barely any zoom, after a long, smelly day in the darkroom, the IXUS V gave me a refreshing taste of the convenience – and potential – of digital imaging.

    That potential had come a little bit closer to being realized late the previous year, when Canon released the EOS D30.

    The D30 was a groundbreaking camera for a number of reasons. Not only was it Canon’s first properly home-grown DSLR (previous efforts had been collaborations with Kodak, and were priced for the pro market), it was the first DSLR with an APS-C format CMOS sensor, and the first to come in at (just) under $ 3000, body only.

    I read early previews and reviews of the D30 voraciously. The sheer potential of the thing was incredible. Along with many other photography nerds at the time I had a whole new language to learn. Raw files. JPEGs. A few terms, like ‘unsharp mask’ I was familiar with from the darkroom, but others like ‘white balance’ and ‘color space’ were alien.

    It was image quality that really sold the D30. God knows it wasn’t the 3-point autofocus system or the pokey, dark viewfinder. For someone used to shooting with a high-end Canon film SLR, the D30’s core photographic specification must have looked alarmingly primitive (pity the first generation of press photographers who had to use them coming from EOS 1N and EOS 3 bodies) but those files…

    Images from the D30 were amazingly clean and detailed, and up to ISO 1600 there was almost no grain – or, as I was learning to call it – noise.

    It’s easy to forget that for 35mm film photographers, shooting above ISO 400 was considered a bit risky. There were some decent general-purpose 800 ISO color emulsions, but film (color film at any rate) was never really great for low-light handheld shooting. As such, the ability to shoot good, clean, contrasty, colorful and virtually grain-free images above ISO 400 on the D30 was a revelation. The late Michael Reichmann took a lot of flak from purists back then for saying that images from the D30 were essentially better than film, but I thought he was right when he published that article, and I still do.

    $ (document).ready(function() { SampleGalleryV2({“containerId”:”embeddedSampleGallery_2814904911″,”galleryId”:”2814904911″,”isEmbeddedWidget”:true,”standalone”:false,”selectedImageIndex”:0,”startInCommentsView”:false,”isMobile”:false}) });

    When we shot our first Field Test video in 2014, I took my D30 along to record some ‘behind the scenes’ shots of the (then) brand-new Canon EOS 7D II being put through its paces.


    Such was the demand for the D30 when it was finally released that they were pretty scarce. Only once do I remember seeing a non-professional with one. He was a guest in the restaurant I waited in3 during my university holidays and he had it out on the table (of course he did). The restaurant was one of those rural boutique hotel restaurants with Michelin Star aspirations and prices to match, but too many covers (and too much corner-cutting) to ever be awarded one. At the time it used to attract a lot of what the head waiter dismissively termed ‘BDGs’, which stood for ‘builders4 done good’. Lots of money, but lacking in taste. The kind of people who would order a soufflé and then ask for ketchup.5 D30 man was a BDG.

    As a 19 year-old student it pained me to see him flashing around a $ 3000 camera which was fabulously beyond my means, and that he clearly didn’t know how to use. But it delighted me when, towards the end of the meal, he drunkenly spilled red wine all over it.6

    Another three years would pass before I owned my own DSLR, an EOS 10D. It took a whole year of working in that same restaurant to pay for it, and I never looked (or went) back. But it was another six years before I finally got my hands on an EOS D30. In 2009, not long before I joined DPReview I found one on Ebay, boxed and in immaculate condition.7 I didn’t need it, but I wanted it. There’s something very special about encountering things that you once lusted over – it’s like a kind of magic. The attraction never quite wears off. I won the bid (a very reasonable £100, if I remember correctly) and fell in love all over again. I still have my D30. I still shoot with it from time to time. And it’s still great.


    1. English Literature & Philosophy, in case you were curious. Which, sixteen years on, means you can basically ask me anything about Mary Shelley’s Frankenstein. 

    2. Vennels, and the Café on the Green mostly I think.

    3. For the benefit of our American readers, waited in = served in. I wasn’t just lurking in a restaurant.

    4. Also for the benefit of our American readers, builder = construction worker. 

    5. I actually saw that happen once, but I was never able to confirm the story of another BDG returning his gazpacho soup because it was cold.

    6. Schadenfreude, like gazpacho soup, is best served chilled.

    7. Listed by a certain Ray Davies, of Birmingham England. Presumably not that Ray Davies.

    Articles: Digital Photography Review (dpreview.com)

  • Canon 5D Mark IV Reviews

    Canon 5D Mark IV Review - Real World Tests

    I recently put the new Canon 5D Mark IV through some very rigorous tests in the field. I put together a series of 7 videos covering a wide variety of tests that you may find interesting over on my YouTube channel All Things Photo. If you’ve been interested in learning more about what the Canon 5D Mark IV is capable of see the video links below:

    Canon 5D Mark IV Speed Review
    https://www.youtube.com/watch?v=NgRIAdvzPck

    Canon 5D Mark IV Dynamic Range Review
    https://www.youtube.com/watch?v=klAaMKQRWos

    Canon 5D Mark IV ISO Performance
    https://www.youtube.com/watch?v=tRNfKmzeLo0

    Canon 5D Mark IV Dual-Pixel Still Photo Post-Processing Review
    https://www.youtube.com/watch?v=lumzMn77MhU

    Canon 5D Mark IV Dual-Pixel (AF) Autofocus Demo
    https://www.youtube.com/watch?v=A0vAYJLy2RI

    Canon 5D Mark IV Extreme Exposure & Sensor Noise Performance Review
    https://www.youtube.com/watch?v=vjSvrvXXtOU

    Canon 5D Mark IV Day-to-Night Timelapse Examples With Flicker Mode Active
    https://www.youtube.com/watch?v=heLkKd1HFro

    The post Canon 5D Mark IV Reviews appeared first on JMG-Galleries – Landscape, Nature & Travel Photography.


    JMG-Galleries – Landscape, Nature & Travel Photography

  • Google’s Pixel phones: What you need to know

    Everything you need to know about Google’s new Pixel phones

    Google’s 2016 smartphones have dropped the Nexus moniker and, in line with the company’s high-end Chromebooks and tablets, have instead adopted the Pixel brand. Despite being made by HTC the Pixel and Pixel XL are marketed as Google devices and only differ in terms of screen size and resolution as well as battery capacity. A 5″ 1080p AMOLED display and a 2,770mAh battery can be found on the standard Pixel, while the XL comes with a 5.5″ QHD-screen and a 3,450mAh battery. 

    Both devices are powered by Qualcomm’s top-end chipset Snapdragon 821 and 4GB of RAM. The metal body with glass inlays on the back also houses a fingerprint reader, USB Type-C port for quick charging and a 3.5mm headphone-jack. In the US the devices will be available in black, silver and blue, with pricing starting at a fairly steep $ 649 for the standard Pixel with 32GB of built-in storage. 

    The Pixel and Pixel XL have generated a lot of buzz for their imaging capabilities in a short amount of time – click through to see what else you should know about the new Google Pixel phones.

    New camera hardware

    Google says the camera stack used by the Pixel has been redesigned, even though on paper the camera specifications are similar to last year’s Nexus models. A 6-element lens with F2.0 aperture is placed in front of a 1/2.3″ 12.3MP sensor with 1.55µm sized pixels. On-sensor phase detection is on board as well and a laser-beam helps measuring the subject distance in low light for even better AF-accuracy. A dual-tone LED flash should make for pleasant skin tones when shooting with the built-in lamp in very low light.  

    On the video side of things the Pixel phones can record up to 4K video at 30fps. In slow motion mode you can shoot Full-HD footage at 120fps or 720p video at 240fps. Perhaps the most notable new feature is a gyroscope-based electronic video-stabilization system that looked very promising in Google’s demonstration video during the launch presentation. It reads the gyroscope 200 times per second in order to correct for any camera movement and also helps reduce the “jello-effect” that is often noticeable on CMOS-sensors when panning the camera.

    The front camera specification would not have looked out of place on a main camera only a few years ago. A 1/3.2″ 8MP sensor with a 1.4 µm pixel size and F2.4 aperture should allow for decent selfies in most conditions and the front camera is also capable of recording 1080p video. 

    Imaging software

    While the Pixel’s camera hardware is pretty much in line with other high-end smartphones, it’s the imaging software that really sets the Google devices apart. Thanks to more powerful image processing and a zero shutter lag the camera can now use Google’s excellent HDR+ mode, which has been available in the Google Camera app for a while, by default, without any noticeable processing delays for the photographer.

    Instead of taking one longer exposure, HDR+ captures multiple images, aligns them algorithmically and merges them. This results in improved dynamic range, lower noise levels and better detail at all light levels but is especially helpful in low light conditions. Additionally, Smartburst captures several frames just before and after you press the shutter button and then, thanks to Google’s image recognition technology, selects the sharpest and clearest photos with the most pleasant facial expressions to display. Google also says the Pixel is quicker than any other smartphone in getting ready to capture a picture.  

    Best ever DxOMark Mobile score

    It appears the Pixel’s high-end camera hardware and Google’s clever imaging algorithms are working together very well. DxO has already tested the Pixel camera before its launch and with a score of 89 the Google device is the best smartphone ever tested. It takes the top position in the DxOMark rankings ahead of such illustrious competition as the new iPhone 7, the Samsung Galaxy S7 and the HTC 10.

    The DxO testers were impressed by the great detail and low noise levels across all light situations. They also found exposure to be spot on and the autofocus to be very accurate, both in still in video mode. You can read the full report on DxOMark.com.

    Unlimited cloud storage for photos and video

    Like previously the Google Nexus devices, the Pixel phones do not come with a microSD memory expansion slot. This is something many mobile photographers won’t be too happy about but the Pixel is meant to be a cloud device and Google is emphasizing that by offering free unlimited cloud storage for full-resolution images and even 4K video in Google Photos.

    A Smart Storage option will upload images and videos storage to your personal cloud and delete them off your phone automatically when your local storage starts to get full, similar to the Nextbit Robin. So nothing is stopping you now from recording that feature film in 4K resolution – just make sure you’re close to a reasonably fast internet connection. 

    Android Nougat 7.1

    The Google Pixel devices are not the first smartphones to come with Android 7 Nougat – that honor went to the LG V20 – but for its own devices Google has launched version 7.1 which comes with a few modifications, some of which are specific to the Pixels. 

    One of the most notable differences is the new launcher that comes with an opaque shelf and round icons and folders. Other cosmetic differences include blue accents and custom navigation bar icons. In addition to unlimited photo storage Pixel users will also enjoy Google’s 24-hour tech support service. You can call or chat with a trained representative right from the device settings.

    New features that are not exclusive to the Pixel phones are fingerprint gestures, which for example let you swipe down on the sensor to open the notification tray and the Night Light feature, a blue light filter that is activated at night. Seamless Updates downloads and installs updates in the background while you keep working on the device. They are then activated after a restart, similar to what you’re used to from a Windows PC.

    Of course version 7.1 also offers the new features we’ve already seen on the original Nougat, such as ‘Project Doze’ which makes the phone use less battery while it’s not in your hands with the screen on and the ability to reply directly to notifications from the notification tray, without opening the corresponding app first. 

    Google Assistant

    Google Assistant is Google’s Version of Siri or Cortana and a much more intelligent version of Google Now. Assistant uses machine learning to become more useful the more you use it and in the future will come with different “personalities” for different types of tasks.

    The version in the Pixel phones is already able to set and send calendar reminders, search for and book restaurants, find gas stations while you are on the road or play music while you are at home among many other things. It remembers every interaction and is therefore capable of having conversations rather than just receiving commands. Google Assistant uses data from your personal Google account in combination with voice and image recognition technologies, the built-in sensors in the phone and machine learning methods to offer its services.  

    Daydream View VR-headset

    The Pixel and Pixel XL are the first devices ready for Google’s Daydream VR technology that was first demonstrated at the I/O conference in May. Together with the smartphones Google has now also unveiled the Daydream View headset, which at $ 79 is meant to bring VR to the masses. The headset is made with a soft and breathable fabric that allows for extra comfort and makes it easy to use the headset over glasses. As a side-effect it is approximately 30% lighter than similar devices, for example Samsung’s Gear VR. 

    Phone and headset come with an auto-alignment system, so once the Pixel is dropped in the Daydream VR you don’t need to worry about any cables or other connections. Daydream VR comes with the Daydream controller remote control that lets you interact with the virtual world you are moving in. It has a number of sensors to interpret your gestures and movements and offers high levels of precision. When not in use it slides into the headphones, reducing the risk of losing it. 
    Articles: Digital Photography Review (dpreview.com)

  • ExoLens offers Zeiss-branded accessory lenses for iPhone 7, adds ‘Prime’ lens line

    ExoLens has announced that it will sell its Zeiss-branded accessory lenses for iPhone 7, and has also introduced a second product line. Calling its existing lineup of lenses with Zeiss optics the ‘Pro’ line, it emphasizes their high quality construction while adding the ‘Prime’ line for ‘artistic expression and non-technical social sharing.’ ExoLens does not mention support for the iPhone 7 Plus and its dual camera modules.

    Three Pro lenses are offered: the Wide, Telephoto and Macro-Zooms first introduced in January. Each will come with an ExoLens Edge machined aluminum mount, as well as a key ring loop. Launching for iPhone 7, 6/6 Plus and 6s/6s Plus in December, the wide-angle and telephoto kits will also sell for $ 199.99 and $ 249.99, respectively.

    Following the launch of these two kits, ExoLens will release the Pro Macro-Zoom Lens in January for $ 199.99 bundled with the lens mount bracket. This kit will include the Zeiss Vario-Proxar 40-80 T macro-zoom lens for taking photos of items that measure between 3cm and 12cm. 

    The Pro macro lens kit will be joined by Telephoto 2x, Wide-Angle 0.6x, and Super Wide-Angle/Macro combo lenses in the PRIME range, all of which launch in the first quarter of 2017; prices for the Prime kits haven’t been released yet.

    Press release:

    ExoLens® Introduces PRO and PRIME Ranges of Professional Accessory Lenses for the iPhone 7

    The new lines offer photographers a range of exceptional mobile lenses that are made for a wide variety of usage scenarios, from professional landscape and portrait imagery to selfies used by social sharers.

    Itasca, IL – October 5, 2016 – ExoLens®, accessory brand dedicated to elevating the mobile photography category, announces the launch of the ExoLens PRO and PRIME ranges. Each line is designed for a specific consumer, which allows everyone from the novice to the professional to join the mobile photography movement. Leading the collection, is the ExoLens® PRO line for the iPhone 7, which feature Optics by market leading brand, ZEISS, to offer truly professional-grade mobile lenses to photographers, artists and journalists to seriously step up your mobile photography game.

    “We are very excited to launch the high-performance ranges of PRO and PRIME iPhone lenses,” says John Fellowes, Chief Executive Officer of Fellowes Brands, which acquired ExoLens in 2014. “The new product lines signify an expanded brand strategy for ExoLens, which will now reach mobile photographers of all levels.”

    First to market will be the ExoLens PRO Wide-Angle and Telephoto Kits for iPhone 7. These kits will bring the aspherical lens technology previously reserved for high-end DSLR lenses, straight to your iPhone as a compact mobile accessory lens. With more than 170 years of experience engineering professional optics, ZEISS has gained unrivaled trust among professional photographers and cinematographers in the industry. The series of high-performance lenses is a new breed of mobile photography optics that will allow the massive community of iPhone photographers and videographers to tell a deeper story with gold-standard gear. All PRO Kits come with the new machined aluminum ExoLens Edge mount, which features an integrated cold shoe accessory mount (compatible with accessories such as external video light) and key ring loop.

    The ExoLens PRO Wide-Angle Kit with Optics by ZEISS features a ZEISS Mutar™ 0.6x Asph T* Wide-Angle lens, which provides virtually no distortion and exceptional edge-to-edge contrast, resulting in an image quality that is unmatched by any other iPhone accessory lens. This Kit helps professionals capture expansive scenery and immerse viewers with frame filling detail, while expanding the frame of the iPhone to see the world in a beautiful new perspective. The ExoLens PRO Wide-Angle Kit with Optics by ZEISS will be available for iPhone 6/6s, iPhone 6 Plus/6s Plus, and iPhone 7 in December for $ 199.99.

    The ExoLens PRO Telephoto Kit with Optics by ZEISS features a ZEISS Mutar™ 2.0x Asph T* Telephoto lens. The Kit offers photographers a narrow depth of field to add a beautiful bokeh to the background while focusing attention on the subject. The focal length of the telephoto allows the contours of the face to appear more natural and closer to real life, and is ideal for street photography, portraits or capturing events. The Telephoto Kit will be available for iPhone 6/6s, iPhone 6 Plus/6s Plus, and iPhone 7 in December for $ 249.99.

    ExoLens PRO Macro-Zoom Kit with Optics by ZEISS features the ZEISS Vario-Proxar 40-80 T* macro-zoom lens. The ZEISS Vario-Proxar 40-80 T* macro-zoom lens has a variable focal length of 40 to 80 millimeters. “In combination with the optics of the smartphone camera, turning the ring does not result in an increase or reduction of the field of view,” Product Developer Vladan Blahnik from ZEISS explains. “Instead, the ring functions much like a manual focus with which different planes can be set. If photographers want to shoot objects that are three to five centimeters away, they turn the ring to the right as far as it will go, and to the left for objects that are five to eight centimeters away.” This allows users to capture objects measuring three to twelve centimeters filling the complete field of view and capture astonishing details beyond what is visible to the human eye to put you impossibly close to the subject. The PRO Macro-Zoom Kit will be available for iPhone 6/6s, iPhone 6 Plus/6s Plus, and iPhone 7 in January for $ 199.99.

    The ExoLens PRIME product line allows for artistic expression and non-technical social sharing to step up your iPhone photography and videography game. They are intended for the photographer looking to create unique, artistic and candid snapshots. The lenses offered for PRIME Kits are the Wide Angle 0.6X, the Telephoto 2X and the Super Wide-Angle/Macro Combo.. The PRIME product line will be available starting Q1 2017.

    Articles: Digital Photography Review (dpreview.com)