Blog

  • Reading Coaster: NYC Public Library Installs Tiny Book Delivery Trains

    [ By WebUrbanist in Design & Fixtures & Interiors. ]

    book-trains

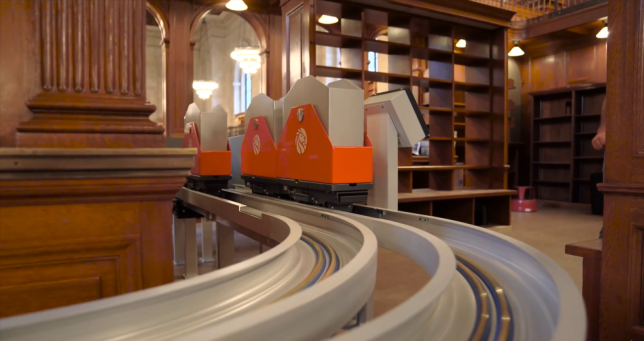
    A crafty conveyor system helps bring up books from a series of research stacks and storage spaces hidden beneath Bryant Park, making the volumes accessible via a system of miniature trains.

    This particular branch of the New York Public Library in the Stephen A. Schwarzman Building houses millions of volumes, many of which are stored below the ground.

    book-train-in-motion

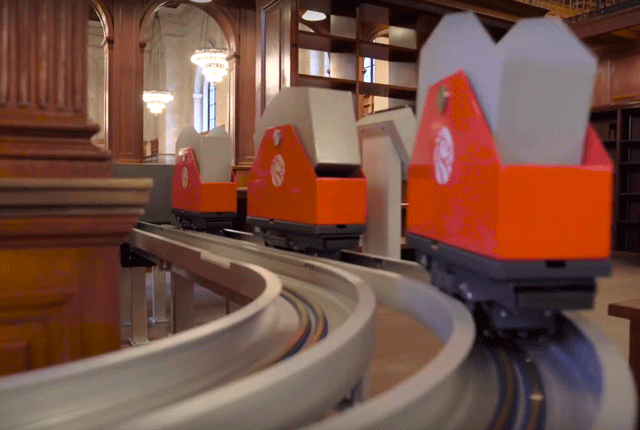
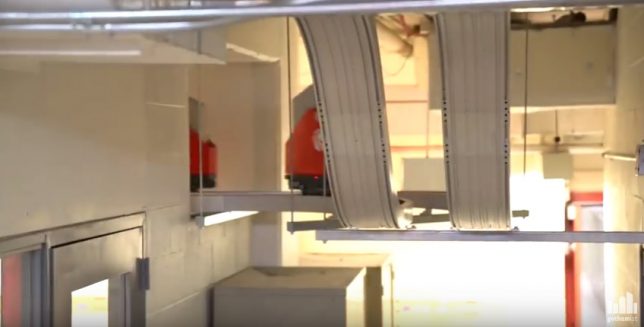
    This book train system looks a bit like a tiny roller coaster and is used to transfer materials seamlessly, quickly and automatically along the vertical-and-horizontal track system, carrying requested books directly to places like the Rose Main Reading Room.

    vertical-book-delivery

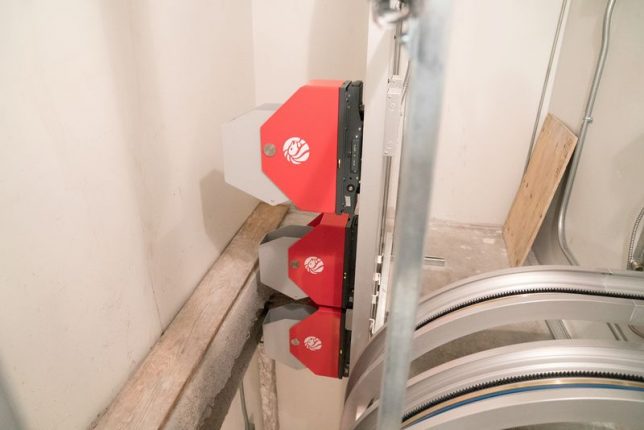
    Each cart (of which there are 24) can hold 30 pounds of reading materials and can climb 11 stories within the building to service various floors.

    reading-room-library-train

    A pivot joint between the book-carrying basket and the main body of the cart allows the former to remain upright without spilling its contents while the latter tilts up to 90 degrees, carrying books straight up between levels.

    Share on Facebook


    [ By WebUrbanist in Design & Fixtures & Interiors. ]

    [ WebUrbanist | Archives | Galleries | Privacy | TOS ]


    WebUrbanist

  • How to Save and Use Stackable Lightroom Presets

    Lightroom presets are basically post-processing shortcuts that can save you tons of time and really speed up your editing workflow. They allow you to save a particular set of edits and apply them later with a single click. Presets can either be a final solution or a great starting point from where you can further tweak and perfect your images.

    Processed Image featured

    Making development presets is incredibly easy and effective working in Adobe Lightroom CC. It even gives you the option to import presets made by others into your own library. Chances are, if you’re a seasoned photographer, you have used presets at some point.

    But are you really getting the most from the huge range of editing control that presets can give you? In this article, you will learn just how versatile your Lightroom preset options can be and how you can essentially stack multiple presets to achieve the exact result you want.

    The Basics

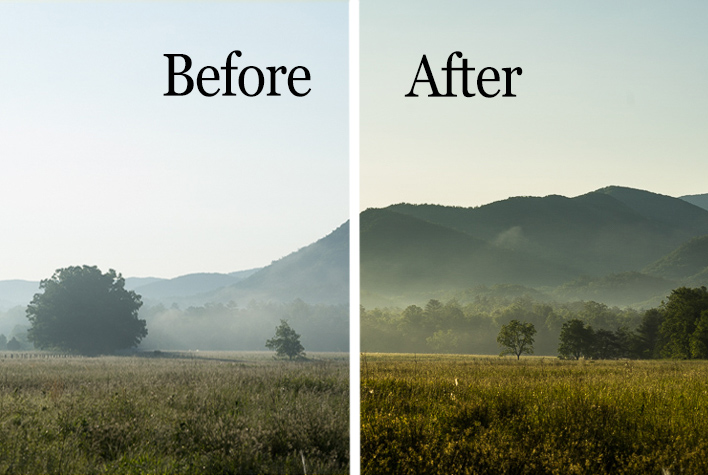
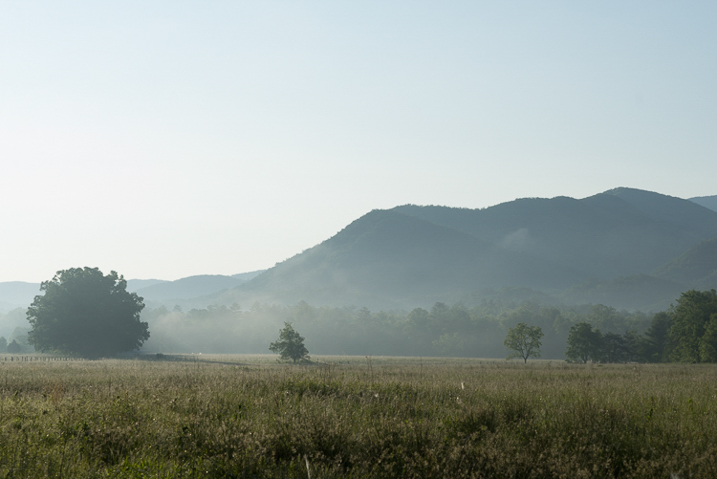
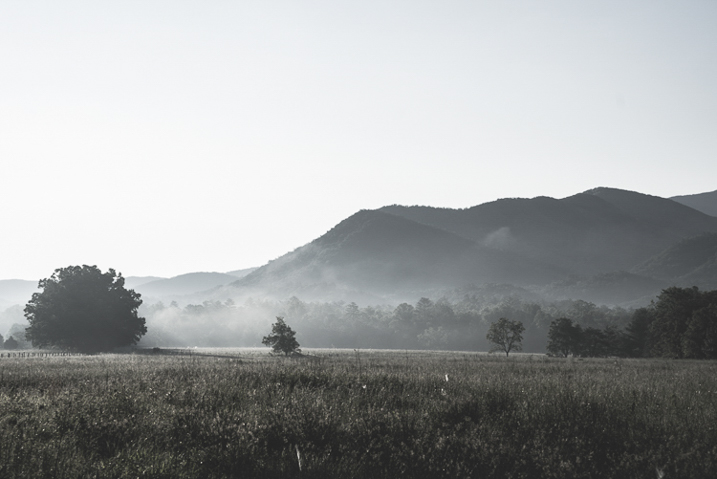
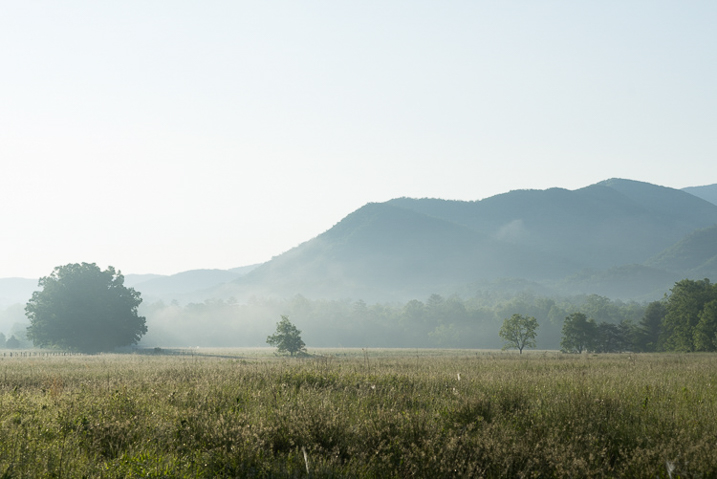
    Just as a refresher, let’s go over the steps for creating and saving presets in Lightroom. Here is a original RAW file of a mountain meadow in the early morning mist.

    RAW Image

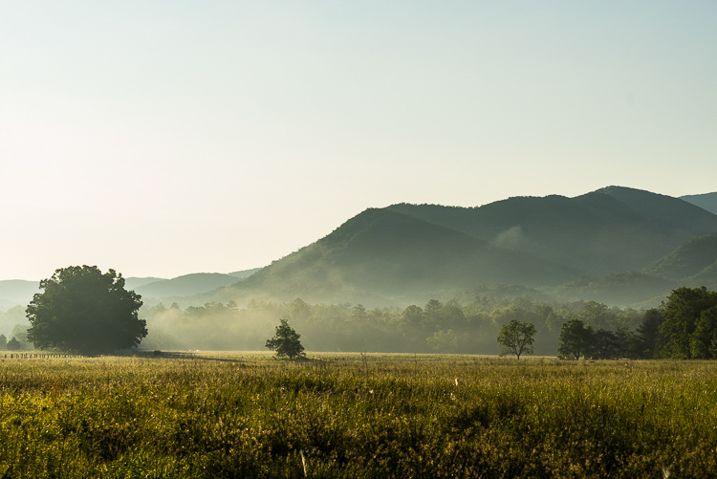
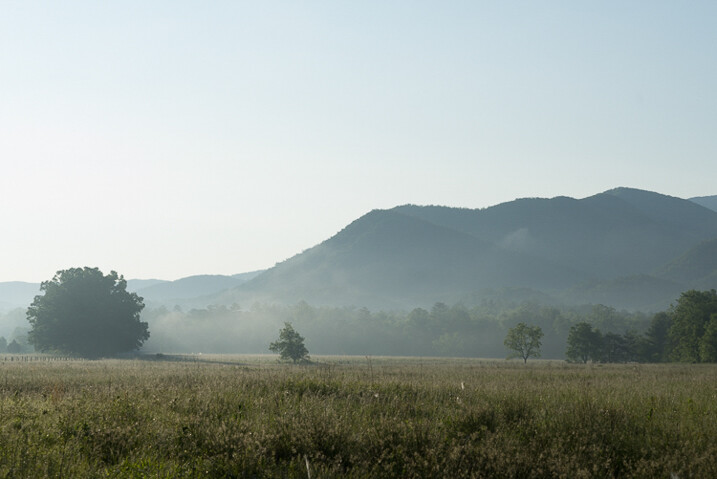
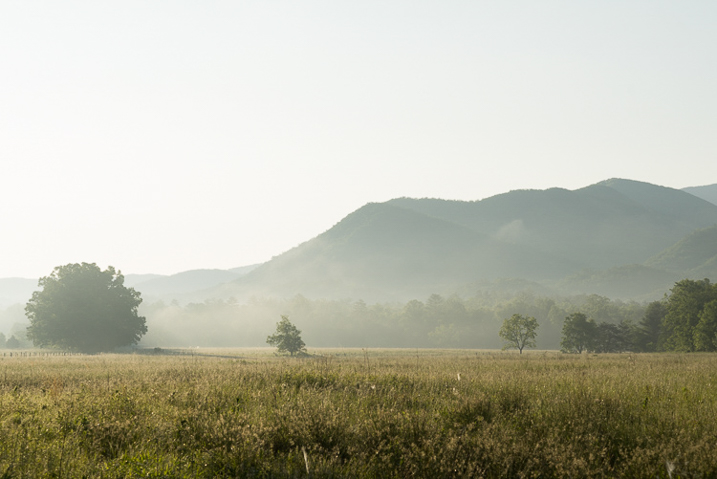
    I applied some basic edits to the RAW file which consist of contrast, clarity, whites and shadows, warming, and then finally sharpening to get the following result:

    Processed Image

    How to save a Preset

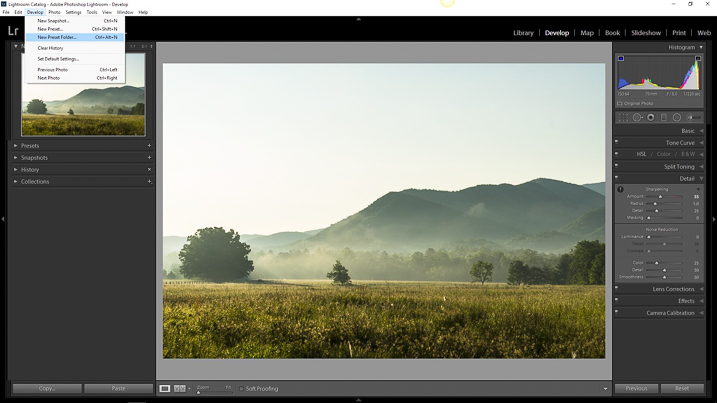
    It’s looking decent. Hmmm, if you feel these edits might work for some similar images later, why not make a preset to save some clicking next time? To do this, you must first create a folder to house your presets. Click the Develop dropdown at top left or use the keyboard shortcut Ctrl+Alt+N (Command+Option+N for Mac).

    Preset Folder

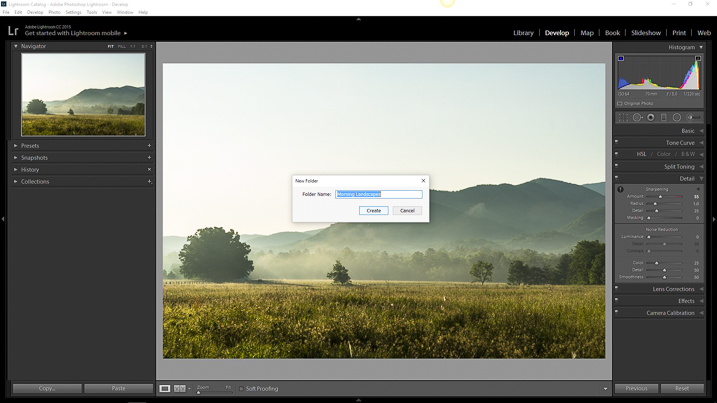
    Then name your freshly minted folder so you can easily locate it later.

    Preset Folder Naming

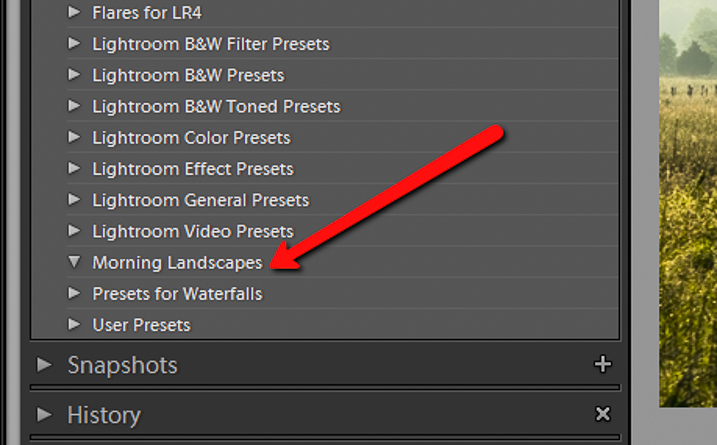
    Now you will see your brand new folder appear under the Presets drop down menu.

    Preset Folder Location

    Since you now have a destination for your preset you can go about actually saving the preset itself. To do this, simply go back to the Develop drop down and select New Preset. You can also use the keyboard shortcut Ctrl+Shift+N (Command+Option+N for Mac) or just click the + symbol next to the Presets menu on the left panel (see below). A fairly large dialog box will appear bring along with it a host of options for saving your preset. First things first, come up with a name for your preset and then select the folder you made earlier as the destination.

    Save preset

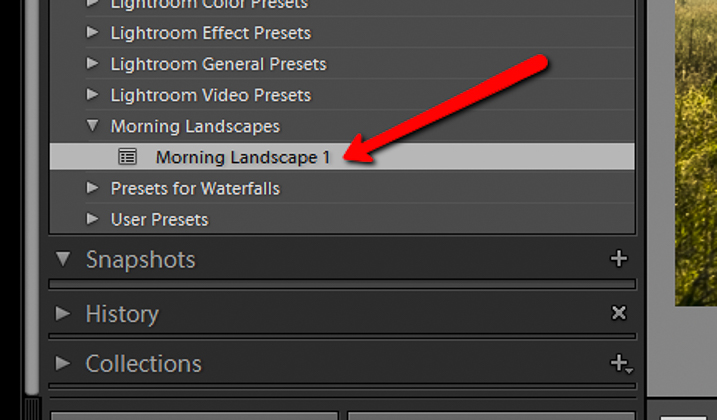
    If you leave the Check All option selected, all the edits you made with any of the sliders and filter tools will be saved. Click on Create at the bottom right of the dialog box and viola! You will see your newly created preset appear in the folder to the left.

    Preset Location

    Preset conflicts

    In most Lightroom preset tutorials that would be all you would do. But this isn’t most tutorials. In order to have full control over your presets you have to go a little deeper and that hinges on just how far you are willing to venture down the post-processing rabbit hole.

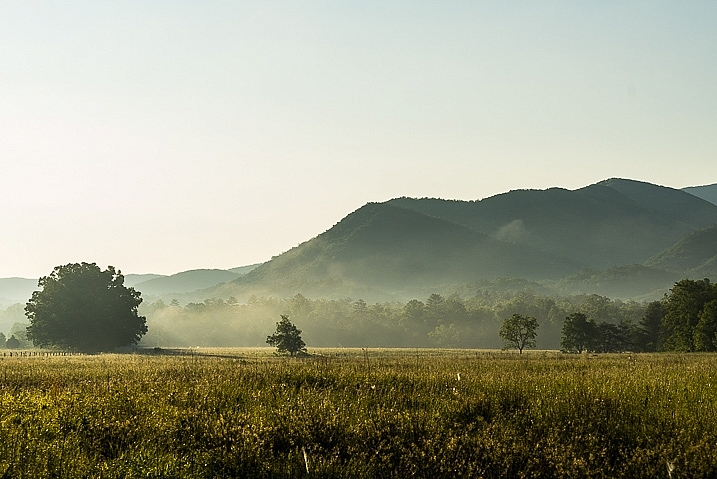
    Here is the final image from which I saved the Morning Landscape 1 preset with the Check All settings applied.

    morning_landscape_preset


    If I attempt to apply another preset, all of the current settings will be changed to whatever values the new preset dictates. Here is the same image after clicking another preset from my preset library.

    Preset Conflict

    The problem that arises when you try to combine multiple presets is that you can’t do it without the processing values conflicting and overriding one another. Or can you? Well, yes and no.

    Remember, that dialog box asking which edits you wanted to save that appeared earlier while you were making the preset? That dialog box is the key to being able to stack multiple editing presets so you can apply different adjustments without them overriding one another. Let me show you how.

    Stacking Lightroom Presets

    It comes down to which edits you choose to save when creating your preset. Instead of selecting to save each and every adjustment, you can select only the ones you want. This way, you can avoid conflicting edits when you apply multiple presets. That means you can have a preset folder for various Clarity edits, a folder for Contrast and Exposure, a folder for Vignettes, or virtually any combination of any adjustment in Lightroom. Here’s how it’s done.

    How to do it

    I’ve created a folder called Clarity and Sharpness. This will be where I keep the Sharpness and Clarity (and even Dehaze) adjustments. I then created a folder for Exposure and Contrast and another for warming and cooling effects aptly titled Warming and Cooling.

    Each one of these folders contains presets related to their respective edits to varying degrees of intensity. When saving for the Clarity and Sharpness folder click the uncheck all box and then select ONLY the Clarity, Sharpness, and Dehaze boxes. This way, any other edits will be left as they are and only these settings will change once you apply your presets.

    Do this with the presets you save for the Exposure and Contrast and Warming and Cooling folders except only check the respective edit boxes to save for each.

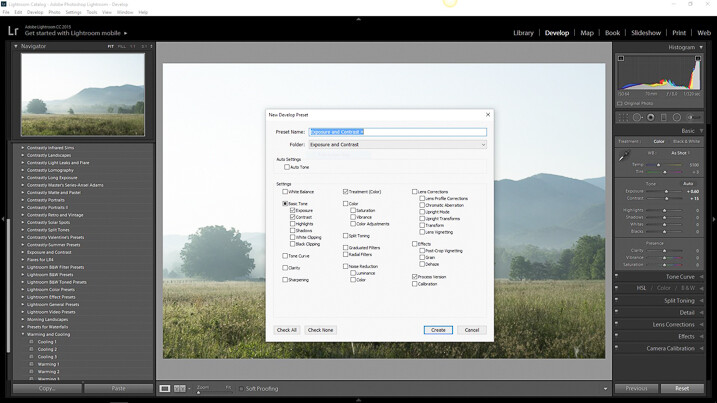
    Exposure and Contrast Selection

    For Exposure and Contrast, select only the relevant boxes as seen here.

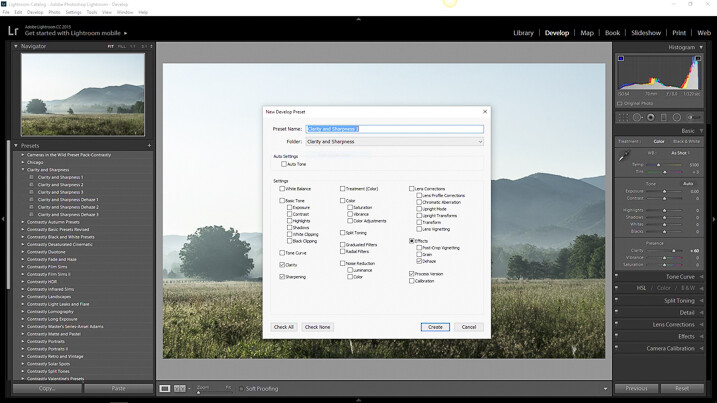
    Calrity and Sharpness Selection

    Do the same for the Clarity and Sharpness folder.

    Saving separate presets which only affect certain aspects of your processing will allow a huge range of preset adjustments to be applied without affecting all the other unrelated edits from another preset. Essentially letting you stack one preset on top of another.

    Applying the new presets

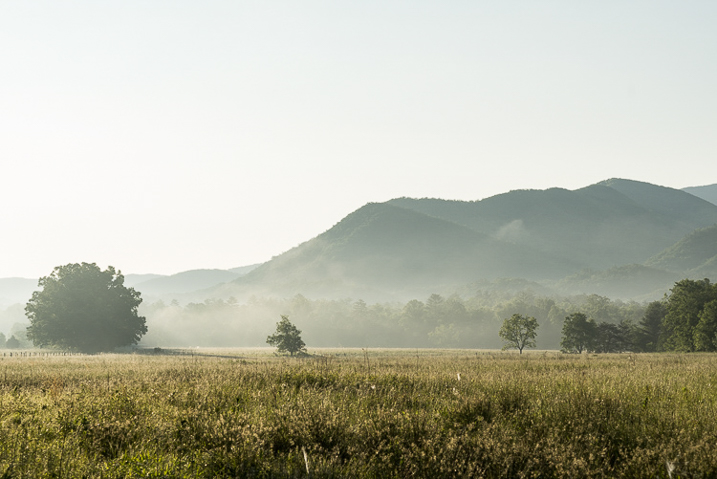
    Let’s look at an example. Here is the RAW image again to which we will now apply our selective presets one by one.

    RAW Image

    RAW image.

    First I will apply the Exposure and Contrast + preset.

    Exposure and Contrast +

    Next, I will add the Warming 2 preset.

    Warming 2

    And lastly, I will Sharpen and Clarify the photo with my Clarity and Sharpness Dehaze ++ preset.

    Clarity and Sharpness Dehaze 2

    Conclusion

    By saving your presets in a way which targets only specific edits, you essentially enable yourself to allow the presets to work together. This way, quickly editing your photos becomes much more controllable and streamlined because you can apply different presets in tandem without disrupting the edits applied by each.

    This advanced knowledge of creating, saving, and applying Lightroom presets can remove a lot of the headache from your post-processing conundrums. It can give you, for lack of a better word, limitless combinations of adjustment possibilities. What might have taken you an hour’s worth of post-processing can now be reduced to only three or four clicks of your mouse.

    While presets might not be a one and done method for editing your photos they can still give you a wonderful starting point to base your more in-depth editing. By being able to apply multiple presets to one image you will have even more of a head start in your processing workflow. Work smarter – not harder.

    How do you use Lightroom presets? Please share in the comments below.

    googletag.cmd.push(function() {
    tablet_slots.push( googletag.defineSlot( “/1005424/_dPSv4_tab-all-article-bottom_(300×250)”, [300, 250], “pb-ad-78623” ).addService( googletag.pubads() ) ); } );

    googletag.cmd.push(function() {
    mobile_slots.push( googletag.defineSlot( “/1005424/_dPSv4_mob-all-article-bottom_(300×250)”, [300, 250], “pb-ad-78158” ).addService( googletag.pubads() ) ); } );

    The post How to Save and Use Stackable Lightroom Presets by Adam Welch appeared first on Digital Photography School.


    Digital Photography School

  • 5 Tried and True Landscape Photography Tips used by the Pros

    Have you ever found yourself wondering how do the professionals (pros) consistently turn out amazing photos day after day, year after year and what are some of their secrets? So besides knowing their camera like their best friend, what are some of the things that the pros do? Here are some tried and true landscape photography tips used by the pros.

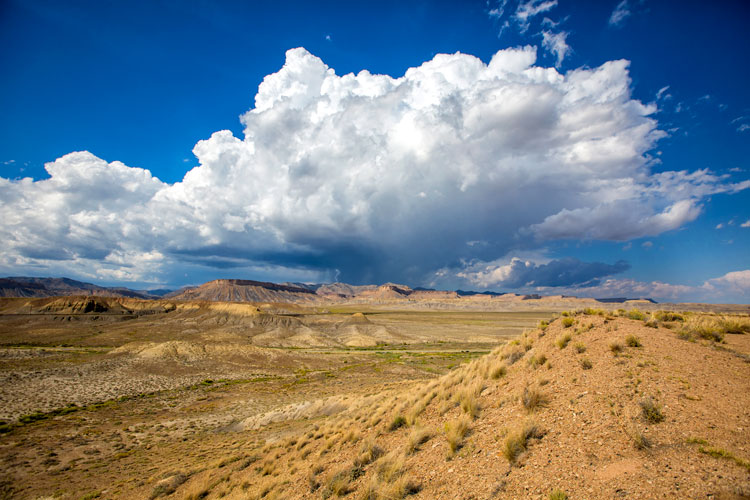
    DesertStorm Landscape Photography Tips used by the Pros

    1. Experimentation

    Experimenting is one of the best ways to shake yourself up out of the doldrums and yes even pros use it to get their creative juices flowing.

    Try photographing something totally outside your comfort zone or even a different subcategory within your preferred genre. If landscape photography is your thing, you are probably already a master of the golden hours (sunrise and sunset). So experimentation can start with shooting a nightscape or even a long exposure in the middle of the day.

    Note: I would highly advise against experimenting at someone’s wedding!

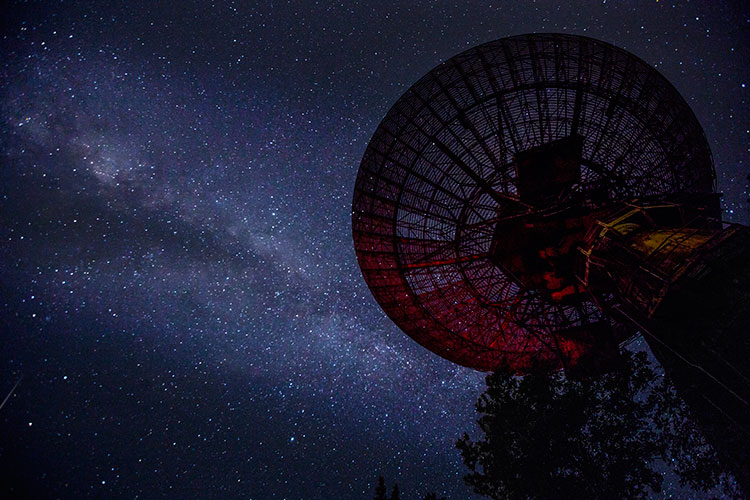
    Night Sky Landscape Photography Tips used by the Pros

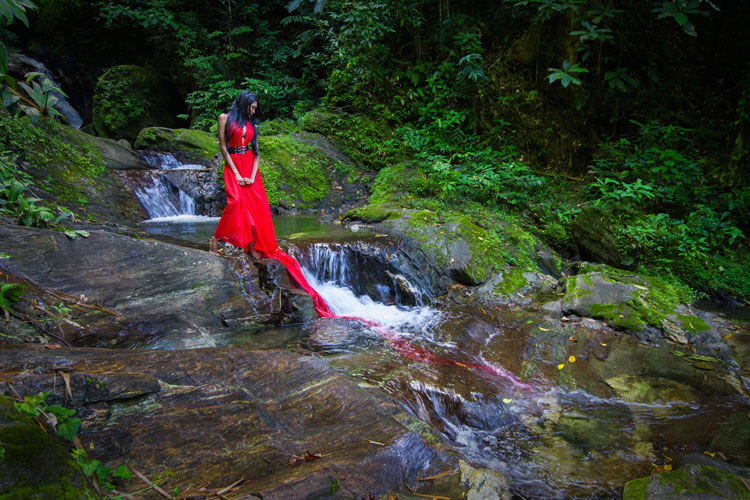
    How about introducing a human element into your landscape and allowing them to be a part of the story? Experimenting keeps you on the learning path and when you learn, you grow as a photographer. It is about challenging yourself to do something different and pushing your boundaries.

    Landscape Model Landscape Photography Tips used by the Pros

    2. Making it your own

    Many places on your photography list have already been captured hundreds of times. That thought can make you throw your hands up in the air and decide you may as well just recreate it. Before you think of recreating, try to showcase it differently. What else can you do? Is there another foreground element you can add or take away? One of the things that make pro’s work stand out from the rest, is their perspective and ability to make a place seem like you are seeing it for the first time.

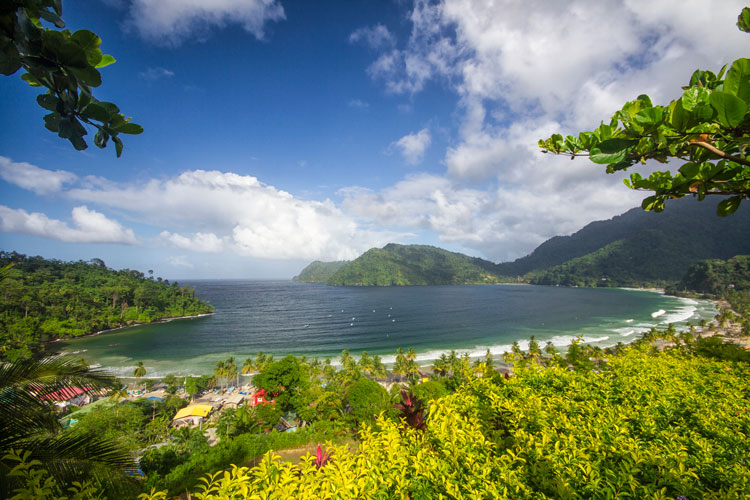
    Maracas Bay, Trinidad - landscape photography tips from the pros

    While it’s not always easy to create something unique and new, your originality is one of the things that will set you apart. Can you get a different angle, add or detract an element when composing, or shoot it differently (e.g. with light trails or multiple exposures)? How about getting off the trail and the popular view areas and charting your own course to find another perspective? There is no problem in finding inspiration in someone else’s work, but at all times keep in mind that you want your work to stand out

    There is no problem in finding inspiration in someone else’s work. But keep in mind that you want your work to stand out, as your own.

    Guardians - landscape photography tips from the pros

    3. Tell a story

    Someone said that “being a good photographer does not necessarily translate into being a good storyteller.” Being able to evoke the emotions of your audience should always be a goal, though. Keep in mind that the purpose of your photo story is to interest, instruct, or amuse your audience.

    Decide how you want the image to affect them and then how to achieve that goal. Is your story going to be in black and white or infrared? Is it going to be realistic or abstract? Pros use different styles of photography to keep producing interesting stories consistently.

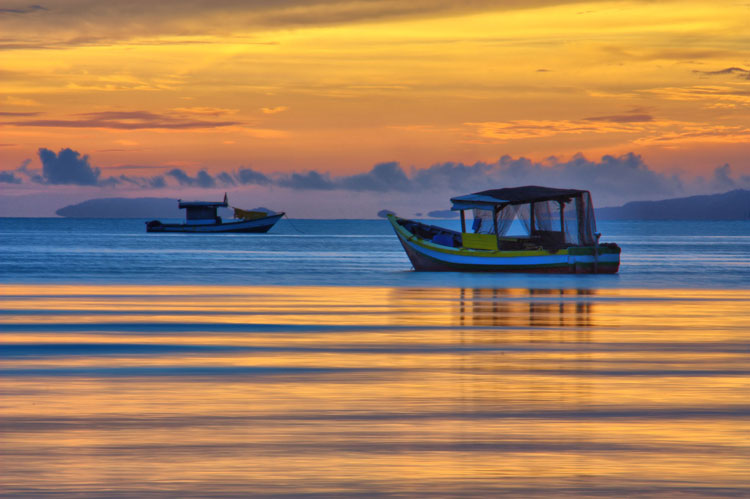
    Boat Friends - landscape photography tips from pros

    4. Less can be more

    In landscape photography, being more selective with the views you present tells a more effective story, so pros understand the power of good composition (a vast topic all on its own). One of the rules of good composition is that your image should contain just enough detail. In landscape photography you do not have the luxury of physically moving things around, so you must arrange the elements of an image by changing your position. This also helps with finding the most flattering view, or one that tells a different story.

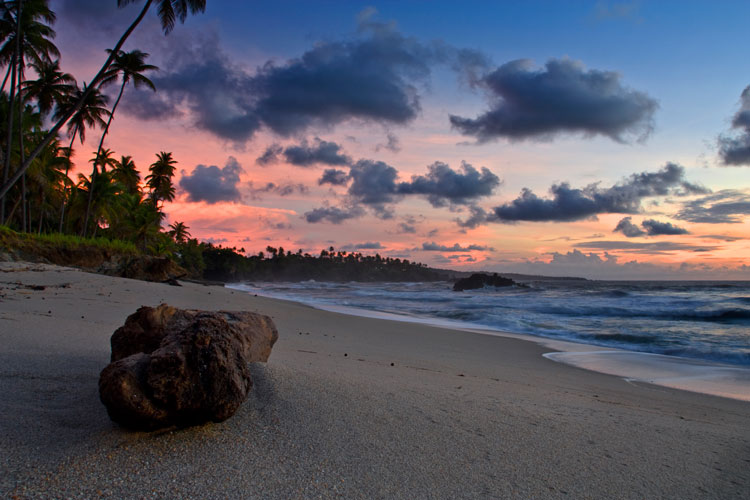
    Ocean Sunrise landscape photography tips from pros

    Choosing the important elements in your photo to highlight helps you decide what to include in the frame and what to leave out. Make your subject dominate by accentuating it with one or few related elements, remembering to declutter as much as you can. As a general rule, if an element in your image doesn’t enhance the subject, it may be detracting from it.

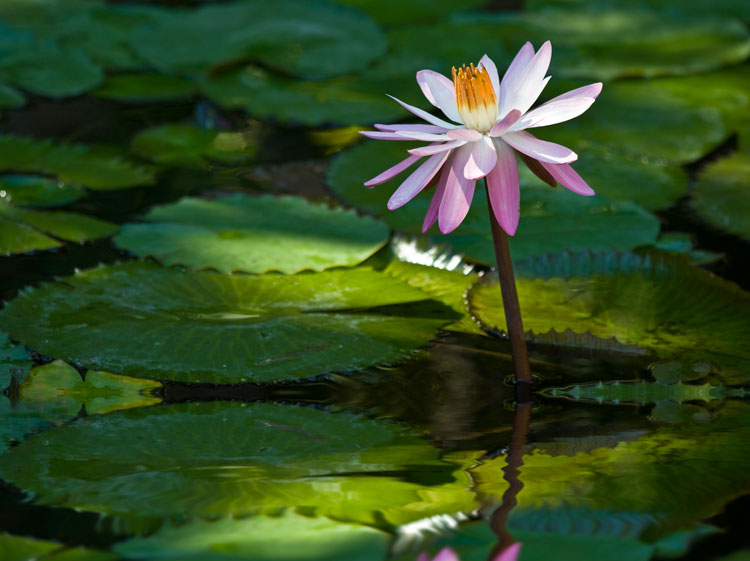
    Lily Pond - landscape photography tips from pros

     5. Know your post-processing

    Ideally, you want to get the shot right in-camera and eliminate or minimize your post-processing. With so many features and settings on DSLRs now, it is possible to produce the image you want. If this does not materialize, then you need the ability to do basic adjustments. These include changes to color and contrast, exposure adjustments, straightening, and cropping.

    Check out these dPS articles for tips on processing:

    • How Cropping in Post-Production Can Improve Composition
    • 4 Key Lightroom Sliders That Will Supercharge Your Photos
    • How to Enhance Urban Night Photographs Using Luminosity Masks in Photoshop
    • 3 Fun Ways to Enhance Your Landscape Images in Photoshop

    Glass Bottomed Boat -  landscape photography tips from pros

    Pros know the importance of post-processing. That is one of the main reasons they shoot in RAW to capture all the uncompressed image data, which leads to higher quality images in the end.

    Post-processing can also add that unique element of you. Decide if the shot you took is what you wanted to achieve or you can choose to adjust elements until you get the image you want to present. Digital photography has made it easier to post-process than the dark rooms of yesteryear but it also makes it easier to  go overboard easily. So determine your vision for the final image and learn to execute it properly so you produce an image that represents you.

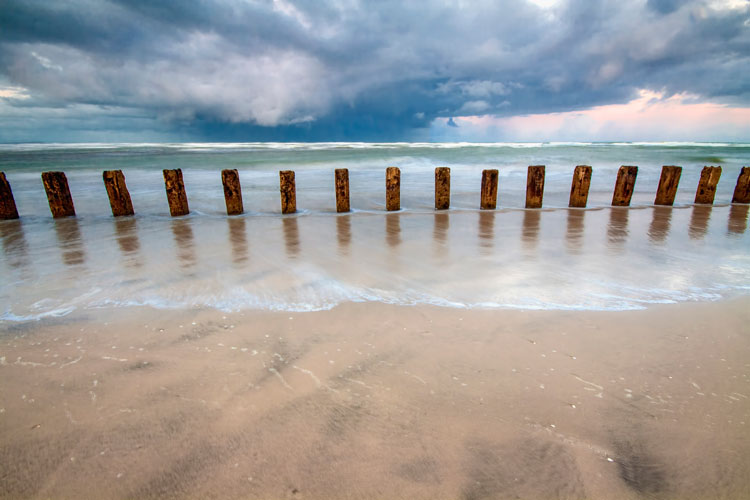
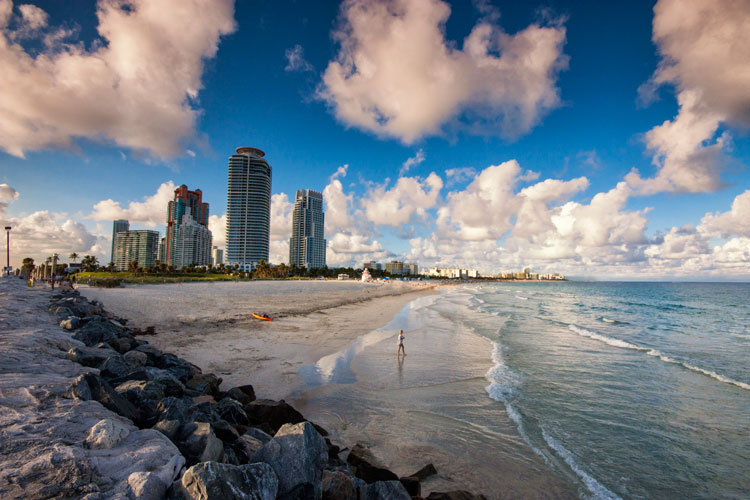
    South Beach -  landscape photography tips from pros

    Conclusion

    These are just a few of the things to keep in the back of your mind when you are creating images. Staying consistent means staying creative or constantly challenging yourself to try something different or learn something new. When you get to your location, think about how you can make the image your own. There is nothing more amazing than producing a piece that someone can identify as yours even before they confirm you did it. Share with us how else you stay consistent when shooting.

    When you get to your location, think about how you can make the image your own. There is nothing more amazing than producing a piece that someone can identify as yours even before they confirm you did it. Share with us how else you stay consistent when shooting and any other landscape photography tips you have learned.

    googletag.cmd.push(function() {
    tablet_slots.push( googletag.defineSlot( “/1005424/_dPSv4_tab-all-article-bottom_(300×250)”, [300, 250], “pb-ad-78623” ).addService( googletag.pubads() ) ); } );

    googletag.cmd.push(function() {
    mobile_slots.push( googletag.defineSlot( “/1005424/_dPSv4_mob-all-article-bottom_(300×250)”, [300, 250], “pb-ad-78158” ).addService( googletag.pubads() ) ); } );

    The post 5 Tried and True Landscape Photography Tips used by the Pros by Nisha Ramroop appeared first on Digital Photography School.


    Digital Photography School

  • Behind the Shot: The Shadow Towers

    In this article I’d like to take you on a nighttime adventure to the remote Torres Del Paine National Park in Chilean Patagonia. This highly photographed park has attracted many photographers, and for good reason: it offers incredible mountainous landscapes and wonderful weather conditions, making for very interesting photography. 

    There are many hiking routes in the park, which range from relatively easy to hard. After visiting Patagonia in 2014 to scout for my ‘Giants of the Andes’ workshop and Fitz Roy Hiking Annex, I regretted not being able to explore more of the hiking trails. I swore to go back and do some more hiking and shooting. I did just that earlier this year, just before guiding my groups. It was a bit of an adventure, and things didn’t always go as I had planned, but I got a few results I’m happy with. This article is about one of them, entitled ‘The Shadow Towers’.

    ‘The Shadow Towers’, Parque Nacional Torres Del Paine, Chile.
    Canon 5Ds R, Samyang 14mm F2.8

    Getting There and Being There

    The Torres Del Paine are the distinctive three granite peaks of the Paine Massif. They are visible from long distances away, but to truly appreciate them, you really need to hike closer. It’s a day hike, taking a few hours to reach the base camp at the bottom of the Torres and another hour or two (depending on your fitness level) from camp to the lagoon from which I took the shot. This last leg is pretty tough with several hundred meters of elevation gain, along a path which is sometimes quite steep.

    My planning went more or less like this: I had rented a car from El Calafate, Argentina, a few days before, and planned to drive all the way to Torres Del Paine and do the hike all in one go, if weather agreed. The moon was going to be full, and it was going to rise directly opposite the Torres, which I had hoped would illuminate the tops of the peaks and make for a very interestingly-lit shot. A couple of days beforehand the forecast indicated clear skies, and it seemed like everything was going as planned.

    Back to El Calafate. I picked up my car early in the morning and made the 6-hour drive to the park. Upon reaching the start of the trail, I packed the necessities – tent, sleeping bag, some food and all my photography gear in a backpack (which weighed in at a not-too-comfortable 15+ Kg) and began hiking. The sun was shining strongly and I was wearing a light shirt and shorts for most of the hike, even though it was already autumn. 

    The hike to base camp wasn’t too hard. It seemed long after all the driving but elevation gain was moderate, at least after the first several km. Beautiful sights were abundant throughout. After about 4 hours I reached camp in the late afternoon and set up my tent. I was a bit tired but I couldn’t get any peace. I decided to climb to the viewpoint that same evening.

    I left the tent – and everything else which wasn’t crucial – in camp, and started the steep hike. It wasn’t easy at all with the heavy weight on my back, but I made the effort and after 1 or 1.5 hours, I was standing on the rocky edge of the glacial lagoon at the Torres viewpoint – Mirador de las Torres. Last light was approaching and I used the remaining visibility to find a sheltered place to put my sleeping bag for the night. I had heard that there was a cave nearby but didn’t have the time to find it, and so I settled for a spot surrounded by rocks, which would shelter me from strong winds. I did a bit of scouting around the lagoon before dark, to find a suitable composition.

    My sheltered bivvy spot. Pardon the cell phone shot.

    Darkness fell and I had to rest a bit from the long day and tough hike. I was waiting for the moon to rise when clouds began rolling in. I was very disappointed, since that meant I wasn’t going to get the kind of light I was hoping for. I kept on waiting and viewing the movement of the clouds and moon. At some point the moon began peeking between the clouds and producing interesting patches of light on the lagoon and the mountains. It was then that I knew I had an opportunity to create a good shot.

    The light was changing very rapidly at this point, and due to the strong moonlight, I could see very contrasty shadow moving over the lagoon, which was exceptionally beautiful and exciting. I took several shots in the changing light. At some point, the moon was strongly illuminating the lagoon and foreground rocks, while the Torres themselves remained in shadow. It was an awesome sight, and I tried to convey what I saw with my camera.

    Another shot I took on the same shoot, with different composition and light conditions.

    After finishing my shoot I went back to the sleeping bag and rested a bit, hoping to shoot some more later with different light. But as it often is with nature photography, things began to deteriorate quickly. More and more clouds came over and I decided to try to get some sleep before trying again. I got perhaps half an hour of bad sleep when it started to rain on me. This was an unexpected turn of events and I was afraid I’d have to sleep in a wet sleeping bag, which was really not how I had planned to pass that night.

    Luckily I had a very good sleeping bag (thank you Feathered Friends!) which was highly water resistant, and apart from some dampness in the zipper area, kept me protected and dry. Still, I have to admit lying there, hiding in the sleeping bag under pouring rain, utterly alone at night, more than an hour’s hike away from any other living soul, wasn’t too much fun. 

    After a few hours or rain, the sun was about to rise. Sadly, the Torres were shrouded in fog by then, rendering them completely invisible. The hikers who were arriving to see the sunrise were disappointed. I packed my gear and hiked back down, all the way to the car. Even the 2-minute drive to the nearby restaurant was agony, but once I got my big, juicy hamburger I was a happy man.

    Settings and Execution

    I took this shot with my Canon 5DsR and Samyang 14mm F2.8 lens. The image is focus stacked from 2 exposures, since I used F2.8 and depth of field was quite small. One image was focused on the foreground rocks, the other on the mountains in the background. Since I used an ultra-wide angle lens, 2 images were enough to cover the depth range.
    I used ISO 800 and a 13 second exposure. Here are the 2 original RAW files.

    Composition

    The main element in the composition is a virtual spiral running from the big rock on the right, through the foreground rocks and all the way to the mountains. Here’s an illustration.

    I decided to leave a relatively large space above the Torres to show some more of the texture and movement on clouds, and to leave some room above the left peak.
    The most important part of the image is the obscure silhouette of the Torres – giving it its mysterious feel, and, of course, its title.

    Post Processing

    As time goes by, I tend to do less and less post processing. This is both an aesthetic decision and an ideological one. The main things I put an emphasis on here are maintaining fidelity to the actual scene as I saw it and making sure the final image still looked like a night shot, while still keeping details in the dark areas.

    The first thing I did was correct the lens aberrations using ACR’s profile correction. I also made a few global adjustments, shown below. No local adjustments were done.

    I then saved the 2 files as TIFFs and went on to Photoshop. I put the images as layers and used Edit > Auto Align Layers to align them. After aligning, I cropped the image a bit.

    As to the focus stacking itself: to get the sharp parts from both images, I used the eraser tool to expose the right section of each of the shots. This was done by eye.

    At this stage I had a focus-stacked, almost complete image, needing but a few last adjustments. Firstly, since the image was still too bright (as visible in the histogram), I used the curves tool to darken the image with more emphasis on the lighter parts. I wanted a darker result, to better convey the night atmosphere and to be more realistic, all that without losing detail in the shadows.

    After taking the contrast down in ACR, I wanted to take it back up a bit in a controllable fashion. To do this I used luminosity selections. I selected a mid-range mask and applied a levels adjustment layer on it. 

    I also added a bit of local contrast using dodge and burn in LAB color mode, to avoid color shifts. I added some saturation, to bring out the natural colors in the lagoon and rocks, performed size reduction and some sharpening and I was done. 


    Erez Marom is a professional nature photographer, photography guide and traveler based in Israel. You can follow Erez’s work on Instagram, Facebook and 500px, and subscribe to his mailing list for updates.

    If you’d like to experience and shoot some of the most fascinating landscapes on earth with Erez as your guide, you’re welcome to take a look at his unique photography workshops around the world:

    Land of Ice – Southern Iceland
    Winter Paradise – Northern Iceland
    Northern Spirits – The Lofoten Islands
    Giants of the Andes and Fitz Roy Hiking Annex – Patagonia
    Tales of Arctic Nights – Greenland 

    Selected articles by Erez Marom:

    • Behind the Shot: Dark Matter
    • Mountain Magic: Shooting in the Lofoten Islands
    • Behind the Shot: Nautilus
    • Behind the Shot: Lost in Space
    • Behind the Shot: Spot the Shark
    • Quick Look: The Art of the Unforeground
    • Whatever it Doesn’t Take
    • Winds of Change: Shooting changing landscapes
    • On the Importance of Naming Images
    • Parallelism in Landscape Photography

    Articles: Digital Photography Review (dpreview.com)
  • Weekly Photography Challenge – Blue

    Color is an important element of composition in photography. Cool colors have a very different feeling then do warm colors. See how the color blue appears in some images here.

    Tim Green

    By Tim Green

    Weekly Photography Challenge – Blue

    This week we challenge you to find and photography some subjects which are blue. Then photograph it in a compelling way. Remember to consider lighting, composition, and center of interest to create a unique image.

    Neil Tackaberry

    By Neil Tackaberry

    Di_Chap

    By Di_Chap

    Alvaro

    By Alvaro

    Darlene Hildebrandt

    By Darlene Hildebrandt

    Share your images below:

    Simply upload your shot into the comment field (look for the little camera icon in the Disqus comments section) and they’ll get embedded for us all to see or if you’d prefer, upload them to your favorite photo-sharing site and leave the link to them. Show me your best images in this week’s challenge. Sometimes it takes a while for an image to appear so be patient and try not to post the same image twice.

    Share in the dPS Facebook Group

    You can also share your images on the dPS Facebook group as the challenge is posted there each week as well.

    googletag.cmd.push(function() {
    tablet_slots.push( googletag.defineSlot( “/1005424/_dPSv4_tab-all-article-bottom_(300×250)”, [300, 250], “pb-ad-78623” ).addService( googletag.pubads() ) ); } );

    googletag.cmd.push(function() {
    mobile_slots.push( googletag.defineSlot( “/1005424/_dPSv4_mob-all-article-bottom_(300×250)”, [300, 250], “pb-ad-78158” ).addService( googletag.pubads() ) ); } );

    The post Weekly Photography Challenge – Blue by Darlene Hildebrandt appeared first on Digital Photography School.


    Digital Photography School

  • iPhone 7 Plus Camera Test

    Don’t have an iPhone 7 Plus? Us either … but, we know someone who does!

    We got our friend Danny to snap a few pics and show us the magic that is a double lensed camera. *swoon*

    Come along and check out that mega zoom, portrait mode and more.
    (…)
    Read the rest of iPhone 7 Plus Camera Test (571 words)


    © laurel for Photojojo, 2016. |
    Permalink |
    No comment |
    Add to
    del.icio.us

    Post tags:


    Photojojo

  • iPhone 7 Plus real-world sample gallery

    With our iPhone 7 Plus review underway, we’ve started off by putting together an initial gallery of real-world samples testing its performance in various light conditions. The 7 Plus is the first Apple device equipped with dual camera modules, so we’ve taken a look at wide and telephoto performance in addition to the camera’s Portrait mode, which simulates shallow depth of field.

    iPhone 7 Plus real-world sample gallery

    Articles: Digital Photography Review (dpreview.com)
  • Adobe Lightroom for iOS updated with iPhone 7 camera profiles

    With iOS 10.1, currently available in beta, the new iPhone 7 and 7 Plus are capable of recording Raw image files. Adobe has now updated its Lightroom app for iOS to take advantage of this new feature. The capability to shoot Raw images with all Apple devices with 12MP camera had already been implemented in version 2.5 of the app, but the latest version  v2.5.2 now also comes with lens and sensor profiles for both new iPhones, including specific optimizations for the dual-camera of the 7 Plus. 

    These should ensure color, noise reduction, lens corrections and other parameters are set at the right levels when opening DNG Raw-files that have been captured with one of the new iPhones. In addition, the new version of Lightroom for iOS supports the DCI-P3 wide color gamut display that is also a new feature of the iPhone 7 series. It offers 25 percent more color than the sRGB color space. The latest version of Adobe Photoshop Lightroom can now be downloaded for free from the Apple App Store.

    Articles: Digital Photography Review (dpreview.com)
  • Adobe and UC Berkeley demonstrate image editing tool powered by machine learning

    Researchers with Adobe and the University of California-Berkeley have detailed a new AI-powered photo manipulation tool that enables sophisticated photo modification using ‘target images’ and/or crude user sketches. The end result is a realistically altered photo that has been machine-modified (or, in the case of blank images, completely machine generated) to match a target image without extensive ‘natural’ user editing.

    According to a newly published study detailing the technology, this tool involves a ‘generative adversarial neural network’ that works to modify images in near-real time. As one example demonstrated in the video below, drawing a general shape over a photo of a bag causes the software to automatically adjust the bag’s size to match the sketched shape without compromising its realistic nature. The software can also generate images based on crude user ‘scribbles’ – no artistic talent required.

    Articles: Digital Photography Review (dpreview.com)
  • Crate Core: Shipping Container Tower Hidden Inside a Carriage House

    [ By SA Rogers in Architecture & Houses & Residential. ]

    shipping-container-house-1

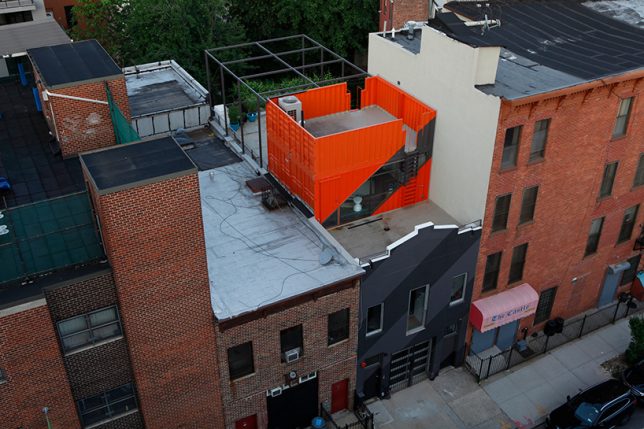
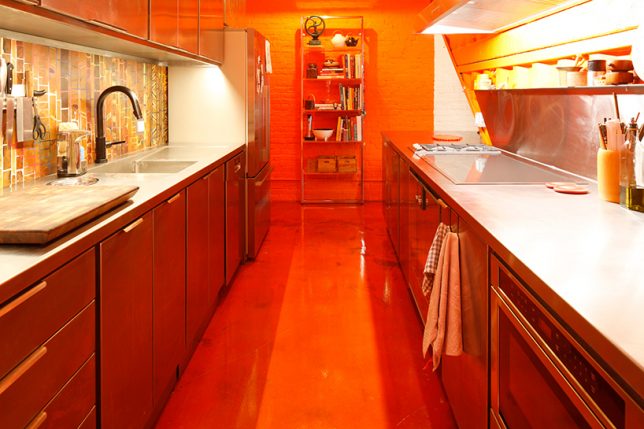
    When glimpsed from above, this stack of vivid orange shipping containers on a Brooklyn rooftop looks like an add-on structure, but it doesn’t end where the original house’s roof begins. It continues straight through the building, all the way to the ground floor, creating a sort of house-within-a-house to subdivide the space in dynamic new ways. The four reclaimed crates that can be seen from higher floors of neighboring buildings are just the penthouse portion, which opens onto a connected rooftop patio.

    shipping-container-house-2

    shipping-container-house-3

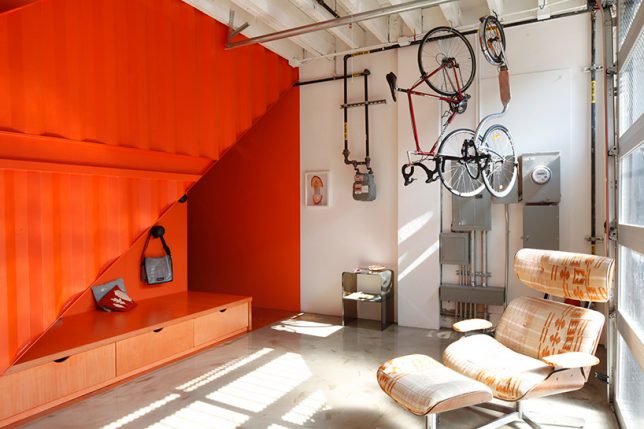
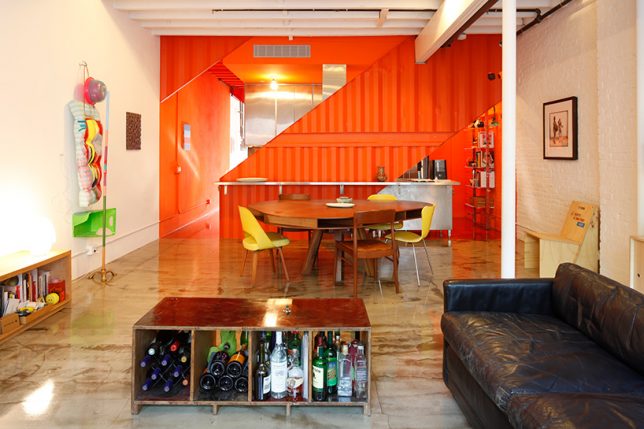
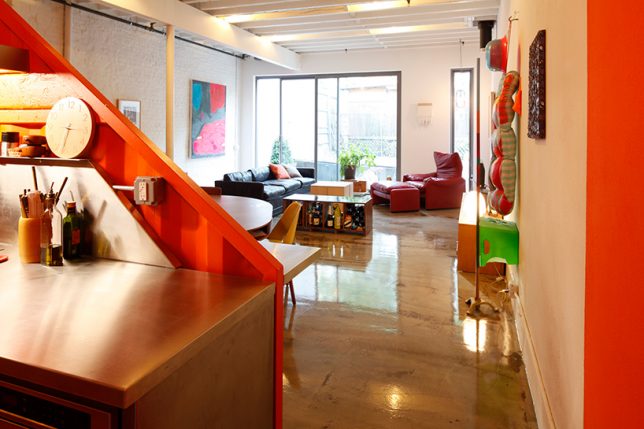
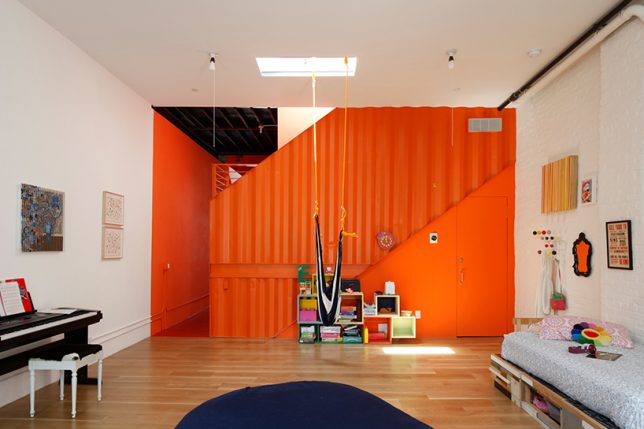
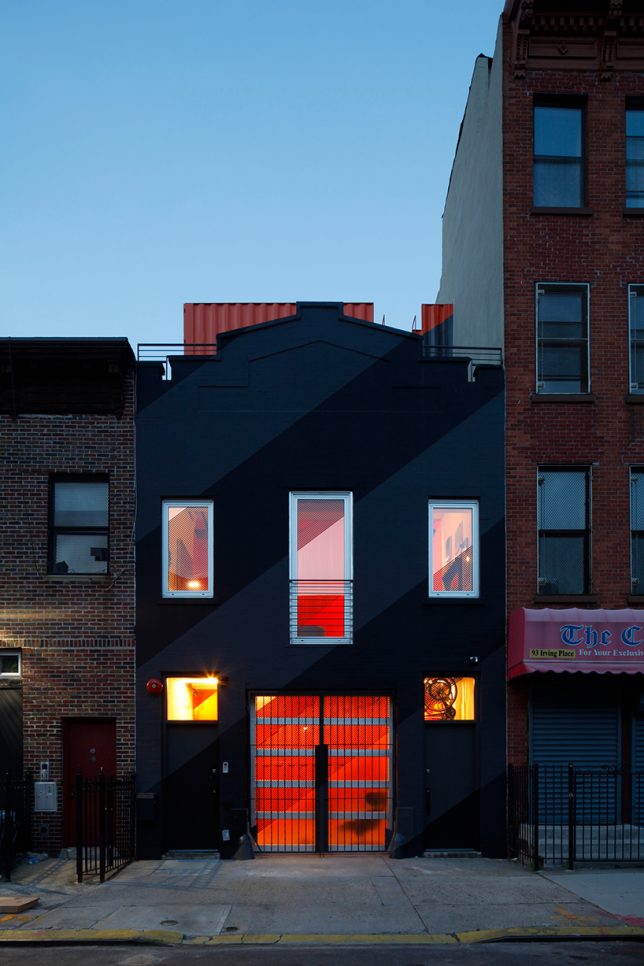
    Designed by LOT-EK, the crate creation reinvigorates the 1930s carriage house, separating the kitchen from the living area on the ground floor and acting as a staircase and room divider on the second level. The containers are cut diagonally to let light pierce through the home from the front to the back.

    shipping-container-house-4

    shipping-container-house-5

    shipping-container-house-7

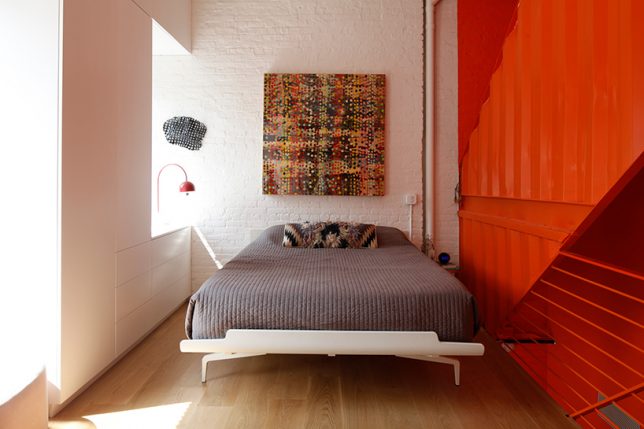
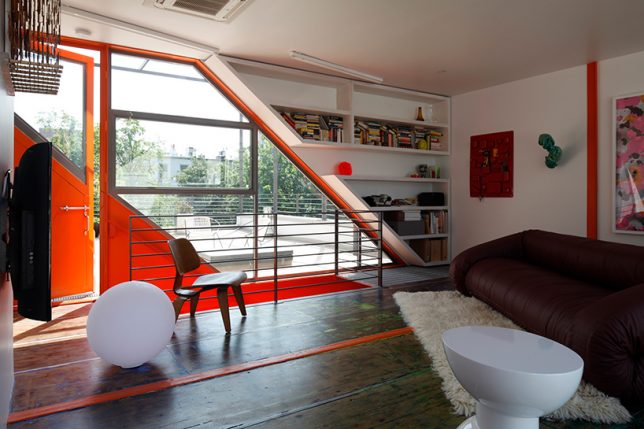
    Placement directly in the center of the building effectively slices the living space into thirds, creating new rooms, like the master bedroom in the back of the intermediate level and the children’s room in the front. On the penthouse level, the same diagonal slices that can be seen below are filled in with glass to frame views of the treetops and other buildings on the block.

    shipping-container-house-8

    shipping-container-house-9

    When standing at street level, you can just barely see the corrugated orange metal sticking up beyond the matte black facade of the home, but the neon color and diagonal lines of the crates are definite attention-grabbers through the glass garage door.

    shipping-container-house-10

    shipping-container-house-11

    Check out 9 more architectural shipping container creations by LOT-EK.

    Share on Facebook


    [ By SA Rogers in Architecture & Houses & Residential. ]

    [ WebUrbanist | Archives | Galleries | Privacy | TOS ]


    WebUrbanist