Blog

  • Lower cost of image sensor business lifts Sony’s annual income estimate

    According to a report by Reuters Japanese electronics manufacturer Sony has lifted its operating income estimate for the financial year ended March 31. Sony says it now expects an income of around ¥285 billion ($ 2.6 billion), which is up from a 240 billion yen estimate in February.

    The main reason for the adjustment of the estimate are lower amortization costs for Sony’s financial services segment but the company also cites lower-than-anticipated costs for its image sensor business. The company doesn’t provide any more detail than that, so we can only speculate what those anticipated costs were. 

    Sony’s semiconductor business has been a market leader for years with a dominating market share of around 40 percent. Sony sensors have been deployed in the cameras and smartphones of a large number of vendors. The company will report its full-year results on April 28.

    Articles: Digital Photography Review (dpreview.com)

  • Samyang Lens Station USB dock spotted in the wild

    Samyang recently showed off a new Lens Station device at the 2017 Seoul International Photo & Imaging Show, according to Photo Rumors.

    The Lens Station is described as a USB docking station for lens customization and firmware upgrades, one said to be similar to Sigma’s own USB dock. Unfortunately, no details about availability or pricing have been released at this time.

    Articles: Digital Photography Review (dpreview.com)

  • Samyang announces VDSLR 16MM T2.6 cine lens

    Lens maker Samyang has launched the new VDSLR 16mm T2.6 cine lens, which is designed for video shooting with uncoupled gear rings with T numbers. This latest launch takes the South Korean manufacturer’s  number of cine lenses up to 19. 13 of those are designed for use with DSLRs, varying from an 8mm fisheye up to a 135mm telephoto, and six for mirrorless system cameras, ranging from 8 to 50mm in focal length.

    The new 16mm T2.6 will be available globally from June at a price of 599 Euros in Europe (USD 640). No information on US pricing has been released yet. 

    Press Release:

    Samyang Introduces VDSLR 16mm T2.6

    April 21st, 2017, Seoul, South Korea – Global optics brand, Samyang Optics (http://www.samyanglensglobal.com) announce a new 16mm T2.6 cine lens, designed specifically for video shooting with uncoupled gear rings with T numbers. This launch adds one more lens to the existing 18 cine lenses for DSLR and mirrorless cameras. 

    Since 2012, Samyang Optics has released its cine lenses based on the needs of professional videographers. Satisfied with the image quality of Samyang lenses, videographers continuously requested for cine lenses and as an answer, Samyang launched cine lens line up. 

    This new launch expands the cine lens line up to a total of 19 lenses: 13 for DSLR cameras varying from 8mm fisheye to 135mm telephoto and 6 for mirrorless cameras varying from 8mm to 50mm. 

    Inheriting the renowned image quality of Samyang’s wide-angle lenses, the 16mm angle of view is commonly used by directors of photography around the globe for its versatile usage for wide-angled emotional scenes in film and videos. Along with the existing 14mm, 20mm and 24mm, this new lens will realise the delicate changes in the scenes. 

    As a ‘Total Imaging Solution’ optics brand, Samyang Optics now offers 51 lenses: 2 premium XP photo lenses, 2 autofocus lenses, 19 manual focus photo lenses, 19 cine lenses and 9 professional cinema lenses specifically under XEEN brand. 

    Launched to complete the Samyang cine lens line up, this new 16mm T2.6 will be available globally from June and will carry a suggested retail price of EUR 599. For more information, visit the Samyang social media channels.

    Articles: Digital Photography Review (dpreview.com)

  • Frederik Buyckx named Sony World Photography Awards 2017 Photographer of the Year

    $ (document).ready(function() { SampleGalleryV2({“containerId”:”embeddedSampleGallery_7331693783″,”galleryId”:”7331693783″,”isEmbeddedWidget”:true,”standalone”:false,”selectedImageIndex”:0,”startInCommentsView”:false,”isMobile”:false}) });

    Belgian photographer Frederik Buyckx has been named the Sony World Photography Awards 2017 Photographer of the Year. Buyckx is a freelance photographer for the Belgian newspaper De Standaard and will receive the $ 25,000 prize for his winning series of images entitle ‘Whiteout’, which was shot in the Balkans, Scandinavia and Central Asia, all remote areas where people often live in isolation and in close contact with nature.

    “There is a peculiar transformation of nature when winter comes, when snow and ice start to dominate the landscape and when humans and animals have to deal with the extreme weather,” Buyckx says. “The series investigates this struggle against disappearance.”

    Chosen from the winners of the Awards’ 10 Professional categories, Chair of Judges Zelda Cheatle said of Buyckx’s images: “I have chosen a series of landscapes so that we may return to the essence of looking at photography. Landscape is often overlooked but it is central to our existence. These are beautiful pictures made by a serious photographer, and they are to be enjoyed.”

    This year the contest received more 227,000 entries from 183 countries, making it the world’s largest photography competition. An exhibition of all winning and shortlisted images and a selection of rare photographs by British photographer Martin Parr, who is this year’s recipient of the Outstanding Contribution to Photography prize, will run at Somerset House in London from now until 7 May. 

    The annual Sony World Photography Awards are free to enter and open to all photographers. The 2018 Sony World Photography Awards open for entries on 1 June 2017. You can find the full list of of this year’s winners below and see a selection of shortlisted and winning images on the World Photography Organisation website. 

    Professional  Category Winners and Finalists

    An expert panel of international judges were challenged to find the best photography series (between 5-10 images) across the ten Professional categories. The winning and finalist photographers are:

    Architecture winner: Dongni, China
    2nd – Julien Chatelin, France / 3rd – Diego Mayon, Italy

    Conceptual winner – Sabine Cattaneo, Switzerland
    2nd – Gao Peng, China / 3rd – Alexander Anufriev, Russian Federation

    Contemporary Issues winner – Tasneem Alsultan, Saudi Arabia
    2nd – Li Sony, China / 3rd – Lorzenzo Maccotta, Italy

    Current Affairs & News winner – Alessio Romenzi, Italy
    2nd – Joe Raedle, United States / 3rd – Ivor Prickett, Ireland

    Daily Life winner: Sandra Hoyn, Germany
    2nd – Christina Simons, Iceland / 3rd – Alice Cannara Malan, Italy

    Landscape winner: Frederik Buyckx, Belgium
    2nd – Kurt Tong, United Kingdom / 3rd – Peter Franck, Landscape

    Natural World winner: Will Burrard-Lucas, United Kingdom
    2nd – Ami Vitale, United States / 3rd – Christian Vizl, Mexico

    Portraiture winner: George Mayer, Russian Federation
    2nd – Romina Ressia, Argentina / 3rd – Ren shi Chen, China

    Still Life winner: Henry Agudelo , Columbia
    2nd – Shinya Masuda, Japan / 3rd – Christoffer Askman, Denmark

    Sport winner: Yuan Peng, China
    2nd – Eduard Korniyenko, Russian Federation / 3rd – Jason O’Brien, Australia

    OPEN PHOTOGRAPHER OF THE YEAR – Alexander Vinogradov, Russia
    YOUTH PHOTOGRAPHER OF THE YEAR – Katelyn Wang, US
    STUDENT PHOTOGRAPHER OF THE YEAR – Michelle Daiana Gentile, Argentina

    Articles: Digital Photography Review (dpreview.com)

  • LaCie reveals 2big 2-bay RAID storage solution with Thunderbolt 3 technology

    Today LaCie announced a new version of its 2big professional 2-bay RAID storage solution that now comes with Thunderbolt 3 technology. The 2big Dock not only offers fast transfer speeds and up to 20TB of storage, making it an interesting storage solution for professional photographers and video-shooters, but also serves as a docking station that helps simplify the workflow.

    At the front, SD and CF Card readers allow for easy file transfer from your camera and a USB 3.0 hub can charge a smartphone or other mobile devices or lets you connect a shuttle drive or digital camera an an additional image transfer options. In addition, the LaCie 2big Dock can be connected to displays with up to 4K resolution via DisplayPort technology.

    Dual Thunderbolt 3 ports can also power a compatible laptop while simultaneously daisy-chaining up to five additional Thunderbolt or one USB-C drive. In addition a USB 3.1 port allows for compatibility with USB-C and USB 3.0 computers via the included adapter cable. The new LaCie 2big Dock will be available in 12TB, 16TB or 20TB capacities this summer and will be showcased at the NAB Show in Las Vegas next week.

    Press Release:

    LaCie 2big Dock Thunderbolt 3 Bridges the Port Gap and Delivers Massive Capacity to Streamline Creative Workflows

    Today LaCie announced the next evolution of its popular 2big professional 2-bay RAID storage solution. Now with Thunderbolt™ 3 technology, the LaCie® 2big Dock delivers fast speeds and massive capacity, making it a powerhouse tool for photographers and videographers. Designed by Neil Poulton, the LaCie 2big Dock is also a sleek yet powerful docking station that provides ports for connecting other devices, a feature that many laptops have sacrificed in recent years. Through a single cable, the LaCie 2big Dock simplifies and centralizes the desktop by directly connecting to a laptop, SD Cards, Compact Flash Cards and other devices. The result is a simplified, more efficient creative workflow.

    Creative professionals juggle massive amounts of data and tight timelines, so capacity and speed are critical. With up to 20TB of storage—a twenty five percent increase over the previous version—the LaCie 2big Dock offers professionals enough space for large video and photo libraries including up to 650 hours of 4K 30fps footage* or 200,000 raw images**. With speeds of up to 440MB/s, users can transfer one hour of 4K footage in one minute***. It also means almost zero lag time when browsing photo libraries in Adobe® Lightroom. Working with compressed 4K or HD footage, videographers can edit quickly and smoothly in Adobe Premiere®Pro.

    More than storage, the LaCie 2big Dock is a powerful docking station that helps photographers and videographers simplify their workflows. Front-facing SD and CF Card slots allow the pro to directly ingest files off memory cards from a drone, DSLR, GoPro® and other devices into Adobe Lightroom or Premiere Pro. The USB 3.0 hub charges a phone or connects a shuttle drive or digital camera to offload footage or files. Via DisplayPort, professionals can connect the LaCie 2big Dock to high-resolution 720-1080p or even 4K displays. Dual Thunderbolt 3 ports can also power a compatible laptop while simultaneously daisy-chaining up to five additional Thunderbolt or one USB-C drive. Plus, the USB 3.1 port enables universal compatibility with USB-C and USB 3.0 computers via the included adapter cable. Thunderbolt 2 compatibility is also possible with an adapter (sold separately).

    Other key features of the new LaCie 2big Dock include:

    • Seagate® IronWolf Pro enterprise-class drives and RAID optimization for superior power management and reliability
    • LaCie RAID Manager that easily monitors system’s health with audible alarm and email alerts
    • Efficient cooling with aluminum enclosure and thermoregulated fan for professional reliability
    • A five-year limited warranty

    The new LaCie 2big Dock will be available in 12TB, 16TB or 20TB capacities through LaCie Resellers this summer. It will be showcased for the first time at the NAB Show in Las Vegas next week. Attendees can stop by the LaCie booth (SL4527) to see the LaCie 2big Dock in action. For more information, visit www.lacie.com.

    * On average, 1 hour of 4K 30fps compressed footage creates 30GB of data.
    ** 20TB can store approximately 200K raw photos.

    Articles: Digital Photography Review (dpreview.com)

  • Trends to watch at NAB 2017

    Trends to watch at NAB 2017

    Next week is the annual National Association of Broadcasters show, or NAB, in Las Vegas, Nevada. NAB is primarily an industry conference, and isn’t generally focused on consumer products, but we go to NAB because it often gives us a window into the future. Tools and technologies created for Hollywood or the broadcast industry have a funny way of tricking down to everyman products over the next few years, and that’s usually a good thing (3D television being a notable exception, in my opinion).

    So, let’s take a look at a few of the product categories we’ll be watching at NAB next week that have the potential to impact us not-named-Spielberg types in the coming years.

    Tools for Emerging Filmmakers

    The filmmaking industry has changed a lot in the past few years: technology has become better, costs have come down, and tools suitable for serious content creation are now accessible to anyone with a dream of producing films and the passion to make it happen. This transformation has ushered in an explosion of what are often referred to as ’emerging filmmakers.’

    These are people who often started making films with DSLRs or mirrorless cameras, but have grown their skills or businesses to the point where they need better, dedicated tools. They include independent filmmakers, small businesses working for commercial clients, or any number of other filmmaking roles. Some things they have in common are that they care about creating high quality content, have high expectations for production value, and they don’t have upwards of $ 20,000 to buy a single cinema lens.

    This category has grown large enough that we’re seeing more companies which have historically catered to the high end cinema market now looking to meet emerging filmmakers’ needs. Whether it’s to drive revenue or create brand loyalists, we’re seeing more tools designed and priced for these users. By way of example, in the past year we’ve seen cinema lenses such as Cookes and Fujinons with sub-$ 5,000 price points. We expect to see even more products aimed at emerging filmmakers at NAB. 

    Virtual Reality (VR)

    Virtual reality is a technology that everyone, from manufacturers to content creators, seems to want to succeed, but which hasn’t quite managed to do so. There’s clearly a lot of unrealized promise, and even Hollywood executives will tell you they’re spending a lot of money trying to figure out how to make it work. Will this be the year VR makes the leap?

    NAB will once again feature a dedicated Virtual and Augmented Reality Pavillion where the VR community can show off its latest technology. And there are clearly a lot of businesses betting big money on it, ranging from consumer-focused companies like Yi Technologies, which plans to announce VR capture devices at the show, to the likes of 360 Designs, whose Flying EYE drone system will livestream 360º 6K content from miles away for a cool $ 75,000. 

    The big question is whether any of the VR products or technologies we see at NAB this year will be enough to get significant traction in the market, or collectively move the needle toward wider adoption of VR by consumers, but the industry isn’t giving up on this one yet.

    8K Technology

    We actually saw 8K display technology for the first time at NAB a couple years ago. And yes, it’s good bleeping amazing. Last year, Canon had an 8K reference display in its booth with a magnifying glass next to it, teasing you to try to see the pixels. After all, with 8K you’re collecting about the same number of pixels as a Nikon D810. In bursts of 24 or 30 frames. Every second. Think of the memory cards you’re going to need… but I digress…

    What does 8K mean for photographers, videographers, and emerging filmmakers? Right now, not a lot. In fact, it’s unlikely we’ll even see 8K TVs being widely marketed to consumers for a number of years. But on the content creation side, there’s a lot to be said for 8K. With 4K quickly moving in the direction of becoming a standard for viewing content, 8K will give content creators the same advantages that 4K acquisition has for creating 1080p content. Right now we’re still talking about very expensive, high end pro cinema and broadcast equipment, but what we see at NAB is often a preview to what we’ll see in less expensive gear a few years down the road.

    And 8K technology may come faster than we expect. We’ve seen 4K gain fairly wide adoption very quickly, and most of the industry seems hell-bent on a collision course between full 8K broadcast and the 2020 Tokyo Olympics (having already demonstrated it at London 2012 and run test broadcasts from Rio 2016). Some of this 8K goodness (or massive data storage overhead, if you’re the glass-half-empty type) may start filtering its way into our cameras in the next few years.

    HDR Video

    HDR video is pretty much what it sounds like: high dynamic range video that lets us see brighter brights, darker darks, and more shades in between. It’s like HDR photos, but with motion, and done well it can look pretty amazing. From a consumer perspective, most talk about HDR video these days relates to TVs, but the market is still sorting itself out. As the old adage goes, ‘The great thing about standards is that we have so many to choose from.’ Between HDR10, Dolby Vision, and Hybrid Log-Gamma, there’s plenty of room for the marketers to fight it out and educate consumers on the jargon.

    But what we’re most interested in is content creation, or HDR video capture. Admittedly, there’s not a lot here for the enthusiast or prosumer at the moment. But… (and you know there’s always a ‘but’) Panasonic has already told us to expect Hybrid Log-Gamma to be included in the mother of all firmware updates – or, as we affectionately know it, MOAFU (really rolls off your tongue, doesn’t it) – that’s coming for the Panasonic GH5 in summer 2017. We look forward to testing it. Once we figure out how to test it.

    Drones

    Love ’em or hate ’em, people are going to use drones for all kinds of things. (At least until Skynet, and we all know how that ends.) Of course, what we care about at DPReview is aerial imaging, whether it’s still photography or video. The drone industry has exploded in the past few years, with tools ranging from octocopters that nonchalantly ferry around RED and Arri cameras to consumer products you can buy off the shelf and use to make your own movies.

    As with other video categories, what started out as technology available only to well-funded production studios has quickly started to filter down to the emerging filmmaker or prosumer level. In fact, less than six months ago DJI introduced the Inspire 2 drone and Zenmuse X5S camera. That combo uses a Micro Four Thirds camera to shoot 5.2K CinemaDNG Raw video with a bit rate of 4.2Gbps. All for the price of a Canon 1D X II. This is Hollywood-level stuff. They even got cinematographer Claudio Miranda, ASC (Life of Pi) to make a film with it, though he had to carry it around in his hands for some shots.

    Why do I bring up a product that was announced a few months ago? First, because it’s an indication of where the technology is going, and competitors will need to find a way to respond. We’ll be watching to see if that happens at NAB. And second, because for the love of God, DJI, can you please put this combination of tech into a regular camera? I don’t care if it’s a Micro Four Thirds camera the size of a Canon 1D X II, I will write you a check tomorrow.

    Such is my plea.

    Live Streaming

    It used to be that we recorded home movies which we then forced our friends and family to watch over Thanksgiving. Later came the internet, so we could just send aunt Mabel a Vimeo link, or start a YouTube channel about cats with millions of followers.

    Today that’s no longer adequate. Things must be on the internet, and they must be on now! Whether it’s Vloggers broadcasting live from a tradeshow floor using their iPhones, or sites like DPReview doing live webcasts from a studio, live streaming has gained a lot of momentum, and viewers are demanding higher quality live streams as time goes on.

    We’ve already seen products to meet this need at a consumer level, whether it’s a DJI Osmo that uses your phone to broadcast on Facebook Live, or the Blackmagic Web Presenter, which allows you to turn virtually any high quality camera into a streaming broadcast camera. We’ll be on the watch for other products and technologies that will fuel our live streaming future. Though we can’t promise to stream them to you live.

    Articles: Digital Photography Review (dpreview.com)

  • How to Overcome Difficult Lighting Scenarios at Weddings

    A wedding photographer has to be prepared for pretty much anything. Big belly laughs, impromptu outbursts of song and bear hugs can happen at any moment. Not to mention that the light is constantly changing and you’ve got yourself a schedule to keep. Let’s just say weddings keep you on your toes.

    That’s why it’s always worth planning ahead and being prepared. Weddings rarely take place in just one location and moving from indoors to outside, or from sunshine to shade can cause a huge change in exposure. When not competing with the sun, indoor lighting poses new problems. Tungsten bulbs mixed with daylight causes all sorts of white balance issues. But this is why we love weddings, they keep us sharp.

    Being prepared and practice is key to achieving consistent results. Here are three top tips on how to make the most of difficult lighting situations.

    Couple portraits – How to find good light on a dull day

    Believe it or not, it is raining at the point of capture in the image below. This photograph was taken in July in Surrey, UK. The British weather was doing all it could to play up to the stereotype it would seem.

    Couple portrait weddings

    Not every wedding takes place on a gorgeous sunny day and it’s not always feasible to shoot at sunset to capture the golden hour of light. What can you do to create images that your clients will love and to which you’re proud to put your name? Especially when the heavens decide to play against you. Here is the process I use when assessing lighting conditions and how this photograph was taken.

    Understanding the principles of lighting is fundamental in any photographer’s quest to a beautifully lit photograph. Fortunately, these principles are consistent regardless of where you are located in the world or how expensive your equipment is. Whether you’re using the latest Canon or a generation old Smartphone, light can be manipulated to your advantage.

    Approaching every scenario with the same set of questions can radically change how you see light and ultimately how you take pictures. Where is the light coming from, where is the even light and where are the greatest differences in the light?

    Place the subjects in shade

    Shade weddings

    Here you can see the scene exposed to what the human eye sees. The background is correctly exposed which throws the foreground into darkness. What we want is to do is correctly expose the foreground to create a clean canvas with an overexposed background. In this scenario, there is about three stops difference in exposure, which is perfect.

    Shade overexposed weddings

    By placing the couple under the branches of the tree they are instantly evenly lit. There are no stray light rays coming through branches or dappled light on faces, and the pebbles on the driveway aid in reflecting light back onto the subjects. By exposing for the skin tones the background will be overexposed, providing a clean canvas.

    A few tweaks in Lightroom to warm the skin and recover some of the highlights and voila! An evenly lit portrait on a rainy day. The added benefit of the tree branches is that they, of course, provide shelter from the wind and rain. This technique of using trees as shelter can also be employed on dry days that are windy. Even if the sun is shining, a venue on a hill can increase the risk of a veil blowing away!

    Confetti

    Why is this difficult? Depending on the location of the venue or church, you may be competing with changing light that the couple will walk through as they process down the confetti line. This is problematic as you are going to be walking backward, trying to capture the action, as well as tracking the changing light.

    It is quite common in the UK for churches to have tree lined pathways, this creates a lighting issue as a break in the trees will cause the couple to walk from light to shade to light, etc. This can mean a dramatic jump in exposure.

    Confetti lighting weddings

    Take pictures of your hand

    This is probably the easiest method to test the exposure of skin tones which can and should be used to test all of the techniques in this article. Take a photograph of your hand, inspect the screen and adjust accordingly. The wedding guests may look at you in an odd way, but when you’re working at a fast pace this can be a life saver.

    Take images of your hand in both the light and the shade and note the difference in exposure before the bride and groom appear. Depending on how you shoot, it makes sense to only change one setting as you will be multi-tasking. The control for shutter speed on Canon cameras is located where the index finger naturally rests, and logically is the easiest of the settings to change.

    Pay attention as the couple moves from light to shade, remembering the readings of your hand. The camera settings are displayed in the viewfinder and alternate between the two as the light changes. Where possible, pre-plan your shots, performing a mental run through of where people are likely to be and what lighting difficulties you may encounter.

    Confetti lighting 2 weddings

    First dance

    Who knows what kind of lighting setup the DJ will have. Will they make a beautiful white spotlight for the first dance, or will they bust out some crazy laser snowflakes? Anything could happen. One method to overcome this is to shoot into the DJ’s lights and use them as compositional features rather than compete with them.

    This isn’t the only option, sometimes shooting with the lights are beneficial as it gives you scope to capture the guest’s reactions. To create this shot, one flashgun at both corners of the stage (pointing at the center of the dance floor), elevated on tripods, and attached to Yongnuo wireless triggers were used.

    First dance weddings

    This setup offers two things. Firstly, by backlighting the subject even exposure on the skin can be achieved with no unwanted shadows. Secondly, you don’t have to worry about what the DJ is doing with their lighting setup.

    It pays to ask the DJ before any dancing commences, what they plan to do and work with them. You would certainly be unlucky should you encounter anyone who wasn’t amiable in having a discussion. However, the point remains that they have a job to do. If they feel the song warrants a change in lighting then they will adapt it for the benefit of the wedding, not for your advantage. This is completely understandable, however, lighting surprises aren’t often welcome. This is why it makes sense to pre-plan and take control of the lighting.

    Lens chimping technique

    A caveat to shooting in this way is that it is possible to end up with equipment or the DJ themselves in the background. For this reason, an interesting tactic to employ is Sam Hurd’s lens chimping technique. By placing a convex lens element in front of your lens it creates cool flares and throws the background out of focus.

    First dance 2 lens chimping technique

    Practice is certainly recommended as an incorrect application of this technique can result in the lens element focussing all lights onto your sensor and completely blowing out the shot. The first dance is often a tricky one to shoot, it would be interesting to hear about your ideas and innovations below. Happy shooting!

    Conclusion

    Hopefully, these quick tips will help you deal with challenging lighting situations at weddings or any other photography opportunities. Do you have any others you want to share? Please do so in the comments below.

    The post How to Overcome Difficult Lighting Scenarios at Weddings by Liam Smith appeared first on Digital Photography School.


    Digital Photography School

  • Ricoh to show-off 4K-capable Theta 360-degree camera at NAB

    Ricoh will be showcasing a prototype Theta 360 camera that can capture 4K clips and live-stream video at the annual NAB show next week. In addition to its video capture and streaming capabilities, the Theta concept will also have four microphones, allowing it to capture ‘spatial surround-sound audio.’

    In an interview at Photokina last year Ricoh told our Richard Butler that putting such features into the current form factor would be difficult due to processing power and heat management, so it will be interesting to see how they pulled it off.

    DPReview will be at NAB and will drop by the Ricoh booth to see if we can take a closer look.

    Press Release

    RICOH TO SHOWCASE THETA 360-DEGREE CAMERA WITH 4K VIDEO AND LIVESTREAMING AT 2017 NAB SHOW

    WEST CALDWELL, NJ, April 20, 2017 — Ricoh today announced it will be showcasing a prototype of its newest Theta 360-degree camera, capable of capturing high-resolution 4K video in a single shot, at the upcoming 2017 NAB Show, April 24-27, in Las Vegas. The camera will be featured at the Ricoh booth, C11139, located in the Central Hall of the Las Vegas Convention Center.

    In addition to capturing 4K video at 30 frames per second, the new camera will enable 4K 360-degree livestreaming, and a built-in 4-channel microphone will record spatial “surround-sound” audio.

    The new camera is expected to be launched later in the year.

    Ricoh offers the industry’s most extensive line of spherical imaging cameras, known for their high image quality, sleek design and ease of use. First introduced in 2013, Theta cameras allow consumers to record fully spherical images that show the entirety of a scene in photos or videos. The camera line’s combination of small size, high quality imagery and incredible functionality are a result of Ricoh’s many decades of experience in advanced imaging and optical technologies. The company has long been a leader in professional printers and copiers, and is known for its high-quality optics and optical components. A key achievement with the Theta series is an ultra-small twin-lens folded-optical system capable of capturing two wide-angle images and then marrying them into a single spherical image.

    Articles: Digital Photography Review (dpreview.com)

  • How to Shoot and Stitch a Panorama Photo

    Sometimes the landscape is just too big. Sometimes, just one image won’t do the trick. Then it’s time to create a panorama!

    How to Create a Panorama photo

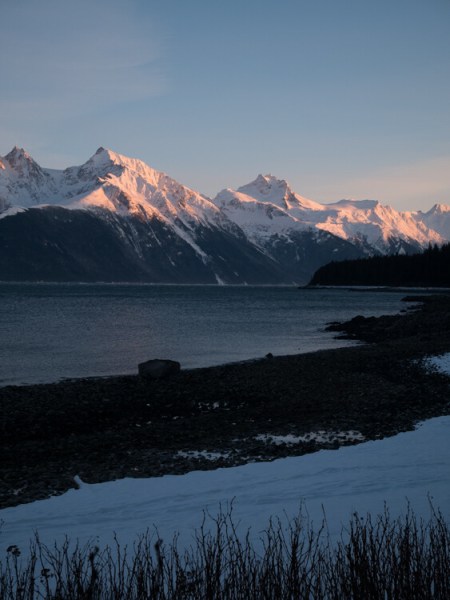
    I’m fortunate to spend a lot of time in the grand landscapes of Alaska. But often, camera in hand, I’ve stood there, unable to create the image I wanted. There was just too much going on, or things were happening in a way that just didn’t match a typical single-image format. I was photographing along a gravel beach near Haines, Alaska this winter, while the alpenglow was lighting up the peaks across the inlet. The glaciers and spires were painted in peach light. Going super wide to capture it all, with my 14mm, made the mountains too small and distant, and left too much empty space. I wanted the details in the

    I was photographing along a gravel beach near Haines, Alaska this winter, while the alpenglow was lighting up the peaks across the inlet (see image above). The glaciers and spires were painted in peach light. Going super wide to capture it all, with my 14mm, made the mountains too small and distant, and left too much empty space. I wanted the details in the mountains while maintaining a sense of the vast landscape. A panorama was the only way to go.

    How to Create a Panorama Photo

    Panoramas are hardly a novelty, Smartphones and many point and shoots can create them in-camera. But stitching together images from a DSLR or other high-resolution camera will yield better results if you do it right. Sadly, panoramas are easy to screw up. Here are a few tips for making an effective panorama from a series of images.

    What lens to use to make a panorama

    Making a panorama isn’t the time to use a wide angle lens. The optical distortion inherent in these lenses tends to mess with the process of stitching them together. Pick a standard lens or a short telephoto; something between 40mm and 100mm will work well, though I’ve occasionally gone as high as 200mm if the situation warrants.

    How to Create a Panorama

    Remove all filters from your lens, especially polarizers. They can cause gradations across an image that are impossible to work with later, so get that thing off your camera.

    Cameras and settings

    I shoot all panorama images in RAW format. This allows me greater flexibility in post-processing to make sure that exposures, white balance, and other settings match from one image to the next. That said if you are careful in-camera, and manually select all your settings from ISO to exposure and white balance, you can get by with JPGs.

    How to Create a Panorama Photo

    Exposure

    Take a few sample shots of your subject. If you are shooting a landscape that varies in tones, meter off the brightest part of your scene and make the image as bright as possible without blowing out the highlights. Take note of those numbers (exposure settings), then using Manual Mode set your aperture and shutter speed accordingly.

    How to Create a Panorama Photo

    Focus

    Turn off autofocus. As you pan across your scene, you don’t want your camera grabbing a new focus point each time. Set the focus so that your subject is sharp, then don’t touch it again until you’ve finished the series.

    How to Create a Panorama Photo

    White Balance

    There are two options for white balance. The first, and easiest, is to set your white balance in camera, using one of the presets. Don’t use auto white balance, because the camera may decide each image varies slightly, and the colors will shift within the final panorama. Pick something appropriate and stick with it. The second option is to set the white balance of your RAW images in post-processing (see below).

    How to Create a Panorama Photo

    Making the images for the panorama

    Composition

    Almost all of my panoramas are created using vertically formatted photos (i.e. the camera is oriented vertically). First, this allows me to stitch together a greater number of photos for the same scene. Second, it allows me to compose with more negative at the top and bottom. This dead space is important to allow for cropping later.

    Here is a series and final image to show you how I took the shots:

    Notice how there is overlap from one image to the next, and they are all shot vertically. So nine images were stitched to make this final panorama image.

    Shooting

    How to Create a Panorama Photo

    A level tripod is very useful, but not absolutely essential. If you are using a tripod, level it. With a level tripod, as you pan, your camera’s angle will not shift up and down. If you are hand-holding be very careful to keep your camera level as you move across your scene shooting your images for the panorama.

    Start a full frame to the side of where you expect your final image to begin. This assures that you have some negative on the sides of the image. Then begin making your series as you pan right or left. Overlap each shot by between a third to one-half of the frame each time. The overlap is what allows the computer to detect which images go where and line them up, so make sure to leave plenty of overlap.

    Move across the scene making as many images as necessary to fully capture the landscape. Take a breath.

    How to Create a Panorama Photo

    Post-processing your panorama

    Continuity

    In the computer (I use Lightroom), go through each your series and confirm that the white balance of each image is identical. If you shot in RAW, assuring white balance continuity is as easy as checking that they each have the same color tone. Check the numbers, if they aren’t all exactly the same, change them so that they match. If you set your white balance in camera, you can skip this step.

    How to Create a Panorama Photo

    Don’t edit the images separately, leave your photos as they are out of the camera (except to make sure the white balance is the same). Any additional post-processing is best done once the panorama has been created.

    Stitching

    There are many programs that can create panoramas. These include specialty programs like PTGui, which is designed to create enormous images involving hundreds of individual photos. However, both Photoshop and Lightroom have merge to panorama capabilities which work great in most situations. As an example, I’ll go through the steps in Lightroom:

    Select your images by clicking the first one in your series, pressing and holding the Shift key, then selecting the final image. All the ones in between will now be selected as well.

    Right-click (PC) or Control-Click (Mac) and select Photomerge > Panorama.

    How to Create a Panorama Photo
    A preview window will pop up offering three options; Spherical, Cylindrical, and Perspective. For most simple panoramas, Cylindrical will work, but feel free to click back and forth between these options to find the best option for your image. Click Merge.

    How to Create a Panorama Photo

    The stitched image will appear in your Lightroom Library, or as a new image in Photoshop. The result will likely have some jagged edges from your base images not quite lining up. Select the crop tool and cut the jagged edges away. (This is why the negative space I noted earlier is so important.) Note: you can also check off “Auto Crop” in the panorama popup box and it will be done automatically for you. 

    Once you’ve got your image cropped you can post-process as you would any other photo in your collection.

    How to Create a Panorama Photo

    Conclusion

    Panoramic photos, while definitely not the best option in all scenarios are a great tool to keep in mind for those moments when a landscape is just too big, too dramatic, or too epic to be captured in a single photo. When I first started shooting panoramas many years ago, I regularly overlooked simple things like remembering to remove my polarizer, or failing to assure the same white balance from image to image. Screw up a setting or forget a filter and the final image just won’t work, and there is nothing you can do about it. Pay attention to those annoying little details and you won’t miss your chance to create some epic panorama images.

    Do you shoot panoramas? If so, show them off below, or share some of your own tips for success.

    The post How to Shoot and Stitch a Panorama Photo by David Shaw appeared first on Digital Photography School.


    Digital Photography School

  • Apple is releasing its Live Photos API, which means more moving photos in more places

    Apple has revealed the API for its Live Photos feature, meaning more app and web developers will be able to support the company’s short 1.5 second video ‘moving photo’ video clips. Apps like Facebook are already able to display Live Photos for users running iOS 9, but making the API available will allow any developer who wants to put a Live Photos viewer on their website or in their iOS app to do so.

    Live Photos debuted in 2015 with the iPhone 6S. Owners of recent iPhones including the 7 and 7 Plus can capture the moving images in the stock camera app, and anyone running iOS 9 or later can play the video clip by pressing and holding the image.

    Articles: Digital Photography Review (dpreview.com)