Blog

  • ISO Invariance: The End of the Exposure Triangle?

    Since the beginning of photography, there have been three basic elements that need to be taken into consideration when making an image; the size of the aperture on your lens, the speed of the shutter, and how sensitive your film (or, in modern times, the digital image sensor) is to light. Indeed almost all of photography boils down to an understanding of how those three variables affect the overall exposure of your image. Like death, taxes, and the morning sunrise – they are immutable and must be considered no matter the type of camera you have or the subject you are shooting.

    Some photographers prefer to shoot in manual and control each of these elements individually, while others prefer the full Auto route. Still others find themselves somewhere in between by letting the camera make some decisions while they control one or two of the parameters themselves.

    But at the end of the day the aperture, shutter, and ISO always work together to help you get the photos you want. Until now. Sort of…

    ISO Invariance: The End of the Exposure Triangle?

    This squirrel was astonished that I could take an underexposed picture of him at ISO 100 and turn it into a completely usable photograph in Lightroom.

    Two constants – aperture and shutter speed

    Two of the three elements of the Exposure Triangle are, and will always be, limited by physics. Changing the size of the aperture on your camera lens determines not only how much light will be let in, but other parameters as well such as the depth of field. Using a fast shutter speed will always be necessary to freeze motion, particularly with fast-moving subjects. Conversely, a slow shutter speed is an unchangeable requirement for capturing light trails and other types of  long exposure photography.

    ISO is different

    But ISO is not nearly the limiting factor it once was and on some newer cameras is almost irrelevant. Almost!

    There are many analogies to help you understand ISO, but one of my favorites is that of a microphone. If you have the gain turned down low you will need to speak very loudly for your voice to be heard. But this gives you the benefit of cutting out low hums and other noises that might otherwise be picked up, such as a desk fan or overhead ventilation unit. Turn the gain up high and you won’t have to speak as loudly, but along with your voice, a myriad of other background sounds will be picked up as well. Once those other sounds are recorded, it’s almost impossible to get rid of them!

    In similar fashion, shooting with a low ISO of 100 or 200 means your camera sensor is not very sensitive to light. So you will need a lot of incoming light in order to take an image. This is accomplished through either a large aperture, slower shutter speed, or combination of the two. The benefit is that ISO 100 results in a picture that is free of digital noise that often looks like colored static – the kind you might see on an old tube-style television set.

    ISO Invariance: The End of the Exposure Triangle?

    Nikon D7100, 50mm, f/1.8, 1/90 second, ISO 100 (pushed 3 stops in Lightroom)

    Raise the ISO

    If you don’t have much incoming light, there has always been a simple solution – raise the ISO. (In the days of film the solution was similar but not as easy. It required the photographer to physically remove the film in the camera and put in another roll of 400 or 800 ASA film that was more sensitive to light.) Like I mentioned earlier, though, photography is all about tradeoffs. Shooting at a high ISO of 3200 or 6400 can help you get the shot you want, but will often result in a picture that is far more noisy and grainy than you might prefer.

    What’s a photographer to do?

    ISO Invariance: The End of the Exposure Triangle?

    Nikon D750, 35mm, f/4, 1/1000 second, ISO 100. No need to adjust exposure in post-processing.

    Thanks to incredible advances in modern sensor technology, shooting at ISO 3200 or 6400 on a new camera like a Canon 5D Mark IV or a Nikon D7200 results in images that are far more usable than their counterparts from five or 10 years ago. But there’s another solution that’s gaining prominence as well.

    Some camera sensors today are so good they are essentially what’s known as ISO Invariant, which is a fancy way of saying the ISO doesn’t really matter. Not in a practical sense, anyway. Shooting with a camera that is ISO Invariant means that you will get roughly the same results if you shoot at a low ISO of 100 or 200, and then change the exposure in post-production, as you would from shooting a higher ISO (like 1600) in the first place.

    Explaining ISO Invariance

    Allow me to illustrate what this means with the help of some visual aids. The following two images look fairly similar, but a closer look reveals something a bit deeper under the surface. They were both taken with the same camera using the same exposure settings, with one key difference – the ISO.

    ISO Invariance: The End of the Exposure Triangle?

    Nikon D750, 50mm, f/2.8, 1/60th of a second, ISO 3200

    The above photo looks decent, but the sun was almost down and I had to shoot at ISO 3200 in order to let in enough light…or did I?

    ISO Invariance: The End of the Exposure Triangle?

    Nikon D750, 50mm, f/2.8, 1/60th, ISO 100 (pushed 5-stops in Lightroom – to effectively ISO 3200)

    Here is the same image except this one was shot at ISO 100, then in Lightroom, I pushed the exposure up by five whole stops. Five stops! That’s a lot of adjustment, yet the final image looks almost identical to the one shot at ISO 3200. Just for the sake of comparison, here is the original ISO 100 image before any editing in Lightroom.

    ISO Invariance: The End of the Exposure Triangle?

    Nikon D750, 50mm, f/2.8, 1/60th, ISO 100 (no editing in Lightroom)

    Whoa – what?!

    I’m not kidding here – the original image was almost entirely black. If you look closely you can just barely make out the roof of the bird house and a bit of color in the sky. Yet so much data was captured by the sensor at ISO 100 that I was able to create a file that was not only usable but in my opinion, superior to its ISO 3200 counterpart. Even doing a bit of pixel-peeping reveals little difference in terms of the noise levels between the two images.

    Not only are the two images quite similar, I would go so far as to argue that the one shot at ISO 100 and boosted 5-stops has richer colors and better noise levels than its high-ISO counterpart. This is, in a nutshell, what ISO invariance is all about. It gives you the ability to shoot at virtually any ISO value and still get a usable image, assuming you shoot in RAW and have the ability to adjust the photo in post-processing software. ISO, then, no longer becomes much of a determining factor in the overall exposure.

    Is it the end of the ISO as we know it?

    Modern camera sensors are getting so good at picking up luminance and color data from incoming light. So the idea of a photographer needing to manually adjust the sensitivity of the image sensor is becoming almost moot. Note that I’m hedging my bets here, as I have throughout this whole article. I will stop short of saying that ISO is not a factor to be considered anymore. Far from it!

    The fact is that camera sensors are getting so good that they are significantly outperforming their counterparts from a few years ago in all areas, not just ISO invariance. ISO 3200 or 6400 on many cameras today, in general, results in images that are perfectly usable. Whereas the same settings on a digital camera from yesteryear would yield an image so muddy it might have been well-nigh unusable. This has also resulted in the same sensors being able to capture significantly more details at low ISO that can, if desired, be used to edit an image ex post facto.

    ISO Invariance: The End of the Exposure Triangle?

    Nikon D750, 200mm, f/5.6, 1/350 second, ISO 100. Using a low ISO allowed me to pull out lots of color detail in post-production on this image.

    Down on the upside

    Of course, not all is sunshine and roses in the land of ISO invariance. It’s important to note that not all cameras are even capable of such a feat. The Nikon D750 is a 24-megapixel full-frame camera. So its individual pixels are physically larger, and therefore much more sensitive to light than a 24-megapixel crop-sensor camera like a Canon Rebel T6 or Nikon D3300.

    Only a handful cameras today can actually be described as ISO Invariant. Whereas most cameras still follow the same rules about using ISO in tandem with aperture and shutter speed that have been the foundations of photography since its inception.

    A demonstration

    To illustrate, here’s another series of images taken with a Nikon D7100. It’s a few years old but quite similar to many cameras today in terms of its imaging prowess.

    ISO Invariance: The End of the Exposure Triangle?

    Nikon D7100, 50mm, f/4, 1/60 second, ISO 3200.

    Now take a look at a similar photo taken at much lower ISO:

    ISO Invariance: The End of the Exposure Triangle?

    Nikon D7100, 50mm, f/4, 1/60 second, ISO 100.

    Whoops! That’s the unedited version in which you can barely tell that there’s a picture at all. Here’s the same image with the exposure bumped up by five stops in Lightroom.

    Nikon D7100, 50mm, f/4, 1/60 second, ISO 100 (pushed 5-stops in Lightroom)

    Even on these smaller web-sized photos, you can see some key differences. The colors are not as natural, the darker portions are muddier, and there is significant banding in the shadows. “Wait a sec,” you might be saying right about now. “What’s banding in the shadows?” Follow the advice of Rafiki from The Lion King and look harder…

    Here you can clearly see that the ISO 3200 image is superior. All throughout the ISO 100 picture, there are horizontal lines crossing through the image, which is a phenomenon known as banding. It often happens when you try to recover details from darker portions of an image. Add this to the fact that the colors are harsh and the whole thing required such a significant amount of processing and you start to see why ISO still matters. It matters quite a great deal.

    Limitations

    There are also some significant limitations to take into account when looking at ISO invariance:

    • It only matters if you shoot in RAW, which allows you to have as much data from your camera’s image sensor as possible. RAW file sizes are huge and must be processed by a program like Lightroom before they can be shared or printed.
    • Processing takes time. Many photographers, myself included, like to get the exposure right in camera if at all possible.
    • In almost every situation you won’t get better results from shooting at low ISO values and then raising the exposure afterward. Most of the time you will get results that are roughly equal to what you would have achieved with just raising the ISO, to begin with.
    ISO Invariance: The End of the Exposure Triangle?

    Nikon D750, 50mm, f/8, 1/200 second, ISO 1250.

    Conclusion

    I like to think of ISO invariance as a backup tool to use when I really need it, not something on which I can rely for everyday shooting. Who among us hasn’t come back from a photo session only to find out that some key pictures were horribly underexposed by accident? (Raise your hand if this is you. Go on, I’ll wait.) I know I have, and it’s nice knowing I can still get a usable photo in these situations as long as I have not blown out the highlights.

    We’re still years, perhaps decades, away from a point at which ISO is no longer a practical consideration, and it’s possible we will never get there entirely. However, if you look at where we have been and where we are now in terms of camera sensor technology, it’s easy to draw a line to a point in the future when ISO might not matter nearly as much as it does now.

    In the meantime, my suggestion for most photographers remains the same; use all three elements of the exposure triangle to get the shot you want. And if you’re worried that using a fast shutter speed will result in a photo that is underexposed, just raise your ISO as you are shooting instead of fiddling with sliders back at your computer. You’ll learn more about photography by doing so, and you will probably have more fun since you’ll be taking pictures instead of being hunched over your laptop.

    The post ISO Invariance: The End of the Exposure Triangle? by Simon Ringsmuth appeared first on Digital Photography School.


    Digital Photography School

  • Post-Processing: The Final Phase of Studio Product Photography

    For the final installation of this series we will be exploring the third and final cog to the product photography studio. We will discuss the system that will allow you to catalog and edit your images to get them web ready in a hurry. For this we are going to deploy Lightroom. I am sure that there are other programs that can be inserted here since we are only doing some minor adjustments and renaming. If you have Lightroom fire it up and follow along.

    SHOOTING TETHERED

    I like to shoot tethered whenever I work in studio for a few reasons. The first being that I can see the image I just shot on a large monitor. I can zoom in and see details that are difficult to get to on the back of a camera screen. The second reason is that I have all the shots automatically sorted into the correct folders.

    SETUP THE TETHER

    To get started with tethering in Lightroom go to File > Tethered Capture > Start Tether Capture.

    Studio product photography processing 01

    From there you will enter the tethered settings. I always put the product name as the session name, in this case “Stan Lee” since I am shooting action figures. Next is the naming, I let the filename remain the part number (or product name) but add a number sequence to the end. You can do whatever works for you to differentiate the shots.

    Next choose the location where you want Lightroom to store your images. In this case I am going to have all of the shots go into the folder for my client “XYZ” so I make a folder called “XYZ Product Images”. Lastly add the metadata information, in this case my contact and copyright information. Then hit OK.

    Studio product photography processing 02

    Next you will get a little display that you can position anywhere on your Lightroom screen, I like to put it up at the top. It shows that the camera is connected.

    *TIP* If nothing is showing up check that you camera is turned on and that the cable is connected. If that fails, reboot your camera, reboot Lightroom and remove and reconnect the cable. This usually clears up 99% of tether issues. Below the camera make is the part number and the rest of your camera settings.

    Studio product photography processing 03

    (You can read all about my camera setting on my other DPS article here; Tips for Fast and Effective Studio Product Photography. Now that you have your tether capture all setup you can begin taking photos.

    Studio product photography processing 04

    THE PHOTO SHOOT

    For this shoot my client wants two angles of this Stan Lee action figure. So I use our basic lighting setup (discussed in this article; Equipment Tips for Quick and Efficient Studio Product Photography) and take the first shot.

    Let’s take a look at this shot in Lightroom Develop module. Hit the D key to enter the develop module, or click Develop at the top of Lightroom. Make sure your clipping detection is turned on by hitting the J key.

    Studio product photography processing 05

    What I am trying to accomplish here is to blow out the background. If it were blown out we would be showing red (clipped) in Lightroom. We aren’t seeing that, which means I need to decrease the shutter speed to let in more light. Let’s try 1/3 of a stop for a bit more additional light and shoot again.

    Studio product photography processing 06

    Set the exposure

    Now we are cooking with fire. All of our subsequent shots will be dialled in making less work. It is not necessary to have the entire background clipping. In fact, for some subjects it will likely mean you have lost a ton of contrast in the image. This amount of red is okay for this subject.

    Keep in mind white and reflective products will become overexposed must sooner than darker ones, so set your exposure accordingly. Even if you have zero red on the background it is okay, there Lightroom tools that will make quick work of the background. But remember that every bit of extra work you do later in Lightroom costs time so try to get it right in camera.

    *TIP* With this product photography studio setup it is so easy to get many product angles in such a short amount of time. It’s always wiser to shoot extra angles now rather than have a client ask for others later. Now that we have four angles of Stan Lee let’s switch to the next product.

    Change the product

    Studio product photography processing 07

    Click the little gear icon on the tether tool which will bring up the Tether Capture Settings and you can change your session name to the new product number, in this case, “Wookiee”. Hit the tab key twice, because, as you can see the sequence number is retained from the last shot and it reads shot number 5. Hit the number 1 key and then hit OK or Enter.

    You are now setup to take the next shot and all of these new images will go into the “Wookie” folder but stay in the main project for XYZ Products.

    Studio product photography processing 08

    Just as before, we will take four angles for the client to make sure we have enough.

    Studio product photography processing 09

    If we expand the navigator pane you can see that we have two product folders, “Stan Lee” and “Wookie” and there are four images in each. We can view all the images by selecting the “XYZ Product Images” folder. We are now done with the tether tool so you can close it.

    Studio product photography processing 10

    THE EDIT

    Typically this is where I will grab all the images from the shoot and export them as small files for client proofs. The client chooses the images they want and then we edit those. Let’s pretend they’ve already given us their list and begin the edits.

    Make the background white

    Hit the D key to enter the develop module, or click Develop at the top of Lightroom. The first thing I like to do is make sure that the background is blown out (pure white with no detail). To do this, make sure your clipping highlight feature is turned on, (hit J on the keyboard if it’s not).

    Since our shot could use a little help at the bottom we will increase the whites with an adjustment brush. Hit the K key and with a new brush enter +1.00 on exposure and +40 on whites (I have saved this preset as its own brush called “blowout”). Turn on Auto Mask, it does a good job of keeping these settings from inadvertently bleeding onto the subject if you get a little too close. Now simply paint the white background and it will clip the whites. If it doesn’t, finish painting, then add a new brush and paint again.

    Studio product photograph processing 11

    Global adjustments

    Hit your K key once more to return to image adjustments. Turn off clipping highlights by hitting the J key. This helps you to focus on the subject during the adjustments. For this image I added +20 contrast, -30 blacks, +30 clarity and +20 saturation.

    You can easily sync these settings to the rest of the product image by bringing up the filmstrip at the bottom of Lightroom. If you don’t see your filmstrip, click the little up arrow at the bottom of the develop module. Now select your first image, hold you Shift key and click the last image. Click the Sync button in Lightroom to apply the settings to all the selected images.

    Studio product processing 12

    We will select Basic Tone, Clarity and Color to sync just those effects to the rest of the images.

    Studio product processing 13

    Click Synchronize and the rest of the products will get the same adjustments. Keep in mind you still need to go back to each image and ensure their backgrounds are properly clipped as well. You can use the Adjustment Brush feature as before. Our Stan Lee products are now on completely white backgrounds and they look great.

    Alternate method

    For the Wookie products I will show you a slightly faster albeit sometimes not as accurate method. Enter the Develop module, and instead of using an Adjustment Brush let’s see if the Whites slider will clip the background. For this image I added +93 to the Whites slider.

    Studio product processing 14

    Worked like a charm. Now let’s finish giving this little guy some additional love. I added +20 contrast, -30 blacks, and +20 clarity. Additionally I added some sharpness found in the Detail pane. This time, when we select all of our Wookie products and synchronize I will click the Check All button.

    Studio product processing 15

    When I do a quick look at the rest of my Wookie products they all look great. These are ready to export and it took me less than two minutes to edit all four images.

    Studio product processing 16

    Studio product processing 17

    Studio product processing 18

    Conclusion

    Assuming you already have a calibrated monitor, the only other thing you might want to do is add a custom color profile for you camera to Lightroom. This will ensure that your product colors remain true, which is very important. You can see how to do that with this dPS article; How to Use the X-Rite ColorChecker Passport to Obtain Perfect Color.

    This concludes my three part series for studio photography and how to inject some speed into it. I hope you enjoyed it. Thank you for reading.

    The post Post-Processing: The Final Phase of Studio Product Photography by Jacob Macias appeared first on Digital Photography School.


    Digital Photography School

  • Canon introduces Compact-Servo 70-200mm T4.4 lens for aspiring filmmakers

    $ (document).ready(function() { SampleGalleryV2({“containerId”:”embeddedSampleGallery_0026914247″,”galleryId”:”0026914247″,”isEmbeddedWidget”:true,”standalone”:false,”selectedImageIndex”:0,”startInCommentsView”:false,”isMobile”:false}) });

    Canon has announced the Compact-Servo 70-200mm T4.4 L IS KAS S, a lens designed for small-scale filmmakers. Targeted at a similar ’emerging production’ market to Fujifilm’s recently announced MK-series cine lenses, it will offer a middle ground between the company’s photographic lenses and its high-end CN-E cinema lenses.

    Unlike traditional cinema lenses it offers autofocus, auto iris and image stabilization (when used with certain Cinema EOS models), but is designed to Canon’s standards for 4K video capture. It comes with a servo unit for driving focus, iris and zoom.

    The lens is scheduled for availability later in 2017; no price was given at the time of announcement.

    Press Release

    CANON ADDS VERSATILITY TO FAMILY OF HIGH-QUALITY, AFFORDABLE COMPACT-SERVO LENSES WITH NEW 70-200mm TELEPHOTO ZOOM LENS

    New Lens Features 4K Optical Performance, Servo Drive Unit, Image Stabilization, Autofocus and Auto Iris Functions*, Ideal for ENG, Documentary, and Budding Filmmakers

    MELVILLE, N.Y., April 20, 2017 – Canon U.S.A., Inc., a leader in digital imaging solutions, is proud to announce today the new COMPACT-SERVO 70-200mm Telephoto Zoom Lens (model name CN-E 70-200mm T4.4 L IS KAS S), a compact and lightweight 4K lens constructed for users that demand versatility and portability. A bridge between traditional Canon EF lenses and CN-E cinema lenses, the COMPACT-SERVO 70-200mm can be ideal for filmmakers and documentary shooters who want the control and quality of cinema optics with the lightweight, compact design and features of Canon’s EF lenses.

    The second in a new class of Canon lenses, the COMPACT-SERVO 70-200mm Telephoto Zoom Lens is a cinema-style lens that includes a servo drive unit as a standard feature. Additionally, the lens incorporates Image Stabilization, Autofocus, and Auto Iris functionality*, three extremely useful features not commonly found in cinema lenses, but are popular in EF lenses. The lens also provides high image quality that supports 4K image productions and was designed to be utilized in a variety of shooting styles including, hand-held, shoulder mounted, and tripod mounted.

    “Canon prides itself on turning the ideas and thoughts from filmmakers about equipment into reality,” said Yuichi Ishizuka, president and COO, Canon U.S.A., Inc. “We are very excited to expand our line of COMPACT-SERVO lenses, providing a variety of creators with an extremely versatile and affordable lens that features the outstanding build-quality and excellent optical performance that professionals have come to expect from Canon. We are excited to continue to build the COMPACT-SERVO line of lenses, and can’t wait to see what the imaging community creates.”

    The new COMPACT-SERVO 70-200mm Telephoto Zoom Lens is a 4K lens and features autofocus and optical image stabilization (with compatible camera models*), resulting in high-resolution imagery, with the ability to assist filmmakers in capturing the shot they envisioned. Compatible with EF-mount Super 35mm large-format cameras, the lens maintains brightness across the entire focal range at T4.4 (equal to f/4.0). The lens is also compatible with both the Canon EF 1.4x III (expanded focal range of 98-280mm) and EF 2x III (expanded focal range of 140mm-400mm) external extenders, expanding the focal range of the lens for additional versatility when the shooting situation calls for it.

    For added convenience, cinematographers can control many of the features of the lens in a variety of ways through the EF-mount communication, including Dual Pixel CMOS AF, push auto iris, record start and stop and remote lens control via the camera with an optional remote control, compensation for chromatic aberration** and peripheral illumination, metadata acquisition, and selection of T-number display**.

    The COMPACT-SERVO 70-200mm Telephoto Zoom Lens features a nine-blade iris aperture diaphragm to help give footage a truly artistic and beautiful look and feel, providing the much desired “bokeh” effect in the out-of-focus areas.

    The lens comes equipped with a Servo Drive Unit, which provides seamless switching between servo and manual modes, allowing videographers motorized control of focus, zoom, and iris settings. The Servo Drive Unit is compatible with broadcast style industry-standard lens controllers including Canon’s ZSD-300D zoom demand and FPD-400D focus demand. Like the Canon COMPACT-SERVO 18-80mm Zoom Lens, the ZSG-C10 accessory grip will be compatible with the new COMPACT-SERVO 70-200mm Telephoto Zoom lens, further enhancing ease-of-use for ENG and “run-and-gun” style shooters. The grip connects to the lens through a 20-pin cable, allowing a variety of lens functions to be controlled from the grip, including zooming via a rocker switch, one-shot AF and the starting and stopping of a recording. When the lens and grip are being used with the EOS C100 Mark II, EOS C300 Mark II and EOS C700 Cinema Cameras, users will also have the ability to control the zoom and iris from the camera’s grip unit.

    The Canon COMPACT-SERVO 70-200mm Zoom Lens is scheduled to be available later in 2017***. In addition, the ZSG-C10 accessory grip is currently available for an estimated retail price of $ 499. For more information please visit usa.canon.com/compactservo

    * Image Stabilization, Autofocus, and Auto Iris functions are enabled with the following compatible camera models only: Canon’s Cinema EOS C100 Mark II, EOS C300 Mark II and EOS C700. To enable these features, these camera models will require a firmware update that is scheduled to be released in the second half of 2017.

    ** These features will not be available on the EOS C100 Mark II camera.

    *** Availability, prices and specifications are subject to change without notice. Actual prices are set by individual dealers and may vary.

    Articles: Digital Photography Review (dpreview.com)

  • Working With A Creative Team

    What exactly is a creative team? It’s a group of people there to aid in the production of a


    Fashion Photography Blog

  • Essential Equipment for Long Exposure Photography

    Normally, I say that equipment is not important, at least not for those just getting started with photography. Until you know how to master the camera, equipment shouldn’t be the main focus. You don’t need to worry about having the best equipment or things you don’t actually need. However, to achieve certain techniques or effects, having the right equipment is essential. Long Exposure Photography is one of these techniques where some additional equipment is needed.

    equipment for long exposure photography

    Let’s jump straight to it and look at what I consider to be essential equipment for long exposure photography:

    Camera with Manual and Bulb Mode

    Okay, so this one might be a given. It’s obvious that you’ll need a camera to take an image. However, to be able to use a slow shutter speed (which is what long exposure photography is all about), you need a camera that allows you to manually adjust the ISO, aperture and shutter speed.

    Since you are working with different shutter speeds it’s essential that you’re able to adjust these settings yourself, so you can then control the quality of your image. Even though most compact cameras do have this opportunity now, I highly recommend using a DSLR (or mirrorless) camera if you don’t already. It doesn’t have to be anything fancy, an entry level camera will do just fine.

    bulb mode

    Nikon D800 Bulb Mode

    Bulb Mode is another option that it’s beneficial for your camera to have. While it’s not essential, it allows you to take exposures that are longer than 30 seconds. Most DSLR cameras have a maximum shutter speed of 30 seconds so if you want to use an exposure longer than that, you need to be in Bulb Mode. 

    With this mode selected (it’s located different places on different cameras), you can expose an image for as long as you want. Basically, as long as you hold the shutter button triggered, the camera continues to take the image. I’ll come back to a neat trick to avoid pushing the button for several seconds or minutes in a bit.

    A Tripod

    I consider a tripod to be essential for any type of landscape photography but when dealing with slow shutter speeds, it’s hard to work without one. Some of you might comment that you can just lean the camera on a fence or lay it on a rock but that really limits your flexibility and, of course, the stability of your camera.

    The reason I always travel with a tripod is because I normally work with images that have a shutter speed just too slow to capture handheld. Plus even if I’m not, I have the option.

    This image wouldn’t be possible without a tripod.

    You don’t need to spend thousands of dollars on the best tripods available but avoid getting the cheapest aluminum ones from the local electronic shop. Make sure that the tripod you choose is sturdy enough to be used in a river with rushing water, or when the weather is windy.

    Exposure times of anywhere between 1/4th of a second to multiple minutes is common with long exposure photography. It goes without saying that you’re not able to get a sharp handheld image when using a shutter speed of 30 seconds. By using a tripod you make it possible to work with such long exposures and capture great, sharp images.

    Neutral density filters

    I’ve previously explained how to do long exposure photography without filters, so why do I now say they are essential? It’s quite simple – the quality of your images will be much higher.

    Before explaining why I consider neutral density filters to be essential for long exposure photography, let’s quickly look at what they are:

    • Neutral density filters are darkened filters that are placed in front of the lens, requiring a slower shutter speed for the same amount of light to reach the sensor.
    • There are two systems available: screw-in and drop-in or square filters.
    • The filters come in different strengths (3-stop, 6-stop, 10-stop, etc.) which describes how much you need to lengthen the exposure time to maintain a well-exposed image.

    NiSi 6-Stop ND Filter in front of my Nikkor 14-24mm

    There are many filters to choose from on the market and it seems like new brands appear all the time. Personally, I’ve been using LEE Filters, NiSi Filters and B+W. NiSi has become my go-to choice these days as their filters don’t have a visible color cast (which is a common issue with these types of filters). LEE is known for its strong blue color cast and B+W had a very dominant red tone. These are relatively easy to fix in Adobe Lightroom or Camera RAW but I prefer to get as much as possible right in the camera.

    Why are ND Filters essential for long exposure photography?

    As mentioned, these filters require you to lengthen the exposure time for the same amount of light to reach the camera’s sensor in order to get a well-exposed image. The filters are darkened and their strength dictates how much you need to slow down the shutter speed. Compared to doing this without filters, using an ND filter allows you to use a much longer exposure times while still maintaining optimal quality (the sharpest aperture of your lens).

    equipment for long exposure photography

    Nikon D800 w/ Nikkor 16-35mm f/4 @ ISO100 – f/11 – 241 seconds.

    It wouldn’t have been possible to capture an image with a 241-second shutter speed, without using an ND filter in the conditions present when I took the image above. You might be able to reach such an exposure time at night but not during a sunset. Without a filter, I might have gotten a 1-second exposure, which would look completely different with an overall lower quality. By placing a dark ND filter in front of my lens (the NiSi 10-stop) I was able to use a very long exposure and capture some of the beautiful motion going on in the sky as well as soften the surface of the lake.

    Remote shutter

    I’ll admit it right away, a remote shutter isn’t essential to achieve a long exposure but it is going to make the process much easier (I feel naked when mine is left behind)!

    I’ve previously written an article where I compared using a Delayed Shutter and Remote Shutter, so I won’t go into the details of which is better here. What I will mention, however, is that when doing long exposure photography you often have to work with quickly changing elements (such as rushing waves). In these scenarios, you want to be able to capture the image at the exact moment the moving element is where you want it to be and can’t afford to wait an additional two seconds (for the self-timer to go off).

    equipment for long exposure

    A remote shutter was used to capture the exact moment the waves went over the rock

    The image above represents one of these scenarios. As the tide was rising, the formations of the waves were constantly changing. I knew that I wanted to capture the exact moment the water started running down the left side rock and to be able to do that, I needed a remote shutter. Had I used the built-in delayed shutter (with a delay of two seconds) I would most likely have missed that exact moment, even though I could have tried to predict the moment of impact.

    For Bulb Mode

    Another benefit of using a remote shutter for long exposure photography is that most of them have a shutter lock function, which is going to save you a lot of hassle when working in Bulb Mode. Rather than manually holding the shutter button (and causing a visible camera shake) for minutes, you can lock up the shutter with a remote release.

    remote shutter

    Remote Cable Release

    You don’t need to purchase the most expensive release out there (they can be surprisingly pricey) just make sure that it’s something that won’t break right away and one that has the opportunity to lock up the shutter. Note: make sure to get one that is compatible with your camera model.

    Cardboard to cover the viewfinder

    My last recommendation is something that many articles forget to mention. You need something to cover the viewfinder! Many cameras have this as built-in function and have a sort of “curtain” that you can close. But there are still many cameras that don’t have this option. If your camera doesn’t, make sure that you bring a piece of cardboard, or similar, that you can use to block the viewfinder during a long exposure. This is to avoid any unwanted light leaks as you see in the image below.

    camera light leak

    I forgot to block my viewfinder so my two-minute exposure looked like this.

    Conclusion

    While there are many other accessories available to make long exposure photography easier, these are the ones I consider to be essential. Do you have any others to add to the list?


    The-Ultimate-Guide-to-Long-Exposure-Photography-eBookIf you want to learn more about Long Exposure Photography I’ve shared everything I know in my eBook The Ultimate Guide to Long Exposure Photography. This eBook is for those who are ready to take their images to the next level and expand their creative vision.

    The post Essential Equipment for Long Exposure Photography by Christian Hoiberg appeared first on Digital Photography School.


    Digital Photography School

  • Ricoh releases Pentax 645Z and K-1 firmware updates and IMAGE Transmitter 2 software v2.3

    Ricoh Imaging has released new firmware for its Pentax 645Z medium format camera and K-1 full-format DSLR. The new firmware makes the cameras compatible with the also freshly released version 2.3 of the company’s IMAGE Transmitter 2 software package.

    The latter allows the cameras to  be controlled when tethered to a PC or Mac via USB cable and after the update now offers a range of new tethered control options, including drive mode, white balance, image format, size and quality, memory card slot selection, live view magnification and focus fine adjustment in live view. 

    As before, you can also adjust essential settings, such as  aperture, shutter-speed, ISO and exposure compensation, or trigger the shutter. Image Transmitter 2 version 2.3 as well as firmware version 1.41 for the K-1 and 1.23 for the 645Z are now available to download on the Ricoh Imaging website.

    Articles: Digital Photography Review (dpreview.com)

  • GoPro unveils Fusion, a 5.2K spherical VR camera

    GoPro has unveiled Fusion, a new pro-grade spherical camera capable of capturing regular and VR video at a 5.2K resolution. The camera will be released this fall, but ahead of the launch comes a pilot program that GoPro will introduce this summer. Interested professional content creators can apply to take part in the pilot program, which GoPro says will be used to ‘refine the user experience.’

    The company hasn’t revealed many details about Fusion, saying only that it capable of recording 5.2K spherical video at 30fps.Operators will also be able to produce ordinary non-VR videos from spherical videos using GoPro’s OverCapture technology. GoPro’s CEO Nicholas Woodman explains that Fusion can ‘capture every angle simultaneously… as though you had six GoPro cameras fused into one.’

    Via: GoPro

    Articles: Digital Photography Review (dpreview.com)

  • 7 Tips for Urban Landscape Photography

    When you ask people what is landscape photography they have no trouble defining it. But ask what urban landscape photography is and you will get conflicting answers. People have an idea, but often don’t really understand what it is, or how to go about doing it. One of the first things to do is work out what it is, and then how you can do your own urban landscapes.

    7 Tips for Urban Landscape Photography

    Urban landscape photograph, taken in the early evening from a rooftop looking back towards the city.

    What is urban landscape photography?

    Before you can start taking specific urban landscape images it is good if you understand what it is. If urban refers to cities and towns, then it is generally understood that landscapes of these would be defined as that. Any image within those places where humans live, work and play would be considered in that category.

    Cities are very popular for this kind of photography. You will find that many of you are already doing urban landscapes, especially when you travel. However, when you ask others what it is you are often told cityscapes. Yes they are, but there is so much more to the genre than that.

    Here are seven tips to help you get better urban landscapes and, hopefully, help you to understand what it is as well.

    1 – Street photography

    Street photography can fall into two categories, one is street portraits, and the other looks more at the scene and what is going on. The first is not what you would typically find in urban landscapes, but the second is.

    Look for scenes where people are, groups, or individuals, but place them in their environment so you get a context of where they are and what is happening. You could photograph people shopping and take a look at consumerism. Perhaps go to sporting events and photograph how people carry on at them. There are parks where people may be sitting on their own with no one around. Anywhere that people hang out is going to make for some interesting urban landscape photography.

    7 Tips for Urban Landscape Photography

    A street scene showing the landscape and what people are doing in it.

    2 – From above

    There are many ways to photograph above the city now. You can see the tops of the buildings looking straight down to the streets below. You can get amazing views that are unique.

    Observation decks allow you to look down onto the city. They aren’t always easy to shoot from, as you sometimes have to take photos through glass or some sort of security mesh.

    Another way is a helicopter ride over a city. It is an option that many cities offer now. You can take a 15-minute ride if you want to pay for it. If you are lucky to live somewhere like Melbourne, you can also take early morning balloon rides over the city. You will get some views of the city that are available no other way.

    7 Tips for Urban Landscape Photography

    A view from above, this was taken from Eureka Deck, an observation deck looking over Melbourne.

    3 – Long exposure photography

    Without a doubt, there aren’t many types of photography that long exposures don’t suit. You can use it for individual buildings or for groups and streets. It allows you to create some magical scenes.

    The most common one that people think of is using Neutral Density filters so you can get very long exposures, anything from 30-seconds to several minutes. They can help create movement with getting blurred clouds, or you can remove people and cars from streets. You can get some interesting effects with the filters. Whether you use it for one building or many, and over water you will get some different images.

    7 Tips for Urban Landscape Photography

    A long exposure of Melbourne taken across the river.

    4 – Night photography and light trails

    Night photography is another way. Urban environments are great when the sun goes down. As the lights come on you can get a completely different view. The camera will pick up a lot more than you can see with your eyes. Depending on how bright or dim it is you may be able to take some exposures for a minute to two, even longer.

    You can also get great light trails at night. Look for interesting streets that have some great buildings in the background that you can use when capturing the trails.

    7 Tips for Urban Landscape Photography

    Light trails of cars moving around captured during the night.

    5 – Interesting architecture

    Every city strives to build interesting buildings. Architects like to show off as much as anyone. No matter where you are, see if you can find the most interesting structures to photograph.

    You could figure out why a building was designed for an area; if there is something unique about it. Churches were often built on hills so the congregations were still looking up to them when they weren’t attending.

    Look for buildings that are nestled in with others that are very different. Perhaps there is an old building somewhere that is surrounded by new ones. Scenes like that can give your images an interesting story.

    7 Tips for Urban Landscape Photography

    One of the most distinctive buildings in Melbourne, Flinders Street Station.

    6 – Weather and seasons

    People often forget how a city or town can look completely different in each season and how the weather can change it as well. If you only go to a place once, you don’t get a lot of choices. But if you live or visit them often then you can get a wide variety of shots when you photograph it at other times and in various conditions.

    Throughout the year, the seasons will give you numerous opportunities to get scenes that are unique to that time. Autumn will have the colors, so any trees in the streets or parks can make them colorful. Winter will have people rugged up against the cold and public places are empty. In summer everyone is in lighter clothing and those same spaces are filled with people. Consider what sort of photos you want and then choose the season accordingly.

    Rain, hail or shine, well perhaps not hail, but each will give your urban landscape a distinct look. The weather is not something you can control but you can take advantage of it. Photos of cities that are white from the snow can be magical. Rain will make all the surfaces reflective and make it look bigger and shinier. Don’t underestimate how much bad weather can make your photos that bit different.

    7 Tips for Urban Landscape Photography

    Rain has given Hosier Lane a shiny appearance.

    7 – Leading lines

    Bridges are beautiful, but they can be used for so much more than traveling. They can be the perfect way to help your viewer enter your image. Leading lines are fantastic for helping your audience know where you want them to look. Though bridges are one type, there are lots of others as well.

    Really anything that will lead people into an image will work. Look for roads that enter and leave cities and towns. Using the light trails of cars or other vehicles can be great for the same thing. Don’t just think road and bridges, consider train tracks, a moving bus, anything that will take or point your viewer to the area where you want them to focus.

    7 Tips for Urban Landscape Photography

    Using the bridge as a leading line to take you into the early morning light in Melbourne.

    Taking the tips

    You don’t have to do all of these, but using one or a few will help you get good urban landscape photography images. Consider what you are taking and think about the environment around you. Make the most of it and give your images a purpose.

    Share your urban landscape photography in the comments below!

    The post 7 Tips for Urban Landscape Photography by Leanne Cole appeared first on Digital Photography School.


    Digital Photography School

  • Bought Your First DSLR? 6 Tips for Learning How to Use Your New Camera

    After a lot of thought and research, you finally pull the trigger. You bring home your first digital camera, pull the sleek marvel of engineering out of the box, and stare at it excitedly. Then you look at all the buttons and controls, and the excitement turns into fear… You realize that you have no idea how to use your new camera!

    Bought Your First DSLR? 6 Tips for Learning How to Use Your New Camera

    So what’s next? Well, the most important thing is to not be intimidated. It’s not nearly as complicated to learn photography as it might seem – despite what all those buttons might make you think. You will thankfully never need half of those buttons.

    This article is going to cover the technical aspects of using your new camera; what you need to know right away to get up and running. The three other aspects to becoming a good photographer are the conceptual, composition, and the editing aspect, but we can cover those another time.

    1. Light

    Before we get into how to use your new camera, there is an important ingredient that will make thinking about using it much more intuitive. What does the light look like? I want you to spend some time looking at light, without a camera over the next few days. A camera is a tool that records this light. You can’t figure out what settings to use if you don’t look at the light first. This is why many new photographers get confused when trying to figure out the best settings. They were never taught to start with the light.

    Where is the light coming from in relation to the camera? How strong is it? Are you in direct sunlight, is it diffused, are there multiple light sources, are you in the shadows, is it late in the day, is there artificial light, and what color is the light? The technical side of photography is really all about the light.

    Bought Your First DSLR? 6 Tips for Learning How to Use Your New Camera

    As you get more experienced, you can start looking into using your own light sources, such as flashes and strobes, but that can come later. Don’t be afraid of this part either. It is not as hard as it looks, as long as you get good at looking at the light.

    Now it’s time to look at your new camera and figure out the settings.

    2. Shutter Speed, Aperture, and ISO

    Besides white balance, if your camera only had three dials on it, one for the shutter, one for the aperture, and one for the ISO, that is all you would need. These three factors all come together to record the light. Here is what they each do:

    ISO:

    The ISO is your camera sensor’s ability to capture light. The higher the ISO, the more light it can capture, but it also means that your image will look grainier (digital noise). Landscape photographers or anyone using a tripod often prefers to use a low ISO, such as 100 or 200 so the images have as little grain as possible. High ISOs are primarily used when handholding the camera in medium strength light and in dark situations, such as indoors or at dusk. This is why concert and event photographers, street photographers, or even travel photographers will often shoot at high ISOs. They often find themselves shooting in low-light situations.

    Bought Your First DSLR? 6 Tips for Learning How to Use Your New Camera

    It is important to know that newer cameras can easily shoot good quality images at an ISO of 1600, and many at 3200 – 6400 for the higher end cameras. A lot of the grain/digital noise will not even show up when making smaller prints, such as 8x10s. The large prints are where grain shows more, but even with this, most viewers will not notice it, and many will even consider it beautiful. I rarely go below ISO 400, unless I am on a tripod. When you get the chance, take a few similar shots at different ISOs and zoom in on the computer to look at the differences.

    Aperture (F-number):

    The aperture is a hole that opens in your lens to allow light to hit the sensor. Changing the aperture adjusts the size of the hole. The larger the hole, the more light that hits the sensor, but it also means that you will have a shallower depth of field (i.e. a smaller range in your image will be in focus). A large hole corresponds to a small f-number, such as f/2. The smaller the hole, the less light that hits the sensor, but more of your image will be in focus. A small hole corresponds to a large f-number, such as f/16.

    I am overgeneralizing here, but often portrait photographers will shoot at very low f-numbers such as f/2.8. This is because they can focus on the subject’s eyes and have the sharpness fall off quickly to  separate the subject from the background. Landscape photographers, on the other hand, typically use tripods and try to shoot around f/11 or f/16 to have as much of the image as sharp as possible, from the foreground to the background.

    Shutter Speed:

    Bought Your First DSLR? 6 Tips for Learning How to Use Your New Camera

    Using a slow shutter speed and a tripod allowed me to blur the moving trains.

    The shutter is a curtain inside your camera body that opens and closes. The amount of time the shutter is opened to expose the sensor to the light is referred to as the shutter speed. 1/160 refers to 1/160th of a second. So an exposure of 1/10th of a second is a slower shutter speed than 1/160th, and allows more light to hit the sensor.

    As you get to slower and slower shutter speeds, you start to see more motion blur in your images, depending on whether or not subjects are moving. How much motion blur will depend on the shutter speed and the speed of the subject. While 1/200th of a second would freeze a person walking, you might need 1/1000th of a second to freeze a car driving past.

    Minimum shutter speed

    Keep in mind that when you are handholding your new camera your hands will shake a tiny amount, which can introduce blur into your images. So you need to use a fast enough shutter speed to offset this. The rule is that your shutter speed needs to be at least one over your focal length. Look at your lens. You see those numbers on the front (i.e. 35mm)? That is your focal length.

    The smaller the number means a wider field of view, while the larger numbers mean more of a telephoto. If you are shooting at 24mm, then you would need your shutter speed to be at least 1/24th of a second, whereas at 70mm you need to shoot at 1/70th of a second (or faster) to not have any handheld camera shake. It makes sense when you think about this. If you are zoomed in on a small part of the background, your slight hand movements will be much more obvious in that small area versus a wide angle of view.

    If your new camera has an APS-C (cropped) sensor, which is normal for most entry-level cameras, the true focal length of your lens is actually 1.5 (Nikon)  or 1.6 (Canon) times what it says (the crop factor). So if you are at 24mm, your actual focal length is 24×1.6=38.4mm, so you would want to be shooting at 1/40th of a second or faster. Micro-4/3rds cameras have a crop factor of 2x instead of 1.6. Full-frame sensors are 1-1.

    3. Manual versus Aperture Priority versus Shutter priority

    In photography, there are three ways to skin a cat. You will want to set your camera to either Manual, Aperture Priority, or Shutter Priority. Once you learn your new camera well, you can use any of these settings to get to the same endpoint.

    Set the ISO first

    Of these settings, the first thing you will do is to set your ISO. Turn ISO Auto off (or read this for a different perspective: How I Learned to Stop Worrying and Love Auto ISO). If you are shooting with a tripod – set the ISO to 100 or 200. Are you handheld in bright sunlight –  an ISO of 100-400 will do. In the shade, an ISO of 400-1600 will be ideal depending on the brightness levels. At dusk, at night, or indoors without a strong window light – usually, ISOs of 1600-6400 are ideal. So for any photography session, step 1 is to assess the light and step 2 is to set the ISO.

    Bought Your First DSLR? 6 Tips for Learning How to Use Your New Camera

    What mode to use next

    Next, you need to figure out if you want to shoot in Manual (M), Aperture Priority (A/Av), or Shutter Priority (S/Tv) mode.

    In Manual mode, you set both the aperture and shutter speed yourself. Some people think it’s macho to only shoot in Manual, but in many situations, Manual can slow you down significantly. For this reason, I use this mode the least of the three. With Aperture Priority, you choose the aperture and the camera uses an internal light meter to guess the correct shutter speed to expose the scene correctly. It usually does a good job at this, except for situations with a lot of bright or dark tones. In Shutter Priority, you choose the shutter speed and the camera chooses the aperture.

    Except for when I’m using studio lighting or in a situation where the lighting is consistent, I mostly shoot in Aperture or Shutter Priority modes. I prefer Aperture Priority mode for portraiture, landscapes, most images on a tripod, or any situation where I want a lot of bokeh (the background blur due to a shallow depth of field). I prefer Shutter Priority for street photography, sports, or anything where either the subject is moving and I want to freeze the motion, or where I purposely want to show motion blur, such as panning.

    While I personally prefer to only shoot in Manual in very specific situations, I suggest you go out for a couple of your first sessions and only shoot in Manual Mode. Guess the ISO, the shutter speed, and the aperture. Take the shot and look at the picture. Is it too dark, too light, is it blurry, or is there motion blur? At first, you will have no idea what you are doing, but you will quickly learn. This is a great way to learn how your settings will affect the scene.

    4. Exposure Compensation (+/-)

    Bought Your First DSLR? 6 Tips for Learning How to Use Your New Camera

    Scenes like this will require you to use Exposure Compensation as the camera will attempt to make the snow gray.

    We’re almost there – I promise. Exposure Compensation is your best friend when shooting in Aperture or Shutter Priority Mode. When using these modes, the camera will use its light meter to guess the correct exposure. Its goal is to render your scene as a neutral gray tone, so sometimes it will get the exposure wrong from what you want. You can use Exposure Compensation to offset this issue. You can raise or lower the exposure compensation (+/-) on your camera to lighten or darken a scene. Use it!

    Some situations where you might need to use Exposure Compensation are scenes with lots of light or dark tones, such as an image with a lot of bright white sky or white snow (like the image above), or in a dark alleyway or at night. For a scene with white snow, the camera would see all that white and try to make it neutral gray – ultimately darkening the image too much. So you have to raise the Exposure Compensation (use + to increase the exposure) to brighten the scene back to normal. For a dark alleyway, the camera will try to brighten the dark walls to be a neutral gray, so you have to adjust the Exposure Compensation (use – to lower the exposure) to make those grays look much darker and more realistic (true to tone).

    5. White Balance

    Bought Your First DSLR? 6 Tips for Learning How to Use Your New Camera

    White balance is how your camera portrays the color of the light in a scene. Different light sources have completely different colors, and the camera has many settings for the most typical ones, such as a sunny or shady day. However, start off by setting your white balance to auto. Auto white balance usually works great. Once you become comfortable with everything else in this article, then start learning more about white balance. It’s a more advanced thing to learn down the road, and auto can take you a long way. I still use auto white balance a majority of the time.

    6. Autofocusing and Taking the Picture (Finally!)

    Bought Your First DSLR? 6 Tips for Learning How to Use Your New Camera

    This is the last thing! I promise!

    Your focus area is the spot that your camera chooses to be sharp. When you set your camera to autofocus and look through the viewfinder, you will see many boxes (squares or circles depending on your camera) that you can select from to choose the area where you want the camera to focus. Figure out how to move this box around (you do not want the focus area to be set to auto or zone) and select one. You will want to move it to focus on the subject in your image.

    Many photographers, myself included, will often just keep the focus box in the middle. I will then aim the middle box at the subject that I want in sharp focus, press the shutter halfway to lock the focus, then recompose the image while holding the shutter halfway pressed. When the composition is right, I will take the photo. This is a great way to focus if you do not feel like constantly moving the focus point around.

    When you press the shutter down halfway, it will focus the camera using the point you select. Pressing it all the way will take the picture. Be careful, because sometimes when you are focusing on the edge of a subject, a subject that is small, or a subject that is far away, the camera can mistakenly focus on the background instead. This is a very common problem called back-focus that happens frequently to newer photographers.

    Note: your camera needs contrast to focus. So make sure you select an area that has an edge so that the camera can focus. It cannot focus on a plain white wall, for example.

    Wrapping up

    Bought Your First DSLR? 6 Tips for Learning How to Use Your New Camera

    I know this was a lot to cover, especially if this is one of your first lessons. It’s a lot to be taken in right away, but it’s really not that hard to learn all of this in real life. It seems much more daunting to read about it all than to see it in person. Really, if I were to show you all of this in real life – in three hours, you would have it down.

    So let’s stop here. Read over what I wrote five or seven times in the next few weeks and play around with the settings. Take photos indoors and outdoors and at different times of day and figure out how to expose them well. Create sharp images, try creating bokeh, and mess around with motion blur. Take your time and change the settings to see how the images look. Look at them on the back of your camera right after you take them. Zoom into the details as well.

    Once you have this all down, then it’s time to move on to the more advanced stuff!

    The post Bought Your First DSLR? 6 Tips for Learning How to Use Your New Camera by James Maher appeared first on Digital Photography School.


    Digital Photography School

  • Selective Hearing: These Earplugs Let You Turn Down Sounds of the World

    [ By SA Rogers in Gadgets & Geekery & Technology. ]

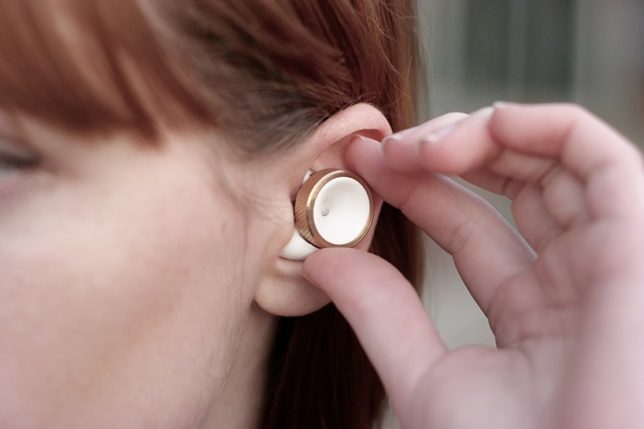
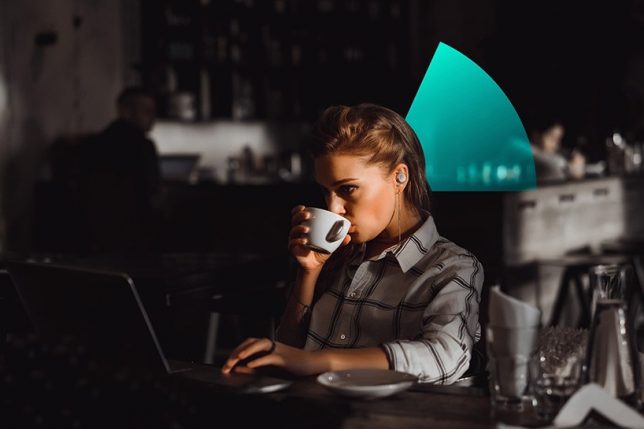
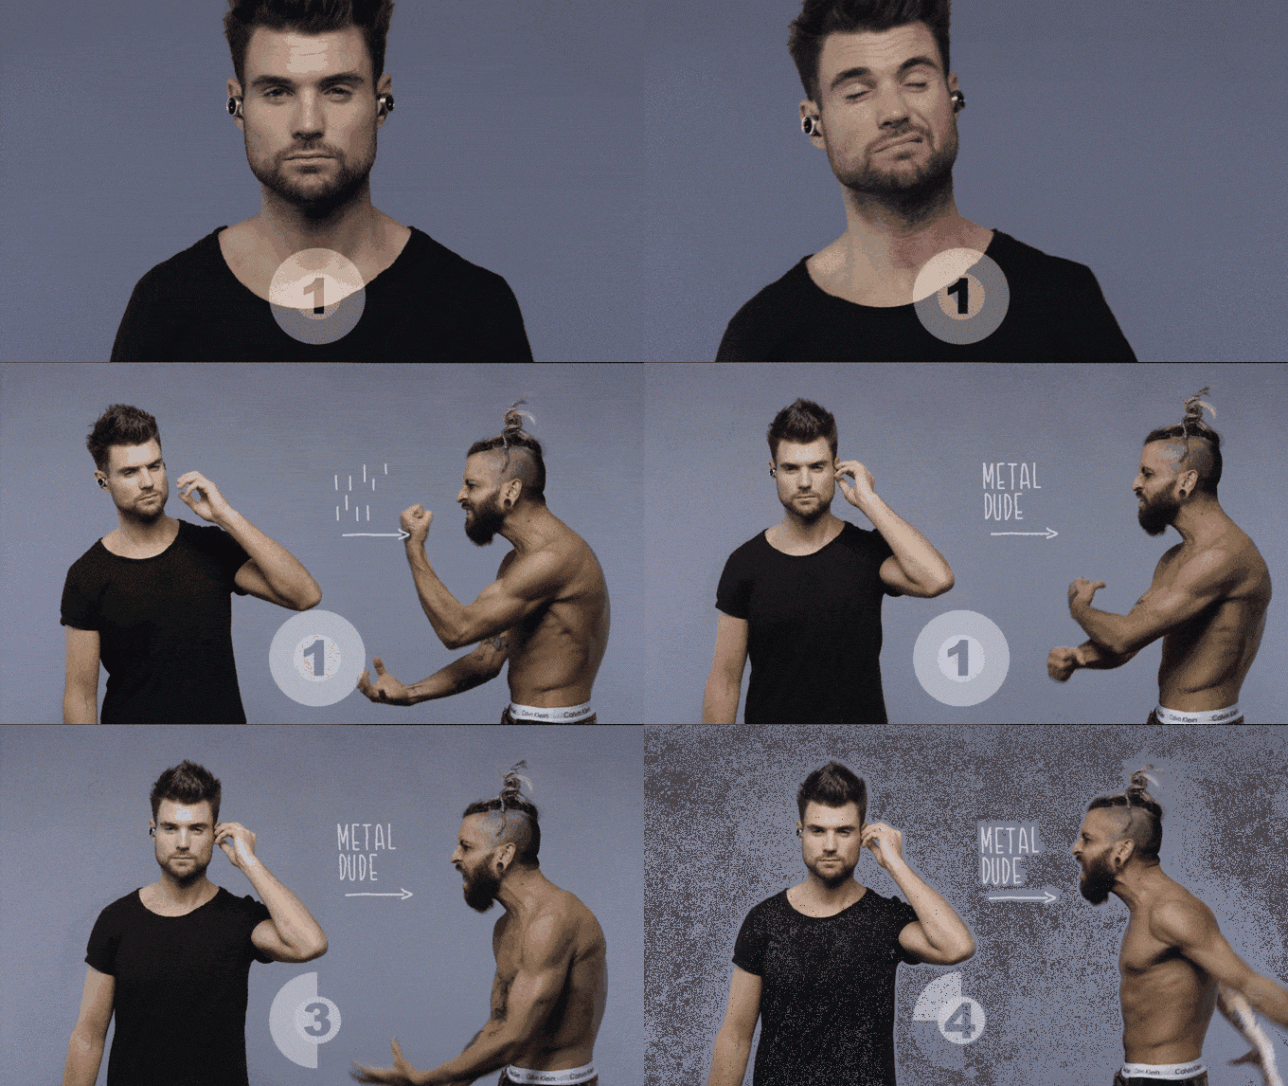
    We’ve all had moments where we wished we could tune out a particular person or muffle loud music without losing the ability to hear a friend’s voice, but standard earplugs don’t exactly allow for a lot of fine-tuning. But with a new product called ‘Knops,’ you can literally turn the volume of the world up or down in an instant. Founded by musicians, the Dutch startup aims to help you hear what you want to hear and ignore what you don’t with the twist of a tiny knob.

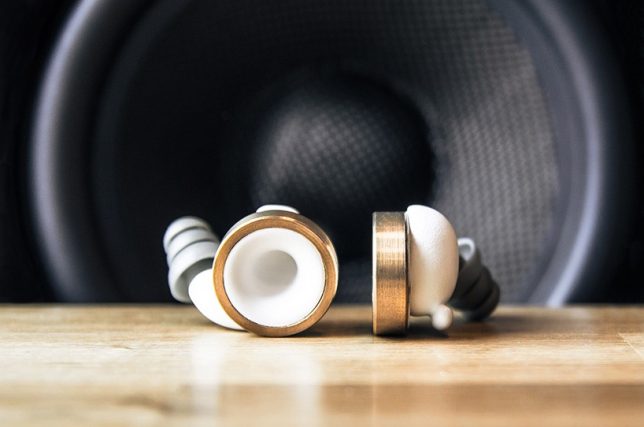
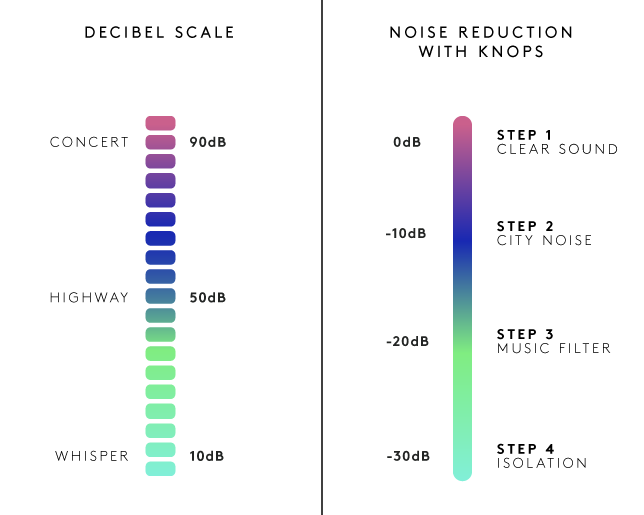
    Each pair of knots has four modes you can switch between: the first is clear sound, the second reduces ambient ‘city noise’ by 10 decibels, the third muffles live music by 20 decibels, and the fourth is ‘isolation,’ blocking out 30 decibels. You can easily switch between the four levels whenever you want, eliminating the need to constantly pull out and reinsert your earplugs.

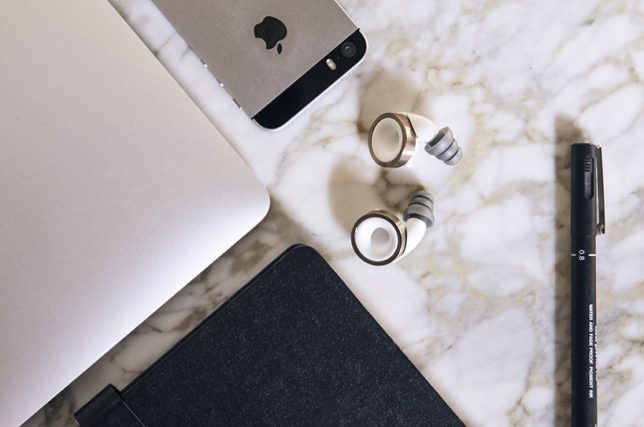
    Noting that most earbuds are “downright ugly as hell,” the designers gave Knops a minimalist look available in four different colors and trims. You might imagine that they’d be unnecessarily high-tech, turning a simple product like earplugs into an expensive, high-maintenance gadget that requires syncing to electronic devices or battery charging. Surprisingly, that’s not the case. The creators wanted control over external sounds without the distortion that can come with electronic solutions.

    How does it work? According to the creators, “Knops uses no electronics, no apps and no batteries. Instead our earbuds are acoustically engineered. The real sound is filtered using gold old physics. With the help of computer simulations and real-world prototypes tested in acoustic labs, we tuned Knops. We spend a lot of time fine-tuning the sound, so we can provide the best quality sound at every volume level. Working with the natural response of the ear canal.”

    You can pre-order a pair by backing the project on Kickstarter for 58 Euros (about $ 62 USD) or more.


    Share on Facebook


    [ By SA Rogers in Gadgets & Geekery & Technology. ]

    [ WebUrbanist | Archives | Galleries | Privacy | TOS ]


    WebUrbanist