Blog

  • Everything You Need to Know About Tripods with Phil Steele

    In this really helpful video Phil Steele covers everything you need to know about tripods including; how to choose the right one, how to use them, and special features you may not know about.

    • How to choose the right tripod
    • How to use a tripod properly
    • Special features you may not even know about

    Here are some tripod articles and reviews for you to check out:

    • Overview of the Vanguard VEO 235AB Aluminum Travel Tripod
    • Benro FGP18C SystemGo Plus Travel Tripod with B2 Ball Head Review
    • Product Review: Polaroid Carbon-Fiber Travel Tripod and Varipod
    • The 3Pod P3COR Tripod and SH-PG Ball Head Review
    • How to Build the Ideal Tripod
    • Tripod versus Monopod – a Comparison and When to Use Each
    • 5 Tips to Get Sharp Photos While Using a Tripod

    If you want to learn more from Phil check out some of his video courses covering topics like event photography, Lightroom, headshots and more on Steele Training.com.

    The post Everything You Need to Know About Tripods with Phil Steele by Darlene Hildebrandt appeared first on Digital Photography School.


    Digital Photography School

  • Digital Knitting Machine: Kniterate is a 3D Printer for Custom Apparel

    [ By WebUrbanist in Gaming & Computing & Technology. ]

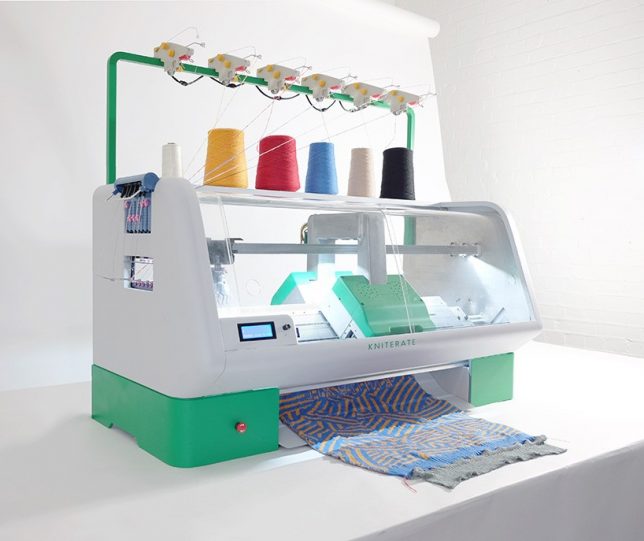
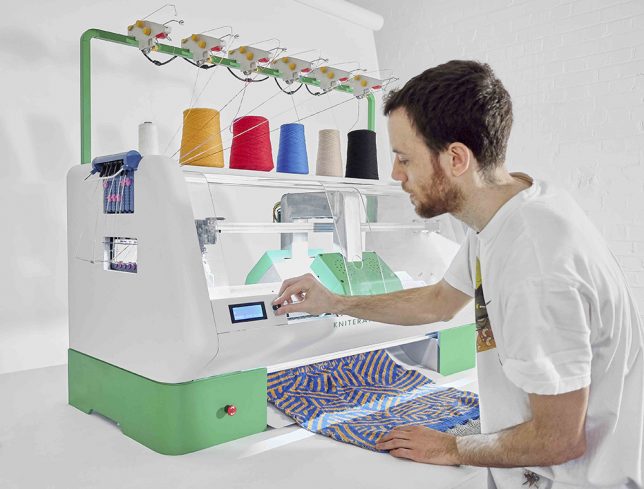
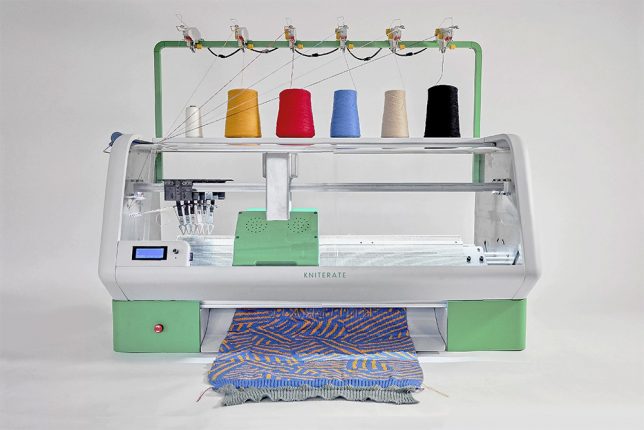
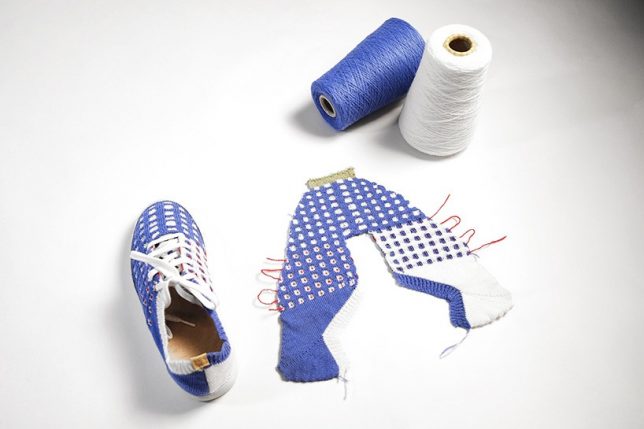
    Borrowing logic from the 3D printing industry, Kniterate lets users turn ideas and designs from digital files to one-off wearable garments in hours. Able to “print” shirts, scarves, sweaters, dresses and more, the machine is aimed at enabling customized creations as well as rapid prototyping.

    Compact, portable and affordable, the gadget itself links into computer and mobile apps – creatives can build out ideas in Photoshop, build them in Kniterate’s device-specific application, then send them to straight to production with the touch of a button.

    The application comes with a number of preset patterns that can be used but the intuitive interface is also designed to allow for easy from-scratch creations, even by people with limited digital design experience. Even in cases there the final product will be made via other methods or materials, this machine allows for iterative design experiments to test size, fit and styles.

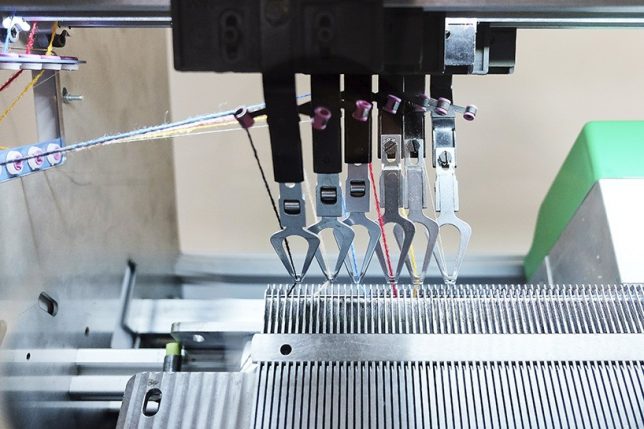
    The system is also designed to reduce waste from off-cut materials, printing with the exact amount of material needed to make a particular piece. The device can carry up to six yarns at a time to span an array of colors and materials – it is also made to be compatible with off-the-shelf yarns, making it more flexible and affordable than printers (often designed to make money from material sales rather than the machines themselves).

    Share on Facebook


    [ By WebUrbanist in Gaming & Computing & Technology. ]

    [ WebUrbanist | Archives | Galleries | Privacy | TOS ]


    WebUrbanist

  • Manfrotto launches fluid head counterbalanced with a nitrogen piston

    Tripod and accessories manufacturer Manfrotto has announced a new tripod head for stills and video users that it claims provides smooth motion and continuous counterbalance for loads of up to 8kg. The new Nitrotech N8 uses what the company describes as a ‘nitrogen piston mechanism’ to counteract movements of the head and the pull of gravity to produce fluid and controlled motion for video and still photographers. While the new technology has obvious applications in the video market, Manfrotto also suggests the head for still photographers working with long lenses.

    Users can adjust the degree of resistance in the pan and tilt axes to suit the shoot, and a side locking mechanism secures a quick release plate that offers 1/4in and 3/8in screws. The head is made from aluminum, features Easy Link threads for attaching accessory arms and an illuminated bubble level is powered by a lithium-ion battery.

    The Nitrotech N8 head can be bought on its own for $ 449.95/£449.95, but Manfrotto has also created a number of kits using both carbon fiber and aluminum leg sets.

    For more information see the Manfrotto website.

    Press release

    Manfrotto Introduces Nitrotech New Fluid Video Head 

    • Breakthrough Nitrogen piston technology for precise, continuous counterbalance
    • Variable pan & tilt fluidity for smooth and accurate shooting
    • Easy link connector with anti-rotation to support off-camera accessories
    • Side-lock sliding plate attachment
    • Secure, 8 kg load capacity
    • Flawlessly constructed professional video heads for superlative videography
    • High-impact, ground breaking design, superior quality materials

    Manfrotto, world leader in the photography, imaging equipment and accessories industry, presents the new Nitrotech Video Head – a revolutionary head that combines the most successful features of Manfrotto’s Video Heads range with the ground-breaking, unique-to-the-market Nitrogen piston mechanism that guarantees continuous counterbalance.

    The new Nitrotech N8 head securely supports a load up to 8 kg. The new head features a precise, continuous counterbalance system that effortlessly and safely holds and operates a wide array of video camera and camera models – in a variety of sizes. The variable fluidity function on both pan and tilt allows smooth, judder-free movement that is perfect for video work and photography work for example: wildlife, long lens, or sports photography. It allows precise control and balance over a heavy telephoto lens or video camera and features a 3/8” Easy Link equipped with an anti-rotation function that enables an external monitor or other accessories to be fitted.

    This new head also features a side-lock sliding plate mechanism that allows safe, quick and easy camera attachment. The NITROTECH head has a flat base mount with a standard 3/8” thread that is highly versatile for different support combinations such as a tripod, slider or rig.

    Manfrotto’s game-changing N8 Nitrotech Video Head makes a strong impression at first sight through its distinctive, impactful design, which emphasizes this core breakthrough technology. Ideal for both video and photography work, the Nitro head is a revolution in fluid video heads.

    For more information, please visit www.manfrotto.co.uk

    Prices start from £449.95.

    Articles: Digital Photography Review (dpreview.com)

  • Professional powerhouse: Hands-on with the full-frame Sony Alpha a9

    Hands on with the Sony a9 (ILCE-9)

    We got a chance to get our hands on the Sony alpha 9 immediately after its announcement. Our first reaction? Continuous shooting with full time live view isn’t a gimmick: you can follow the action without any interruption. 

    This is an entirely different beast compared to the a6500, which only had 8 fps live view during continuous shooting. This is a nearly 8-fold increase in frame rate: actual 60 fps live view during bursts (120 fps when not shooting).

    Hands on with the Sony a9 (ILCE-9)

    It feels more substantially built than the existing a7 cameras, but without it becoming hefty. Sony says the a9 is ‘well sealed – especially around most buttons and dials’ for dust and moisture resistance. Whether it’s up there with the Canon EOS-1D X Mark II or Nikon D5 remains to be seen.

    The camera’s grip is a little deeper than the a7 cameras, which means it’s more comfortable to hold with larger, heavier lenses such as the 24-70mm F2.8 GM.

    Hands on with the Sony a9 (ILCE-9)

    Despite the fairly radical specifications, the a9 retains the same fundamental form factor as the existing series II a7 cameras. However, as you’ll be aware if you were following the camera’s launch, just about everything inside the body shell has been revised to optimize speed. And outside the shell too – far more direct controls, like the AF and drive mode dials up top.

    Hands on with the Sony a9 (ILCE-9)

    Here’s just some of the cleverness that lives inside the camera: the processing board with twin SD card slots, a 3.7m dot OLED viewfinder and a beefed-up lens mount with more screws for greater strength and durability. But the big news is the 24MP stacked CMOS sensor, mounted on a 5-axis stabilized cradle.

    The 24.2MP stacked CMOS design includes memory for buffering immediately behind the pixel layer. This and the (comparatively) modest pixel count are key to the camera’s fast readout, which underpins the camera’s headline features: 20 frames per second shooting, 60 fps AF/AE calculations for improved subject tracking, and a fully electronic (truly silent) shutter with minimal rolling shutter.

    The Bionz X processor itself is also new (relative to the a7R II and a99 II), and comes with a front-end LSI. These improvements help increase processing speeds 1.8-fold and the buffer 6-fold relative to the a7R II, allowing for 241 continuous compressed Raws during 20 fps bursts. These improvements also help reduce power consumption by 40% compared to the a7R II.

    Hands on with the Sony a9 (ILCE-9)

    Although it looks a lot like an second-generation a7 series camera, the a9 features a range of improvements, many of them things that photographers (including us) have been requesting for some time.

    The most obvious of these is the AF point joystick on the camera’s rear panel. This and the dedicated AF-On button (as opposed to the recessed button switchable between AF/MF and AEL on previous cameras) will be immediately welcome by anyone who’s shot with an existing Sony camera. The joystick is responsive, but often as you’re using it it accidentally registers a center (downward press), which can be assigned to any function custom buttons can be assigned to. For now, we suggest assigning it to ‘Not Set’ (nothing) so you don’t inadvertently activate something else (like center point AF-S, which it’s set to by default) while trying to move your AF point.

    There have been changes to the elements that have been carried over too. For example, the dial on the rear plate of the camera is larger and has more noticeable ‘clicks’ as you turn it, making it far easier to use with precision. The buttons also have a more direct feel, rather than the slightly spongy sensation of the ones on the existing models (particularly the a7R II and a7S II.

    Hands on with the Sony a9 (ILCE-9)

    Our first impressions of the camera are that everything is that bit faster. Startup time is reduced (30% faster than a7R II), as is the speed at which the viewfinder panel is activated when you pull the camera up to your eye. AF is faster as well: 25% faster AF acquisition speeds, and 30% higher detection rate when it comes to Eye AF and face detection, compared to the a7R II. Low light AF speeds and performance should be improved as well, as Sony now claims AF at -3 EV with F2 lenses (1 EV better than the a7R II).

    We’re also impressed with the new quad VGA viewfinder. Its offers a crisp, detailed view and fast enough refresh rate to follow action (120 fps, dropping to 60 fps during bursts). Since it’s OLED, it’s nice and contrasty. We wish the LCD had improved though: Nikon and Canon DSLRs offer retina-esque displays on their newer cameras that make shot images look that much more inspiring.

    Hands on with the Sony a9 (ILCE-9)

    Other changes include the addition of a physical control for switching between MF and the camera’s different AF modes. This, along with the ability to assign an AF area mode (with or without AF activation, a la Nikon D5/500) to the camera’s custom buttons, should make the a9 as quick to operate as it is at shooting.

    Unfortunately, as of now, only one AF area can be assigned as ‘Reg. AF Area’ (oddly by long-pressing the Fn button while in that AF area mode), so you’ll only be able to instantly switch to one other AF area mode from the one that is currently engaged. We’ve requested Sony to enable multiple AF area modes to be assignable to multiple buttons, directly via the menu, as opposed to having only one ‘Registered AF Area’ the camera can store in memory. This might allow you to quickly switch between, say, Lock-on AF, complete Auto (when Lock-on fails), and good old center point. It would be even nicer if one could specify AF-S vs. AF-C for any of these modes so that, for example, I could generally keep the camera in AF-C, but always fall back to good old center-focus-and-recompose when all else fails.

    Hands on with the Sony a9 (ILCE-9)

    Stills aren’t the only area that gains massive improvements over previous models: Full-frame 4K video is now oversampled 2.4-fold from 6K footage. No pixel-binning, no line skipping. This leads to incredibly crisp footage but, more importantly, with extremely low rolling shutter thanks to the incredibly fast readout speeds of the new stacked CMOS sensor.

    Which makes it all the more a shame that, for some reason, Sony decided to forego S-Log (and Picture Profiles entirely) on this camera. Sony claims this is because the camera is aimed at professional stills shooters, but for a camera that shoots such good full-frame 4K, we feel it’s a bit of a shame.

    Hands on with the Sony a9 (ILCE-9)

    The a9 uses a new battery. The ‘Type Z’ NP-FZ100 is bigger than the existing batteries and offers significantly more capacity: 16.4Wh to be exact, up from 7.7Wh in the older, ‘W’ type packs used in previous models. This allows the camera to achieve a rating of 650 shots per charge, based on CIPA standard tests.

    As always, it’s quite common to be able to get many more shots out of a battery than the rating suggests, but the higher rating should mean the a9 will regularly be able to shoot for twice as long as most of the a7 series before needing a battery swap.

    Hands on with the Sony a9 (ILCE-9)

    Announced alongside the a9 is an accessory that should excite existing E-mount camera owners, particularly videographers.

    The NPA-MQZ1K Multi-Battery Adaptor Kit comes with two of the new NP-FZ100 batteries and has space for another two. It not only works as a charging station for up to four Z type batteries but also has a dummy battery that allows it to be used as an external power pack. The unit is compatible not only with the a9 but also with the a7, a7R, a7S, a7 II, a7R II, a7S II, a6000, a6300, a6500, a5000, a5100 and RX10 III, providing up to 8x their current battery capacity. It include tripod-style mounting sockets, for attachment to a video rig.

    Hands on with the Sony a9 (ILCE-9)

    The ports on the camera’s left flank are all fairly familiar: headphone, mic, USB and HDMI. What’s slightly unexpected is that, despite the camera’s speed, the USB port is only version 2, rather than the much faster USB 3.

    As you can see, the doors aren’t especially substantial, which is presumably why Sony isn’t making particularly strong claims about weatherproofing.

    Hands on with the Sony a9 (ILCE-9)

    The a9 is the first Sony to feature an Ethernet port, making clear its pitch-side intentions.

    We’re surprised to see a traditional flash sync socket, for studio work. We’d expect that of Sony’s current models: the higher-resolution a7R II (which, curiously, lacks a flash sync socket) would appeal more to studio photographers. A hint perhaps that there’s a higher-resolution a9-series body on the way…

    Hands on with the Sony a9 (ILCE-9)

    An optional VG-C3EM battery grip doubles the camera’s battery life. The grip itself holds two batteries but fills the battery compartment, meaning you end up with two batteries in total, rather than three. Still, a rating of around 1300 shots per charge with two batteries puts the a9 will into DSLR territory in terms of longevity.

    What do you make of the Sony a9? Let us know in the comments.

    Articles: Digital Photography Review (dpreview.com)
  • Solarcan is a single-use pinhole camera made out of a soda can

    A new Kickstarter campaign is seeking funds for Solarcan, a single-use pinhole camera that’s housed in a tall soda can. This long-exposure camera is intended to capture the sun’s path over the course of several days onto a 5×7 piece of Ilford Pearl photographic paper. Users then remove the top of the can using a can opener and ‘develop’ the film using a smartphone app.

    According to Solarcan’s Kickstarter campaign, this would be the first ever mass-produced solargraphy camera, one that ships preassembled so that users merely mount it in a particular location and then reveal the photographic paper to sunlight by removing a small black tab from the can. After several days (or longer) have passed, the can is opened and the photo negative is removed.

    Users then take a picture of the photo negative using the Solarcan smartphone app, which inverts the image, ‘developing’ it as a digital photo with proper colors. According to the Kickstarter page, a total of 1,000 units of Solarcan are in the pipeline for production; interested backers can pledge £12 (about $ 15) or more to reserve a unit. Shipping to backers is expected to start next month.

    Articles: Digital Photography Review (dpreview.com)
  • Peak Design will donate today’s online sale proceeds to Conservation Alliance

    If you’ve been eyeing a Peak Design bag, today may be the day to strike. In honor of Earth Day, the company is donating 100% of proceeds from the day’s online sales to the Conservation Alliance. The organization provides a link between outdoor brands like Peak Design and community efforts to protect and restore public lands.

    Peak Design also recently launched Give a Shot, a website where wildlife non-profits can connect with visual content creators looking to volunteer their skills for a good cause. To sweeten the deal, the company offers creators who take on a volunteer project credit toward Peak Design goods.

    Articles: Digital Photography Review (dpreview.com)
  • NASA puts it all in perspective with this image of Earth between Saturn’s rings

    Earth, photographed from 1.4 billion kilometers / 870 million miles away. Photo: NASA/JPL-Caltech/Space Science Institute

    NASA’s Cassini spacecraft will soon meet its demise in Saturn’s atmosphere, but one of its last photos of Earth is making for a heck of a swan song. The image, dated April 12, 2017, shows Earth as a bright white dot framed by the planet’s rings. For comparison, it’s about the same size as your standard speck of dust. Our entire planet.

    Cassini has been orbiting Saturn since 2004 and has spent the last decade and then some beaming back information about the ringed planet and its moons. But all good things must come to an end, and as the spacecraft’s fuel supply runs low, NASA will begin the process of safely putting it out to pasture.

    Articles: Digital Photography Review (dpreview.com)
  • How to Create a Kaleidoscope and Make Unique Abstract Images

    Struggling to remain creative

    I’ve recently been struggling to shoot creative images and found myself in a rut battling to see things with fresh eyes. As I needed to come up with a topic for my next article (this one!), I decided to take this as an opportunity to experiment and come up with some new ways to shoot abstract images.

    How to Create a Kaleidoscope and Make Unique Abstract Images

    Here’s one of the images I took using the kaleidoscope I made. I processed this image in Analog Efex.

    Inspiration can come from anywhere

    I decided to focus on abstract images since they seem to be speaking to me lately. The challenge became to create unique abstracts and have fun at the same time. Well, I happened to come across this video on the web. I was looking for a craft to create with my son, and the idea sprang from there.

    The Construction Details

    How to Create a Kaleidoscope and Make Unique Abstract Images

    Here’s the finished Kaleidoscope. It’s a pretty simple design.

    I decided to adapt this idea and create something I could use with my DSLR. I went to my local home renovation store purchased a mirror and had them cut it into three sections. My mirrors are 16cm wide by 31cm long. I chose this size so that my wide angle lens could fit inside the kaleidoscope opening. I didn’t want any of the outer edge included in my images.

    Clear packing tape was used to attach the mirrors forming a triangle. I then taped three pieces of cardboard around the outside of the mirrors. This was done to protect my hands from the sharp edges of the glass.

    How to Create a Kaleidoscope and Make Unique Abstract Images

    Here’s a top view. You can see that it was a pretty rough tape job.

    You could certainly choose to attach more mirrors together if you want. The important thing to remember is that you always want to use an uneven number of mirrors so that the shape is more conducive to creating abstracts. The look of the image you shoot will change with the size and number the mirrors you use. Have fun and experiment.

    How to Create a Kaleidoscope and Make Unique Abstract Images

    I used both my Canon 5D with a wide angle lens and my phone. Note that this technique doesn’t work with a telephoto lens.

    Now it’s time to have fun and play

    After constructing my kaleidoscope, it was time to start experimenting. I immediately thought of trying to photograph some flowers. My idea was to place a bright bloom on a black background. I was curious about what types of images I could create.

    Unfortunately, Mother Nature wouldn’t cooperate. We had a massive snowstorm, and I was stuck in my house with no chance to purchase some flowers. So it was time to experiment with other items. I found some square pieces of felt sitting around my house and decided to try using them. Here are the results.

    How to Create a Kaleidoscope and Make Unique Abstract Images

    Here you can see how I set up the kaleidoscope with some pieces of felt underneath it.

    How to Create a Kaleidoscope and Make Unique Abstract Images

    I again took this image into Analog Efex for editing.

    As you can see, my kaleidoscope created some rather interesting designs and shapes. It was a lot of fun to see what types of designs could be created. I used several different items in front of the mirrors. I tried fabric, tinfoil, camera lenses and even Lego toys.

    People photos

    After experimenting with so many different materials, it was time to try it with people. My son was willing to have his photo taken. Here are the results. He spent a few minutes giggling at the images. It would be interesting to see what a larger kaleidoscope and mirrors might do to portraits like this.

    How to Create a Kaleidoscope and Make Unique Abstract Images

    It’s an interesting effect. My son loved messing around with it.

    I then experimented with photos of a good friend. These images were shot through the kaleidoscope from images projected on my computer screen. They were taken from different Facebook photos. It was a lot of fun, and he was certainly entertained by the results as much as I was. I truly appreciate him allowing me to post the results here on the web. Thanks, Ali.

    How to Create a Kaleidoscope and Make Unique Abstract Images

    He was hesitant at first to let me post this but we had a lot of fun messing around with the image. There’s a little bit of banding from the computer screen but oh well we were just having fun.

    Drawbacks of the experiment

    One of the things I noticed as I shot was the very fuzzy and slightly darker reflections. That bothers me. Parts of the image that contained the original piece of fabric were much brighter and sharper than the reflections. I found the effect to be quite displeasing. So, I need to experiment more with the kaleidoscope to try and alleviate that.

    Perhaps a light shining from above might change this effect, it is something I will consider for the future. As you can see from this experiment, I used a very rough and simple set up. It was put together quite quickly. In the future, it would be beneficial to try several different methods for positioning the kaleidoscope and my camera. You will note that I used both my DSLR and my cell phone for these shots. I used the Lightroom mobile App as it allowed me to use some pretty specific manual controls.

    How to Create a Kaleidoscope and Make Unique Abstract Images

    I used my phone for several of the shots.

    Things learned from this experiment

    This whole activity was very insightful. It was well worth the afternoon I spent creating and shooting. It has sparked my curiosity. As a result, I created a list of questions that can be used to further the project and inspire more creative shooting.

    1. What types of objects look best when shot with a kaleidoscope?
    2. How can post-processing change the look and feel of these abstract images?
    3. What would be the effect of a larger kaleidoscope?
    4. What would happen if I added much smaller sections of mirrors to a kaleidoscope?

    There’s so much more that I can learn from this exercise. It feels like just the surface has been scratched. The use of mirrors for creating interesting abstracts is now on my list of projects. If you’ve experimented with different techniques, tell us about it. Share your experiments good or bad. There’s so much to learn. There’s also a lot of fun to be had during that experimentation. Perhaps as I perfect this technique, I will produce a further article that will contain my lessons learned. But for now, I hope my afternoon of tinkering will inspire you to try new ways of creating images.

    How to Create a Kaleidoscope and Make Unique Abstract Images

    This is a shot taken from my computer screen through the kaleidoscope.

    How to Create a Kaleidoscope and Make Unique Abstract Images

    I used black velvet and an old lens from my film camera for this shot. I think this one is my favorite images.

    There’s so much to learn. There’s also a lot of fun to be had during the experimentation phase. Perhaps as I perfect this technique, I will produce a further article that will contain my lessons learned. But for now, I hope my afternoon of tinkering will inspire you to try new ways of creating images.

    The post How to Create a Kaleidoscope and Make Unique Abstract Images by Erin Fitzgibbon appeared first on Digital Photography School.


    Digital Photography School

  • National Geographic and NASA celebrate National Parks with images from space

    $ (document).ready(function() { SampleGalleryV2({“containerId”:”embeddedSampleGallery_5505857540″,”galleryId”:”5505857540″,”isEmbeddedWidget”:true,”standalone”:false,”selectedImageIndex”:0,”startInCommentsView”:false,”isMobile”:false}) });

    If you’re unable to take advantage of free National Park entry this weekend, you can still enjoy the grandeur of some of the US’s best-loved National Parks thanks to National Geographic and NASA. To celebrate National Parks week they’ve published some of their favorite photos of parks – from space.

    We were pleased to discover that Grand Prismatic looks just as colorful from space as it does from the ground. Maybe we can keep it that way if we don’t trample all over it, hmm?

    Take a look at a few of the images above and see more over at National Geographic Travel.

    Articles: Digital Photography Review (dpreview.com)
  • DPReview photographs Seattle’s famous cherry blossoms (with expensive gear)

    There are an infinite numbers of ways to photograph a subject. So when a group of DPR staffers headed to the University of Washington campus recently to photograph the cherry blossoms, we each got a chance to show off our personal tastes and styles shooting the same subject.

    See the DPReview cherry blossoms gallery

    Click through the gallery to see each staffer’s approach and to find out what each of us chose to shoot with. And for more on the gear we chose and why, check out our behind the scenes video below.

    Articles: Digital Photography Review (dpreview.com)