Sometimes you can find ways of taking amazing pictures without spending much money at all, and one of the best examples of this is a technique called fire spinning. This usually involves just a couple of basic items, available at any hardware store and grocery market, and with a little creativity you can create some pictures that are downright otherworldly.
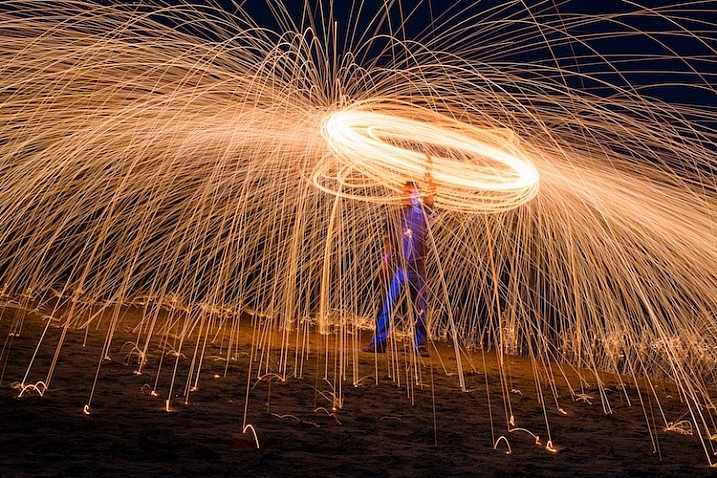
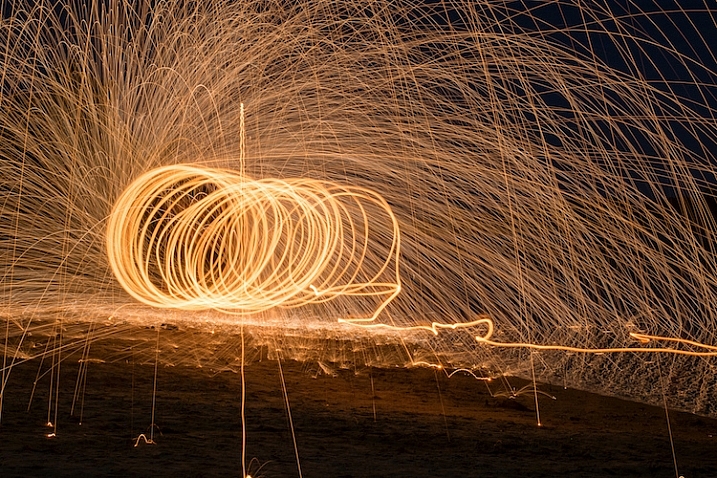
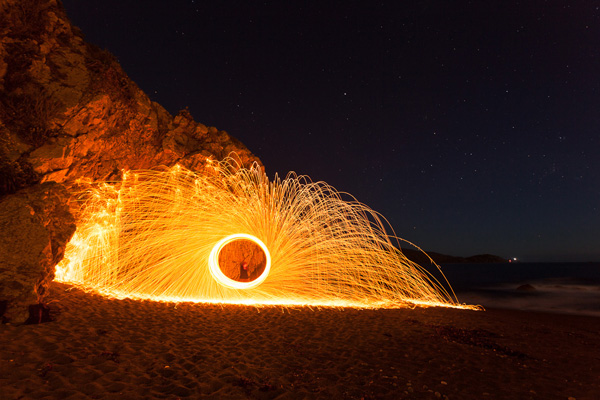
50mm, f/13, 30 seconds, ISO 200
Safety warning – please abide:
Before I go into detail about what it takes to create an image like this, I need to make it abundantly clear that fire spinning is dangerous, not only to yourself, but the area around you, and even your camera equipment.Please follow these safety precautions:
- Take care to only do this where you have plenty of open space, and nothing around you that will catch on fire.
- Make sure that you wear thick clothing such as full-length pants, closed-toe shoes, a long-sleeved shirt, and something to cover your eyes (glasses or safety goggles) and hair.
- Never do this in a field of grass or near a house, dry wood or brush, or near anything that could potentially catch on fire.
- Also make sure to put plenty of distance between your camera and the sparks, as they fly farther than you might think!
The images you see in this article were all taken at night, on a deserted beach where nothing else could start burning, and my camera was far enough away from the subject to avoid any wayward flying sparks or smouldering embers.
What you will need
You may already have some of the items necessary for a fire spinning photo, but if not, you can easily find everything you need for only a few dollars. You can add additional things such as multiple chains and whisks to create different effects and styles, but for a basic fire spinning shoot you can start with the following trinkets:
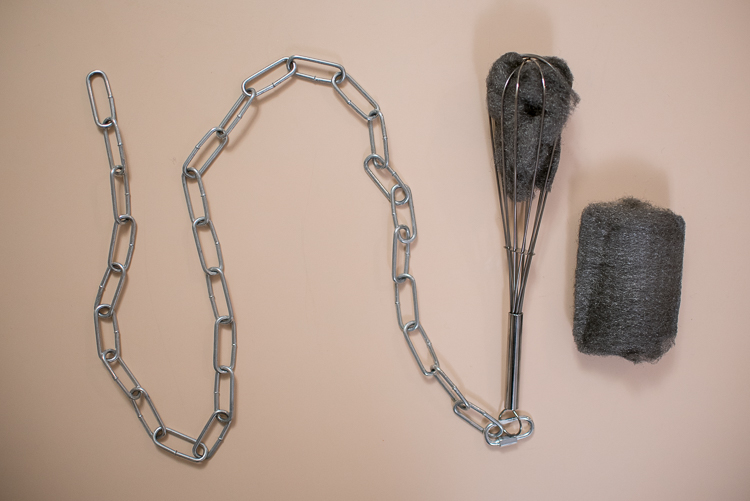
A chain, wire whisk, a connector, and steel wool, are all you need to create amazing fire spinning images.
- A few lumps of fine steel wool (thick stuff works okay, but the finer steel wool is better: 0-0000 grade)
- A small chain, roughly half a meter in length (1.5′)
- A wire whisk commonly used in baking
- A small clasp or carabiner to faster the chain to the whisk
- Something to light the steel wool on fire (cigarette lighter, grill lighter, etc.)
Other items necessary for the shoot include:
- A tripod for your camera
- A wide-angle lens (I shot the top picture at 50mm, but I would have preferred something wider like 35mm)
- A flashlight, so you can see as you’re setting up your camera and planning the shoot
- A friend who is willing to hold a spinning fiery object attached to a chain
Once you have all the things you need, preparing for your photos is fairly simple. Stuff a wad of steel wool into the whisk (fluff it up a bit so it gets some air), attach the whisk to the chain, and you’re all set. Fine steel wool is better (I used grade 00 for these images) because it will burn easier, and send more sparks flying around during your shoot. The basic idea involves lighting the steel wool, which will cause it to smoulder, then spinning it around in the air, which will cause sparks to shoot off in every direction.
While the steel wool won’t exactly burn like a piece of paper, twirling it in the air will cause sparks to fly all around. By using a long exposure on your camera, you essentially take a time-lapse image of the sparks, which results in an incredibly dynamic image not unlike something you might see during a fireworks display at an independence day celebration.
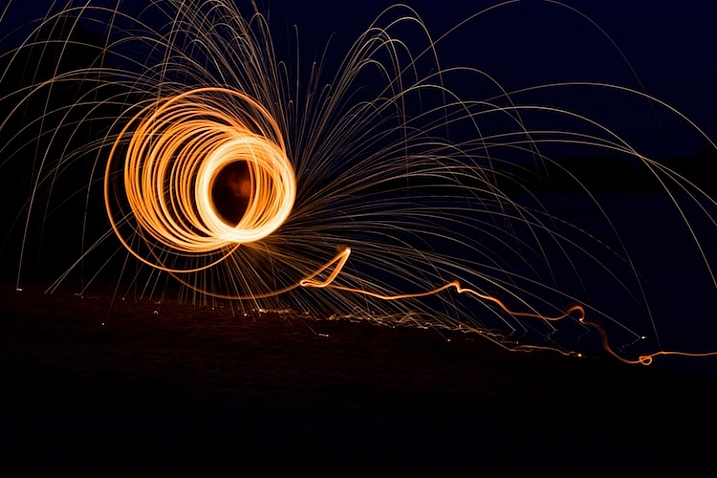
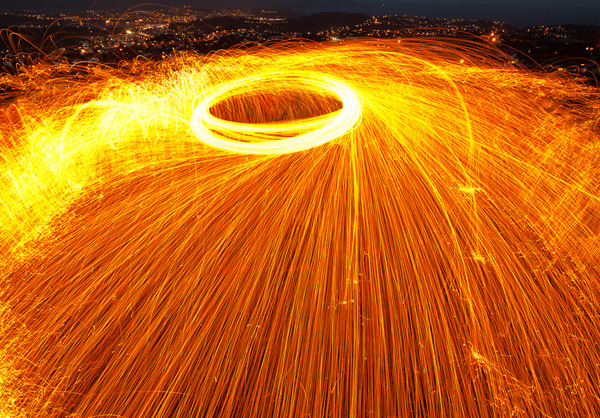
50mm, f/9.5, 20 seconds, ISO 200
The fire-spinning method
After your chain, whisk, and steel wool are ready, you will need to find a location, and decide how to frame your shot, which is why it can be handy to have a friend help you out. You can do fire spinning photos by yourself, but it really helps to be able to direct someone else who’s doing the spinning, so you can get everything positioned exactly how you want in the shot. It helps to draw some lines in the sand or dirt so your helper knows precisely where to stand, and depending on how dark it is, you may need to use your flashlight to help get everything positioned just right.
The rest of the process is fairly simple, but it will probably take a great deal of trial and error to get the shots you want. Set your camera and tripod low on the ground, several meters away from your friend, and have him shine a flashlight on his body so you can lock focus (either use autofocus to lock, then switch it to manual – or try back button focusing). Large apertures should be avoided, since you want a very wide depth of field, and you don’t need to worry about gathering enough light because the sparks will be plenty bright to show up even with small apertures. Use a long exposure time of 20 or 30 seconds, and a low ISO of 100 or 200.
When you are ready to take the shot, have your friend hold the lighter under the steel wool until it starts glowing. That’s your cue to press the shutter button, then just stand back while your friend spins the chain and the sparks start flying. One final trick is to use your camera’s 2-second self-timer so your friend has a bit of time to light the steel wool on fire before the actual exposure begins.
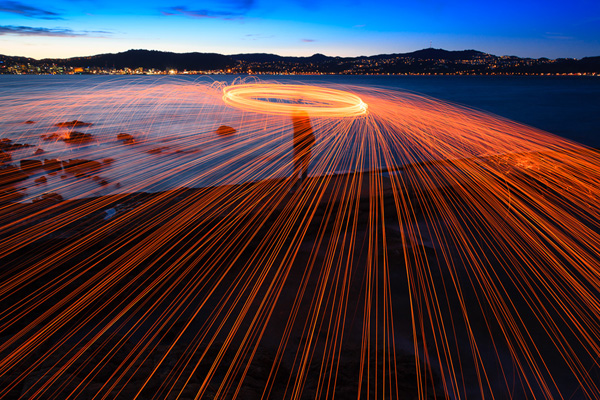
35mm, f/10, 6 seconds, ISO 200
Once you get the hang of the basics the rest is all about finding a technique that works, to get the shots you want. You can try lots of variations to get different photos such as:
- Stand in place and twirl the chain in a circle
- Stand in place and twirl two chains, one on each side
- Walk across the frame while spinning the chain to create a giant glowing tube
- Have multiple people in the shot spinning multiple chains
- Flash an off-camera speedlight on rocks or other background elements to add depth to the shot
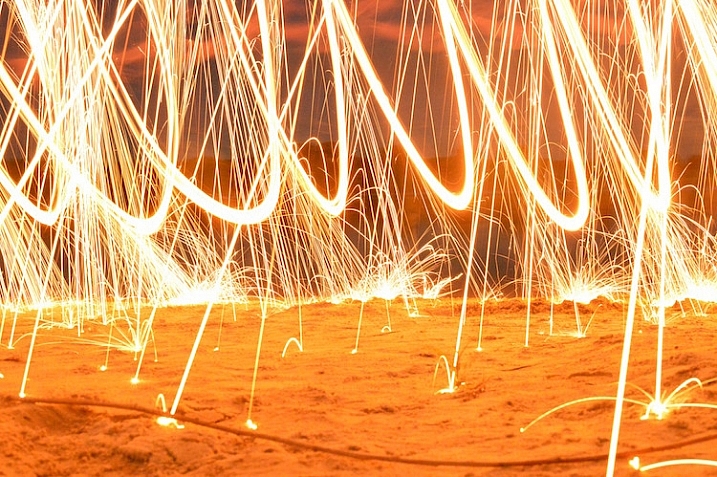
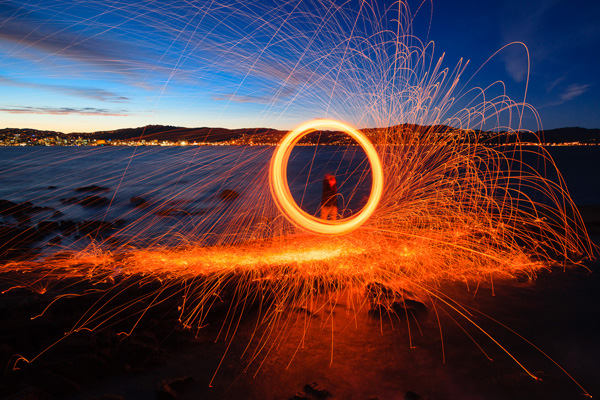
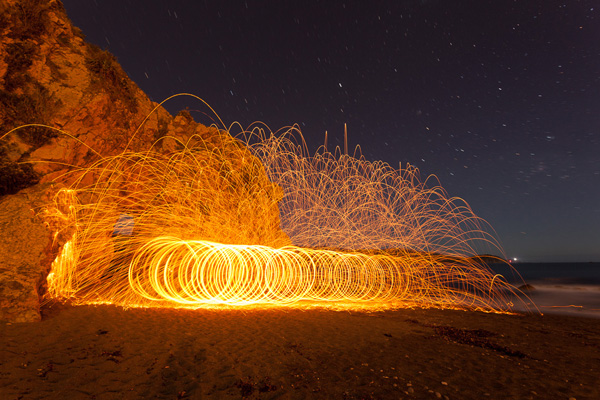
50mm, f/13, 20 seconds, ISO 200
With a little practice you can get some astounding results, and it’s always good to shoot in RAW so you can tweak the colors, and pull some details from the shadows later on if you want. If you search online for “fire spinning photos” (or steel wool spinning) you will find thousands of images, using all sorts of variations on this basic technique. I realize it’s somewhat cliché to say this, but the possibilities really are endless.
Have you ever tried fire spinning before? What are some of your favorite tips and tricks that others should know? Share your thoughts and any of your favorite photos in the comments section below!
This is the second of a series of articles we will be featuring this week on dPS all about special effects. Check out the last one: How to Photograph the Full Band of the Milky Way
googletag.cmd.push(function() {
tablet_slots.push( googletag.defineSlot( “/1005424/_dPSv4_tab-all-article-bottom_(300×250)”, [300, 250], “pb-ad-78623” ).addService( googletag.pubads() ) ); } );
googletag.cmd.push(function() {
mobile_slots.push( googletag.defineSlot( “/1005424/_dPSv4_mob-all-article-bottom_(300×250)”, [300, 250], “pb-ad-78158” ).addService( googletag.pubads() ) ); } );
The post Fire Spinning with Steel Wool – A Special Effects Tutorial by Simon Ringsmuth appeared first on Digital Photography School.


You must be logged in to post a comment.