RSS
 

Posts Tagged ‘Tips’

Tips for Using Natural Framing to Improve Your Composition

14 Jul

To help you compose more exciting and beautiful photographs, there are certain key composition techniques that you can use. Natural framing is one that is widely known, but needs careful and thoughtful application. Using framing can create extremely impressive and elegant images when done right. Here are some tips to help you.

natural-framing-tips--10

Natural framing is when you use an element within your image to frame the subject. This draws the eye into the photo and highlights the actual subject.

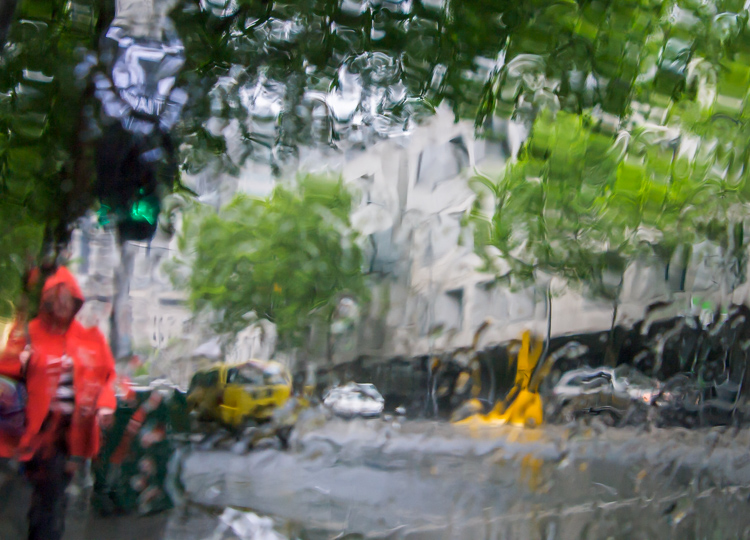
This internal frame can be constructed using a multitude of things you’ll find anywhere – branches, archways, tunnels, door frames etc., as well as things that aren’t solid like light, shadows, rain, fog, etc. – it doesn’t matter what you use.

Framing is a technique to use sparingly – but when it’s totally right, it looks natural. So few people use it well that if you can master it, you can create some fantastic shots.

natural-framing-tips--2
Why you should use natural framing:

  • It easily draws your viewer’s eye into the photo and emphasizes the subject.
  • It isolates and separates your subject from what’s around it.
  • It brings a sense of order and structure to a photo – and the eye loves order.

When to use natural framing

  • To obscure boring sky (my favourite).
  • To add depth to an image – especially when the item acting as the frame is not in focus.
  • To bring contrasting elements into the photo without detracting from the subject.
  • To create structure.
  • To create a feeling of a self-contained image, particularly if you are photographing something quite ordinary and simple, a frame will help give depth to the subject.

natural-framing-tips--12

Traditionally the frame should be distinctly separate from the subject, so that it’s not confusing to the eye. But I will also show you where I haven’t done that, and the photo still works. I will show you both how to use this technique as well as where else you can take it – how to let it inspire you to develop your images.

Rules are made to followed, bent and broken

Like anything that is considered a technique or rule, people can feel very passionately for or against their use.

“Consulting the rules of composition before taking a photograph, is like consulting the laws of gravity before going for a walk.” Edward Weston

But for me, it comes down to not using any of the rules so much, that your photos end up all looking the same. Don’t let rules keep you stuck in a box. They are a great springboard for your photography, or a way to help refresh your vision, so that you start composing in a different way.

natural-framing-15

When I was starting out, I worked hard to get really familiar with the key compositional techniques, but then after a while, once I’d embedded them, I started to develop my own way of using these techniques, my own style.

I also encourage you to think of all these techniques and rules as opportunities to see and learn to organise the elements within your photos differently. In my workshops I’ve noticed that one of hardest things for people is to break the world down into elements, and then learn how to organise these elements to create striking compositions.

Natural framing isn’t an add-on

Natural framing is one of the harder rules to pull off well. I think many people use it to make a boring landscape or scene more interesting. But to me, if your subject is boring, no technique is going to liven it up. Framing should be used as an additional interesting element – not as an overlay to a mundane scene (just search: “natural framing” on Google images and you’ll see what I mean).

natural-framing-tips--3

I find natural framing is most interesting when used in the loosest possible interpretation. It has to be employed in a way that enhances the photo, and feels like it is a natural part of the composition.

“There is no better time to crop a bad composition than just before you press the shutter release.” Bryan Peterson

With those caveats – now it’s time to relax, have fun, and play with it!

Creating your frame

natural-framing-20

You don’t need to have a frame around all four sides of your photo for it to work – in fact I’d encourage you not to do that. I think more often than not, it looks more natural and pleasing to the eye for the frame to take up just two or three sides of the image. But like every recommendation – use your own personal judgement.

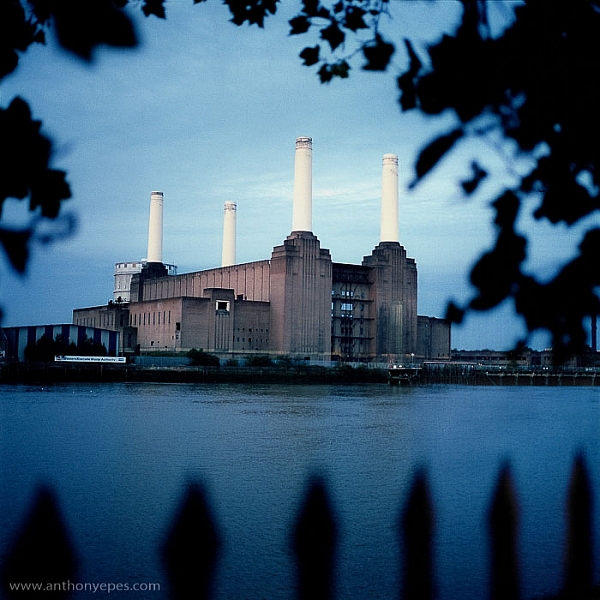
The photo above of Battersea Power station is probably one of my most traditional interpretations of natural framing. I have framed the building with the branches and leaves at the top, and the outline of a fence at the bottom. Two important things to point out in this photo:

  • When the frame is out of focus it create a sense of depth to the image.
  • The frame can be made from different elements: I’ve used two different elements but their colour is the same, and they are both interesting shapes – so they have some common qualities.

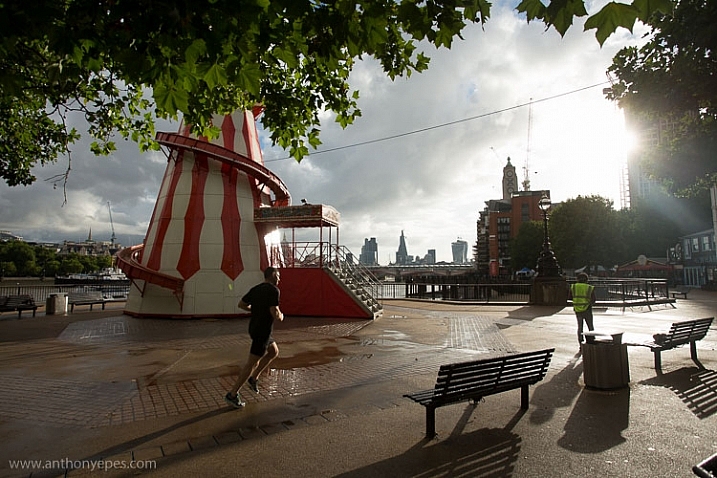
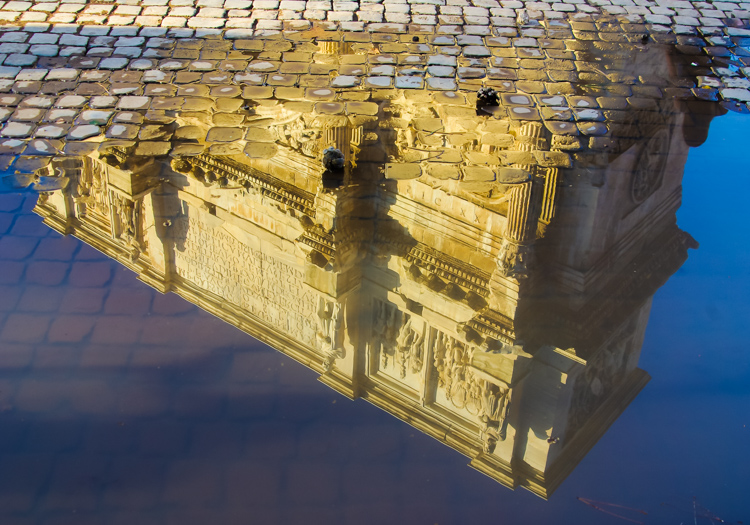
Obscuring boring sky

natural-framing-tips--7

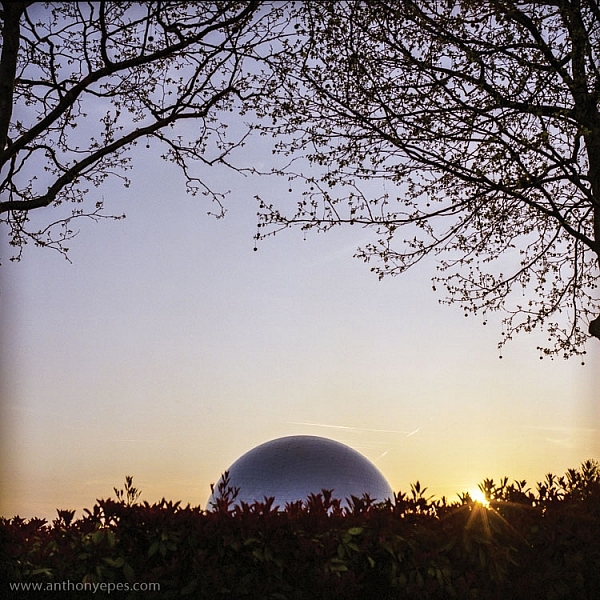
In the photo above, I wanted to capture the shiny dome and the rising sun. But that wasn’t enough to make an interesting photo. There was some pretty endless sky, so I added a silhouette of the bare branches above. I seem to use a lot of tree branches in my natural framing compositions. In this case, I love how they create this beautiful, wild, chaotic pattern, above the very clean and shiny dome. Then I’ve added this little almost tuft of leaves below, which balances the photo out.

I love using framing elements that have great texture – again they add depth. Just remember to keep it well organized and clear so people can see what you are trying to do. This photo is really about the simple contrasting shapes – and by using natural framing it creates a nicely ordered photo, constructed from the available elements.

natural-framing-17

So once you’ve got a grasp of the concept you can start using the technique in other ways – have fun!

You are in control of how the viewer sees the image

Naturally framing is a very good way to remember that you are in control of how the viewer’s eye will go around the image. It doesn’t matter how big the photo is, the eye won’t see the complete image all at once. The eye will be drawn to one part and then move around the image depending on where the elements are placed. Your job as a photographer is to direct the eye.

natural-framing-tips--4

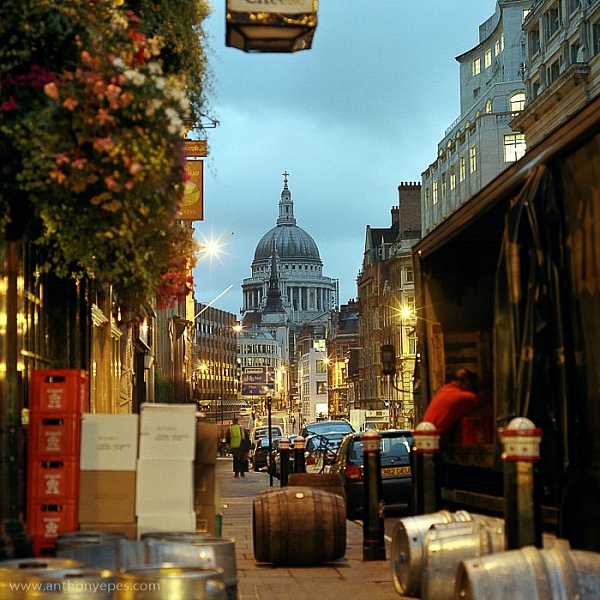
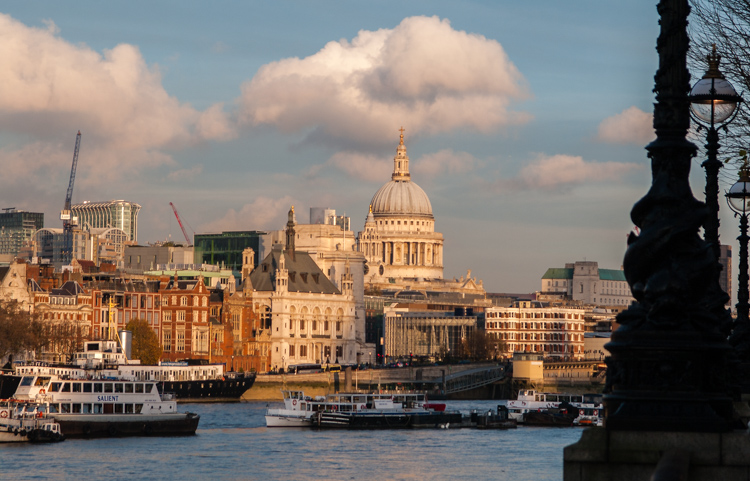
Here the subject is St Paul’s Cathedral, bang in the centre of the image. But all around it there are buildings, streets, cars, etc. When you first see the image, all of that other detail bleeds into one, creating a natural frame for the cathedral. But then gradually you start to see the details, so the image becomes something quite different.

This photo is a good example of how you can use framing to create order to a very busy scene, and give the viewer a way into the photo. It’s also a good example of how your eye moves around an image.

The one-sided frame

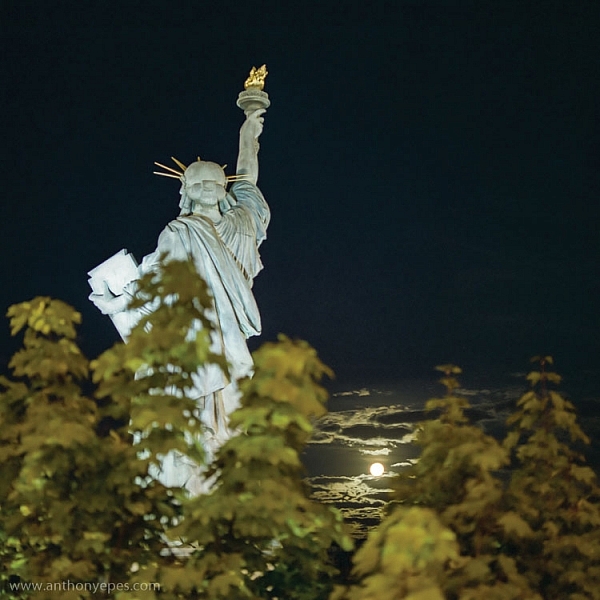
It is possible to do a one-sided frame, and it works! Below, even though the foliage is only running along the bottom, it creates a great grounding effect, and pushes the eye up toward the moon and the Statue of Liberty. Therefore, in my book, it adheres to the principal of drawing your eye towards the real subject of the photo. This isn’t even a strong line that’s creating the framing element – it’s simply the power of suggestion.

natural-framing-tips--6
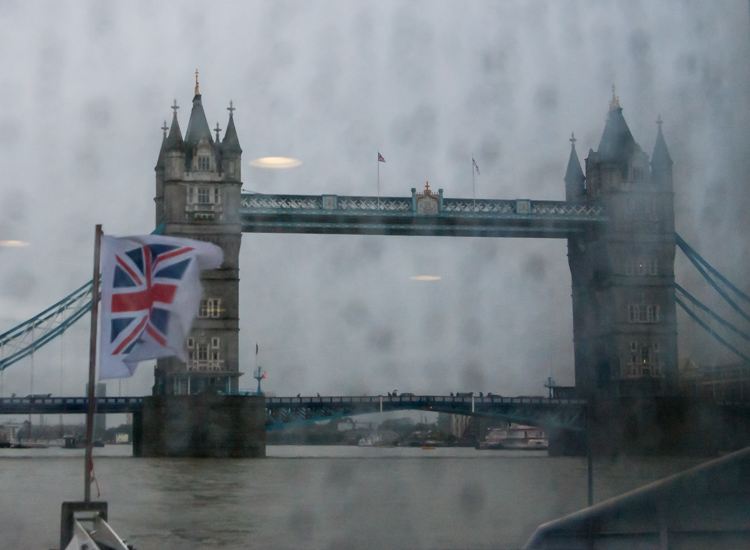
In the photo below you’ll see some framing which is going across the corner of the photo. So it’s still drawing your eye to the subject – which is the rising sun and Tower Bridge – but it’s quite subtle. I would perhaps suggest that the bottom elements are creating a second framing element, grounding the photo, and framing the sun. What do you think?

natural-framing-tips--8

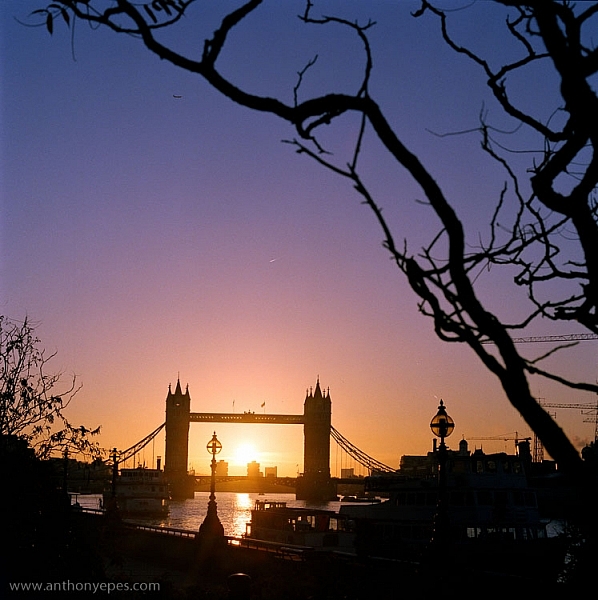
When I am shooting photos with big sky – which is favourite subject of mine – what I often do is shoot when small objects appear in the sky, like above. If you look closely you can see a very small plane. Or sometimes a tiny bird appears, or some other random object. People often ask me why I don’t Photoshop it out because it can look like a piece of dust or a mistake, but I love these little surprising elements. It’s great if there can be tiny details that create layers of interest in your shots, so your viewers don’t see everything all at once. (Or as Henri Cartier-Bresson said, “The little, human detail can become a Leitmotiv.”)

Here is another photo that is truly on the edge of being framing. But I think it shows how you can play with the idea (and there is nothing more fun than playing with all these different concepts and ideas, and making them your own).

Greeting Shadows

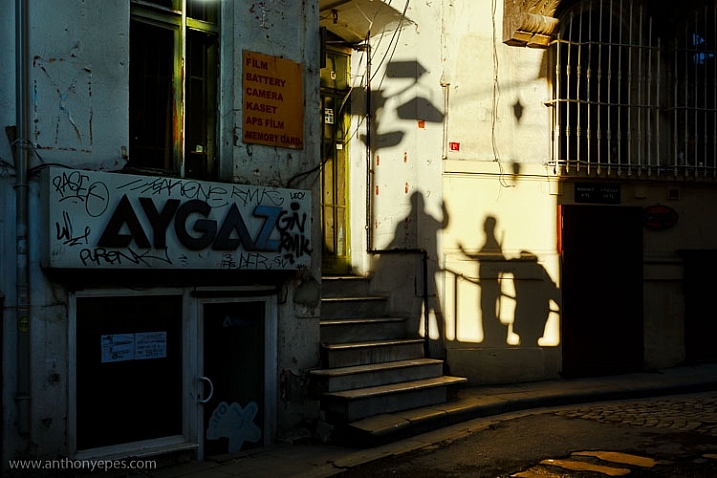
I looked at this photo and thought – wow, I’ve framed the image of the shadows of the people with the surrounding dark shadow. It is doing what natural framing tells us to – which is use a frame to draw attention to the real subject of the photo, so I think it fits.

Use multiple frames within one image

I am a little bit obsessed with photographing things I find on the street. I love photographing very ordinary things – like chewing gum or lines on the road, disconnecting them from their wider context, and just playing with their shapes. This is also another way to help train you to practice breaking the world down into elements, so that you can then start to organize them in a more constructive way.

You can go further still by making the frame within your image just a part of the image, and not the whole thing. It could even be just a suggestion of a frame, like I did here.

natural-framing-tips--5

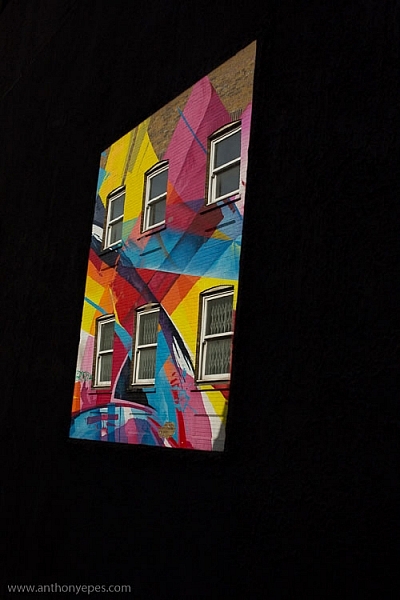
I love using very simple backgrounds with strong colours for my portraits. This is because firstly, I want the background to not distract from subject, so a simple background is usually best. The camera can’t easily recreate the layers that we see with our awesome 3D eyes. So if, for example, you put a subject in front of a crowd, you will get a flat image without depth.

Homeless World Cup Hasselblad Portraits

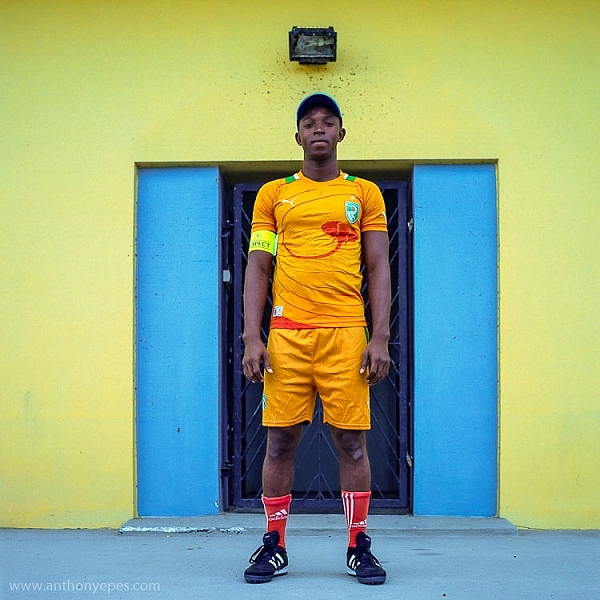
Plus, I like to have the colour and texture of the background really fit with the subject – maybe with their clothes, their posture, their expression, etc. This photo is a good example of my philosophy on this point.

Now back to framing! One key reason the photo above works is the added dimension of some framing. Yes, again not a totally traditional use of it, but you can see that the yellow arch shape and the blue strips either side are adding some great structure and form to the image. You’ve also got a sense of them confining the subject, which gives a nice balance to his strong, proud posture. That feeling of being confined is something you can do well with natural framing, and adds a curious feeling to the photo (since the posture of the subject is so proud and strong, you can’t imagine him being confined, right?).

Everything within your frame has a message

natural-framing-19

As the photographer, you need to make sure that everything you put in the frame is saying something that you want it to – that the elements are all working together to form the idea and feeling that you seek. If you don’t know what that’s supposed to be – just ask yourself:

  • What am I feeling here?
  • What is interesting to me in this scene?
  • Why is this important?

It’s these feelings that you will be communicating through your images, if you’ve done it well and created a strong photograph.

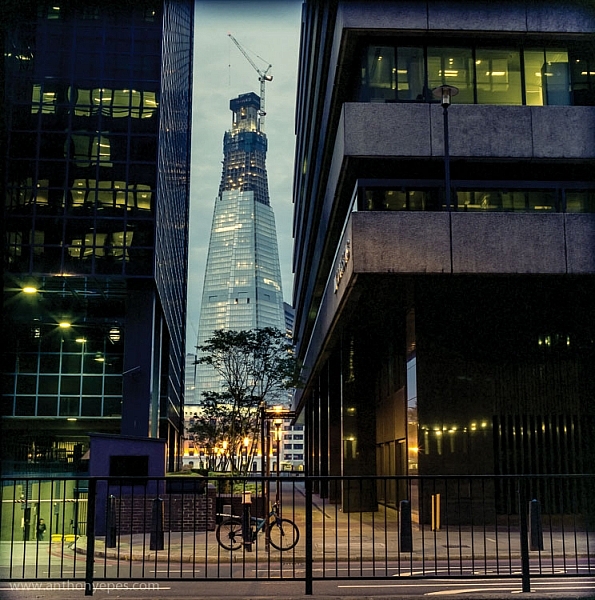
In the image below I framed the Shard, with buildings on the side and a fence along the bottom. There is a risk that it could all have blended in together, but that bright blue sky has created a natural space around the subject.

natural-framing-tips--1

If this is all feeling like a bit too much, don’t worry, as it all becomes instinctive after a while. As a final note, I like this thought from Henri Cartier-Bresson:

“You just have to live and life will give you pictures.”

It’s a great way to live.

I’d love to know what you think of natural framing – do you use this technique? What do you think of the examples I’ve given here? Have you been inspired to try this out if you’ve never used it before? If you have any photos you’d like to post here I’d love to see them.

googletag.cmd.push(function() {
tablet_slots.push( googletag.defineSlot( “/1005424/_dPSv4_tab-all-article-bottom_(300×250)”, [300, 250], “pb-ad-78623” ).addService( googletag.pubads() ) ); } );

googletag.cmd.push(function() {
mobile_slots.push( googletag.defineSlot( “/1005424/_dPSv4_mob-all-article-bottom_(300×250)”, [300, 250], “pb-ad-78158” ).addService( googletag.pubads() ) ); } );

The post Tips for Using Natural Framing to Improve Your Composition by Anthony Epes appeared first on Digital Photography School.


Digital Photography School

 
Comments Off on Tips for Using Natural Framing to Improve Your Composition

Posted in Photography


4 Tips for Better Child Photography by a Mom

10 Jul

Elena Shumilova and her family moved to the country and she started photographing her two sons. Then she put her images online and something magical happened – the world loved them! She has over 50 million views of her images and counting.

In the first video below you can see how she captures the natural moments of her children’s lives in such a way as to captivate the world. Then watch the second to get four tips you can use to do the same and do better child photography of your own kids, grandkids or neighbors.

Mom Captures Childhood of Her Sons

4 Expert Tips for Child Photography

You can see more of Elena’s images of childhood here.

Are you inspired? Go take some photos of the children in your life and share them below!

googletag.cmd.push(function() {
tablet_slots.push( googletag.defineSlot( “/1005424/_dPSv4_tab-all-article-bottom_(300×250)”, [300, 250], “pb-ad-78623” ).addService( googletag.pubads() ) ); } );

googletag.cmd.push(function() {
mobile_slots.push( googletag.defineSlot( “/1005424/_dPSv4_mob-all-article-bottom_(300×250)”, [300, 250], “pb-ad-78158” ).addService( googletag.pubads() ) ); } );

The post 4 Tips for Better Child Photography by a Mom by Darlene Hildebrandt appeared first on Digital Photography School.


Digital Photography School

 
Comments Off on 4 Tips for Better Child Photography by a Mom

Posted in Photography


Tips for How to Make the Most of Rainy Days

08 Jul

It isn’t always possible to get great weather when are out photographing. If you’re on a once in a lifetime vacation and you encounter rainy weather, then you have a couple of choices. You can pack away your camera and forget about shooting until the weather improves, or you can find a creative approach to make the most of the inclement weather. I suggest you attempt the latter, and when you encounter wet weather, look for opportunities to create great photos notwithstanding the rain.

In fact, if you compare a day with dull gray skies to one where there is plenty of rain, you might actually find that the rainy day is preferable, as there are more things of interest happening.

Melbourne Australia in the rain

There are, however, some things to consider when shooting in the rain. You will want to protect your gear from getting too wet, and you will want to know a bit about using your camera so that you can take great shots. Here are some tips for shooting on rainy days.

Preparing for rain

Invariably, at some time you will encounter rainy weather when you are out photographing. If you have a set of “go to” creative options that you have practiced, and you are familiar with, you can swing immediately into the mindset of taking advantage of the wet weather and capture some great shots. I’ll give you some ideas about what you can shoot.

You’ll also need to prepare yourself and your camera so you can stay as dry as possible. Wet weather shooting should still be fun, and staying dry is an important part of that.

What to shoot

When you encounter rainy weather you can try to minimize the appearance of the rain or capture it. If you try to avoid the rain you’ll often capture dull and uninteresting images. Whereas if you capture the rain in your photographs, you’ll likely achieve more creative and interesting images.

Shoot through windows

Here are two shots of Tower Bridge in London shot from a ferry on the Thames. For the first image I shot through a rain-splattered window and focused on the Tower Bridge. The result is, quite frankly, embarrassingly awful.

Tower Bridge London in the rain

This second image is shot from the same ferry, through the same window, but this time I focused on the raindrops instead of the bridge. The Tower Bridge is still recognizable, and the overall image is much more creative and pleasing. When you next get a chance, try focusing on the raindrops on a window, and not what you see through it.

Tower Bridge London in the rain

In this shot below , captured through a taxi window as it sped through Melbourne in a sudden downpour, the focus has landed somewhere between the window and the bike, and the result is a painterly image.

Tower Bridge London in the rain

Shoot puddles

Where there is rain, there are generally puddles. These puddles will reflect anything (and everything) from car taillights to buildings, and from people to trees. Look out for interesting objects reflected in puddles.

Rome - reflection of building in a puddle

Shoot water droplets

For a time after it has rained, raindrops will still cling to plants and other surfaces. Look for interesting objects dotted with raindrops.

raindrops on yellow flowers

Shoot the clouds

Before it rains you will typically see interesting formations of rain clouds. Sometimes they will enhance an otherwise spectacular landscape, and sometimes they are the subject a photo in and of themselves.

thunderous clouds

When there are gaps between rain clouds, you will often see shafts of sunlight piercing the clouds and highlighting small areas of a landscape or cityscape. This light is truly magical and it will give a sense of drama a scene. Keep an eye out for this light and shoot it quickly when you see it – because the clouds are moving, light that is there one minute, will be gone the next.

St Paul’s lit by shard of light

Camera settings

Some creative photography will require skills beyond using the automatic settings on your camera. For example when you opt to capture the raindrops on a window rather than what you see through the window you will need to experiment to find the best distance to stand from the window. Moving one or two steps closer or further from the window can totally change the image.

You will also probably need to manually focus your camera so you need to know how to set it to Manual focus mode. The reason for this is that most cameras in autofocus mode will try to focus on the distant building, and won’t focus on the raindrops on the window. Using manual focus will allow you to determine exactly what is in focus in your shot.

To capture raindrops on plants and other surfaces, you can use Aperture Priority mode and vary the aperture to achieve different results. A very large aperture (f/ 2.0 – f/5.6) will give you a shallow depth of field with only a small part of the scene in focus. A small aperture (f/8- f/13) will result in a much deeper depth of field, where more of the scene is in focus. It is up to you to decide how much of the image you want to be in focus – just be sure you know how to set your camera in Aperture Priority mode, what range of apertures are available for the lens you are using, and how to change the aperture setting.

Caring for you and your camera

When shooting in the rain you’ll want to keep your camera and yourself as dry as possible. I find it preferable to wear a raincoat with a hood because I find it impossible to juggle an umbrella and a camera at the same time. Whatever you choose, carry only what you need to have with you, so you have a better chance of keeping everything dry. It’s best to avoid changing lenses in wet weather, so stick with just one lens. Take care when moving from a cold, rainy situation into a warmer building. The heat combined with the damp will increase the humidity and you run the risk of condensation forming inside your camera lens.

Even if your camera has good weather seals, take care to protect it as best you can. There are plenty of good rain covers that you can purchase for your camera, or in a pinch, cover the camera and lens with a plastic bag, and cut a small opening for the lens. Duct tape or elastic bands will hold the bag securely on the camera.

Make sure to pack some clean, dry towels that you can use to wipe off your camera, but don’t use them on your lens – only use a lens cleaning cloth on the lens glass.

If your camera gets wet, dry it off as carefully as you can, and leave the lens open at full zoom until it’s thoroughly dry. A camera will dry best in a cool dry place, and you can use silica gel (an absorbent material sold in packets) in your camera bag to help avoid condensation forming.

Conclusion

Giving some thought as to creative options for capturing great photos in the rain, with some advanced preparation so that you and your camera stay dry, may turn the prospect of shooting on a rainy day from a sorry disappointment, into an exciting challenge.

googletag.cmd.push(function() {
tablet_slots.push( googletag.defineSlot( “/1005424/_dPSv4_tab-all-article-bottom_(300×250)”, [300, 250], “pb-ad-78623” ).addService( googletag.pubads() ) ); } );

googletag.cmd.push(function() {
mobile_slots.push( googletag.defineSlot( “/1005424/_dPSv4_mob-all-article-bottom_(300×250)”, [300, 250], “pb-ad-78158” ).addService( googletag.pubads() ) ); } );

The post Tips for How to Make the Most of Rainy Days by Helen Bradley appeared first on Digital Photography School.


Digital Photography School

 
Comments Off on Tips for How to Make the Most of Rainy Days

Posted in Photography


Wanted: Homepage content tips and freelance writers!

07 Jul

We’re on the lookout for freelance writers to contribute news and short feature content for our homepage. If you’re an experienced writer with great editorial instincts who loves ferreting out interesting and unusual photo-related content, we want to hear from you. 

If you’re interested in contributing to dpreview.com, click here and tell us about yourself – preferably with links to published work. If we like the cut of your jib, we’ll be in touch.

If you’re not interested in writing for DPReview, but you’ve found an interesting story that you think we should write about, you can submit suggestions here.

Articles: Digital Photography Review (dpreview.com)

 
Comments Off on Wanted: Homepage content tips and freelance writers!

Posted in Uncategorized


5 Life-Saving Tips on How to Back Up Photos

07 Jul

Everyone’s heard the horror stories about people who’ve lost their photos, and everyone knows that – no matter what they’re of or what they’re for – losing your pictures can be devastating. Whether it’s a folder of precious family photos, a portfolio, or a project for a client, replacing what was lost can be time consuming, expensive, and even impossible Continue Reading

The post 5 Life-Saving Tips on How to Back Up Photos appeared first on Photodoto.


Photodoto

 
Comments Off on 5 Life-Saving Tips on How to Back Up Photos

Posted in Photography


Tips for HDR Night Photography to Retain Maximum Image Detail

07 Jul

Night photography is very popular, and if you go out to take photos on on any given night here in my hometown of Melbourne, you will find other photographers doing the same thing. Night photography can create magical images and you are able to see things with the camera, that you can not see with your eyes alone. Your camera can do a better job at taking in the lights than you can.

leannecole-night-photography-nightHDR-start

HDR image of Docklands, Melbourne.

Taking photos with your phone, or on a compact camera, is never going to give you those amazing results you see of night photos. You really need to do long exposures; set your camera up on a tripod and do exposures from a couple of seconds, to several minutes.

One major problem with taking photos at night is the sharp contrast between the highlights and shadows. If you try and get detail in the shadows, you will often blow out your highlights. If you do expose for the bright parts, then you won’t get any detail in the rest. Most people don’t mind this. However, if you want your night images to really sing, you should start looking at what you can do to make them stand out.

Comparing shots with different exposures

Here is a side by side comparison of images all taken at the same time, but with different methods. The first was taken with a phone, the second is a single exposure, the one the camera says is correct. Lastly, the third image is an HDR using four out of five bracketed shots.

leannecole-nightphotography-comparison

Three images of the same scene, (left) phone, (middle) camera correct exposure, and (right) HDR.

Hopefully you can recognize the difference and appreciate just how unique each approach is.

Photos with your phone

You see a lot of people in the city taking photos with their phones. If it is all you have, then you have to be content with what you get. However, you are never going to get amazing night photos simply with a phone or most compact cameras. Often the photos are too grainy, you will only get a few of the highlights, and none of the depth that a longer exposure will give you.

To get great night photos you need to have a camera on which you can control the ISO, aperture and shutter speed.

The first image (below) was taken with the Samsung Galaxy Note 4. It is not a bad image for a phone, but it is noisy and not as sharp.

leannecole-night-photography-phone

Image taken with phone of Melbourne at the Casino.

Using a DSLR or Mirrorless Camera

When you can control what your camera is doing, then you can use a low ISO, the aperture you want, and get a shutter speed of a couple of seconds to several minutes. You will get a lot more detail doing this, however, you do need more equipment.

A tripod or somewhere solid to set your camera is important to prevent camera shake. If you want to do exposures longer than 30 seconds you will need a remote shutter release, that will allow you to lock your shutter open for however long you choose to expose. Both are pieces of equipment that you will use a lot so they are worth getting.

This image was taken with a DSLR at the correct exposure, according to the camera.

leannecole-night-photography-3

Single image of Melbourne at the Casino.

Bracketing

Bracketing your photos is thought to be a process that people only do for HDR. However, photographers have been using this technique for a very long time. In the days of film, you would have had to work it out for yourself, but most digital cameras have the ability to take bracketed exposures, and do the calculating for you.

The process involves taking a series of photos, usually three or five. When you do this, you are taking one image that is the correct exposure, and additional images that are under and overexposed. The amount of time for each image changes, while aperture and ISO remain the same, and the shutter speed is altered by the camera.

There are good reasons for bracketing, one being that it gives you more options. Sometimes the exposure the camera says is the right one, is in fact not. The overexposed image or the one that is under can be the better choice.

leannecole-nightphotography-bracketed

Five bracketed photos ready to use.

There are, of course, disadvantages to bracketing. You end up with many more images, especially if you are doing five each time. If you are shooting in RAW you may encounter storage problems. However, I find that the positives far outweigh the negatives.

High Dynamic Range (HDR)

HDR has been popular for a few years and we have all seen those hyper real images that some people create. They have given the process a bad name, but if it is used in the situations it is meant for, it can be very effective.

High Dynamic Range is used to correct the problem of having very bright and overly dark areas. Cameras do not work the same way as our eyes, and they cannot make the necessary adjustments that your brain and eyes do. Your camera will either expose for the highlights and make the shadows too dark, or it will do the opposite.

HDR software takes the well exposed highlights and shadows, and puts them together in one finished image so that nothing is lost in either area. You can do it manually (using luminosity masking or layer blending), but there is good software out there which can do it for you.

Here is an HDR image of the same scene above, using four of five bracketed shots. Notice how much more detail is retained in the highlights.

leannecole-night-photography-hdr-example

HDR night image of Melbourne at the Casino.

HDR Software

There are many different types of software that can process your HDR images for you. The most popular has been Photomatix Pro, though Lightroom and Photoshop can also be used, and they have improved significantly over the years.

Lightroom does a fairly decent HDR image and I often use it. However, you do have to be careful that the image is processed properly. Sometimes it misses spots, but most of the time it is effective.

Lightroom HDR

It is easy to use Lightroom’s Merge to HDR. Select the images you want to process and highlight them. Go to Photo > Photo Merge > and click on HDR (you can also find it by right clicking with the images selected).

leannecole-night-photography-101

Selecting photos and merging for a HDR in Lightroom.

A separate window will come up. You can select whether you need deghosting or not (use it if something has moved between shots like trees or people). If you have used a tripod to take the image then you shouldn’t need deghosting, although it doesn’t hurt to use it regardless.

leannecole-night-photography-102

Lightroom loading the photos ready for you to click Merge

Watch for the Merge icon to come up and then press it.

Often the image will appear at the end of the folder, sometimes just after the images. You may have to search for it (sort by file name and it should appear next to your originals).

Once it is done you will see that it does not look great.

leannecole-night-photography-103

What the image looks like when Lightroom has processed it using Auto Tone.

Lightroom shows you the adjustments that it has made using Auto Tone, but there is no reason why you can not change them.

I have found that it will often have the exposure up too far, but you are able to turn that down slightly. You can turn the shadows down a little, and you usually need to add more black to the image. Compare the image above and below and you can see what changes have been made.

leannecole-night-photography-104

What it looks like after you have made changes to the adjustments.

Once you have the image as you want it, you can do further adjustments in Lightroom or press Ctrl+E and continue editing it in Photoshop.

Long Exposure Night Photography

There is nothing wrong with doing long exposures as well. You do not need filters, but you can do images that are more than 30 seconds. Using a tripod and a remote shutter release, you can put your shutter speed on Bulb, and try taking some exposures for a minute or longer.

leannecole-night-photography-longexposure

A one minute exposure of Melbourne at the Casino.

You do have to be careful that you don’t blow out the highlights too much. Try different times and see what you can get.

Examples

Night photos taken with any of these techniques can give you great results. You should try them all and see which ones you like, and what works best for your style.

Following are some more night shots with descriptions of how they were done.  Good luck and be safe out there.

leannecole-night-photography-example3

Hosier Lane in Melbourne, HDR image with 4 images.

leannecole-night-photography-hdr-example2

HDR image of laneway in Melbourne.

leannecole-night-photography-example4

Single image at docklands with a one minute exposure.

googletag.cmd.push(function() {
tablet_slots.push( googletag.defineSlot( “/1005424/_dPSv4_tab-all-article-bottom_(300×250)”, [300, 250], “pb-ad-78623” ).addService( googletag.pubads() ) ); } );

googletag.cmd.push(function() {
mobile_slots.push( googletag.defineSlot( “/1005424/_dPSv4_mob-all-article-bottom_(300×250)”, [300, 250], “pb-ad-78158” ).addService( googletag.pubads() ) ); } );

The post Tips for HDR Night Photography to Retain Maximum Image Detail by Leanne Cole appeared first on Digital Photography School.


Digital Photography School

 
Comments Off on Tips for HDR Night Photography to Retain Maximum Image Detail

Posted in Photography


Tips for Successful Star Trails Photography

06 Jul

Star trail photography – not so difficult with the correct planning and appropriate gear

In this short article I will show you, the night sky enthusiastic, that by using the right gear and proper planning, you too can make beautiful star trail photo.

Actually, shooting the stars is not that much different from any other kind of photography, and a decent composition is the key to an outstanding photo. Here are some star trail photography tips to help you.

Camera pointed to NorthNorth West

Camera pointed to North/North-West with an artificially lit foreground.

Prepare your gear

  • A DSLR camera (or one that has Manual shooting mode) with fully charged battery.
  • Plenty of room on your memory card. I suggest shooting all in RAW as you’ll get better results later in post-processing.
  • A wide angle lens. Anything between 10-20mm will give you good results. You can shoot also with a longer focal length but the results will be less impressive. Using a wide aperture is also essential to allow lower ISO.
  • A strong, steady, tripod. When placing it, make sure nothing will cause it to shiver from a passing wind.
  • A remote control (preferably not wireless). If you have a way to program intervals in your camera, the remote is not necessary.
  • Stuff to help you pass the time – coffee set, snacks, a comfortable chair, etc.
Camera pointed to North with an artificially lit foreground .

Camera pointed to North with an artificially lit foreground .

Planning ahead

Before going out there, you must consider there is some planning needed to be done.

  1. Choose your location carefully (there is no place for spontaneity). There are several things to consider, but most importantly you need a dark location, as far as possible from light polluted areas. Consider that city halos are visible at night for a very long distance, so get as far as possible from light sources. The darker the area you’re, the more stars you’ll see.
  2. Consider an interesting foreground item to be used as your anchor in the photo. It is not enough to shoot the stars, you want to have a nice foreground to make your photo interesting and unique. Find yourself a big tree, an interesting rock formation, a pier on a lake, or any other item to be used as your anchor.
  3. Learn about the weather and the moon phases – to get a good, clean shot you need a good, clear, dark sky. Choose that period of the month when the moon is not visible in the night sky (or is smaller like crescent moon), and make sure the forecast does not predict too many clouds. High humidity is also not good, as it may accumulate on your lens and result in blurry frames.
  4. Consider the rotation of the stars and the Earth, as this will determine the appearance of the final result. The best results (in my opinion) will be achieved by shooting to the North (photo above) or to the South-East (photo below). Since Earth and the North Star are moving in the same direction, at the same pace, it appears as if all stars are rotating around the North Star, so having it in your frame will result in getting circles of stars. Shooting to the South-East will grant you with an almost horizontal line, that is concave in one corner and convex in the opposite corner. The stars rotation speed is 15 degrees per hour around the North Star. That means that stars closer to the North Star will make a shorter distance in comparison to those further away (also, the longer you’ll shoot, the longer the lines will be).
Camera pointed to South East

Camera pointed to South-East with foreground lit by surrounding light pollution.

Getting started

#1 Pick a foreground anchor

Although you may want to show as much of the night sky as possible, it cannot stand alone. Your photo must rely on a “strong” anchor / foreground if you want your viewers to be really impressed.

#2 Get there before dark

In most cases, it will be quite difficult, to the verge of impossible, to build your composition at night, in total darkness. It is better to arrive before night falls and it gets too dark to see. The last minutes of the day are your best time to plan and build your composition.

#3 Compose your shot

This is now the moment you place your camera and composing your frame. Remember to consider not only the appearance of your foreground in the frame, but also the direction that the camera is facing (as explained above).

Camera pointed to North/North-West lit by surrounding light pollution. Trails looks fragrant due to passing clouds.

Camera pointed to North/North-West lit by surrounding light pollution. Trails looks fragmented due to passing clouds.

#4 Shoot for the foreground

Take the first shot which will be used as the foreground of the frame. If you want your foreground to be a silhouette then all is good. But, if you want details to be shown, you will need to have at least one frame lit up. This can be achieved if few ways

  • Shooting one frame during twilight
  • Use a high ISO and longer exposure
  • Using an outside light source such as flash (it is good to use a CTO gel for the right color temperature). Your goal here is to get one frame that has good detail of your chosen foreground. It is better to take few options using different ISO level / exposure time / lightning options to be able to choose the best result afterward. When satisfied, you can move on to do a test frame of the sky.

#5 Setup and test camera settings for the night sky

Change the settings of the camera to get the best result for the night sky, without interference of light pollution. You need to see as many stars as possible, and to make sure they are in focus. The camera needs to be in Manual mode (or Bulb if using intervals). White Balance needs to be decided by you, and not on Auto mode (preferably in Tungsten mode, it will give you more blue in your image). Aperture set as wide as possible and an exposure time of around 30 seconds (with intervals you can set it to longer, but not more than a minute, for the sake of your sensor – it gets too hot).

You can change the ISO to get lighter or darker sky as needed, but not too high to keep a smooth, clean frame. Once satisfied with the result, keep the settings and erase these test frames (just make sure to keep the foreground frames you did in step #4 above).

#6 Take a couple dark frames

Camera pointed to South-East with foreground lit by surrounding light pollution coming from behind.

Camera pointed to South-East with foreground lit by surrounding light pollution coming from behind.

Take one or two dark frames. This is done by putting on the lens cap, and shooting with the settings you chose in step #5 above. These frames will be used later in post-processing. Make sure you remove the cap once you’re done this part!

#7 Take your interval shots

Lock the shutter release controller or press start if doing intervals. Wait to see that it works properly, and a new exposure starts immediately after one ends. Now it’s time to let the camera work for as long as you decided, while you rest or go do something else, but make sure you keep a distance and are not adding light into your camera or composition. For a good result, it is advised to shoot for at least two hours, especially when shooting to the North.

#8 Take two more dark frames

Once your intervals are finished, before moving the camera, repeat on step 6 and take a couple more dark frames.

This is it, YOU made it! All is finished and you can go back home for the post-processing part.

Post-processing star trails

First, from the foreground frames, choose the one that looks the best and process it to your liking. In this frame you can ignore the look of the sky, and if possible, it’s even better to darken it. When you’re happy with it, convert to JPEG or TIFF.

Foreground frame

A frame taken during blue hour to be used as foreground.

Next, move on to the sky frames. Process the first one to improve the appearance and visibility of the stars. In this frame you can ignore the look of the foreground, and if possible, it’s better to darken it. Synchronize your settings to the rest of the sky frames. Export or convert the files to JPEG or TIFF.

Sky frame

One of the frames taken for the stars.

If you did any lens corrections, apply them also to the dark frames, then convert them to the same format as the sky frames.

Move on to the software you use for combining the frames – you can choose StarStax (Mac and Windows) or Startrails (Windows only) which are both free, very easy, and efficient. Upload the frames to their dedicated location (dark frames goes separately – the software is using them to subtract burned pixels from the final result).

Stacked frame

The result of merging all the sky frames in Starstax.

The foreground frame can be handled in one of two ways – (a) placed together with all other sky frames or (b) left aside for merging it later to the final result, in Photoshop.

If you are working with StarStax, I recommend marking the Gap Filling option (in Startrails it is called: Lighten-screen-blend). It will make the processing time a bit longer, but the final result will be smoother.

If you chose to add the foreground image in when stacking the sky image, the result you’ll get is the final one and you may need only some fine-tuning to be done in Photoshop. Due to the time passed from the shooting of the foreground frame to the sky frames, you will notice a dot in front of every trail. These are the stars captured in the foreground frame. I see them as an interference in the overall look and erase them one by one.

If adding the foreground image in Photoshop later was your choice, then now is the time to put it all together. Load the foreground frame and the star trail frame as layers in Photoshop, and merge them into one using a layer mask. This option is better when the sky in the foreground frame is too bright.

Final after merging and cleaning

The final frame after cleaning up any disturbing lights in the sky, and merging with the foreground.

googletag.cmd.push(function() {
tablet_slots.push( googletag.defineSlot( “/1005424/_dPSv4_tab-all-article-bottom_(300×250)”, [300, 250], “pb-ad-78623” ).addService( googletag.pubads() ) ); } );

googletag.cmd.push(function() {
mobile_slots.push( googletag.defineSlot( “/1005424/_dPSv4_mob-all-article-bottom_(300×250)”, [300, 250], “pb-ad-78158” ).addService( googletag.pubads() ) ); } );

The post Tips for Successful Star Trails Photography by Amir Ehrlich appeared first on Digital Photography School.


Digital Photography School

 
Comments Off on Tips for Successful Star Trails Photography

Posted in Photography


Equipment Tips for Quick and Efficient Studio Product Photography

05 Jul

In this article I’m going to discuss the equipment you will need to create great product photography. I built my setup to provide great versatile lighting, speed, and the ability to cut out the product in post production very quickly and accurately. This setup can be used for still life, food, fine art and even some macro work.

Article Example_03

When I first started doing product photography I was hired by a company to reshoot their entire 3200 piece inventory. Needless to say that was a HUGE job, and speed and efficiency was paramount. I had previously not done more than a few dozen parts at one time for a client, so I really was not set up to undertake a job of this scale. I was going to have to rethink a lot of things, and I knew I was going to need additional studio equipment. The words, “Not going to happen” were not going to come out of my mouth, as I wanted the challenge and the learning experience. Many of the things I implemented for that specific job are still in use for my product photography today. This tips in this article are a good base to start if you are an aspiring product photographer.

Requirements of a product setup

Article Example_04

Here is what I felt were the most important things to plan for to make this job happen.

  1. Speed – to be able to quickly move through multiple angles of a single product, and to adapt quickly to the next product.
  2. Versatile light – lighting that can stay constant for similar groups of products, but remain flexible enough to quickly shift to get proper exposure.
  3. Cut-out ease – the ability to knock out a product from the background quickly in post-production, and place a product on pure white without having to open the image in Photoshop.

With this list in mind you find yourself smack dab in the crosshairs of a shooting table. There really is no other way around it. This is why a shooting table works so well for this type of setup.

1. Speed

Article-Example_01b

A platform is needed when you want to quickly move products in front of your camera and then off the set. Why not make it a platform that is specifically made for photography? The seamless background of a shooting table means less fussing around with intersecting lines that is typical with most background setups, and you won’t have to spend much time with product placement within the scene. That alone will speed up your shoots.

2. Versatile light

You can bounce light off the white shooting table, or better yet light the table from below, causing it to glow. Another great thing about a shooting table is that it’s white. White is a great way to control the shadows of a product. If I had it my way I would have the product completely enshrouded in white light or reflectors, then introduce shadows that add shape and dimension via black cards for the ultimate control. That unfortunately isn’t going to happen, but a white table is a great start.

ShootList4

Table with light coming from below.

ShootList5

Table with light from above.

3. Remove background quickly in post-production

Article Example_05

Article-Example_02b

Nice clean light, easy to cut-out product shot.

No one wants to sit around using the Quick Selection tool in Photoshop, refining the edge, seeing the horrible job that tool does, and then finally having to use the much more labor intensive Pen tool to mask out the background. It’s far easier to get this done in camera, or at least give yourself a huge head start. The time you will save with this method will add up very quickly, and will give you a more natural look.

A shooting table

A shooting table is the first place to spend your money. There are many different tables out there but after all my research I found the Foba DIMIU shooting table to be the perfect solution for me.

ShootList3

It is a large shooting area, a long sweeping seamless Plexiglas surface that allows you to light from above or below it, the table frame features 4 – æ inch studs at each corner that can be used for various attachments such as arms and brackets to hold cards, product or lights.

ShootList1

The table is lightweight, can be moved around the studio with ease, and is easy to assemble. I raised the height of my table by using 6×4 lumber cut into blocks, and some bed risers.

ShootList2

At $ 1,544 I realize that the price might keep it out of a lot of hands. But, don’t fret, a more affordable option can be found, like the Manfrotto large still life table for $ 811. If you’re planning on shooting only small products, the Manfrotto mini table at $ 480 is an option as well. Keep in mind, if you think you might have large products in the future, spend the money now and get the largest table you can afford.

Lighting

Lighting is the next thing to consider. The type of system you choose is going to make a pretty big difference when it comes to shooting your actual products. You will ultimately be choosing between two main types of light; a constant (continuous) light system or a studio strobe (flash) system.

A constant light setup is going to be much easier if you’re just starting out with product photography. With a constant light system the learning curve is exponentially smaller. The benefits of What You See Is What You Get (WYSIWYG) light cannot be overstated. I am going to go out on a limb to make a broad statement and say that if you are reading this article for help with your product photography, then you likely do not have the experience needed to employ studio strobes as your light source.

Article Example_03

Even if you have some experience with strobes, unless you have two to three years or more of shooting strobes in a product environment, do yourself a huge favor and get continuous lights. You will be amazed at how much, and how quickly you will learn when you use constant light. Plus there are some added benefits of using a constant light:

  • No tether equipment. You do not have to control the lights with a radio transmitter, by placing the light in optical slave mode, or by a cable like you do with studio strobes. They will always be on, ready to make pictures.
  • You can use them as video lights if you want to get into motion for product shots.
  • They are a far superior light learning tool, even for more advanced photographers. In my opinion this reason alone is why you want go with constant light.

ShootList9

Okay great, you are going to take my advice and get some constant light. My recommendation would be the Westcott Spiderlite TD6 system for the following reasons:

  • They are bright.
  • The fluorescent bulbs stay cool. A huge deal when you are stuffed in a studio with no windows.
  • The included bulbs are daylight balanced and can be mixed with light from a window.
  • Option to use tungsten halogens (not sure why you would because those bulbs run so hot).
  • Westcott has plenty of light modifiers for shaping your light.
  • Light output is controllable in 33% increments with three switches.
  • Solid build, with all metal heads and quality light modifiers.

When I bought the kit from Westcott it came with the Spiderlite TD6 head, six 50w fluorescent bulbs, a tilter bracket, and the 36×48 softbox. I paid $ 700 per light, and bought two of those kits for a grand total of $ 1400.

ShootList10

There is some good news though. At the time of writing this article, there is a Westcott promo kit that comes with two of everything, two heads, two brackets, two sets of bulbs, and two softboxes, one is the 36×48 the other is a strip 12×36. The kit is going for $ 799. A fantastic buy for this lighting system.

If that is still a little more than you want to spend, then there are some other options for lighting. Impact has a kit that has light heads, stands, bulbs, and modifiers for about $ 265. But as my grandfather always said, you can’t afford to buy something twice. If product photography is something you are going to do, pay for the quality of Westcott. It will last, day in and day out.

My TD6 lights are used primarily as my key (main) and fill lights. I still need to be able to light my shooting table. For that I turned to some reflectors.

ShootList6

I went with two 16″ reflectors from Flashpoint, for $ 70 a piece. These sit under my raised shooting table and shine straight up through the bottom to blow out my table top.

ShootList7

Light stands

Now is a good time to talk about support. Supporting your lights should be carefully considered, and you need to ensure you don’t skimp here. I have a story to help illustrate this point. While doing a product shot for a client I was moving about the studio, and I brushed past my lights on my way back to my camera. Before I could turn around and look at the scene I heard a crash. My light had toppled over, hit the table, knocked the product off balance, and it hit the floor and broke. It was a bottle of wine. I was left with a huge mess to clean up, a broken bottle that needed to be replaced, and a bill from the client for the unreturned product. It could have been worse, but not by much. Invest in your light stands. Get good ones and weigh them down properly with sandbags.

You are going to want to use some sort of a C-Stand. Whether it be a turtle base (removable legs from the center column) a rocky mountain C-stand (a stand with one leg that can go up and down the center column) or a super C-stand (extra heavy duty) invest in a C stand for your large lights. Also, always have sandbags handy to weigh the C-stands down once you bring them onto your set.

ShootList8

For the price of $ 129 per stand from Adorama, for their Flashpoint C-stand with turtle base is pretty great, I couldn’t be more pleased. It has been a fantastic solid stand for my large TD6 lights.

The other stand that I bought was a lot less mission critical, it was for my reflectors. I bought a few Manfrotto Nanopole stands which bottom out at 20″, and can go as high as six feet. They are not meant for anything too heavy, but they do the small stand job perfectly.

So, we touched on all the main equipment needed to make a successful product photography set. Do you have any other tips to add? What do you use for product photography? If you have any questions please ask in the comments below.

googletag.cmd.push(function() {
tablet_slots.push( googletag.defineSlot( “/1005424/_dPSv4_tab-all-article-bottom_(300×250)”, [300, 250], “pb-ad-78623” ).addService( googletag.pubads() ) ); } );

googletag.cmd.push(function() {
mobile_slots.push( googletag.defineSlot( “/1005424/_dPSv4_mob-all-article-bottom_(300×250)”, [300, 250], “pb-ad-78158” ).addService( googletag.pubads() ) ); } );

The post Equipment Tips for Quick and Efficient Studio Product Photography by Jacob Macias appeared first on Digital Photography School.


Digital Photography School

 
Comments Off on Equipment Tips for Quick and Efficient Studio Product Photography

Posted in Photography


Tips for File Renaming Success in Lightroom

03 Jul

This article is about how to build a useable file renaming strategy, and how to implement it in Lightroom. Your standard camera names are generally pretty boring. IMG this or DSC that, or even P0235425653. If you’re not using continuous naming you might even end up with hundreds of IMG_0001 files. Don’t laugh, I was there once upon a time after reading some terrible advice on camera settings.

If you’re using Lightroom, renaming is really straightforward and accessible from quite a few places in the application.

File naming in lightroom 1

Before we talk about how to rename your files, let’s talk about what you should name them. First and foremost, each photo should have a unique name. There are two number sets that can pretty much ensure this. The first is the date the photo was taken, and the second is the sequence number the camera creates (assuming you do use a continuous camera naming system). Mixed together these give each file a unique name. You’d need to shoot 10,000 images in a day to get two identical names with this structure. You could just use this method and nothing else, but a series of numbers, while great for sorting, is generally meaningless to most people.

File naming in lightroom 2
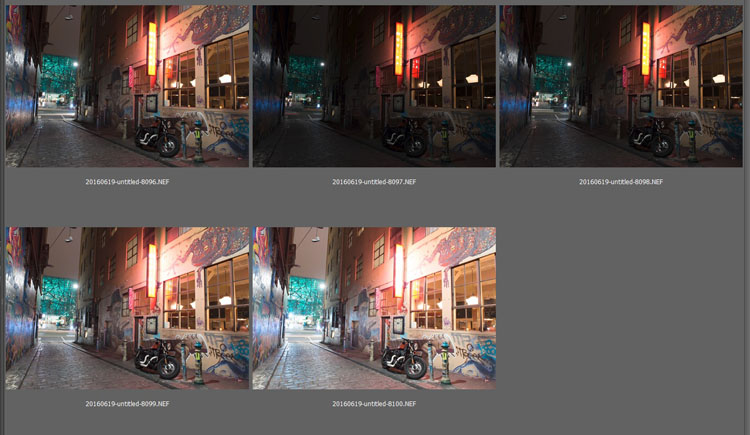
Some photographers use those number sets and their initials to get the filename. It’s enough to create that unique pattern. A string of numbers doesn’t tell you what’s in the file though, even with some initials. For this reason, I use a custom text field that I change with each shoot that I import. In Custom Text field I put a little description of the shoot. That way even outside Lightroom I can tell the contents of the file just from the name. It also gives me additional search terms I can use when looking for a file. Let’s look at how to set this up.

File naming template in Import

Renaming in Lightroom uses a mix of tokens and direct text in the box. The Dialog for creating File Naming Templates can be called up from a variety of places in Lightroom. The first place you see it is in the Import Dialog box when using one of the following settings: Move, Copy or Copy as DNG. It’s on the right hand side in the appropriately named File Renaming panel. As well as the type of File Naming, you can choose Custom Text/Shoot Name, a Start Number, and whether the file extension is upper or lower case.

File naming in lightroom 3

File naming in Lightroom depends on Templates, so click on the Template list and choose Edit from the bottom of the list (shown above). This opens the Filename Template Editor (below). At the top we see the current Template, or in a typically Lightroom fashion, it’s called a Preset here, versus being called a Template in Import. The contents of this list matches the one you saw in Import from the Template dropdown. Note that the Filename Template Editor is not exactly the same in each location you can use it in Lightroom. You’d think it would be, but nope, it’s not.

File naming in lightroom 4

Note this is the box you will see in the Import dialog popup. If you access rename files from the Library module it looks slightly different.

Next is the text box where the template is built. Any item you click from the list below will be added to the box, in the order you click them. You can also type directly into the box. Remember that text typed directly into the box will be added to all filenames, so use it sparingly (above there is only a hyphen added between tokens Custom Text and Sequence # to separate them).

File naming in lightroom 5

Below this are the tokens, split into sections of similar information. Image name has two options, Filename and Filename number suffix. The latter refers to the string of numbers at the end of the current filename (not necessarily the original file numbers). Note: When you use Edit in the Library version of renaming, you also get Folder Name as an option.

File naming in lightroom 6

Numbering has far more options. In each case you can choose an option with leading zeros. It’s good practice to include enough of these so your sorting looks okay. For example, Image1 is followed by Image10, then Image2 if you have no leading zero in the file name. For most things three leading zeros is enough.

File naming in lightroom 7

Import refers to the number of imports and can be set in the Catalog Settings dialog (under the Edit menu on PC, Lightroom menu on Mac), as can Image. Image itself refers to the number of images imported into Lightroom. Sequence creates a new sequence each time, with the start number set in the renaming panel (except on Export). Total refers to the number of images that are being imported at that time.

File naming in lightroom 8Next is the Additional Section. For the Date, you can opt for any combination of year, month, day, hour, minute or second. Personally I go for the YYYYMMDD version, though you could choose Year YY, Month MM and Date DD as as shorter year set. Using this at the start of the name puts all the photos in a dated chronological order when when sorting by name.

File naming in lightroom 9

The 2nd part of Additional is a metadata list (above). It contains things like the camera serial number and file dimensions.

Custom lets you add text that can change between imports. Shoot Name is available only in the Import menu. Shoot related naming is not available using Auto Import.

File naming in lightroom 10

When you’ve entered the tokens you can either click Done, to have the settings apply as Custom Settings or you can go back to the Presets menu, where you now have additional options. If you started off by editing an existing Preset (e.g. Filename) you can Save you settings as a new Preset, Update the Current Preset, or restore the default presets.

File naming in lightroom 11

If you select a Preset and don’t edit it, you get the options to Delete or Rename the preset (below) instead of the Update option. That covers the mechanics of creating a File Naming Template.

File naming in lightroom 12

My method:

My preferred renaming method is: {YYYYMMDD}_{Custom Text}_{Original Filename Suffix}. The items in {} are the tokens from the Date, Custom Text and Filename menus (see right). The underscores are written directly into the textbook between the tokens. You may prefer to use a dash instead. I use underscores, because the Web module changes dashes into underscores.

File naming in lightroom 13

This keeps files in order by set based on the Date and Custom text, the Suffix then keeps the sequence. You can use any naming system you like, of course. The important thing is that you use the same naming consistently. When I first started using this kind of renaming system, I had the Custom Text first, but it turned out to be a pain for sorting. Generally when I look through a shoot now, I visually ignore the date part of the name and look at the custom text if I’m just browsing. I don’t need to see it generally, but it helps the sort.

File naming in lightroom 15

This is how my file naming looks

Renaming inside the Library Module

As well as renaming on Import, you can batch rename inside Library by pressing the F2 key. This brings up a really basic dialog where you can select or edit a preset, change the Custom Text, or the Start Number if you’ve chosen a sequence. When you select Edit from the Preset list, the Filename Template Editor has a slightly different set of options to that of the editor inside of Import.

File naming in lightroom 14

We’ve looked at Image Name. The other main differences are the Sequence menu now has Date as well and the Additional section is now called Metadata with a 2nd set of Metadata, in this case IPTC metadata. Other than that, it works identically to in Import.

File naming in lightroom 16

Renaming on Export

You can also rename when Exporting. In the Export Dialog, File Naming is usually the second option. It’s similar to the other instances where you can select or edit a file naming preset, add Custom Text or choose a Start Number. In this case the Filename Template Editor is the same as the one available in the Library module.

File naming in lightroom 17

So that’s a look at how to choose a suitable naming system in Lightroom, and how to create a filename template to match it. How do you do your file names? What structure do you find works best for sorting and finding images later? Please share your thoughts in the comments below.

googletag.cmd.push(function() {
tablet_slots.push( googletag.defineSlot( “/1005424/_dPSv4_tab-all-article-bottom_(300×250)”, [300, 250], “pb-ad-78623” ).addService( googletag.pubads() ) ); } );

googletag.cmd.push(function() {
mobile_slots.push( googletag.defineSlot( “/1005424/_dPSv4_mob-all-article-bottom_(300×250)”, [300, 250], “pb-ad-78158” ).addService( googletag.pubads() ) ); } );

The post Tips for File Renaming Success in Lightroom by Sean McCormack appeared first on Digital Photography School.


Digital Photography School

 
Comments Off on Tips for File Renaming Success in Lightroom

Posted in Photography


10 Pro Tips to Design a Killer Mood Board to Present Your Work

28 Jun

When you’re working on a design or photography project for a client, a mood board can be one of the best ways to get your vision across. A mood board is essentially a collage of things that inspired you for this particular project. They can help you really nail down the look and feel of your work, and make sure Continue Reading

The post 10 Pro Tips to Design a Killer Mood Board to Present Your Work appeared first on Photodoto.


Photodoto

 
Comments Off on 10 Pro Tips to Design a Killer Mood Board to Present Your Work

Posted in Photography