Full guide at: www.dslrtips.com / DSLR Tips: How to take perfect sunsets
Full guide at: www.dslrtips.com / DSLR Tips: How to take perfect sunsets

“Whatever kind of victory all those protests achieved, it wasn’t one for consumer rights — if anything, Instagram is the real winner here. The company just managed to score a round of positive press for retracting an unpopular change and give itself the ability to actually use photos in ads.” — Nilay Patel, The Verge
Over at the Verge Nilay Patel makes a case that the backlash earlier this week against Instagram’s unpopular TOS update was actually a loss for consumers not a gain. He argues that Instagram’s current TOS is broader than their more explicit proposed one and so consumers are worse off, not better off. Because Instagram technically still holds the rights to sell your photos under their current TOS, and even more broadly, the consumer backlash was misguided and really did more harm than good.
I disagree with Nilay and feel that actually this week’s backlash was one of the more significant movements yet for photo sharing on the web.
It’s not that Facebook (whose TOS is equally broad) and Instagram couldn’t legally sell your photos on the web under their broad TOS in the past or in the future, it’s more that *politically* it is now far more difficult for them to begin selling your photos out from under you on the web using their broader TOS.
Who cares what the TOS says, the message that Facebook got loud and clear this week is not to f*** with your photos. Your photos are important. You care about them. They are much more personal to you than Facebook may have previously considered. They have emotional importance and significance and collectively your users will rise up and bash you in the face if you try to exercise terms of your TOS that your lawyers have allowed you to screw around with photos. Whatever your future monetization strategies might be, they will not be based on a loss of control over OUR creative efforts — even our duckface creative efforts.
No, there is no question about it. Instagram lost this week and they lost big. This is in no way a positive for Instagram. People trust them less and they had to turn around and eat crow, they gained nothing.
Flickr won big at Instagram’s expense and Google+ won a little. Flickr won more because like Instagram their site is 100% about photography. They also just released a pretty awesome new iPhone app that is in fact even slickr than what Instagram currently offers.
Flickr also went out of their way last year to really drive home the ownership rights of your photos. This old forgotten post was revived with new life as a stark contrast to what it felt like Instagram was trying to pull. Kevin Systrom eventually even had to parrot back some of that “yes, we know your photos are your photos” stuff in his awkward non-apology apology.
Dan Lyons wrote a post that talked about Google+ winning some here too. Google+ smartly has a provision in their TOS that specifically limits their rights to your photos to basic operational use. Google+ is probably the most active community of photographers on the web today and are a natural beneficiary from what Lyons’ refers to as “Facebook Greedheads.”
The biggest winner or all though was you, the photographer. Whatever Instagram’s original intention was in being more specific in their TOS, it backfired on them. The idea that they could/would profit off your emotionally significant photos without your consent, authorization or most important, sharing the dough, hit a nerve with photographers and likely won’t be tried again by anyone in a long, long time.
The thing is, this didn’t have to be such a painful learning experience for Instagram. There was/is in fact a HUGE opportunity for some smart social media property make a ton of money off of your photos, Instagram just went about it wrong.
As much as Flickr’s deal with Getty sucks (photographers get a miserly 20% payout) photographers on Flickr still went bonkers for it when Flickr released it. The idea that you could actually get PAID to post your photos on a social network, paid ANYTHING, had most users on Flickr clamoring to get into the program, not out of the site.
Even though Flickr/Getty’s call for artists group is now closed (due to overwhelming demand) almost 90,000 photographers joined this group hoping to get selected by Getty for the right to sell their photos for the paltry 20% payout.
The difference with Flickr’s deal though was that 1. you CHOOSE to opt in and 2. at least you got paid something.
What if instead of Instagram saying, “hey, we might sell your photos without your consent and pay you NOTHING,” they said, “hey, do you want to sell your Instagram photos and if we sell them for you split the money 50/50″? Instead of losing accounts and becoming the scourge of the internet for three days, they would have had photographers rushing to sign up and begin marketing their images on their site.
Although there are sites out there like 500px and SmugMug that let you sell your photos now, Flickr is the only larger social network that has a selling program. Google+, Instagram, Facebook, even Twitter, all have a major opportunity to become the first large social network to allow us to license our images through their service and share in the revenue with them. This is a multi-BILLION dollar industry dominated at present by Getty who is not paying creatives enough for their work. What the internet does best is get rid of middlemen when they are being unreasonable, and an 80/20 split with photographers is unreasonable.
Instead of stealing our work and paying us zero, how about using your significant reach in reputation, marketing and search to partner with us and empower us to sell our work together. I guarantee you that whoever comes up with the best program first has some of the best photography on the web flooding your network. Even if 99% of us never sell a single photo, simply giving us the feeling that we have the opportunity to sell a photo would be a powerful incentive to get us active and humming on your network.
Thomas Hawk Digital Connection
Pin It

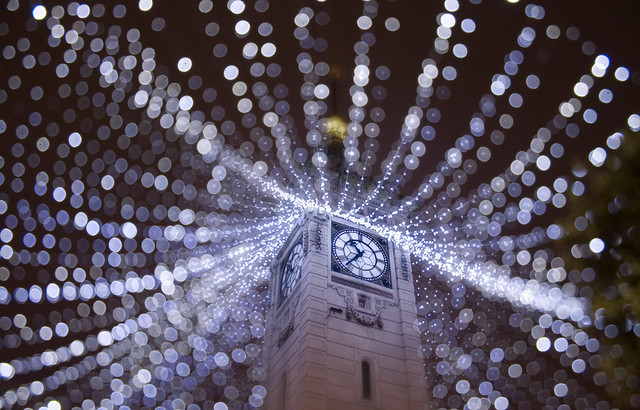
It’s beginning to feel a lot like Christmas… and in our forums I’ve noticed more and more great Christmas images being shared – some of which feature a technique that is always popular at this time of year – Bokeh Christmas lights shots.

The technique takes a bit of experimenting and practice but is relatively simple to do. You need some Christmas lights and a camera lens with a reasonably ‘fast’ aperture (or a large aperture).

The key is to shoot at the larger end of your available aperture – this throws the background (and foreground) of your shot out of focus and any Christmas lights in the foreground or background will become little balls of light.

As you’ll see in most of the images featured in this series – the technique is particularly good if you also have some element in your shot that is in focus. This ‘subject’ might be a person, a pet, a Christmas decoration or something else.

You can make the little balls of light bigger by increasing the distance between your in focus subject and the out of focus lights in the background.

While most of the images in this series have the Christmas lights in the background of the image (behind the subject) it is also possible to create the little bokeh balls of light by putting the lights in the foreground of your image (in front of your subject). You can see this in the image below. The impact is a little different as the bokeh balls will cover part of your subject.

Another popular technique is to create different shaped bokeh. You can make stars, hearts or even little snow flakes like the image below.

To get these different little bokeh shapes is pretty simple. You just need to make a little cutout ‘mask’ for your lens. Rather than go over how to do it here check out this video tutorial that will walk you through it here.


The other way to change the shape of your bokeh balls is to experiment with different apertures. You’ll find that in most cases the larger your aperture the rounder the ball – but go for a slightly smaller aperture you may find your bokeh becomes more hexagonal (or Heptagonal or Octagonal… the number of sides will depend upon how many blades your lens has).

The different ways of using this bokeh Christmas lights technique is only limited by your imagination. Here are some more examples to give you ideas. Enjoy!


 ‘
‘


Pin It
Post originally from: Digital Photography Tips.
Check out our more Photography Tips at Photography Tips for Beginners, Portrait Photography Tips and Wedding Photography Tips.
How to Take Beautiful Bokeh Christmas Images [With 39 Stunning Examples]
A Guest Post by Piper Mackay from www.pipermackayphotography.com.
The creativity in your photographs is what will make your imagery stand out. Most of us, if we commit the time, can technically master the craft of photography. Capturing a compelling image can be much more difficult especially when you are excited, experiencing something for the first time, and are visually overloaded.
You begin pointing and shooting at everything you see. You arrive home, look at your photographs, and see that you have captured extraordinary subjects or a beautiful location, but the images are somewhat mediocre. Taking an extraordinary photograph of and extraordinary subject is what you want to strive for.
I want to share with you a few tips that can quickly help elevate the creativity in your photography and help you to focus on the artistic side of photography; without the creative process, you are really only turning dials and pushing buttons.
 The eyes are the windows to the soul. If you are going to place your subject in the center, get close, fill the frame and deeply connect with your subject.
?

A more interesting portrait composition is to place your subject off center, looking into the frame at a slight angle, with a blurred out or clean background.

Now up your game and add layers of impact by adding a simple, but beautiful background.

Take it one step further by adding a second person to draw the viewer more deeply into the frame.

One of the basic rules of composition is leading lines, but if there is more than one, it can be more effective in keeping the viewer in the photograph longer. In this image there is a leading line from the bottom right to the top left and another one that leads the viewer back across the photograph.

Using layers of impact makes for a very powerful image. When photographing people I love to use a wide-angle lens, getting up close to my main subject with something interesting in the background to draw the view into the photograph. Here my main subjects are interesting, positioned in front of a beautiful background along the Omo River that curves and leads to the women in the distance, creating layers of impact and depth in the image.

I love using selective focus to draw the viewer’s eye exactly were I want it. This usually works best with repeating patterns and groups of items such as: spices or vegetables, crafts at a local market, flowers in a field or a herd of animals, as a few examples.
?

Being at eye level with your subject makes for a more dynamic image. So, if your subject is down on the ground, hit the dirt and get dirty. Picture in your mind how this photograph would look if you stood and shot down on these subjects. This angle makes the viewer feel as though they are there.

Most people would have just taken this photograph from the shore with a zoom lens but I wanted something more powerful. I planned to be in this area during the dry season, suffering in 110+ heat when the river would be at its lowest. I got into the river with my wide-angle lens and photographed this at eye level with the canoe. There were a lot of challenges, watching out for crocs was one of them, and although I did not get the photograph I had envisioned, I knew I and a unique perspective.

Shoot from a different angle. Getting lower than your subject adds drama and power. The opposite can work as well—get above your subject and shoot down on them.
Most importantly, it does not have to be new; it has to be you. We all see things differently and express them differently. This is the reason many of us picked up the camera, to seek out places for ourselves that we have already viewed through someone else’s eyes. We want to experience it for ourselves, capturing our own vision. The way you express your unique view through the lens is what makes it new and interesting.
Piper Mackay is a professional travel and wildlife photographer whose work is heavily based in Eastern Africa. She is currently leading both wildlife and cultural safaris in Kenya, Tanzania, Rwanda and Ethiopia. Her work is represented by Getty images and she is and instructor for the Travel and Editorial track at Calumet. View her work at www.pipermackayphotography.com.
Post originally from: Digital Photography Tips.
Check out our more Photography Tips at Photography Tips for Beginners, Portrait Photography Tips and Wedding Photography Tips.
How to Take Extraordinary Photos by Thinking Creatively

For A55 specs or to purchase: bit.ly For the Cyber-shot® WX9: bit.ly Today we’re looking at two really different types of Sony cameras. First, we’ll compare the Sony Cyber-shot® WX9 and see how it stacks up against other point-and-shoots. Then, we’re taking apart a Sony Alpha A55 camera and checking out what goes on inside. Stay tuned at the end of the episode for an awesome giveaway. Subscribe for free Sony gadget videos! www.youtube.com More SGNL www.youtube.com SGNL Homepage sony.com Tweet us your thoughts! twitter.com ABOUT SGNL A close-up look at Sony’s gadgets, games, movies and music. (less info)
Video Rating: 5 / 5
Music video I directed for singer song writer Jeff Redd
Video Rating: 5 / 5
The Ayuri Project NYC Photo shoot in Brooklyn newyork with photographer ayuri luciano. shot and directed by lamont goodine.
Video Rating: 4 / 5
Race to some creative fun pictures and movies with the Kidizoom Lightning McQueen Digital Camera from VTech. The best digital camera for your kid. This easy to use and ultra durable camera features a sleek Lightning McQueen design and has three modes that allow your child 3 years and older to take photos, edit photos, and make movies. For added fun, the camera can also be connected to your TV (cables included) so kids can view their creative work on the big screen. Use the USB port and cable (included) to connect the camera to a computer where your little photographer can add stamps and frames to their photos featuring the characters of Cars 2 using the Photo Editor software. The camera includes 256MB of built-in internal memory storing up to 500 photos or 10 minutes of video. Add more storage capacity by using an SD card up to 16GB. Edit later or take photos on the spot with Lightning Mcqueen and his friends Mater, Holley Shiftwell, Finn Mcmissile, lemons, bad guys, and others. Very easy to use. More easier to transfer to a computer or watch in the big screen. Sells for just .00 and provides hours and hours of fun. Perfect for Christmas present. Display: 1.8 color LCD screen 2.0 mega pixels and 2x digital zoom Photo resolution: 1600×1200 jpeg Video resolution: 320×240 Racer Lightning McQueen is also called “Bliksem Mcqueen” “Saetta mcqueen” “Lynet McQueen” “Rayo McQueen” “Flash Mcqueen” “Blixten McQueen” “Faísca McQueen” “Blesk McQueen” “?????? ???????” “Relâmpago …
Video Rating: 3 / 5
Most people who have experimented in Photoshop, especially those who shoot in raw, will have some experience of trying to sharpen an image. Sharpening increases the contrast between neighbouring pixels resulting in the visual effect of a crisper image. It is typically the last processing step that should be performed on an image and is often used to enhance already well-focussed images or in desperation to try and rescue elements of a photograph that weren’t captured in-focus when the shutter was pressed.
There are numerous ways to sharpen images in Photoshop, so much so that there is a whole sub-menu of filters dedicated to sharpening, each offering a different amount of control and different levels of success. However, one of the most overlooked filters that can help you achieve better results with more control isn’t found in the Sharpen sub-menu, but is in fact found in the, usefully named, Filter -> Other menu: the high pass filter.
I’ll take you through a step-by-step guide to using high pass filter and hopefully show you how simple and effective image sharpening can be.
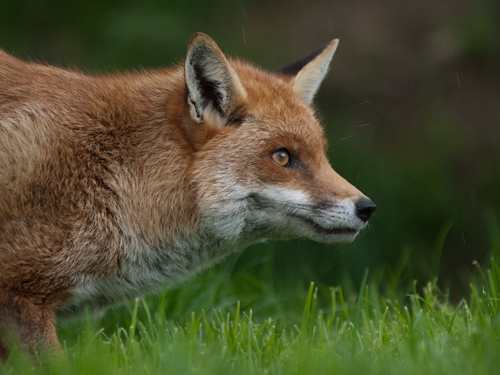
Start by opening the image that you want to sharpen – ideally, the image will have come from a raw file so not to over-sharpen an ‘out-of-camera JPEG’. Make sure that you have completed all other processing steps that you wish to perform. Here I’ll use this image of a fox to illustrate the process (feathers and fur often react well to a bit of sharpening).
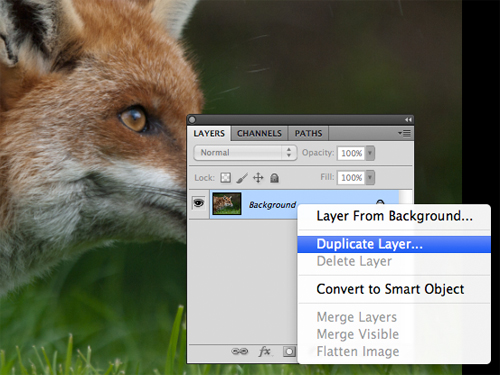
In the layers palette, right click the Background layer, select Duplicate and click OK. This creates a copy of the original layer and is a key step for the application of the high pass filter.
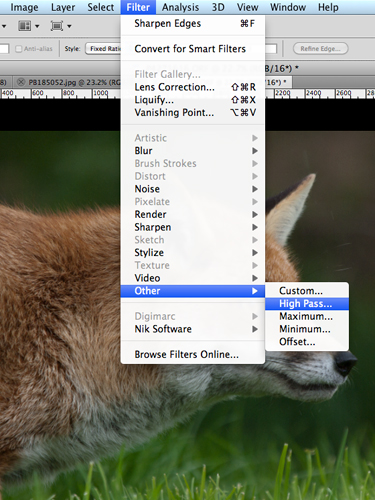
With the duplicate layer selected, select Filter -> Other -> High Pass
This will bring up a high pass window with a small preview of the results and a Radius control. If you can see the whole image behind this window, you will notice that the Duplicate layer has turned grey – don’t panic, it’s supposed to.
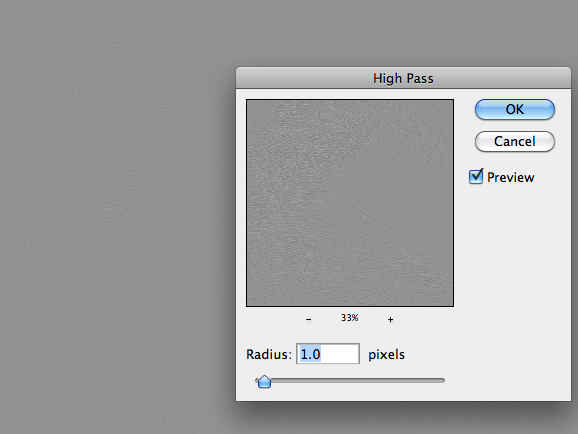
Set the Radius value and click OK. The higher the Radius, the more sharpening will be applied to the image. If you play around with the Radius slider, you will notice that at low values, e.g. 1.0 pixels, only high-contrast edges are visible in the grey layer, whereas if you move the Radius slider up to 10 pixels, you will notice that more edges within the image will be highlighted.
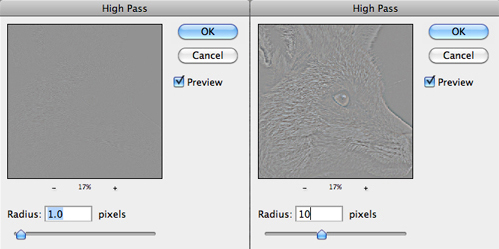
The precise Radius value that will result in optimal sharpening will be image dependant, but somewhere in the range 1.0 to 5.0 pixels will suffice. Generally, 5.0 pixels will be too much, but given that we are performing this action on a duplicate layer gives us the flexibility to be heavy handed with the high pass filter, I’ll explain more shortly.
In the layers palette, set the blending mode of the duplicate layer to Overlay.
The Overlay mode ‘multiplies’ the blacks and ‘screens’ the whites of the layer below – that is, makes the dark areas darker, and the light areas lighter. Up on application of the high pass filter, our image was turned grey (neutral grey in fact), and when setting the Radius value, edges were picked out in light/darker shades of grey. Therefore, when the blending mode is set to Overlay, the neutral grey areas of the image have no effect, yet the lighter/darker edges screen/multiply the edges of the layer below, increasing the contrast, resulting in a sharper image.
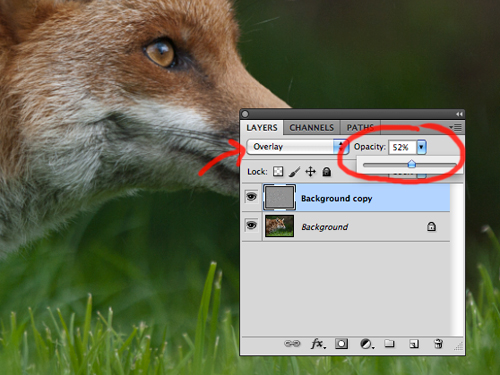
Change the Opacity of the duplicate layer to achieve the desired sharpness. I mentioned that you can be heavy handed with the high pass filter – that is because you can tone back any over sharpening using the Opacity slider. It is often a good idea to set the Opacity to zero and work your way up to an acceptable level of sharpness so not to over sharpen and introduce artefacts.
It is advisable to try and print off a section of your image, at the same scale as you intend to print the full photograph, to get a feel for how much sharpening an individual image requires and adjust the Opacity slider as appropriate.
And that’s it, image sharpened!
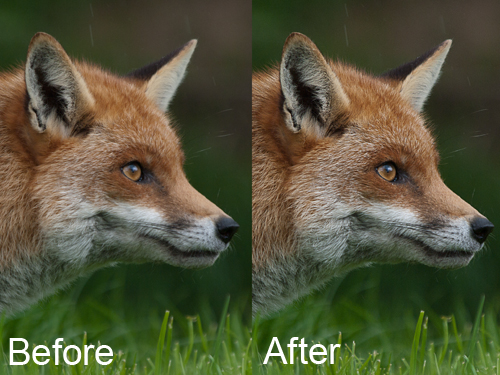
The benefit of using this method to sharpen your images is that the sharpening effect is applied in a non-destructive fashion, on a duplicate layer, with a very simple to understand parameter (in the Radius value) that controls the magnitude of the sharpening, as well as giving you the ability to fine tune the final effect using the Opacity slider.
In addition, given that the sharpening is entirely controlled by the duplicate layer, you can have further control for where the sharpening is applied within the image by applying a layer mask to the duplicate layer.
So there you have it, a quick yet effective method for sharpening your images that gives you full control.
Post originally from: Digital Photography Tips.
Check out our more Photography Tips at Photography Tips for Beginners, Portrait Photography Tips and Wedding Photography Tips.
Take control sharpening in Photoshop
i randomly decided to do this video, i didnt want any creative shit in it at all. just a straight up, raw studio shoot relying on my performance rather than any editing etc. we decided to work with the well known and very talented photographer kane hibbard. Because i wanted the video to be all 1 take it took a lot of takes to get it right, there are a few TINY fuck ups in this video (i hope you dont mind) but i felt the performance was the most powerful and moving takeso i decided against doing any editing to fix shit up just to keep that raw 1-take element to it. this is one of my favourite songs ive ever written, its easily one of the realest and deepest. performing it over and over was so hard – every time we would shoot i would get more and more emotional throughout/and at the end of the video.. but this take was to me the best one. please know that i am now in a very good state of mind, i wrote this song when i was in a very dark head space.. its like therapy for me.. if i have any issues going on in my life this is how i deal with it, by writing and turning the pain (or whatever emotion it may be) into a song…i know other people go through shit, all you need to do is find a way to deal with it… talking to someone helps, its not for everyone though. there’s lots of different options – but never keep it to yourself if you’re going through a really hard time.. talk to someone you love or write a rap about it 😉 hope you enjoy the video. and to anyone going through …
Video Rating: 4 / 5
I’m answering your questions from vlog #1 and #2. 1. Are you in Egypt? No, I’m currently studying in Canada. 2. What are those things stacked up back there? They’re coffee cups. 3. What do you use to make your videos? I borrowed my friends’ camera (Nikon D90 for 1st vlog and Nikon D7000 for the 2nd one) and I edited the videos using Windows Live Movie Maker. 4. When are you going to post your next vlog? It depends. I don’t think I can do it routinely. 5. Are you trying to emulate someone else? Yes, I emulate the Prophet. 6. Where can I get the t-shirt? I bought it from a friend who’s selling the shirt for Libya relief effort. NOTE: I NO LONGER SELL THE SHIRTS. THANK YOU FOR THOSE WHO BOUGHT THEM! Outro song: www.youtube.com
Video Rating: 4 / 5
You must be logged in to post a comment.