RSS
 

Posts Tagged ‘Take’

Six Ways to Take Care of Your Creative Spirit

07 Aug

I like photographers. Some of my favorite people and closest friends are photographers. In general, I find us to be a likeable bunch: witty, intelligent, wildly attractive. I also find that we reside in a grey area where we aren’t quite regarded as artists. We are the redheaded stepchildren of the art world, and I can say that because I both am a redheaded stepchild and have a redheaded stepchild. Truth be known, she is the easiest kid of the bunch. She pulls no punches, just tells it like it is. Much like photography.

lynsey_mattingly_1

But we are artists! As much as any painter or sculptor, or person that is covered in bronze paint and stands as still as a statue on a street corner. Have you seen these people? My eyes water just thinking of the shower they have to take every night when they get home from work. I have always been grateful that photography is fairly low on the mess scale. So instead of showering off bronze paint for hours, or ceremoniously ridding the clay from our hands, here are six ways you can care for and nurture your creative artist soul.

Take care of your eyes

When I get home from a long shoot, I always complain that my eyeballs hurt, and they do! It’s not that they are dry or that something is wrong with my vision, it’s just that after being on high alert for hours, my eyes are stressed out. So much so that I actually saw an eye doctor to make sure that I wasn’t going to need to have my eyeballs removed anytime soon. Do you know what the doctor told me? That I need to rest my eyes before and after a shoot just like a professional baseball pitcher would rest his arm before a game. For some reason having an actual doctor, with a high degree in medicine and lots of fancy initials after his name, telling me this, made me actually listen. I’ll save you the office visit; be good to your eyes. They are the only lenses you can’t replace.

lynseymattingly_4

Have other hobbies

Like many pros, I started photography as a hobby. I am the classic “MWAC” (Mother With A Camera), having a career that’s spanned a decade, but rooted from pictures I took of my own children, with a fancy camera I didn’t know how to operate at the time. My former mother-in-law told me I took nice pictures and I figured if she said that, considering that she hated everything else I did, they must be fairly good.

I then immersed myself in photography, reading every blog, shooting every single thing my kids did in hopes that it would be portfolio building. Photography was what I lived and breathed. It’s the only thing people knew about me, but it wasn’t enough. One day, pushed past the brink, frustrated and burnt-out, I sold all of my back-up equipment and extra lenses in a week and had convinced myself, and everyone else, that I was never going to do it professionally again. I kept my Canon 5D and 50mm f1.2L, thinking that I would want to take pictures of my kids someday with something other than the camera on my iPhone.

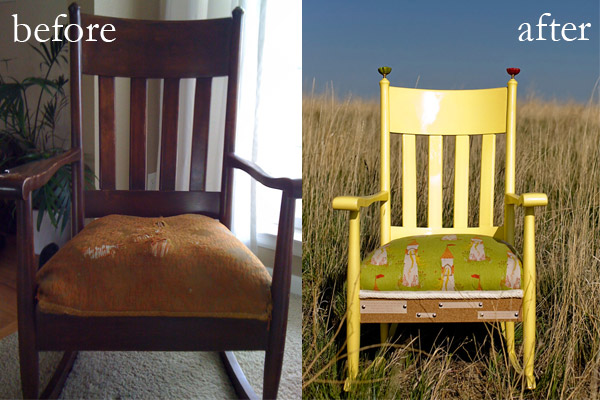
One outlet is not enough for the average creative person. You owe it to yourself, and to your photography, to be great at something else. Or to be really horrible at something else, but regularly try something else. I make chairs. I find old chairs in flea markets or on the side of the road with “free” signs and I bring them home, let them sit in my garage for months or longer, and then rehab them with new ideas and fresh materials. Sometimes I sell them, sometimes I give them away, and sometimes they turn out really awful and I put them out in my yard with a “free” sign. The point is that this gets out all of my creative energy, and when I am stuck in a photography rut, I make a chair. When a chair frustrates me, I grab my camera.

lynsey_mattingly_chairs

Take Chances

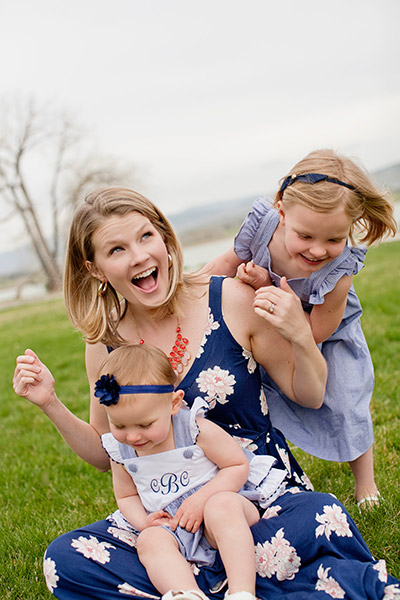
One of my first national publications only happened because I contacted a celebrity that lived a few hours away, who had just had a baby, and asked if I could take her pictures for free. I honestly thought she wouldn’t even respond, assuming she even got the email, because I did some crazy research to even find an email address that might be hers. Not only did she respond, and say yes, but she actually had two publications that were wanting to buy photos of her and her new family. There’s opportunity and there’s flat-out luck, and when you strike both you have a say in your own destiny.

I had been taking pictures professionally for four years, but this was my first huge break and having an international publishing gig, and continuous contacts, has opened doors for me, no doubt. Put every cliche about trying: not knowing until you do, you’ve got nothing to lose, etc., into a pot, and stir. It turns out our parents were right, and all of those silly sayings are true.

lynseymattingly5

Stop Comparing Your Work

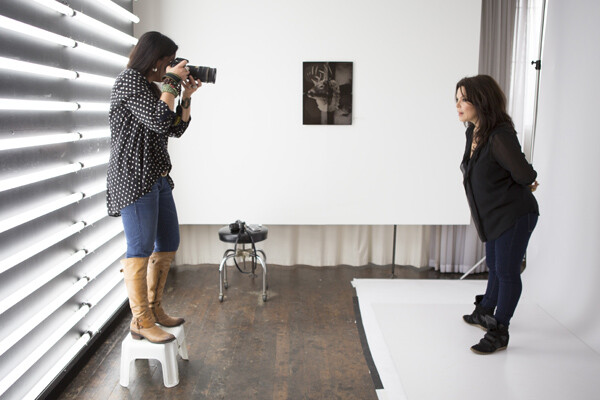
When I first became interested in portrait photography I was obsessed with this one photographer’s blog. Not just because her images were beautiful, but also because I loved her words. We had similar backgrounds and a similar style, and when she talked about her life outside of photography, I understood. When she shot images that were different, I got it. Had she sent me a note before study hall, oh how I would have checked every single box. The only thing keeping me from hanging out on her front lawn confessing my profound crush was about a thousand miles. I was infatuated; with her photographs, her business, her life, her success. I wanted it for myself. And because of the similarities, I found myself doing things the way she did, hoping for, and sometimes even assuming, the same outcomes. I wasted a great deal of time trying to align my path with hers and holding her work in a higher regard than my own.

A decade later and my business is, my by own account, every bit as successful as I thought hers seemed. But it is not the same. Until I realized that what worked for her wasn’t always going to work for me, and that perhaps her end goal was different than mine, I wasn’t in any way being inspired by her. My obsession with a woman I hadn’t even met at that point was my focus (and yes, I would later meet her, and boy what a disappointment that was, is best saved for another article). No one else’s tips, ideas, or work can be your focus. Be inspired, yes, but don’t let jealousy, or in my case, crazy obsession, get the best of you. Your images are yours, and they can be whatever in the world you want them to be, so long as you don’t run them through another photographer’s filter.

lynsey_mattingly2

Don’t Stop Taking Snaps

When you are a professional photographer, or perhaps just a really good photographer, it’s easy to put extra scrutiny on your everyday snapshots. The pictures you take on your cellphone or with a Polaroid or point-and-shoot – a pretty landscape, a funny face of a friend, the loaf of zucchini bread you just baked that came out of the oven poofy and golden brown. Those shots are easy to over-think, to obsess over, or to give too much time and attention to, and miss the very point of taking them.

I find myself checking the background when I take pictures of my cat. The world doesn’t need perfect pictures of my cat. I don’t need perfect pictures of my cat. The internet doesn’t even need perfect pictures of my cat (I checked). Let the snapshots be snapshots and view them completely different than your “work” so you don’t tire of doing the everyday picture taking that was likely what gave you a love of photography.

lynseymattingly_halloween

Respect Your Gift

That’s what photography talent is – a gift. You have been entrusted to all its amazement whether you are just beginning, doing it professionally, or as a hobby that enables the creative piece of you to speak. You’re here on this very site, reading about photography, because photography calls to you in some way, due to your natural ability. Treat your gift with compassion, cut yourself some slack when needed, and allow yourself as many periods of rest as you do challenges. I was never a cheerleader and getting sappy kind of freaks me out, so when I say that you (yes, YOU) are a creative force to be reckoned with, you know I mean it.

What’s something you do to take care of your creative spirit?

lynsey_mattingly3

The post Six Ways to Take Care of Your Creative Spirit by Lynsey Mattingly appeared first on Digital Photography School.


Digital Photography School

 
Comments Off on Six Ways to Take Care of Your Creative Spirit

Posted in Photography


6 Tips to Take Your Architecture Photography to the Next Level

18 Jul

Liams Seattle

Architectural photography may seem like an incredibly boring subject, but there is lots of creativity involved with shooting buildings, not to mention it’s a rather lucrative way to make a side income as a photographer. However, the rules of photographing a building versus a person are quite different. Whether you are a relatively seasoned architectural photographer looking to refine your approach, or a budding photographer curious about how to create impactful architectural photos, these tips should help take your photography to another level. This post is written for a photographer approaching an official architectural photography assignment, but the tips also apply to casual shooters.

1. Do your homework and see if there are any photos of the space online

Most buildings in the world have been photographed at least once thanks to Google. A quick Google Image search of the space you’re looking to shoot should pull up a variety of photos by both professionals and amateurs. Use the work of others to your advantage. Check to see what angles other photographers may have already shot, and which ones they haven’t. Examine the photos for any potential challenges that may arise, such as tall interiors or exteriors, or areas that look better when naturally lit by a sunset. Do what you can to anticipate your needs on site before you arrive.

Puerto Vallarta

2. Know the geographical aspect of your building

Speaking of natural light, this can be your friend or your foe. Many modern buildings today are being built with lots of features that offer natural light such as floor-to-ceiling windows and skylights. While these may seem great for the actual building occupant, these features can make or break your architectural photo shoot. More than ever, it is important to know the geographical aspect of the building you are shooting. Is it east-facing or west-facing? Depending on the time of day, it truly matters. Be sure to consider the geographical aspect in relation to the time of day you choose to shoot.

3. Always walk through the space first

There are a couple reasons why a walk through is essential. First, it is much easier to remove any clutter or unorganized elements. Two things to always look out for are trashcans and wrinkles in fabrics such as curtains or bed spreads. These are two things that are much easier to remove before you shoot rather than in post-production. Second, think of the walk through as your scouting mission. Look for any “special access” places such as nooks and crannies or elevated spaces, that you may be able to squeeze yourself into to get an alternative view of the space. In this day and age where just about everyone has a camera, capturing stand out photos is about finding the angles of a space that aren’t so obvious.

Hecho Seattle

4. See if the space has been styled

Before you walk through the space, check with your photography coordinator to find out if the space has been staged or styled by a designer. If so, you’re in luck! Staged spaces tend to look like they’re straight out of a magazine with furniture, artwork, and props carefully placed in the area, making your job much easier. If the space hasn’t been staged, you will have to put in more effort to figure out the architectural importance of the space and have these elements shine through in your images. Ask yourself, “without furniture, what is it about this space that makes it special?”. Perhaps it’s the exposed brick and wood beams, or the floor-to-ceiling windows. Whatever it is, make sure these elements become the focal points of your photos.

5. As you begin shooting, watch for vertical lines

When shooting architecture, you almost always want to use a wide-angle lens such as a Canon 16-35mm, but these lenses have a tendency to cause converging verticals. This happens when two parallel lines in an image appear as if they are leaning in towards each other. To make your photos appear more professional, and the architectural subject appear more structurally sound, it is important to correct these converging verticals. The easiest way is to simply change your perspective. Take a few steps away from your architectural subject, or elevate yourself until your vertical lines appear more parallel. Other ways to correct for converging verticals is to fix it in Photoshop, or if you have the budget, invest in a perspective control or tilt-shift lens.

Fairwinds Seattle

6. Elevate yourself

There are two main reasons why you want to get to higher ground while shooting a building. The first is to correct for converging verticals as mentioned above. The second reason is to strive for a different photographic perspective. If you’re lucky, the space you’re photographing may come with a balcony, staircase, or natural element that lets you rise several feet for a taller perspective. However, keep in mind that again this is an obvious element that many other photographers will make a beeline for. This is why in 90% of architecture photography situations it pays to have a foldable, portable ladder or step stool and a monopod with you always. Having these two relatively cheap and lightweight items will help you achieve different, elevated perspectives of interiors and exteriors from atypical angles. Keep them in the trunk of your car; you never know when they will come in handy.

EMP SFM Seattle

Architectural photography at face value may not seem like an interesting subject, but think of it this way: when you travel, how many buildings do you see that you end of taking a photo of? Use these tips not only for approaching a real estate photo job, but whenever you plan to take semi-professional photos of buildings or just for yourself.

Have any other tips you want to share, please do so in the comments below.

The post 6 Tips to Take Your Architecture Photography to the Next Level by Suzi Pratt appeared first on Digital Photography School.


Digital Photography School

 
Comments Off on 6 Tips to Take Your Architecture Photography to the Next Level

Posted in Photography


5 Photoshop Tools to Take Your Images from Good to Great

03 Jul
Seascape image - Before and After image editing

Seascape image – Before and After image editing

We hear it all the time, “That photo has been Photoshopped”. Sometimes it sounds like the photo has caught a disease or that Photoshop is some undesirable effect that has been added to the image. Photoshop is the KEY to making your good images look spectacular. Yes, I said “good” images. Photoshop is not about fixing mistakes or trying to rescue a bad shot. It is more about refining your images and making them look amazing without overdoing it. Photoshop is a fantastic tool when it is used effectively but can be your enemy when you overdo it. Depending on what you want to achieve with your photos, this quick guide to five Photoshop tools will help you adjust your exposure effectively and make the colour really pop out of your image.

NOTE: the examples in this article simply show you how to make the adjustments on a separate layer. You could also use an adjustment layer which gives you much more control over the adjustment. The only tool that can’t be used with an adjustment layer is Shadow and Highlights. I will go into more details about adjustment layers in upcoming articles, for now, if you follow these guidelines, your images will look compelling and rich without looking overdone.

1. Shadow and Highlights Tool

This tool will be used to get more detail in the shadow areas of your image. Modern cameras can capture lots of detail, but depending on the light in the scene you are shooting, the shadows may be a little dark. The Shadow and Highlights tool will bring back some of the details in those areas.

Open your image in Photoshop and go to:  IMAGE > ADJUSTMENTS > SHADOW AND HIGHLIGHTS.

Finding the Shadow and Highlights tool

Finding the Shadow and Highlights tool

The tool will pop up and you will see this (as shown below), if you don’t see all these sliders, click “more options” to expand the box. You will use this tool to bring detail back into the shadows and you won’t be making any adjustments to the highlights. I find that the highlights part of this tool does not do a really good job, so I don’t use it at all.

Making adjustments to the Shadows in the image

Making adjustments to the Shadows in the image

The best way to work with the tool is to slide the Amount slider under the Shadows box to about one third across (33%). Then slide the Tonal Width slider to directly under the Amount slider. Lastly  bring the radius slider to directly under it. In most cases, you will want to have these sliders directly under each other (see screenshot below right).

shadows-highlightsThe important thing to remember here is to make the adjustments and take careful note of your image has been affected. Click on the preview button on the right hand side of the tool (you can do this with all the tools in this article) to see the “before and after”. You will be able to see at a glance how your changes are working. If you need to extract more detail from the shadows then slide the Amount slider to the right even more but make sure you line the other two sliders underneath it.

The amount that you decide to adjust the shadows is up to you. Be careful not to overdo it. Once you start seeing a “glow” around certain parts of your image, you may have gone too far. This glow is often referred to as a halo which can be avoided by watching carefully how your adjustments are affecting your image. If you see them appearing, simply drag the sliders back to the left until they disappear. Once you are happy, click OK.

2. Levels Tool

With your image open and the shadows adjusted, you will now adjust the overall exposure in the scene. If your image is a little over or under exposed, the levels tool can fix that. Go to: IMAGE > ADJUSTMENTS > LEVELS on the menu bar (or using the keyboard shortcut Command/Control+L). You will see the LEVELS dialogue box pop up and it will have a graph in it. This graph is called a histogram.

histogram

A histogram is simply a graphical representation of the pixels in the scene. If the graph is pushed over to the left side it means that your image has more darker tones in it, if the graph is over on the right side it means that your image has more brighter tones. There is no right or wrong histogram, it is simply a representation of the light in your scene. There are some great articles about histograms on the dPS site, so if you want to learn more about them, click on one of the links above.

Using the Levels tool to enhance the exposure and boost contrast

Using the Levels tool to enhance the exposure and boost contrast

The important thing to remember when working with levels is to make sure you don’t adjust your image so much that it causes the image to become under or over exposed. Thankfully, Photoshop gave us a way to see if that is happening, which I will explain shortly. Firstly, you will notice there are three sliders on the bottom of the histogram. The slider on the right is white (adjusts highlights) the slider in the middle is grey (adjusts mid tones) and the slider on the left is black (adjusts shadows). The levels tools will help adjust contrast and colour in your image. You can start the process by clicking and dragging the white slider in (move it to the left) to touch the edge of the histogram. Do the same for the black slider (drag it to the right). Your image will already look better.

Using the ALT key to see where the highlights are being overexposed

Using the ALT key to see where the highlights are being overexposed

Then you can move the middle slider to the right or the left to see which works better. Small changes always work best, so don’t make extreme changes on each slider. If you want to see how your adjustments are affecting your image, hold down the ALT key (PC) or OPTION key (Mac) while you click on the white or black slider. When you click ALT and hold down the white slider, the image will go black. As you slide to the left, you will see some red areas in your image (see above). When you see this, Photoshop is showing you which parts of the image will be overexposed, or clipped. The opposite is true for the the black slider. If you hold down ALT and click on the black slider, the screen will go white and as you slide to the right, the areas that come up on the screen will be underexposed, or clipped. It is a good idea to use this function if you are not sure if you have overdone your adjustments in Levels.

3. Colour Balance

This is a good tool to use to change the overall colour in the image. If your image is too blue and want you want it to be warmer, then you can do that by pulling up the red tones. Also, if your image has an undesirable colour cast, maybe the overall colour of the scene seems too green, then you can correct that by using this tool. The colour balance tool is found in the top menu bar under IMAGE > ADJUSTMENTS > COLOUR BALANCE (or using the keyboard shortcut Command/Control+B).

color-balance

Once the dialogue box is open, you will see three sliders (as above). The sliders represent the visual colours in the image, and are set in the middle by default. By moving them to the left or the right you will be able to change the colour in the image. The top slider affects Cyan/Red, the middle slider works on Magenta/Green and the bottom slider is Yellow/Blue. The colour will change according to which slider you choose and how far left or right you move it.

Note: you can also choose which area of your image to affect as in the Shadows, Midtones or Highlights but selecting the appropriate button in the Tone Balance section below the sliders.

You will want make small adjustments here too. A big adjustment can make your image look over saturated with a particular colour and that will look unnatural. The idea is to enhance your image by boosting certain colours in the scene. So, if you have a sunset image (as below) you may want to boost the reds, yellows and magentas. That will make your image look warm and will give the scene some colour boost.

Using Colour Balance to boost the colours in the image

Using Colour Balance to boost the colours in the image

4. Hue and Saturation

One of the most powerful colour tools in Photoshop is the Hue and Saturation tool. To open it go to: IMAGE > ADJUSTMENTS > HUE/SATURATION (or using the keyboard shortcut Command/Control+U). This tool can be used very effectively to adjust all the colours in your image. When you open the tool, you will notice that there are three sliders again, namely Hue, Saturation and Lightness.

hue-saturation

Hue means colour, this is not used very often as it will reassign the colours in your image, what you want to use this tool for is saturation. Saturation controls the richness or intensity of the colours in your image. Above the three sliders you will see a drop down box called Master. If you click on this, you can choose the colours that you want to saturate. This gives you very fine control over each colour in your image. You can select each colour individually and adjust it according to your preference. You may want to saturate the reds and yellows more than the blues, as an example, this tool allows you to do that. It is good to know that you are not adding colour to your image, you are saturating the colours that are there. Again, incremental adjustments are key. Don’t overdo it, small adjustments throughout this process will make your image look more natural and more dramatic

Getting the most out of the Hue and Saturation tool by saturating colours by channel

Getting the most out of the Hue and Saturation tool by saturating colours by channel

5. Vibrance

vibranceThe vibrance tool is found under IMAGE  > ADJUSTMENTS > VIBRANCE (no shortcut). It effectively saturates colours that are not completely saturated. This is a good finishing touch to your image editing to make sure your image gets a final boost. There is no real guideline as to how much you should adjust on this tool, but be aware of how it is affecting your image. Once this step is complete, your image should look remarkably different and if done correctly, the viewers won’t be saying those dreaded “Photoshopped” words.

The final step, boosting the vibrance to get that extra pop in the image

The final step, boosting the vibrance to get that extra pop in the image

In Conclusion

These five tools will help you make your good images spectacular. The important thing to remember in Photoshop is to make adjustments incrementally. As you can see from this process you slowly and incrementally make changes but the overall effect is dramatic without looking overdone. There are many other tools in Photoshop that can add even more enhancement to your images (I will be doing articles on those over the next few months) but start with these and get comfortable with how they work. To summarize, in Photoshop, slower is better and many small adjustments make a more dramatic impact on your image than a few large adjustments. Enjoy and experiment and as always, let me know what you think in the comments below.

The post 5 Photoshop Tools to Take Your Images from Good to Great by Barry J Brady appeared first on Digital Photography School.


Digital Photography School

 
Comments Off on 5 Photoshop Tools to Take Your Images from Good to Great

Posted in Photography


How to Take Pretty Photographs in Bars & Nightclubs

25 Jun

There’s something about a dimly bar that gets my muse excited. The old guys hunched over their beers, talking about the weather. The tattoo-covered dudes confidently working over the pool table. The colorful ladies, often wearing their most eye-catching clothing and makeup…For most people, it’s the highlight of their week. Whether they are kicking back, cutting loose with friends, or Continue Reading

The post How to Take Pretty Photographs in Bars & Nightclubs appeared first on Photodoto.


Photodoto

 
Comments Off on How to Take Pretty Photographs in Bars & Nightclubs

Posted in Photography


Two Videos on How to Take Care of Your Camera Gear

16 Jun

This week I found two different videos on how to take good care of your camera gear from two different perspectives (serious and more tongue in cheek). It’s important to take care of your equipment to make sure it keeps functioning properly and takes nice clean images with no dust spots.

The first video by photographer Gregory Cazillo is the serious one. He goes through a list of a few things you can do to protect, clean and maintain your gear in good condition.

He recommends jotting down all your serial numbers so when you are are travelling out of the country you don’t have any issues with customs coming back home. I suggest taking it one step further and actually register your gear with customs before you leave. Most airports have a customs area, just take your equipment in there and get a customs registration card from them. Make sure to arrive early to have time to do that.

The second video is from DigitalRevTV (The most subscribed and viewed photography show on the interweb, presented by an asian dude with British accent – as they describe on their YouTube channel) and guest host Ultrasonic Dragon 88 (aka Ian Wong). Obviously this one is a little “cheeky” and is meant to be humorous. Take it with a grain of salt and have a little fun.

Here are some links to other articles here on dPS about taking care of, and protecting your camera equipment:

  • Do you Clean your Own Sensor?
  • Tips to Protect your Gear in Harsh Weather Conditions
  • How to Protect your Camera in Extreme Conditions
  • Embrace the Weather with Your Photography
  • So You Want to Keep your Camera Safe? Here’s How
  • Readers: Lens Filters: To Use or Not To Use? Your 2 cents, if you please!

The post Two Videos on How to Take Care of Your Camera Gear by Darlene Hildebrandt appeared first on Digital Photography School.


Digital Photography School

 
Comments Off on Two Videos on How to Take Care of Your Camera Gear

Posted in Photography


Take your Photos from Blah to WOW with Lightroom and Photoshop

07 Jun

Would you like to get started with black and white (or color) fine art photography, but don’t really know how to get the results you want? I will give you some insight in the process to take your photos to the next level and let you see how you can make the most of the not so ideal situation. I will explain how you can take your ordinary photo and transform it from this . . .

Img1

to this!

Img final

Take your Photos from Blah to WOW with Lightroom and Photoshop

For the creation of this photo I used both Adobe Lightroom and Adobe Photoshop (Note: any program that handles layers will also work including GIMP or Photoshop Elements). The beginning photo is just a black and white conversion of the color photo, as shot. It is important that when you go out and shoot, you have an idea of the final image in your head. If you are at a location, take a moment and think of what you would like to see as a final result. This way, it will take you less shots to get your winning photo.

First step the photography, how was this photo created?

This photo was shot with a Nikon D3000, Tokina 12-28mm f/4 (IF) DX AT-X PRO and Haida ND3.0 (10 stop neutral density filter). That’s right, it’s not a full frame camera! With good light conditions you don’t need one, spend money on lenses instead. I was aiming at an exposure time of minimum 25 seconds, to make the clouds and water smooth. I metered 1/60th at f/14, 100 ISO, so that would give me the 25-27 second exposure (with the ND3.0) I wanted.

You can find exposure tables online, and sometimes you get them with the filter you buy. If all the conditions were perfect (which wasn’t the case) I wanted to shoot until sunset, expanding my exposure time to over 1 minute. But clouds rolled in (wasn’t forecast) and ruined the light. After a few shots, I got what I wanted and was heading home.

Next step, post-processing your image

First load the photo in to Lightroom and give it some minor adjustments to contrast and clarity. Increase the contrast a bit and reduce the clarity of the bottom part of the photo (the water). This can be done with a graduated filter (keyboard shortcut “M”) and moving the clarity slider to the left.

Now move over to Photoshop to take care of the sky (you can export it directly from Lightroom, right click on the photo and select edit in Photoshop). I was aiming for a nice movement in the sky, but the clouds weren’t going fast enough for my maximum exposure time. So we are going to replicate that with the help of photoshop.

Duplicate the image and select the sky, using the magic wand selection tool (W). Use the current layer and a brush seize of 30 pixels. When you’ve got your selection (it won’t be perfect but that is fine), click on the add layer mask symbol. (below the layers on the bottom right side of the screen).

You can make the layer mask more accurate with the pen tool (p). Click on the edge of a building (and later on the bridge) and work your way around the skyline, by clicking on every corner. The pen too will automatically draw a straight path from one point to another. When complete (you have to get all the way back to the first point you made), right click on the image and select “make selection” (feather 0, and make new selection) hit OK in the new window. Now fill your selection with black and you have a nice and clean layer mask of the sky.

Add motion blur to the sky

Now you can add a zoom blur to the sky layer, so you get a nice washed out cloud formation. Here is how to do that:

  • Select the duplicated sky layer then select Filter -> Radial Blur
  • In the menu select Blur Method -> Zoom, Quality -> good and amount 70 (you can add more, but that depends on the photo) – don’t hit OK yet!
  • Nest select where the Blur Center is positioned in the right window by clicking and dragging it around (somewhere in the middle for this photo)
  • Hit OK
  • After this you need to clean up the layer, because it now runs over the buildings
  • Hold CMD (alt on win) and click on the layer mask for the sky. Click -> selection -> inverse (you now have everything but the sky selected and hit delete.

Now you should have something like this:

Img2

As you can see the sky is now very pleasing, full of movement. When you look closer you can see that all the wires from the bridge are gone. We will have to fix that next. The wires aren’t straight lines, so the selection process of these is a pain – but worth the effort.

Using the pen tool (P) you can select all the wires on the background layer (which took me quite some time). You can do this one by one. Select one complete wire and duplicate the selection into a new layer. When you have all of them, merge all of these layers to one and place it above the duplicated sky layer.

You could also use the Magnetic Lasso Tool (L) to select all the wires but because of the low contrast in some places it won’t work, and you have to correct it later on.

Using the pen tool is a complete chapter, and I’m feeling that explaining how to use the tool takes too much focus away from this tutorial. It can take some time to master but I highly recommend reading tutorials on how to use the pen tool. You will need it for this image, but for the most of the images you can just make straight selections.

Here is my selection of the wires:

Img3

Now you can add some adjustments to the contrast in the wires and bridge, using a Brightness/Contrast adjustment layer. I used: Brightness +3 and Contrast +24

Img4

Final adjustments in Lightroom

From this point we leave Photoshop and continue in Adobe Lightroom. You could, however, do the same in Photoshop with dodging and burning, but I like the workflow of Lightroom more and used it to get to the final stage of the image.

From here it is basically just adding and removing light (exposure, contrast, white point) to selective places in the photo and checking for some dust particles. I can go into the details here, but it’s your vision of what you would like to achieve with the photo. Use the gradient filter (M) and the adjustment brush (K) in Lightroom to add and remove light to selected areas of the image. You have to “color” the photo to your wishes and crop it when needed. You are in fact painting with light.

Here is what I came up with for the final image:

Img final

“Catch  the light” – Rotterdam (The Netherlands)

Do you have any additional tips for processing for that wow factor? Please share in the comments below.

The post Take your Photos from Blah to WOW with Lightroom and Photoshop by Martijn Kort appeared first on Digital Photography School.


Digital Photography School

 
Comments Off on Take your Photos from Blah to WOW with Lightroom and Photoshop

Posted in Photography


8 Tips to Get You to Take Better Smartphone Pictures

05 Jun

Sometimes the best camera is the one you have with you, and most of the time, this will be your phone camera.  This doesn’t mean your photos have to be terrible; it just means you must work on your picture-taking process a little more, as smartphones have limited capabilities. Besides accessibility, one of the main advantage smartphones have is that Continue Reading

The post 8 Tips to Get You to Take Better Smartphone Pictures appeared first on Photodoto.


Photodoto

 
Comments Off on 8 Tips to Get You to Take Better Smartphone Pictures

Posted in Photography


5 Tips to Help You Slow Down and Take Better Photos

18 May

When you go out to take photos it can be tempting to start shooting right away with the goal of getting the ideal image or capturing the perfect picture. But before you get your camera out, it might be good to take the opposite approach and slow down. Way down. Let’s take a minute to consider some lessons you can learn from the age-old tale of the tortoise and the hare. Ironically, one of the most important things you can do when inspiration strikes is to move slowly like the tortoise, rather than rush along like the hare. The tortoise might not have been the quickest animal in the meadow, but he stuck it out and made it to the finish line while the hare had long since grown weary of the race and gave up altogether. As a photographer, it’s tempting to be a hare and race to photographic perfection, but if you look to the tortoise you see a much better example to follow.

image-001-mockingbird

Here are five tips to help you slow down and take better photos:

1. Study your surroundings

One of the most important elements of a good photograph is that of framing; how is your subject positioned relative to the environment? You might have already considered the subject of your photo (your child, your vehicle, a statue, a flower, etc.) but before you start racking up those pictures on your SD card, take a few minutes or more to consider where the subject is with respect to everything else in the area. Are there buildings, houses, or man-made structures that you could use to help make your subject stand out? Are there natural elements, like trees, shrubs, or rock formations that you could use to highlight features or colors of your subject? By pausing to consider everything else aside from your subject, you will be able to make better decisions about how to get the moments you are really striving to capture.

image-002-saint-francis

When I took this picture of Saint Francis on an overcast morning I had to consider not just the bust itself, but what else might help frame the photo. The quickest and most convenient option would have been to point my camera down and snap a picture, but by slowing down and taking time to consider everything else besides the statue it resulted in a much more pleasing image. I ended up crouching down low to the ground, and using the background elements to give the viewer a sense of space and context. By considering the environment and using that to inform my choice about how to take the photo, I was able to get a much better picture than I would have otherwise.

2. Wait for the light

You might not have a giant flash, or studio-style strobes and softboxes, but you can still get amazing pictures by using the best source of light anywhere – the sun. The downside is, you have to be patient if you really want to use it to its full potential. It might not be easy, but one of the best techniques you can utilize to take advantage of natural light is be patient and wait until it suits the needs of your photograph. Bright daylight is often not the best time to be outside and shooting, as the sun’s direct rays can be too harsh and create too much contrast especially if there are trees, building, or other elements casting big shadows.

image-003-bronze-man


Instead, take the tortoise approach and wait until the sun is lower on the horizon. An hour or so before sunset is one of the best times to be out taking pictures, as the low angle of the sun creates a much more pleasing source of light than when it’s directly overhead. Another good time to be shooting in nature is right after sunrise, as you still get the low angle and warm colors. I had to get up early to take this picture of a bronze pedestrian whom someone had bedecked with a bit of garland. But by waiting for the sunlight to be what I needed, rather than what happened to be available, I was able to get a much better photo.  It might not have been the quickest option, but it certainly yielded a much better image.

3. Be part of nature

Taking photos of wildlife does not always require a telephoto lens, but it does require patience. If you want to get good pictures of the animals around you, whether it’s in your backyard or on a hike up the mountains, it’s often best to be patient and let nature come to you. Animals will hear you coming and quickly scamper off, but if you stake out a good spot to wait for them you can be rewarded with some compelling photographic opportunities. A few weeks ago I wanted to get a picture of a squirrel, so I started chasing this one around while he looked for nuts and acorns. I soon realized this was an exercise in futility, as he kept running away from me! So instead I picked out one spot and just waited. After a while he crept back and started poking around near me, and I was able to get a decent picture.

Image003 squirrel

Nature can be a fickle mistress, and will often refuse to comply with what might seem like quite reasonable requests (“Hold still, little birdie! No, don’t fly away!”). But if you take time to be part of nature, and even let nature come to you, you will often be rewarded with much better photos than you could get by rushing into things.

image-005-snake

4. Let kids be kids

Trying to get a good picture of children can take all the fun out of a birthday party or an afternoon at the park. For many of us, our instinct is to be in control: “Look here everyone! Now say cheese!” Inevitably one kid will be smiling, one will be blinking, one will be staring off to the side, and one might even be crying. It might seem like getting a good picture of kids is almost impossible! Thankfully, there is hope. Instead of rushing like the hare to construct a greeting-card-worthy photograph, try taking the opposite approach and just let the kids play. Keep your camera ready, and use it to capture the kids just being themselves. The catch is, you could be waiting quite a while, but you (and the kids) will have much more fun in the process.

Image004 girl

I took this photo of my friend’s daughter while she and my son were playing around in the dirt, and even though it took a while and I got myself rather muddy in the process, I ended up with a picture that was far more interesting than all the posed ones we took earlier. Another advantage of this approach comes months later when you are looking through your pictures. Posed photos of children smiling at the camera might seem like a good idea at the time, but afterwards you will often find that these are not nearly as interesting as the ones where the kids are just playing around and acting natural. But if you are not willing to be patient and wait for these moments to happen, they will often slip by and be lost forever without you ever even noticing.

image-007-kids2

No fancy studio, no special camera gear- just sunlight and patience

5. Learn one new camera function, and learn it well

Cameras today have so many options, buttons, and dials it’s no wonder so many people shoot in Auto mode, and I can hardly blame them for doing so! Learning to operate your camera can be a daunting task, and if Auto takes pictures that are generally good enough, why bother with all the menus and knobs? I have seen so many people try to learn how to operate their cameras to take better pictures, but give up in frustration because it’s so overwhelming. The trick is to pick one thing and learn it thoroughly, and in doing so the various elements of exposure and photography will slowly start to come together.

For example if you shoot in Auto, try choosing the Aperture Priority mode (Av or A on your camera) and learn how to control the aperture of your lens to get better shots. Don’t worry about shutter speed, ISO, white balance, AE-L, or anything else just yet. All that is important, but it can wait. Once you spend a few days, weeks, or even longer getting the hang of adjusting the aperture, then move on to something else like the Shutter Priority mode (S or Tv on your camera) where you control the shutter speed and let the camera figure out the rest. You will soon start to see how the various elements of exposure (Aperture, Shutter, and ISO) affect one another, and how to control them to produce the amazing shots that have somehow always eluded your grasp.

By sticking with just one new camera function at a time you might not learn everything about your camera as quick as you would prefer, but you will likely avoid the frustration and burnout that often comes with trying to learn too many new concepts at once. After all, the hare might have gotten off to a quick start but we all know how that turned out. In photography, it pays to be more like the tortoise: slowing down might not seem ideal at first, but it will help you produce brilliant results in the end.

The post 5 Tips to Help You Slow Down and Take Better Photos by Simon Ringsmuth appeared first on Digital Photography School.


Digital Photography School

 
Comments Off on 5 Tips to Help You Slow Down and Take Better Photos

Posted in Photography


10 Portrait Tips to Take Your Photography to the Next Level

13 May

You have all the makings of a beautiful photograph: the perfect client, an overcast day for soft natural lighting and a gorgeous landscape as the backdrop. You’re taking photos but noticing that something’s not quite right. The photos look underwhelming. Believe me, I’ve been there. Here are 10 tips to take your portraits to the next level.

Cjust_tip1

Photographing Danielle LaPorte – author

Portrait of Danielle LaPorte - author

Portrait of Danielle LaPorte – author

Tip #1 – have your subject look up at you

It’s slimming and flattering (see images above). Bring a small step stool to stand on and photograph your subjects from slightly above their eye line. Watch double chins disappear. Keep a step stool in the trunk of your car so you don’t even have to think about adding it to the list of gear to bring when you prep the night before. It’s there, ready to go.

Tip #2 – capture the moments in between poses

Cjust_tip2

Personally this is a favorite of mine. If you’re noticing the images look too posed, or your subject is uncomfortable in front of the camera, shake things up. Ask them to do the most ridiculous pose or ask them to pretend to laugh really hard. Take that photo, but keep the camera up and wait. The moment after that photo happens you’ll find their guard will come down, they will laugh authentically or give you a moment that feels much more real.

Tip #3 – turn the subject’s body slightly

Have them turn their body slightly away from the camera and their face still looking straight at you. This is not only slimming, it also gives the photograph more depth.

Tip #4 – flattery

Always tell them how beautiful they look. It’s unnerving to have someone pointing a camera at you and not know what the photos look like. Tell them. It will help calm their nerves and you will notice a difference in the photos because they will feel more confident and attractive.

cj_tip9

Tip #5 – connection

This is the key to everything really. If there’s a connection between you and the person you are photographing, there’s a magic that happens that’s unexplainable. Sure, you can have the right lens, the right camera, and the right lighting, but an authentic connection between the two of you takes it up a notch. You can see it in their eyes. They connect with you, and it shows with a different authenticity that can’t be faked. Ask questions, become curious about who they are. Get to know them on a more personal level. Keep that conversation going throughout the photo session. Laugh with them.

cjust_tip6

Tip #6 – tell your subject to flirt with the camera

Ok, that sounds weird but it can work. Ask them what celebrity crushes they have. That changes the look in their eyes and on their face. Have them pretend that the camera is that person. Seriously. It makes them laugh, which goes with tip #2, and helps them loosen up as well. If they are in a relationship, ask them when they met, how they met, or some other stories about their partner that lights them up. Watch the shift happen and take photos throughout the conversation. You’ll capture moments that are real and off guard.

Cjust_tip7

Tip #7 – have them bring a playlist of their favorite music

I bring a portable wireless speaker and play their music, which creates a mood they are comfortable with. You can also play your own music. It helps give them something else to pay attention to and can lighten the mood. Get playful with it and dance around with them. Let them express themself and just pay attention with your camera ready. You can take photos of those moments as well. You can try a longer shutter speed while they dance for some variety and movement. A little blur can add more of a story to the series of images.

Tip #8 – clothing selection is important

Have them pick out clothing from their wardrobe that makes them feel like a rock star. It must be clothing that they feel comfortable in and which allows them to move easily. No crazy patterns or bright colors. The emphasis is on their eyes and their expression not the bold neon stripes on their top.

cjust_tip10

Tip #9 – lighting

If you’re outside, open shade is extremely flattering. This is best early in the morning, late afternoon and close to sunset, when shadows are being created from trees and buildings. Have your subject stand in the shade. A great place to explore this is in doorways. Try just inside an open garage door. Stairways inside parking garages can also provide a shade that’s not too dark, with the brightness outside reflecting on them perfectly. If you’re inside, you can still use natural lighting by turning off all the overhead lights and lamps and having your subject move close to the window. When it’s overcast it’s best because again, it will be even soft light on their face without any shadows or harsh light making them squint.

Tip #10 – break the rules

cjust_tip10b

Allow the flare from the sun to fill the lens. Use alternative cameras like a Polaroid SX-70 or your iPhone. Try out the iPhone apps. It helps you expand as a photographer when you stretch yourself in new unchartered ways. Only bring one lens to the photo shoot. Bring the one you know is the most flattering. My favorite portrait lens is the Nikon 85mm 1.4 lens. ( yep, I’m a Nikon girl ). Think of this as more than a portrait shoot but as a fine art project. Have your subject create a Pinterest board of their favorite portraits before the photo session and play with those ideas. Try unconventional poses. They can lead you to unexpected moments of greatness with your portraits.

Next steps

Allow yourself to go on a journey of exploration during the photo session. There are so many ways to go from ordinary to extraordinary. Paying attention to the basics of composition, lighting, posing can help. Incorporating your own authentic personality into the session will help your client be more relaxed and open to try new things. This will bring you better results in the end.

So, what is one tip you’ve learned along the way that has helped you create better portraits? Share it with us in the comments below.

The post 10 Portrait Tips to Take Your Photography to the Next Level by Catherine Just appeared first on Digital Photography School.


Digital Photography School

 
Comments Off on 10 Portrait Tips to Take Your Photography to the Next Level

Posted in Photography


35 Cityscape Images to Take Your Breath Away

02 May

Recently I’ve done a lot of natural world images including landscapes, bugs, waterfalls, flowers and even pets. So it’s time for something different and I’m shifting gears to man-made.

Here’s a collection of cityscape images to get you inspired enough to get out and take some of your own. Enjoy!

Photograph Up and Above by Sebastian Opitz on 500px

Up and Above by Sebastian Opitz on 500px

Photograph Shanghai at Night by Clemens Geiger on 500px

Shanghai at Night by Clemens Geiger on 500px

Photograph Brooklyn Bridge New York City - NY by Dominique  Palombieri on 500px

Brooklyn Bridge New York City – NY by Dominique Palombieri on 500px

Photograph Houses of Parliament, London by David Mar Quinto on 500px

Houses of Parliament, London by David Mar Quinto on 500px

Photograph Concrete Jungle 2 by Kerim Hadzi on 500px

Concrete Jungle 2 by Kerim Hadzi on 500px

Photograph Dark Pace by Toby Harriman on 500px

Dark Pace by Toby Harriman on 500px

Photograph Fire over San Francisco by Toby Harriman on 500px

Fire over San Francisco by Toby Harriman on 500px

Photograph Painted Ladies by Bobby Gibbons on 500px

Painted Ladies by Bobby Gibbons on 500px

Photograph Sydney Harbour by Dragostesun Photography on 500px

Sydney Harbour by Dragostesun Photography on 500px

Photograph Sky Gate by Gianluca Gobbi on 500px

Sky Gate by Gianluca Gobbi on 500px

Photograph Puddle Mirror Reflection on Notre Dame by Loïc Lagarde on 500px

Puddle Mirror Reflection on Notre Dame by Loïc Lagarde on 500px

Photograph Silent morning by Martin Stantchev on 500px

Silent morning by Martin Stantchev on 500px

Photograph Windows by Catalina Justiniano on 500px

Windows by Catalina Justiniano on 500px

Photograph Strolling Venice by Cristina Ramos on 500px

Strolling Venice by Cristina Ramos on 500px

Photograph Blue City by Woosra Kim on 500px

Blue City by Woosra Kim on 500px

Photograph Misty Taj by Daniel Cheong on 500px

Misty Taj by Daniel Cheong on 500px

Photograph The Trench Run by peter stewart on 500px

The Trench Run by peter stewart on 500px

Photograph The Aperture by  M. Rafiee on 500px

The Aperture by M. Rafiee on 500px

Photograph Golden Sunrise by Andi Andreas on 500px

Golden Sunrise by Andi Andreas on 500px

Photograph Hong Kong by César Asensio Marco on 500px

Hong Kong by César Asensio Marco on 500px

Photograph The Twilight Hour by Marc Perrella on 500px

The Twilight Hour by Marc Perrella on 500px

Photograph Golden Bricks by Toney's Photo Journey on 500px

Golden Bricks by Toney's Photo Journey on 500px

Photograph quarters.only by Robert Pfeuffer on 500px

quarters.only by Robert Pfeuffer on 500px

Photograph On the bridge II by Roland Shainidze on 500px

On the bridge II by Roland Shainidze on 500px

Photograph Microzurich by Vladimir Popov / Uhaiun on 500px

Microzurich by Vladimir Popov / Uhaiun on 500px

Photograph Paris TS by Federico Venuda on 500px

Paris TS by Federico Venuda on 500px

Photograph Still Morning by Tristan O'Tierney on 500px

Still Morning by Tristan O'Tierney on 500px

Photograph twilight arcs by Sven Fennema on 500px

twilight arcs by Sven Fennema on 500px

Photograph Roman Forum (Rome, Italy) by Domingo Leiva on 500px

Roman Forum (Rome, Italy) by Domingo Leiva on 500px

Photograph The Petronas Tower. by sk teh on 500px

The Petronas Tower. by sk teh on 500px

Photograph Sunset in Oia by Slava Mylnikov on 500px

Sunset in Oia by Slava Mylnikov on 500px

Photograph Gothic Quarters - Barcelona by Frank van Haalen on 500px

Gothic Quarters – Barcelona by Frank van Haalen on 500px

Photograph Colmenas II by Rosa M.  Font Regí on 500px

Colmenas II by Rosa M. Font Regí on 500px

Photograph Clash of the Titans by Alfon No on 500px

Clash of the Titans by Alfon No on 500px

Photograph Madrid full moon by Juan Carlos Cortina  on 500px

Madrid full moon by Juan Carlos Cortina on 500px

The post 35 Cityscape Images to Take Your Breath Away by Darlene Hildebrandt appeared first on Digital Photography School.


Digital Photography School

 
Comments Off on 35 Cityscape Images to Take Your Breath Away

Posted in Photography