RSS
 

Posts Tagged ‘Supplies’

Droneport: New UAV Hub to Ship Medical Supplies Across Rwanda

25 Sep

[ By WebUrbanist in Architecture & Public & Institutional. ]

drone airport emergency medical

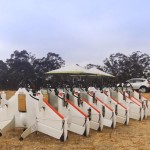
This architect-designed drone airport will be the first of its kind, created to facilitate an unmanned aerial vehicle supply chain servicing remote areas of Africa, addressing urgent medical and other ongoing needs. Just as much of the continent skipped landlines and went straight to mobile phones, this strategy could jump steps in the development of infrastructure for delivering for physical goods.

drone airport vaulted brick

Developed by Afrotech in collaboration with Foster + Partners, work is set to begin next year with a pilot program completed by 2020. The vaulted brick structure will have spaces for drone building and repair as well as packaging, shipping and storage of goods both medical and otherwise. The architecture is intentionally open, simple and able to be constructed with local materials and labor.

drone airport side view

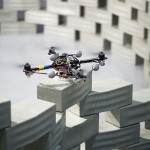
Two systems will function simultaneously to provide emergency and ongoing supplies, respectively. The Redline will include small situation-specific drones that can serve targeted emergency needs, carrying over 20 pounds. Larger 200-pound-capacity Blueline drones will manage more sizable shipments of less urgent supplies.

drone airport rwanda

“The Droneport offers a new typology for a building which we hope will grow into a ubiquitous presence, much like petrol stations have become dispersed infrastructure for road traffic,” acting as a network of stopping, refueling and repair stations.

drone alternative shipping routes

Currently, only a small percentage of the African population lives within a mile of year-round accessible roads, while UAVs from the Droneport will be able to more quickly, easily, safely and reliably access nearly half of Rwanda’s citizens.

drone airport commerce

“We require immediate bold, radical solutions to address this issue. The Droneport project is about doing ‘more with less’, capitalising on the recent advancements in drone technology – something that is usually associated with war and hostilities – to make an immediate life-saving impact in Africa.”

drone airport hillside

“It is inevitable on a crowded planet, with limited resources, that we will make more intensive use of our sky using flying robots to move goods faster, cheaper, and more accurately than ever before. But it is not inevitable that these craft or their landing sites will be engineered to be tough and cheap enough to serve poorer communities who can make most use of them. Droneport is an attempt to make that happen, and to improve health and economic outcomes in Africa – and beyond.”

Share on Facebook


[ By WebUrbanist in Architecture & Public & Institutional. ]

[ WebUrbanist | Archives | Galleries | Privacy | TOS ]


WebUrbanist

 
Comments Off on Droneport: New UAV Hub to Ship Medical Supplies Across Rwanda

Posted in Creativity


Class Is In Session! Turn Photos Into School Supplies

13 Aug

Can it be? Summer’s almost over? It feels like it just started.

Guess that means it’s time to switch sunbathing for school supplies. But hey, that’s not a bad thing. Really!

Just check out our list of DIY school supplies that you can make out of your very own photos and you’ll see what we mean.

Now go get crafty and make all your classmates jelly!
(…)
Read the rest of Class Is In Session! Turn
Photos Into School Supplies (445 words)


© Taylor for Photojojo, 2015. |
Permalink |
No comment |
Add to
Photos Into School Supplies”>del.icio.us

Post tags:


Photojojo

 
Comments Off on Class Is In Session! Turn Photos Into School Supplies

Posted in Equipment


Snazzy Engineer Prints, Limited Supplies!

20 Mar

Spruce up your digs and support awesome photographers!

We teamed up with a few of our fave photo makers to offer a limited run (hurry! hurry!) of their work printed up as big beautiful 3 foot x 4 foot Engineer Prints.

See Our Selection of Engineer Prints
(…)
Read the rest of Snazzy Engineer Prints, Limited Supplies! (0 words)


© Erin for Photojojo, 2015. |
Permalink |
No comment |
Add to
del.icio.us

Post tags:


Photojojo

 
Comments Off on Snazzy Engineer Prints, Limited Supplies!

Posted in Equipment


How to Make a Mini Light Studio Using School Supplies

28 Jun

When school’s out, most kids are thinkin’ “Oh man, summer’s here!”

Us? We’re thinkin’ “What are we gonna do with all these binders???”

Staring at binders all summer long is no fun, so our buddies Chris Rutter and Jeff Meyer (of Digital Camera World) showed us how to turn them into a sweet light tent — perfect for casting beautifully diffused light onto your photo subjects.

That means your photos won’t have harsh shadows from the sun, and your camera will catch all of your subject’s details.

Everyone has a binder or two at home, so you can start this project today!

Plus, this portable light tent gives you great lighting on flowers, insects, and other small stuff without having to pluck them out of the ground.

Throw it in your bag, and you’ve got a mini studio wherever you go this summer.

How to Turn Binders into a Light Tent

Ingredients

  • 3 white, translucent binders
  • 8 1/2″x11″ colorful cardstock
  • Duct tape (grey is good!)
  • A camera
  • Optional: small hand-sized beanbags

Step 1: Tape it together

beforeLay one binder open and flat.

Grab a second one and lay it open and flat. Keeping them open, overlap the cover of one binder on top of the back cover of the second.

Use your duct tape to keep them connected at their folds (check out the photo). You should have three panels.

Cut the front cover off your third binder and attach it to the center panel at its top edge. It’ll act like the roof to your light tent.

Try standing your light tent up, and if the roof is too floppy (flappy?), tape it down to help the tent keep its shape.

Step 2: Pick something to shoot

beforeTake a peek outside.

Scratch that. Take a good long look! We bet there’s something hidden out there that’d make a great photo subject.

Jeff found this budding flower, but maybe you’ll catch a rollie pollie unfurling or a butterfly snacking on a daisy.

If you’re not feeling the outdoors, set up a fun miniature scene with figurines, knick knacks, and stuff around your house. Slinkachu’s rad inspiration for that.

You can also practice your product photography by throwing almost anything in your light tent and playing around with getting the best even lighting on it (think setting it by a window, taking it outside, setting something reflective under it or playing around with the angle of the flaps).

Step 3: Make it pretty with a background

beforeNow that you have your thing-to-photograph picked out, observe its beautiful array of colors and what kind of background you think would complement it.

Perhaps take a gander at the Color Wheel, a diagram for figuring out which colors are complementary and which might clash.

The blue-yellow combination here goes pretty good, we’d say.

You can go with a piece of card stock or a color folder, even. Get more use out of those school supplies!

Place your background over the back panel and use use tape or a paperclip to keep it in place.

Step 4: Mad Props

beforeNow, prop it up! It’s a tent, after all.

Place it over your subject so that your subject sits in the center of your “tent.”

If you have nice cushy grass to work with, then getting it to stand on its own might be easy. If your surface is smooth, prop it up with paperweights or small hand-sized beanbags on either side of each flap.

Step 5: Get your camera ready

beforeOnce you have everything just how you want it, grab your camera and put it on manual mode, so you can figure out the best settings for your snap.

For this shot, Jeff used an aperture of f/5.6 and shutter speed 1/200 at 200 ISO. A low ISO worked here because the sunlight was aplenty, but if your photo looks too dark, you might need to raise your ISO to 400 or so.

Play around with your settings ’til it’s how you envisioned.

Take it further

before

  • Ever wanted to set up a mini studio in your home? Here are the 5 things you’ll need.
  • Teresa Franco shoots amazing macro photos of all the little things we miss under our feet.
  • How to make macro photos without buying an expensive lens

Related posts:

  1. Turn Your Tablet Into a Studio Light Extra photos for bloggers: 1, 2, 3 Your iPad is…
  2. DIY: Make Crazy Detailed Light Paintings with Photo Light Stencils Extra photos for bloggers: 1, 2, 3 Ever tried painting…
  3. You Only Need 5 Things to Make Your Own Home Studio Extra photos for bloggers: 1, 2 Photography doesn’t have to…


Photojojo

 
Comments Off on How to Make a Mini Light Studio Using School Supplies

Posted in Equipment