The post Back to Basics: Understanding the “Sunny 16 Rule” in Photography appeared first on Digital Photography School. It was authored by Adam Welch.

In life, we are sometimes met with certain inalienable truths; water will always flow downhill, there will always be an unhappy baby on your flight, and the milkshake machine at your favorite fast food place will always be broken when you need it the most. There are also some self-evident truths that we must accept when it comes to photography; one being, one day, you will need to set your own exposure manually. If you’ve been shooting exclusively in Auto Mode or Aperture and Shutter Priority Modes, this can be an enormous challenge.
Take heart! I’m about to show you one of the easiest and most long-standing methods for calculating exposures. Using it will help you almost always get a usable baseline exposure when shooting your camera in full manual mode. Yes, really.
It’s called the Sunny 16 Rule, and it’s going to be your best friend.

You may very well have heard of it before but never fully understood how simple it truly is to implement (and modify) this handy little formula to fit the situation in which you find yourself shooting.
Getting to know the Sunny 16 Rule
Understanding the Sunny 16 Rule couldn’t be more simple. It’s all based around the relationships between our three key elements of exposure: ISO, aperture, and shutter speed.
Sunny 16 had its roots in film photography when it was used to help photographers figure out their exposure when a light meter wasn’t available. However, it works perfectly well with digital photography too. In fact, since we have the added convenience of on-the-fly ISO adjustments with our digital cameras, the Sunny 16 Rule becomes even more universally useful.

As you might have guessed, the concept of the Sunny 16 Rule begins with bright sunlight and setting our aperture to…*drum roll*…f/16. Bright sunlight refers to unobstructed sunlight on a cloudless day; think noon with a clear sky, and its brightness is virtually constant.
After we’ve got our aperture set to f/16, we can now dial in our shutter speed based on the ISO we happen to be shooting. To calculate your shutter speed based on Sunny 16, all we have to do is put “1” over our ISO. This will be your shutter speed.
Keep in mind that some cameras measure exposure in full, half or third stops and your shutter speed might not be exactly the same as your ISO. For example, in half-stop increments, if you are shooting ISO 400 then your exposure would be (for slight underexposure) f/16 at 1/500th of a second. At ISO 100 your settings would be f/16 at 1/125th of a second. For ISO 800 it would be 1/1000th of a second and so forth.
As far as ISO settings are concerned, it is a good practice to “set it and forget it.” There’s not much need to adjust the ISO as we can vary our exposure using our aperture settings – unless the scene dictates otherwise…more on this in just a bit.

Why the Sunny 16 Rule is so useful
The reason the Sunny 16 Rule is such a fantastic concept is due to the fact it gives us a usable exposure setting based on what will likely be the brightest light you will encounter – the sun.
Once you know what your shutter speed will be at a given ISO and f/16 in bright sunlight, you can essentially estimate any exposures for darker environments. The reason for this is that ISO, aperture, and shutter speed are all connected. You can adjust each relative to the another so that you can control your exposures based on the needs of a particular scene. If you’d like to learn a little more about how ISO, aperture and shutter speed relate to one another, have a look at this great article on understanding the exposure triangle.
Perhaps one of the best things about working with the Sunny 16 rule is that it’s a great way to teach yourself to read light and adjust your exposure based around the creative requirements for your photo. Let’s look at some considerations to take into account when you need a little more control over your photographs when basing your exposures around the Sunny 16 concept.

How to modify the Sunny 16 Rule
Years ago, when I first heard of the Sunny 16 Rule, my first thought was “That’s great, but what if I don’t want to shoot at f/16?”
Indeed, a great question.
What happens when you need a more shallow depth of field than f/16 can produce? Alternatively, what if the indicated ISO-based shutter speed just isn’t fast enough or slow enough for your subject? Furthermore, you definitely won’t always photograph in blazingly bright sunlight (ironically not ideal for most photography).
The good news is that the Sunny 16 Rule is incredibly flexible.
Remember, the Sunny 16 Rule does nothing more than eliminate variables in your exposure to produce a baseline camera setting which you can then manipulate given your particular needs.

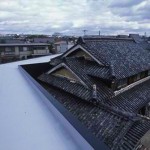
Virtually identical exposures in direct sunlight based on the Sunny 16 Rule with constant f/16 apertures and ISO-dependent shutter speeds.
For example, let’s say you’re shooting a subject that requires a more shallow depth of field, like a portrait or still life that is in bright sunlight. At ISO 100, your resulting Sunny 16 exposure would be f/16 at 1/125. For reference, here’s a sample photo I shot at those settings in direct afternoon sunlight.

Needless to say that if I open up my aperture to f/2.8 (five full stops wider) in order to better blur the background, the resulting image will be completely overexposed, and looks something like this:

Yes…there is a photo there.
So, how to remedy this problem? Since we are working from the Sunny 16 Rule, all we have to do is apply some basic photographic principles (remember the exposure triangle?) to normalize our exposure based on our new, wider aperture.
Seeing as we opened up our aperture by five stops, we simply need to increase our shutter speed by five stops to compensate.
So if my initial shutter speed were 1/125th at f/16, my new adjusted shutter speed setting at f/2.8 would be 1/4000th. Here is the resulting exposure:

Blurred background and a normalized exposure based on the Sunny 16 Rule.
The same is true in the case of fast-moving subjects. If you’re experiencing unwanted subject motion at, say, 1/125th of a second at f/16, and you want to try a faster shutter speed of 1/500th of a second to help arrest the motion, you need to compensate for the faster shutter speed with a corresponding wider aperture setting to allow more light to come into the camera. In this case, 1/500th of a second – two full stops faster than 1/125th – so we would open our aperture by two stops from f/16 to f/8.
Some adjusted Sunny 16 baseline exposures
If you’re wondering about lighting situations other than bright sun, here’s a quick (but by no means definitive) list of baseline aperture adjustments derived from the Sunny 16 Rule. I’ve listed Sunny 16 at the top as a baseline exposure at ISO 100 and 1/125th of a second. To adjust your exposures for varying degrees of brightness, all you need to do is change your aperture.
- Direct bright sunlight with harsh shadows: f/16 at 1/125th of a second and ISO 100
- Indirect bright sun with soft shadows (shade/cloudy): f/11 at 1/125th and ISO 100
- Overcast skies with little to no shadows: f/8 at 1/125th and ISO 100
- Dusk/morning light: f/4 at 1/125 and ISO 100
I also want to point out the elephant in the room which is holding a big neon-yellow sign that reads, “Why not just bump up the ISO?”
In short, you can adjust your ISO settings to compensate for more or less light in the scene. Modern cameras are becoming better and better at reducing high ISO digital noise. The Sunny 16 Rule was based on the fact that most film cameras are limited to the ISO of the film used. In these cases, the ability to read and understand light becomes paramount.
The concept of Sunny 16 gives us digital shooters a way to nail exposures (or come close) every time in-camera without constantly checking our images after each shot.
Final thoughts on the Sunny 16 Rule
Of course, as with most things, the Sunny 16 Rule isn’t a true “rule” in the sense that you must follow it to the letter. Instead, it is a rule in the way that gives something to relate one thing to another; in our case it allows us to relate the luminance of available light to our camera settings to achieve predictable and reproducible results.
Sunny 16 is also a great learning tool to help us understand the nature and measurement of light. Going further, it is a guide that is extremely versatile once you understand just a few basic principles of exposure. I, for one, feel as if I don’t use Sunny 16 enough in my work. I think that is about to change.
Do you practice the Sunny 16 Rule? How has it affected your shooting? Let us know in the comments below!

The post Back to Basics: Understanding the “Sunny 16 Rule” in Photography appeared first on Digital Photography School. It was authored by Adam Welch.


You must be logged in to post a comment.