RSS
 

Posts Tagged ‘Studio’

Sony Cyber-shot DSC-RX100 IV added to studio test scene comparison

27 Jun

Sony’s latest RX100, the Cyber-shot RX100 IV, brings the manufacturer’s stacked CMOS sensor design to the 1″-type sensor size for the first time. The 20MP chip, also in the Cyber-shot RX10 II, pushes all the pixel circuitry onto a separate layer, creating room for high-speed processing within the chip. See how it performs against its peers in our studio test scene. Read more

Articles: Digital Photography Review (dpreview.com)

 
Comments Off on Sony Cyber-shot DSC-RX100 IV added to studio test scene comparison

Posted in Uncategorized


Production Canon EOS 5DS and 5DS R added to studio test scene

25 Jun

We’ve updated our Canon EOS 5DS/5DS R First Impressions to include studio test samples from final production versions of the cameras. The 5DS and 5DS R share a 50MP full-frame CMOS sensor and are identical in every way except for one: the 5DS contains an anti-aliasing filter, while the 5DS R has a self-canceling filter. While we’ve previously tested a beta version of the 5DS R, we’ve finally been able to put final production versions of the two cameras through our studio. Read more

Articles: Digital Photography Review (dpreview.com)

 
Comments Off on Production Canon EOS 5DS and 5DS R added to studio test scene

Posted in Uncategorized


Nikon 1 J5 and Samsung NX500 added to studio test scene

08 Jun

We’ve just added a pair of compact mirrorless cameras to our studio test scene – the Nikon 1 J5 and Samsung NX500. The J5 brings a 1″-type 20.8MP BSI-CMOS sensor to Nikon’s entry-level mirrorless lineup. The NX500 is Samsung’s scaled down version of its flagship NX1, using the same 28MP APS-C BSI-CMOS sensor. See how each camera performs in our studio scene. Read more

Articles: Digital Photography Review (dpreview.com)

 
Comments Off on Nikon 1 J5 and Samsung NX500 added to studio test scene

Posted in Uncategorized


Learn How to Setup Studio Lighting in 15 Minutes

29 May

Do you find studio lighting daunting? Understandable. When I got my first set of lights I played with it for half an hour. Intimidated and confused, I shoved it back in the box where it stayed for six months.

Don’t worry though, mastering exposure with studio strobes is easy; in fact it’s probably one of the easiest of the photographic skill sets. By following this tutorial, you can go from no experience with studio lighting, to getting a correct exposure on your first frame, without the aid of expensive and unnecessary light meters. This isn’t a crash course in complicated theories and physics; our goal is to get you using strobes and creating photographs as quickly as possible. You can return to the theories at your convenience. I am a firm believer in the idea that it’s easier to learn the why, when you’ve already figured out the how.

Warpaint john mcintire photography 0754 2

Getting Ready

Before we start, you’ll need to do a few things in preparation:

  1. Setup your studio strobe on its stand, set it to full power and make sure it works.
  2. You should know how to connect your strobe to the camera and make it fire by way of remote trigger, pc sync cable, slaved to your on-camera flash, or by way of an in-camera system. Refer to your manuals if you need help.
  3. Have your strobe’s instruction manual at hand.
  4. Settings: Set your camera to manual mode, your shutter speed to 1/125th of a second, and your ISO to 100. (If you have an older model, or a film camera, then default to 1/60th of a second.)
  5. Have a calculator at hand will make things easier.
  6. Finally, I recommend that you start to think in full stops, which I’ll cover in the next section.

Thinking in Full Stops

Most of our modern cameras are capable of setting the aperture in increments of 1/3 or 1/2 of a stop. This is extremely useful for fine tuning the exposure in most situations; however, for the purpose of this exercise, it is much easier to ignore them for now and concentrate on the full stop values as indicated in the chart below.

Fstops

Finding Your Guide Number

The next step is to flip through your strobe’s manual and find where it lists the Guide Number (also check whether the guide number is listed in feet or meters; this is vital). This magic number is a rather complicated thing and steeped in the brain-wracking Inverse Square Law. As promised, you don’t yet need to know why it works; you only need to know how to use it at this point.

There are two main ways to use the guide number, that will be useful to you. You can choose your aperture based on the desired outcome of your photo and calculate where to put your strobe, or you can place your strobe for a desired lighting effect and calculate the correct aperture.

Calculating Aperture

Some lighting effects require strobes to be in certain positions, and distances from your subject and other strobes. In other circumstances, your strobe might be in a fixed position and it cannot be moved.

In these events, to calculate the aperture for a correct exposure all you have to do is measure the distance between the light source and your subject in feet or meters (whichever your guide number is listed as). Now divide your guide number by that distance. For example a guide number of 66 with a distance of 6 feet between your subject and the light source would result in: 66 divided by 6 for a result of 11. Your answer is your aperture for a correct exposure: f/11.

Most guide numbers never divide so evenly into full stops. For example, if you get a result along the lines of f/9.2, just round it off to the nearest full-stop for the moment and we’ll learn how to fine-tune the exposure shortly.

Calculating Strobe Distance

Conversely, if you know what aperture you want to use, for a creative effect perhaps, simply divide the guide number by your desired aperture. My tendency for studio portraits is f/8, so if you divide our previous example of 66 by 8 (66/8) you get 8.25. To get a correct exposure for this setup, you would just place your light source 8.25 feet away from your subject. It really is that easy.

One caveat: if you have a high powered strobe in a small place, you’re not going to be able to set your camera to something ridiculous like f/64. If your power output is too high, just turn your strobe down to half power and divide the guide number by two.

Fine Tuning Exposure without Changing Your Settings

As you learned, there are instances where you want your aperture to remain constant. You also don’t want to mess with the power settings on your strobe so much that they completely change your guide number and negate your ability to calculate your exposure with ease. Yet subjects move, or you might want to over or underexpose your image for creative effect. The way to do this is simple.

To underexpose or reduce the amount of light falling on your subject, you would move your strobe further away. If your light source is really close to the subject and you move it back about a foot, you will lose 1-2 stops of light (smaller f/number). If your source is farther away from the  subject and you move it back one foot, you will lose less light. This is caused by the Inverse Square Law which states:  In physics, an inverse-square law is any physical law stating that a specified physical quantity or intensity is inversely proportional to the square of the distance from the source of that physical quantity.  (and link to the wiki definition). Just know that closer in you lose more light as you back it away, than if the light is situated farther from the subject to begin.

This is also why I asked you to consider thinking in full stops rather than fractional increments. Moving a strobe or a model one or two feet is much easier to judge on the fly than the four inches (10cm) a third of a stop increment would require.

Notes on Modifiers

The most common modifiers in studio photography will affect the output of the strobe in terms of exposure. You may need to increase or decrease your aperture, or the distance of your light source, depending on which modifier you choose.

Soft boxes and white or translucent umbrellas, which all produce a softer, more diffused light, will decrease the amount of light falling on your subject. To combat this, choose a larger aperture (smaller f/number) or move your light source closer to your subject.

Beauty dishes, silver umbrellas and reflectors, which all produce a harder, more defined light, will increase the amount of light falling on your subject requiring you to choose a smaller aperture (larger f/number) or to move your light source further from your subject.

Modifierexamples john mcintire photography

If you choose to alter your aperture in these situations, feel free to revert to your 1/3 stop increments. A modifier will rarely alter the output of a strobe by a full stop.

You will quickly learn how your modifiers affect the output of your strobes and within a few sessions you should find yourself automatically compensating for them without thinking about it.

Putting it into Practice

I set up a quick portrait session to help demonstrate how to employ these techniques. Gemma graciously volunteered for the task.

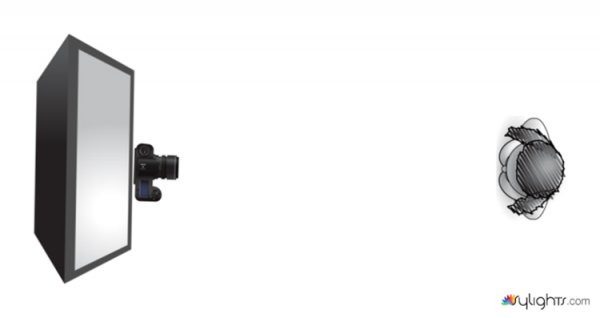
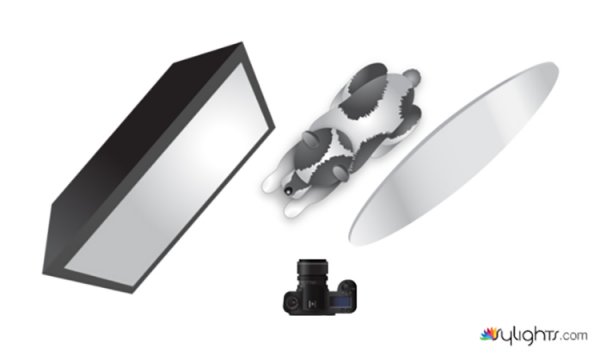
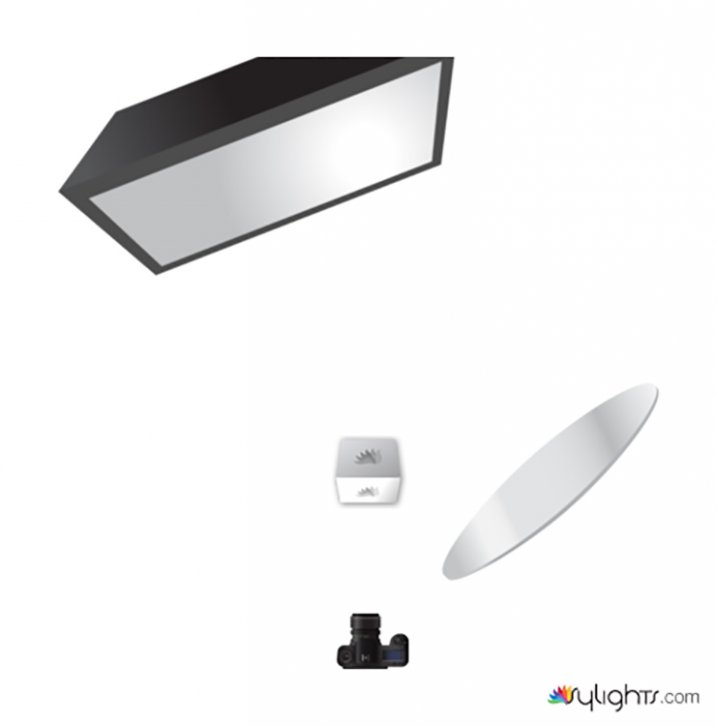
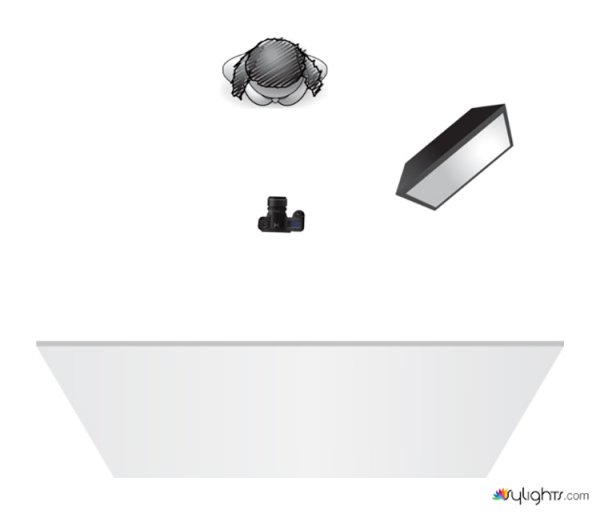
The only preparation was the setup of a paper background and fitting the strobe with a beauty dish. After she arrived, I asked Gemma to stand two feet from the background and I placed the light source straight in front of her and as high possible with the beauty dish pointed downward at her face.

All that was required to start shooting was the correct aperture. The Bowens GM400 I used has a guide number of 76. I measured how far away the light source was; which was 7.5 feet. Dividing 76 by 7.5 gives a result 10.133. Because I was using a silver beauty dish, we know that I need to stop down the aperture to get a precise exposure so I set the camera to f/11 and took a test shot. As you can see from the histogram, these simple calculations gave me the correct exposure and it took less than a minute to get there.

Gemmahistogram

In this image you can see that from the first frame to the last, the exposure remained constant leaving me free to concentrate on other aspects of the images.

Gemmacontactsheet

Finally, here you can see the end result.

Gemma john mcintire photography 1692

I hope you’re still with me, and that I’ve convinced you that studio strobes are nothing to be afraid of. With a little practice, the techniques outlined in this article will quickly become second nature, allowing you to concentrate less on the technicalities of exposure, and more on aesthetic variables such as composition and establishing rapport with a client or model. As with most things, the key is practice. Snag a friend, a pet or even a bowl of fruit and run through the whole process again and again, until calculating the correct exposure becomes reflex, and you’ll find yourself spending more time and energy on the creative processes rather than the technical ones.

googletag.cmd.push(function() {
tablet_slots.push( googletag.defineSlot( “/1005424/_dPSv4_tab-all-article-bottom_(300×250)”, [300, 250], “pb-ad-78623” ).addService( googletag.pubads() ) ); } );

googletag.cmd.push(function() {
mobile_slots.push( googletag.defineSlot( “/1005424/_dPSv4_mob-all-article-bottom_(300×250)”, [300, 250], “pb-ad-78158” ).addService( googletag.pubads() ) ); } );

The post Learn How to Setup Studio Lighting in 15 Minutes by John McIntire appeared first on Digital Photography School.


Digital Photography School

 
Comments Off on Learn How to Setup Studio Lighting in 15 Minutes

Posted in Photography


Canon EOS Rebel T6s/T6i added to studio test scene comparison

21 May

The Canon EOS Rebel T6s and T6i (760D and 750D) have been in our hands long enough to put together a couple of real-world sample galleries, and now we’ve added the cameras to our studio test scene comparison tool. The new 24.2MP APS-C CMOS sensor that these cameras share represents a step forward for Canon’s Rebel lineup, which had been using an 18MP chip since the T2i. Read more

Articles: Digital Photography Review (dpreview.com)

 
Comments Off on Canon EOS Rebel T6s/T6i added to studio test scene comparison

Posted in Uncategorized


5 Easy Studio Setups With One Light

13 May

Studio lighting is one of the most versatile tool sets available to you as a photographer. Apart from 24 hour access to a quality light source, there is a vast quantity of modifiers, accessories, and techniques that allow you to design and shape the light exactly as you need to fulfil your creative vision. However, all of this choice that is available to you can often result in confusion and indecision. The sheer amount of stuff available can also lead you to believe you need more than you already have.

Fortunately, in the case of lighting, less is often really more. In this tutorial I am going demonstrate five ways to use a single light source to good effect, with a variety of subjects. Even though each of these images was created with a specific modifier, each setup will work with most any modifier of your choice. For example, you could swap a softbox for a beauty dish. This will alter the shape and softness of the light but you will still get good results. Some of the techniques also use a silver reflector.

If you don’t have a reflector, you can get a large piece of cardboard and glue a sheet of aluminium foil to it. Another option is to use a mirror. You don’t even need a strobe or flash to make these techniques work; window light, with a bit of extra effort can produce the same effects.

Here are five easy studio setups with one light you can try yourself.

Setup #1

Amb john mcintire photography 0049

Simplicity in technique is the aim of this first image. The light source is a strobe fitted with a medium sized softbox. It is positioned about five feet away from the subject, elevated about four feet above, and pointed down at a 45 degree angle. The camera is directly under the softbox (this is called Butterfly lighting).

lightingdiagram1

Lighting diagram for light placement

The centre of the softbox is pointed to the left of the model (camera right) with only the edge of the light source directly falling on her. This technique is called feathering. It is useful for controlling and fine-tuning the light in a scene, and helps to soften light from a harder modifier such as an 110 degree reflector.

If you don’t think you’re ready to try feathering just yet, try to aim your light source at your subject’s nose instead.

Setup #2

Greyhounddalmatian john mcintire photography 0795

lightingdiagram2

To create dramatic lighting in your photos, try lighting your subject from behind. This image of my dog is lit by a softbox placed at a 45 degree angle behind her at camera left. The softbox is just out of the left-hand side of the frame and is very close to the subject. Because she is black and white, there is a huge amount of contrast in the scene. This left the shadow areas closest to the camera very dark. To fix this, you would introduce a reflector. The reflector is also only just out of the frame on the right-hand side. Bringing it in close allows you to increase the amount of reflected light filling in the dark shadows.

Setup #3

Pastry john mcintire photography 6968

For added versatility, you can combine the previous two techniques. This image is again lit by a softbox six feet behind the pastry and elevated about five feet above. Instead of pointing the light source at the pastry, it is aimed straight ahead so that the softbox is not directly illuminating the subject. This is a more extreme version of feathering that creates beautifully soft light.

lightingdiagram3

When you feather the light in this way, be aware that you are lighting the scene with a only a tiny fraction of your flash’s output. You will need to compensate by altering your ISO, increasing the flashes power output or altering your aperture.

To fill in the shadows created by the backlighting, use your silver reflector.

Setup #4

Romey john mcintire photography 0971

lightingdiagram4

If you want to create images with more contrast in your light than a softbox provides, try using a silver beauty dish. The light source in this photo is slightly to the right of the camera and is three feet away from the subject. The bottom edge of the beauty dish is lined up with the top of the model’s head, again creating the feathering effect. To fill in the shadows, ask your model to hold the reflector pointed towards her chin and just out of the frame.

Setup #5

Monika john mcintire photography 5347

If you prefer really soft light, you need to increase the size of your light source in relation to your subject. The obvious ways to do this are to move your light source closer to your subject, or to use a bigger modifier.

Alternatively, you can bounce your light into a wall or a ceiling, converting that surface into your light source.
To imitate the lighting in this image, fit your light source with a bare reflector and point it into the corner of a room. Be wary of off-coloured walls though; the slightest deviation from white can cause colour casts in your images that take a lot of time to correct. If you’re shooting black and white, then colour casts are irrelevant and you can bounce your light from just about any surface you can imagine.

lightingdiagram5

As you can see, you don’t need piles of equipment to get the most out of the studio. A single strobe, a modifier or two, and a reflector will provide you limitless creative opportunities for your photography. Go ahead and alter these suggestions to suit your needs and style and don’t be afraid to experiment, there really are an infinite number ways to use this modest amount of equipment.

googletag.cmd.push(function() {
tablet_slots.push( googletag.defineSlot( “/1005424/_dPSv4_tab-all-article-bottom_(300×250)”, [300, 250], “pb-ad-78623” ).addService( googletag.pubads() ) ); } );

googletag.cmd.push(function() {
mobile_slots.push( googletag.defineSlot( “/1005424/_dPSv4_mob-all-article-bottom_(300×250)”, [300, 250], “pb-ad-78158” ).addService( googletag.pubads() ) ); } );

The post 5 Easy Studio Setups With One Light by John McIntire appeared first on Digital Photography School.


Digital Photography School

 
Comments Off on 5 Easy Studio Setups With One Light

Posted in Photography


Creating Effective DIY Studio Lighting With Household Items

12 May

When I first started to experiment with controlling the light, I couldn’t afford to splash out on studio gear just to experiment, so I improvised with what I could find around the house, or acquire for only a few dollars. Some improvisations were, let’s just say, less successful than others. But some did produce good results. Some DIY studio lighting I still use, even though I now have a studio setup.

Let’s start with an easy and free lighting method, because free is my favourite price!

Use a table lamp

HawkinsDPS1

This shot was taken with a table lamp. Most of us have some sort of lamp around the place. Any kind will do. They come with their own diffuser, the lamp shade, and are easy to move around. You can adjust height with boxes, books, or anything stable you can find. You can experiment with alternative lamp shades as well as different strength, variety, or colour of light bulbs, or the number of lamps you use.

Lamp lighting usually isn’t very bright so you might need a tripod or somewhere solid to put your camera. For the image above I had the model hold the lamp and move it around slowly as I fired away, getting her to go even slower or stop when things were looking good.

For the shot below I put the green glass dish directly on top of a lampshade, in front of an abstract painting. It’s all about experimenting.

HawkinsDPS2

Make-shift softbox

While lamps were great, I really wanted to try soft box style lighting, so I had to get a bit more creative. The portrait below of friends and their dog was lit using a large open cardboard box lined with aluminium foil and placed on its side. I then shone a bright halogen work-light into the box, and softened the resulting light with a white sheet held up in front of the setup. Off to the side was a similar setup using a lamp with the shade removed, a smaller foil lined box, and a white pillow case.

HawkinsDPS3

It’s not a perfectly lit portrait. I was just starting out with portraiture and it was my first attempt with my DIY softboxes, but the results were encouraging enough for me to keep experimenting.

Try different things – experimentation is key

I went on to using regular white umbrellas, of the rain repelling variety, to diffuse the bright bulbs used for household outdoor lighting. I’ve bounced the light from an array of heavy duty flashlights, into a foil lined rain umbrella, all attached to a tripod with about a million miles worth of gaffer tape. I’ve used metallic cardboard sheets from the newsagent, or foil covered boards as reflectors. There were many experiments, some good, some not so much, and some were surprising.

Basically you just need a light, or two, and something to diffuse or reflect/bounce the light, or both. Preferably without setting fire to anything. Work-lights and other really bright bulbs can get surprisingly hot. It’s best not to have flammable things like sheets or cardboard too close and have something protective underneath if the light is placed on surfaces.

If you are not so keen on lining boxes and hanging sheets, you might like to try light painting.

Light painting

HawkinsDPS4

Apart from the emanating beams of light which were added later in Photoshop, the rest of this image, shot in my kitchen, was lit with only a two dollar LED light from the junk store. This was a complicated shoot, which had to be lit and shot several times, then blended in Photoshop. But you don’t have to go to that extreme. With a bit of experimenting and practice you can light a subject this way in one single shot.

There are many interesting and informative articles about light painting here on dPS. I highly recommend having a browse through them if you’ve never tried it before, but I’ll just run you through the basic idea here.

You’ll need a tripod (or somewhere solid to put your camera), a completely or almost completely dark room and a cheap little flashlight, or LED light. This is what I used for the shot above, a two dollar press button, night light.

HawkinsDPS5

A slow shutter speed is necessary to give you time to paint. I usually start off with a shutter speed of about 20 seconds, ISO 400, aperture at roughly f/11. Then adjust from there, depending on the subject and light brightness. Once you are all set up, turn out the lights, shine your flashlight on your subject while looking through viewfinder to get your focus, then click the shutter and start painting your subject with light.

You’ll have to move in close and run your light around only a few inches from the areas you want to light. That means being in front of the lens when the shutter is open, but the camera will only pick up what you shed light on, so as long as you don’t accidentally light yourself up, you won’t show up in the shot.

Try a bit of side lighting, play around with different lengths of exposure time, different light sources. If the light shines directly into the lens, you will get what I call ghost lines, which can be used deliberately as I did in this shot below.

HawkinsDPS6

While these methods are obviously not a replacement for studio lighting gear, they are an effective alternative that can produce some surprisingly good results and allow you to take a bit of control over your lighting without forking out more than a few dollars. It’s also very fun and even though I now have a properly equipped studio, I still sometimes love to play around with a simple table lamp or two dollar torch (flashlight).

Feel free to share any photographs you created with DIY lighting setups in the comments, I’d love to see them!

googletag.cmd.push(function() {
tablet_slots.push( googletag.defineSlot( “/1005424/_dPSv4_tab-all-article-bottom_(300×250)”, [300, 250], “pb-ad-78623” ).addService( googletag.pubads() ) ); } );

googletag.cmd.push(function() {
mobile_slots.push( googletag.defineSlot( “/1005424/_dPSv4_mob-all-article-bottom_(300×250)”, [300, 250], “pb-ad-78158” ).addService( googletag.pubads() ) ); } );

The post Creating Effective DIY Studio Lighting With Household Items by Lea Hawkins appeared first on Digital Photography School.


Digital Photography School

 
Comments Off on Creating Effective DIY Studio Lighting With Household Items

Posted in Photography


Canon EOS 5DS R added to studio test scene comparison

06 May

Ever since Canon announced its 50MP EOS 5DS R, we’ve been eager to get it into our studio and in front of our test scene. The wait is over and the 5DS R has been added to our studio scene comparison tool alongside the likes of the Nikon D810 and Pentax 645Z. Read more

Articles: Digital Photography Review (dpreview.com)

 
Comments Off on Canon EOS 5DS R added to studio test scene comparison

Posted in Uncategorized


Pentax K-S2 added to studio scene

15 Apr

Historically, Pentax’s entry- and mid-range DSLRs have managed to offer a number of features usually reserved for higher-end models, and the K-S2 is no exception. Omitting the blinking lights and unconventional mode dial placement of its K-S1 sibling, the K-S2 provides a 20MP APS-C sensor, fully articulated 3″ 921k-dot LCD, 100% coverage optical viewfinder, and built-in Wi-Fi with NFC. Take a look at how it performs against other cameras in its class. Read more

Articles: Digital Photography Review (dpreview.com)

 
Comments Off on Pentax K-S2 added to studio scene

Posted in Uncategorized


Studio Update: Nikon D7200 and Panasonic GF7 added to comparison tool

06 Apr

Monday got you down? We’ve got something to help pick you right back up – our studio scene comparison tool has just been updated. Now included are samples from the Nikon D7200, Panasonic Lumix DMC-GF7 and Panasonic Lumix DMC-ZS50. Take a look at how they perform against their peers. Read more

Articles: Digital Photography Review (dpreview.com)

 
Comments Off on Studio Update: Nikon D7200 and Panasonic GF7 added to comparison tool

Posted in Uncategorized