RSS
 

Posts Tagged ‘Studio’

Olloclip launches Studio accessory-mount case for Apple iPhone

16 Jan

Mobile phone add-on-lens manufacturer olloclip has announced it is to introduce a new case for the iPhone 6 series that makes it easier to fit additional accessories to complement the process of shooting movies and stills with its products. 

The olloclip Studio features a rail on the lens side that allows finger grips, a tripod thread and a cold-shoe to be attached to the case. The idea is that the case then provides the means for the photographer to fit an LED light panel or a microphone, as well as mount the phone on a tripod, a grip or shooting handle. 

Included accessories: 1. Studio Case 2. Finger Grip 3. Cold-shoe (x2) 4. Kickstand 5. Tripod thread clip (x2)

The case has a cut away section so that the olloclip lenses can be attached, and a kick-stand allows the phone to free-stand to make reviewing images more comfortable.  

The olloclip Studio is due to arrive in February, and will come in two form-factors to be compatible with the iPhone 6/6s or the iPhone 6/6s Plus. Both versions will cost £79.99/$ 89.99, without a lens. 

For more information visit the olloclip website. 

Articles: Digital Photography Review (dpreview.com)

 
Comments Off on Olloclip launches Studio accessory-mount case for Apple iPhone

Posted in Uncategorized


246 Shades of Grey: Leica M Monochrom Typ 246 real-world and studio samples

11 Jan

The sensor in the Leica M Monochrom (Typ 246) is an interesting one. Without a color filter array, the 24MP CMOS sensor doesn’t lose sharpness through interpolation, much like a first-generation Foveon sensor or Pentax’s pixel shift mode found in the K-3 II. The catch is, of course, no color. However, it also means the sensor is more… well… sensitive at base ISO, making this ones’ base ISO 320 instead of 200 like its Bayer counterparts.

There is another issue, however. Even without a mirror flipping out of the way in this rangefinder, the shutter causes blur at speeds near 1/125sec when using the 90mm F2 Summicron. To see the true sharpness of the camera at base ISO, we recommend switching over to low-light mode where the shutter’s effect isn’t present.

You’ll notice that the M Monochrom is marked as non-standard. Keeping true to its rangefinder roots, it can only change shutter speed in half-stop increments, whereas our standardized Raw exposures are based off of third-stop increments. However, the M does do exposure compensation in third-stops, even though it will only report half-stops. Therefore we shot the M in aperture priority and bracketed +-1 stop EV. We then, since it didn’t report accurate shutter speeds in its metadata, chose the Raw exposure that was closest to Lab 50 without adjustments. JPEG images still follow our normal procedure.

Articles: Digital Photography Review (dpreview.com)

 
Comments Off on 246 Shades of Grey: Leica M Monochrom Typ 246 real-world and studio samples

Posted in Uncategorized


Sony Cyber-shot RX1R II added to studio test scene

18 Nov

The Sony RX1R II is the kind of camera that turns heads. With a full-frame 42.2MP sensor, fixed 35mm F2 lens, optical variable low pass filter and a 399-point phase-detect AF system that’s much improved over its predecessor, it’s just about in a class of its own. We’ve had a full-production model for a few hours – just enough time to get it into the studio to see how it handles our test scene. Read more

Articles: Digital Photography Review (dpreview.com)

 
Comments Off on Sony Cyber-shot RX1R II added to studio test scene

Posted in Uncategorized


Canon PowerShot G5 X and G9 X added to studio comparison, real-world G9 X gallery published

17 Nov

Canon’s PowerShot G9 X and G5 X offer two distinctly different shooting experiences, but are based around the same 20.2MP 1″-type sensor. The G5 X provides an SLR-style grip and an EVF with a 24-100mm equiv. F1.8-2.8 lens, while the smaller G9 X offers a 28-84mm equiv. F2.0-4.9 lens. We’ve put them through our standard studio scene testing, and we’ve also assembled a gallery of real-world samples from the G9 X. Read more

Articles: Digital Photography Review (dpreview.com)

 
Comments Off on Canon PowerShot G5 X and G9 X added to studio comparison, real-world G9 X gallery published

Posted in Uncategorized


Studio tests: Leica SL

28 Oct

It came out of nowhere, a brand-new full-frame professional level mirrorless camera and lens system: the Leica SL. It combines a bespoke lens system (using the existing mount from the T) with an extremely high resolution viewfinder and a sensor based on the one used by the coveted Leica Q. Take a look at some preliminary studio test results from the Leica SL. Read more

Articles: Digital Photography Review (dpreview.com)

 
Comments Off on Studio tests: Leica SL

Posted in Uncategorized


How to Make a DIY Tabletop Studio Setup

22 Oct

When it comes to studio accessories, photographers are spoiled for choice. There are a lot of great options available, whether they be dedicated studio tables, extra large reflector panels or even backgrounds that studio lights are fitted onto. These accessories can all be brilliant, but one thing they are usually not is portable. They can also be cost prohibitive. What do you do if you get into a conversation with an acquaintance or a shop-owner, and they ask you to do some photos for them on the spot? You could, of course, decline, and attempt to get them to come to you sometime in the future, but this may lead to complications for what could be an otherwise easy task.

The easiest way to get around some of these problems is to build your own solution. This may bring about visions of complicated engineering skills and power tools, but it really does not have to be that way. In the end, all you really need is the ability to shape and modify the light you have available to you, and that doesn’t need to be complicated.

DIY-studio-setup-1845

This tutorial will teach you how to make a simple tabletop studio setup with things you are likely to already have on hand, or at the very least, you’ll have little trouble obtaining: paper and tape. As it is so simple, this setup is ideal for straightforward record and product shots.

It can be modified in a variety of ways for different effects, but if you’re looking for an elaborate and permanent solution, this is probably not what you need. However, if you need something that can be set up in moments, with next to no cost, then read on.

What you need

  •  Two sheets of black paper/ card (thicker paper provides more stability)
  •  One sheet of white or colored paper/card
  •  Tape
  •  A base (a block of wood or similar that will raise your subject above the bottom of the setup.) Simply choose something that will look good in your photos.
  •  Extra paper (assorted colors, plus extra black and white)

Putting it together

Assembly is as easy as taping the sheets of paper together as illustrated in the diagram below. The only thing to watch out for is to ensure that the edges of the paper are flush and not overlapping. You should be able to fold each sheet over one another without difficulty.

DIY-studio-setup-studio-diagram

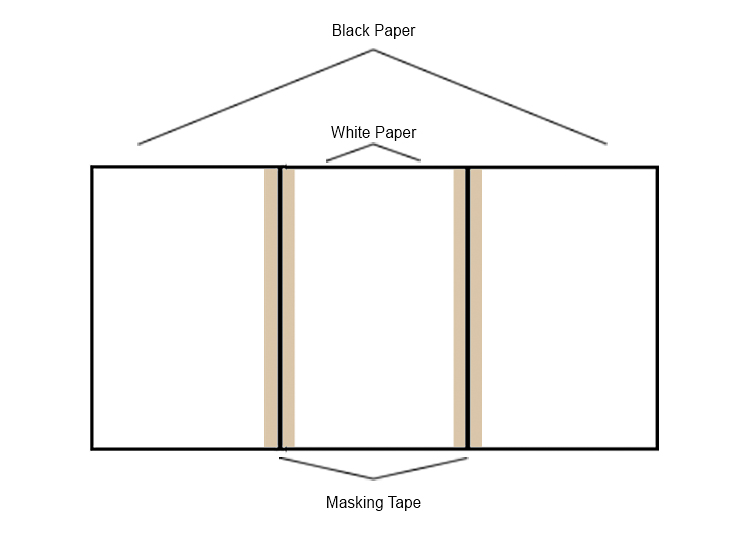
Here it is is in all of its unbridled glory:

DIY-studio-setup-1849

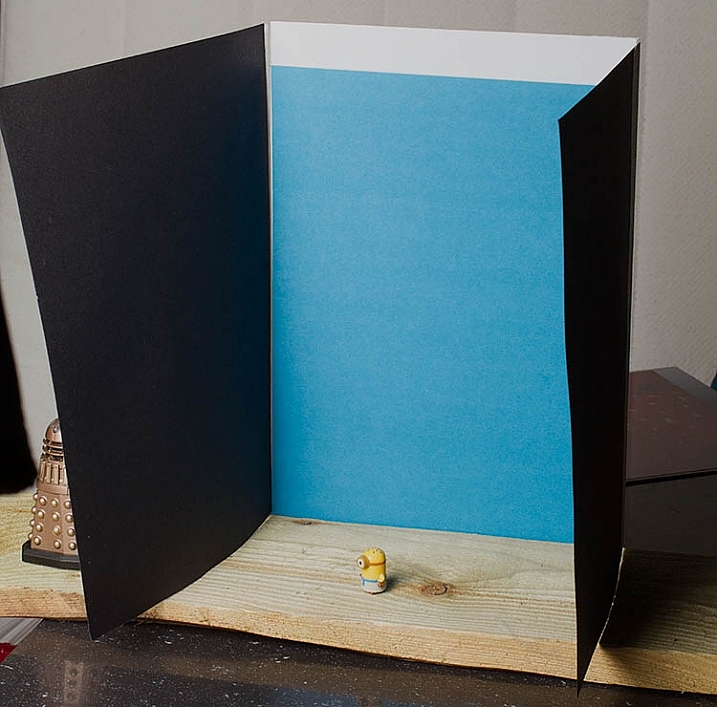
Fortunately, it doesn’t matter what it looks like on the table. You’re the only person who ever has to see it. What matters is the results you can get in lieu of having no other options.

Putting it to use

The entire point of any studio equipment is to modify light. It doesn’t matter what the source of that light ism and this setup will work as well with strobes, as it will with natural light. With that said, the best results from this setup will come with a single directional light source.

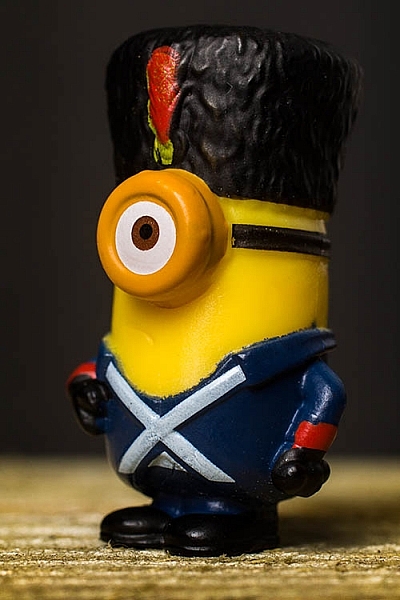
With your light source illuminating the subject from the front, the black sides are acting as flags and are controlling how much light hits your subject. This creates, and emphasizes, a narrow strip of light on your subject. It also increases contrast and can help to illustrate depth.

DIY-studio-setup-1827


Because the sides are not fixed into position, you can move them inward and outward as you see fit to alter the effect. When doing this though, you need to watch the background. Make sure that the sides are not casting any shadows over any part of the background that will be in your final images. Any such shadows will show up as ugly gradations in your photos.

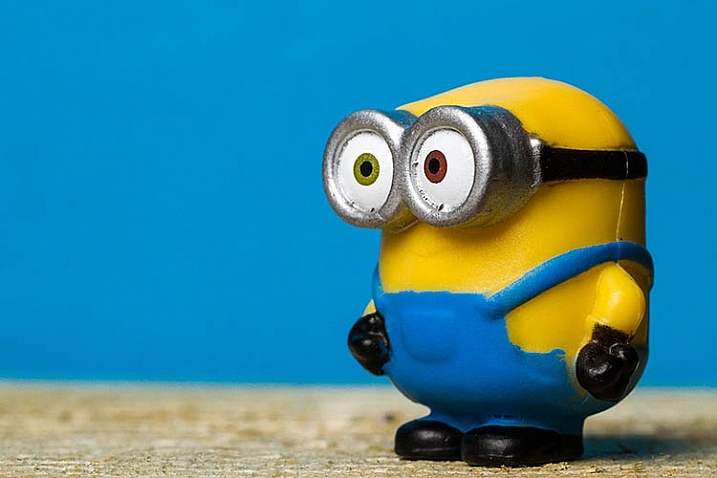
Because your subject is mere inches from the background, a proper exposure for your subject should, in most cases, allow for a correct exposure of the background as well. However, if you’re using a white background and the results aren’t satisfactory, try to insert a piece of colored paper and compare the results.

It really is as easy as that: meter for your subject and go.

However, you do need to take special care with your compositions. Because of the small amount of space you have to work with, you will need to pay extra attention to ensure that the edges of the background do not make it into the frame.

Reflectors

DIY-studio-setup-1836

In most situations, especially in natural light, your light will probably be coming from above your subject. This can cause deep shadows where you may not want them. The easiest way to combat this is by adding a small reflector and laying it flat in front of your subject. In most cases, this will be enough. Reflectors are easy enough to make, but there are also inexpensive 12″ circular varieties on the market, that are portable and fold up. These make good additions to any camera bag, especially if you find yourself photographing small subjects, such as flowers, a lot.

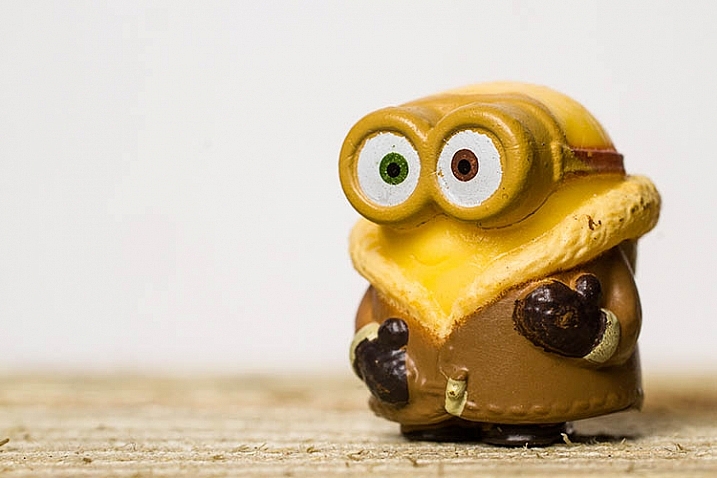
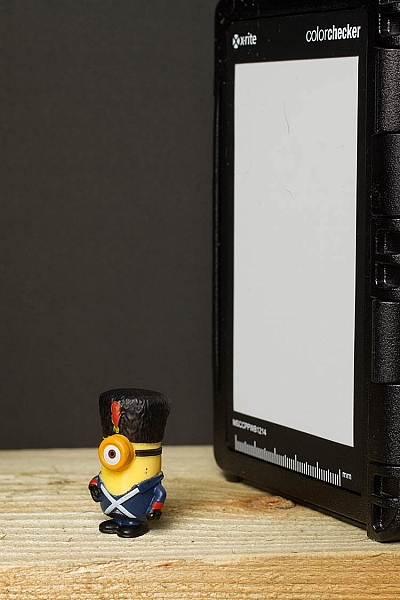
In situations, like the photo above, where there isn’t a lot delineation between the subject and the background, you can add a reflector from behind. Anything white or silver will do the job. Try something like an index card. In this example, I used the white balance portion of my ColorChecker Passport.

DIY-studio-setup-1835

The spice of life

Aside from simplicity, the real beauty in this setup is the scope of variations. The only limitations for how much you can change things to suit your needs are only limited by your imagination. Here are a few changes you can make to get wildly different results.

Side panel colors

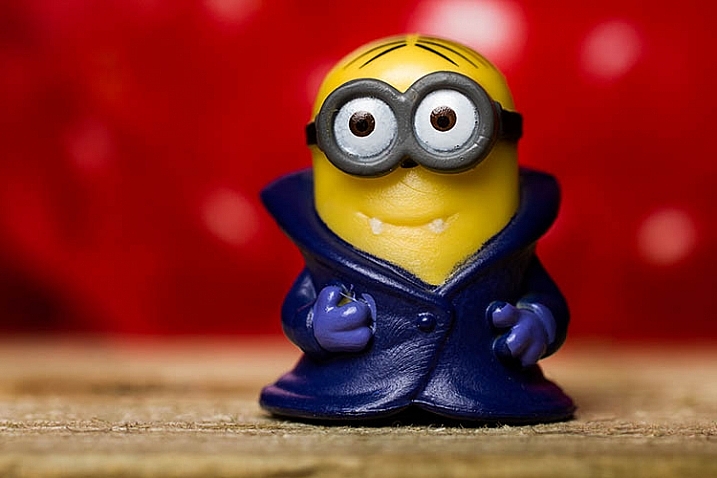
Instead of the black cards acting as flags, tape aluminum foil to the inside of the panels. This will still shape the light falling onto your subject, but instead of deepening contrast it will fill in the shadows, and result in brighter images. If the effect is too strong, try making only one side a silver reflector. For a more subtle effect, try using white paper as the sides. The shadows will still fill in, but the effect will not be as strong.

Exploring these options may result in flatter images, but depending on your needs and taste, that may be perfect.

Backlighting

If the paper or card you’re using for a background is thick enough, you can cut most of the center of it out, being sure to leave enough to allow it to be taped to the sides. You could then tape tissue paper to the inside of the background, covering the hole and acting as diffusion material.

Then face the back of the setup toward your directional light source, effectively back lighting your subject. When doing this, it’s best to use a reflector to fill in the inevitable shadows and high contrast this will cause. To fashion a makeshift reflector, simply tape a bit of foil to a scrap of cardboard.

Backgrounds

DIY-studio-setup-1790

Of course, you’re not limited to solid color backgrounds. As long as the material you choose to make the setup will support the weight, you can use anything from fabric to wood. If it seems like it might work: try it.

A favorite trick of mine is to use old prints that I have scattered about. Once they’re in position you can have anything from an abstracted, colorful background to a landscape.

Scalability

Everything here has been on a pretty small scale, but you can make this setup as big as you need, provided you can find the materials. You may have trouble trying to build one for an elephant, but a trip to a hardware store should provide the right materials to make an affordable portrait sized setup.

In the end

This solution may not reek of elegance or creativity, but what it is in fact is: fast, cheap, and effective. Folded up, the whole thing can fit, undamaged, in a bag with a laptop, so it can go anywhere you do. Of course, this is only one option. As such, you could pull it out to isolate a wildflower in a field for a record shot. Or you could build one in minutes to create product photography for a friend’s e-commerce site.

googletag.cmd.push(function() {
tablet_slots.push( googletag.defineSlot( “/1005424/_dPSv4_tab-all-article-bottom_(300×250)”, [300, 250], “pb-ad-78623” ).addService( googletag.pubads() ) ); } );

googletag.cmd.push(function() {
mobile_slots.push( googletag.defineSlot( “/1005424/_dPSv4_mob-all-article-bottom_(300×250)”, [300, 250], “pb-ad-78158” ).addService( googletag.pubads() ) ); } );

The post How to Make a DIY Tabletop Studio Setup by John McIntire appeared first on Digital Photography School.


Digital Photography School

 
Comments Off on How to Make a DIY Tabletop Studio Setup

Posted in Photography


Go big: Leica SL studio and real-world sample gallery

21 Oct

Leica has just unveiled its first full-frame mirrorless camera, the SL Type 601. The new camera uses a modified version of the 24MP CMOS sensor from the Leica Q in tandem with a Maestro II processor, allowing ISO 50-50,000 shooting, 4K video recording and 11 fps continuous shooting. With early access to a full production SL, we’ve been able to test it against our studio test scene as well as in a variety of real-world shooting conditions. Read more

Articles: Digital Photography Review (dpreview.com)

 
Comments Off on Go big: Leica SL studio and real-world sample gallery

Posted in Uncategorized


How to Create and Use Hard and Soft Light in a Studio Setting

11 Oct

Hard light vs soft light craig wagner studio 3

When setting up your lights for studio photography, you first need to consider what lighting setup will create the look you are going for. Is your light going to fall into the category of hard light – or will it be soft? What’s the difference?

Let’s first look at the basic characteristics of hard and soft light sources, and the different feel each creates when shooting the same subject.

HARD LIGHT

Imac hard light example craig wagner

In general, a single-point light source, aimed from a distance is referred to as hard light, much like our sun on a clear day or a streetlight at night.

Hard light example levis jacket studio 3

This hard light source creates a high contrast look, where the transition between highlights and shadows is sharp and well-defined.

Keds shoes hard light example craig wagner

In some cases, this contrast can look harsh (and unwanted).

SOFT LIGHT

Imac soft light example craig wagner

On the other hand, a soft light source is a larger, broader, light placed relatively close to the subject. A cloud-covered or overcast day, where diffused sunlight reflects off a large concrete wall would be one example of a soft light source.

Breakfast oatmeal soft light example craig wagner

The light tends to be flatter in contrast, and the highlights hold more detail, with the shadow’s edges being soft and open.

Reverend nats hard cider soft light example studio 3

Generally this is a more pleasing light, but not necessarily the only light-source.

Many factors go into choosing light quality and the type of light source on set. One may be the direction given from an art director or client where you may be asked to match images from an existing campaign. They may want you to recreate a natural lighting condition (such as hot harsh desert sun on a pair of boots, or cool early morning light falling on a table setting).

The subject matter itself can also have a strong influence on your choice of light source. A highly reflective (like glass or chrome), or high-contrast product can be quite the challenge if you try lighting it with a hard light source. Fighting spectral highlights, or holding detail in the shadows and highlights, can be a pain if you have to use hard lighting alone.

If you’re lucky enough to be given creative freedom by the client, or working on a personal project, you might be illustrating a mood or an emotion and will use appropriate lighting needed to create it. Careful choice of lighting, and mixing your hard and soft light sources, will allow you to achieve that.

How to set up for a hard light shoot

Hard lighting setup diagram craig wagner

Imac hard light example craig wagnerFor the studio hard-light set, place the key (main) light (a strobe head with a 12” modifier) to the left and slightly behind the subject. The initial beam may be too broad, so to concentrate the light you can add a 35-degree grid to the modifier.

For this setup, final adjustments to the height and position of the key light were made, in order to modify the angle and length of the shadows on the table and floor, as well as to illuminate the edges of the computer screen in a pleasing manner. A 4’x8′ sheet of black foamcore was placed to the right of the set to deepen the shadows and remove unwanted reflections. Two smaller sheets of white foamcore were set low, in front and to either side, to control the amount of detail in the front edge of the table and legs.

A second strobe head with a 7” grid modifier was set high, and to the back of the set. Its angle was adjusted to illuminate the upper right corner of the background, which you can see in the photo (right).

How to set up for a soft light shoot

Soft lighting setup diagram craig wagnerImac soft light example craig wagnerTo create the soft-light look, the key light is set in the same place, but a 4’x4′ full diffusion panel is placed between the light and the subject, just out of the frame. Remove the grid from the key light to broaden the light. The black foamcore is replaced by a sheet of white to fill or open the shadows (but the two sheets out front remain). The background light is pulled back, the grid removed, and a diffusion disk added to soften the beam and cover the entire background. In this way the whole set appears bright and soft and with a lot of ambient light filling the image (left).

How to change a hard light source into a soft one

You may get into a situation where you’ve set up your light source and find you actually want to go the other direction with it. In this case, it is quite easy to change one type of light source into the other. You can diffuse a hard source into being soft, by placing diffusion material between the lighting and the subject, which allows you to control the angle and light gradient. You can also just attach a softbox to the light to soften the light and make it into a broader, even source. You can also take a soft source that you’ve set up and change its distance from the subject in order to make it a harder, more focused light. You can also bounce the light around more using reflectors, umbrellas, or a handy wall in order to soften it and make it less directional.

Combining hard and soft light

The ultimate tip for studio photography is to be flexible with your lighting setup regardless of your years of know-how. You may have an idea in mind for the final look you want for the photograph, but you may find that on set the product looks quite different under various lighting conditions. Be prepared to play around and try things – because often a mixture of both hard and soft light can show the product to its full advantage.

Stash tea flower teacups hard light example studio 3

Soft light example with a hard light rim (kicker or accent) light from behind. Notice the hard shadow on the table in front of the cups – that is created by the hard rim light.

Once you have a full understanding of hard and soft light sources, you can combine the two lighting techniques. For example, the set might have a general, overall softness to its light, but you might use a rim (or accent) light to give the shot more mood or dimension, or to accent certain elements of items in frame. Mastering both types of light allows you to have the ultimate control over your lighting, and the final image that comes out of the camera.

googletag.cmd.push(function() {
tablet_slots.push( googletag.defineSlot( “/1005424/_dPSv4_tab-all-article-bottom_(300×250)”, [300, 250], “pb-ad-78623” ).addService( googletag.pubads() ) ); } );

googletag.cmd.push(function() {
mobile_slots.push( googletag.defineSlot( “/1005424/_dPSv4_mob-all-article-bottom_(300×250)”, [300, 250], “pb-ad-78158” ).addService( googletag.pubads() ) ); } );

The post How to Create and Use Hard and Soft Light in a Studio Setting by Craig Wagner appeared first on Digital Photography School.


Digital Photography School

 
Comments Off on How to Create and Use Hard and Soft Light in a Studio Setting

Posted in Photography


Corel introduces three new Pinnacle Studio 19 applications

01 Oct

Corel has introduced a trio of new versions of its video editing software applications: Pinnacle Studio 19 Ultimate, Pinnacle Studio 19 Plus, and Pinnacle Studio 19. A couple new features have been added to the software, including a new Multi-Camera Editor in each version of the application. In addition, the latest version offers support for 6th-generation Intel Core i7 processors. Read more

Articles: Digital Photography Review (dpreview.com)

 
Comments Off on Corel introduces three new Pinnacle Studio 19 applications

Posted in Uncategorized


Super Raw? DxO ONE added to studio test scene

29 Sep

As far as pocketable cameras go, the DxO ONE is the most likely to fit into the smallest of pockets. Built as a companion to Apple mobile devices, it connects directly via integrated Lightning connector to bring your iPhone a 20MP 1″-type sensor and 32mm equivalent F1.8 lens. We put its standard shooting mode as well as its SuperRAW mode up against our studio test scene. Read more

Articles: Digital Photography Review (dpreview.com)

 
Comments Off on Super Raw? DxO ONE added to studio test scene

Posted in Uncategorized