[ By WebUrbanist in Design & Fixtures & Interiors. ]
Complimenting a flexible open area on one side of this apartment are a series of suspended separators that provide storage but also move along rails, opening up a variety of additional functions on demand. If the system looks familiar: it is based on the sliding stacks often used to save space in libraries.
Designed by PKMN Architectures in Madrid, Spain (with images by Javier de Paz García), this cost-and-space-saving solution employs relatively cheap materials including engineered particle wood boards (composed of glued wooden flakes) and a ceiling-hung system of industrial rails.
The three suspended sections offer shelves and cabinets and variously create a kitchen, dining or living room depending on how they are configured and positioned relative to the room and one another.
Fold-down tables and a fold-out bed are able to be accessed as needed while the walls are variously occupied by storage, openings or unique decorative, fun and functional touches (like a blackboard for sketching ideas during meetings).
Sliding panels can also provide privacy when desired, separating the more open space from the modular-room side of the apartment. The fixed-in-place spaces are reserved for open living and dining areas as well as a bathroom in one corner of the unit.
Want More? Click for Great Related Content on WebUrbanist:
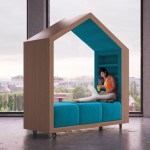
Slices of Home: Modular Mobile House-Shaped Micro-Rooms
Spatial separation can be as much about a feeling of enclosure as a physical divider, like this set of portable lounge structures that provide a semi-secluded …
Click Here to Read More »»
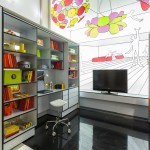
Transforming Furniture: Fitting 5 Rooms into 640 Square Feet
With a mostly-open floor plan tucked into 60 square meters of space, the design challenge was to effectively fit the functionality of five rooms into the …
Click Here to Read More »»
Borrowed from Libraries: Mobile Shelving for Modular Rooms
To save space, libraries employ a rolling stack system that allows access to only one or a few aisles needed at one time. How about the same in homes or …
Click Here to Read More »»
[ By WebUrbanist in Design & Fixtures & Interiors. ]
[ By Steph in Architecture & Houses & Residential. ]
Rooms rotate, roofs open to the sky, facades slide away to reveal glass walls and interiors literally turn inside out in these 13 transforming, highly customizable home designs. Some close up into impenetrable fortresses for maximum security while others unfold to blur the boundaries between indoors and out.
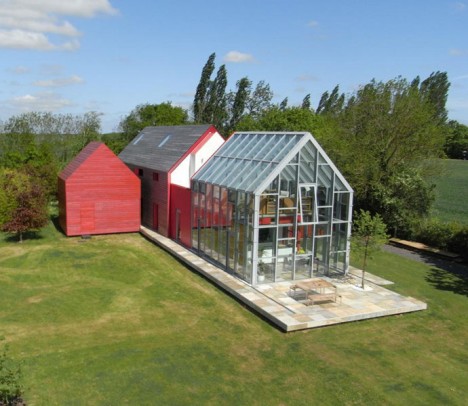
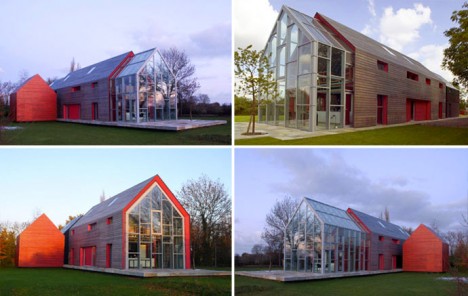
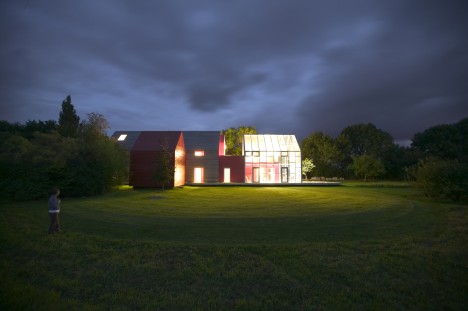
The Sliding House by DRMM
The outer walls and roof of this house in Suffolk, England by DRMM slide back and forth on rails to reveal a glassed-in static structure, opening the house to the outside world to a highly customizable degree. Deceptively simple-looking when it’s all closed up, the house practically transforms into a greenhouse when the 50-ton mobile roof and wall enclosure is pulled back via electric motors charged by solar panels.
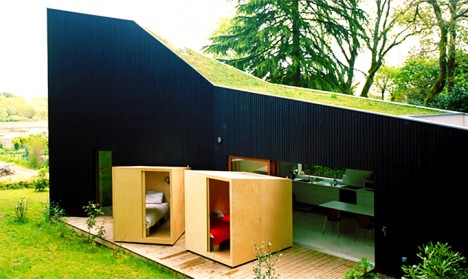
Bedrooms That Can Be Wheeled Outside
Ever wish you could move your bed outside on a particularly nice day? The lucky residents of this house in Sazeau, France by Raum can go one step further, wheeling their entire bedrooms out of the house and onto a wooden terrace to interact with the surrounding landscape. A large doorway makes it easy to move the lightweight wooden cubes outside.
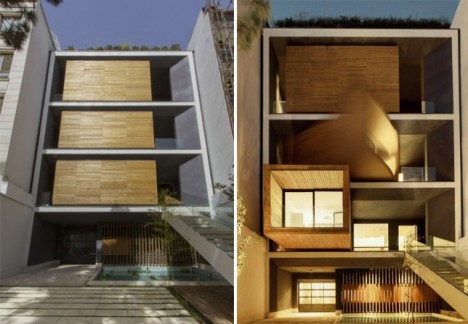
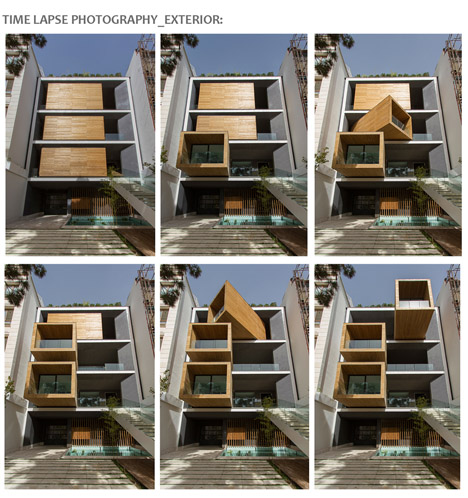
Push a Button, Change Your House Layout
Three wooden boxes within a fixed volume rotate and extend outward with the push of a button at the Sharifi-Ha house in Tehran by nextoffice. The volumes contain a guest room, home office and dining room that can either be aligned flush against the static parts of the home or rotated so the glassed-in ends face a variety of angles.
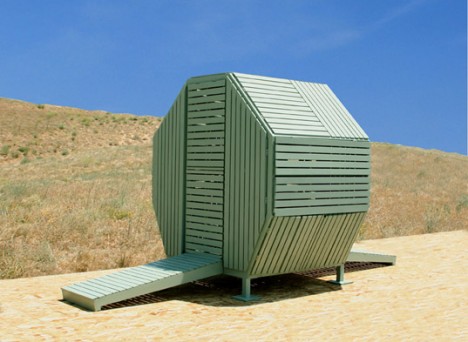
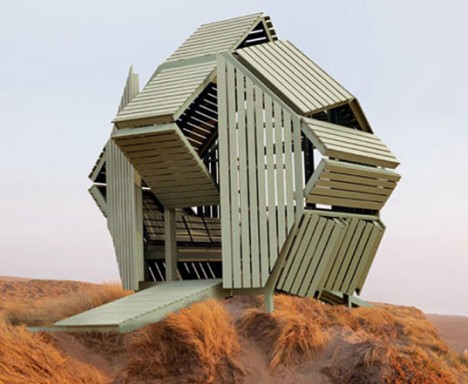
M-Velope Transformer House
A 230-square-foot mobile living space expands in surprising ways with slatted wood panels that bend and angle in surprising ways. Extending out from a steel frame, the walls fold to reveal interior benches, sleeping platforms, work surfaces and small shaded rooms.
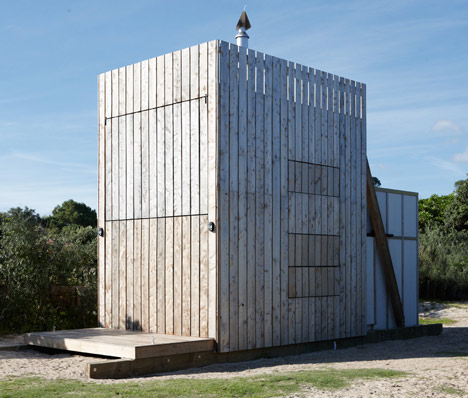
Shed-to-Beach-House
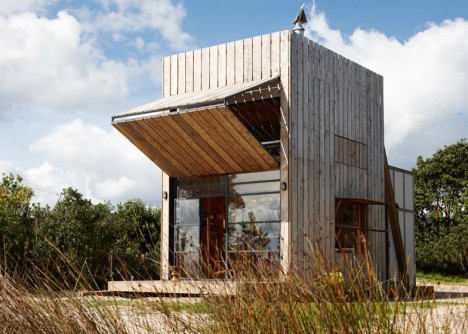
What looks like no more than a wooden shed at first glance is actually a mobile beach house that can be towed off the sand before severe storms. Located on the northern coast of New Zealand, the ‘hut on a sled’ by Crosson Clarke Carnachan features a large wooden shutter facade that opens to reveal a two-story glazed wall facing the sea. The glass is operable, as well, opening the entire interior up to the ocean breezes.
Next Page – Click Below to Read More: 13 Transforming Houses Slide Unfold Spin And Expand
Want More? Click for Great Related Content on WebUrbanist:
Hover Houses: 12 Cliff-Clinging Homes with a View
Swim to the edge of an infinity pool that feels as if it’s going to pour right out into the sea, or stand on a glass-walled balcony hanging off a …
Click Here to Read More »»
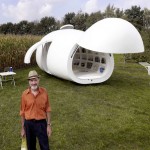
Blob: Oblong White Mobile Home Looks Like a Dino Egg
Designed as an extension to a home, this mobile live/work pod eschews conventional mobile home aesthetics in favor of something decidedly more eccentric. …
Click Here to Read More »»
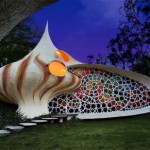
Unique Retreats: 8 Offbeat One-of-a-Kind Houses & Homes
Custom homes come in all shapes and sizes, but few stand out so much as these unique examples of residential architecture. They are, however, anything but …
Click Here to Read More »»
[ By Steph in Architecture & Houses & Residential. ]
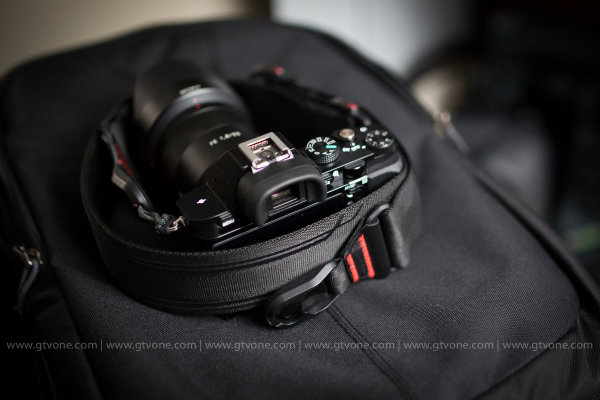
With Peak Design launching another set of products via Kickstarter, we’re very fortunate to get our hands on the new, as yet unreleased, Slide and Clutch camera carrying system prior to launch for a little dPS preview!
You can see the Kickstarter here and pre-order if that’s your thing!
As a Peak Design pro, I’ve been using “Capture” since it was released along with Leash and Cuff. The video below of Pete and Adam will give you a great idea of what the team at Peak Design are doing with this new gear and why they’re passionate about what they do – they love this stuff we do called photography.
The Kickstarter is already funded, 450% funded, which says a lot about what they’ve built and the products they’ve created in the past. The new strap, Slide, is building on that, and after using it for a week (no, they don’t pay me to say this) it really is worth picking up now via the Kickstarter campaign. If you don’t, and you see it afterwards for more money, you will think to yourself “you know, Simon was right”. The strap sits really comfortably on my shoulder, it allows quick attachment to my camera through Peak Design’s unique anchor system, it literally slides around to where you want it and is so super easy when you’re wearing it, to make the strap shorter or longer as you can see in the video.
I’ve also been using Clutch,a hand strap system that keeps your camera firmly in your big greasy paw when you’re out and about shooting. I have used it with a gripped Canon 5DMK3 and without the grip – it’s quick to attach, quick to tighten and very quick to loosen off, too. When shooting portrait, I’d slide my hand out of Clutch and shoot my portrait photographs and then slide my hand back in. I didn’t really notice any loss of speed and after a few goes I was a veritable wild west camera slinger. I used Clutch on the weekend for a cycling event and loved the flexibility of being able to not worry about dropping my camera in the rain, and boy did it rain! It stayed firmly in my hand and allowed me to drop the camera into Capture to use the other body with my long lens and Slide attached – once done, I could let the long lens slide around to my hip / back and grab body number one back to continue shooting. Lots of bodies, no time to stop (over a thousand cyclists to grab a portrait of while they cycled past) and it worked perfectly (aside from when I tried to drink soup and shoot at the same time, but that’s another story).
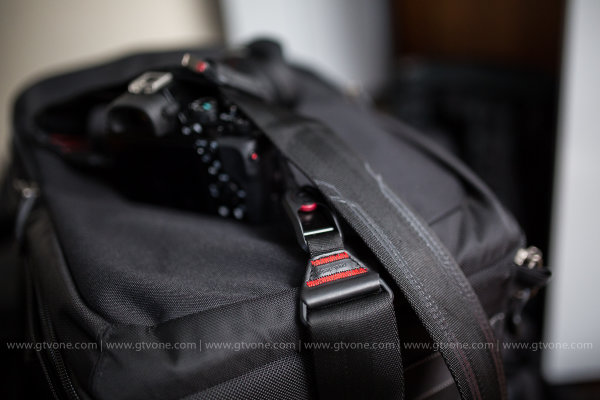
Back in my office now and this is what the Slide strap looks like attached to a Sony A7, (granted, at f/1.4 which doesn’t show you much A7 at all, but you get the picture) to give you a vague idea of scale.
In conclusion, I’m super impressed with this, the next iteration of the Peak Design strap – Slide. (Leash being my first Peak Design strap) and from me, it’s highly recommended! I give it a healthy FIVE stars.
That said, I’m sure you have questions! So,as I have the Slide with me, and I’m taking it on a quick trip to China tomorrow, please feel free to ask any questions in the comments section below, I will answer as best I can. Another great product from Peak Design. Well done guys.
–Sime
The post Preview of the Slide and Clutch Camera Carrying System from Peak Design by Sime appeared first on Digital Photography School.
San Francisco-based Peak Design will release a couple of new camera straps, the Slide and Clutch, in October following a successful funding campaign on Kickstarter. The Slide is a quick-connecting shoulder strap for cameras of any size, while the Clutch is a smaller hand strap designed for use regardless of whether the camera has a battery grip. Read more
For one day only, residents of Bristol were offered just 360 ‘tickets to slide’ (out of nearly 100,000 applicants) down a main city street at over 10 miles an hour, surrounded by thousands of jealous onlookers.
Inspired by the previous year’s heat wave and created by Luke Jerram, this participatory crowdfunded project was an inclusive, all-ages community endeavor, with sliders ranging from 5 to 73 years old.
The slide was installed on Park Street in Bristol as part of Make Sunday Special and the Bristol Art Weekender, drawing a mix of participants from within and beyond the city.
Plastic sheets over padded mats were shaped and held in place by hay bales – this simple canyon was then supplied with continuous water to ensure a smooth ride from top to bottom.
While he has no plan to tour his own creation, Luke is going to make the plans freely available for other people who want to follow suit, making public water slides in their own towns or cities around the world.
Want More? Click for Great Related Content on WebUrbanist:
Tentacle-Like Tubular Slide Swirls Through NYC Penthouse
An incredible tentacle-like mirrored steel slide swirls and twists through four stories of a bright white, modern penthouse in Manhattan.
Click Here to Read More »»
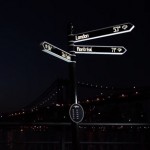
Social Signage: Digital Street Sign Gives Dynamic Directions
This evolved version of a familiar and classic form of all-points signage replaces static locations and fixed directions with interactive ones available to …
Click Here to Read More »»
Open-Source Street Store Offers Free Clothes for Homeless
Donated boxes of right-sized clothing can be a boon for those who cannot afford another choice, but this clever approach empowers people in need to choose …
Click Here to Read More »»
Are you ready to come along on a fantastic voyage? No time travel to throwback music videos required.
We were thinking a voyage to the hardware store to gather building supplies for the coolest tutorial yet — a DIY slide light.
It’s a minimalist light box that can display pictures, and it sure looks good doing it. Whether you shoot film, digital, or even Instagram (remember this tutorial?) – the slide party is open invite!
Think of this project as a way to create a mini gallery, with which to show off and rotate tiny versions of your photography.
To start you’ll only need one more power tool than your average tool-free craft project. Totally coolio, huh?
Build Your Own Slide Light
p.s. Photo Week (from our buddies at creativeLIVE) is coming up! RSVP for 6 days of free live workshops with primo instructors.
Why It’s Cool
We were so inspired by the most awesome light ever that we wanted to make one ourselves! Like the hits of our rapper friend Coolio, Slide Light has been rocking it since the 90′s. Completely classic.
Although your cameras aren’t out for this tutorial, you can still pay homage to your beloved craft by building a beautiful home for teeny photographs. Isn’t that thoughtful of you?
Since keeping fingers intact for future shutter clicking is priority, all measurements used to build this light are based on standard sized cuts. No saws or reasons to fear tools! Your new slide light will be easier to assemble than, well… just about anything from Ikea.
Ingredients:
24” Fluorescent cabinet light
32” by 24” sheet of acrylic
Two 36” by ¾” Aluminum Angles (L shaped)
One 6ft 1” by 3” piece of pine wood – (cut in half at store)
One 6ft 1” by 4” piece of whitewood – (cut in half at store)
One piece outside corner finished moulding (see photo)
Small piece of balsa wood (or sub any thin plywood)
Eight 1 ¼” #8 phillips round head screws
Six 1” #8 phillips round head screws
Ten 1/2” #4 phillips head wood screws
Power Drill with 1/8 & 5/64 bits
Phillips screwdriver
Staple gun
Box cutting knife
Measuring tape / straightedge
Vellum paper (enough to cover 32” by 2.25”)
Spray adhesive
STEP 1: Measure, Mark, and Mount
Off-center the cabinet light on a 1″ by 4″ board, with power chord positioned near the outside left edge. Leave at least 1” of space on all sides (to build the frame around the light). Use two #4 screws and follow the instructions on the package to mount your light to the board.
After mounting the (unplugged) light, ensure the switch is in the “on” position. Once the light is enclosed in the box, the plug will become the on/off switch.
Starting at opposite ends, mark both your Aluminum “L” angles 4 times, spaced every 12 inches. Use this same spacing measurement on the top and bottom edges on the back 1″ by 4″ board of the light.
Next, mark both of the 1” by 3” boards three times along the 1” side. Offset marks on the left side by at least 1 ½” from the edge. The other two marks will go in the middle of the light and 1 1/2″ from the right edge. When the frame for the light is assembled, these marked edges will face forward.
Use a permanent marker and a straightedge to mark the acrylic sheet so it is 2 1/4” tall by 32” wide.
STEP 2: Cutting and Prepping
Find a safe, level surface for cutting. Use the box cutter and a straightedge to score both sides of the acrylic along your guide line. Repeat this step as many times as it takes to ensure a deep cut.
Next, line up the the scored cut with a straight edge of a table. Use your forearm (for evenly distributed pressure) to press down on the side of acrylic that is not supported not on the table.
Keep applying pressure till it breaks! Feel free to clean up a jagged edge with wire cutters or sand paper… although, this edge isn’t going to be visible so it’s more important that it fits the dimensions.
Use spray adhesive to attach vellum paper to the piece of acrylic. Smooth out any bubbles and trim away excess paper.
Use scissors to cut the outside corner molding to the same length as the acrylic.
STEP 3: Pre-drill, Pre-drill, Pre-drill! Oh… and tack.
Because the wood is 1” thick in a lot of places, you’ll have more control installing the screws by hand when you use pre-drilled pilot holes as a guide.
Line up the acrylic along the left corner and trace the spacing of the marks from the side of the top 1” by 3” board. Use the ? bit to drill holes in the plastic where marked.
Use the 5/64 bit to drill holes in the aluminum along where marked (see step 1 if you missed it!).
With the staple gun, tack moulding to the inside edge of the bottom 1” by 3” board. Make sure the lip (edge that will hold the slides) is sticking out slightly to the front.
Next, line up the boards in a “U” shape. The 1″ by 3″ boards are the sides of the “U” and the 1″ by 4″ board is the base. Level the sides and use the staple gun to tack the top and bottom boards to the 1″ by 4″, so they will stay in place when you secure the frame.
Flip the attached pieces so the back of the light is facing up. Use the ? drill bit to drill eight pilot holes on the top and bottom edges of the 1″ by 4″ board holding the light. If tacked down securely, the pilot hole should extend a little into the attached 1” by 3” board.
STEP 4: Business Time
When installing screws, apply pressure to the surfaces being connected until you feel the screw has engaged.
Install all eight 1 1/4″ #8 screws in the coordinating pilot holes along the back of the light.
Flip light over. Line up the acrylic with the top board so that the bottom of the plastic rests in the lip of the moulding. Use the 1/8 bit to drill pilot holes through the holes in the plastic. Install the six 1” #8 screws in the locations you marked. Although there is no plastic attached to the bottom board, the screws will ensure the bottom aluminum angle is flush with the rest of the light.
Position aluminum angles with the pre-drilled holes on top and on bottom. Use the 5/64 bit to drill pilot holes through the pre-existing holes, and install eight 1/2″ #4 screws.
STEP 5 – Finishing Touches
Trace the edge of both sides on the balsa wood in pencil. Return to your cutting surface and cut out end caps using box cutting knife.
Make a hole for side with plug and feed chord through the hole prior to stapling the balsa wood along the open edges of the light frame. Attach hanging hardware of your choice and hang on wall. Mount your slides and flex/change/rearrange to your heart’s content.
**note: as with most electrical dohickeys, do not leave on and unattended for extended periods of time. Remove the top aluminum angle and acrylic when the bulb needs to be replaced.
Taking It Further
Use the opening on the right side of the light as a mini library for your extra slides! Or get creative with your leftover materials to make a storage box.
Make Instagram slides using transparencies. Print on vellum paper for bold colors.
Let your slides work together! Use photo-editing software to adapt this tutorial and resize a wide landscape photo so it fits over several slides.
Enlist the pros at Digital Slides to turn your digital photos into 35mm slides!
Jenny Sathngam is a tutorial writer/photographer for Photojojo, based in Austin, TX. If she’s not shooting or editing, you’ll find her building, crafting, or scheming up the next big project.
Related posts:
Make a Magnetic Photo Bulletin Board for Under $ 15 ~Have a cool photo product or site? Reach 260,000 photo…
DIY: Make Crazy Detailed Light Paintings with Photo Light Stencils Extra photos for bloggers: 1, 2, 3 Ever tried painting…
How to Make a Mini Light Studio Using School Supplies When school’s out, most kids are thinkin’ “Oh man, summer’s…
Nikon President Makoto Kimura says the company could make a non-camera consumer product, prompting speculation that it’s eyeing the smartphone market, in response to falling compact camera sales. With compact camera sales down by around 25% across the industry (according to market research company IDC) and shipments from Japanese makers down 47% year-on-year for the first five months of 2013, Nikon says it may fall short of its ‘fairly low’ earnings estimates for the first quarter of this financial year. Despite Japanese DSLR incomes falling by around 13% in the first five months of the year, Kimura says he expects the company’s DSLR sales to support the loss of compact sales for ‘several more years’ until it can produce ‘a product that will change the concept of digital cameras.’ Read more over at connect.dpreview.com
[ By Steph in Architecture & Houses & Residential. ]
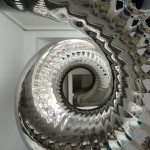
A silvery steel tentacle swirls through four stories of a bright white renovated 19th-century penthouse in New York City. Architect David Hotson turned the modern space into a playful residence for children and adults alike with the remarkable tubular slide, a floral-printed ‘nest’ accessible by a bridge, vertical climbing surfaces and a swing dangling three stories above the ground.
The polished stainless steel slide starts in an attic space with a funnel-like entrance, winds down through an interior window and offers an exit on the next floor before spiraling down three more stories. A faceted white staircase offers a more conventional way to get from floor to floor, that’s no less visually stimulating.
The nearly all-white space is punctuated with neon furniture and artwork, playful details that break up the gallery-like expanses of walls. At the center of the space is a four-story entry hall spanned by glass bridges, bringing daylight down into the living room from the upper floors.
Taking advantage of a unique space never before used as a residence, Hotson pays tribute to the architectural character of the surrounding cityscape, installing windows that perfectly frame landmarks like Frank Gehry’s residential tower and the Chrysler Building.
[ By Steph in Architecture & Houses & Residential. ]
Camera Dolly for cheap! Just using furniture sliders to move my tripod around. There are some small shakes but putting some weights on the tripod should do the trick. Also, remember that practice makes perfect! 😉 Featured in: lifehacker.com cheesycam.com nofilmschool.com Get updates and exclusive sneak peeks on my current/future projects! Facebook: www.facebook.com Twitter: www.twitter.com Picture Style: prolost.com Video Rating: 4 / 5


 Extra photos for bloggers: 1, 2, 3


 secure the frame.


