RSS
 

Posts Tagged ‘Simulating’

Simulating False-Color Infrared Photography in Photoshop

15 Mar

The post Simulating False-Color Infrared Photography in Photoshop appeared first on Digital Photography School. It was authored by Adam Welch.

Simulating False-Color Infrared Photography in Photoshop Featured Image

Let’s get right down to it and say that today, things might get a little weird. The techniques we’re about to discuss aren’t for everyone or every photograph. With that said, I’m about to show you something extremely cool. You’re about to learn how to simulate color infrared photography in Photoshop.

More specifically, I’m going to show you how to approximate the looks of the legendary color infrared film stock, Kodak Aerochrome.

The best part is, this technique is infinitely customizable.

Infrared photography in Photoshop

Let’s dive in and enter the overtly surreal world of infrared color photography in Photoshop.

What is false-color infrared photography?

Simply put, infrared photography makes use of wavelengths of light which fall outside the visible spectrum. Specifically, those which range from about 700 nanometers to about 1mm.

Don’t worry, that’s about as deep as we’re going to go into science with this tutorial.

The important thing to note is that while infrared photography stems from this invisible form of light, we can still use it to form photographs – even in color.

This is where the “false-color” aspect comes into play. In particular, the Aerochrome “look.”

The Aerochrome Effect

Kodak Aerochrome is/was an infrared-sensitive, false-color reversal film.

It was specifically produced for practical uses in aerial photography applications for forestry and camouflage detection, as well as other scenarios where specific infrared reflectance photographs could be useful.

For our purposes, it produces some highly interesting effects as far as colors are concerned.

A waterfall of Infrared photography in Photoshop

Primarily, vegetation with high amounts of chlorophyll content appears as pinkish-red instead of the normal green color. This has led some notable photographers and filmmakers to make use of Aerochrome to produce stylistically creative images.

Luckily for us, we can come close to producing this effect with just a few quick tricks inside of Adobe Photoshop.

What images work best?

Naturally, seeing as the original color effects of the false-color Aerochrome worked best with green vegetation containing large amounts of chlorophyll, this is the main subject matter that will work best for our simulation.

However, it’s still fun to experiment with different images ranging from landscapes to portraits, street photography and still life. The results can range from the mundane to the aesthetically startling.

A resting deer in grass

That’s enough of the background. Let’s go through step-by-step and explain how you can produce a digital simulation of the false-color infrared photography effect right inside of Photoshop.

How to simulate false-color infrared photography

The basis of our digital, false-color infrared simulation, centers around switching around the color channels of our photo.

Photoshop allows us to accomplish this switch quite easily using color channels.

Not only that, but we can further tweak the look of our photo to achieve exactly the colorization effects we want. This arguably makes this method more convenient and controllable than its analog counterpart.

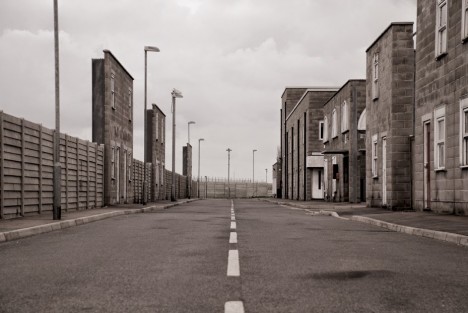
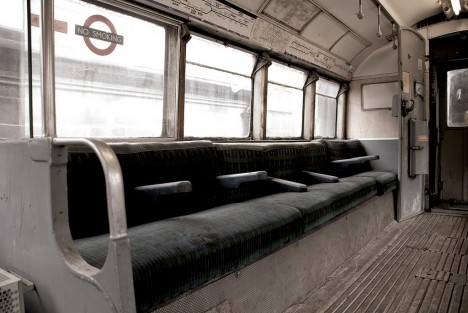
To get started, I’ve brought an image into Photoshop that contains a relatively large amount of greens.

Original photo before Infrared photography in Photoshop

The first step is to make a copy of the base layer. With this layer selected, use the keyboard shortcut ‘Ctrl+J’ (Cmnd+J for Mac) to copy the layer.

Infrared photography in Photoshop

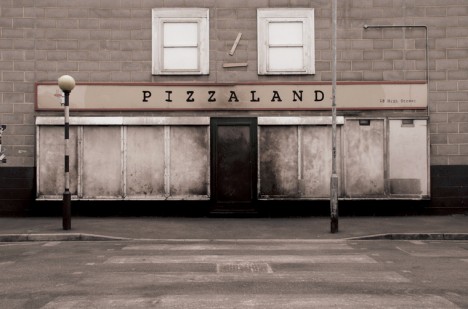
Next, we’ll invert the layer we’ve just copied by using the keyboard shortcut ‘Ctrl+I’ (Cmnd+I for Mac).

Inverted layer for Infrared photography in Photoshop

Note the readily apparent psychedelic change. We have essentially converted the photo to a negative image.

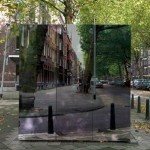
From here, we’ll change the blend mode to ‘Color’. Alternatively, the ‘Hue’ blend mode will produce similar results.

Color blend layer selected

With the blend mode changed to ‘Color,’ much of the heavy lifting is already done for us. Next, we’ll need to switch around the color channels to make the false-color infrared effect become more apparent.

Remember, we’re looking for a reversal of certain colors; namely blue and red. This is easily done using the “Channel Mixer.”

Select the ‘Channel Mixer’ icon to add the mixer adjustment. This is where the magic happens. And it couldn’t be easier.

Channel mixer selected for Infrared photography in Photoshop

Select the red channel from the drop-down and set that slider value to ‘0.’ Next, set the blue slider to ‘100.’

Red channel swap for Infrared photography in Photoshop

From here, select the blue channel. Set the red slider to ‘100’ and blue slider to ‘0.’

Blue channel swap for Infrared photography in Photoshop

What we’ve done is ‘reversed’ the blue and red channels much the same way as false-color, infrared photography does with infrared color-reversal film.

Infrared photography in Photoshop

At this point, our core processing is completed. However, there are other ways to make the effect much more refined depending on your photo.

Fine adjustments of your false-color infrared photography

While we have finished the bulk of the false-color infrared conversion, we can go a bit further and adjust the hues and color temperature of our photo. After all, this effect is not born simply from Aerochrome film but also the filters used during shooting and the subject matter itself.

Hue and Saturation

The greatest control over the effect comes from adjusting the hue and saturation of the false-colors we’ve just created. We can adjust these by creating a ‘Hue and Saturation’ adjustment layer.

Infrared photography in Photoshop

Use the hue and saturation to dial in the exact look you like.

Color Temperature

When shooting with true infrared color-reversal film, such as Kodak Aerochrome, you must use lens filters.

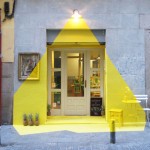
Often times these are yellow and orange color filters which generally “cool” the tone of the colors within the image. We can simulate this by adding a “cooling” filter in Photoshop. This is optional, but I find it lends a much more authentic feel to the final photo.

Infrared photography in Photoshop with cooling filter applied

After adding the cooling filter, it’s a good practice to go back and adjust your hue and saturation layer to tweak the resulting balance of the individual colors a bit further.

Final mage after Infrared photography in Photoshop

Parting thoughts on false-color infrared photography

The advice that can be given when dipping your feet into simulating false-color infrared photography in Photoshop is to view true false-color infrared photos made with this type of film.

I suggest the images of Richard Mosse and his work in the Congo to give a great example of the effects of this sort of photography.

Of course, there are many other examples, and a quick Google search will help you immensely. As you move forward, here are a few tips that will aid your image selection and processing for your simulations:

  • The infrared effect is based on the reflectance of chlorophyll, so choose images that have healthy green vegetation for the best results.
  • When shooting, go for the brightest lighting conditions possible.
  • The bright, mid-day sun makes for the best lighting. After you make your base color swaps using the channel mixer, experiment with adjusting the hue and saturation of the individual colors within your photo.
  • Don’t forget the benefits of creating Photoshop Actions! You can save all the adjustments for easy one-click applications later.

Perhaps the best part of creating the false-color infrared effect is that it preserves the unique effects of this sort of analog film photography, which as of 2007, is no longer produced.

It’s a dying art that we can enjoy for years to come with our digital photography. Again, it’s not for everyone, but it is a great way for you to create stunningly-surreal color images that will stand out from anything else.

Also be sure to check out my very first experience using an infrared-converted DSLR here!

Try out this effect of simulating false-color infrared photography in Photoshop, and please share your resulting images with us in the comments section. We’d love to see them.

The post Simulating False-Color Infrared Photography in Photoshop appeared first on Digital Photography School. It was authored by Adam Welch.


Digital Photography School

 
Comments Off on Simulating False-Color Infrared Photography in Photoshop

Posted in Photography


The Basics of Simulating Vintage Film in Lightroom

15 Feb

The post The Basics of Simulating Vintage Film in Lightroom appeared first on Digital Photography School. It was authored by Adam Welch.

Like all forms of art, photography can be a complex and contradictory medium. It’s straightforward yet complicated; personal but at the same time wholly based in exhibitionism. In recent years perhaps the weirdest and paradoxical event to happen in the world of photography is the idea of simulating film photographs with our digital photography. Think about it for a second or two. We’ve moved (for the majority) from using physical photographic film to digital sensors, and still, we are searching for the feel and aesthetic quality of the very process we left behind.

F:\DPS Images\Simulating Vintage Film\simulating-vintage-analog-film-in-lightroom-adam-welch-dps-8.png

A digital photo split toned for yellow in the shadows and blue in the highlights. Faded and then finally grain added to approximately simulate ISO 800 film.

We’ll leave the discussion of the currently popular “analog renaissance” for another day. For now, let’s talk about how you can go about simulating the look of a photographic film. More specifically, creating vintage or expired film looks using Adobe Lightroom. Adobe has made a couple of big updates to Lightroom lately that make working towards that “vintage film look” more effective and easier than ever before! Simulating the look of any film consists of four core dimensions: color, contrast, and grain. Before we get into the “how” of simulating film in Lightroom, let’s first briefly talk about some of the confusion surrounding film photography in general.

Film photography is full of variables

There’s a misconception that the look of film is set in stone; meaning that “XXX type of film always looks like this and XXXX type of film always looks like this.” Nothing could be further from the truth! There are all kinds of factors which play a roll (film humor) in how the final negative or print appears to the viewer.

simulating-vintage-analog-film-in-lightroom-adam-welch-dps-

A Nikon F3 35mm film camera. Shot with a digital camera…made to look like a vintage film. Ironic.

The age of the film, how it was stored, type and temperature of chemicals used in development, the duration of development, even how we agitate the chemicals around the film all play a major part in how the finished film appears. Also, when it comes to the final print, there are even more variables that can affect the look of the picture. The reason I’m saying all of this is to make sure you understand that simulating the look of vintage films has just as much to do with your creativity as it does with understanding the basics of how film works. There is no explicit right or wrong! So relax and let’s get to work learning how to simulate the look of vintage film in Lightroom.

Color

Color is the most effective part of the simulation process and there are many routes we can take to manipulate the colors of our vintage film simulations. The “vintage look” comes about literally by the progression of time. As the light-sensitive emulsion of the film degrades, it produces all sorts of funky color tones and nuances. To simulate this effect of color aging, we will use the tried and true Split Toning Panel and also one of the biggest and newest features to come along for Lightroom: Creative Profiles.

Split Toning

Don’t worry, split toning can look a little intimidating but it’s really not! Split toning is just a way for us to add in specific color tones to the shadows and highlights within our photo.

simulating-vintage-analog-film-in-lightroom-adam-welch-dps-2

To change the color tone of the highlights move the highlights color slider to the color tone you like or select it from the color palette.

simulating-vintage-analog-film-in-lightroom-adam-welch-dps-3

You can also change the saturation of the highlight colors by using the saturation slider. The same goes for the color toning of the shadows as well.

The balance slider is just a way for us to control the bias of the split toning to favor either the highlights or the shadows. Moving the balance slider towards the left makes the shadow toning more prominent while sliding it to the right makes the highlight color stand out. There are limitless combinations of colors and saturation balances so feel free to experiment. Just remember that using complementary colors for the shadows and highlights (blue and orange, yellow and violet) are always a good choice when it comes to split toning. Also, color changes in an expired film are usually quite subtle so keep that in mind as well as your tone.

Creative Profiles

One of the coolest and most versatile new features to come along for Lightroom recently is the introduction of “Creative Profiles.” Profiles have long been a part of Lightroom, but now we have the option to apply our own custom profiles that we’ve either bought or made ourselves. To learn more about the full power of Adobe’s Creative Profiles check out another one of my articles here. For our purposes, Creative Profiles allow us to introduce color grading to our vintage film simulations.

simulating-vintage-analog-film-in-lightroom-adam-welch-dps-3

The great things about creative profiles are that they apply themselves without disrupting any of your development settings. What’s more, you can dial in the strength of the profile using the density slider. Being able to use controllable color grading with creative profiles not only opens up a whole new world when it comes to simulating vintage film but in all areas of your post-processing workflow.

Contrast

Unlike color, simulating the contrast of vintage film in Lightroom is more or less a straightforward idea. Generally, as the emulsion of a photographic film ages its contrast usually decreases. This is due to the breakdown of the light sensitivity of the film.

F:\DPS Images\Simulating Vintage Film\Simulating_Vintage_Film_simulating-vintage-analog-film-in-lightroom-adam-welch-dps-3.png25.png

A 4×5 large format negative

The amount of contrast lost depends on a number of things such as the age of the film, the way it was stored, and the actual type of the film itself. The take away from this is that a good guideline for vintage film simulations is to essentially “fade” the image by decreasing its contrast. You can achieve this in a few ways. The most simple being to use the contrast slider to lessen the contrast. However, there’s a more precise and arguably more appealing way to fade the photo; by using the tone curve.

simulating-vintage-analog-film-in-lightroom-adam-welch-dps-5

To decrease the contrast and ultimately simulate the fading of an image all we need to do is take the control point at the bottom left of the tone curve and move it directly upwards. This controls the luminance values of the darks in the photo and makes those areas appear lighter which in turn makes them less contrasted. In most cases, you’ll want to add at least one more control point to the right of the one you’re adjusting and pull the rest of the tone curve back down. Of course, this is completely subjective. Feel free to add other control points and play around with the tone curve to really control the way your fades appear within your photo. Remember, there is no correct amount of fading so experiment as much as you like!

simulating-vintage-analog-film-in-lightroom-adam-welch-dps-6

Grain

The final facet of our vintage film simulation routine is to add in and control simulated grain to our photos. Not to be confused with digital noise, film grain is a direct result of the visibility of the individual silver crystals present in the films light-sensitive emulsion. The more/larger the crystals which present in the emulsion, the more sensitive the film to light and the higher it’s ISO rating. While the overall appearance of grain depends on a vast array of variables, a general rule is that the higher the ISO of the film the more pronounced the film grain becomes. So if you are attempting to make your simulations appear as a highly light-sensitive film such as ISO 1200 or ISO 3200, the more grain needs to be added to your simulations. If you are shooting for a lower ISO film for your vintage film simulation, say an ISO 80 or ISO 100 speed, you add less grain or even none at all. Here’s an image from a medium speed expired 35mm film, Kodak Tri-X 400. It was developed at a higher temperature and agitated quite a bit to bring out more of the grain.

simulating-vintage-analog-film-in-lightroom-adam-welch-dps-8.png

To control the presence of the grain we add in Lightroom we are presented with three sliders: amount, roughness and size.

simulating-vintage-analog-film-in-lightroom-adam-welch-dps-5

When you think about each of these sliders, it’s easy to visualize how they affect your image if you imagine them as physically controlling characteristics of the light-sensitive silver crystals of the film’s emulsion. The Amount slider would add in more or less crystals. Roughness is how raised or bumpy those crystals appear. Lastly, the Size slider controls how large or small those crystals seem. I know…that might still be a little confusing. So I’ve made up a quick guide for adding in your grain and given a couple of common real-world 35mm film stocks as reference points:

  • ISO 50-100(Kodak Ektar 100, Ilford FP4 Plus, Fujichrome Velvia 50)
    Amount: 15
    Size: 10
    Roughness: 10
  • ISO 200-400(Kodak Tri-X 400, Ilford HP5 Plus)
    Amount: 30
    Size: 10
    Roughness: 10
  • ISO 800-1600(Fujifilm Superia X-Tra 800, Fujifilm Superia 1600, Kodak Portra 800)
    Amount: 45
    Size: 40
    Roughness: 15
  • ISO 3200 and above(Kodak T-Max P3200, Ilford Delta 3200)
    Amount: 60
    Size: 40
    Roughness: 45

Lightroom automatically sets the “size” and “roughness” sliders to 25 and 50 respectively. If you add ANY amount of grain to your photo remember that those defaults are set out of the gate. Also, something to keep in mind, the amount of grain added largely depends on the original digital ISO of your photo. The values listed above are merely baseline approximations.

Vintage film simulations: Why?

Even as we steep in the digital waters of today’s modern photography world, I still have a love and lust for shooting film. Film, especially expired and vintage film, carries an aesthetic that goes beyond digitized image files of “1’s” and “0’s”. Speaking just for myself, the majority of my professional work consists of digital photography – not film. To that end, I’m sure that some of you are still thinking, “If you want the look of film, just shoot film.” Yes, I understand that even at its most basic applications, film photography isn’t for everyone. That’s why being able to approximate the looks of so many different types of film in Lightroom is such a wonderfully paradoxical thing. We can still enjoy the accessibility and convenience of digital photography without wholly sacrificing the “feel” of film. What’s more is that thanks to the recent advances of color profiles in Lightroom, we can now blend and mix our settings until we reach that perfect imperfectness which captures the organic unpredictability of vintage film. Which, when you think about it, should grant each of us the realization of how extremely fortunate we are to be living in such a cool time to be photographers.

Test out the ideas in this article and try some vintage film simulations of your own. Be sure to post your results in the comments. We’d love to see them!


You may also find these articles on vintage techniques helpful:

How to Add a Toy Camera Effect to Your Digital Images Using Photoshop

How to Mimic a Digital Cyanotype Using Photoshop with Ease

How to Create a Lithography Effect Using Photoshop

How To Mimic a Cross-Processing Effect in Photoshop

How to Mimic Lomography in Photoshop with Ease

The post The Basics of Simulating Vintage Film in Lightroom appeared first on Digital Photography School. It was authored by Adam Welch.


Digital Photography School

 
Comments Off on The Basics of Simulating Vintage Film in Lightroom

Posted in Photography


Gravesend: Fake Town for Simulating Crimes, Riots & Terrorism

19 Nov

[ By WebUrbanist in Travel & Urban Exploration. ]

artifical street urban complex

Like the set of a movie or setting of a video game, this surreal suburban facility could easily be mistaken for a real place at first glance – in reality, the installation is an elaborate artificial environment used by police to simulate complex and dangerous situations (photos by Chris Clarke).

artificial empty building facaDE

As Geoff Manaugh summarizes the setup, “the barren streets and hollow buildings of this militarized non-place were designed for use as an immersive staging ground for police-training exercises, fighting staged riots, burglaries, bank robberies, and other crimes” including hostage situations and terrorist attacks.

artifical training ground building

Located in Gravesend, Kent, just outside of London, this strange facsimile of an urban complex is devoid of residents but comes complete with parks, nightclubs, estates, aircraft, trains and tube stations (for hijacking and bombing simulations). Its population, instead, consists of the ebb and flow of the Metropolitan Police, of which the complex accommodate up to 300 militarized participants at one time.

artificial city for police

Open “in 2003 to provide London’s officers with firearms and public order training,” the complex’s designers at Advanced Interactive Systems (AIS) “provided all specialist firearms-related design, fit-out of the live-fire ranges with internal ballistic and anti-ricochet finishes, simulation and targetry equipment, and range sound systems.”

artificial backdrop city street

The same company was later contracted to “upgrade the specialist indoor shooting ranges and simulation systems [to] feature High-Definition projection systems, additional support for standard issue firearms and less-lethal devices, laser-based 3D virtual training environments, and a course editor for creating bespoke training exercises.” Even these official descriptions lend themselves to a range of dystopian speculation and dark interpretation.

artificial complex urban tube

Author of Subtopia, Brian Finoki notes that this dull gray place is deeply bizarre in nature, “a city standing on the planet for one purpose: to be rioted, hijacked, trashed, held hostage, sacked, and overrun by thousands of chaotic scenarios, only so that it can be reclaimed, retaken, re-propped in circuitous loops of more dazzling proto-militant exercise, stormed by a thousand coordinated boots for eternity, targeted by hundreds of synchronized crosshairs of both lethal and non-lethal weapons.”

artifical commercial street facade

Photographer Chis Clarke, whose Flickr photo set is worth seeing in its entirety, suggests a bold take on the complex and its meaning in the contemporary cultural context of the United Kingdom: “Gravesend can be interpreted as a warning – a prophecy of society’s potential to alienate itself from itself, and kill its collective identity. This surreal installation serves as a chilling account of the death of community in 21st century Britain.”

Share on Facebook


[ By WebUrbanist in Travel & Urban Exploration. ]

[ WebUrbanist | Archives | Galleries | Privacy | TOS ]


WebUrbanist

 
Comments Off on Gravesend: Fake Town for Simulating Crimes, Riots & Terrorism

Posted in Creativity