RSS
 

Posts Tagged ‘Silky’

How to Create Silky Smooth Water Effects

19 Jun

You might have seen photos in nature magazines or websites with silky-smooth water effects cascading over rocks, branches, and trees. Have you also wondered how in the world the photographer was able to capture such beautiful images?

For years I thought these types of images were the purview of professional photographers armed with an arsenal of digital tricks and camera tweaks that I would never be able to learn. But in reality, it’s quite simple to make images like these.

You don’t need any computational wizardry or mystical skills, and once you pick up a few basics you can start creating beautiful smooth-water photographs in no time at all.

How to Create Silky Smooth Water Effects - waterfall over a brook

Limiting the Light

To start with, the goal here is somewhat counterintuitive compared to a lot of other types of photography. Instead of letting in as much light as possible, the goal with smooth-water pictures is to let in the smallest amount of light in order to allow your shutter to remain open as long as it can. This requires a couple of settings on your camera as well as, in most cases, a very inexpensive piece of gear.

When you take a picture at a high shutter speed of 1/125th or 1/500th of a second it’s fast enough to freeze motion and allow you to get a blur-free picture of your subject. This is usually a good thing except when cascading water is involved, as freezing the motion is the opposite of what you are trying to do. Limiting the light allows the water to create motion trails and also adds an entirely different tone to the image, often one of peace and tranquility.

The following two images illustrate what I mean. This first one was taken at 1/60th of a second.

How to Create Silky Smooth Water Effects - moving water, partially frozen

1/60th of a second. Some motion trails are present but the image doesn’t feel calm, and also lacks a focal point.

The next one was taken with a much slower shutter speed and feels like an entirely different picture.

How to Create Silky Smooth Water Effects - slower shutter speed and blurred water

What you need to do

In order to cut down on the incoming light and also make sure you are getting the best images you will need to do the following:

  • Shoot in Manual Mode so you can force your camera to do what you want, not what it thinks you want. Using Auto or semi-auto modes (P, Av, Tv, A, or S) will usually not work for these types of shots.
  • Shoot in RAW so you can tweak your image afterward. It’s difficult to get smooth-water photos just right straight out of the camera and it’s nice to be able to tweak things to your liking.
  • Use a small aperture. Not necessarily the smallest aperture your lens allows, because this can sometimes cause image quality to deteriorate due to light diffraction, but a value of around f/11 or f/16 should be fine.
  • Use the lowest native ISO value for your camera. This will let you use slower shutter speeds while also giving you the cleanest, sharpest image possible.
  • Use the slowest shutter speed possible without overexposing the image too much. If you’re using RAW you can probably overexpose by one stop and recover things in post-production. But much more than that and you’re going to blow out all your highlights.
  • Put your camera on a tripod to minimize any shake or wobble from your hands. My favorite is the Joby Gorillapod since it lets me position my camera using just about any available surface, and allows me to get nice and close to the water as well.

Neutral Density Filters

Even with all this, it’s difficult to get a slow enough shutter speed to really create some good smoothing effects, and the solution is to use a Neutral Density filter. This is an inexpensive attachment that screws on to the front of your lens and cuts down the incoming light.

I like to think of it as putting sunglasses on your camera. This is the secret to getting the type of silky smooth water effects you have always admired but never knew how to create on your own.

shot of a fountain - How to Create Silky Smooth Water Effects

Here, a long exposure of 1-second not only smoothed the water in the fountain but evened out the surface of the pond as well.

There are many different kinds of ND filters that block varying levels of light, but my recommendation for smooth-water images is one that blocks 3 or 6 stops of light. Others are available but they block so much light that it’s difficult to get your exposure settings right.

You can find ND filters at any camera retailer but the key is to get one that fits your lens. Look on your lens cap to find the thread size. It will usually be the Greek letter phi followed by a number, such as 53mm or 58mm.

ND filters often come in packs of two or three. While these cheaper ones aren’t going to produce the absolutely highest-quality results they are a fantastic and inexpensive way to get started.

Getting the Shot

I enjoy creating silky smooth water images on cloudy days since it means even more light is blocked – almost like nature’s own ND filter. Morning and evening are good times to shoot as well. But any time of day will work as long as you can get slow shutter speeds using a small aperture, low ISO, and an ND filter.

How to Create Silky Smooth Water Effects - yellow leaf in flowing water

2 seconds. The long exposure time really helped create a sense of motion in the background while the leaf in the foreground serves as a focal point for the viewer.

Use Live View

I like to use Live View when preparing my shot since I can adjust the exposure parameters and see the image lighten or darken in real-time. But if you are using an optical viewfinder just pay attention to your light meter and you should be fine.

When your camera is ready and you have your shot composed, use your camera’s self-timer so you don’t add any shakiness to the image with your fingers when you press the shutter.

This method can also be used for adding a layer of gloss to moving waters, which is a fun way to add a bit of a creative element to pictures taken at the beach. The difference is that instead of trying to get pictures that show the motion of water, you are trying to make the water as smooth as possible.

How to Create Silky Smooth Water Effects - lake shot

At 1/90th of a second, the water is full of ripples and small waves.

Limiting the amount of incoming light by using the techniques above (small aperture, low ISO, and ND filters) I was able to virtually eliminate the appearance of imperfections on the surface of the water.

How to Create Silky Smooth Water Effects - long exposure on a lake

6 seconds. In addition to the surface being smooth, a host of large and small rocks are now visible which creates an additional almost otherworldly feeling.

Conclusion

Creating these types of images can be addicting! Once you get the hang of it, you may want to spend all day seeing what you can create with your camera. It doesn’t take much, but it opens up a whole new photography frontier that can be extraordinarily enjoyable and highly rewarding.

The post How to Create Silky Smooth Water Effects appeared first on Digital Photography School.


Digital Photography School

 
Comments Off on How to Create Silky Smooth Water Effects

Posted in Photography


How to Create Silky Split Toned Black and White Photos Using Luminosity Masks

22 Mar

Have you ever found it hard to choose between processing an image in color or black and white? It can be a tough decision. Enriching colors that instantly captivate your attention versus a timeless black and white photograph full of texture and complex shadows.

There’s every chance you’ll process both versions because you can’t have the best of both worlds, right? Well, with split toning, maybe you can – sort of.

1 How to split tone black and white images using luminosity masks

Split Toning 101

At its core, split toning is a pretty simple editing technique. You can create a split tone effect by simply introducing color into the highlights and/or shadows of your photograph.

It’s often used by photographers (and extensively by film makers) to recreate a film look and to create a consistent style across a series of images. In recent years, it’s become renowned for creating the ever so popular “orange and teal” look.

These days, the mere thought of split toning your photograph is greeted with groans of “not another Insta-image”. But for all of its popularity on social media platforms, perhaps split toning is most effective when applied to black and white photographs. This is where its subtle tones combine with texture and luminance to create sumptuous results.

2 How to split tone black and white images using luminosity masks

Black and White Versus Color

Colors are powerful. Not only do they add excitement and interest, but they also set the tone for your images. By default, colors come with a little extra baggage – they’re moody, symbolic and represent a preconceived tone.

3 How to split tone black and white images using luminosity masks

Tones such as reds, yellows, and oranges are usually associated with warm, gooey feelings of love and comfort.

4 How to split tone black and white images using luminosity masks

Whereas the cooler tones such as blue, cyan and magenta are typically associated with melancholic feelings of calmness and reflection.

You could almost think of color as a way of spoon-feeding the viewer with the tone, style, and mood of your images. Essentially, colors can make your job of storytelling a lot easier.

With this in mind, you’d be forgiven for wanting to enhance the emotion of your photographs by pumping up the saturation of your colors. But there’s a consequence. They’re too powerful.

Color Can be a Distraction

For all of their excitement and emotional qualities, colors have the potential to be overly dominant and cause major distractions. I’m not going to pretend I know the science behind why this is, but have you ever noticed that black and white photographs appear to offer a little more oomph? A particular grittiness.

It’s almost like they have a 3-dimensional quality that seduces your eyes and encourages them to roll around in the graduating tones. Okay, maybe it’s just me.

The theory goes that the presence of strong color can make it more difficult for your eyes to detect luminance, perceive depth, and absorb the finer detail in your images. A problem black and white photographs need not worry about.

5 How to split tone black and white images using luminosity masks

You may notice that your primary focus flickers from color to color instead of exploring the shapes and textures of the building in this image.

6 How to split tone black and white images using luminosity masks

Removing the color helps your eyes to journey through the maze-like building to explore the textures, lines, and shapes.

Enter Split Toning

Without color, your eyes turn into luminance seeking missiles as they journey deep into your image to revel in silky graduating tones, land on interesting shapes, and explore complex textures.

So how do you combine the moody nature of color with the textural qualities of a black and white image?

This is where split toning makes its grand entrance. Applying a subtle color to the highlights and shadows of your black and white photographs gives you a slice of the emotional qualities that color can offer, without disguising the depth and texture of your black and white photograph.
Who said you can’t have the best of both worlds?

7 How to split tone black and white images using luminosity masks

Basic Color Theory 101

Before you dive in and start splashing color around as if you’re celebrating the Holi festival, it’s a good idea to have a basic understanding of color theory. Then you’ll know exactly what colors to combine when you split tone your black and white photographs.

The Adobe color wheel is a great tool that represents the relationship between primary, secondary, and tertiary colors. Photographers, designers, and artists often apply basic color theory to the color wheel to create visually appealing color palettes for their work.

8 How to split tone black and white images using luminosity masks

Here are three common color schemes you can use to develop a subtle, harmonious, or contrasting color palette for your split toned black and white photographs.

Analogous Color Scheme

An easy way to understand the analogous color scheme, which also avoids you having to pronounce it, is to think of it as a really good set of next-door neighbors.

9 How to split tone black and white images using luminosity masks

Analogous color schemes use colors that are directly next to one another on the color wheel. They are naturally harmonious and can often be found in nature.

Triadic Color Scheme

10 How to split tone black and white images using luminosity masks

Triadic color schemes use colors that are evenly distributed around the color wheel. This type of color scheme is typically more vibrant and interesting than an analogous one.

Complementary Color Scheme

11 How to split tone black and white images using luminosity masks

Colors that are directly opposite one another on the color wheel are known as complementary colors.

If you have watched almost any movie in the last 10 years or scrolled through your Instagram feed in the last 10 minutes, it’s highly likely you would have noticed a strong presence of orange and teal colors. This is a perfect example of a complementary color scheme.

Brief Recap

So far I have briefly covered the advantages of color and black and white photographs and how, in theory, it’s somewhat possible to combine their qualities to get the best of both worlds using a split toning technique. I’ve also introduced a basic level of color theory, so you will know how to create visually attractive color combinations in your split toned images.

At this point, you might be wondering how to apply all this wonderful information and actually split tone your photographs. So, let’s dive in and bring it all together.

How to Create a Silky Split Tone Effect

A common and very easy way to split tone your images would be to use the Lightroom Split Toning tab in the Develop Module.

12 How to split tone black and white images using luminosity masks

This allows you to select a specific hue for the highlights and shadows, adjust the saturation, and the balance of the effect.

13 How to split tone black and white images using luminosity masks

While this method is extremely fast and produces acceptable results, it lacks the ability to infuse your images with a triadic or analogous color scheme. More importantly, it doesn’t allow you to control how the split toning effect is applied to the different tones in your image.

Using Luminosity Masks in Photoshop

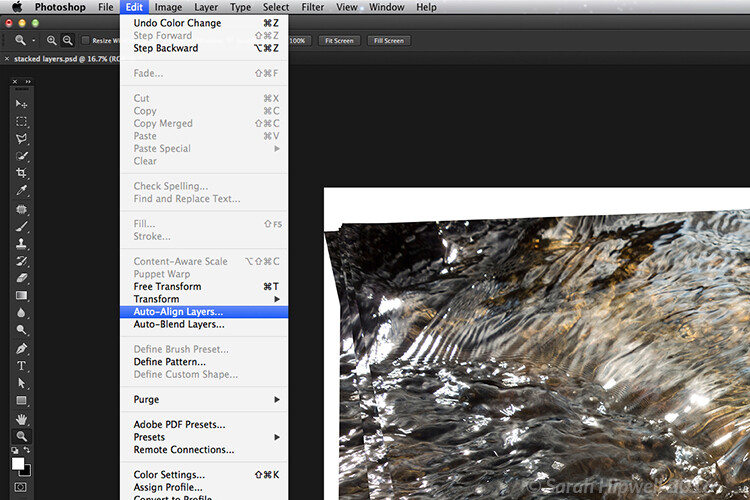
Having more control can help you to create a silky split toned black and white photograph that makes you want to instantly hit print and proudly publish it for all to see. To gain this level of control you’ll need to take a deep breath and join me as we take a big brave step into Photoshop.

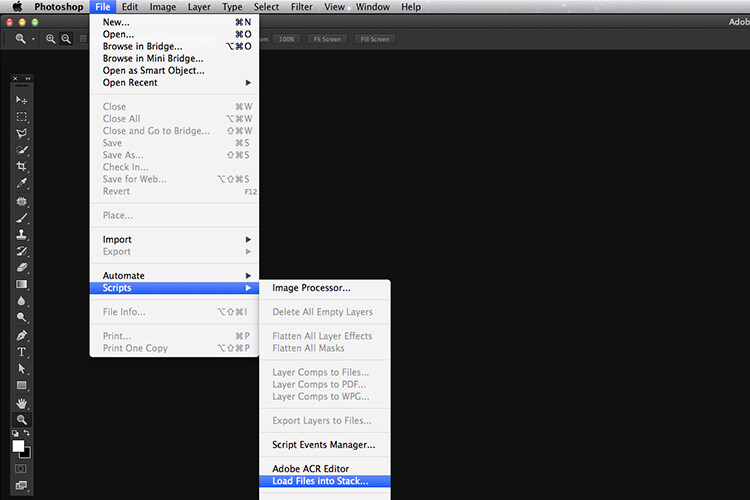
Step 1: Creating Luminosity Masks

To get started you’ll need to open up Photoshop and load a series of luminosity masks.

If you’ve just exhaled that deep breath with a, “Huh!? What is that!?” there’s no need to run a “What’s a luminosity mask?” Google search. All the basic information you need (and a free action that does all the work for you) is available right here.

Originally developed and thoroughly documented by Tony Kuyper, luminosity masking is regarded as one of the most effective techniques to control your images in Photoshop.

Despite its complex sounding name, luminosity masking is a relatively easy technique you can use to apply subtle adjustments to your images in a clean and effective way.

14 How to split tone black and white images using luminosity masks

Several tonal adjustments were applied to this image using luminosity masks to gradually build contrast and depth in this image.

Luminosity masks are commonly used among landscape and architecture photographers to seamlessly blend bracketed exposures, gradually build contrast, and create silky black and white photographs. They work by creating a series of selections that isolate the highlights, mid-tones, and shadows on a granular level, which allows you to target specific tones based on their luminance (brightness) value.

Sadly, the process of creating luminosity masks is nowhere near as fun as using them. So, to save you (and me) from:

  • Death by 100 confusing screenshots detailing how they are created
  • Spending 15 minutes creating luminosity masks every time you want to split tone an image in Photoshop

Here’s a link to download a Photoshop Action that includes all the information you need to install and create luminosity masks in a just a few clicks.

15 How to split tone black and white images using luminosity masks

Luminosity masks in Photoshop.

Essentially, having a selection of luminosity masks at your disposal gives you ultimate control over your photographs. It means you’re able to work with the highlights, mid-tones, and shadows independently of one another. Which, if you’re partial to the odd black and white photograph, provides you with the perfect system to create a beautiful split toning effect.

Step 2: Create a Color Palette

With your luminosity masks created, head over to the Adobe color wheel to create a visually attractive color palette. Note down the hex value of your desired colors, as you will need these in the next step. For this example, we’ll create a complementary color scheme.

16 How to split tone black and white images using luminosity masks

Step 3: Apply your Shadow Color

Create a Solid Color Adjustment Layer and enter the hex code of the color you’d like to introduce into your shadows.

17 How to split tone black and white images using luminosity masks

Step 4: Color Blending

Change the blend mode of the Solid Color Adjustment Layer to “Color”. As you do so, you’ll notice that your entire image will be colorized with the hue you selected. Now select the default white layer mask and delete it by dragging it to the trash can icon.

18 How to split tone black and white images using luminosity masks

Step 5: Select a Luminosity Mask

Navigate to the Channels tab and locate the luminosity masks you created using the Photoshop action in step one. You’ll notice that seven luminosity masks with varying degrees of intensity have been created for your highlights, likewise for your shadows, and two luminosity masks will target the mid-tones of your image.

15 How to split tone black and white images using luminosity masks

Luminosity masks are stored in the Channels tab.

The aim here is to apply one of these luminosity masks to the Solid Color Adjustment Layer you just created. This will restrict the effect of the adjustment layer to only appear in specific areas of your image.

Clicking on each of the luminosity masks allows you to preview the target areas of your image.

Luminosity masks work much in the same way as regular masks. The white areas of the mask will reveal the effect and the black areas of the mask will conceal it. The grey areas of a luminosity mask will partially reveal the effect which helps to create a subtle and clean finish.

19 1 How to split tone black and white images using luminosity masks

Clicking on a luminosity mask allow you to preview what areas of your image it targets.

The general aim is to select a luminosity mask with just enough white (and gray) in the areas where you’d like the color to be visible. As a rule of thumb, when choosing a luminosity mask to add color into your highlights, selecting the “Lights 2” or “Lights 3” mask usually works well.

If you intend to introduce a color into the shadows of your image (like in this example), then you may find that using the “Darks 2”, “Darks 3” or “Darks 4” luminosity masks will provide you with a silky-smooth finish.

19 2 How to split tone black and white images using luminosity masks

The white areas represent where the blue tone will be revealed.

Step 6: Load Luminosity Selection

With your chosen Luminosity Mask selected click on the “Load mask as selection” button at the bottom of the Channels panel. Upon doing so, you’ll notice that the marching ants appear to indicate the selection.

20 How to split tone black and white images using luminosity masks

Step 7: Create a Layer Mask

Navigate back to your layers tab, select your solid color layer and click the “Add Layer Mask” button. This will create a layer mask using the luminosity selection which will restrict the Solid Color Adjustment Layer to only be visible in the white areas of the mask.

In the example, you can see that the blue color tone is now only visible in the darker areas of the image.

21 How to split tone black and white images using luminosity masks

Loading the “Darks 4” luminosity mask helps to restrict the effect to the shadow areas only.

Step 8: Refine Your Color

At this stage, there’s every chance the effect will look a little too strong and not very subtle. This is where working with adjustment layers and masks gives you complete control.

To refine the effect, double-click on the Solid Color Adjustment Layer to reduce the saturation and brightness. If need be, you can also adjust the overall opacity of the Solid Color Adjustment Layer to soften the effect.

22 How to split tone black and white images using luminosity masks

Reducing the saturation and brightness helps to create silky smooth shadows.

If your effect is still too strong then you may want to consider deleting the layer mask and repeating steps 5 and 6 to select a luminosity mask with a softer selection.

Step 9: Housekeeping

To help keep your layers neat and tidy, you can rename the Solid Color Adjustment Layer to “Shadows”.

23 How to split tone black and white images using luminosity masks

Step 10: Mid-tones

Repeat steps 3-8 to apply your desired color to the mid-tones. Only this time, when you get to step 5, you’ll need to select the “Midtones 1” luminosity mask.

25 How to split tone black and white images using luminosity masks

Note: When you load the “Midtones 1” luminosity mask as a selection, Photoshop will display a warning which states “No pixels are more than 50% selected. The selection edges will not be visible.”

24 How to split tone black and white images using luminosity masks

You can safely ignore this warning. Your mid-tones will still be selected, this message is just Photoshop’s way of saying, “Woah there! You are making a selection so subtle that the marching ants can’t show you where it will apply.”

Step 11: Highlights

Finally, you can now introduce a color into your highlights.

26 How to split tone black and white images using luminosity masks

To do this, you’ll need to repeat steps 3-8, modifying step 5 to select a “Light” luminosity mask. Often the “Lights 2” or “Lights 3” masks will create subtle results.

27 How to split tone black and white images using luminosity masks

Here’s an example of the shadow, mid-tone, and highlight layers combining to split tone the image.

28 How to split tone black and white images using luminosity masks

Before and After

14 How to split tone black and white images using luminosity masks

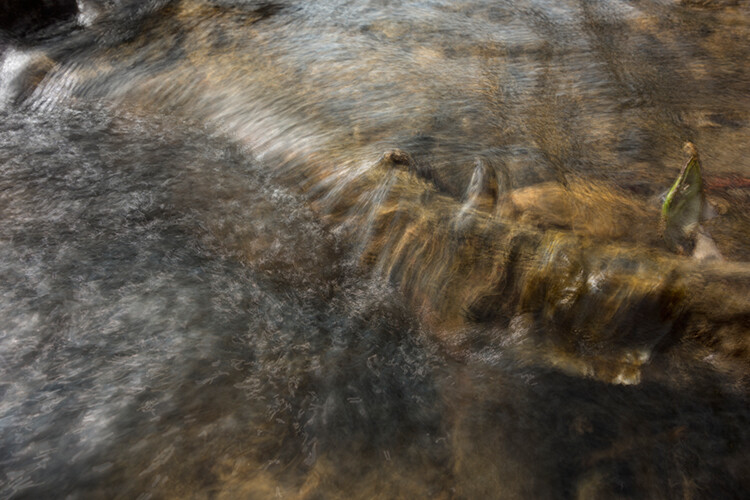
Here is the image prior to applying the split toned effect.

1 How to split tone black and white images using luminosity masks

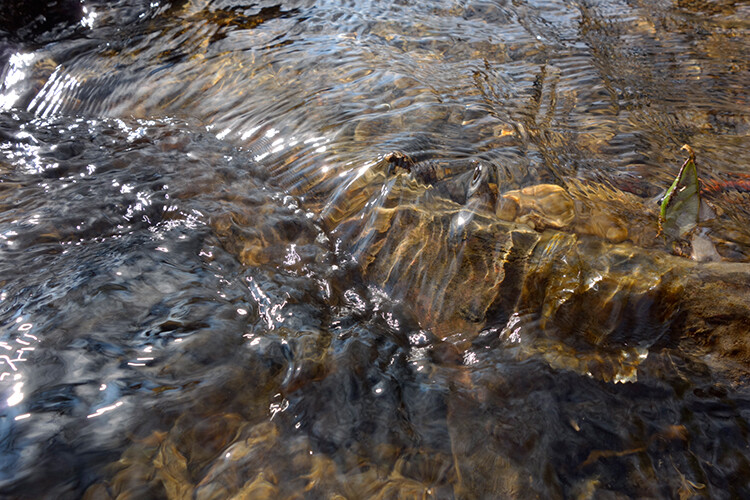
Here is the image after applying a complementary split toned effect.

As you can see, the subtle toning helps to add a little emotion to the cityscape without losing the sense of depth of the original black and white image. And because the toning has been applied with luminosity masks and layers, you’re able to tweak and control the precise tone until it has a silky quality that makes you want to jump inside the image and roll around in its graduating tones.

Examples

Here are a few examples of different color schemes applied to the cityscape using the exact same process.

Warm Analogous Color Scheme

29 How to split tone black and white images using luminosity masks

Warm analogous color palette created with the Adobe color wheel.

30 How to split tone black and white images using luminosity masks

A Cool Analogous color scheme

31 How to split tone black and white images using luminosity masks

Cool analogous color palette created with the Adobe color wheel.

32 How to split tone black and white images using luminosity masks

Triadic color scheme

33 How to split tone black and white images using luminosity masks

A vibrant Triadic color palette created with the Adobe color wheel.

34 How to split tone black and white images using luminosity masks

Conclusion

Whether you are looking for a way to add a little more emotion into your black and white photographs or simply trying to work out if you prefer an image in color or monochrome, you may find that split toning a black and white image can often give you the best of both worlds.

35 How to split tone black and white images using luminosity masks

And besides, in a world full of heavy saturation, smartphone filters, and HDR, it can be refreshing to strip away excess color and produce a sumptuous split toned black and white photograph.

I hope this encourages you to play with the color wheel and experiment with split toning effects. If you decide to give it a try, I’d be delighted to see your photographs in the comments below.

The post How to Create Silky Split Toned Black and White Photos Using Luminosity Masks by William Palfrey appeared first on Digital Photography School.


Digital Photography School

 
Comments Off on How to Create Silky Split Toned Black and White Photos Using Luminosity Masks

Posted in Photography


How to Create a Silky Water Effect in Post-Processing without Using Filters or a Tripod

17 Apr
Affiniy-photo-mean-stack-mode

Smooth water effect edited in Affinity Photo using the Live Stacks feature.

Even if you don’t shoot landscape photography, photos of waterfalls with the smooth water and glassy appearance are awesome. The gist to achieving this, and I do stand corrected if I have this wrong, is as follows:

  • Slow shutter speeds – the need for a tripod
  • A remote shutter release or your camera’s timer
  • Wide angle lens and the camera settings using a small aperture of f/22, ISO 100
  • Neutral Density and/or polarizer filters, as you’ll be shooting long exposures during the day
  • Of course the scene and by all accounts patience too

However, I personally don’t own ND or polarizer filters. These type of filters are required for long exposures during the day, so that your shutter speeds are slow enough, possibly one minute or more to get that misty look. On top of which, you have to get the exposure right, which requires a bit of math and experimentation. ND filters block out the light in terms of stops.

So taking long exposures during the day is an involved process, especially if you want to create that smooth, silky water effect in-camera. But, is there a way to simulate this effect in Photoshop or other post-processing software? Yes there is! It does require that you take multiple shots. I’m not advocating that this technique in post editing is a replacement to going out and achieving long exposures out in the field, far from it. But, I hope this technique may serve as a stepping stone or inspiration to go out and capture silky waters, clouds etc., in-camera.

This article will demonstrate how you can achieve a similar result by taking a bunch of photos in continuous mode without using any filters or a tripod. Although, I would recommend you use a tripod.

First, I’ll demonstrate this effect using a manual method in Photoshop CS6 (standard version). There is an automated way to do this with the Stack Mode feature, which I believe is in Photoshop CC. If you have previous versions of Photoshop, the Stack Mode feature is only available in extended versions, not standard, unfortunately. However, Gimp has this Stack Mode feature and it’s free. Then, I will compare the manual method in Photoshop with Affinity Photo, using Live Stacks. I was really impressed with this feature.

Photoshop manual method

Let’s begin. On the day I took these images, I was pressed for time. So I took a series of shots in continuous mode, and handheld the camera while I focused on this part of a small river. I would recommend that you use a tripod and give yourself some time. It will be easier to align the images later.

small-river-handheld

I took a bunch of images in continuous mode of this small river, close-up deliberately for this article.

You will need to load your images as layers into one document in Photoshop, as follows:

file-scripts-load-files-into-stack

Loading multiple images into one document in Photoshop. File>Scripts>Load Files into Stack

Go up to the Menu Bar > File > Scripts > Load Files into Stack. As I didn’t use a tripod, I selected all the layers to align them. Go to Auto-Align under Edit. As you can see, Photoshop had its work cut out trying to align the images.

images-after-auto-align-photoshop

I handheld my camera when I took a bunch of shots in continuous mode. As you can see from this screenshot, I needed to use Auto-Align Layers in Photoshop. If you use a tripod the alignment will be much easier.

Now that the layers are stacked on top of each other. Start at the bottom and leave this layer at 100%, go to second layer above and reduce the opacity by 50%(100÷2=50). Continue with the next layer and reduce the opacity by 33%(100÷3=33).

percentages-opacity-reduced

Reducing the opacity of each layer by dividing the number of the layer into 100%. The bottom layer remains at 100%. The second layer is 50% and so on.

Therefore, depending on the amount of layers you have, and where they come in the stack, divide this number into 100. So if you had 30 images, the opacity for the top layer in the stack will be 3% (100÷30=3). Remember the bottom layer is always 1=100%. What this is doing is averaging out the layers. This may sound complicated, but in practice, it’s more straightforward. Although it is a bit more tedious than the automated way.

This is the effect of averaging out the layers in Photoshop - reducing the stacked layer's opacity by X amount. I also had to crop this image, whereas the same image when edited in Affinity Photo kept more of the image. See below.

This is the effect of averaging out the layers in Photoshop – reducing the stacked layer’s opacity by X amount. I also had to crop this image, whereas the same image when edited in Affinity Photo kept more of the image. See below.

I have been keeping a close eye on Serif’s Affinity Photo. So I took the plunge and purchased it for (€39) $ 44 USD. That was a discounted offer. At such an affordable price, I was curious to see how this software performs and what it can do.

In Affinity Photo, there is a Live Stacks feature which is similar to Stack Mode in Photoshop. It was easy and simple to use, and the process was fast.

Affiniy-photo-mean-stack-mode

Affinity-photo-new-stack

The equivalent Stack Mode feature in Photoshop is called Live Stacks in Affinity Photo.

Go to File > New Stack. The pop up dialog box appears where you select your images. Make sure Automatically Align Images box is ticked. Click Ok. This takes a couple of seconds. It defaults to Median in the Live Stack Group, but scroll up to the next one and this is Mean. That’s the one you want.

Affinity-photo-auto-align-images

images-selected-after-new-stack

When you create a New Stack, the pop up dialog box appears. Select your images on your computer and click Open.

Affinity-photo-live-stacks-mean

The stacked images are grouped into a folder called Live Stack Group. The different stack options are located by clicking on the small icon, circled in blue. It defaults to Median but I changed it to Mean.

The cool thing about this feature is when you scroll through each of the different stack modes, it shows the different results live.

Affinity-photo-live-stacks-maximum

Different stack options can be scrolled through one by one, and the results can be seen live, which is impressive.

When I compared the two results from Photoshop and Affinity Photo, I could see no obvious difference, with the exception that I had to crop the image of the river more in Photoshop, whereas the auto alignment in Affinity Photo meant I didn’t lose much of the image at all.

second-river-original

Here is another example of moving water.

The same image as above edited in Affinity Photo using Mean in Live Stacks. I got the same result using the manual method in Photoshop.

The same image as above edited in Affinity Photo using Mean in Live Stacks. I got the same result using the manual method in Photoshop.

Take away tip:

In my examples, I didn’t use a tripod. I would recommend using one. I also took only a series of 8-10 shots. I would recommend taking at least 15 or more.

I found this technique interesting and fun, and I am now inspired to go out and take images of waterfalls. The good thing about this technique is if you don’t have ND or polarizing filters, it doesn’t prevent you from going out and taking shots of waterfalls. Then when you get back to your computer, you can create your own silky, smooth effect.

Let’s see some of your examples below.

googletag.cmd.push(function() {
tablet_slots.push( googletag.defineSlot( “/1005424/_dPSv4_tab-all-article-bottom_(300×250)”, [300, 250], “pb-ad-78623” ).addService( googletag.pubads() ) ); } );

googletag.cmd.push(function() {
mobile_slots.push( googletag.defineSlot( “/1005424/_dPSv4_mob-all-article-bottom_(300×250)”, [300, 250], “pb-ad-78158” ).addService( googletag.pubads() ) ); } );

The post How to Create a Silky Water Effect in Post-Processing without Using Filters or a Tripod by Sarah Hipwell appeared first on Digital Photography School.


Digital Photography School

 
Comments Off on How to Create a Silky Water Effect in Post-Processing without Using Filters or a Tripod

Posted in Photography