RSS
 

Posts Tagged ‘Short’

InVisage posts short movie shot with its QuantumFilm HDR smartphone sensor

27 Oct

For a few years now, InVisage has been working on a new kind of smartphone image sensor that claims to offer higher dynamic range and zero rolling shutter than the chips currently found in mobile devices. It appears the technology is now at a stage where its benefits can be demonstrated, and for this purpose InVisage has commissioned a short movie called Prix  shot entirely on a prototype device using InVisage’s QuantumFilm technology. Read more

Articles: Digital Photography Review (dpreview.com)

 
Comments Off on InVisage posts short movie shot with its QuantumFilm HDR smartphone sensor

Posted in Uncategorized


Long and short of it: Tamron 16-300mm F3.5-6.3 Di II VC PZD Macro review

15 Sep

Tamron’s 16-300mm F3.5-6.3 takes the superzoom concept it made famous a few steps forward. It offers a significant increase in telephoto range, and also goes wider to bring real wide-angle capability to the superzoom category for the first time. It’s also earned a ‘Macro’ designation with its close focusing ability. Is it truly a super zoom? Take a look at our analysis. Read more 

Articles: Digital Photography Review (dpreview.com)

 
Comments Off on Long and short of it: Tamron 16-300mm F3.5-6.3 Di II VC PZD Macro review

Posted in Uncategorized


LensRentals applies copy variation test to short telephoto primes

22 Jul

LensRentals has embarked on a quest to investigate the complicated topic of sample variation among copies of the same lens. It’s the kind of fascinating, geeky stuff we’ve come to know and love from LensRentals, and in the latest round of tests they’ve taken a look at a group of short telephoto primes ranging from 85mm to 150mm. Read more

Articles: Digital Photography Review (dpreview.com)

 
Comments Off on LensRentals applies copy variation test to short telephoto primes

Posted in Uncategorized


Split, Broad & Short Lighting Techniques

17 Sep

Image from Alana Tyler Slutsky's Surrealia series featured on Fashion Photography Blog (FashionPhotographyBlog.com)SPLIT, BROAD AND SHORT TECHNIQUES

Hey FashionPhotographyBlog.com readers! Welcome back.

Today we’ll cover the other three basic techniques for lighting – split, short and broad lighting.  If you missed yesterdays’ basic techniques of Paramount, Loop and Rembrandt lighting, you can find them here.

Let’s jump right in!

LIGHTING TECHNIQUES

Split Lighting: Slight lighting literally divides the subject’s face in half.  It’s also known as side lighting.  Because of the nature of this type of lighting, it’s great slimming light.  Keep in mind that in lighting from the side, it will show any texture (and imperfections).  Aka- this is not ideally the light to be used on a very zitty person.

Split/side lighting is exactly as it sounds – Place the key light at your subjects side.  It will illuminate half of their face and leave the other half in shadow.

If you don’t want as extreme a shadow as pictured above, use a bounce fill or fill light to bring in detail on the shadow side.

Split lighting diagram featured on Fashion Photography Blog (FashionPhotographyBlog.com)

Split Lighting Diagram

These next two lights are not exactly a lighting pattern, but terms that deal with the subject and the lights orientation to the camera.  The two lighting scenarios below deal with the subject being 3/4 to the camera.

Broad Lighting: Broad lighting will create a “broad” or “wide” face.  This is because the part of the face that is lit (the part of the face that is facing the camera) is wider than the section of the face that is in shadow.  Don’t use this type of light on heavier people, it will make them look bigger than they are.  It’s ideal for thin people.

To achieve this, place the light opposite the direction of your subject’s face.  For example, If the subject is looking to the left of the camera, place the light to the right of the camera.

Broad lighting example featured on Fashion Photography Blog (FashionPhotographyBlog.com)

Broad lighting diagram featured on Fashion Photography Blog (FashionPhotographyBlog.com)

Short Lighting: Short lighting will create a narrower looking face.  This is because the part of the face that is in shadow (the part of the face that is facing the camera) is wider than the section of the face that is lit.  This type of light is great for heavier people!  It creates a thinning effect which makes it really flattering lighting.

To achieve this, place the light in the same the direction of your subject’s face. For example, If the subject is looking to the left of the camera, place the light to the left of the camera.

Short lighting example featured on Fashion Photography Blog (FashionPhotographyBlog.com)
Short lighting diagram featured on Fashion Photography Blog (FashionPhotographyBlog.com)
Lighting type guide featured on Fashion Photography Blog (FashionPhotographyBlog.com)

If you want to know more about Kickers, Rim, Hair, and Background lights, check our post on Types of Light.

As always, if you have any questions, feel free to shoot me an email.

– Alana


IMAGE SOURCE:

Feature image & image 1: photography by Alana Tyler Slutsky from her Surrealia series. To view the rest of the photos from this series visit her website.

Image 2-8: Alana Tyler Slutsky


Fashion Photography Blog

 
Comments Off on Split, Broad & Short Lighting Techniques

Posted in Uncategorized


Seven photographic hacks, one short video

08 May

Screen_Shot_2014-05-07_at_10.08.35_AM.png

Photographers love simple solutions to challenging problems. How many of us have saved a shoot with a strip of duct tape and a piece of cardboard? This three-minute video shows seven clever photographic ‘hacks’ – from using an egg timer and GoPro for a panorama to creating a Gary-Fong style diffuser with a Tupperware container to creating a neutral-density filter out of welder glass and rubber bands. Learn more

News: Digital Photography Review (dpreview.com)

 
Comments Off on Seven photographic hacks, one short video

Posted in Uncategorized


Life is too Short to be Taking Photos of Great Subjects in Bad Light

10 Apr

Sometimes the lessons are so basic, they are overlooked. This is one I feel needs to be repeated for new photographers as well as a gentle reminder for those of us with decades of shooting experience.

Peter-West-Carey-_MG_5589

Photography is the process of recording light. It is the same with your eyes, every waking moment of every day you use them. You see subjects around you and mentally are so busy classifying and figuring them out (“What a beautiful red Ferrari! Is it slowing down for a right hand turn?”) that when it comes time to lift a camera to your eye, you forget to stop and think about what is really going on.

You make pictures of light first

Of what are you really taking photos? You are taking photos first and foremost of light. Most of the time it is light reflected off of a subject but sometimes it is of the light source itself (e.g. sunsets, light painting, fireworks, etc.). In the case of the former, you need to remember the subject itself might be interesting, but if the light is ‘bad’ then the subject doesn’t stand a chance.

Let me illustrate by example. These images are of the Olympic Mountain Range in Washington State, where I live part of the time. They are beautiful this time of year, when it’s not raining so much we can’t see them, and when they still have a full coating of snow for contrast. I took the pictures at different times of day of the exact same subject, but the results are different each time.

Sunrise 6:12AM

Sunrise 6:12 a.m.

After Sunrise 7:04AM

After Sunrise 7:04 a.m.

Nearing Mid Day 10:28AM

Nearing Mid Day 10:28 a.m.

An Hour Before Sunset 6:10PM

An Hour Before Sunset 6:10 p.m.

The Morning Before At Sunrise 5:59AM

The Morning Before At Sunrise 5:59 a.m.

Light changes throughout the day

The images were all processed exactly the same and while the color balance naturally changed, what is most dramatic is the change in light and effect it has on the impact of the image.

A great photographer always thinks about light, even when she or he doesn’t have a camera up to their eye. It is light that makes the photo. The great thing about it is there is no ‘perfect’ that need be obtained in this regard. There is simply different light which will impart a different feel to the subject and whether or not you like that light.

What if the light is bad?

Sometimes it is the tone of the light, or the angle, or the intensity, or the temperature. The best practice for taking the best picture possible of a given subject, in my mind, goes something like this, “Wow, that’s a beautiful subject! Does the light work right now?”

This process has stopped me from taking more bad pictures than I can count. This is because I have reviewed thousands of my own crappy images with bad light, but great subjects, that this process has been cemented into my mind.

The next time you are enamored by a fabulous subject, ask yourself, “Is this the best light for this subject?” If not, your photos will be lackluster. If the light is not right, find a time or place where it will be better. If the situation won’t allow for great light, set your camera down and just admire the subject that caught your attention in the first place.

Life is too short to be taking photos of great subjects in bad light.

The post Life is too Short to be Taking Photos of Great Subjects in Bad Light by Peter West Carey appeared first on Digital Photography School.


Digital Photography School

 
Comments Off on Life is too Short to be Taking Photos of Great Subjects in Bad Light

Posted in Photography


Short Film Explores Intersection of Fashion & Architecture

14 Nov

[ By Steph in Art & Installation & Sound. ]

Kaplinski Fashion Architecture Film 1
Fashion and architecture intersect in a short film called Kaplinksi, wherein models wear and then break out of architectural structures made of children’s wooden blocks. The film is a collaborative work between filmmaker Benjamin Seroussi and architect David Tajchman, and features abstract, geometric Constructivist design from the Soviet Union circa 1920.

Kaplinski Fashion Architecture Film 2

Kaplinski Fashion Architecture Film 3

The four-minute black and white film explores both the human body as a framework for architecture, and architecture as a cage. Abstract cities and skyscrapers form around the models, and begin to self-destruct. Constructivism inspired both the photography and the look of the film.

Kaplinski Fashion Architecture Film 4

Kaplinski Fashion architecture film 5

The blocks used in the film are ‘Kapla blocks,’ small pine rectangles of identical size and shape that are stacked rather than interlocking, so any structures made with them are temporary and rather fragile. The name of the film refers both to these bricks and to the Russian influence of the aesthetic.

Share on Facebook


[ By Steph in Art & Installation & Sound. ]

[ WebUrbanist | Archives | Galleries | Privacy | TOS ]


WebUrbanist

 
Comments Off on Short Film Explores Intersection of Fashion & Architecture

Posted in Creativity


Why are my Buildings Falling Over? A Short Guide to Perspective Distortion and Correction in Photography

07 Aug

A guest contribution by Misho Baranovic, co-developer of the Perspective Correct app and author of the iPhone Photography DPS eBook .

Perspective Photo1

I’ve read a lot of perspective correction articles over the past few days and my head is spinning from the technical explanations, illustrations and equations.   In this article, I’m going to keep it simple and talk about the role that perspective plays in photography.  

What is Perspective?

Perspective is one of the many ways that the human eye can judge depth within a scene.  Perspective is something that we can see with one eye (monocular) rather than two (binocular).  It refers to the angle and location of parallel lines within a scene.  The eye registers depth when parallel lines start moving towards each other (converging).  An example would be standing on a straight road, looking down the road, and noticing how the road narrows as it gets further away from you.

Perspective Photo2

In art and photography, Linear Perspective refers to the way lines are drawn and captured to show an objects perceived size within space. In short, how we translate real world depth into a flat picture. Linear Perspective is made up of two basic concepts, the horizon line and vanishing point.  The horizon line represents the viewing angle of the observer.  Vanishing points are the point (on a horizon line) where parallel lines meet (converge). For example, the point where the two sides of the straight road meet (as shown below).

Perspective Photo3

One of the key visual cues in Linear Perspective is that vertical lines and edges remain vertical in the scene. The only time you would have vertical lines coming together is if you are trying to show a triangular or pyramid shape within the scene, like the angle of a building’s roof or the shape of the Eiffel Tower.

Perspective Photo4

Since the start of photography, camera and lens makers have focused on replicating the visual cues of Linear Perspective in order to make photos look as ‘true to life’ as possible. Nearly all modern lenses are rectilinear – they capture straight lines in a scene as straight lines in a photograph.  Whether wide angle or zoom, DSLR or iPhone, lenses are designed to keep lines straight, which helps the eye judge depth within a two dimensional scene. The fisheye is the most popular non rectilinear lens as straight lines are shown as curved from the extreme field of view.

Perspective Distortion

For this article I’m going to focus on only one form of photographic perspective distortion – perspective convergence or keystoning.  This form of distortion is very common across architectural, street and travel photography.  It’s most often seen when tall buildings ‘fall’ or ‘lean’ within a picture. This distortion has become so common that most people have stopped noticing it within their pictures or just think it has something to do with the focal length of their lens. For example, you can see the extent of the vertical convergence below when the verticals are outlined in white.

Perspective Photo5

Perspective Photo6

For a number of photographers, vertical convergence and distortion are unpleasant and unwanted because they don’t conform to Linear Perspective cues where vertical lines remain vertical.  This makes the scene look different to how we think it should look.  While this distortion can be used creatively, corrected photos often look ‘right’ to the viewer (see below).

Perspective Photo7

Why does Distortion Happen?

It’s actually pretty simple.  As mentioned, modern lenses are designed to show straight lines.  However, this only works when we the camera is pointed straight at (in line) with the object that is being photographed. This is because the distance between the camera and object remains the same.  As soon as the camera is titled then the distance changes.  Let me explain, if I’m trying to capture a tall building straight on with my camera I can only get the bottom section – vertical lines are straight but I’m missing the rest of the building. Now if I angle the camera higher I can get the whole building into the frame but now the vertical lines (sides of the building) are converging.  Why?  It’s because the top of the building is now further away from the lens than the bottom – just like the road receding into the distance.

So how do you take a photograph of a tall building without this happening?  There are a few ways.  The most obvious is by changing your viewpoint.  You need to get higher to shoot more of the building front on, with the mid-point being the best place to capture the maximum amount of the structure.  You could shoot out the window of a neighbouring building, or if there is nothing around you could spend some money on a crane!

Perspective Photo8

This photo was taken from the third floor of a neighbouring block. You can see that all the verticals in the photo are straight.

If you can’t physically get higher then you can change your viewpoint in two other ways.  One is with the help of shift lenses the other is through perspective correction software.

Shift Lenses

The ability to shift the position of the lens has been around since the beginning of photography.  The original view cameras (created in the 1840s) used a bellows system which let photographers change the position (shift) the lens in relation to the film. The shifting mechanism acted like a mini elevator, moving the photographer’s viewpoint higher and lower. Historically, shifting in order to correct perspective convergence was seen as an important part of the capture process, just like focus, shutter speed and aperture. Shifting was possible because the lens captured a much larger (circular) field of view than the film. The same way that modern shift lenses work.  Modern shift lenses are commonly used by architecture photographers to limit vertical convergence on large buildings. However, these lenses can only be used on DSLR or medium format cameras and can also be very expensive (upwards of $ 1,000).

Perspective Photo9

Here you can see the mechanical shift mechanism on an SLR lens – Photos by Bengt-Re

Software Correction

In recent years, digital technology has been able to replicate this shifting process, artificially changing the photographer’s viewpoint.  Software like Photoshop, Lightroom or Gimp reworks the pixels in an image in order to straighten vertical lines in turn reducing distortion.  Most of these programs allow you force the image back into a ‘correct’ position through either sliders or by selecting and dragging a corner.  One of the downsides of the software is that significant adjustments require resampling of the image, often reducing sharpness in parts of the photograph.  

Perspective Photo10

Camera Distortion Correction with Photoshop Elements 11

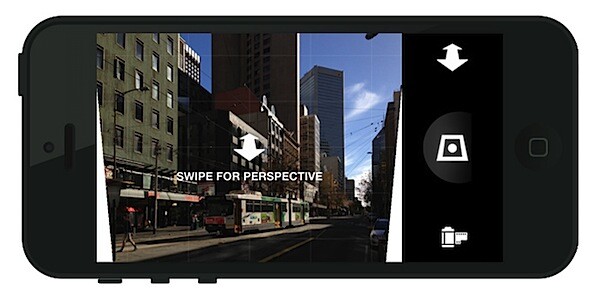
For photographers that either shoot or edit photos on their mobile phones, the Perspective Correct app for iPhone uses the touch interface to adjust both vertical and horizontal convergence within an image.  For example, an up/down swipe on the screen represents the same movement as the shift mechanism on a lens. 

201308011644.jpg
While it’s easy to overlook, small perspective adjustments can often be the difference between good and great urban and architectural photographs.

…………………………………….

Perspective Correct is the first app to offer live perspective adjustment of your photos and is available for download from the Apple App Store for US $ 1.99

Post originally from: Digital Photography Tips.

Check out our more Photography Tips at Photography Tips for Beginners, Portrait Photography Tips and Wedding Photography Tips.

Why are my Buildings Falling Over? A Short Guide to Perspective Distortion and Correction in Photography


Digital Photography School

 
Comments Off on Why are my Buildings Falling Over? A Short Guide to Perspective Distortion and Correction in Photography

Posted in Photography


Time-Lapse Tagging: Short Film Reveals Secrets of Graffiti

29 Jul

[ By WebUrbanist in Art & Street Art & Graffiti. ]

time graffiti artist ladder

You see the finished pieces all over – ornate, curved and layered – but rarely get such a vivid and complete all-angle, real-time view of how their tags come together. If you are even remotely interested in graffiti, this behind-the-scenes video with its shifting point of view is well worth a few minutes of your time.

time lapse graffiti mural

Featuring Melbourne street artist Sofles and directed, filmed and edited by Celina Mills of Unity Sound & Visual, this video provides a whirlwind four-minute window into the creative process behind tagging. Instead of a static shot of a single tag, though, the camera follows the artist from wall to wall, into an abandoned building and more.

time lapse tagging video

What makes it really remarkable, though, is that it gives you a tour of different scenarios and contexts for various styles and types of graffiti creation. It features interior and exterior settings as well as canvasses ranging from blank to brick to already-painted – so you can see what happens from start to finish in all kinds of urban situations.

Share on Facebook


[ By WebUrbanist in Art & Street Art & Graffiti. ]

[ WebUrbanist | Archives | Galleries | Privacy | TOS ]


WebUrbanist

 
Comments Off on Time-Lapse Tagging: Short Film Reveals Secrets of Graffiti

Posted in Creativity


Canon EOS 60d Video Test Short Film (18-200mm Lens at 720p HD at 30fps)

09 Feb

This is the first actual video I’ve put together (with the help of a friend w/ editing) with my Canon 60d. It shoots GREAT video in 1080 @ 30fps and 720 @60fps. All of these were shot with the 18-200mm lens (that came in the kit) on Sanibel Island Florida and Ft. Meyers Florida. LOTS more 60d HD videos to come so subscribe to check em out right when they do!!
Video Rating: 5 / 5