RSS
 

Posts Tagged ‘Shooting’

Canon announces development of EOS R5 with ‘8K’ video and 20fps shooting

13 Feb

Canon has announced the development of the R5 – a flagship RF-mount mirrorless camera capable of 8K video and 20fps stills shooting. Details are scant, but the new camera is expected to be released at some point this year.

Rumors have been swirling about an upcoming R-series camera for a while, and although we were skeptical about the ‘8K video’ claim at first, it seems that the R5 will, indeed, offer some kind of 8K video capture option.

Canon’s press release is rather non-specific when it comes to details, referring to the ability of photographers ‘to extract high-resolution still images from video footage as well as process 8K video into higher-quality 4K video’. As such, it’s possible that for practical purposes, the R5’s main selling point will be 2X oversampled 4K, but we’ll find out soon enough.

To natively sample 8K video (usually defined as 7680 x 4320 pixels) would require a 7680 x 5120 pixel sensor. This being the case, we can make a pretty good guess that effective resolution of the R5 will be ~40MP.

Alongside the R5, Canon is also teasing ‘9 RF lenses’ coming later this year, including a new telezoom – the RF100-500mm F4.5-7.1 L IS USM. Samples of the R5, the 100-500mm, and two new RF Extenders (1.3X and 2X) are expected to be shown at the CP+ show in Yokohama, Japan, later this month.

Press release:

Canon announces development of the EOS R5 next-generation full-frame mirrorless camera and new RF series lenses

TOKYO, February 13, 2020 — Canon Inc. announced today that the company is currently developing the EOS R5 full-frame mirrorless camera—containing CMOS sensor, image processing, optical and other state-of-the-art technologies the company has cultivated through its long history of camera development. What’s more, during 2020, Canon plans to release a total of 9 RF lenses currently in development. Through the addition of competitive cameras and lenses to its lineup, Canon will continue to strengthen the EOS R System.

The EOS R System enables greater freedom in lens design thanks to a wider lens mount diameter, short back focus and high-speed system for transmitting data between the camera and lens, resulting in an imaging system that delivers higher image quality and greater ease-of-use.

The new full-frame mirrorless camera currently under development will fully leverage the advantages of the EOS R System to realize high-speed continuous shooting and 8K video recording and expanding the boundaries of visual expression. In addition, it can contribute to more efficient workflows thanks to improved transmission functionality, operability and reliability. These enhancements and more will help the new camera elevate the EOS Series concept of “Speed, Comfort and High-image-quality” to a higher level.

Canon’s EOS R5, the first of the next-generation full-frame mirrorless cameras in the company’s EOS R System, will include a newly developed CMOS sensor that makes possible such advanced features as high-speed continuous shooting—up to approximately 20 frames per second (FPS) using an electronic shutter and up to approximately 12 FPS using a mechanical shutter—to facilitate shooting of athletes at sporting events and other fast-moving subjects. In addition, the camera’s 8K video capture capability will enable users to extract high-resolution still images from video footage as well as process 8K video into higher-quality 4K video, opening up new possibilities for visual expression. What’s more, the EOS R5 will be the first Canon camera equipped with a high-performance coordinated image stabilization (IS) system that integrates the camera’s in-body IS with IS systems on attached RF lenses. The camera will also feature dual media card slots and will support automatic transfer of image files from the device to the image.canon cloud platform (to be available from early April 2020).

Alongside the EOS R5, Canon is also developing a total of 9 RF lenses scheduled for release during 2020, including the RF 100-500mm F4.5-7.1 L IS USM, Extender RF 1.4x and Extender RF 2x.

Additional Information

Reference exhibits for the EOS R5 and RF 100-500mm F4.5-7.1 L IS USM, Extender RF 1.4x and Extender RF 2x will be on display in the Canon booth at the CP+ Camera and Photo Imaging Show 2020, to be held from February 27 to March 1 at the Pacifico Yokohama convention hall in Yokohama, Japan.

Articles: Digital Photography Review (dpreview.com)

 
Comments Off on Canon announces development of EOS R5 with ‘8K’ video and 20fps shooting

Posted in Uncategorized


Canon EOS R5 on the Way, With a 45 MP Body and 20 FPS Electronic Shooting

05 Feb

The post Canon EOS R5 on the Way, With a 45 MP Body and 20 FPS Electronic Shooting appeared first on Digital Photography School. It was authored by Jaymes Dempsey.

canon-eos-r5-news

After months of vague rumors regarding upcoming Canon mirrorless bodies, we now have specifics on a camera, right down to the name:

The Canon EOS R5.

While still unconfirmed by Canon, the EOS R5 is shaping up to be a powerhouse of a mirrorless camera, sporting a 45-megapixel full-frame sensor, in-body image stabilization (potentially 5 stops, and 7-8 stops with a combined IS lens), and 20 frames-per-second continuous shooting with the electronic shutter (12 frames-per-second with the mechanical shutter).

In fact, the EOS R5 appears to correct most (if not all) of the faults of Canon’s first full-frame mirrorless body, the EOS R:

First, instead of a single card slot, we’re on track to see dual slots in the R5. This is a necessity for pretty much any photographer who requires redundancy in their work, such as professional wedding shooters (after all, you can’t reshoot that big day if your card fails!), as well as professional sports photographers.

The programmable touch bar on the back of the EOS R, which received significant criticism following the R’s release, will be replaced by a scroll wheel.

And, as mentioned above, we should see some impressive IBIS, something which the EOS R left out, and which plenty of shooters see as a key trait in mirrorless bodies.

Astonishingly, the EOS R5 is reported to shoot 8K video at 30 fps and 4K video at 120 fps. While the details of these specs aren’t certain, 8K video of any kind would be a significant upgrade from the Canon EOS R, which offers 4K video at 30p.

So who is the EOS R5 for?

From the specs listed above, it’s clear that the EOS R5 will be aimed at professional shooters. The dual card slots and high continuous shooting rate suggest a body designed for serious sports photographers, wildlife photographers, and some wedding photographers. And while no details on the autofocus system have been released, I suspect that we’ll see something impressive, even compared to the excellent AF offered by the EOS R.

As far as the release date goes, the Canon EOS R5 will supposedly be announced in mid-February, several weeks prior to the late February CP+ show. The camera will likely ship in July.

The post Canon EOS R5 on the Way, With a 45 MP Body and 20 FPS Electronic Shooting appeared first on Digital Photography School. It was authored by Jaymes Dempsey.


Digital Photography School

 
Comments Off on Canon EOS R5 on the Way, With a 45 MP Body and 20 FPS Electronic Shooting

Posted in Photography


Sony releases new wireless shooting grip for select mirrorless cameras

14 Jan

Sony has launched the GP-VPT28T, a new wireless shooting grip designed to work with a number of Sony cameras. The grip, which also serves as a tripod, uses Bluetooth connectivity to wirelessly control the shutter, zoom and more on compatible cameras.

Specifically, the grip can trigger both photo and video capture, control zoom on compatible cameras, and trigger a custom setting using the dedicated ‘C’ button on the face of the trigger. There’s also a ‘Lock’ button to ensure you don’t accidentally trigger the camera.

The grip is dust-and-water-resistant and works with the following Sony cameras: a9 II, a9, a7R IV, a7R III, a7 III, a6600, a6400, a6100, and RX100 VII.

The GP-VPT2BT Shooting Grip With Wireless Remote Commander is set to ship this month in North America for $ 140 ($ 180 CAD).

Articles: Digital Photography Review (dpreview.com)

 
Comments Off on Sony releases new wireless shooting grip for select mirrorless cameras

Posted in Uncategorized


Shooting with the Olympus OM-D E-M5 Mark III in Sonoma County

14 Jan

From rolling vineyards to redwoods to ocean views, Sonoma County is a stunning place to photograph. For restaurateur and cyclist Remi McManus, it’s also a much-needed escape from the stresses of his day-to-day work. On a recent trip, he brought along the Olympus OM-D E-M5 Mark III to capture the sights on a ride through the region, getting better acquainted with its beauty (and wines), as well as the scars that remain after the recent wildfires.

Sample images from this video

$ (document).ready(function() { SampleGalleryV2({“containerId”:”embeddedSampleGallery_0971220987″,”galleryId”:”0971220987″,”isEmbeddedWidget”:true,”selectedImageIndex”:0,”isMobile”:false}) });


This is sponsored content, created with the support of Amazon and Olympus. What does this mean?

Articles: Digital Photography Review (dpreview.com)

 
Comments Off on Shooting with the Olympus OM-D E-M5 Mark III in Sonoma County

Posted in Uncategorized


Gear of the Year: what we loved shooting with in 2019

04 Jan

Each year DPR staff pick the gear they most enjoyed shooting with over the past year – and that’s the only criteria. It doesn’t have to be the best or fastest, just enjoyable. Here are all of our 2019 picks in one place.

Articles: Digital Photography Review (dpreview.com)

 
Comments Off on Gear of the Year: what we loved shooting with in 2019

Posted in Uncategorized


Photographer David Burnett on shooting his third impeachment: ‘I felt that historic pang’

16 Nov
© 2019 David Burnett/Contact Press Images

It’s not every day that you see someone using a 4 x 5 film camera on TV, and certainly not during the coverage of one of this years’ most-watched events: the opening on Wednesday of the public phase of the house impeachment enquiry into President Donald Trump. But as diplomat William Taylor and State Department official George Kent took their seats, our eye was caught by one figure among the crowd of photographers jostling for a shot, and his camera.

After some quick Twitter research, we identified him as David Burnett, multi award-winning photographer, and veteran of three impeachment hearings. His camera? A custom-made ‘Aero Liberator’. We caught up with David on his drive back to New York after the hearings to learn more about his work, his approach to photography, and that camera.

The following interview has been lightly edited for clarity and flow.


When did you start shooting large format film?

I’ve been shooting with my Speed Graphic for 15, 16 years. I started in 2003-4 doing politics, then I did the Olympics, and some presidential stuff – John Kerry and George Bush. I won a bunch of World Press Photo prizes in 2004-5, ‘Best Sports Story’ with the pictures taken with my Speed Graphic. Along the way I met this guy called John Minnicks, who I happily describe as a mad scientist, who takes a camera and then makes it into something else. John made me this camera, which he calls the ‘Aero Liberator’.

He figured out a way to make it using a Graflex Super D, which is a sweet little camera, and just such a beautiful little thing. So he puts the Aero Ektar lens on it. I’m sort of responsible for the re-birth of that lens in the past 15 years, because for my Speed Graphic, I was getting tired of shooting slow lenses. So I looked around, and I found this F2.5 lens, from a WWII reconnaissance camera.

There must be easier ways of working, as a photojournalist….

If you’re shooting with film holders, you have created for yourself a major impediment. Nobody did that to you, you did it to yourself. And in a way, you could say to yourself ‘well that was kind of a dumb move, why can’t you just shoot cool digital cameras like everybody else?’ And I’ve got Sony a7s and a9s and I love those cameras. But one frame, having the wherewithal and the guts to slow down and figure out when that one frame is supposed to be shot, that’s the real deal.

WW1 re-enactors at the 2019 Veteran’s Day Parade, New York City.
© 2019 David Burnett/Contact Press Images

So the other day, I walked up and down 5th Avenue during the Veterans Day parade, I shot 18 frames. I’ve been shooting this stuff for 15 years now. You could ask why would you tie one hand behind your back by working like that? When you force yourself to step up to that challenge, and you get a picture – and you don’t always get a picture! I may not have anything from today, in which case my so-called ‘heroic’ actions will have been for naught! But it’s worth a try.

I’ve been doing this a long time, and I love being fired up enough to still want to do something a little different, and a little challenging.

Did you know that you were featured in the live stream from the hearing?

I had no idea that I was on-camera. We’d all just gotten into the room to figure out where we were going to be. I was just standing there with my camera, and I’d brought along my little Sony a6500, which today I was using with an old 1940s Kodak Cine lens, a 50mm F1.6 Anastigmat. It’s very fun! It rekindles the fun, and makes it challenging.

David Burnett at the opening of the house impeachment hearings on Tuesday November 12th, with his custom ‘Aero Liberator’ 4 x 5 film camera. (NBC News)

Your first color assignment was covering Apollo 11, and that was 50 years ago…

I know, that was a long time ago!

What keeps you doing it?

I don’t know if you’ve seen the wonderful movie that Stephen Wilkes did about Jay Maisel? It’s called ‘Jay, Myself’. There’s a wonderful moment in there when Jay says ‘I love photographs, but I really love photographing’. You have to decide which is your dominant personal motivation. And watching the movie I was thinking ‘well, I know which one I would choose – I wonder if I chose the right one?’

There are many times when you don’t get the picture, but the act of being there and trying to get it is not a bad thing.

I love photographing. I’d prefer to be paid for it, but there are times when it’s pretty clear I’m not going to be paid for it and if I want to go shoot something, I’ll go shoot it. There are many times when you don’t get the picture that you want, but the act of being there and trying to get it is not a bad thing. Just be happy to share and discover.

Were you on assignment today?

No, that was just me. I was at the Nixon hearings, and Clinton, and I felt that historic pang.

So this is your third impeachment?

I will be my third, yeah! But it’s not really about politics for me. I’ve been going to the white house for 52 years. The only thing I care about is how I feel when I walk through the North West gate. It’s always special. I’ve been there for Nixon, Johnson, both Bushes – everybody. For me it’s about the institution, and how it still works. That’s the cool thing. That’s really what draws me to politics. Eventually you’ll find yourself in a place where for 200 years people have been doing the same thing.

It’s a great tradition to be able to walk into that place with a camera and try not to get to beat by everyone around you. And that happens a lot! Turns out there are a lot of really great photographers, men and women, that work there.

President Lyndon B. Johnson at a joint session.
© 2019 David Burnett/Contact Press Images

Watching you in the footage today, I’m interested to know about your process.

With this camera, it’s a mirror reflex so you look down into it from overhead. I kind of eyeball it, roughly, then I’m just looking at Ambassador Taylor to see if I can identify a moment which might be more interesting than half a second ago, or half a second from now. A thing like this, where you don’t have long, and then you have to back away, I try to get my focus where I think he’s going to be, but I don’t always shoot right away. You’ve got one shot, and by the time you’re ready for the next one that’s maybe 20 or 30 seconds. I can do it pretty quickly, I’m not bad with it, but there’s a lot to do on those cameras.

The ‘Speed‘ Graphic? I mean – compared to what? Well, compared to what came before it, it was pretty good.

Natalie Coughlin, Olympic Gold Medalist.
© 2019 David Burnett/Contact Press Images

What kind of reaction does the old film equipment get?

When you bring out a camera like that, people tend to give you a second of hesitation, before they say ‘no’. It puts you in a slightly different place as a photographer, as a journalist and an artist. Compared to if you were showing up with the usual three or four digital cameras and all that stuff. ‘OK, this is a little different’. And it’s much appreciated, by me. As long as you don’t drop it, or do something stupid, it definitely gives you a little bit of an edge.

I was the only guy at the Olympics to get a letter saying ‘he’s authorized to carry a tripod’.

It’s hilarious – I used to carry my Speed Graphic around at the Olympics. I was the only guy at the last three Olympics to get a letter from the Olympics chief saying ‘he’s authorized to carry a tripod’. It’s been great, I made a few really good pictures, and maybe you could have made the same picture with a digital camera, but when you see all the flaws that can happen [with large format film] it has more of an honesty about it. There are 100 things that could go wrong, and any one of them can really screw you up.

If it turns out that you didn’t get any shots from today, how would you feel?

Well, I looked at my digital pictures already, and honestly, I’m going to look at the papers tonight and tomorrow and see who made a great picture. There was some real talent in that room. I mean real talent. Doug Mills, Damon Winter – those guys, it’s hard to do better than either of them. Scott Applewhite from AP was there, there were some really good people in the room.

So if I don’t get anything, I won’t feel like a total schmo but I’ll be a little disappointed. But I made a couple of good pictures at the veterans parade on Monday and that kicked me in the ass to decide to go give it a try.

How long before you’ll know?

Well it’s Wednesday night now, so maybe Friday afternoon if I’m lucky. I’ll let you know!

Visit David Burnett’s website to see more of his work

Learn more about the Aero Liberator by John Minnicks

Articles: Digital Photography Review (dpreview.com)

 
Comments Off on Photographer David Burnett on shooting his third impeachment: ‘I felt that historic pang’

Posted in Uncategorized


17 Tips for Shooting Better Urban Portraits

11 Nov

The post 17 Tips for Shooting Better Urban Portraits appeared first on Digital Photography School. It was authored by Matt Murray.

tips-for-shooting-better-urban-portraits

Are you interested in doing an urban portrait shoot, but you’re not sure where to start? An outdoor shoot in your local town or city is a great way to be more creative, think on your feet, and come away with some unique images that you can’t get from a shoot in a studio or your local park. However, If you’ve never done one before, you may be a little daunted. In this guide, I run you through my top tips for shooting better urban portraits.

One way to make sure your talent is relaxed at the start of the shoot is by asking them to smile and getting some fun shots to kick things off.

1. Have a vision for the images you want to shoot

Begin with the end in mind. Create a mood board of urban portraits using a free tool such as Pinterest. These could either be your images or inspirational images from other photographers. Keep these in mind as you plan your shoot, as this is the standard you’ll be aiming for.

2. Location scouting

Before you plan your shoot, get an idea of the type of urban landscapes in your area. What kind of images could you take here? How could the buildings and street scenes feature in your photographs as a point of interest or as a background texture?

Every town and city has its unique charms – from heritage buildings to seaside piers to abandoned shopping centers. Find what’s interesting about your area and use it.

You can find out more about what I look for when scouting locations in my previous dPS article, How to Choose Urban Landscapes for Portrait Photography.

tips-for-shooting-better-urban-portraits

There’s always something of interest to shoot. Open up to the creative possibilities in your town.

3. Find talent for your shoot

The easiest way to find someone for a shoot is by asking family or friends. This way, the pressure is off, as you have someone familiar to work with that you can test your ideas on. Make sure you ask someone that is not too shy or self-conscious, though; after all, it will involve posing for photographs in a public location.

If you’re ready to test your urban portrait skills with a model, organize a TFP (time for print) shoot. These have been around since the pre-digital days, when photographers, models, and make-up artists would collaborate and give their time for free in exchange for physical prints of images taken during the shoot. These days, images from TFP shoots are usually digital files shared over the internet.

Finding people to work with should be relatively easy. Most cities have photographer and model groups on Facebook. Type the name of your area with the words model or photographer and see what comes up. If you have no luck, you can also ask in general photography groups if anyone knows of a TFP-style group you could join.

Image: In this image, I have lit Alyssa with a video light. Fujifilm X-T3 with a 35mm f1.4 lens.

In this image, I have lit Alyssa with a video light. Fujifilm X-T3 with a 35mm f1.4 lens.

4. Ask for expressions of interest

Once you’ve joined a local Facebook group, have a scan of the posts and see if it’s the kind of community you wish to work with. If you feel comfortable, it’s time to post your expression of interest.

Create a post introducing yourself and calling for expressions of interest in a TFP urban portrait shoot. Link to examples of your work and your Instagram.

Let people know specific details about the shoot. This includes the approximate location, proposed days and times, and the types of shots you’re looking to get. You can also link to or share images from your mood board on the post to set an expectation of the kind of shots you’ll take. If you use images on the mood board that are not yours, make sure you credit the photographer and explicitly state whose work it is.

Finally, ask people to comment on the post or send you a private message, expressing their interest. Also, ask them to link to their Instagram or portfolio.

tips-for-shooting-better-urban-portraits

Safety is important on any shoot – never put yourself or your talent in danger to get a shot. I took this image with the model on the footpath.

5. Arrange details for the shoot

After you’ve chosen whom you’d like to work with, organize the shoot. Agree on the day, time, and location. Prepare to negotiate regarding which day you can shoot, but not on the time. Always choose the time of day that you know will work best for photography. For me, that’s about an hour before dusk as this provides opportunities for natural light and after-dark images.

If the model is under 18, check that their parent or guardian is coming along and that they will be able to sign a model release form.

Ask your model what they’re planning to wear for the shoot. Quite often, they will ask for your advice or provide you with options. Explain that it would be ideal to have two or three different looks. Some people will prefer to have completely different outfits for the first and second half of the shoot (if there is somewhere to change). For others, it means bringing along some fun accessories like glasses, sunglasses, a hat or jacket.

If you’re arranging a shoot a week or two in advance, don’t forget to stay in touch with your model. Remind them a day or two before the shoot.

tips-for-shooting-better-urban-portraits

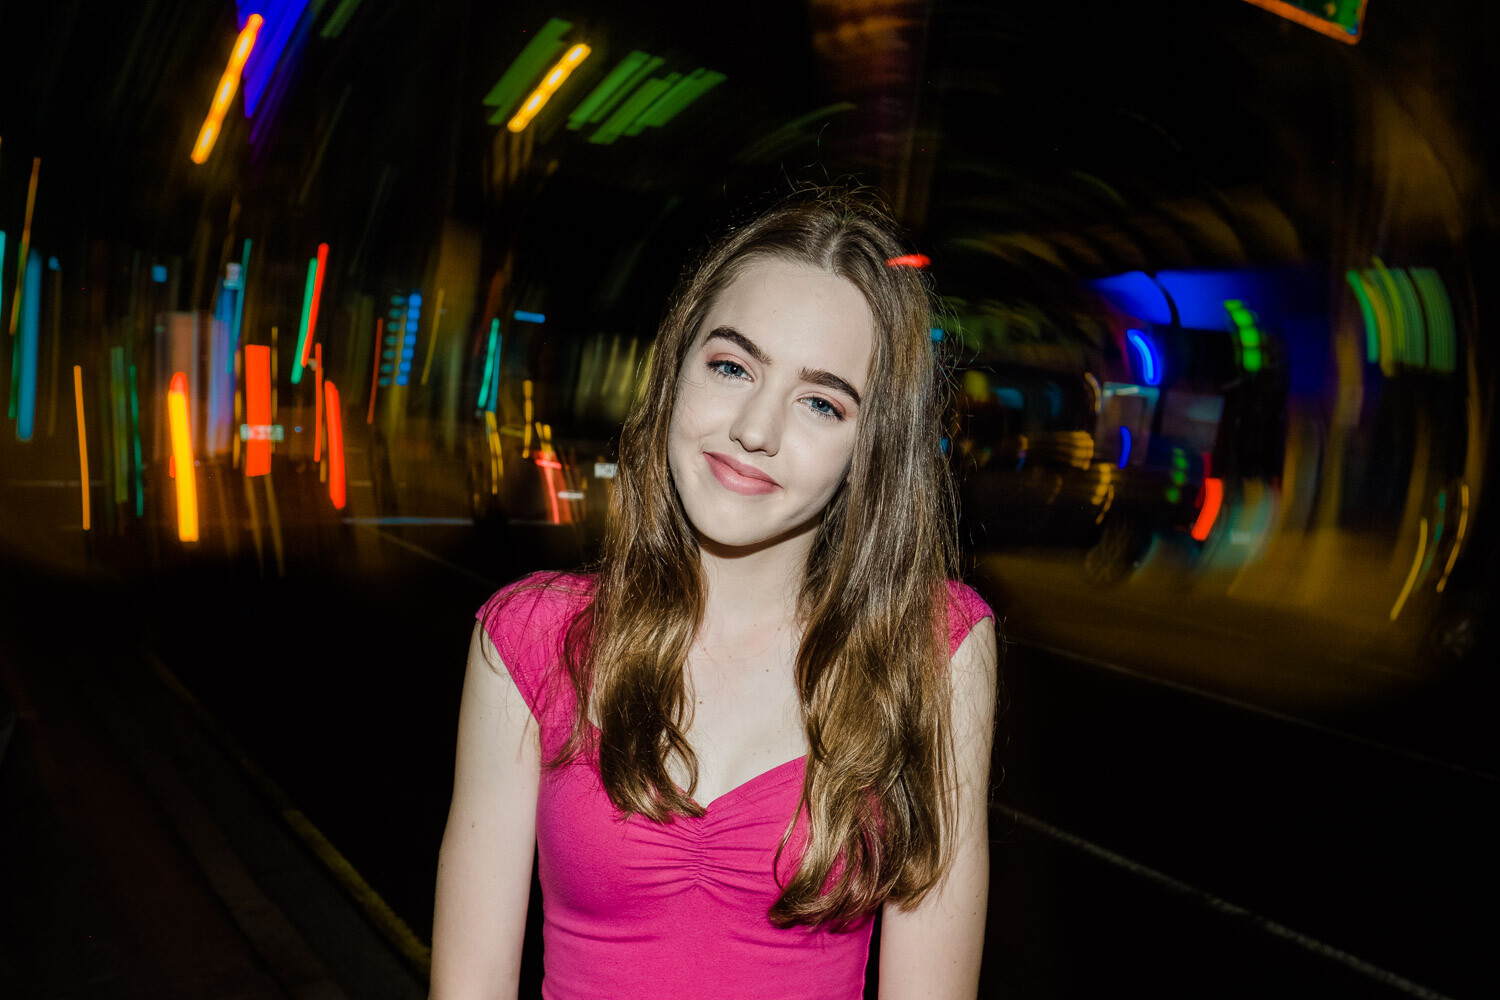
Sunglasses can be very handy on a shoot – especially when there are neon signs! Anneke, Brisbane. Fujifilm X-T3 with a 56mm f1.2 lens.

6. Have a plan

Think back to your location scouting. Have a list of 8-10 places where you’d like to shoot that are within walking distance of each other. Draw a map in your notebook and plan your route and the types of shots at each place. Typically, I only shoot in 6-8 locations, but I like having a couple of options up my sleeve in case some don’t work out.

Finally, don’t be afraid to throw your plan out the window if a better opportunity presents itself.

17 Tips for Shooting Better Urban Portraits

7. Plan your kit

It’s tempting to take as much kit as you can carry on an urban portrait shoot. However, strike a happy medium between taking enough kit to give you options without having to hire a Sherpa to carry your gear.

I typically take two camera bodies (Fujifilm X-T3 and X-T2) with prime lenses, with a third lens in my bag. My lenses of choice are usually the Fujinon 16mm f1.4 for wide-angle and environmental portraits, and either the 35mm f1.4 or the 56mm f1.2 lenses for portrait work. With the APS-C crop factor, these work out to 24mm, 52.5mm, and 84mm equivalent lenses in full-frame terms.

Although I love zoom lenses for family portrait shoots, I only take fast prime lenses on urban portrait shoots.

Double-check all your camera settings when you pack your gear. Things I check are:

  1. I’ve selected the same JPG film simulation on both cameras,
  2. I have the same auto ISO settings,
  3. JPG + RAW is selected in the image quality settings.
  4. There are spare formatted SD cards and spare batteries in my bag
  5. I have model release forms and a pen.

8. Get to know whom you’re photographing

Make sure you turn up early – you won’t make a good impression if your talent is waiting for you and wondering if you are going to turn up or not. Get to know your model and their chaperone. Everyone can be a bit nervous at the start of a shoot, so have a good chat with them before you even think about pulling out a camera.

9. On the shoot

Remember, on these kinds of shoots, you don’t need quantity, you need quality. I aim to get a dozen images I’m really happy with. This means potentially shooting in a different way than you usually would. Take your time with directing the model and getting the composition right before taking the shot.

Make sure you get a variety of shots – close-ups, full length, looking to the camera, looking away. Also, remember to get some different looks by using any accessories the model has brought with them.

tips-for-shooting-better-urban-portraits

Make sure you get a variety of shots – not just close-ups.

10. Be prepared to direct the model

Directing talent is a skill you will need to learn – especially with younger up-and-coming models with limited experience. There’s no need to be worried if you have no experience doing this yourself. Get yourself the 67 PORTRAIT POSES (PRINTABLE) Guide from DPS to have on your phone (or print them), or have a stash of urban portrait images, ready to flick through to give your talent some ideas on how to pose.

17 Tips for Shooting Better Urban Portraits

11. Check your ISO and shutter speed

As the day moves into night, keep a check on your ISO and make sure you have usable shutter speeds above 1/80th of a second. The most annoying mistake I’ve made on these shoots is looking at the back of the LCD screen, thinking that I’ve captured a sharp image, only to see that the image wasn’t as sharp as I thought on my computer screen later on.

12. Limit any negative self-talk

Negative self-talk can affect us all. If you had an idea for an image, but it doesn’t work out on the shoot, move on and forget about it. Many images are still there for the taking.

13. Carry your own lighting options

For the first half of an urban portrait shoot, I rely on natural or ambient light. As darkness envelopes the urban landscape, I look to my own lighting options.

The first option I usually take is a speedlight flash that I can use on-camera, or trigger remotely. Typically, the light from these types of flashes can be harsh, so you may like to use a light modifier such as a mini softbox.

The second type of lighting that I use on my urban portrait shoots are small LED video lights. These are fantastic, and I love using them. Again, you can use one through a light modifier for a softer effect.

Image: Using an on-camera flash can lead to some creative effects.

Using an on-camera flash can lead to some creative effects.

14. Safety

Safety should be your number one priority on a shoot like this. Identify any hazards before the shoot and brief your model. The last thing you want is someone getting hurt. Be aware of your surroundings at all times. If you get a bad vibe from an area, it’s best to move on.

Never leave any of your bags on the ground unattended. A few moments of inattention is all an opportunistic thief needs.

15. Legal

Always operate your shoots legally. Research if you need any permits to shoot in your city, look into public liability insurance, and have model releases signed before the shoot.

16. Limit the shoot time

Keep the shoot between 60 and 90 minutes; you’ll be amazed at how fast this will go. It’s better to have it run shorter and end on a high than run it longer with everyone exhausted. For younger models, keep it to under 60 minutes.

tips-for-shooting-better-urban-portraits

Keep the shoot length to under an hour for younger people – modeling is very tiring!

17. Editing your images

I always try and get it right in-camera, with only minor edits made to images afterward. One decision you may have to make is how much you want to clean up the image in post. In the example below, there were a lot of cigarette butts on the ground. I decided to remove these in Photoshop to make a cleaner image.

17 Tips for Shooting Better Urban Portraits

tips-for-shooting-better-urban-portraits

In this image, I removed all the cigarette butts and other debris from the road as I felt it detracted from the image. Sasha, Brisbane, Fujifilm X100F lit by a Godox flash.

Conclusion

Urban portrait shoots are a lot of fun and can stretch your creativity as a photographer. They help you to think on your feet and overcome challenges. If you’ve never done one before, there’s no need to feel daunted. Do your research and planning, and it will all fall into place.

If you have any questions or comments about planning an urban shoot, let us know below.

The post 17 Tips for Shooting Better Urban Portraits appeared first on Digital Photography School. It was authored by Matt Murray.


Digital Photography School

 
Comments Off on 17 Tips for Shooting Better Urban Portraits

Posted in Photography


What is it like to come back to a DSLR after shooting mirrorless?

10 Nov
With the 18-135mm attached, the 90D is a larger camera than I’ve become used to carrying. It didn’t get the way of enjoying my vacation, though.

I’ve been a professional photographer since 2012, when the DSLR reigned supreme. The Canon 5D Mark III was my main body that I used exclusively for photography work. As my personal and professional interests gravitated towards video, I took the plunge and placed an order for the Sony a7R III in February 2018. A year later, I added the Fujifilm X-T3. Slowly but surely, those mirrorless cameras replaced my DSLRs as they better supported my overall vision of being a hybrid photo and video shooter.

However, the 2019 release of the Canon 90D piqued my interest. How was Canon’s DSLR technology faring in a world where many declare the DSLR to be on its way out? I took the 90D on vacation to Hawaii and committed to using it exclusively for a week. Here are my conclusions.

First impressions

The Canon 90D with the 18-135mm kit lens is both bulky and heavy. It’s not a discreet camera by any means. Many people (myself included) gravitate towards mirrorless cameras as they are smaller in size and weight, and the 90D immediately reminded me that the bulk of DSLRs is not something that I miss, especially when I’m on vacation.

There are times and places you don’t want the bulk of a DSLR

One thing I do miss is Canon’s vast DSLR lens library. From fisheyes and tilt shifts to super telephoto lenses, Canon offers some of the best and most versatile lenses that even big mirrorless manufacturers such as Sony aren’t producing yet. But for the sake of this test, I stuck with the kit lens for a full week and found that despite its size, 18-135 is an incredibly useful focal range, especially for travel photography. After a week of schlepping it around, I got used to the size and ultimately appreciated the versatility of the lens.

A little like coming home

After over one year of shooting Sony and Fujifilm mirrorless, the Canon 90D feels like coming home. The ergonomics, dials and controls were all very familiar and easy to use without making lots of custom settings as you often have to with mirrorless cameras such as Sonys and even Canon’s newest EOS R and RP. It was incredibly easy to power on the camera and just start shooting a wide range of subjects, from a wide landscape shot of a beach, to homing in on the green sea turtles that I suddenly spotted swimming close to shore.

While 135mm on a crop sensor gives you a nice amount of reach, the Canon 90D gives you even more flexibility since it produces 32-megapixel images. This allows you more flexibility to crop in on your subject in post production, as I did with this image of a mongoose, and some shots of sea turtles.

Concerns about noise

One feature that I find indispensable in mirrorless cameras is silent shutter. This is key for certain professional shooting moments, such as in auditoriums or at performances where shutter sounds are frowned upon, or when attempting to capture candid moments. On the Canon 90D, there’s the additional sound of mirror slap and its shutter is clunky and loud: once even startling a group of birds that I was attempting to photograph. There is no subtlety or finesse in the shutter sound and, while there is a full-electronic mode, you can’t avoid the sound of the mirror opening for you to get into live view to use it. Even in everyday travel photography scenarios, the shutter sound was distracting not only to me, but also the subjects I was attempting to photograph.

Finding in favor of a finder

The initial familiarity of the Canon DSLR layout was nice at first. However, I quickly became aware that I’d come to find mirrorless cameras offer several key features that make them superior to DSLRs (at least, for my shooting style).

Caption

Firstly, DSLRs are restricted to using only optical viewfinders (OVF) while mirrorless cameras offer electronic viewfinders (EVF). Being forced to use an OVF in Hawaii was painful.

With an EVF, my creative compositions have greatly expanded thanks to the seamless transition between using the LCD and EVF eyepiece to frame my shots. I love the ability to get up high or get down low to compose shots using the LCD. While DSLRs such as the Canon 90D does allow you to enable Live View to shoot still photos with the LCD, it is clunky and isn’t as responsive as LCD shooting on mirrorless cameras. Thus, it felt pointless using the LCD to shoot on the 90D, and I felt like I sacrificed many photo opportunities and creative angles that I would have been able to get with a mirrorless camera.

Conversely, because DSLRs require the mirror to be flipped up when recording video, you are then restricted to only using the LCD. This is very difficult in bright, outdoor lighting and it quickly became frustrating to not be able to seamlessly transition back and forth between the EVF and LCD as you can on mirrorless cameras.

All about the flexibility

Since the Canon 5D series still does not offer tilting or articulating rear screens, I was excited to finally see one on the Canon 90D. As I say, the ability to shoot and compose with a movable LCD on mirrorless cameras has really enhanced my creativity when it comes to image composition.

Now that I’ve spent some time with the fully-articulated screen on the Canon 90D that can face forward for vlogging, I find that it isn’t very useful for shooting photos. For most photo and video needs, it is more efficient to have a two-axis LCD screen that simply pops out and tilts up or down; you truly only need the 90D’s forward-facing flip screen if you intend to vlog or take selfies.

The 90D’s fully articulating screen made it easy to get low enough to take this shot, but a tilting display would have made alignment easier.

In the photo below, I had the camera low to the ground on top of the train tracks and needed to angle the LCD up to compose. It not only took longer to flip the LCD screen out to the left, but it also became hard to center the image since the LCD was so far to one side. This is a case with a simple tilting screen would have worked much better.

On the other hand, I love the Canon 90D’s screen that lets you turn the LCD inward to face the camera, thereby offering screen protection. It would be fantastic to see other camera manufacturers add this feature to their LCDs.

The best touchscreen I’ve ever used

Another thing in favor of the 90D’s screen was that its touch operation is the best I’ve experienced on any DSLR or mirrorless camera. It’s very responsive with no lag, and it allows for multiple functions, from reviewing your images by swiping, selecting quick modes, and (best of all) setting a focus point. I’ve long heard that Canon’s Dual Pixel Autofocus is among the very best, and after trying it on the Canon 90D, I have to agree. When you select a focus point by tapping on the touchscreen, tracking is fast and accurate. This came in handy when shooting this tiny and very fast lizard perched on a sprinkler head. Within seconds of snapping this photo, he took off running.

Within seconds of snapping this photo, tiny (and very fast) lizard took off running, but the 90D’s live view AF was quick enough to capture him, first.

All in all…

After a full week of shooting with the Canon 90D and the kit lens, I’ve adjusted to its size and shooting style. If I had to, I could use this camera comfortably to shoot photos and videos for both fun or professional use. But given the choice, I would still reach for a mirrorless camera instead. It has nothing to do with image quality (I still prefer Canon’s output), or autofocus performance (though Sony still has an edge).

Instead, it comes down to the DSLR’s lack of an electronic viewfinder (EVF). With mirrorless cameras, I’ve become used to constantly (and rapidly) switch between using the rear LCD screen and EVF to compose and shoot both photos and videos. This transition is quick and seamless on a mirrorless camera. Yes, you have an option to enable Live View shooting on a DSLR like the Canon 90D, but the experience is clunky and therefore not practical on a professional shoot, or even a casual vacation.

$ (document).ready(function() { SampleGalleryV2({“containerId”:”embeddedSampleGallery_6804737136″,”galleryId”:”6804737136″,”isEmbeddedWidget”:true,”selectedImageIndex”:0,”isMobile”:false}) });
Articles: Digital Photography Review (dpreview.com)

 
Comments Off on What is it like to come back to a DSLR after shooting mirrorless?

Posted in Uncategorized


The Leica SL2 is a refined full-frame camera with in-body stabilization, fast burst shooting and capable video features

09 Nov

$ (document).ready(function() { SampleGalleryV2({“containerId”:”embeddedSampleGallery_3068214413″,”galleryId”:”3068214413″,”isEmbeddedWidget”:true,”selectedImageIndex”:0,”isMobile”:false}) });

The Leica SL2 is a major update of the company’s original full-frame mirrorless camera, the SL, which was introduced four years ago. The SL2’s design isn’t a dramatic departure from the original, though the hard edges have been softened, the grip has been refined and a new three-button rear interface is similar to that of the Q2. Build quality and weather-sealing has improved to the point where the SL2 has earned an IP54 rating.

The real differences between the SL2 and SL can be found on the inside. The SL2 has a 47MP full-frame CMOS sensor – likely similar to what’s in the Q2 and Panasonic’s S1R – and a 5-axis sensor-shift IS system that can also be used to produce 187MP Raw images. Its contrast detection autofocus system has been improved according to Leica, and a ‘Smart AF’ feature can automatically switch between focus and shutter release priority.

$ (document).ready(function() { SampleGalleryV2({“containerId”:”embeddedSampleGallery_3364066639″,”galleryId”:”3364066639″,”isEmbeddedWidget”:true,”selectedImageIndex”:0,”isMobile”:false}) });

Photos can be composed via a 3.2″ touchscreen display with 2.1 million dots or a large 5.76M-dot electronic viewfinder. As before, a small status display on the top plate shows important shooting information.

The SL2 can shoot bursts at 20 fps with the electronic shutter and 10 fps with the mechanical shutter, both with AF locked. For continuous focus and exposure, you’ll need to drop to 6 fps. The camera has dual SD card slots, both of which are capable of UHS-II speeds. The official battery life rating for the SL2 is 370 shots per charge, but as always, you’ll likely do better.

The SL2 can shoot DCI or UHD 4K at up to 60p from nearly the full width of the sensor. Both 60p and 50p footage are captured as 8-bit 4:2:0, while 30p and below can be recorded or output as 10-bit 4:2:2 streams. There’s also an option to shoot 5K at up to 30p from a 4:3, roughly 1.6x, cropped region of its sensor. The camera will let you shoot using a proprietary L-Log gamma curve for any of its 10-bit modes and the standard, ready-for-use HLG curve in its 10-bit 4:2:2 modes.

The Leica SL2 will be available on November 21st at a list price of $ 5995.

View our SL2 sample gallery

Go hands-on with the SL2

Watch DPReview TV’s first impressions

Press release:

A New Icon: Leica Camera Announces the New Leica SL2, Successor to the Trailblazing Leica SL

November 6, 2019 – Building on the foundation established in 2015 with the visionary Leica SL-System, Leica Camera proudly introduces the Leica SL2, the storied brand’s new icon and next evolutionary step towards building the perfect all-purpose camera. By listening closely to the valued feedback of photographers and existing SL owners, Leica made many efforts to push the envelope of technological innovation and performance while respecting its heritage of design and legacy. In addition to a technical marvel of pure performance and unmatched build quality, the Leica SL2 is also a joyous experience to use with improved ergonomics and more comfortable grip married to the well-established, simplified three-button control layout, further unifying the Leica design language across multiple product lines. While cutting-edge new features such as in-body image stabilization unlocks newfound potential from legendary Leica M-Lenses, it simultaneously augments the growing selection of SL-Lenses which are some of the finest optics Leica has ever produced. The Leica SL2 is the natural evolution of the innovative Leica SL, serving as a groundbreaking embrace of the future of digital photography and videography while paying homage to its respected history and lineage.

CMOS sensor with 47 megapixels for superior image quality

The unprecedented resolution of the SL2’s CMOS image sensor in full-frame format results in an unparalleled level of detail rendition and image quality. Enormous dynamic range, a color depth of 14 bits per RGB channel and a sensitivity of up to ISO 50,000 enable outstanding image quality in all lighting conditions. Even when combined with Leica TL lenses, which are designed for the smaller sensor format of the Leica TL2 and CL, the SL2’s sensor still delivers an excellent image resolution of over 20 megapixels.

Image stabilization through sensor-shift technology

In a major evolution of the SL, the Leica SL2 features a suspended sensor which adjusts its position in order to quickly and efficiently compensate for camera shake. This in-camera method even makes image stabilization available to lenses that are not equipped with their own.

Additionally, in multishot mode, the tripod-mounted camera can record up to eight consecutive frames, whereby the sensor is shifted in half-pixel increments in between every exposure. This key feature results in images with an incredible quadrupled resolution of around 187 megapixels, leading to an extreme increase in detail resolution.

Improved ergonomics for stress-free shooting in any situation

Despite significant technical improvements, the Leica SL2 is neither larger nor heavier than its predecessor and feels particularly compact to handle. This is due to the fully redesigned camera body, whose handgrip and the edges have been subtly refined for easier handling.

Improved body design paired with increased durability make the SL2 the perfect companion for all forms of shooting. The SL2’s IP54 certification ensures an elevated weather sealing for more rugged situations, while a new option to turn off noise reduction during long exposures allows for more hands-free shooting. Less worry about the weather and environmental situations means photographers can focus more on getting the shot.

Overall the design of the SL2 recalls more of the iconic Leica identity and traditional design DNA elements that the brand has become known and loved for.

Streamlined design with new status menus

The Leica SL2 offers an innovative user interface whose efficient design allows photographers to focus their attention on the creative process. The design alignment with the existing M and Q systems makes the adjustment even easier for existing Leica photographers.

The main recording parameters can be viewed on the rear display and adjusted quickly and easily with a simple finger tap. A click wheel, a joystick and three strategically placed, individually configurable buttons also contribute to a straightforward operation. Thanks to two dedicated status menus for stills and video recording, the parameters for either shooting mode can be adjusted entirely separately from each other.

Limitless connections

Featuring an L bayonet lens mount, the Leica SL2 is not only compatible with the ever-growing portfolio of SL-System lenses, but also with lenses of the TL-System and with the legendary lenses of Leica’s M, S and R-Systems via adapter, providing more than 170 Leica lens options, guaranteed to offer the right fit for any photographic scenario. The L-Mount Alliance expands this scope of possibilities even further, by giving SL2 photographers access to L-mount-compatible lenses from Sigma and Panasonic.

Maestro III processor for ultra-fast operation

The new Maestro III processor facilitates a superior operating speed that shines in many aspects of the SL2’s performance. The autofocus is significantly faster and allows for a virtually lag-free shutter release in any shooting situation, which is further complemented by the new Smart AF mode, which autonomously switches between focus priority and shutter release priority. Full-resolution recordings of consecutive images are possible at 10 frames per second with the focal plane shutter, and 20 frames per second with the electronic shutter. Thanks to two UHS-II-compatible SD card slots, raw files can be saved simultaneously in DNG and JPEG format.

Leica EyeRes® viewfinder with even higher resolution

The camera’s electronic viewfinder now boasts a resolution of 5.76 megapixels, allowing for a large, entirely natural-looking viewfinder image. Simultaneously, the experience is further enhanced when using the touchscreen, which has increased in size to a 3.2-inch diagonal, and now offers a significantly higher resolution of 2.1 megapixels.

Perfect tool for cinematographers

In addition to its great appeal for photographers, the Leica SL2 speaks the language of cinematographers, as the camera is able to record up to 60 frames per second in Cine 4K mode, and up to 180 frames per second in Full-HD mode. Activating Cine mode transforms the SL2 into a manually controlled cine camera as ISO becomes ASA, the shutter speed is marked in degrees on the rotary disk shutter, and the f-stops indicating the aperture ratio are replaced by T-stops, which measure the actual amount of light transmitted through the lens. Connecting audio equipment to the Leica SL2 no longer requires the use of adapters, as the camera now features a build in headphones and mic jack, complemented by a fully-fledged HDMI connector for external monitors.

The Leica SL2 is available in Leica Stores and Leica Boutiques beginning November 21, 2019, at a recommended retail price of $ 5,995.

Leica SL2 specifications

Price
MSRP $ 5999
Body type
Body type SLR-style mirrorless
Body material Magnesium alloy
Sensor
Max resolution 8368 x 5584
Image ratio w:h 3:2
Effective pixels 47 megapixels
Sensor size Full frame (36 x 24 mm)
Sensor type CMOS
Processor Maestro III
Color space sRGB, Adobe RGB
Color filter array Primary color filter
Image
ISO Auto, 100-50000 (expands to 50-50000)
Boosted ISO (minimum) 50
White balance presets 8
Custom white balance Yes
Image stabilization Sensor-shift
CIPA image stabilization rating 5.5 stop(s)
Uncompressed format RAW
File format
  • JPEG
  • DNG (14-bit)
Optics & Focus
Autofocus
  • Contrast Detect (sensor)
  • Multi-area
  • Center
  • Selective single-point
  • Tracking
  • Single
  • Continuous
  • Touch
  • Face Detection
  • Live View
Autofocus assist lamp Yes
Manual focus Yes
Number of focus points 225
Lens mount Leica L
Focal length multiplier 1×
Screen / viewfinder
Articulated LCD Fixed
Screen size 3.2
Screen dots 2,100,000
Touch screen Yes
Screen type TFT LCD
Live view Yes
Viewfinder type Electronic
Viewfinder coverage 100%
Viewfinder magnification 0.78×
Viewfinder resolution 5,760,000
Photography features
Minimum shutter speed 1800 sec
Maximum shutter speed 1/8000 sec
Maximum shutter speed (electronic) 1/40000 sec
Exposure modes
  • Program
  • Shutter priority
  • Aperture priority
  • Manual
Built-in flash No
External flash Yes (via hot shoe)
Flash X sync speed 1/250 sec
Drive modes
  • Single
  • Continuous
  • Interval
  • Exposure bracketing
  • Multishit
Continuous drive 20.0 fps
Self-timer Yes
Metering modes
  • Multi
  • Center-weighted
  • Spot
Exposure compensation -3–5 (at 1/3 EV, 1/2 EV steps)
AE Bracketing ±3 (3, 5 frames at 1/3 EV steps)
Videography features
Format MPEG-4, H.264
Modes
  • 4096 x 2160 @ 60p, MOV, H.264, Linear PCM
  • 4096 x 2160 @ 50p, MOV, H.264, Linear PCM
  • 4096 x 2160 @ 30p, MOV, H.264, Linear PCM
  • 4096 x 2160 @ 25p, MOV, H.264, Linear PCM
  • 4096 x 2160 @ 24p, MOV, H.264, Linear PCM
  • 3840 x 2160 @ 60p, MOV, H.264, Linear PCM
  • 3840 x 2160 @ 50p, MOV, H.264, Linear PCM
  • 3840 x 2160 @ 25p, MOV, H.264, Linear PCM
  • 3840 x 2160 @ 23.98p, MOV, H.264, Linear PCM
  • 1920 x 1080 @ 120p, MOV, H.264, Linear PCM
  • 1920 x 1080 @ 100p, MOV, H.264, Linear PCM
  • 1920 x 1080 @ 60p, MOV, H.264, Linear PCM
  • 1920 x 1080 @ 50p, MOV, H.264, Linear PCM
  • 1920 x 1080 @ 30p, MOV, H.264, Linear PCM
  • 1920 x 1080 @ 25p, MOV, H.264, Linear PCM
  • 1920 x 1080 @ 23.98p, MOV, H.264, Linear PCM
Microphone Stereo
Speaker Mono
Storage
Storage included Dual SD card slots (UHS-II supported)
Connectivity
USB USB 3.1 Gen 1 (5 GBit/sec)
HDMI Yes (10-bit output)
Microphone port Yes
Headphone port Yes
Wireless Built-In
Wireless notes 802.11ac + Bluetooth
Remote control Yes (via smartphone)
Physical
Environmentally sealed Yes
Battery Built-in
Battery description BP-SCL4
Battery Life (CIPA) 370
Weight (inc. batteries) 835 g (1.84 lb / 29.45 oz)
Dimensions 146 x 107 x 42 mm (5.75 x 4.21 x 1.65)
Other features
Orientation sensor Yes
Timelapse recording Yes
GPS None

Articles: Digital Photography Review (dpreview.com)

 
Comments Off on The Leica SL2 is a refined full-frame camera with in-body stabilization, fast burst shooting and capable video features

Posted in Uncategorized


11 Tips for Shooting Travel Stock Photography to Make Money

30 Sep

The post 11 Tips for Shooting Travel Stock Photography to Make Money appeared first on Digital Photography School. It was authored by Kav Dadfar.

Stock photography is a tough industry to master. The competition is fierce and prices have been falling over the last decade. But if you are willing to put the effort in and have a long term plan, you can certainly reap the rewards. As a photographer who has been involved in stock photography for over a decade, I have certainly seen the highs and lows. So here are my top tips for shooting travel stock images and how to make money from it.

shooting-travel-stock-photography

1. Include people

Picture buyers are always looking for something new and fresh. Including a person can often be what makes your images unique to the thousands of others that already exist. Including a person in the shot also gives the image some context and shows more of an experience rather than just documenting a place.

Some scenes are busy enough that you don’t need someone to pose. But if you do need someone, don’t be afraid to ask a stranger. Rarely have I found that anyone says no. I always offer to send them a copy of the image to sweeten the deal. This doesn’t mean you shouldn’t take the more generic-type shots. It more about maximizing your sales potential by shooting a variety of different images.

shooting-travel-stock-photography

2. Get a model release

So once you have included a person when shooting travel stock photography, it is a good idea to get a model release. If the person or people are mainly unrecognizable, or if you intend to sell your shot for editorial purposes only, you won’t require one. But be aware that some stock agencies will require a model release even if it is someone’s hand showing in a photo. Of course, there are times where it simply isn’t feasible, for example, if you are photographing a crowd of people. Getty Images have a great model release form that you download here.

shooting-travel-stock-photography

3. Shoot portrait and landscape

When shooting travel stock photography, you should always shoot a landscape and portrait version. Not all scenes work in both landscape and portrait, so sometimes it might not be possible. But if you can, it will come in really useful.

But not only portrait and landscape, try to capture some different compositions. For example, place your point of interest on the left or right. Leave room above and below. You are already at the location so you might as well cover as many possibilities as you can. You never know when a buyer will ask if you have that image in a different crop. Doing this will mean that for example, your image may get used as a double-page spread or a front cover.

11 Tips for Shooting Travel Stock Photography to Make Money

4. Leave space for copy

It is important to shoot images with dead space to allow for copy or headlines to be put in. Sometimes this can mean breaking those all-important rules of composition you have spent years perfecting. But it’s worth it to make those sales.

As mentioned above, you can always shoot multiple versions of the same shot. Try to imagine where and how your image will be used in a publication (or even a website), and compose your shot with that in mind.

Image: There was plenty of free space at the top of this image for the copy to be placed.

There was plenty of free space at the top of this image for the copy to be placed.

5. Choose the right agency

This might be pretty obvious, but it’s important to submit your images to the correct stock photography library. If you shoot travel stock photography, then a specialist travel site is best. If you shoot still life, then an agency that specializes in this would be more successful.

Beyond that, spend some time researching the agency that you are thinking of submitting to. For example, are you happy to see your images sold for a few cents? Consider what your commission rate will be as well as they vary greatly from one agency to another.

shooting-travel-stock-photography

6. Think carefully before submitting to Microstock

Every single person I have ever spoken to who submitted to microstock sites regrets doing so down the road. Of course, there are probably some photographers out there who are very happy with their returns. The problem is that you will need such a huge collection of images with a wide coverage to see any returns that will be worth your time. This is because microstock sites sell images for cents. Ask yourself, would you prefer to sell one image at $ 25 or 250 at 10 cents?

11 Tips for Shooting Travel Stock Photography to Make Money

7. Find fresh angles

If you really want to make your images stand out and catch the buyer’s eye, photograph it differently! Every picture buyer has seen the classic shot of the Eiffel Tower, and it has been on the cover of hundreds, if not thousands, of publications. So the same is not likely to catch many prospective client’s attention. It’s not always easy, but if you can capture something different or unique, you might end up with a few sales from it. This could be as simple as photographing something from lower down or higher up.

11 Tips for Shooting Travel Stock Photography to Make Money

8. Unique location

As well as finding fresh angles, find new locations. Iconic locations such as London or New York, are constantly changing, so there are always potential new places from which to capture photos. This could be from a new rooftop bar with a unique view of Manhattan or new art installation on the streets of London. Even if your location isn’t ever-changing, finding somewhere with a view that not everyone photographs can be very useful.

shooting-travel-stock-photography

9. Quality over quantity

This is often a bit of a contradiction when it comes to stock photography because stock photography is a numbers game. The more images you have, the better your chances of making a sale. However, the key is that they have to be quality shots that people would be willing to pay for. This is the reason that it will take most stock photographers a few years to get a wide enough coverage of images to see a decent return.

Try to always shoot the best locations at the best possible time of day. More often than not, this will be sunrise or sunset, but you will need to assess each scene individually. Your aim should be to capture each shot in a way that you can sell it.

11 Tips for Shooting Travel Stock Photography to Make Money

10. Stay local

Shooting good travel stock photography doesn’t always mean jetting off to far-flung locations. You can often produce great travel stock images a lot closer to home. If, like me, you are lucky enough to live near an iconic place (for me it is London), then you already have endless photo opportunities.

Shooting locally has other benefits as well.

You can revisit locations easily if the weather wasn’t great. You don’t have to worry about the additional travel expenses that eat into your profits. In fact, you will probably find that your local shoots end up having a far better ROI (return on investment) than traveling to other places.

11 Tips for Shooting Travel Stock Photography to Make Money

11. Do something different

Another way that you can try to capture different types of images is to use different technology. For example, drones have now been around a while and can offer a completely new and unique view of something that may have been photographed a lot. But there’s no denying it’s getting harder and harder to fly drones in many places. So if it’s something you are interested in, it’s probably a good idea to get a license. But drone images do sell pretty well, so it is worth considering.

shooting-travel-stock-photography

Conclusion

For most people stock photography will never be the main source of income. However, with some preparation and planning, you can certainly make some extra money from your hobby or profession. The key to being a successful travel stock photographer is to treat it like a business as much as possible. Keep your costs as low as you can, and shoot as often as you can.

Do you have any other tips you’d like to share? Do you make money from shooting travel stock photography? Share with us in the comments!


shooting-travel-stock-photography

The post 11 Tips for Shooting Travel Stock Photography to Make Money appeared first on Digital Photography School. It was authored by Kav Dadfar.


Digital Photography School

 
Comments Off on 11 Tips for Shooting Travel Stock Photography to Make Money

Posted in Photography