Curves ENT shoot with rSellos photography and OTG Video
Video Rating: 3 / 5
Curves ENT shoot with rSellos photography and OTG Video
Video Rating: 3 / 5

Check out the full resolution, 10mb Jpeg, from the Pentax 645D medium format digital camera. See the 645D here: goo.gl You can see the image on our flickr page – use this direct link: goo.gl Join our new Flickr forum: www.flickr.com www.facebook.com www.mattgranger.com https
Video Rating: 3 / 5
Behind the Scenes of a Fashion Photo shoot.
Video Rating: 0 / 5
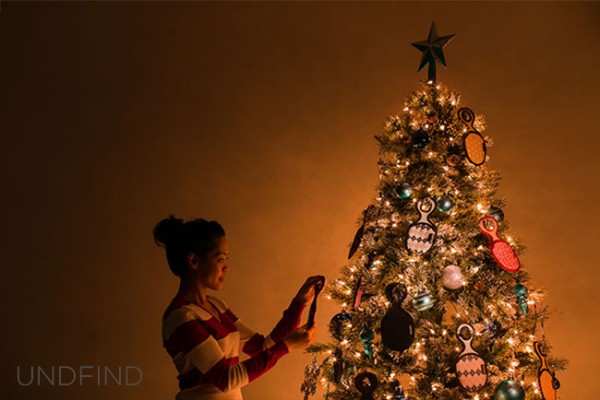
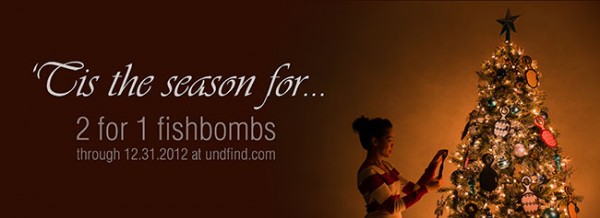
The holiday season is upon us, and what better way to start the season than to share our behind-the-scenes video on how to shoot a composite image? I needed to shoot and create an advertising image for UNDFIND’s Fishbomb, which is a versatile accessory pouch that can carry lens filters, memory cards, and other small items. So I figured, why not create a behind the scenes video and tutorial on how I went about the shoot. Plus, it’s not a bad stocking stuffer for the photographer in your life, especially since you can get two for $ 13 (50% off) with this sale, wink! =)
Anyway, because the Fishbomb is shaped like a Christmas tree ornament, I decided to decorate a Christmas tree with the Fishbombs and shoot our model, Maria, placing a Fishbomb on the tree. Here is the final image we will be working towards.
If you are interested in watching the full behind the scenes video on the SLR Lounge YouTube Channel, here is the video below.
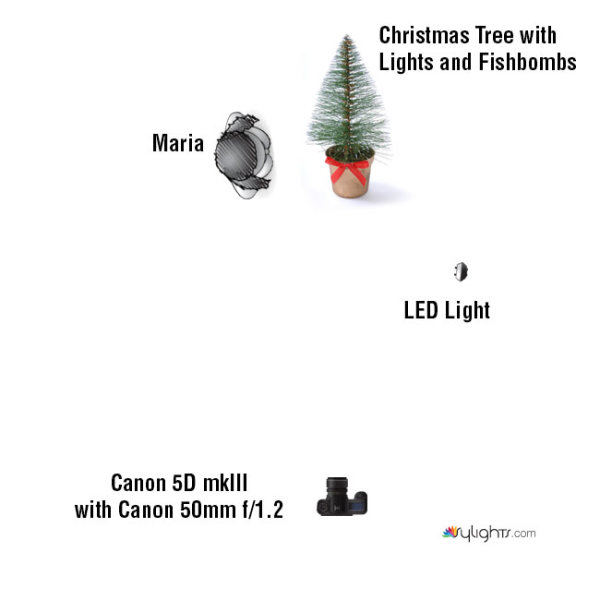
GEAR USED:
Camera: Canon 5D mkIII
Lens: Canon EF 50mm f/1.2 L USM Lens
Lighting: LED Light and Christmas lights on the Christmas tree
The biggest challenge that I encountered was how to light the Fishbombs in addition to lighting Maria, the Christmas tree, and the environment. The Christmas lights were used to light Maria and the environment.
However, when we hung the Fishbombs on the tree, we noticed that the front of the Fishbombs were not illuminated by the Christmas lights. This meant that we had to light the Fishbombs using another light source; I selected an LED light with an adjustable temperature so that I could color match with the tree’s natural Christmas lighting.
However, I ran into another problem. The LED light was casting a harsh shadow against the wall which destroyed much of the warm, ambient light from the Christmas tree as you can see in Shot 1 below.
The easiest way to solve this lighting issue was to light and shoot two separate images, one for the model and the environment, and the other for the actual detail on the Fishbombs and the tree. Afterwards, we can composite both images together in Photoshop via layers.
For each shot, I had the camera placed on a stationary tri-pod to make it simple to combine both layers into our final composite. So let’s look at how I shot each image.
Shot 1: The Fishbomb and Tree Details
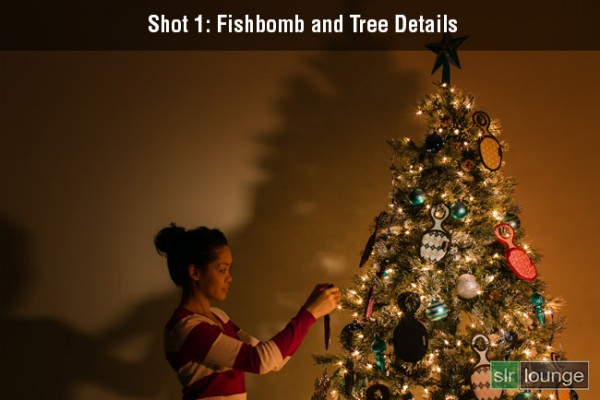
Shutter: 4.0 seconds
Aperture: f/16
ISO: 100
For the first photo, I lit the Fishbomb and the front of the Christmas tree with the LED light. I also dragged the shutter speed and used the smallest aperture possible in order to get a twinkling/starburst effect from the Christmas lights. I didn’t have to worry about any camera shake because the camera was on a tripod and was triggered with a shutter release. The tree and the ornaments were completely still as well since we were in a closed environment.
Shot 2: Maria and the Environment
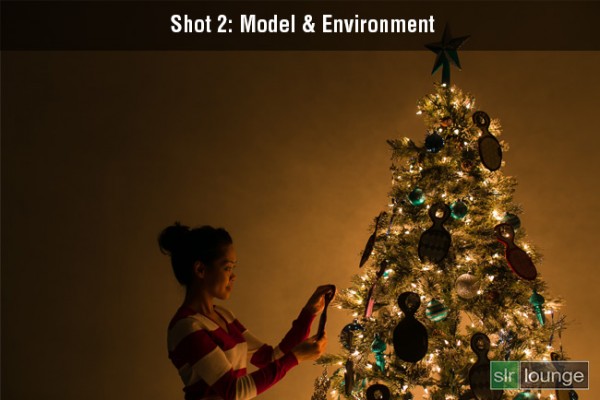
Shutter: 1/8 seconds
Aperture: f/2.8
ISO: 200
This image was lit strictly by the lights on the Christmas tree. Because I want to minimize any motion blur with the model, a quicker shutter speed was required. Therefore, I used a wider aperture and a higher ISO in order to attain a shutter speed of 1/8 seconds. Even then, I still had to ask Maria to hold completely still during the photo to prevent any motion blur.
In Lightroom, I applied the Soft Portrait preset from the SLR Lounge Lightroom 4 Preset System to both images. Additionally, I shifted the Tint and the Temperature in order to add a warm, intimate glow reminiscent of a fireplace. Once I achieved the look that I wanted, I exported the two images into Photoshop via layers for compositing.
In Photoshop, I used layer masking to reveal the Fishbombs and the tree details from the first image over the second image of Maria and the environment.

After a little bit of clean up in the hair and the cloning of an extra branch to the top of the tree, this is how the image looks.
Finally, here is how the UNDFIND Fishbomb ad looks after I added the text:
Hope you all enjoyed this article! If you are interested in picking up some Fishbomb’s for stocking stuffers, the deal is available on UNDFIND’s Camera Bags website through the end of the year.
Post originally from: Digital Photography Tips.
Check out our more Photography Tips at Photography Tips for Beginners, Portrait Photography Tips and Wedding Photography Tips.
How to Shoot and Create a Composite Image for a Product Advertisement

Part 4 covers back up, storage and editing options, following a wedding shoot. In this series ThatNikonGuy Matt Granger will show you all you need to know to get started in wedding photography. From planning, to gear, to shooting and editing tips, Matt will walk you through the process and help you avoid common pitfalls. Whether you are going in full time, or have been asked to shoot at a friends wedding – take the time to research and plan – it will avoid a lot of headaches down the track! GEAR: Lowepro S&F gear – products.lowepro.com Tamron 70-300SP – www.tamron.com Nikon gear – www.nikon.com.au Join our facebook and flickr groups to stay up to date with what’s going on: Join our facebook group HERE: www.facebook.com Flickr group HERE: www.flickr.com www.mattgranger.com
Video Rating: 4 / 5
In this series ThatNikonGuy Matt Granger will show you all you need to know to get started in wedding photography. From planning, to gear, to shooting and editing tips, Matt will walk you through the process and help you avoid common pitfalls. Whether you are going in full time, or have been asked to shoot at a friends wedding – take the time to research and plan – it will avoid a lot of headaches down the track! See the Lowepro S&F gear here: goo.gl Join our facebook and flickr groups to stay up to date with what’s going on: Join our facebook group HERE: www.facebook.com Flickr group HERE: www.flickr.com www.mattgranger.com
Video Rating: 4 / 5
Nikon D40 Photoshoot by Veronica Spriggs Visit Me www.eye-on-design.com www.twitter.com www.facebook.com Subscribe to My Channel www.youtube.com If you are into Digital Scrapbooking and want to check out my Scrapbook Products check out my shop you’ll be glad you did! shop.scrapbookgraphics.com
razzi.me www.facebook.com www.PhotographersOnUTube.com https In this video you will learn how to select settings for your flash and how to adjust the flash power. If you follow these guide lines you will have no problem shooting in manual flash and manual camera setting.
Video Rating: 0 / 5
In Part 5, Matt runs through 12 shots giving full shooting details, technique and explaination of how and why he chose the settings. He also presents a few that didn’t work perfectly, and talks them through too. In this series ThatNikonGuy Matt Granger will show you all you need to know to get started in wedding photography. From planning, to gear, to shooting and editing tips, Matt will walk you through the process and help you avoid common pitfalls. Whether you are going in full time, or have been asked to shoot at a friends wedding – take the time to research and plan – it will avoid a lot of headaches down the track! GEAR: Lowepro S&F gear – products.lowepro.com Tamron 70-300SP – www.tamron.com Nikon gear – www.nikon.com.au Join our facebook and flickr groups to stay up to date with what’s going on: Join our facebook group HERE: www.facebook.com Flickr group HERE: www.flickr.com www.mattgranger.com
Video Rating: 4 / 5
Like me on FaceBook www.FaceBook.com Behind The Scenes on a Beach Photo Shoot with Sexy Latina Model, Roxy Sanchez and Celebrity Fashion Photographer, Arthur St. John. Photographer Arthur St. John www.ArthurStJohn.com www.FaceBook.com www.Twitter.com www.YouTube.com www.ModelMayhem.com Model Roxy Sanchez www.RoxySanchez.com www.Twitter.com www.ModelMayhem.com Hair Stylist & Make-up Artist Rena Maeda www.RenaMakeup.com Wardrobe Stylist Tyree Fifer www.TyreeFifer.ViewBook.com www.Twitter.com www.ModelMayhem.com Behind The Scenes Video Curtis J. Moore www.CurtisJMoore.com www.Twitter.com Brett Cassano Behind The Scenes Video Editor Cheok Wai Lei www.CheokWaiLei.com Music Cameron Cartio “Cuando Volveras” Winterfall Records www.FaceBook.com Arthur St. John Photography & Casting www.ArthurStJohn.com info@arthurstjohn.com arthurstjohn@yahoo.com
A Guest Post by Olivia Vitazkova from www.reverinephotography.com

Recently I’ve been asked more and more about how I go about organising a photo-shoot.
It was mainly asked by my new flatmates who were surprised at the constant influx of strange, good-looking people in our tiny kitchen. The place would get transformed into a showroom, with enough makeup and clothes to be suspected of robbing a department store. The flatmates would look at me with a mixture of suspicion and curiosity: „Where do you get these people? How do you organise a photo-shoot?“ So I explained and then I thought that some of my knowledge can be useful for new photographers, thinking of planning their first big fashion shoot.

One of the most important things you need to consider is the theme or the concept of your photo-shoot. This will determine all your other choices including makeup and location. Your theme can be anything. You can start with a simple idea say „romantic picnic in a park“ from which we can already decide that we want an innocent looking young girl with long blond hair and maybe a male model to keep her company. Styling – romantic pastel colours, skirts and dresses. Makeup – natural. Location- park. Nothing too complicated, you just come up with an idea and then organise everything else to fit your vision.
Despite this, I must confess that I rarely start organising a shoot with a precise theme or idea I have to execute. I usually start by getting into contact with a model I find interesting and think about what sort of concept would they suit best, essentially constructing the concept to fit the model. Either way you end up with some sort of a theme or idea, which is great for editorial work/fashion spreads as it will make the series of photographs look coherent and consistent.
But sometimes I don’t even bother with that. That is what I call an improvisation shoot, and these are usually the most fun ones. It usually happens when it’s a last minute casting call and I don’t have much time to think/prepare but want to shoot. I tell the model to bring a big bag full of clothes, and we’ll mix and match on the spot and do the makeup accordingly. This is fairly easy and fun as it doesn’t require much preparation beforehand. However, you need to think on your feet once the team assembles. This can result in either fun and inspired photos or some fairly boring safe ones. The good thing is that there is no one director and everyone can bounce ideas off each other and have an input. You could maybe do two looks wildly different from each other depending on what photos people need. It’s a good way to go about getting portfolio work done but probably not a coherent editorial.

Models can often either make or break the shoot. Depending on your theme you should decide on the look she or he should have. Think whether they should have any specific features (tattoos or no tattoos) or abilities (e.g. dancing) that would be useful for the shoot.
But first of all, how to find models? Professional photographers often go straight to modelling agencies which make the process of choosing models easier, and more reliable. Unfortunately it’s not very budget friendly (unless you already have an amazing portfolio) so let’s explore some free alternatives.
There’s a lot of websites for models and photographers, such as modelmayhem.com which enable you to search and connect with models, stylists and makeup artists in your area. The best thing is to offer a TFP (time for prints/photos) photo-shoot to models on your level of experience, this way you’ll both get something out of it and you’re less likely to be rejected. First make sure you already have some good photos of people uploaded on your profile. If you’re just starting out and have no pictures you can always find a lot of freelance models willing to work for a small fee. Hiring a model might cost you, but you should be getting a model who knows what she’s doing, and is highly motivated not to cancel on you, and with your new amazing photos more people will want to work with you.
Lately however Facebook became more dominant due to the ease of posting casting calls and getting replies instantly, there’s several Facebook groups for models and photographers so try to find and join one for your location, or create a new one.
Your friends and family are another option, even if they don’t look like supermodels, fashion is for people of all ages. You can even stop people on the street if you see someone absolutely incredible. I’ve done it once and had a photo-shoot with a lovely green-haired girl I probably wouldn’t have met otherwise.
Okay, now you’re in contact with your model. Great. It’s always best to get a feel for her experience before the shoot, so you know what to expect. Is she new to modelling as well? Then you’d better read something about posing (the DPS has a great series on posing) or maybe just do a beauty shoot where it’s less about the body and more about makeup (and expression). For the first few photo-shoots I’d recommend working with just one model as posing multiple models can be quite challenging, but nothing wrong with starting big.

The other person you need the most is the makeup artist, or as we call them – MUA. I love these guys, not only they make the model look more beautiful than before (or crazy, depending on the look you’re going for), but they can often double as assistants. I often make them carry my bags and shine the reflector during the shoot, which is probably not what they thought they’ve signed up to do. Also it’s great to have another pair of eyes on set as they may notice little details that you’ve missed, like hair in the face or wardrobe malfunctions, while you were concentrating on exposure and composition. So yes, makeup artists are indispensable.

But how do you get hold of these wondrous people? Don’t worry, it’s pretty much like finding a model. A lot of people study makeup these days and need photos for their portfolios so are keen to help out on a TF basis. You can also ask your model about them if they’re more experienced, as they would often have a favourite MUA they can contact for you. Score.
Now it’s time to think about what sort of clothes the model will be wearing. Contact a stylist, local designer or a vintage shop to help you with sourcing clothes for your big photo-shoot. These people are generally quite difficult to reach so don’t get disappointed if you can’t find anyone. You should try and be proactive in the local fashion community, going to vintage fairs, fashion shows and socialising with people there, actually that’s a great way to meet models and MUA’s as well.
Okay, now you’ve gathered a team of people – model, MUA and a stylist, you may also need a hair stylist or an assistant, depending on what your shoot needs. The next step is to think of what makeup and clothes you need based on your idea. „The girl next door“ should not have the same makeup and clothes as „the biker chick“. Look for inspirational images for makeup and clothes in magazines or on the internet and send them to your team, so you know they’re on the right page regarding your idea. You can print these out and make a mood-board that you can use during preparation.
Nothing worse than telling the MUA to do whatever she wants, then deciding after she’s finished an elaborately creative look that you want something more natural. Or not telling the model what clothes she should bring and getting disappointed that nothing fits your vision. Or bringing clothes yourself but realising they won’t fit the model. Communication is key so make sure that everyone is on the same page.
Regarding communication, the most difficult thing will probably be deciding on the right date and time (unless you send out a casting call with exact time and date and got suitable replies, in which case I applaud you). Hopefully everyone in your team will be free on the same date.
You also need to pick where you’re going to shoot, is it a studio, indoor location or outdoors? Yet again, the location should fit your theme.
You also need to decide where you’ll do the makeup, I usually just gather everyone at my place as it’s convenient and easy to get to, but might not work for everyone. You can use someone else’s flat, studio or a public place – once we had to do the makeup in Starbucks, and we didn’t even order anything, now that’s shooting on a budget…
Anyway, try and keep in mind that the makeup will probably take about an hour and a half, the resulting time will depend on various factors such as model’s skin, intricacy of makeup and just how much fun you’re having while chatting away. Therefore make sure to factor in makeup time, and always give it more time than you think just so you wouldn’t accidentally miss the golden hour, or pay more than you expected if you’re hiring a studio.
?
Preparation
Stare at your mood-board obsessively. List in various magazines for inspiration for poses and lighting. If you have already not done so, scout your area for the locations you’re gonna shoot in. Make sure you’ve got your equipment ready, charged and sparkling clean.
Day before the shoot, message everyone to confirm the shoot. Make sure you’ve got everyone’s number and that everyone’s got your number and know where they’re going and when. In case it’s an outdoors shoot and the weather is supposed to be bad decide on a plan B (my plan B usually involves telling people to bring umbrellas, I live in Scotland so I’m more surprised when it’s not raining at my shoots).

Be nice. If you’re hosting the event make sure to offer everyone at least a glass of water or a cup of tea. Sometimes things go wrong, trains are cancelled, things forgotten etc. Even if things are not going your way, it’s no use getting upset, and making everyone else in the team feel bad. Instead take it as a challenge.
Make sure to notice the little things, don’t get too trigger happy only to be disappointed by the photos because the model has the same pose on every photo or there’s a bra strap poking out. Your makeup artist or assistant might notice some of these things and fix them, but don’t get too caught up in the moment to forget directing when it’s needed. Expression is also extremely important so make sure you’re communicating with the model, making everyone feel relaxed and content. Your model might look stunning with her makeup and clothes in a gorgeous location, but if she looks awkward the picture won’t work, but don’t worry most people will get right into it after a few frames. Just remember that you’re creating images, not shooting wildlife, although with some models it might as well feel like it.
But most of all, don’t forget to have fun.
Then, what’s next? Edit your pictures and send the best ones to the team, you can then submit to magazines or slap them on to your website… and start planning your new photo-shoot.
Good luck!
Olivia Vitazkova is a fashion photographer based in Glasgow, UK. When she’s not running around with her camera or attempting to travel the world, Olivia can be found annoying her cat, reading books and consuming ungodly amounts of chocolate. You can find her work on www.reverinephotography.com or her blog.
Post originally from: Digital Photography Tips.
Check out our more Photography Tips at Photography Tips for Beginners, Portrait Photography Tips and Wedding Photography Tips.
How to Organise a Fashion Shoot in 5 Easy Steps
You must be logged in to post a comment.