RSS
 

Posts Tagged ‘Sharp’

My Favorite Lens of All, the Sharp, Smooth, Feel of the Canon EF 135mm f/2L USM

26 Oct

One Last Hand

For those of you who know me or follow my work, you probably already know about my love affair with the Canon EF 135mm f/2L USM telephoto lens. Simply put, this is my favorite lens I have ever used in my life. It’s also the lens I use for probably 70% of the photographs which I produce. This is a workhorse lens and I believe it is the sharpest lens that Canon makes. If I could only own a single Canon prime lens, this would be it.

Bet Red

Professional grade Canon L series lenses are not cheap. Canon’s L series represent their top of the line optics. They are what almost all Canon professional photographers shoot with. That said, I think the EF 135mm f/2L USM is one of the best values as far as Canon L series lenses go. The lens costs a little over $ 1,000 and is amongst the most economical L series lenses you can buy.

I probably shoot this lens at f/2 the majority of the time. This gives you a super clean point of focus, with the beautiful out of focus bokeh away from your primary point of interest. For those low light shallow depth of field photos, it does not get better than this lens in my opinion. The portraits you can make with this lens are beautiful — sharp as tack but with the subtle bokeh around the edges that a lens like this can produce.

Two Hearts Can't Be Wrong

The autofocus on this lens is the most responsive of any lens I’ve ever used. It autofocuses so lightning fast and allows you to quickly lock in on the action that you want to see. It’s a very quiet and very smooth feel when you hit your focal point perfectly on the mark.

The photos in this blog post were all taken on my recent trip to Vegas with this lens. I cannot recommend this lens strongly enough. An example of why I like this lens so much can be seen in the first photo in this post. Forget about it as it appears in this post, click here to see it in full high res glory. Look at how sharp the details are on that photo. Notice the individual neon tubes as visible in the Harrahs and Flamingo signs. I took this photo from the balcony of the Cosmopolitan of Las Vegas, a great distance away. The 135mm EF f/2L USM gave me the distance I needed to shoot down with such clarity on the neon signs in the photo.

The photo of the roulette wheel and the mannequin in the post show how great the bokeh and depth of field is around an isolated focus point. This is another of my favorite characteristics of this lens. Shooting portraits at f/2 on this lens feels just perfect to me.

In addition to portraits, this lens is great for street photography, sports, concerts, abstracts, and so many other types of photography.

As a reminder, my analysis of my Canon gear is being done in partnership with Canon and I am receiving compensation for this work with them. More on Canon telephoto lenses here.

Teardrop

I'll Take Two

Seeing Red


Thomas Hawk Digital Connection

 
Comments Off on My Favorite Lens of All, the Sharp, Smooth, Feel of the Canon EF 135mm f/2L USM

Posted in Photography


Looking Sharp: Blade-Like Bridge Slices Through the Air

09 Oct

[ By Steph in Destinations & Sights & Travel. ]

blade bridge 1

Five blade-like beams slice into the sky when this cantilevered footbridge in London’s Merchant Square rises to make way for boats moving along the Grand Union Canal. The movement of its dynamic design is inspired by the opening and closing of a traditional hand-held fan, the steel elements separating as they’re lifted into the air by hydraulic jacks.

blade bridge

blade bridge 2

Designed by Knight Architects and AKT II, the bridge spans a 20-meter (65-foot) section of the canal. The beams weigh six to seven tons each, and are balanced by a 40-ton counterweight. When fully open, the bottom blade hovers about 8 feet over the surface of the water. When closed, the bridge offers a flat and comparatively unremarkable surface that pedestrians can cross three-abreast.

blade bridge 3 blade bridge 4

Envisioned as a kinetic sculpture, the design beat out dozens of others in a 2012 contest. Like Thomas Heatherwick’s nearby Rolling Bridge, which curls into a ball as it opens, the new bridge rises every Friday and is considered a landmark for the area.

Share on Facebook


[ By Steph in Destinations & Sights & Travel. ]

[ WebUrbanist | Archives | Galleries | Privacy | TOS ]


WebUrbanist

 
Comments Off on Looking Sharp: Blade-Like Bridge Slices Through the Air

Posted in Creativity


How to Get Super Sharp Landscape Photography Images

15 Apr

The most common question I get asked by my workshop students is ‘how do you get such sharp images?’. It’s actually really simple. Basically, avoid movement of any kind while the shutter is open, focus well and choose the right aperture for your creative vision. Mostly it’s just plain old common sense with a couple of technical elements thrown in, so if you want to learn how to get super sharp landscape photography images, here’s my list of top tips.

Top tips for sharper landscape photography

How to take sharp landscape images - Gavin Hardcastle

1 – Use a good tripod with a sturdy ball head and make sure everything is TIGHT

Seems obvious, but time and time again I see students using decent tripods and they often don’t have everything clamped down tightly. For example, the attachment that is screwed to the underside of your camera should be as tight as you can get it, eventually it’ll work its way loose. Make sure that ball head is completely locked down once you’ve composed your shot.

2 – While taking the shot, don’t place your hands on your tripod

The vibrations of your hands will blur the shot. When that shutter opens, your hands should be nowhere near the camera.

How to get ultra sharp landscape shots - Gavin Hardcastle

3 – Use the 2 second timer or a remote shutter release

This insures that the shutter won’t open until you are completely hands free.

4 – Cheap lenses will defocus while you rotate your circular polarizer

This is another one that seems obvious but I’ve seen it happen a lot. Let’s say you’ve achieved perfect focus on your landscape composition and now you’d like to rotate the polarizer which is attached to your perfectly focused lens. Guess what, as you rotate that filter, the lens is now losing its focus because of the movement and pressure you’re exerting on the filter. This rarely happens with high end lenses but I’ve seen it happen a lot with cheaper kit lenses that are poorly engineered. When this happens simply remember to refocus before hitting the shutter.

How to get tack sharp landscape images Gavin Hardcastle

5 – Enable the mirror lock-up if you have a DLSR

Using mirror lock-up ensures that the mechanical shock induced by the cameras mirror mechanism has dissipated by the time the shutter opens.

6 – Remove your camera strap

In windy situations it will act like a sail and induce vibration.

7 – Add some weight to your tripod’s central column

If the conditions are windy, it will also help reduce vibration.

8 – Place a small but heavy bean bag on your camera and lens

Do this just before taking the shot to further eliminate movement from shutter shock.

How to get very sharp landscape photos - Gavin Hardcastle

9 – Choose a Mid-range to Narrow Aperture

This one should be an article in itself but for now it’s important to understand that if you want corner to corner focus in your landscape images you’ll need to select an aperture that gives you a wide depth of field. Using f/2.8 is pointless, so pick an aperture like f/11 or f/16 depending on how close you are to your foreground subjects. Be aware however that the narrower the aperture (larger number like f/22) the less sharp your image will be due to light diffraction so experiment with your lenses to discover their sweet spot for wide depth of field.

Side Note: Shallow depth of field in landscapes can be beautiful when done well, in which case you’ll need a wide aperture like f/2.8 and ideally a lens that delivers beautiful bokeh – most super wide angle lenses don’t do bokeh well.

How to get really sharp landscape photographs

10 – Focus In the Distance

Don’t focus on the object closest to you. Pick an object in the middle distance that has a clear contrasting line and focus on that. You could focus to infinity but beware that most of the wide angle lenses I’ve used actually focus beyond infinity so I often have to focus to infinity and then carefully rotate the focus wheel back so that it’s just slightly before the ‘infinity’ mark.

11 – Put Your Glasses On

If you need glasses in order to see clearly and focus on things, it should go without saying that you might need to put on your stylish and expensive bifocals in order to achieve clear focus in your photography. Besides, everyone knows that glasses make you look cool and more intelligent, so why not put them on?

12 – Use Live View or EVF magnification

If you have a DLSR with an optical viewfinder I highly recommend that you use your cameras ‘Live View’ mode and then magnify it to your point of interest and use your manual focus ring to achieve sharp focus  If your camera has an EVF (Electronic View Finder)  you can do the same thing while looking in the EVF. I actually prefer this because you don’t get distracted by glare on the LCD or external light sources. Either way, remember to disable auto focus if you decide to focus manually with Live View.

How to get super sharp landscape images

I use every single one of these techniques in my Vancouver Island photo workshops and I teach them to all of my students. If you follow these tips every time you shoot landscapes, you’ll be sure to get much sharper images. If you’ve got some of your own tricks and tips for getting super sharp landscape images please leave a comment below and share your knowledge.

The post How to Get Super Sharp Landscape Photography Images by Gavin Hardcastle appeared first on Digital Photography School.


Digital Photography School

 
Comments Off on How to Get Super Sharp Landscape Photography Images

Posted in Photography


Sharp thinking: Nikon creates selectable strength low-pass filter

30 Aug

shared:NikonLogo.png

Nikon has patented a technology that can adjust a camera’s low-pass (AA) filter based on the situation. By using an electronically controlled liquid crystal panel, the AA filter can either be turned on and off, or set to ‘normal’ or ‘high’ intensity. The first design would allow for a D800 that become a D800E at the push of a button. The second design would have a mild anti-aliasing effect for stills, and a stronger effect to reduce moiré in movies. More details on this exciting development after the link.

News: Digital Photography Review (dpreview.com)

 
Comments Off on Sharp thinking: Nikon creates selectable strength low-pass filter

Posted in Uncategorized


‘Film was never this sharp’: Breaking Bad photographer interviewed

14 Aug

fo3_bb_main.jpg

Commercial photographer Frank Ockenfels III has worked on several high-profile blockbusters like Harry Potter and Men in Black 3, as well as a number of TV shows, and his most recent work is currently being used to promote the season five finale of Breaking Bad on AMC. PopPhoto has published an interview with him, in which he explains how he got started in the TV and movie business, the equipment he uses, and why he bases his career around the concept of ‘never having just one idea’. Click through for a link to the full article. 

News: Digital Photography Review (dpreview.com)

 
Comments Off on ‘Film was never this sharp’: Breaking Bad photographer interviewed

Posted in Uncategorized


New cheat sheet tells you how to keep photos sharp when sharing

30 Jul

fb1.png

The cautious photographer is always conscious of what’s happening to their images when they’re being shared online – whether they’re being resized, re-compressed or otherwise modified from the original. Social networks like Facebook and Twitter all treat images differently, but a new cheat sheet can help you keep your pictures sharp by detailing the pixel dimensions of just about every component on the major social networking sites. Click through for more details on connect.dpreview.com

News: Digital Photography Review (dpreview.com)

 
Comments Off on New cheat sheet tells you how to keep photos sharp when sharing

Posted in Uncategorized


Getting Landscapes Sharp: Focus Stacking

07 May

A key aspect of successful landscape photography is image sharpness.  Usually, it is desirable to ensure that all elements of a scene, whether close or far, are captured in sharp focus.  This can prove to be challenging and, if not achieved with the click of the shutter, cannot be corrected later during post processing.

One approach that is often taken is to use the smallest aperture available, e.g. f/22, to obtain the largest depth of field.  Whilst maximising the depth of field is a good intent, using such a small aperture will actually result in softer images due to an effect known as diffraction.

Most lenses are at their sharpest when used at apertures between f/8 and f/11 and whilst hypefocal focussing may allow you to capture an entire scene acceptably sharp in one image using these apertures; it is always still a compromise between a number of factors and there will be times when you cannot generate enough depth of field to capture a whole scene at optimum sharpness.

That is where focus stacking comes in.

Focus stacking is the technique of stacking (or blending) a number of images that have been focussed at different points throughout a scene to give a final image that contains the sharpest portions of the originals, seamlessly blended into one.  It isn’t as laborious as it sounds and can give really good results, rendering scenes far sharper than possible in just one exposure.

Focus Stack Initial Image

The initial image, shot at f/8, lacked front-to-back sharpness as there was not sufficient depth of field. ISO100, f/8, 2 secs

In the field…

As you will be stacking the images into one, aside from the point of focus, you want the individual photographs to be identical in all other respects.  Therefore, it is best to have the camera positioned on a tripod and use a remote release.

Using your optimum aperture (can easily be determined for a given camera/lens combo using focus charts, however you will most likely find that f/8 is a good starting point), take the required number of images focussed at different points throughout the frame.

A minimum of two images are required, i.e. one focussed for the foreground and one focussed for the background, however an additional third image, focussed for the middle ground can also be a good idea.

Focus stack comparison foreground

A comparison of a 100% crop of the foreground from two images, one focussed for the foreground (left) and one focussed for the background (right).  Both shot at ISO100, f/8, 2 secs.

Focus stack comparison background

A comparison of a 100% crop of the background from two images, one focussed for the foreground (left) and one focussed for the background (right).  Both shot at ISO100, f/8, 2 secs.

Back at home…

Open the two images in Photoshop and create a new file that contains both images as different layers, in the one file (to make life easier, name the layers accordingly, e.g. near, far).

Select both layers and go to Edit > Auto-Align Layers to ensure both images overlay perfectly.  Select the ‘Auto’ option, and deselect the ‘Vignette Removal’ and ‘Geometric Distortion’ options.

Then select Edit > Auto-Blend Layers, and choose ‘Stack Images’, ensuring ’Seamless Tones and Colours’ is selected.

Focus stack auto blend dialog box

The Auto-Blend dialog box

At this point, Photoshop will determine the sharpest portions of each image to incorporate into the final image, and apply a mask to each layer.  Below you can see the layer masks applied to the two images.  In this instance, you can see the rocks in the lower portion of the image are the main area selected by the layer mask for the ‘near’ layer whereas the rocks in the middle distance and the background mountains are incorporated from the ‘far’ layer.

Focus stacks layer masks

The automatically generated layer masks, applied to each layer, includes the sharpest portions of each layer (shown in white).

It is worth checking the image at 100% zoom to ensure that there are no strange artefacts caused by poor blending of any moving grasses or branches.  These can be fixed by manually painting white or black on to the relevant layer mask (remember: white reveals, black conceals).  For those using Elements, if you are only using 2 or 3 images, it is possible to do the blend manually using layer masks and white/black gradients.  In some instances, it actually gives better results, with fewer ‘blending artefacts’ to do the blend manually.

Once you are happy with the blend, merge the layers to give your final, focus stacked image.

Focus Stack final image

The final image with good sharpness from the foreground rocks right through to the mountains in the background

It may not be immediately apparent when showing images at web resolutions, but the difference in the overall sharpness when using optimum apertures and focus stacking is astounding when printing images.  To be able to focus stack, it only takes a little more forethought when out capturing the scene, and a few short processing steps when back at your computer so why not give it a go the next time you are out photographing landscapes.

Post originally from: Digital Photography Tips.

Check out our more Photography Tips at Photography Tips for Beginners, Portrait Photography Tips and Wedding Photography Tips.

Getting Landscapes Sharp: Focus Stacking


Digital Photography School

 
Comments Off on Getting Landscapes Sharp: Focus Stacking

Posted in Photography


Getting Landscapes Sharp: Hyperfocal Distances and Aperture Selection

26 Feb

An important element of landscape photography is ensuring that all of the key elements within your composition are sharp.  This can often include foreground objects that are a matter of meters from your camera as well as background elements that can be kilometres away.  Therefore, to achieve this, you need to ensure your depth of field is large enough to render everything of interest, suitably sharp.

Sunrise over the limestone pavement

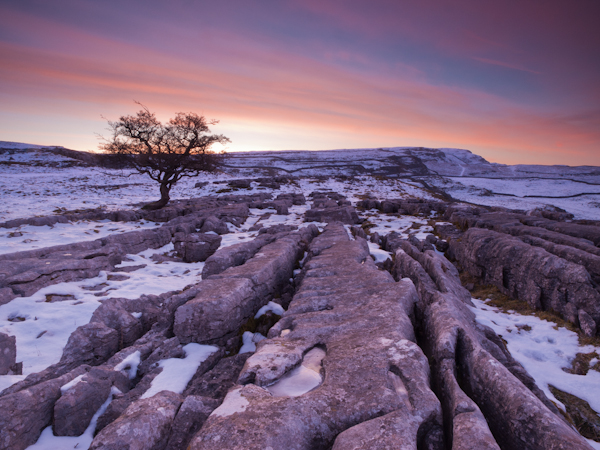
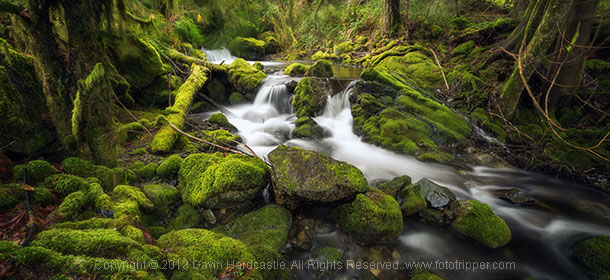
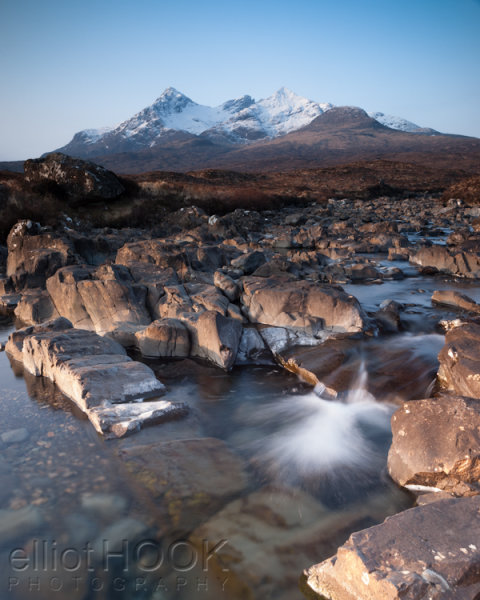
In this scene it was important to capture everything from the frozen puddle in the foreground, to the hills in the background, in sharp focus

When you focus on an individual point within your landscape, you are in fact creating a plane of focus that lies parallel to the sensor.  Everything in front of, and behind, that plane is technically not in focus, however there is a region within which objects will appear acceptably sharp – that is the depth of field.  For instance, in the scene below the camera has been focussed on a rock.  Therefore, the plane of focus lies parallel to the sensor across that rock and the limits of acceptable sharpness, that form the bounds of the depth of field, lie in front of, and behind, that plane.

Hyperfocal Distance Diagram 1

A theoretical example showing the depth of field for a given focal length, aperture and point of focus. The depth of field will always extend one third of the distance in front of the focal plane, and two thirds of the distance behind it.

In the diagram above, the depth of field is not sufficient to capture all of the trees within the range of acceptable sharpness, i.e. they will appear out of focus.  However, the depth of field can be easily manipulated to extend as far as you wish as it is controlled by a number of factors, namely: focal length, aperture and distance to the focal point. (I’m not going to include sensor size here as, after the purchase of your camera, it is not subject to user control; however it does not hurt to appreciate that the depth of field is inversely proportional to sensor size meaning that different cameras have different capabilities with respect to achievable depth of field).  The relationship that these factors have with depth of field is given below:

  • Focal length: Up first is focal length as, typically, your focal length will be determined by your composition.  Changing your focal length will alter your field of view and therefore your composition, meaning that you don’t often adjust your focal length to alter your depth of field but generally manipulate the other factors at your chosen focal length.  A short focal length, i.e. wide-angle, will give you a greater depth of field than a long focal length, i.e. telephoto.
  • Aperture: Probably the most obvious factor in depth of field control is aperture. A narrower aperture, i.e. larger f/ number, gives you a greater depth of field and vice-versa.  It is important to select the smallest, diffraction-limited aperture so to obtain the maximum depth of field without suffering from image degradation.
  • Distance to focal point: In combination with a given focal length and aperture, deciding where to place that plane of focus will impact the resulting depth of field.  The depth of field increases as the distance to the focal point from the camera increases.  Therefore, once a focal length has been chosen, it is generally the combination of the selected aperture and distance to the focal point that controls the depth of field.

Hyperfocal Distance

One way to ensure that the entire frame is in focus (well, ‘acceptably sharp’) is to ensure that the depth of field extends from the foreground to infinity.  To do this, you need to focus at the ‘hyperfocal distance’: for a given focal length and aperture, there will be a distance where setting your point of focus will result in the entire scene being within the depth of field.

Hyperfocal Distance Diagram 2

By focussing at the hyperfocal distance, the entire scene (and more beyond) will fall within the depth of field

So theoretically, by selecting the correct aperture and moving the point of focus to the hyperfocal distance (assuming the composition and therefore focal length remain unchanged) it would be possible to render the entire scene in focus.  A point worth noting is that when focussing at the hyperfocal distance, the near acceptable limit is always half of the hyperfocal distance.

The calculation to determine the hyperfocal distance isn’t trivial, so there are numerous sites or apps to help you when out in the field.  However by frequent application, it isn’t long until you gain an appreciation of where to set your point of focus, for a given aperture at your commonly used focal lengths.

Aperture Selection

For any focal plane, the depth of field extends 1/3rd in front and 2/3rd behind the point of focus.  Therefore, an easy, but potentially flawed, application of hyperfocal focussing is to select a very small aperture, e.g. f/22 or f/18, and to focus 1/3rd of the way into the scene from the bottom of the frame.  It’s not a bad assumption, as often you will achieve the desired depth of field, however in choosing such a small aperture, you may well be losing any benefits of infinite focus due to decreased image sharpness as a result of diffraction.

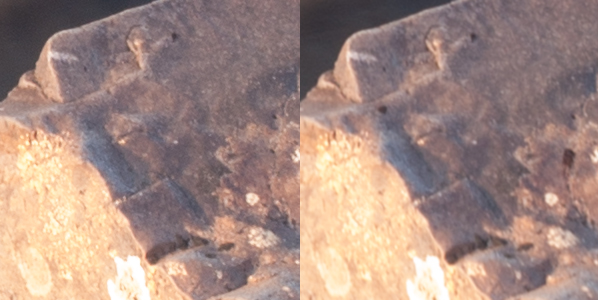
For example, the image below shows a comparison of the same scene, shot at f/8 (left) and f/16 (right).

Hyperfocal distance aperture selection 1

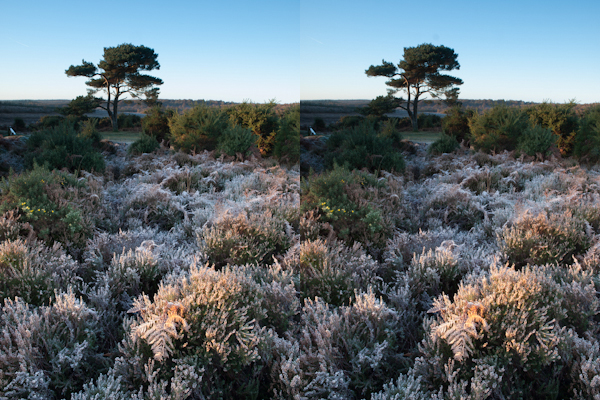
The frosty fern leaf in the centre of the frame at the bottom of the image, was an important part of the foreground interest here.  Even though both images look perfectly sharp, the 100% zoom for each image below shows the difference in sharpness for between using f/8 and f/16, even though both apertures result in a depth of field that extends from before the fern leaf to infinity:

Hyperfocal distance aperture selection 2

The sharpness of the fern leaf at f/8 (left) vs. f/16 (right). Even though the lens was stopped down from f/22 to f/16, the resulting image could still be captured with greater sharpness throughout, by using a wider aperture of f/8, and focussing at the hyperfocal distance

Diffraction becomes an issue all lenses as the aperture gets smaller, especially at the edges of the image, and will be more pronounced on inexpensive lenses.  Typically, the sweet spot, in terms of lens performance, will be somewhere between f/8 and f/11.  Therefore, use of the smallest  ‘diffraction limited’ aperture that can still achieve the required depth of field becomes important.

So, hopefully, you will see that it is worth being aware of the hyperfocal distance for your commonly used focal lengths, especially for the apertures that result in optimum lens performance.  With the tools available to us today, it isn’t difficult to work it out, even when out in the field, so why not give it a go the next time you are out photographing landscapes.

Post originally from: Digital Photography Tips.

Check out our more Photography Tips at Photography Tips for Beginners, Portrait Photography Tips and Wedding Photography Tips.

Getting Landscapes Sharp: Hyperfocal Distances and Aperture Selection


Digital Photography School

 
Comments Off on Getting Landscapes Sharp: Hyperfocal Distances and Aperture Selection

Posted in Photography


Sharp shows prototype 8K screen at CES

11 Jan

sharp.jpeg

CES 2013: High-resolution screen advances were on display at the Consumer Electronics Show in Las Vegas this week, with everyone from tablet makers to television manufacturers pushing pixel count further than ever before. Sharp stole the show, in terms of screen resolution technology by exhibiting a 85-inch 8K LCD screen prototype. Co-developed with Japanese broadcaster NHK, the UHDTV screen offers 16 times the resolution of a standard 1080 TV and would allow you to display a 33MP image without downscaling or cropping. 

News: Digital Photography Review (dpreview.com)

 
Comments Off on Sharp shows prototype 8K screen at CES

Posted in Uncategorized


“PhotoTips” How to get sharp images (My top 10 tips)

10 Jan

www.PhotoTips.biz – I share the top ten ways to get a sharp image. – Comments are locked. All comments, questions, and concerns should be directed to the website. I do not answer questions here.
Video Rating: 4 / 5

Music/flipping starts at 0:30 if you want to skip the sappy stuff! Video: Recorded on a crappy point-and-shoot Nikon Audio: Your Hand In Mine – Explosions In The Sky (edited). (Band site: www.explosionsinthesky.com )