RSS
 

Posts Tagged ‘sensor’

Using Robotics Sensor Triggers

01 Jan

This Tutorial shows you how to use Phidget’s light, infrared and pressure sensors to capture images with ControlMyNikon. ControlMyNikon allows you to remotely control your Nikon DSLR with your PC. For more information, check out www.controlmyikon.com

Nikon D300s


15 December, 2012 – DxOMark Camera Sensor Explained

15 Dec

One of the most quoted camera metrics these days is DxOMark Camera Sensor, a number and indeed a series of numbers for quantifying camera sensor performance. But many people don’t really understand what the numbers signify.

With his second essay on the subject to appear on this site Peter van den Hammer gives us an in-depth look at how to interpret what DxOMark Camera Sensor means.


Happy Holidays! 


The Luminous Landscape – What’s New

 
Comments Off on 15 December, 2012 – DxOMark Camera Sensor Explained

Posted in News


How Fair are the DXOMark Sensor Evaluations? (Canon 550D 60D 7D Nikon D7000 D90 D700 Pentax K5)

27 Nov

artoftheimage.blogspot.com – How Fair are the DXOMark Sensor Evaluations for DSLR digital cameras like the Canon 550D 60D 7D Nikon D7000 D90 D300s D700 Pentax K5? Discussing Peter van den Hamer’s article “DxOMark Sensor For Benchmarking Cameras” posted over at Luminous Landscape. http
Video Rating: 2 / 5

A lot of the clips where I actually get kills are fail-smite outs. I smite out someone, and I hit horrible so they manage to protect when I kill them as well as clips that were fails. Anyway, I haven’t made a video in a while because I haven’t been pking much recently. I’ve been skilling a lot lately. I’m going to start pking and gathering clips, I have some left to make another mini video so expect that in a few days. xoxo. Subscribe. #wolf-pack heart.issy

 
Comments Off on How Fair are the DXOMark Sensor Evaluations? (Canon 550D 60D 7D Nikon D7000 D90 D700 Pentax K5)

Posted in Nikon Videos


Nikon Canon lenses’ true focal range or length on a consumer grade crop sensor DSLR

17 Nov

razzi.me www.facebook.com www.PhotographersOnUTube.com https

 
Comments Off on Nikon Canon lenses’ true focal range or length on a consumer grade crop sensor DSLR

Posted in Nikon Videos


Why You Might Want To Consider A Full Frame Fisheye Lens Even If You Have A Crop Sensor Camera

13 Nov

There are few things better in life than having something go wrong that leads to the discovery of something even better.

Such is the case with my plan to test out a Canon 8-15mm fisheye lens courtesy of BorrowLenses.com. My intent with the lens was to take it with me to the wilds of Arches and Canyonlands National Parks in Utah for some crazy, circular images. The problem is I lack a full frame Canon camera, but would be traveling with Michael Riffle, who owns a Canon 5D Mark III. He accepted the challenge to test the lens, being familiar with fisheyes himself.

One thing led to another and we never got around to testing the lens on his camera. Instead, I often found myself using the lens on my Canon 7D, a crop sensor camera. The Canon 8-15mm is intended to fit a full frame sensor and produce, at 8mm, a fully circular image, much like this example from a Sigma 4.5mm on a crop sensor camera.

PeterWestCarey-Nepal2011-1008-9891

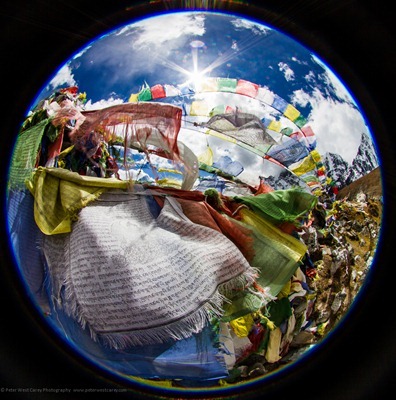
What happened instead was a cross between this full circle and a more traditional 15mm on a crop sensor. The 8-15mm lens will show edges of the circle when below 10mm but will otherwise fully cover the sensor from 10mm-15mm. A major difference from a non-fisheye lens, though, is the curving in the image.

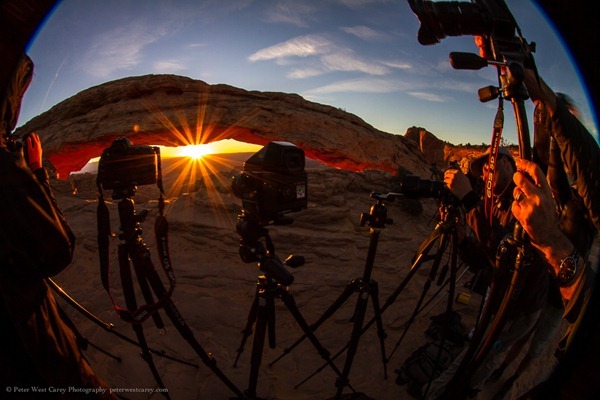
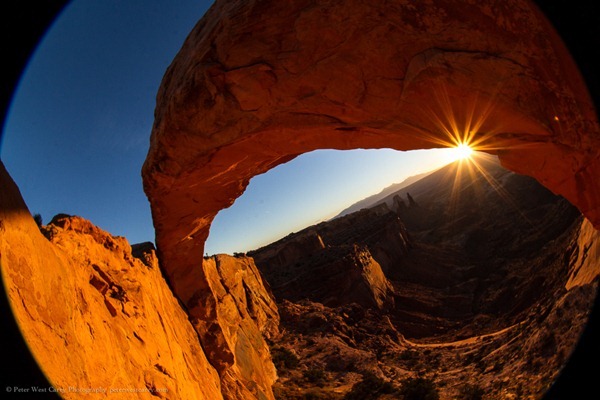
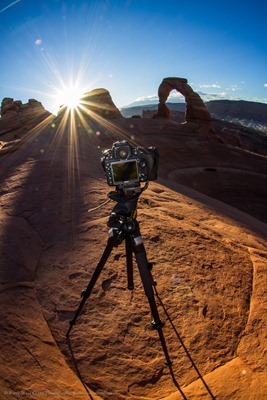
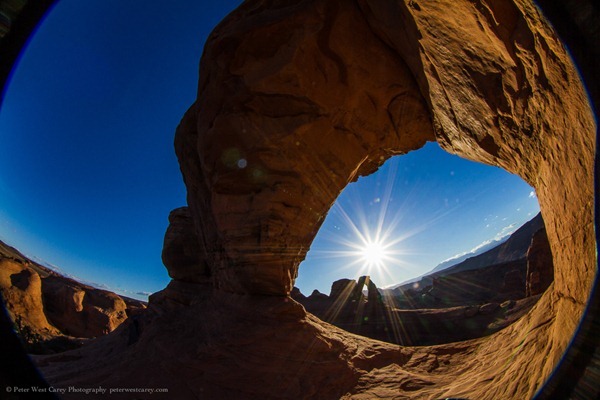
For instance, here are two shots, both taken at 10mm. The difference: the first lens is a non-fisheye Canon EF 10-22mm lens and the second is the Canon 8-15mm fisheye.

PeterWestCarey-Utah2012-1021-7193

PeterWestCarey-Utah2012-1021-7187

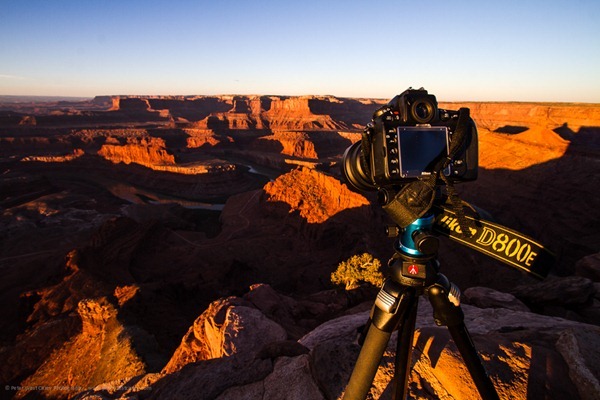
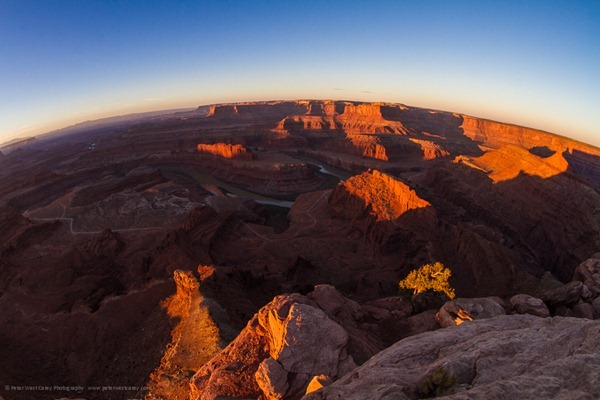
Both shots are taken from nearly the same perspective (the fisheye is taken from the position of the Nikon D800E in the first image) but the fisheye gives a different feel. I only made slight clarity and level adjustments in the photos and did not crop them, so this is what you can expect at 10mm.

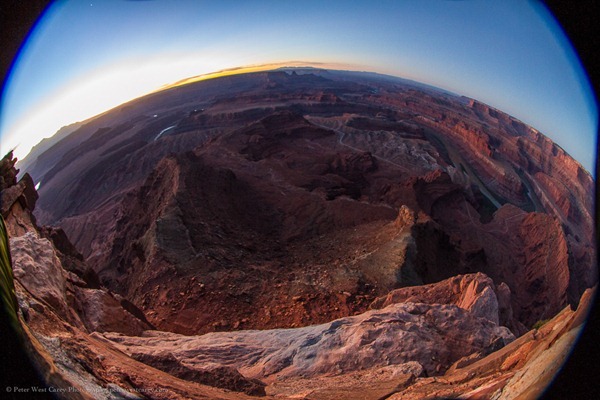
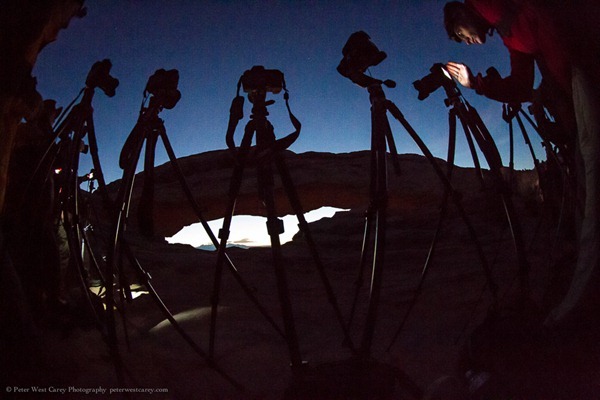
Below 10mm the black edge of the area outside the fisheye is seen. How bad is it? It depends.

At first it annoyed me to have the incomplete image. Neither full fisheye nor filled frame. Like this:

Peter-West-Carey-Utah2012-1021-7155

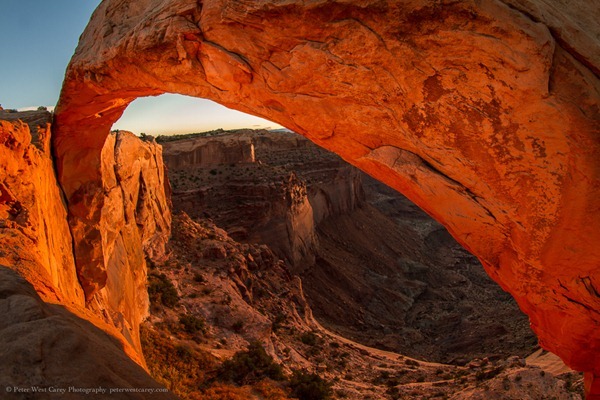
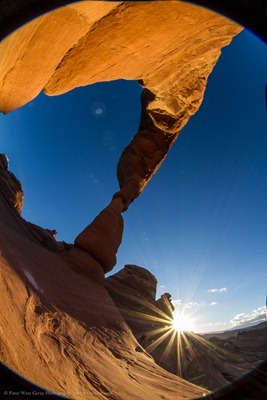
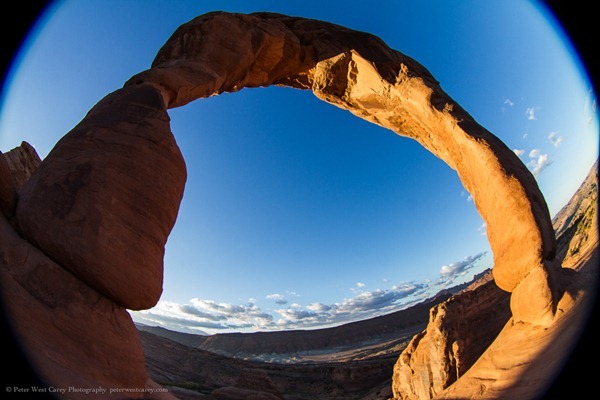
But then I started finding instances where it worked well. The arches found in these parks lent themselves naturally to the form factor. The more I experimented, the more I enjoyed the effect.

I realize not everyone will like this look. By the time you read this, there might be a dozen notes in the comment section below stating how horrible it is. But this is photography and it is art, so it doesn’t really matter what I like or the commenters like. It matters what you like.

Below are more examples from my short trip. If they intrigue you to give the lens a try, all the better. Some have the corners blacked out and some are zoomed in slightly. Experiment, play, have fun.

(Click on an image for a 1000px version)

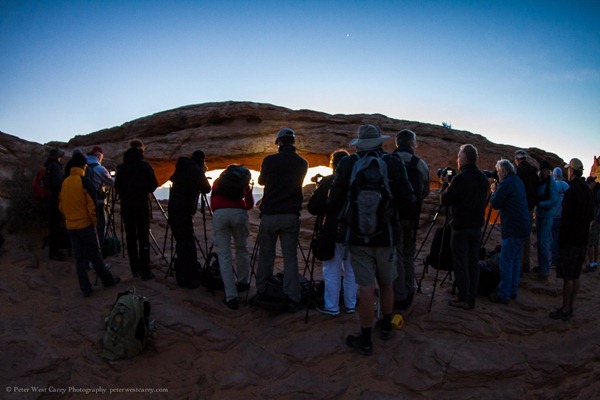
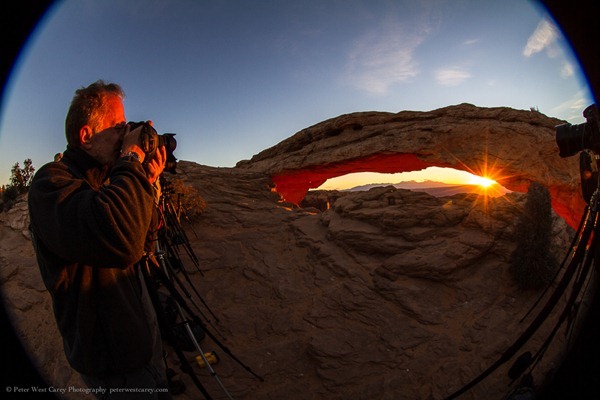
The first set of images are from Mesa Arch in Canyonlands NP at sunrise which was packed with 20 or more photographers. The second set is from Delicate Arch in Arches NP at sunrise with absolutely no one else around.

Peter-West-Carey-Utah2012-1022-7348

Peter-West-Carey-Utah2012-1022-7392

Peter-West-Carey-Utah2012-1022-7445

Peter-West-Carey-Utah2012-1022-7451

Peter-West-Carey-Utah2012-1022-7456

Peter-West-Carey-Utah2012-1022-7500

Peter-West-Carey-Utah2012-1023-7955

Peter-West-Carey-Utah2012-1023-7961

Peter-West-Carey-Utah2012-1023-8001

Peter-West-Carey-Utah2012-1023-8010

A special thank you to BorrowLenses.com for giving me the chance to play with the lens.

Post originally from: Digital Photography Tips.

Check out our more Photography Tips at Photography Tips for Beginners, Portrait Photography Tips and Wedding Photography Tips.

Why You Might Want To Consider A Full Frame Fisheye Lens Even If You Have A Crop Sensor Camera


Digital Photography School

 
Comments Off on Why You Might Want To Consider A Full Frame Fisheye Lens Even If You Have A Crop Sensor Camera

Posted in Photography


iFixit tears down the Nikon D600 – Chipworks confirms Sony sensor

08 Nov

MCLmUSsFFytBCjbU.jpeg

iFixit.com has performed a complete tear-down of the Nikon D600, reducing it to its component parts to see how easy it is to repair. Nikon’s latest full-frame DSLR scored a low ‘repairability’ score, of 2 out of 10 since ‘most components almost require a certification in soldering in order to properly remove’. On the plus side, the tripod mount is easy to remove, if you ever cross-thread it accidentally. iFixit has also worked with semiconductor experts Chipworks to take a very close look at the D600’s 24MP CMOS sensor. Click through for more details, images, and a link to both iFixit and Chipworks’ tear-downs. 

News: Digital Photography Review (dpreview.com)

 
Comments Off on iFixit tears down the Nikon D600 – Chipworks confirms Sony sensor

Posted in Uncategorized


How To Deal With A Dirty Camera Sensor

30 Oct

yachts-sensor-cleaning

Have you ever noticed little black specks appearing in brighter parts of your photos? These are dust specks that have found their way on to the sensor of your DSLR. Although not a serious problem, I think they’re amongst the most infuriating things photographers encounter! So I’m going to provide an easy, step-by-step process for removing them.

Firstly, I’ll just mention that one very simple means of preventing dust from landing on your sensor in the first place is to angle your camera body downwards when changing lenses. Similarly, when a really good shot appears to have been blighted by the presence of these pesky blobs, just use the clone-stamp tool in Photoshop or Lightroom to eliminate them.

yachts-sensor-cleaning-1

Cleaning Your Sensor, Step-By-Step:

  1. First things first. Get an idea of what you’re dealing with by taking a test shot. The idea here is to create an image that shows any senor dirt at its absolute worst.You’ve probably noticed that sensor dirt is only visible against bright parts of an image, like the sky. It’s also exaggerated when the aperture is at a wide setting. So, find a plain white subject, like a wall or a featureless overcast sky, focus on infinity and select the maximum aperture. Take the shot.
  2. Now it’s time to inspect the image. So upload it to your computer and open it on whatever processing software you use. Increase the contrast a touch to make things even clearer, before zooming in to 100%.This should give you a really clear idea of what needs to be done, and in what position some of the worst offending specks are.
    sensor-preview-dirty
  3. In your camera’s menus find the ‘mirror lock-up’ option and turn it on. Sometimes this is called ‘sensor cleaning mode’ or similar. This causes the reflex mirror inside the camera body to swing up and remain open, exposing the image sensor.
  4. The first tool you’ll need is a ‘bulb-blower’, which is a rugby ball shaped rubber air pocket with a thin plastic tube attached. Squeezing it causes air to be propelled at reasonably high pressure, and quite accurately, from the end of the tube.Remove the lens from your DSLR and hold the camera at a downward angle (this is important as it allows the dust to fall out of the camera). It’s not a bad idea to secure the camera in position on a tripod. Now carefully move the tube of the bulb blower towards the sensor, being careful not to make contact with any internal parts. Pump air for about 30 seconds to disperse any loose dust particles. Return the air blower to its pouch and re-attach the lens to your camera.
  5. Now take another test shot, exactly as in steps 1 and 2. Has the air blower been successful? If there are no longer any visible dust specks, job done. If there seem to be a few very faint ones, you can decide whether it’s worth having another go with the blower (remember, your test shots show the dust particles at their very worst).Sometimes you’ll find that there are some truly stubborn marks which haven’t even moved position in the slightest. Often these appear with a slight ring around them and have been become attached to the sensor with more than just static. If you see some of these, it’s time for step 6.
  6. To get rid of more stubborn marks, a sensor cleaning brush can be an effective tool. Select mirror lock-up (step 3) and position the camera at a downward angle, using a tripod if you wish to have maximum control. Take a sensor cleaning brush and carefully swipe it across the face of the sensor once.Don’t be tempted to go back and swipe it across the sensor again, for obvious reasons. The whole idea is to transfer the dust from the senor to the fine bristles of the brush. So once you’ve picked them up, remove the brush from the camera and blast air through the bristles with the air blower to clean them. Now you can return to the sensor and swipe the brush across it another time. When finished, return the brush to its storage box so that it doesn’t pick up any dust.
  7. Now for another test shot (as per step 1). Inspect the image and decide whether further cleaning is needed (as per steps 2 and 5). You may well find that those really stubborn marks have still stayed put, in which case it’s time for step 8.
  8. The last tool for cleaning sensors is a sensor swab, which comes with a special solution. Set everything up as before, with mirror lock-up on and lens removed. For this, it’s best to work sitting down with the camera body facing upwards for easy access.Apply a small amount of cleaning solution to both sides of a swab. It doesn’t want to be dripping or almost dry, but wet enough to budge stubborn particles. Swipe both sides of the swab across the sensor once. Use downward pressure (remember, you’ve already failed to get rid of these specks with an air blower and brush), but do treat it like the extremely expensive object that it is. Discard the swab and repeat with a new one.
  9. Re-attach the lens and take another test-shot (as in step 1). You should find that even those dust specks that seemed to have put down roots have now been blasted away! Zoomed in at 100%, you should have a satisfyingly pristine sensor.
    snesor-preview-clean
  10. If it turns out that there are still little specks of dirt, you have a couple of options: a) Have another go with the swabs, this time applying a touch more downward pressure and using a bit more solution, or b) send your camera off for a professional clean.

There’s no need to be afraid of cleaning your camera’s sensor yourself. As long as you use the right equipment and are not heavy handed, you should rarely need to spend money on a professional clean. Personally, I tend to find that the air blower does the trick 90% of the time. Don’t forget the clone stamp tool either, which is an invaluable asset for rescuing dust-affected images.

Josh Austin is a photographer based in the UK, with a particular interest in landscape, travel and street photography. When not out shooting he shares tips on digital photography through his blog Photography Art Cafe.

dslrBlog

 
Comments Off on How To Deal With A Dirty Camera Sensor

Posted in Photography


Proper Sensor Cleaning Tutorial

25 Oct

Questions? Go here: www.youtube.com Tutorial on how to clean the camera sensor for dust-free images. See below for cameras with built-in Mirror Lock Up option available. Download the list of required supplies here (PDF): tinyurl.com D1-Series: EH-5 AC Adapter Required D2-Series: Mirror…

 
Comments Off on Proper Sensor Cleaning Tutorial

Posted in Nikon Videos


Aptina details 1″ sensor for mirrorless, bridge or broadcast-video cameras

16 Oct

Aptina_AR1820HS_sample.jpg

Sensor maker Aptina has released more details of its two most recently-announced chips, including a 10MP, 1″-type sensor that uses its dynamic range-boosting DR-Pix technology. The company, which also makes the 1″ sensors used in the Nikon 1 System cameras, is making this new sensor available to the wider market. It has also provided more detail about an 18MP 1/2.3″ compact camera sensor that can shoot 1080p video with three different crops at up to 120 frames per second.

News: Digital Photography Review (dpreview.com)

 
Comments Off on Aptina details 1″ sensor for mirrorless, bridge or broadcast-video cameras

Posted in Uncategorized


Latest Sony 12MP sensor allows brighter lenses for enthusiast compacts

16 Oct

IMX144.png

Sony has published details of its latest 12MP 1/1.7″-type (7.5 x 5.6mm) back-lit CMOS sensor. The IMX144CQJ offers full-resolution 12-bit output at up to 35 frames per second or a roughly ‘widescreen’ 17:9 crop at up to 60 fps – allowing 4k video. Sony stresses how well the sensor can receive light from oblique angles, thanks to its large pixel size, making it able to work with ‘brighter lenses and high power zoom lenses.’ This is interesting, given the recent launch of a group of wide-maximum aperture compacts based around 12MP, 1/1.7″-type BSI CMOS sensors, such as the Olympus XZ-2, Nikon Coolpix P7700 and Samsung EX2F.

News: Digital Photography Review (dpreview.com)

 
Comments Off on Latest Sony 12MP sensor allows brighter lenses for enthusiast compacts

Posted in Uncategorized