RSS
 

Posts Tagged ‘Selective’

How to Use Selective Color for More Dynamic Images

27 Aug

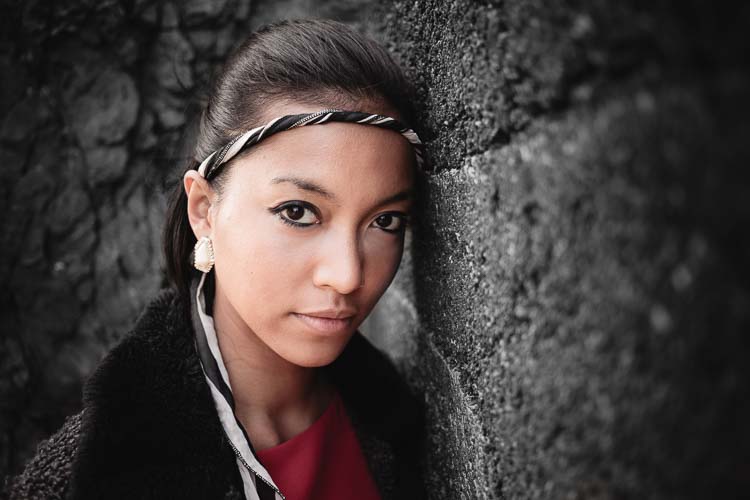
Semi black and white or selective color photos are quite effective. It’s an old trick by some photographers considered a cheap trick, nevertheless, it is a quite effective one. And just because it’s an old idea it should not hold you back from experimenting with it.

Learn How to Use the Strength of Selective Color - old ship in Denmark

A selective color photograph of the Viking ship “The Sea Stallion” in Roskilde, Denmark.

In this article, you will learn a couple of different ways to make selective color photos and you how to spot or photograph the candidates. It’s not a technique that is applicable to all photographs, but for some, it can make a big difference.

You most likely already know some famous selective color photos. A classic image is of a 7-year old boy kissing a 7-year old girl while holding a red rose, where the flower is the only thing in color. Or a photo of a red bicycle, and everything else but the bicycle is black and white.

These examples are probably part of the reason the technique is considered a cheap trick.

street in europe at night with orange lights - Learn How to Use the Strength of Selective Color

Background information

Before diving into the technique, you might want to know the theory. The pioneer landscape photographer Ansel Adams used a technique in his darkroom to change the exposure locally on various parts of a photo. This way he could make some areas brighter and others darker.

The human eye naturally seeks the brighter parts of a photo and by using this knowledge, Ansel Adams could emphasize what he wanted and guide the viewer around in his photos. This technique is called dodging and burning.

selective color landscape scene - Learn How to Use the Strength of Selective Color

You can use a similar technique with colors. Just as the human eye is attracted to bright areas in an image, it is also attracted to more saturated areas. In this way, it is very similar to dodging and burning. You can use this as a tool to guide the viewer’s eye around a photo.

Just to be clear: It is the difference in saturation that the eye can spot not just high saturation. If you have even saturation all over your photo, you can’t control the eye through color. Increasing or decreasing the overall saturation will not change that situation and if everything gets too saturated it often becomes painful to look at.

If you only turn up the saturation on certain objects of interest in your photo, the eye will seek those out. This way you will be able to guide the viewer to the important objects in your photo.

Chicago the Bean - Learn How to Use the Strength of Selective Color

You can achieve the same effect by decreasing the saturation from everything else but the subject. If you go to the extreme end and completely remove all color, except a few elements, you will have a semi-black and white or selective color photo.

By using this technique you will create stronger photos.

The classic technique to create selective color photos

You can create the classic “boy kisses girl” or “red bike” photographs, but you can also go searching for something else. This example is from the famous Nyhavn in Copenhagen. These old houses are very colorful, which can look great, but also can be quite an eyeful of colors.

row of houses in Copenhagen - Learn How to Use the Strength of Selective Color

By removing colors from all houses except the two yellow ones, the attention is strong on those two houses. Any house or two houses picked to be saturated, would attract attention, but the two picked are good candidates, because:

  1. They are both the same color, which creates balance.
  2. They are approximately the same size, which also adds to creating balance.
  3. Most importantly, they have symmetrical placement in the photo.

Composition

Notice that the houses are placed the same distance from the edge of the frame. That emphasizes the composition and makes it a stronger photo than most other available choices.

Notice also that the windows between the two yellow houses have some color. That is a spice that allows the viewer to discover more subtle details, making the image more interesting to look at.

Learn How to Use the Strength of Selective Color

You can use the selective color approach to create a different kind of composition within your photo. You can plan this when you are photographing. Or, as I did in this case, you can discover it when you post-process the photos. It is the final result that counts, not the path you chose to get there.

The next photo is a similar example from a metro station. Again you can see the clearly separated colored stairs. Just like before, you can also find a little spice in the blue color added to the stairs. You can do that kind of trick to make the image more intriguing.

red and blue stairs - Learn How to Use the Strength of Selective Color

If you want to create photographs like these, search for something that you can make stand out. Then frame it, like it was more or less the only object within the frame. You have to think of it as a very simple composition, even if it is a busy scene.

When you desaturate the rest of the image, the balance will change. The colored elements will be the primary focus points, regardless of everything else in the photo.

How to make a classic selective color photo

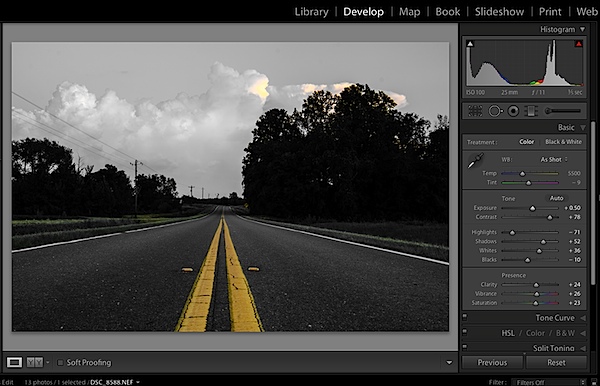
There are several ways to do this, in this example, you will learn an easy-to-learn approach in Adobe Lightroom. First, you have to find the photo that you want to work on and then follow these steps.

Step 1 – Go to the Development Module

Lightroom Develop - How to Use Selective Color for More Dynamic Images

Step 2 – Pick the Adjustment Brush tool

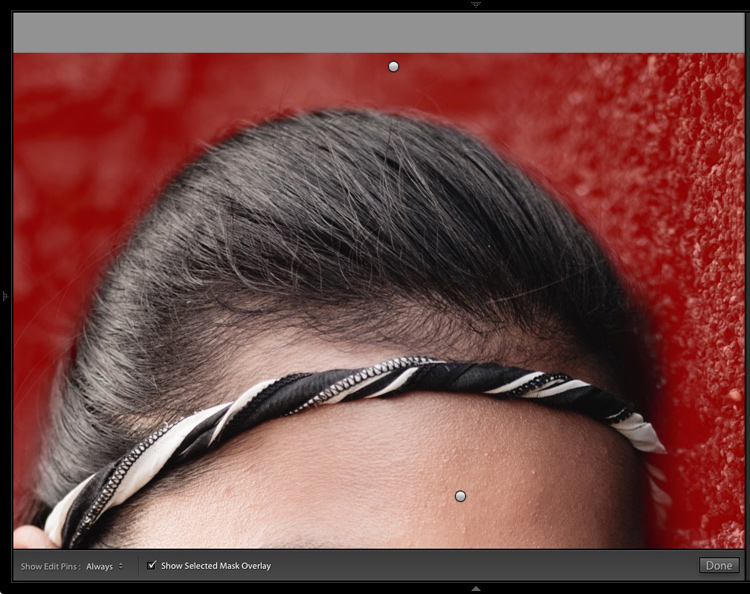
Step 3 – Set brush settings

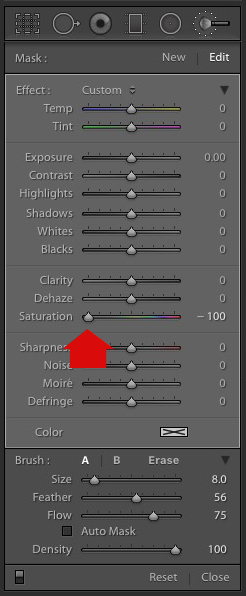
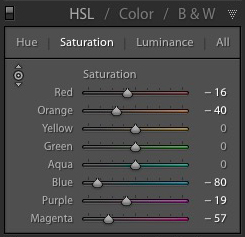
At first, make sure you have edge detection (Auto Mask) disabled and the brush is at 100% flow and 100% density. Then reset all settings (double-click on the word Effect) except Saturation, which you will then set to -100.

Step 4 – Paint everything black and white

How to Use Selective Color for More Dynamic Images

Step 5 – Switch to the Erase brush

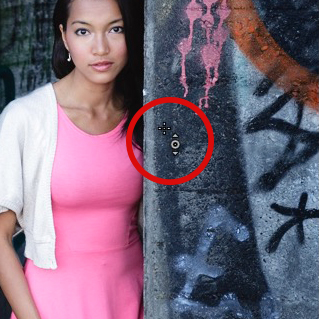
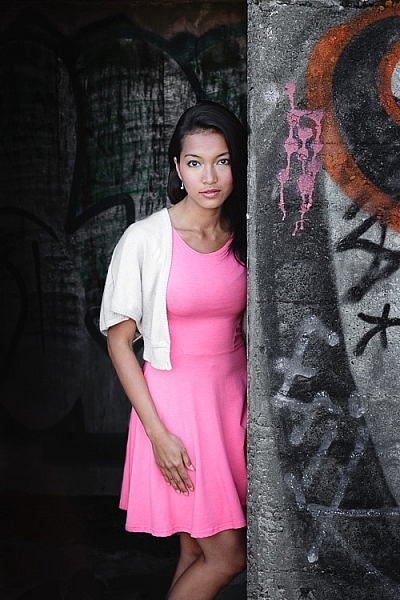
Step 6 – Paint in the objects you want to have color

Set the size of the brush to something that is fitting for your subject and paint roughly over it. The Erase Brush will remove the black and white, and you will get a colored object.

Step 7 – Zoom in and make sure you have the edges right

Next Zoom in (press Z) and switch between the Brush and the Erase Brush to make a perfect edge.

Depending on your photo, you may have to use either Feather at 0 or you may be able to use Auto Mask, which is the automatic edge detection. In this case, the Auto Mask cannot figure out the edge and I had to use a brush at 0 Feather (hard edge brush).
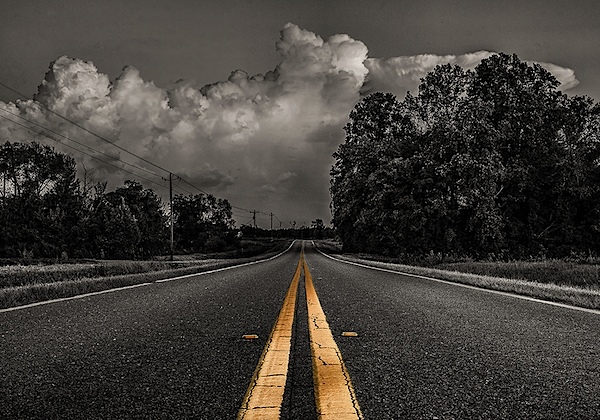
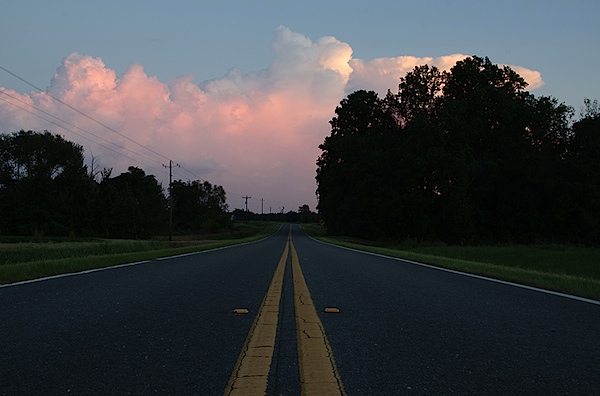
How to Use Selective Color for More Dynamic Images

Remove some colors

You can also use a different approach. Instead of limiting the colors to a specific object, you can remove certain colors. This approach works well on photos that have unwanted colors or a color cast.

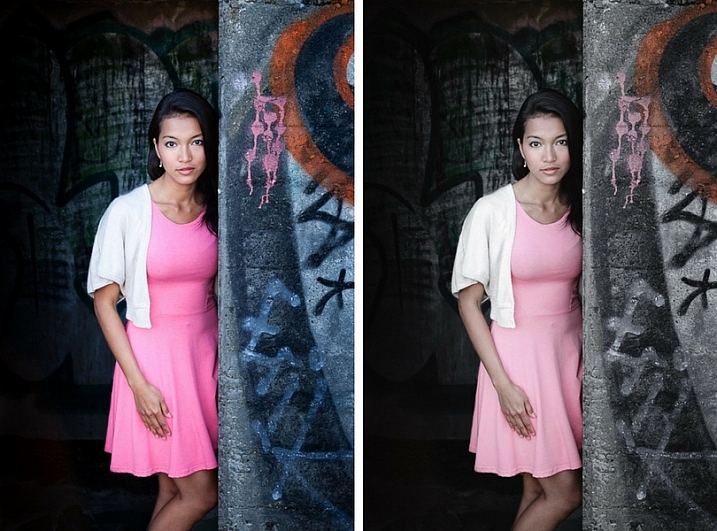
In the example below of the Vikingship, the photograph was shot during the blue hour. Because the blue light reflects in the snow it becomes too much and it is not flattering. By removing the Blues and the Cyan/Aquas the photo changes and becomes a piece of fine art. Use the HSL panel to do this.

How to Use Selective Color for More Dynamic Images - before and after images

Just by removing blue and cyan/aqua a photo can become a piece of fine art.

This technique gives photos that have a much more complex separation between the black and white and the colored elements and the viewer can go searching for details. In the photo above, you can find a second Viking ship with Christmas lights on in the background.

Here’s another example from The Scoop in London. There was a light drizzle, which was enough for the blue light to shine and appear to glow into the air. By removing all other colors than blue and purple the photo is changed dramatically.

This third photograph below is from a train station in Geneva.

If you study the photos you can see the colored selections are much more complex and not something you can do by hand.

The photograph from London is about the shape of The Scoop. The original photograph had an orange sky, which did not work well with the blue light of The Scoop. By using the selective color black and white technique, the focus is on The Scoop.

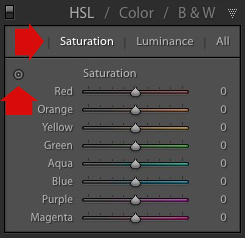
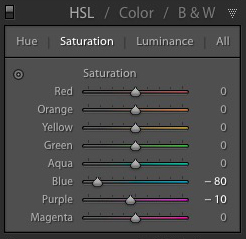
How to remove individual colors

You can very easily remove specific colors in Adobe Lightroom. Find the photo you want to work with.

Step 1 – Go to the Develop Module

How to Use Selective Color for More Dynamic Images

Step 2 – Go to the HSL module

HSL panel
Play with pulling some of the sliders to zero and leaving some at 100. You may have to dial several of the sliders to zero to achieve the desired effect.

The post How to Use Selective Color for More Dynamic Images appeared first on Digital Photography School.


Digital Photography School

 
Comments Off on How to Use Selective Color for More Dynamic Images

Posted in Photography


Selective Hearing: These Earplugs Let You Turn Down Sounds of the World

22 Apr

[ By SA Rogers in Gadgets & Geekery & Technology. ]

We’ve all had moments where we wished we could tune out a particular person or muffle loud music without losing the ability to hear a friend’s voice, but standard earplugs don’t exactly allow for a lot of fine-tuning. But with a new product called ‘Knops,’ you can literally turn the volume of the world up or down in an instant. Founded by musicians, the Dutch startup aims to help you hear what you want to hear and ignore what you don’t with the twist of a tiny knob.

Each pair of knots has four modes you can switch between: the first is clear sound, the second reduces ambient ‘city noise’ by 10 decibels, the third muffles live music by 20 decibels, and the fourth is ‘isolation,’ blocking out 30 decibels. You can easily switch between the four levels whenever you want, eliminating the need to constantly pull out and reinsert your earplugs.

Noting that most earbuds are “downright ugly as hell,” the designers gave Knops a minimalist look available in four different colors and trims. You might imagine that they’d be unnecessarily high-tech, turning a simple product like earplugs into an expensive, high-maintenance gadget that requires syncing to electronic devices or battery charging. Surprisingly, that’s not the case. The creators wanted control over external sounds without the distortion that can come with electronic solutions.

How does it work? According to the creators, “Knops uses no electronics, no apps and no batteries. Instead our earbuds are acoustically engineered. The real sound is filtered using gold old physics. With the help of computer simulations and real-world prototypes tested in acoustic labs, we tuned Knops. We spend a lot of time fine-tuning the sound, so we can provide the best quality sound at every volume level. Working with the natural response of the ear canal.”

You can pre-order a pair by backing the project on Kickstarter for 58 Euros (about $ 62 USD) or more.


Share on Facebook


[ By SA Rogers in Gadgets & Geekery & Technology. ]

[ WebUrbanist | Archives | Galleries | Privacy | TOS ]


WebUrbanist

 
Comments Off on Selective Hearing: These Earplugs Let You Turn Down Sounds of the World

Posted in Creativity


3 Ways to Make Selective Color Portraits Using Lightroom and Silver Efex Pro 2

26 Jan

3 Ways Make Selective Color Portraits Using Lightroom and Silver Efex Pro 2
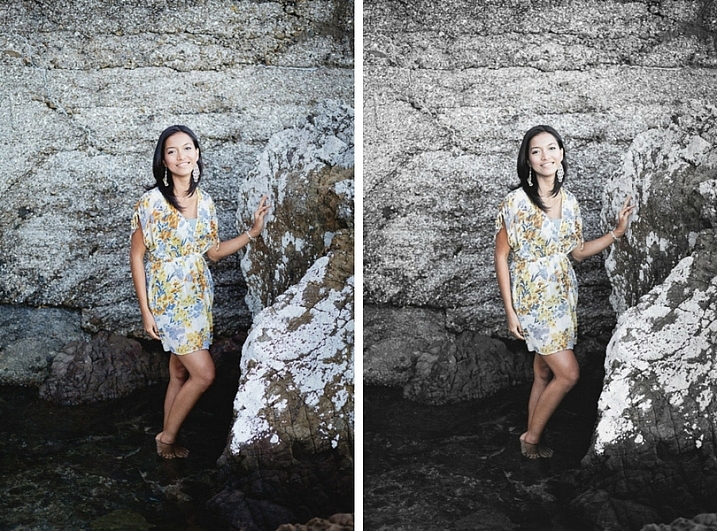
Selective coloring is a post-processing technique where you convert an image to black and white, but leave part of it in color. It has a bad reputation because it can be used to create some truly horrendous images where the only thing on display is the photographer’s lack of ability.

But the good news is that you can use selective coloring in a far more sophisticated way to create some interesting images. The key is to keep it subtle and to use it only on suitable photos. I like to make selective color portraits, but of course you are free to experiment with other subjects as well (but please, no flowers).

I prefer to keep my workflow within Lightroom whenever possible as it saves hard drive space and makes the entire photography workflow much simpler. The first two techniques below are for Lightroom, the third uses Silver Efex Pro 2, a free plug-in you can download from Google.

1. Selective color in Lightroom using the Adjustment Brush

The first example, below, shows what you can do in Lightroom. This is the portrait that I am going to work with for this technique.

3 Ways Make Selective Color Portraits Using Lightroom and Silver Efex Pro 2

The simple background means it’s ideal to use for a selective color portrait.

Start by going to the Develop module and activating the Adjustment Brush tool. Paint in the background to create a mask (as shown below).

3 Ways Make Selective Color Portraits Using Lightroom and Silver Efex Pro 2

The mask is shown here in red.

It may help to zoom in and use a smaller brush around the model for a more accurate mask.

3 Ways Make Selective Color Portraits Using Lightroom and Silver Efex Pro 2

View zoomed in so you can mask more accurately around the model.

Go to the Adjustment Brush sliders and set the saturation to zero.

3 Ways Make Selective Color Portraits Using Lightroom and Silver Efex Pro 2 - set saturation to zero

That removes all color from the background, giving this effect. Don’t forget you don’t have to move Saturation all the way to zero – you can simply lower it to reduce the color intensity of the background. Play around and see what works best for your image.

Selective coloring in Lightroom

It’s important that you chose the correct image for this technique to get the best effect. There are several reasons it works well with this portrait.

  • The background is monochromatic. It wouldn’t work as well with a colorful background.
  • The rocks in the background have plenty of texture, which looks good in black and white.
  • Some of the model’s clothes are black or charcoal gray, so introducing this color into the background fits with the overall aesthetic of the image.

2. Selective coloring in Lightroom using the HSL

The next portrait (below) has a more colorful foreground. I’m not going to remove the color completely, but I would like to make it more monochromatic. That will help the subtle colors in the model’s dress and skin to stand out.

3 Ways Make Selective Color Portraits Using Lightroom and Silver Efex Pro 2

Go to the HSL / Color / B&W panel in the Develop module. Click the Saturation tab, then the Targeted Adjustment tool (marked below) to activate it.

Selective coloring in Lightroom

Move the cursor over part of the image that you want to desaturate. In this case, the foreground has a blue cast that I want to remove, so I chose this spot (marked by the small cross circled in red below).

Selective coloring in Lightroom

Click and hold the button as you move the mouse downward. Lightroom reads the pixels under the cross representing the Targeted Adjustment tool and reduces the saturation of those colors across the entire image. The matching color sliders in the HSL panel move to the left. When I did this, Lightroom set Blue to -80 and Purple to -10.

Selective coloring in Lightroom

This is the result.

3 Ways Make Selective Color Portraits Using Lightroom and Silver Efex Pro 2

I took it further by repeating the technique. This time using the Targeted Adjustment tool on the pink and orange paintwork on the wall, resulted in the following saturation settings.

Selective coloring in Lightroom

This is a before and after of the final portrait showing these extra adjustments.

selective-colored-portrait-01

Notes:

One key thing to be aware of is how the colors in your photo are related. In the photo above reducing the saturation of the pink paint affected the model’s dress, which is also pink.

Reducing the saturation of the orange paint also affected the model’s skin. In this case, it worked out okay, but you should always zoom in and double check, especially when changing the color settings of Red, Orange or Yellow hues, as this can have some strange effects on skin tones.

3. Selective coloring using Silver Efex Pro 2

Silver Efex Pro 2 is one of my favorite black and white plug-ins. I’d like to show you how to use it for making a selective color portrait with a subtle effect that almost looks like an old style hand-tinted black and white print.

This is the portrait I’m going to use. It’s a good photo to use as the colors are subtle.

3 Ways Make Selective Color Portraits Using Lightroom and Silver Efex Pro 2

If you don’t have Silver Efex Pro 2 already, you can download it for free from the official Nik Collection website.

Once it’s installed go to Lightroom’s Library module and select the photo you want to edit. Go to File > Edit In > Silver Efex Pro 2 (you can also find this option by right-clicking the photo).

Select the option that says “Edit a Copy with Lightroom Adjustments” in the next window (it will probably be the only one you can select) and click Edit. Lightroom converts the Raw file to a TIFF file and opens it in Silver Efex Pro 2.

Selective coloring in Silver Efex Pro 2

Your first task in Silver Efex Pro 2 is to decide whether you want to stay with the default neutral black and white conversion or use one of the built-in presets. I selected the Soft Sepia preset (below), then made some adjustments to the tonal values until I was ready to apply selective coloring.

3 Ways Make Selective Color Portraits Using Lightroom and Silver Efex Pro 2

In Silver Efex Pro 2 you make local adjustments by going to the Selective Adjustments panel and adding Control Points. This screenshot shows seven of the Control Points that I added to this photo. Each one is depicted by a yellow dot.

Selective coloring in Silver Efex Pro 2

Using Control Points

Control Points work by analyzing the color and brightness of the pixels underneath them, then applying the selected effect to the pixels within the circle. In this photo, I moved the Selective Coloring slider (SC) to the right to bring the colors back to the model, but not the background.

You control the size of the circle by moving the top slider. Silver Efex Pro 2 displays a circle to show you the area affected by the Control Point.

3 Ways Make Selective Color Portraits Using Lightroom and Silver Efex Pro 2

Add multiple Control Points with circles that cover the model but as little of the background as possible. When you are finished, click the Save button. Silver Efex Pro 2 closes, saving the new TIFF file in the same folder as the original file and adding it to the same Collection in Lightroom.

Here’s the before and after with portrait after selective coloring in Silver Efex Pro 2. Notice it’s very subtle.

selective-colored-portrait-02

Conclusion

Hopefully, this article has shown you how to use selective color in a subtle and sophisticated way that moves on from the garish examples you have probably seen online. Do you have any questions about these techniques? Let me know in the comments below.


If you’d like to learn more about Lightroom, then please check out my popular Mastering Lightroom ebooks.

googletag.cmd.push(function() {
tablet_slots.push( googletag.defineSlot( “/1005424/_dPSv4_tab-all-article-bottom_(300×250)”, [300, 250], “pb-ad-78623” ).addService( googletag.pubads() ) ); } );

googletag.cmd.push(function() {
mobile_slots.push( googletag.defineSlot( “/1005424/_dPSv4_mob-all-article-bottom_(300×250)”, [300, 250], “pb-ad-78158” ).addService( googletag.pubads() ) ); } );

The post 3 Ways to Make Selective Color Portraits Using Lightroom and Silver Efex Pro 2 by Andrew S. Gibson appeared first on Digital Photography School.


Digital Photography School

 
Comments Off on 3 Ways to Make Selective Color Portraits Using Lightroom and Silver Efex Pro 2

Posted in Photography


Lensbaby adds Android option for its selective focus lens

24 Apr

kickstarter.jpg

When Lensbaby launched the  Kickstarter project for its ‘Sweet Spot’ selective focus lens at the beginning of April it was initially iPhone only. Now the company has added a pledge level for Android users, too. For $ 50 you can pre-order the Sweet Spot lens and the Android application for your device. Delivery is expected in October. Learn more

News: Digital Photography Review (dpreview.com)

 
Comments Off on Lensbaby adds Android option for its selective focus lens

Posted in Uncategorized


Lensbaby brings ‘Sweet Spot ‘ selective focus lens to iPhone

04 Apr

lensbaby1.jpg

Lensbaby is well known among DSLR photographers for its array of special-effect lenses. Now the Portland, Oregon-based company wants to expand into mobile photography and has launched a Kickstarter project to fund the final development stage of its Lensbaby Sweet Spot lens for iPhones. Learn more

News: Digital Photography Review (dpreview.com)

 
Comments Off on Lensbaby brings ‘Sweet Spot ‘ selective focus lens to iPhone

Posted in Uncategorized


Olympus patent hints at selective exposure in ‘Live Time’ mode

15 Mar

2014_39116_fig05.png

Earlier this week, Japanese patent blog Egami reported that Olympus has patented a technology that would allow the photographer to selectively adjust exposure of different scene areas during an exposure. This might allow for a more balanced exposure of scenes where cameras might normally struggle. Click through for an explanation of what we think the patent might mean for photographers. 

News: Digital Photography Review (dpreview.com)

 
Comments Off on Olympus patent hints at selective exposure in ‘Live Time’ mode

Posted in Uncategorized


How to Easily Create Selective Color Using Lightroom

11 Apr

This is a guest post by: John Davenport

Selective color photography has been around for ages. It’s something that has been used in the movies – Schindler’s List and Sin City come to mind – and more recently Chase Freedom and Budweiser have used it in their ad campaigns to highlight their products. So even if you dislike selective color, or if haven’t given it much thought, you have to admit it’s a great technique to use when you’re trying to draw attention to a certain subject and is something useful to have in your tool belt.

Today I’m going to show you how to create simple selective color images using only Lightroom as your processing software.

What Makes a Good Selective Color Image?

Double Yellow.jpg

First we need to make sure we know what to look for when we’re out photographing our subjects because selective color photography is not something suited for every situation. Whether you’re a landscape photographer, a portrait photographer, or someone shooting on the city streets it’s important to keep the idea in the back of your head that selective color shouldn’t be forced.

Typically you’ll want to pull a vibrant color out of a rather drab scene so fall foliage can work really well, blue eyes in portraits are a very common theme, bright dresses and clothing work well too.

One final point is that you should make sure that whatever you’re keeping in color adds value to the photograph and isn’t something that will detract from the overall scene.

How to Create Selective Color in Lightroom

One of the limitations of Lightroom is that it does not have the ability to do true layers like Photoshop does. We can get around this for selective color processing by working with the HSL tab and working with the Adjustment Brush tool. In short, what we’re going to be doing today is turning the saturation down on all the colors and areas of the photograph that we don’t want color in. The following is a step by step guide on how I created the image at the top of this post.

Here’s the original image for your reference.

original.jpg

The first step would be to go into the HSL tab in Lightroom and remove the saturation from all the colors you don’t want in your photograph. In my case I wanted to keep yellow so all the other sliders have been pulled to the far left.

Screen Shot 1.png

Next step would be to tune the image to your liking – this is a rough tuning just something to get you close to where the final image will be. Simply go into the Basic editing tab of Lightroom and get the overall image set up how you like. You might notice as you do this, some colors start creeping back into the photograph, that’s okay we’ll fix this in the next step.

Screen Shot 2.png

Cleaning up any colors that have reappeared after your tuning process can be done easily with the Adjustment Brush. Simply create a new adjustment brush layer and turn the saturation to the far left. Paint anywhere you don’t want color. If you accidentally paint over something you want to keep switch to the erase mode and go back over that area until you get it right.

Screen Shot 3.png

After you get to this point it’s up to you to finalize the photograph for your own unique look with final touches and cropping.

I find that this workflow does a good job at creating selective color images without the confusion and time consuming nature that dealing with layers in Photoshop has. Of course it should be noted that with a program like Photoshop you’ll have a lot more control over your selective color processing, but for many of us this Lightroom trick is a great alternative.

Let’s Hear From You

Now that we’ve learned how to perform selective color edits I’d love to hear what your opinions are of this kind of processing do you use it? Do you hate it? Have you ever done this kind of thing in Lightroom before?

John Davenport is an avid amateur photographer who shares daily photos on Facebook. For more tips on Lightroom editing check out John’s weekly series which focuses on how to edit photos in Lightroom.

Post originally from: Digital Photography Tips.

Check out our more Photography Tips at Photography Tips for Beginners, Portrait Photography Tips and Wedding Photography Tips.

How to Easily Create Selective Color Using Lightroom


Digital Photography School

 
Comments Off on How to Easily Create Selective Color Using Lightroom

Posted in Photography


Selective Colour Time Lapse 2

18 Nov

www.libanyusuf.com Buy photo prints! http Cities Photographed: Havana Prague Rome Niagara Falls (Canada) Frankfurt Toronto International Airport Music: Valentina Igoshina playing Chopin’s Nocturne in C Minor, Op. 48, No. 1. Equipment: Nikon D300, Photoshop & Final Cut Pro. Thanks for watching, please rate, fav and subscribe!
Video Rating: 4 / 5

 
Comments Off on Selective Colour Time Lapse 2

Posted in Nikon Videos


Adobe Photoshop CS3/CS4 Selective Coloring Tutorial

03 Nov

This is a quick an easy tutorial on how to use selective coloring. For more information, tutorials, and help subscribe to Valegod’s Channel! WEBSITE: www.Valegod.com PLEASE COMMENT/RATE/SUBSCRIBE
Video Rating: 3 / 5

All Video Editing Software at www.Bassz.com Adobe Photoshop Elements 9 at www.Bassz.com
Video Rating: 5 / 5

 
Comments Off on Adobe Photoshop CS3/CS4 Selective Coloring Tutorial

Posted in Retouching in Photoshop


Adjusting Color with the Selective Color Tool in Photoshop

28 Oct

Doing dramatic edits with only two fairly simple tools in Photoshop.

DOWNLOAD HERE bit.ly Professional Photoshop Actions, for a perfect Grayscale conversion These Adobe Photoshop Actions are realized to suit almost every photography. ” Through a combination of tested post processing corrections, we realized these Actions to save time, and convert any image into a perfect black & white photo, in a matter of seconds. Also 3 Unique Sharpener Actions are included.” Watch the Video Tutorial to see how to use these Actions, and how to achieve a perfect black and white photo depending on how you use these Actions. Create perfect Black and White photo effects, with no skills What you get in this item: Detailed Instructions Suggestions and tricks about how to work with these Actions 3 Sharpener Actions wich enhance details, using the same process 3 Pro Black & White Actions, to make perfect Greyscale conversions DOWNLOAD HERE bit.ly
Video Rating: 5 / 5

 
Comments Off on Adjusting Color with the Selective Color Tool in Photoshop

Posted in Retouching in Photoshop