RSS
 

Posts Tagged ‘Seascape’

How to Shoot Long Exposure Seascape Photography [video]

08 Feb

The post How to Shoot Long Exposure Seascape Photography appeared first on Digital Photography School. It was authored by Caz Nowaczyk.

In this video by Landscape Photography IQ, Tom Mackie shares some great tips on how to shoot long exposure seascape photography.

?

Firstly, seaspray and salt cover everything! So bring optical wipes or spray to clean your lenses and filters.

Things to consider:

  • Think about your composition. Are there leading lines that you can use?
  • What direction is the wind going, and how is that affecting the movement of the clouds?
  • What are the tides like?
  • How quickly is the light changing?

Camera settings:

  • You may need to use a polarizer, with a graduated ND filter over the sky.
  • Put ISO at the lowest setting (64 or 100 ISO).
  • Stop down to your aperture to around f/14 max (depending on the amount of foreground and background you want in focus). Further than that softens the image through diffraction.
  • Play with different exposure times for varied effects. Try 30seconds or 60seconds.

You may also find the following articles helpful:

Step-by-step Guide to Long Exposure Photography

Recommended Gear for Doing Long Exposure Photography at Twilight and Dusk

How to Avoid Blurry Long Exposure Images with Proper Tripod Setup

How to Choose the Correct ND Filter for Your Desired Long Exposure Photography Effects

Long Exposure Photography 101 – How to Create the Shot

Long Exposure Photography 201 – How to Edit a Long Exposure Seascape

A Guide to Shooting Long Exposure Landscape Photos

The post How to Shoot Long Exposure Seascape Photography appeared first on Digital Photography School. It was authored by Caz Nowaczyk.


Digital Photography School

 
Comments Off on How to Shoot Long Exposure Seascape Photography [video]

Posted in Photography


Long Exposure Photography 201 – How to Edit a Long Exposure Seascape

10 Mar

In case you missed it, in an earlier article I introduced you to the 101’s of Long Exposure Photography, provided a checklist of the essential equipment, and detailed the exact steps to follow so you can capture a long exposure photograph.

In this article, I will share a precise workflow that you can use to process your long exposure photographs.

01 Long Exposure Photography 201 How to edit a Long Exposure Seascape

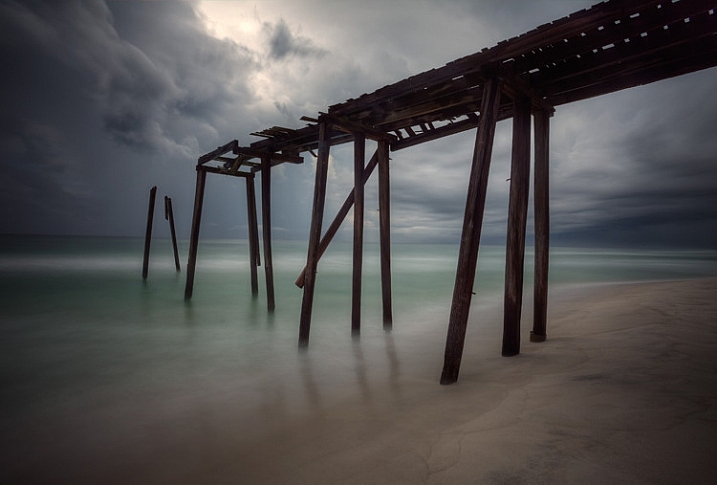
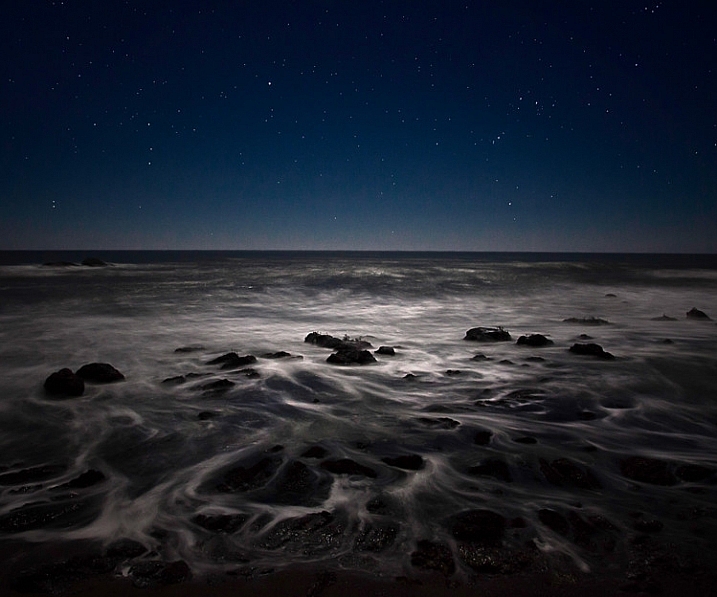
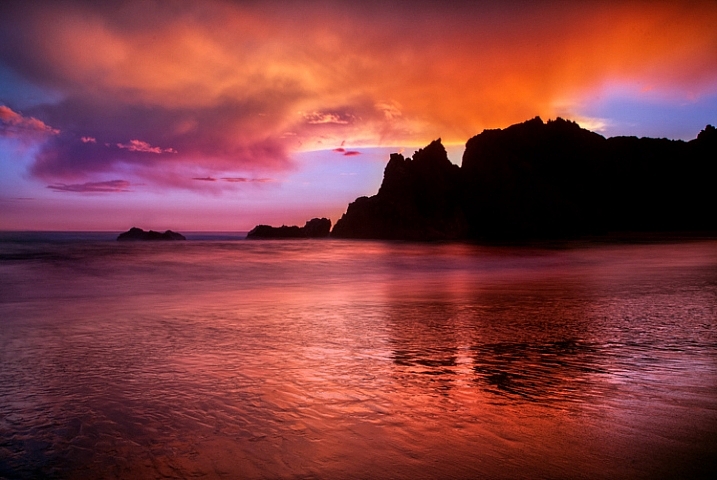
Long exposure seascape after editing.

Straight out of the camera (SOOC)

Long exposure photographs, when imported straight out of the camera are, in many ways, a lot like rough diamonds. Sadly, in most cases, the price tag usually isn’t one of them.

Straight out of the camera, it’s inevitable that your long exposure photograph will have a color cast and a degree of undesirable noise. Particularly if you miscalculate the exposure time and underexpose your image by accident (nobody’s perfect right?).

02 Long Exposure Photography 201 How to edit a Long Exposure Seascape

Underexposed, blue, and noisy RAW image straight out of the camera.

After taking one look at an image like this, it would be easy to feel a little disheartened. You’d probably reject the image, write your time off, and hope for better luck next time.

Noise, color casts, and the occasional exposure miscalculations happen – it comes with the territory. Fortunately, with a little sprinkle of post-processing magic, you can correct these mishaps.

Now, to be clear, I’m not suggesting you adopt a “fix it in post-production” approach. Like any genre of photography, you want to capture your subject as best as you possibly can in-camera. But, unlike more sensitive photography genres (portraiture, commercial, beauty, etc.), the atmospheric and surreal nature of long exposure photographs provides you with greater tolerance for post-processing corrections.

The chances are there’s a diamond hidden among all those imperfections. Here’s precisely how you can uncover it.

Processing Steps for Long Exposure Images

Step One – Basic Edits

01 Long Exposure Photography 201 How to edit a Long Exposure Seascape

Step one: Dust it down.

After importing your RAW image into Lightroom, it’s likely it will look a little flat and may have a handful of imperfections. The most common being color noise and color casts.

03 Long Exposure Photography 201 How to edit a Long Exposure Seascape

This image has a significant amount of Color and Luminance Noise.

Before you can tackle the corrections, polish your image off, and proudly display it for the world to see, you need to be able to see what you’re doing.

Regardless of whether your image is underexposed or overexposed, it’s a good idea to use the Lens Corrections and Basic Tone Panel in Lightroom to strengthen the basics of your image. Doing so will make correcting those imperfections much easier in the next step.

Here’s an example

Load your image into Lightroom’s Develop Module and navigate to the Lens Corrections tab.

Enable the “Remove Chromatic Aberration” and “Profile Corrections” checkboxes. These features will detect the lens you used to capture your image and load a profile to correct any distortion. This is particularly efficient at removing the vignette caused by any ND filters.

04 Long Exposure Photography 201 How to edit a Long Exposure Seascape

Before and after comparison of the Lens Corrections.

With the Lens Corrections in place, navigate up to the Basic panel. The general aim here is to refine your image as a whole using global adjustments. A good rule of thumb is to correct your exposure, restore detail in your highlights and shadows, and retain a good degree of overall contrast.

The specific values will vary for each image. Here you can see that increasing the exposure slider helps to correct the underexposed image. Further adjustments to the Shadows and Highlights were applied to restore detail. Finally, the Contrast, White, and Black sliders were fine-tuned to boost the overall contrast.

05 Long Exposure Photography 201 How to edit a Long Exposure Seascape

Before and after basic global adjustments.

Step Two: Correcting Color Casts

Long exposure images are prone to blue or magenta color casts, often caused by using ND filters. Provided you captured your image in RAW, correcting the color cast couldn’t be simpler. Simply adjust the White Balance sliders to counter your color cast.

In this case, the blue color cast is easily removed by adjusting the White Balance to almost 10,000 K.

06 Long Exposure Photography 201 How to edit a Long Exposure Seascape

The White Balance tool can be used to remove the color cast caused by your ND filters.

Step Three: Correct Noise

Noise can be problematic in long exposure photography. It’s caused by a variety of factors – ISO setting, the length of your exposure, and the heat of your camera sensor – none of which are terribly exciting to talk about.

In short, there are two variations of noise. Luminosity noise and color noise.

Luminosity noise creeps its way into your long exposure photographs through a combination of your ISO and the heat of your camera’s sensor. Essentially, the longer your exposure, or the higher your ISO, the more luminosity noise it will generate. Luminosity noise is colorless and typically shows up as small bright pixels.

07 Long Exposure Photography 201 How to edit a Long Exposure Seascape

The small bright pixels are known as Luminosity Noise.

Color Noise is luminosity noise’s irritating ugly brother. It typically looks like unsightly splotchy green and red pixels. It’s often found in the darker and lighter areas of your image.

08 Long Exposure Photography 201 How to edit a Long Exposure Seascape

Unsightly Color Noise.

In long exposure photography (LEP), it’s inevitable that you will encounter noise in your images. Sure, there are techniques to minimize it in camera. Like taking a bunch of shorter exposures, then aligning and blending them all together.

But if you read part one of this tutorial, you’ll know that sitting back and letting your camera do all the work while you enjoy a cup of tea is all part of the fun of long exposure photography. If the price you pay is a little bit of noise then I say, “Boil that kettle!”. Besides, it’s really easy to reduce or completely remove noise from your images. Take a look.

Navigate to your Detail tab in the Develop module and zoom into your image at 100%.

09 Long Exposure Photography 201 How to edit a Long Exposure Seascape

The Detail tab allows you to reduce Luminosity and Color Noise.

Start by adjusting the Color Noise reduction slider upwards until the bulk of your color noise disappears.

10 Long Exposure Photography 201 How to edit a Long Exposure Seascape

The Color Noise has been significantly reduced.

It’s likely you will still have some residual color noise. In that case, tweak the Detail and Smoothness sliders until you find a balance that removes the color noise and still retains detail in your image.

11 Long Exposure Photography 201 How to edit a Long Exposure Seascape

Tweaking the Detail and Smoothness sliders has completely removed the Color Noise.

Now you can turn your focus to the Luminosity Noise. Adjust the Luminosity slider upwards until the bulk of your luminosity noise has vanished. To fine-tune the adjustment, you can tweak the Detail and Contrast sliders.

12 Long Exposure Photography 201 How to edit a Long Exposure Seascape

The Luminance Noise is almost completely removed.

Be careful not to overdo the Luminosity slider. Retaining detail is more important than complete noise reduction. It’s no good having a perfect noise-free image if your subject now looks like it’s carved out of wax.

13 Long Exposure Photography 201 How to edit a Long Exposure Seascape

Before and after noise reduction.

Step Four: Restore Presence

By now, your image should either be noise free or have a degree of acceptable noise. If you’ve had to be a little heavy-handed with your noise reduction, the chances are your subject might have lost a little texture and overall presence.

To restore this, navigate to the Basic panel and adjust the Clarity slider upwards. This will bring a little texture and presence back into your subject.

14 Long Exposure Photography 201 How to edit a Long Exposure Seascape

Before and after increasing the Clarity slider to enhance the rock formation.

The overall color strength of your image also plays a big role in how your subject appears. In the example, you can see that reducing the overall saturation helps to mute the vibrant colors and lets the rock formation do all the talking.

15 Long Exposure Photography 201 How to edit a Long Exposure Seascape

Decreasing the Saturation helps to mute the ocean and make the rock formation stand out.

Step Five: Creative Vision

By now your image will have progressed significantly. Let’s take a second to compare the results in just four steps.

16 Long Exposure Photography 201 How to edit a Long Exposure Seascape

Original RAW versus current image with global adjustments.

You’ve probably invested a considerable amount of time preparing the shot, capturing the image, and processing it in Lightroom. Therefore, you might be tempted to call it a day, settle for the current progress, and share your not-so-rough diamond with us in the comments section below.

Alternatively, if you want to give your image a little extra sparkle before proudly unveiling it for the world to admire, then I welcome you to join me. Let me hold your hand while we lightly step into the world of Photoshop.

To get there, right click on your image, scroll down to “Edit” and select “Edit in Adobe Photoshop…”

17 Long Exposure Photography 201 How to edit a Long Exposure Seascape

Open your image in Adobe Photoshop.

Photoshop can be a little overwhelming. Therefore, it can help to create a plan and jot down your ideas before you get to work. This will help keep you focused and will serve as a reminder of what you are trying to achieve.

Create a new layer and rename “Notes”. Then use the brush and type tools to jot down your vision and ideas. If you’re stuck for ideas, these questions (and this article) will give you a good place to start.

  • Where do your eyes get drawn to first?
  • Where do your eyes go next?
  • What elements enhance the story?
  • Which elements weaken the story?

Here you can see the notes that were created for the example image. These set the goal for the final outcome.

18 Long Exposure Photography 201 How to edit a Long Exposure Seascape

Creating notes will serve as a reminder of your goal when you are editing your image.

Step Six: Bring it to Life

Up until now, all the edits have been applied globally (meaning to the entire image). If, like in the example, your long exposure image is looking a little flat and is in desperate need of some sparkle and polish, applying local adjustments to target specific areas of interest is a very effective method.

How do you know which areas to target? When you look at an image, your eyes will tend to gravitate towards the sharper areas that contain the most brightness and contrast. Take a look at the example.

19 Long Exposure Photography 201 How to edit a Long Exposure Seascape

Notice how your eyes want to gravitate up into the bright sky. And, if they haven’t already left the frame, they may descend to settle in the high contrast areas on the outer areas of the rock.

Controlling your viewer’s eye is both important and quite simple. An easy method you can adopt is to create a series of simple minor adjustments that:

  • a. Gradually decrease the contrast and highlights in the areas you don’t want your viewer to focus on.
  • b. Gradually build up contrast and highlights in the areas that you do want your viewer’s eyes to settle on.
18 Long Exposure Photography 201 How to edit a Long Exposure Seascape

Referring to our notes, you can see that the aim is to draw the viewer towards the rock formation.

How to do you create those minor adjustments?

Here’s a simple Curves Masking System that allows you to lighten or darken selective areas of your image to control contrast, shadows, and highlights in a natural and subtle way.

20 Long Exposure Photography 201 How to edit a Long Exposure Seascape

1. Create a Curves Adjustment Layer.

21 Long Exposure Photography 201 How to edit a Long Exposure Seascape

2. Decide what areas of your image you want to target and lighten or darken the curve accordingly.

22 Long Exposure Photography 201 How to edit a Long Exposure Seascape

3. Click on the layer mask thumbnail and use the keyboard shortcut Command + I (Mac) or Control + I (PC) to fill the layer mask with black to hide the effect.

23 Long Exposure Photography 201 How to edit a Long Exposure Seascape

4. Select either the Gradient Tool or a soft Brush with the settings at Hardness 0%, Flow 10%.

24 Long Exposure Photography 201 How to edit a Long Exposure Seascape

5. Press D to set your foreground color to white.

25 Long Exposure Photography 201 How to edit a Long Exposure Seascape

6. Apply your Gradient or paint with white over your Layer Mask to reveal the effect of the Curves Adjustment Layer.

26 Long Exposure Photography 201 How to edit a Long Exposure Seascape

This is what your Layer Mask will look like after applying the Gradient tool. The white areas of the Layer Mask will reveal the effect of the Curves Adjustment Layer.

27 Long Exposure Photography 201 How to edit a Long Exposure Seascape

7. Create a Hue/Saturation Adjustment Layer, clip it to your Curves Adjustment Layer and reduce the Saturation slider to desaturate your adjustment. Note: Only do this step if you Darken the curve in step 2.

Using your notes to guide you, work your way around your image. Apply several versions of the Curves Masking System to lighten or darken particular areas and control the viewer’s eye, each time varying the intensity of the Curve to create a subtle and natural result.

Here you can see how the Curves Masking System allows you to:

  • Selectively darken the sky to push the viewer’s attention down towards the rock formation.
  • Lighten the foreground to draw attention to the bottom half of the image.
  • Create contrast, presence, and depth in the rock formation to capture and hold the viewer’s focus.

Using the Curves Masking System to Darken the Sky

28 Long Exposure Photography 201 How to edit a Long Exposure Seascape

Two applications of the Curves Masking System were used here to gradually darken the sky.

29 Long Exposure Photography 201 How to edit a Long Exposure Seascape

The darkened sky helps to push your focus back into the middle of the frame.

While darkening the sky helps to keep your eyes inside the frame, you’ll notice the image is still looking a little flat and not very interesting. To inject a little more life into the image, you can use the Curves Masking System to create contrast, presence, and depth in your subject as well. Here’s an example.

Creating contrast, depth, and presence in the rock formation

30 Long Exposure Photography 201 How to edit a Long Exposure Seascape

Several applications of the Curves Masking System were used here, alternating between lightening and darkening the Curve to gradually build up presence in the rock formation.

31 Long Exposure Photography 201 How to edit a Long Exposure Seascape

Selectively enhancing the contrast and highlights in the rock formation helps to draw your focus in and creates a point of interest for your eyes to settle in and get comfortable.

With your subject now sparkling and ready to flaunt its new-found presence, you want to make sure it gets seen.

We know eyes love to settle on bright sparkly things. Therefore, you can use the Curves Masking System to strategically lighten areas of your image to practically escort your viewer’s eyes directly to your subject. Here’s an example.

Selectively Lighten the Foreground

32 Long Exposure Photography 201 How to edit a Long Exposure Seascape

Several applications of the Curves Masking System were used to lighten the foreground to draw your attention to the lower half of the image.

33 Long Exposure Photography 201 How to edit a Long Exposure Seascape

Increasing the brightness of the water immediately captures your attention. Care was taken to ensure the rock formation still contained the brightest pixels in the image.

Let’s take a quick look at the example image before and after, applying the Curves Masking System:

34 Long Exposure Photography 201 How to edit a Long Exposure Seascape

Before

35 Long Exposure Photography 201 How to edit a Long Exposure Seascape

After

After several applications of the Curves Masking System, you’ll notice that your eyes no longer gravitate up into the sky and exit the frame. Instead, your eyes now descend toward the rock formation and go for a little swim in the silky water. Much more refreshing!

All that’s left for you to do now is to give your image a good clean and polish, then share it with us in the comments. Here’s how to do it.

Step Seven: Clean and Polish

Long exposure photograph is not only great for capturing surreal images, it’s excellent for letting you know if your camera gear needs a clean. Upon close inspection of your image, you may notice random dull spots. If so, the chances are there’s a bit of dust on your lens, ND filters, or your camera’s sensor.

36 Long Exposure Photography 201 How to edit a Long Exposure Seascape

Random dull spot – often caused by dust on your lens, filters or camera sensor.

Removing these spots is incredibly simple.

On a new layer, select the Spot Healing Brush and simply paint over the spots. Photoshop will work its magic and voila! Your once (very) rough diamond is now ready for unveiling to the world for all to enjoy.

37 Long Exposure Photography 201 How to edit a Long Exposure Seascape

You can use the Spot Healing Brush to remove dust spots and hot pixels from your image.

Recap

Let’s take a second to recap the long exposure processing workflow before taking a peek at the before and after.

  1. Dust it down – start off in Lightroom to apply Lens Corrections and basic tone adjustments.
  2. Correct color casts – adjust the White Balance to correct the color cast from your ND filters.
  3. Correct noise – use the Detail tab to remove Color and Luminosity Noise.
  4. Restore presence – navigate the Clarity, Vibrance and Saturation sliders to give your subject more presence.
  5. Creative vision – open your image in Photoshop and note down your vision for your final image.
  6. Bring it to life – use a series of Curves Adjustment Layers and Layer Masks to manipulate light and direct attention towards your subject.
  7. Clean and polish – Select Photoshop’s Spot Removal Brush and remove the dust spots from your image.

Before and After

02 Long Exposure Photography 201 How to edit a Long Exposure Seascape

Original image before processing.
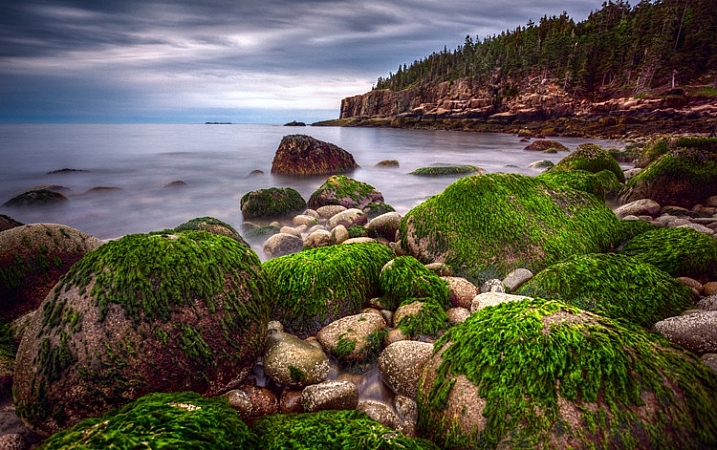
01 Long Exposure Photography 201 How to edit a Long Exposure Seascape

Final image.

Well, that concludes this two-part guide for capturing and editing long exposure photographs. Hopefully, the workflow, tips, and bad jokes shared encourage you to reach for your camera, venture outside, and unearth something special.

Share it below, I’d love to see it.

In case you missed it, you can read part one here: Long Exposure Photography 101 – How to Create the Shot.

The post Long Exposure Photography 201 – How to Edit a Long Exposure Seascape by William Palfrey appeared first on Digital Photography School.


Digital Photography School

 
Comments Off on Long Exposure Photography 201 – How to Edit a Long Exposure Seascape

Posted in Photography


Top 10 Features to Bring Your Seascape Photos to Life

31 Jul

Seascapes are awesome opportunities for photography. In fact, it will probably be your first impulse upon seeing the ocean to pull out your camera (or wish you had it with you). It takes some skill, however, to turn a beautiful coastal scene into something more than a snapshot. If you are not careful, your coastal photo can be a boring picture of sand and water.

One of the keys to success for coastal photography is finding something interesting along the coastline to put in your picture. It would be great if there was an abandoned boat every 100 meters, but there isn’t. And we don’t all live near Big Sur or the Cliffs of Moher. Therefore, you often have to hunt for features to make your seascapes come alive. When you find such a feature, look at it from different angles, often with your camera to your face (you’ll be surprised at how different things sometimes look through the viewfinder or through the LCD). 

To get you started, here are some suggestions of coastal features to look for:

1. Old piers and docks

Abandoned piers and docks solve a huge problem with most coastal photography in that they add a center of interest to your photos. Many times you have a beautiful background created by the coastal scenery, but nothing else. You want an actual subject for your photo, the pier gives you that.

Top Coastal Formations - Pier

Abandoned piers and docks also provide a great opportunity for you to blur out the water, which creates a strong contrast between the blurred water and the sharp pier. To do this, make sure you have a 10-stop neutral density filter. Using this filter will reduce the amount of light allowed into your camera, and cause the camera to use a much longer shutter speed than it would otherwise. That long shutter speed blurs (or smooths) the water.

2. Lighthouses

A less common feature, but one that you should always look for, is a lighthouse. These add a great subject to an otherwise uninteresting scene.

Obviously, you won’t find lighthouses everywhere, but you’d be surprised how many there are if you look for them. In the U.S., the state of Maine alone has over 60 lighthouses, California has about 30. You can check to see if there is a lighthouse near your destination by using the map created by the Lighthouse Friends.

Seascape features example -  Portland Head Light

Oftentimes access to lighthouses is restricted to certain hours because they are on public property. This can be an issue if you want to shoot before sunrise or after sunset, as most of us do. Be sure to check the access and/or opening times.

3. Sunrise and sunset

Whereas your location may not have something like an abandoned pier or a lighthouse, no matter where you are there will always be a sunrise and sunset. You may not get the most dramatic of sunrises or sunsets on the day you are out shooting, but you will always have one. If you are not doing this already, it is the number one improvement you can make to your photographs, and it costs nothing.

If you don’t ordinarily shoot into the sun, do so on occasion to add drama and interest. You can also use the sun as a center of interest.

Top Coastal Formations - Sunset at Pigeon Point

Be sure to arrive well before sunrise or hang around after sunset. The skies are often more dramatic during these times than during the actual sunrise or sunset itself.

4. Interesting rock formations

Remember that in coastal photography, the top half of your picture is often a given; it will be the water and sky. In those cases, the only variable is the foreground. Therefore, you should spend a lot of time looking down to get the best foreground possible.

When you do that, one thing to look for – which is available no matter your location – is interesting rocks, or rock formations. Spend a lot of time looking for them, and as you do so, look through your camera frequently. The camera sees things differently than you.

Seascape features example -  Green rocks at Acadia

To make the rocks stand out, get let low to the ground and get right behind them. This is sometimes inconvenient or uncomfortable, but it is worth it. Be sure to use a wide angle lens to capture the whole scene.

5. Patterns in the water

Sometimes the water itself is enough to create an interesting photo. For this to be the case, you will need to capture the pattern of the waves or the currents in the water.

top Coastal Formations - Ocean at Night

Use a slow shutter speed to capture the patterns of the waves and currents. At night, your shutter speed might naturally be slow enough to do this because of the low-light environment. During the day, however, you will need a 10-stop neutral density filter to use a slow enough shutter speed.

6. Animals

Seacoasts are home to a vast array of wildlife. In some places, livestock are allowed to roam freely along coastal regions. If nothing else, you can count on birds being present at the coast. Use one of these animals as a center of interest for your photo when you capture the scene.

Seascape example - Valencia Island with Sheep

You will need to use a reasonably fast shutter speed to capture the animal and make it sharp. If you like to shoot from a tripod and use a neutral density filter when capturing coastlines, you will have to change things up. Creating a blur to the water will also blur the animal, which will ruin the shot.

7. Powerful waves

On some days, the waves are enough to create a nice photo. In particular, after a storm or high winds, the waves may come crashing in and give you something interesting to work with.

Top Coastal Formations - Crashing Waves

Use a fast shutter speed (at least 1/250th) to capture the power of the waves. If you use a slower shutter speed it will blur the wave, which will create a sense of movement, but not show the power of the wave. This will probably not be a problem most days, but if you are working in low light you will need to increase your ISO, or open up your aperture a bit to get the shutter speed fast enough.

8. People (for a sense of scale)

You can have the most dramatic scenery in the world in your picture, but if your viewer cannot instantly determine the scale of the scene, it might be lost. Nothing solves this problem more than having a person in your picture. We all know how big people are, and seeing a person in the picture instantly helps put the size and scale of the scenery in perspective.

Seascape features example -  Photographer at Davenport cliffs

Next time, rather than cloning out that person who wandered into your picture, leave them in. Better yet, look for opportunities to include a person in your scene to add a sense of scale.

9. Reflective water

If you are shooting up or down the coastline (i.e. perpendicular to it), land features will sometimes reflect on the water or wet sand. These reflections can make a nice foreground for your picture. Capturing reflections usually requires that:

  1. You are photographing just before sunrise or after sunset
  2. You use a long exposure, which will blur the water and make the reflection show up

Seascape features example -  Reflections at Pfeiffer beach

It need not be a perfect reflection (it rarely will be, since the water is moving so much), but just something that captures the colors and tones in general. You will use these to create a foreground that is more interesting than just a bunch of sand. Slow down your shutter speed and see what develops.

10. Clouds

Another item found along the coast that does not depend on your location or geography is clouds. More often than not, the clouds will give you something to work with. Coastal regions – being a transition between land and sea – often develop the most interesting clouds anywhere, and conditions can change rapidly.

Seascape features example -  Davenport clouds

If you are focusing on the clouds as the subject of your picture, make sure that the top two-thirds (2/3) of your picture (at least) is above the horizon line. Be sure to use your polarizing filter if you are shooting near midday.

Next steps

There is nothing to do now but get out there and photograph the coast. Start with the features in this article, then go find your own. There is no end to the interesting things you can find along the coast. If you have a favorite that I didn’t list, be sure to leave it in the comments below.

googletag.cmd.push(function() {
tablet_slots.push( googletag.defineSlot( “/1005424/_dPSv4_tab-all-article-bottom_(300×250)”, [300, 250], “pb-ad-78623” ).addService( googletag.pubads() ) ); } );

googletag.cmd.push(function() {
mobile_slots.push( googletag.defineSlot( “/1005424/_dPSv4_mob-all-article-bottom_(300×250)”, [300, 250], “pb-ad-78158” ).addService( googletag.pubads() ) ); } );

The post Top 10 Features to Bring Your Seascape Photos to Life by Jim Hamel appeared first on Digital Photography School.


Digital Photography School

 
Comments Off on Top 10 Features to Bring Your Seascape Photos to Life

Posted in Photography


Tips for Better Composition of Seascape Photographs

23 Jan

I do not believe that in photography there are absolute rules of composition, but it is undeniable that certain compositions work better than others.

Why? Probably because our brain is the result of millions of years of evolution, and as in two dots and a line we recognize a face (you don’t believe me? Have a look here.), in the same way we recognize some images as more pleasant to look at than others.

So let’s look at a few tricks to keep in mind during your next visit to the seaside.

Start following rules

Before trying to break rules, try to follow them. Start with the Rule of Thirds: divide your image into nine equal parts by two equally spaced horizontal lines and two equally spaced vertical lines. Then place important compositional elements along these lines or their intersections. The result will be that your photo becomes more balanced. In a seascape shot, for example try to put a Lighthouse on one of the vertical lines and the horizon on one of the horizontal ones.

1 post

Important elements (the lighthouse and the horizon) are positioned along the lines and at the intersections

1 ante

Choose the leading actor

If you follow the Rule of Thirds, you’ll never again put the horizon in the middle of your image, and that’s a great thing unless you have a perfect symmetrical reflection.

Decide next if the leading actor of your seascape is the sky or the sea, and place the horizon line accordingly. For example if the leading actor is the sea, the image portion under the horizon line will be 2/3 of the whole image.

2 post

The rock formation in the foreground is really interesting with this tide. I wanted to emphasize it and so I give ? o the image to the sea in this the image.

2 ante

Check the horizon

There is nothing more annoying than seeing a crooked horizon. Use the built-in level of your camera, or for few cents buy an external hot shoe level (the yellow one with an air bubble inside). Why? Because every time you fix the horizon in post-production you will lose a portion of the image. Finally, remember that if you publish an image with a crooked horizon, the horizon will be the leading actor of your image.

Choose your focal length wisely

Sometimes you might believe that a certain focal length is perfect for the scene you have in front of your eyes. Think wider! If you’re using a 24mm lens, try with an 18mm or a 21mm lens – don’t be lazy. Remember that in post-production you can always crop your 21mm image to a 24mm image, but you’ll never be able to do the opposite.

3 post

A 21mm lens was perfect here as it let me put inside the frame the spring flowered plant on the bottom right.

3 ante

Use leading lines

An image is like a book, and to really enjoy it you should be able to read it from the begin to the end. To do that, try to use lines and curves to guide the eyes through a path. You can use a road or the natural line of the coast for example. Keep in mind that you should avoid interrupting that path because it’s like skipping a line in a book; you lose the sense of the story that you’re telling. Also try to avoid lines that guide the eyes of the reader outside the image. You want attention given to what is inside the image, not to what is outside.

4 post

I used the road to drive the eye of the viewer from the margin of the image to the main character.

4 ante

Avoid straight objects in the margin

One common problem of wide angle lenses is the perspective distortion when the camera is not aligned perpendicularly to the subject. In other words buildings like lighthouses appear to be falling if you (correctly) place one according to the rule of thirds. Well, the bad news is that there is no an universal solution. The best one is obviously to buy a lens with excellent optical quality, but they are very expensive and in any case the perfect lens does not exist. So we need to correct the distortion in post-production. There are a thousand ways to do that, but most of them require an image crop. For that reason, if you have a straight object in your frame, don’t put it exactly on a vertical line of the Rule of Thirds, but slightly closer to the image center. In that way, after correcting the distortion, your lighthouse will be nearer the vertical line of the third.

5 post

If I had put the small village too close to the frame edge, it would be affected by perspective distortion and to correct it in post production probably I would have lost the nice leading line with a crop.

5 ante

Add dimension and scale

When I started taking seascape pictures, I was a purist: no humans or human artifacts were allowed inside my frame. If humans are still not allowed to join, sometimes I think it’s a good idea to put some artifacts in my composition. The main reason is that even if you exactly the dimensions of the rock formations in front of you, viewers of your image may have no idea if they have never visited that place. When you look at a image, your brain tries immediately to define the dimensions comparing the unknown to something known – help it and use something like a lighthouse, bridge, church to give an idea of scale. A reef is even more beautiful if it is perceived as high and massive.

6 New
The lighthouse give a dimension to the other rocks in the image (try to cover the lighthouse with your finger.)

6 ante

Use negative space

I’m a big fan of using negative space. But what exactly is that? Easy – it is nothing but the space around, and between, the subject of an image. Yes, basically they are “the” nothing. So, how can that be useful? Negative space is perfect to emphasize the subject. A lonely church on the top of a cliff is even more brave if it seems that it challenges the vastness of the sea.

7 post

This old church reminded me a solitary sentinel who scrutinizes the sea.

7 ante

Have fun

Finally, remember that every rule is made to be broken. If the horizon is not perfectly in one third because the sky lacks of clouds, put it above the upper horizontal line of rule of thirds. If you need to put a lighthouse near the margin of the frame to use leading lines, just do it.

The real goal of a picture is not to follow the rules, but to arouse emotions in the viewer. Keep this in mind and there is no composition that can overcome you.

8 post

The lighthouse is on the right vertical line of rule of thirds. Unfortunately I didn’t have a wider lens with me and I had to put it there in order to use leading lines in the foreground and not to cut the nice wave trails in the upper left side of the image.

8 ante

googletag.cmd.push(function() {
tablet_slots.push( googletag.defineSlot( “/1005424/_dPSv4_tab-all-article-bottom_(300×250)”, [300, 250], “pb-ad-78623” ).addService( googletag.pubads() ) ); } );

googletag.cmd.push(function() {
mobile_slots.push( googletag.defineSlot( “/1005424/_dPSv4_mob-all-article-bottom_(300×250)”, [300, 250], “pb-ad-78158” ).addService( googletag.pubads() ) ); } );

The post Tips for Better Composition of Seascape Photographs by Francesco Gola appeared first on Digital Photography School.


Digital Photography School

 
Comments Off on Tips for Better Composition of Seascape Photographs

Posted in Photography


A Beginners Guide to Seascape Photography

13 Oct
A somewhat abstract seascape scene, the movement of the water makes the image dramatic

A somewhat abstract seascape scene, the movement of the water makes the image dramatic

Seascapes are often seen as a subset of landscape photography. This is true, but I feel that seascapes have their own specific techniques that need to be thought about when you are shooting a scene. The typical sea scene could be a warm sandy beach, blue sky and some palm trees. That is generally the kind of image I try and avoid. For something more dramatic, you may want to try to shoot at sunset and try and capture something unique, rather than a typical postcard shot. When you get it right, your seascape scene should be breathtaking and exciting to look at. It should show the scene, but not look like the kind of shot that anyone could have shot. That means, you may have to scout for some unique or unusual vantage points along the coast.

Safety first please

Seascape photography can be dangerous. Very often you will be hiking over slippery and sharp rocks, the tide may be rising and the waves might be coming in closer and closer. Always be aware of your surroundings and be careful to observe what is happening around you. On more than one occasion, I have been trapped on a rocky outcrop with nothing but wild sea around me. Getting back onto dry land was a relief and an ordeal on those occasions. I have also been completely soaked by freak waves at times and almost lost my camera into the water more than once. So yes, seascape photography can be a little dangerous, but the results are well worth it. The first rule is always, safety first. If possible, go out with a fellow photographer so that there are two of you to help each other if necessary. So, with that disclaimer out of the way, here are some tips on how to set up to get some great seascape images.

Location considerations:

1. Tide

If you don’t know the tidal movements or the tidal range, it’s a good idea to find out. Most coastal towns will have a tide table or chart available, this is important information to know before you go out on your shoot. You can also simply Google “tide table for (city or town)” and all the tide times and measurements should be there. This is important because you may scout a location at low tide, only to return at high tide and find that the rock you were planning to stand on is now submerged under water. Also, the tide can affect the water movement and wave size. If it is high tide, there may not be as much water movement as you would like. It is also a good idea to chat with local photographers or fishermen to find out how the tide is moving.

The incoming tide trapped me on this rocky outcrop

The incoming tide trapped me on this rocky outcrop

2. Weather

Most coastal areas can be unpredictable from a weather perspective. A storm can roll in pretty quickly over a coastal town. Be sure to check the weather forecast for three or four hours before you plan to shoot, and an hour or two after you plan to end your shoot. Sometimes the weather and particularly the wind, can cause the conditions to become difficult to shoot in. One of my favourite apps on my iPhone is Accuweather. I use it often when I am in a location that I am unfamiliar with. It is very easy to use and has been about 90% accurate whenever I have used it.

3. Location

You need to decide where you want to shoot. Do you want to shoot from the beach, the rocks, or the elevated cliff? This will determine what kind of personal gear you will need to take with you (hiking boots, long pants, etc.) It is also a good idea to pack an extra sweater or rain jacket as it could become wet or cold very quickly. Be sure to look at where the sun will be setting. There is nothing more frustrating than being in the shadow of a headland with 80% of your scene in shade as the sun goes down. Remember to look out for channels where the sea water may run up into. These channels and gullies along a rocky coastline can be very dangerous as the water may recede when the tide is out, but as the tide comes in, they may be impossible to cross. If you cross the gulley in low tide and try to return at high tide, you may be trapped as the water could be too deep to cross over.

Magnificent light and moving water makes for a great image

4. Lighting

It is easy to forget your headlamp or flashlight when you are walking along the beach in the warm sunlight. You may be at your location until way after dark and when you decide to return, you will realize that it is pitch dark and the path back has changed because the tide has come in. Don’t forget to carry your headlamp or flashlight with you whenever you do any kind of landscape photography, but especially when you do seascape photography. I have been lost on a rocky coastal outcrop a few times and it is more than a little scary. Fortunately, I always carry my headlamp in my camera bag, no matter what, so that has helped me find my way back to the road or my car.

Photography considerations:

1. Shutter speed

Depending on the seascape scene you are shooting, you will have two choices. You can freeze the movement of the waves or you can blur the movement of the water. If you are shooting a seascape scene that includes rocks in the foreground and the water rolling over the rocks, then you may want to blur the water. This will give the water that soft silky effect and the images will look somewhat surreal. To slow things down even further you could use a neutral density filter to make the exposure time even longer. This will have the effect of really softening the water to the point that it may look misty. Depending on what your vision is for the shot, you need to decide how soft you want the water to be. To freeze the action of the water, you will need to be shooting at 1/1000th or faster. I find that freezing the action of the water is not always as dramatic as softening it. Being able to freeze the action is useful if you are shooting surfing or some other water sport.

2. Aperture

As with landscape photography, you will want to have everything from the foreground to the background in focus. That means you will need to be using an aperture of f/8 or smaller. This will also allow you to slow the shutter speed down, and get some soft water in your scene. Make sure that you focus your camera once you have decided on your scene and composition, then switch your camera to manual focus. That way, when the light begins to fade, your lens won’t be hunting to find a focus point.

Look for reflections in a seascape scene

Look for reflections in a seascape scene

3. Colour or black and white

Seascapes can work very well in black and white. You should shoot your images in colour and convert them afterwards in Photoshop or Lightroom. Both of these image editing suites have great black and white conversion tools and you will be able to make numerous adjustments to your image afterwards. If you shoot in black and white however, you can never get the colour back into the scene. You may try the image in black and white and realize it works better in colour, so be sure to keep shooting in colour.

4. Tripod

You will need a tripod to shoot seascapes effectively. You may be shooting after the sun has set and there is no way you could hold your camera still to get a great shot. Sharpness is key in a good seascape. Portions of your image will be blurred (water) but other parts of the image should be tack sharp (rocks, clouds, etc.) So be sure that everything is very sharp by using a tripod and a cable release if possible. Be aware if you set your tripod up on the sandy shoreline. As the sea comes in, it may cause your tripod to move or sink as the sand may not be firm enough to keep your tripod perfectly still. Always check your image afterwards to be sure that you have the rocks and clouds sharp.

A tripod will be necessary in low light conditions

A tripod is necessary in low light conditions

Subject matter

There are no shortage of scenes to shoot in a seascape scene. Some of the following are ideas to look out for on any beach:

  • Lighthouses – Always fun to shoot and if possible, shoot them in the early evening when the light first comes on.
  • Rocky outcrops – Moving water and rocky beaches make for great seascape images.
  • Reflections – if the tide is moving out on a flat beach, you can capture some amazing reflections of the sky on the shiny beach sand.
  • Colour of light – If you expose properly you can have a warm sky and the blue water in one image. This makes for a beautiful scene.
  • Storms – This is a little more tricky, but sometimes shooting a raging storm over the sea can make a fantastic shot.

If you live near the sea or are planning to visit the seaside, then try your hand at this genre of photography. The results can be very satisfying and you will be astounded how easy it is to produce consistently good results, once you know how. The important thing is to be sure that you are safe and aware of your surroundings at all times. Don’t be afraid to venture out to try this type of photography, it is a lot of fun and it is worth it for sure.

Good foreground interest will anchor the scene

Good foreground interest will anchor the scene

The post A Beginners Guide to Seascape Photography by Barry J Brady appeared first on Digital Photography School.


Digital Photography School

 
Comments Off on A Beginners Guide to Seascape Photography

Posted in Photography


7 Tips to Help Improve Your Seascape Photos by Controlling the Waves

18 Sep

When photographing outdoors, you generally take the world as you find it, and you have very little control over the elements. You cannot control the weather. The terrain is a given. You certainly cannot control the skies or the clouds.

But when photographing seascapes there is one thing you can control, and that is the waves. At least, you can control the appearance of the waves. This is a fundamental difference between landscapes and seascapes.

Picture1 Pier

In landscapes you have generally static ground and foreground elements, while in seascapes you are dealing with a fluid substance that is in constant motion. If you just treat a seascape as a landscape, you will get an ordinary photo, but with some attention to the waves you can get extraordinary pictures.

You can actually control the appearance of the waves in order to add just the right mood and interesting effects to your photos. It is actually very simple to do; it’s all about controlling your shutter speed. In general, the slower the shutter speed, the more calm and serene the water will appear, while a very fast shutter speed implies power and action.

In this article, I will walk you through some shutter speed ranges that you might try in your own seascape photography next time you are at the coast. So here are some tips to help you take better seascape photos:

#1 Minimal Gear Needed

To photograph moving water successfully at various speeds, you will not need much in the way of extra gear. Other than a camera, a tripod, and perhaps a remote shutter release, the only necessity is a neutral density filter.

It is best to have a few different strengths of neutral density filters. A 10-stop filter is a must, and from there I recommend adding a 3-stop and a 6-stop filter. In a pinch, remember that polarizing filters typically reduce the amount of light reaching the camera by two stops, so you can use a polarizer as well.

Picture2 AcadiaRocks

#2 Controlling Shutter Speed

Coastal pictures are all about controlling the shutter speed, and you will usually find yourself trying to slow down the shutter speed. If you are shooting in one of the automatic modes, this is a good opportunity for you to step up Manual (M) mode. Just set the shutter speed where you want it, then if you can get the proper exposure by changing the aperture settings, great. But if not, use your neutral density filter to cut down on amount of light entering the camera.

This is also a rare instance where you might consider Shutter Priority (Tv or S) mode. Once you set the shutter speed, the camera will set the aperture for you. Of course, you could also use Aperture Priority (Av) mode and set the aperture with an eye toward where the camera is setting the shutter speed.

When you get to the coast, take a few test shots, Keep an eye on the histogram to make sure your exposure settings work for the mood you are trying to create.

Picture3 SchoodicSunset

#3 Creating Flat Seas with Extremely Long Shutter Speeds (at least 10 seconds)

Most of my favorite seascapes were taken at shutter speeds of 10 seconds or more (sometimes a lot more). Under calm conditions this adds a sense of serenity to the seascape. Under other conditions the slow shutter speed can add some drama to the scene.

Picture4 DavenportCliffs

To accomplish this effect, you are probably going to need to use the 10-stop neutral density filter. If you are set up for a proper exposure before you put the filter on the lens, you will need to add 10 full stops of light to get the proper exposure once the lens is on the camera. If your camera is set up to adjust in 1/3-stop increments, that will mean 30 clicks (of your dial) of additional light.

This filter is so powerful that it leads to some challenges. You are going to need to focus and set your exposure before you put the filter on the camera. Once you put the filter on, you will not be able to see anything or focus. A great process for these long exposures is this article: Step-by-step Guide to Long Exposure Photography

In addition, keep in mind that the exposure will be quite long and the camera will need to be very stable. If you are on sand or other unstable surface, be sure to jam the legs deep into the sand to make it as stable as possible. If you are near the water, let a wave or two touch the tripod’s feet before shooting because the first wave will shift the tripod a little bit.

Picture5 PortlandHeadLight

#4 Ocean Trails: Long shutter speeds (2-8 seconds)

Another great way to capture the sea is with a long shutter speed of at least a few seconds, but not so long as to blur everything out. The advantage of the speed is that it gives the viewer an idea of the rhythm, or currents, of the ocean. This range of shutter speed will often show trails in the ocean and give a general sense of the location of the waves.

Picture6 DavenportSurf

To capture this look, the shutter speed will ordinarily be between two seconds and eight seconds. That also means a neutral density filter, but often not the 10-stop filter. If you have a 3-stop or 6-stop density filter, those usually work best in this situation, depending on the amount of light available.

Picture7 WaveApproaches

#5 Motion and Power: Moderate shutter speeds (1/8 – 1/2 second)

Sometimes you want the viewer to see the actual wave. It still helps to have a little motion to the wave though. This will convey both a sense of motion and give a sense of the power.

To accomplish this, you will typically need to slow the shutter speed down just a little bit. You will find the best shutter speeds for this range are between 1/8th and 1/2 of a second. At these speeds, you can still clearly see the waves, but the slower shutter speed takes the jagged edges off of them.

Picture8 AcadiaWave

While you will still need a tripod at these shutter speeds (they are too slow to hand-hold your camera and get sharp images), you can often get away without using a neutral density filter by stopping down the aperture.

Picture9 DunDochathair

#6 Pure Power: Fast shutter speeds (1/500 and up)

Finally, there are days when the ocean is very active where you will want to stop the motion and really capture the power of the sea. A great way to do that is with a fast shutter speed. Speeds of 1/500 of a second and faster work best.

Picture10 CrashingWave

The good news here is that you will not need to use a neutral density filter. You can also ditch the tripod and just hand-hold your camera. These shots offer maximum flexibility and mobility.

A fun thing to do is try to time the wave at it crashes into a rock or the surf. This means a lot of trial and error, but when you hit one, the results can be spectacular.

#7 Before You Go

Remember that the sea coast is a harsh and unforgiving environment. Salt water and electronics do not mix very well, and just the spray of the ocean can lead to serious camera problems (which, unfortunately, I have experienced firsthand). In addition, the terrain can be slippery and treacherous. If you are not careful, you can also find yourself stranded on some rocks in a rising tide (learned this one the hard way too, I’m afraid).

But if you are careful about what you are doing, there is no better place to be than on the coast at dawn or sunset. So get out there and give it a try, and if you have questions or need additional information just use the comments below.

The post 7 Tips to Help Improve Your Seascape Photos by Controlling the Waves by Jim Hamel appeared first on Digital Photography School.


Digital Photography School

 
Comments Off on 7 Tips to Help Improve Your Seascape Photos by Controlling the Waves

Posted in Photography


Seascape Photography By Kieran O’Connor

20 Nov

A collection of seascape images taken on the South Coast of NSW, Australia by photographer Kieran O’Connor Website – www.kieranoconnorphotography.com Add me on Google+ – plus.google.com Join me on Facebook – www.facebook.com

Thanks to everyone involved! special thanks to Arnaud Chaudiere and Hadri for the awesome Base jumping footage! Yan Riv for the freeboard ride! mostly shot on GoPros and Nikon d90. I DO NOT OWN any of the soundtrack.. Glitch Mob – Bad Wings a Holiday video by Joe. actoner@hotmail.com
Video Rating: 4 / 5

 
Comments Off on Seascape Photography By Kieran O’Connor

Posted in Nikon Videos