RSS
 

Posts Tagged ‘REVIEW’

DPReview TV: Sony a7S III review

31 Oct

Watch our review of the Sony a7S III to find out why Jordan calls it ‘the best camera for run and gun videography’ available today.

Subscribe to our YouTube channel to get new episodes of DPReview TV every week.

  • Introduction
  • Photography
  • Dynamic range
  • Sharpness
  • Rolling shutter
  • Autofocus
  • Video codecs and compression
  • 1080p and slo-mo recording
  • Overheating
  • Electronic viewfinder (EVF)
  • Low light samples
  • White balance
  • Raw video recording
  • High ISO performance
  • Conclusion

Sample gallery from this episode

$ (document).ready(function() { SampleGalleryV2({“containerId”:”embeddedSampleGallery_6733082169″,”galleryId”:”6733082169″,”isEmbeddedWidget”:true,”selectedImageIndex”:0,”isMobile”:false}) });
Articles: Digital Photography Review (dpreview.com)

 
Comments Off on DPReview TV: Sony a7S III review

Posted in Uncategorized


Field review: The Olympus M.Zuiko 12-100mm F4 IS Pro goes to Oz

28 Oct
Silver Award

84%
Overall score

The Olympus 12-100mm F4 IS Pro is a rugged, professional-level zoom lens with a focal length range that can cover almost any everyday situation. It also focuses impressively close, only adding to its versatility. It’s the kind of one-lens solution that might tempt you for travel photography in particular, but these types of lenses often trade convenience for outright image quality – so is that the case here? Let’s find out.


Key specifications:

  • Focal length range: 12-100mm (24-200mm, 35mm equiv.)
  • Stabilization: Up to seven stops with Olympus bodies
  • Filter thread: 72mm
  • Close focus: 1.5cm (0.6″) at 12mm; 27cm (10.6″ at 100mm)
  • Maximum magnification: 0.3x at wide end of zoom (0.6x 35mm equiv.); 0.21x (0.42x 35mm equiv.) at tele end
  • Diaphragm blades: seven
  • Hood: LH-76B (included)
  • Weight: 561g (1.24 lb)
  • Optical construction: 17 elements in 11 groups
The Olympus 12-100mm F4 is pretty much up for anything. Like a good Port Douglas sunrise.
ISO 200 | 1/6400 sec | F4 | 47mm

Back in 2018, which feels more like two decades ago instead of two years, I took the Olympus 12-100mm F4 on a vacation to Australia for three weeks as my main lens alongside a single bright prime. Mounted on an OM-D E-M1 Mark II, it seemed to me to fit the bill of a reasonably sized solution for just about everything I’d want to photograph. Plus, I knew from prior experience that the Olympus kit would stand up to just about anything mother nature could throw at me.

Full disclosure: I organized and paid for this personal trip on my own, and the choice to bring Olympus gear was my own as well.

All images edited in Adobe Camera Raw 13 with adjustments limited to white balance, exposure, highlights, shadows, white and black levels. Sharpening at ACR defaults; noise reduction at 25 luminance, 25 chroma.
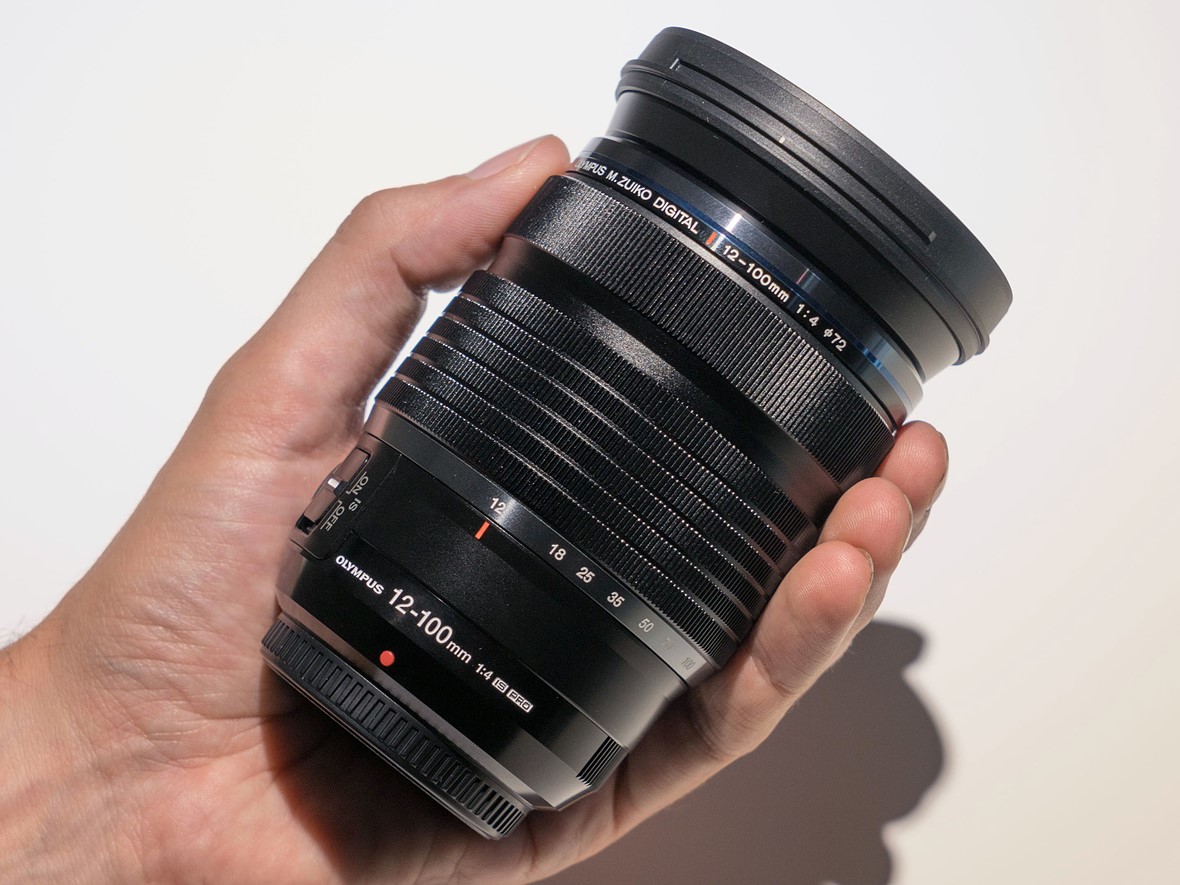

Handling and design

The M.Zuiko 12-100mm F4 joins Olympus’ Pro lineup of prime and zoom lenses, offering top-notch build quality, with claims of dust-proof, splash-proof and freeze-proof construction. It has a manual focus clutch mechanism, giving the feel and very nearly the response of a mechanical focus ring, even though it’s technically a focus-by-wire system. The large, metal-ribbed zoom ring has just the right amount of resistance to it.

The manual focus clutch mechanism in its pulled-back position The stabilization switch and customizable L-Fn button

There’s no denying it, hold this lens in your hand and it just oozes quality. Nearly everything is metal, though even the plastic IS switch on the side of the lens doesn’t so much ‘snap’ into place as ‘thunk’.

What you get in exchange for this feeling of solidity, though, is some heft. At 561g (1.24 lb), it’s very nearly the weight of an Olympus E-M1 Mark III, and significantly weightier than the E-M5 Mark III and E-M10 Mark IV. That said, the larger grips of the E-M1 Mark III and E-M1X mean it actually balances quite well on those bodies.


Autofocus and stabilization

Autofocus on the Olympus 12-100mm F4 is extremely quick, whether you’re shooting close-up or far away. The bokeh isn’t half-bad either, considering that’s fencing in the background. A more in-depth look at bokeh is coming up later in the review.
ISO 200 | 1/250 sec | F4 | 100mm

The Olympus 12-100mm F4 racks through the entirety of its focus range really quickly. It’s perhaps not quite as quick as some Panasonic lenses designed to take advantage of those cameras’ Depth-from-Defocus technology, but it’s more than fast enough for any wildlife I encountered, both inside and outside the Australia zoo.

The rapid AF speeds also make it easy to use the lens when you’re near minimum focus distance, allowing for easy capture of close-ups without necessarily needing to resort to manual focus.

Great stabilization with slower shutter speeds helped to keep my ISO values low a lot of the time, even when working around the F4 max aperture.
ISO 250 | 1/3 sec | F4.5 | 12mm

The stabilization promised by the combination of the 12-100mm F4 and the E-M1 Mark II was part of the reason I could see past this lens’ F4 maximum aperture for general use. It wouldn’t be great for shooting fast action in failing light, but it was perfect for images like this travel snap of a crazy-colored hostel under warm sunset light.

And really, the nice thing about the M.Zuiko 12-100mm F4 is that unless you need to stop down for depth of field or another reason, the lens is more than sharp enough to just shoot wide-open all the time.


Image quality

Olympus’ line of Pro lenses has a history of being renowned for their great image quality, and the M.Zuiko 12-100mm F4 is a strong performer in most respects.

Sharpness

The lens maintains a great level of sharpness throughout the zoom range, and it doesn’t get hazy or fall apart if you’re close to your subjects. So while there were times on this trip where I stopped the lens down, it was usually to get more depth of field, not to increase sharpness.

Things stay nice and sharp even at 200mm (equiv.), and with a relatively close distance to the subject.
ISO 200 | 1/200 sec | F4 | 100mm

On the wider end of things, the 12-100mm is more than a match for the 20MP sensor in the E-M1 Mark II even at F4. This is great news for users that might be leery of a Micro Four Thirds lens that ‘only’ opens up to F4, as well as those users that want to take advantage of the high-res shot mode.

Wide open, the Olympus 12-100mm is plenty sharp across the frame for the 20MP sensor. Click-or-tap-through for the full-size image.
ISO 200 | 1/2500 sec | F4 | 12mm

Vignetting and distortion

As is the case with most lenses designed for mirrorless systems, the M.Zuiko 12-100mm F4 Pro has some non-optional software corrections built into its design. These are applied automatically to the Raw files. So while characteristics like vignetting and distortion appear really well-controlled, it’s likely that software is partly responsible. You can see in the image above that there’s still some vignetting in the extreme corners, but it clears up somewhat as you zoom in.

There’s a bit of vignetting at the wide end of the zoom, but it’s not too objectionable.
ISO 200 | 1/5 sec | F4.5 | 12mm

Again, likely due to built-in software corrections, there’s not much to complain about with regards to distortion either. There looks to be a small amount of barrel distortion at the wide end of the zoom, and without much in the way of pincushion distortion at the longer end of the zoom. Check out the vertical lines present in the two images below to get a sense of how the lens’ distortion will (or won’t) impact your images.

At longer focal lengths, there’s not much in the way of distortion at all.
ISO 200 | 1/500 sec | F5.6 | 80mm
Click through to see a small amount of barrel distortion in this image at wide-angle.
ISO 1250 | 1/10 sec | F4 | 12mm

Bokeh

While this lens was never going to be a bokeh machine owing to its F4 maximum aperture, you can absolutely get some subject isolation depending on your distance to subject and focal length.

For snapshot portraiture, you can get some subject isolation even in the middle of the zoom range.
ISO 200 | 1/250 sec | F4 | 54mm

In most cases, the bokeh is nice and smooth. You’ll struggle to really blur the background fully away unless you’re real close to your subject and at near maximum zoom. Unfortunately, if your background is full of lots of out-of-focus highlights, you may sometimes notice it looks a bit ‘busy’, with rings around the outsides of the ‘bokeh balls’ and in some cases some ‘onion ring’ effects.

I found the bokeh in this image to be a bit ‘busy’ for my taste.
ISO 200 | 1/800 sec | F4 | 100mm
For smaller subjects, you can get close and zoom in for nice isolation.
ISO 640 | 1/60 sec | F4 | 70mm

Flare and sunstars

Flare and loss of contrast aren’t serious issues on the 12-100mm F4, even with the sun in the frame. What I was never really sold on, though, were the sunstars. They just didn’t ‘sharpen up’ even as I stopped down further, which then softened up the rest of the image due to diffraction.

After all, F11 on Micro Four Thirds is F22 equivalent for full-frame systems, so if you’re stopping down to the same aperture you would on 35mm to get better sunstars, your sharpness will drop off a cliff. Admittedly, I did put up with some diffraction to get some fantastic sunstars with the M.Zuiko 17mm F1.2 on this trip, so it seems like this is just a slight weak point of the 12-100’s design.

Flare is pretty well controlled, but I’m not super sold on the sunstars; stopping down might help more, but on Micro Four Thirds, that’s guaranteed to soften the image. (And apologies for those couple specks of dust, as well).
ISO 200 | 1/800 sec | F8 | 13mm

Lateral and longitudinal chromatic aberration

The M.Zuiko 12-100mm F4 does a pretty good job keeping chromatic aberrations at bay. If you look closely, though, you will see some fringing in challenging situations. The bottom-left corner of the below image shows some residual fringing around the leaves; the built-in corrections look to have taken care of much other fringing, but left the purple behind. At least this type of CA (lateral) is easy to remove.

Less easy to deal with is the bit of fringing around the slightly out-of-focus sticks just to the right of the center of the frame; this is longitudinal CA, and you can see a bit of it in as green/cyan fringing in the reptile image earlier in the review. So it’s there, but we’ve definitely seen worse.

Bats. So. Many. Bats.
ISO 200 | 1/200 sec | F4 | 100mm

But jumping back to bokeh for a moment, I think the biggest issue with this image (other than the subjects, if you’re not a fan of bats) is the severe onion-ring bokeh in the highlights behind the flying mammals.


Conclusion

What we like What we don’t
  • Sharp across the zoom range
  • Built like a tank
  • Resistant to flare
  • Incredibly versatile range
  • Very good stabilization
  • Low distortion
  • Bokeh can be busy
  • Sunstars aren’t the best
  • Some CA present, even with built-in corrections
  • Heavy
  • Expensive

And so, as happens occasionally on this site, I will be forced to eat some of my previously published words. I’ve said before that I don’t need a zoom on vacation. And I said I like cameras that are small and light, maybe even pocketable. Well, it turns out that I may have become a convert to zooms, depending on the destination.

If I myself was in the Olympus ecosystem, this is a lens I’d strongly consider. Also, this is the beach on which I got sunburned through my shirt. That Australian sun is no joke.
ISO 200 | F9 | 1/320 sec | 20mm

The M.Zuiko 12-100mm F4 provides such a versatile range in such a well-built package that I really did feel ready for anything. From dimly lit church interiors and landscapes to portraits and wildlife, the 12-100mm can handle pretty much anything. No, it won’t blur backgrounds to oblivion most of the time, and when you do get some subject isolation, the backgrounds will occasionally look a bit busy. Sunstars aren’t the best (nor the worst), and some people will have trouble accepting an F4 zoom on a Micro Four Thirds body.

On the other hand, the stabilization offered by this lens (when mounted to a compatible body) is pretty insane, which allowed me to keep my ISO values lower much of the time. I also love being able to hand-hold images at 1/10th of a second to get some motion into a scene while the surrounding environment stays tack sharp.

ISO 200 | 1/160 sec | F4 | 28mm

I think the biggest knock against this lens is the price; with an MSRP of $ 1299, it’s a costly proposition. There are a few Olympus options that fall within this focal range that are less expensive and built similarly well, but that’s just the nature of this particular offering.

If you want solid image quality and don’t want to be fumbling around and changing lenses on a beach next to a sweltering Australian rainforest, the M.Zuiko 12-100mm F4 IS Pro is well worth considering.


Scoring

Olympus M.Zuiko Digital ED 12-100mm F4.0 IS Pro
Category: Superzoom Lens
Optical Quality
Build Quality
Autofocus
Image Stabilization
Ergonomics and Handling
Value
PoorExcellent
Conclusion
The Olympus M.Zuiko 12-100mm F4 Pro IS is a solid option for travel and generalist photographers using the Micro Four Thirds system. It doesn't grant you the blurriest backgrounds nor the most compact dimensions available among other Olympus lenses, but it's well-built, offers excellent stabilization and gives a great zoom range to match almost any situation you find yourself in.

Good for
Travel and generalist photography, including landscape and architecture work.

Not so good for
Situations where you need a fast aperture as well as a fast shutter speed to freeze the action, as in low-light sports imagery.
84%
Overall score

RegularScoreCompareWidget({“mainElementId”:”scoringWidget”,”mainProduct”:”olympus_12-100_4p0_is_pro”,”scoringSchema”:{“id”:”Lenses”,”variables”:[{“id”:”OpticalQuality”},{“id”:”BuildQuality”},{“id”:”Autofocus”},{“id”:”ImageStabilization”},{“id”:”ErgonomicsAndHandling”},{“id”:”Value”}],”categories”:[{“id”:”Wideangle”,”label”:”Wideangle Lens”,”shortLabel”:”Wideangle”},{“id”:”Normal”,”label”:”Normal Lens”,”shortLabel”:”Normal”},{“id”:”Telephoto”,”label”:”Telephoto Lens”,”shortLabel”:”Telephoto”},{“id”:”Superzoom”,”label”:”Superzoom Lens”,”shortLabel”:”Superzoom”}]},”helpText”:”Choose one or more lenses from the drop-down menu, then roll your mouse over the names to see how their scores compare to the lens on review.”})


Sample gallery

Please do not reproduce any of these images without prior permission (see our copyright page).

$ (document).ready(function() { SampleGalleryV2({“containerId”:”embeddedSampleGallery_6403402487″,”galleryId”:”6403402487″,”isEmbeddedWidget”:true,”selectedImageIndex”:0,”isMobile”:false}) });
Articles: Digital Photography Review (dpreview.com)

 
Comments Off on Field review: The Olympus M.Zuiko 12-100mm F4 IS Pro goes to Oz

Posted in Uncategorized


Sony a7C review: Compact size, big sensor image quality

28 Oct

$ (document).ready(function() { SampleGalleryV2({“containerId”:”embeddedSampleGallery_5104195094″,”galleryId”:”5104195094″,”isEmbeddedWidget”:true,”selectedImageIndex”:0,”isMobile”:false}) });

Silver Award

87%
Overall score

The Sony a7C is the company’s latest and smallest full-frame interchangeable lens camera. It fits a 24MP full-frame sensor and image stabilization into a body more closely resembling the APS-C sensor a6600.

A lot of work has clearly gone into making this one of the smallest full frame cameras available, whereas a lot of the features and capabilities are familiar. A new retractable kit zoom is being launched along with the a7C to help maintain those size savings.

Out of camera JPEG.
ISO 500 | 1/40 sec | F9 | Sony FE 35mm F1.8
Photo by Carey Rose

Key specifications

  • 24MP BSI CMOS full-frame sensor
  • Bionz X processor (same as in the a7 III)
  • ‘Real-time tracking’ AF system with human head, face, eye, and animal recognition
  • Oversampled 4K video at up to 30p, including 8-bit S-Log and HLG
  • Continuous bursts at up to 10 fps
  • Fully articulating 921K dot touchscreen
  • 2.36M dot EVF with 0.59x mag.
  • Mic and headphone sockets
  • Large ‘Z-type’ battery, rated to 740 shots per charge

The Sony a7C is available at a price of around $ 1799 ($ 2399 CAD) or with the new collapsible 28-60mm F4-5.6 kit zoom for around $ 2099 ($ 2699 CAD).


Review contents

From the camera’s controls to the image and video quality it’s capable of, find out what exactly what you want to know about the a7C right here.

What’s new and how it compares

The a7C fits almost all the capabilities of the a7 III into a body that has more in common with the a6000 series. This means a smaller viewfinder but few other compromises.

Read more

Body and handling

The a7C has three dials, all controlled using your thumb. It still handles pretty well, though, with a solid body and a small but pretty comfortable grip.

Read more

Initial impressions

The a7C’s main strengths are its size and convenience. This could make it a powerful travel or family camera. But there’s a price to be paid, and this isn’t necessarily a budget option.

Read more

Image quality

The a7C produces both Raw and JPEG images that are a match for any of its peers. Dynamic range is excellent but you need to shoot large, uncompressed Raw files to get the full benefit.

Read more

Autofocus and video

The a7C’s main improvement over the a7 III is an autofocus system that integrates all its subject recognition capabilities so you don’t need to mess around changing modes to get the most out of it.

Video is good but its operation can be a little awkward.

Read more

Conclusion

The a7C’s combination of size, image quality, AF performance and battery life make it a superb travel camera, but some awkward aspects of operation, including its small viewfinder, hold it back as a photographer’s choice.

Read more

Sample gallery

We’ve been shooting the a7C with both its kit zoom and the sensibly compact FE 35mm F1.8, to see what the camera offers.

See the gallery

Articles: Digital Photography Review (dpreview.com)

 
Comments Off on Sony a7C review: Compact size, big sensor image quality

Posted in Uncategorized


Review: The Autel EVO II is a solid drone and an alternative to DJI

24 Oct

Autel Robotics announced its long-awaited EVO II series drone at CES 2020 in January, promising vast improvements over the original EVO model launched back in 2018. Its most notable feature is a modular camera system, offering three models that cover a range of features that meet different users’ needs, from consumers to professionals.

The camera on the standard EVO II uses a 1/2″ 48MP Quad Bayer sensor and is the first consumer drone to offer 8K video. The EVO II Pro uses a larger 1″-type 20MP sensor that gives 6K recording, and the EVO II Dual features both an optical and a thermal camera in a single unit and also maxes out at 6K recording. The modular system allows users to switch cameras if needed on a single drone.

$ (document).ready(function() { SampleGalleryV2({“containerId”:”embeddedSampleGallery_7283436635″,”galleryId”:”7283436635″,”isEmbeddedWidget”:true,”selectedImageIndex”:0,”isMobile”:false}) });

Key specifications (not including camera)

  • 3-axis gimbal
  • Support for H.264 and H.265 codecs at 120 Mbps
  • HDR video at up to 4K resolution
  • 10-bit A-Log gamma
  • 40-minute battery life (35 minutes hovering)
  • 12 computer vision sensors for omnidirectional obstacle avoidance
  • Controller with built-in color screen
  • 9km video transmission
  • No geofencing
  • Online login not required to fly

These shared specifications suggest a capable drone. The lack of geofencing will certainly appeal to some, and the 40-minute flight time is impressive. However, there are key differences between models depending on which camera you intend to use.

EVO II EVO II Pro EVO II Dual
MSRP $ 1495 $ 1795 $ 9998
Sensor size 1/2″ CMOS 1″-type CMOS

1/2″ CMOS (optical)

FLIR BOSON sensor (thermal)*

Sensor resolution 48MP Quad Bayer 20MP

20MP (optical)

640 x 512 (thermal)

Max photo resolution 48MP 20MP 20MP
ISO range

Video: 100-6400

Photo: 100-3200

Video: 100-6400

Photo: 100-12,800

Video: 100-6400

Photo: 100-12,800

Max video resolution 8K/25p, 6K/30p, 4K/60p 6K/30p, 4K/60p, HD/120p 6K/30p, 4K/60p, HD/120p
Lens 26mm equiv. (F1.8 fixed) 29mm equiv. (F2.8-11) 29mm equiv. (F2.8-11)
Zoom 8x (up to 4x lossless) 8x (up to 3x lossless) 8x (up to 3x lossless)
Takeoff weight 1150g (2.5 lbs.) 1191g (2.6 lbs.) 1150g (2.5 lbs.)

*FLIR sensor size not specified

When buying an EVO II, you can choose the model with the camera that best fits your needs. If you want to switch cameras at some point, you can do it without buying a whole new drone.

The EVO II was released in June following several delays, beginning with a software bug and supply chain shortages. Has the company ironed out the glitches that delayed its launch for a few months? And, how does it compare to similar models from DJI? We’ll explore both questions in this review.

We tested the standard EVO II, thanks to our friends at Drone-Works. Chicago-based professional Antoine Tissier lent us his EVO II Pro model for some additional tests. We did not test the EVO II Dual.

Aircraft and controller

The EVO II bears a strong resemblance to DJI’s folding Mavic series of drones, though its body is substantially larger, and it doesn’t quite fit in your palm. One thing that’s a bit perplexing is that the bottom propellers don’t fold neatly under. They jut out slightly, making it more difficult to carry the drone in-hand.

Aircraft

The EVO II features a total of 12 computer vision sensors located on the front, rear, top, bottom, left, and right side of the aircraft for omnidirectional obstacle avoidance. There are also two ultrasonic sensors located on the bottom of the drone for precision hovering.

The Owner’s Manual points out that there are blind spots on all 4 corners of the drone. When I flew the EVO II in diagonal directions, I noticed that obstacle avoidance didn’t activate at times. You should always fly your drone within visual line of sight, regardless.

The bottom of the Autel EVO II aircraft is equipped with 2 Ultrasonic sensors (closest to the camera) followed by the Downward Vision System (in the middle and back) and the Downward Vision Lighting LED (middle-right).

Autel claims a 40-minute battery life while flying and 35 minutes when hovering without wind. I found this figure extremely accurate. For comparison, the Mavic Air 2 clocks in at 34 minutes while the Mavic 2 Pro tops out around 30 minutes. That extra 6–10 minutes of battery life will matter if you’re performing an inspection or mapping a site.

The battery is huge at 7,100 mAH and slides in and out easily. According to Autel, a ‘patented Battlock system’ prevents the battery from ejecting during fast flights or crashes.

8GB of onboard storage is available if you’re without a memory card or as back up if you run out of space while capturing imagery. Media stored on the drone can be accessed through a USB-C port located on the right-hand side. On the opposite side is a microSD slot that can house a card up to 256GB.

Controls and flight modes

The EVO II is powered by the same type of remote as the original EVO, which is disappointing for several reasons. Because you’re using it to maneuver your drone, the remote should be ergonomically friendly. Unfortunately, that’s not the case with this particular design. Two rather awkward handles fold out from the bottom that are made of slick plastic. While I didn’t fly in hot weather, I couldn’t help but wonder how challenging it might be to hold on to the remote should my palms sweat.

Your mobile device clamps in on top of the remote, and you don’t need to remove your smartphone case. Much like the original EVO or competing Mavic models, tablets will not fit. The main part of the controller features a built-in 3.3–inch OLED display.

The controller’s 3.3–inch built-in OLED display gives you critical flight information.

It’s possible to operate the EVO II using the remote controller on its own. This works for taking photographs or video clips on the fly. However, Autel recommends using its Explorer app on a smartphone to access all of the drone’s features.

Unlike recent Mavic controllers, there isn’t a simple routing solution for connecting your mobile device if you’re using Apple’s iPhone. Instead, a USB Type-A port can be found at the bottom of the remote. This means you need to supply your own connecting cable, much like the DJI Phantom 4 models of 2016. For all other smartphones, a USB Type-C connector is included.

Another issue stems from two buttons labeled ‘A’ and ‘B’ on the remote’s backside. They’re way too easy to accidentally press while flying and activating, for example, the Voice Assistant or an Intelligent Flight mode. It’s possible to program the buttons to perform different functions, but you’re likely to activate a feature unintentionally at least once per flight, and it’s distracting at best.

Poorly placed buttons on the backside of the remote make it much too easy to activate features like Autel’s Voice Assistant accidentally.

I can’t help but wonder why Autel didn’t take a cue from DJI, who made it incredibly simple to switch flight modes by featuring them front–and–center on their Mavic Air 2 remote. For example, to activate ‘Ludicrous’ mode, the equivalent of Autel’s Sport mode, which allows the drone to travel at its top speed of almost 45 mph, you need to go into the app’s settings menu to switch over.

The sticks on the remote are easy to maneuver with just the right amount of resistance. When powering on, you’ll have to press down on the drone battery button for three or more seconds before it powers up or down, a bit different for DJI users accustomed to a quick tap followed by a two-second hold.

Odds and ends

Drone-Works sent me the EVO II ‘Rugged Bundle,’ which includes a hard case designed specifically for this product by GPC. It also has two extra sets of propellers and an additional flight battery. The case is rather large for what is fundamentally a compact drone and will be a hassle, especially with airport security, once air travel becomes commonplace again.

On the right is a Mavic 2 case I purchased for myself. Though the drone isn’t too much smaller than the EVO II, the case that comes with the ‘Rugged Bundle’ is overwhelmingly large for a foldable drone.

Articles: Digital Photography Review (dpreview.com)

 
Comments Off on Review: The Autel EVO II is a solid drone and an alternative to DJI

Posted in Uncategorized


DPReview TV: DJI RS 2 and RSC 2 review

23 Oct

DJI’s new Ronin gimbals, the RS 2 and RSC 2, have been updated a ton of important ways: better stabilization algorithms, built-in color displays, heavier payloads… heck, even the carrying cases are better. Jordan takes a closer look at what’s new and how they function in the field, both as tools for videographers and fitness buffs alike. Yep, you read that right.

Subscribe to our YouTube channel to get new episodes of DPReview TV every week.

  • Tonin' with the Ronin
  • Introduction
  • Upgrades to both models
  • Pro Combo Accessories
  • RS 2 features
  • RSC 2 features
  • RavenEye ActiveTrack
  • SuperSmooth mode
  • Which one should you get?
  • Dad's a wimp

Articles: Digital Photography Review (dpreview.com)

 
Comments Off on DPReview TV: DJI RS 2 and RSC 2 review

Posted in Uncategorized


Canon EOS R5 review

23 Oct

Introduction

$ (document).ready(function() { SampleGalleryStripV2({“galleryId”:”4249583179″,”isMobile”:false}) })

Sample photoSample photoSample photoSample photoSample photo

All product photography by Dan Bracaglia

Gold Award

91%
Overall score

Canon’s EOS R5 is an excellent camera for professionals or anyone that’s looking for a supremely capable option for almost any type of photography, from sports and action to studio portraits and landscapes.

It’s a 45MP full-frame mirrorless camera that can shoot clips of 8K video, has impressive Dual Pixel autofocus and excellent ergonomics. It can also capture 10-bit HDR stills and video for HDR display and is the spiritual (and mirrorless) successor to Canon’s 5D-series DSLR cameras. It’s not a perfect camera, but we think it’s an excellent and highly competitive addition to an already crowded field of competent high-resolution full-frame mirrorless cameras.

Key specifications:

  • 45MP full-frame Dual Pixel CMOS sensor
  • 8K video, with option for Raw or 10-bit 4:2:2 C-log or HDR PQ
  • Up to 4K/120p, or oversampled 4K up to 30p
  • 100% coverage Dual Pixel II AF system with human and animal detection trained by machine learning
  • 12 fps / 20 fps bursts (mech. / elec. shutter)
  • 5.76M-dot OLED EVF with 120fps max refresh rate
  • 3.2″ 2.1M-dot fully articulating touchscreen
  • 10-bit HDR photos in HEIF format
  • 1x CFexpress slot, 1x UHS-II SD slot
  • Claimed weather-sealing to EOS 5D Mark IV levels
  • 2.4/5Ghz Wi-FI with Bluetooth and FTP connectivity
  • CIPA rated to around 320 shots (using EVF)
Out-of-camera JPEG.
ISO 100 | 1/400 sec | F2.8 | Canon RF 28-70mm F2L @ 70mm

As you can see from the spec list, there’s a lot to cover. The EOS R5 is available now for $ 3899 USD body-only, or $ 4999 with the RF 24-105mm F4L lens.

Next page: What’s new and how it compares


Review index

What’s new and how it compares

The EOS R5 has a lot of new features inside and out. We’ll go through what they are, and why they matter, here.

Read more

Body, controls and handling

Canon has banished the EOS R’s touchbar and put a very nice AF joystick in its place. Overall, the R5 is a really pleasant camera to use.

Read more

Image quality

The EOS R5 offers strong JPEG and Raw performance; find out the details here.

Read more

Dynamic range

Canon’s EOS R5 does a great job with high-contrast scenes, like sunrises and sunsets.

Read more

Autofocus and performance

There aren’t a ton of settings you need to fiddle with on the EOS R5 to get the most of its AF system…but you should check out one or two of them right here.

Read more

Video

This might be the hottest part of the review.

(Read about EOS R5 overheating issues and its overall video quality here.)

Read more

Conclusion

The EOS R5 is absolutely the ‘mirrorless EOS 5D’ for most users. Find out why, right here.

Read more

Sample gallery

Peruse our huge sample gallery full of JPEGs, Raws and processed Raw images from a full-production EOS R5.

Read more

Articles: Digital Photography Review (dpreview.com)

 
Comments Off on Canon EOS R5 review

Posted in Uncategorized


It’s great, but the Max should be even better: iPhone 12 Pro camera review round-up

21 Oct

Today is the day a number of reviewers are allowed to share their first thoughts on Apple’s new iPhone 12 Pro, the smaller of the company’s two latest flagship mobile devices announced last week. While we haven’t had the chance to take one for a spin yet, we’ve rounded up a few reviews from across the web to see what others’ opinions on the photographic capabilities of the new iPhone devices are.

From more general tech-centric reviews, such as The Verge’s Nilay Patel’s, to photo-specific reviews such as Austin Mann’s in-depth dive, we’ve tried to gather a nice spread of opinions. Overall, the consensus seems to be that while the iPhone 12 Pro is at the top of its game in the photography department, the iPhone 12 Pro Max will likely pack even more punch with its better camera specifications—so long as you don’t mind the extra bulk.

Over the coming days, as more reviewers get units in their hands, we’ll add those to this round-up. If there’s a review (or two) you think we missed, leave it a link the comments below.

Austin Mann

You can’t talk about annual iPhone camera reviews without mentioning Mann’s thorough deep dives. He’s spent some time with Apple’s latest iOS devices while camping out of an Airstream in Glacier National Park, Montana and has wrapped up his thoughts on the photographic capabilities of the iPhone 12 Pro in a very comprehensive guide on his website.

He puts the new ultra-wide-angle lens to the test, pushes Night Mode to its limits and overall provides a comprehensive overview with plenty of sample images to look through. He concludesd by saying, under the headline ‘Buying advice for photographers:’

’The iPhone 12 Pro is a solid camera, and thanks to a bunch of new digital tech I found it to be slightly stronger than the already great iPhone 11 Pro — but if you are serious about photography with your iPhone, wait for the iPhone 12 Pro Max. It looks to be the most significant jump in iPhone camera hardware we’ve experienced in years, and it’s only three weeks away.’

Nilay Patel, ft Becca Farsace (The Verge)

Being a more general technology website, The Verge’s review doesn’t only focus on photography, but author Nilay Patel does have a thorough section dedicated to the imaging capabilities of the iPhone 12 Pro. He also gets the thoughts of The Verge video director Becca Farsace, whose work we’ve featured here on DPReview in the past.

There’s also a video review from The Verge:

Aundre Larrow (via PetaPixel)

Photographer and former Adobe Creative Resident Andre Larrow has teamed up with PetaPixel to share his thoughts on the new iPhone 12 Pro camera system. Taking a departure from the usual type of imagery you expect to see in reviews, Larrow opted to put it to the test by taking a series of intimate portraits with friends and acquaintances who have been quarantining together, as to minimize any health risks with the outdoor portrait sessions.

The series is somehow both serious and lighthearted with an editorial feel you don’t often associate with smartphone photography. It’s a welcomed change of pace and well worth the read.

Raymond Wong (Input)

Despite ‘taking [his] phone photography quite seriously,’ Raymond Wong of Input takes a more casual approach to reviewing the camera technology inside the iPhone 12 Pro. Despite the more casual approach, he does a great job comparing the new iPhone 12 Pro to the iPhone 12, iPhone 11 Pro and Pixel 5 in a number of areas, with sample images for comparison. Head on over to the review to see for yourself.

Articles: Digital Photography Review (dpreview.com)

 
Comments Off on It’s great, but the Max should be even better: iPhone 12 Pro camera review round-up

Posted in Uncategorized


Fujifilm Instax Mini 11 review: the best easy-to-use Instax Mini model

16 Oct

Fujifilm Instax Mini 11
$ 60-70 | Instaxus.com

The Fujifilm Instax Mini 11 is a fresh entry-level instant camera from Fujifilm and a refinement of the Instax Mini 9 (there is no Mini 10). As the name suggests the camera makes use of the Instax Mini film format.

Improvements include a new ‘Selfie Mode’ and better auto exposure compared to its predecessor. But unlike its higher-end siblings, the Mini 25/26, Mini 70 and Mini 90, there are no additional creative exposure modes or special features to speak of. That said, the camera is simple to operate and capable of producing lovely images in a variety of lighting conditions.

Key specs:

  • Retractable 35mm equiv. F12.7 lens
  • Full-automatic exposure control (flash always fires)
  • Variable shutter speeds from 1/2 to 1/250 sec and slow synchro flash for low light
  • Selfie mirror on front of lens
  • Selfie/close-up mode
  • Auto frame counter
  • Powered by two AA batteries (100 shots / 10 packs per fresh set of batteries)
  • Available in: Blush Pink, Ice White, Sky Blue, Lilac Purple, Charcoal Black

Operation

The Mini 11 comes with two accessory buttons you can affix to the shutter release via double sided tape (included). I attached the glow in the dark button (shown above).

The Instax Mini 11 is really straightforward to use, making it a great choice for kids. Simply press the button next to the lens to pop it out, switch the camera on and hit the shutter button by the viewfinder to take a photo; there are no other buttons to fumble with. When you’re done, push the lens back into the body to turn it off.

The Instax Mini 11 is really straightforward to use, making it a great choice for kids

The camera does a have a selfie mode as well as a small selfie mirror on the front of the lens. To engage the mode, pull the very front of the lens outward until the words ‘Selfie on’ appear (see image below); it admittedly took some digging through the instructions to figure this out.

Usability

Selfie mode = engaged.

The camera is, by default, held in the vertical orientation, making it good for portraiture. The viewfinder is a bit small, but that’s par for the course with these Instax Mini format cameras.

In use, I found the shutter button can be easy to bump accidentally, and given the high cost of film, that’s a bummer. Fujifilm does include two accessory shutter releases that affix to the button via double-sided tape – one glows in the dark! Installation is tricky, but once attached, I did find my self less likely to pop off an unintended frame.

The shutter button can be easy to bump accidentally and given the high cost of film, that’s a bummer

Another note about usability: the selfie mode mechanism is a bit hard to engage and feels like it could be a fail point of the camera. It takes a good bit of force to yank the lens forward into selfie mode and retracting the lens after selfie mode has been engaged is a fiddly affair.

The Instax Mini 11 is held in the vertical orientation.

Image quality

Selfie shot in the camera’s standard mode. Focus is a little soft, but the exposure is on the money. Selfie shot using the selfie mode. The subjects are sharp but the exposure is hot.

Image quality from the Mini 11 is good through-and-through. The camera handles balancing ambient light with its flash output with ease, in most shooting scenarios. The addition of variable shutter speeds and slow synchro flash definitely seem to give it more versatility in tricky lighting than Mini 9, which has a fixed shutter speed of 1/60 sec.

When shooting in bright daylight, the inability to turn off the flash from firing can be annoying. There’s also no infinity mode, so shots in which the subject is far away can look a tad soft (see examples in the gallery below).

Using the selfie mode can sometimes result in blown highlights

Like most Instax Mini cameras, the Mini 11 produces its best images in good and moderate lighting conditions with subjects at relatively close distances (within the maximum flash range of 2.7 m / 8.85 ft). Shots in very low light tend to come out darker than desired. This is where some sort of exposure compensation would be useful. The Mini 25/26 and Mini 70, for instance, both offer a ‘High Key’ mode that adds +2/3rds exposure compensation.

I’m tempted to say skip the selfie mode all together. From my testing, a selfie in normal mode seems to produce a better exposure, though focus may be a tad soft. Using the dedicated selfie mode can sometimes result in blown highlights. That being said, I did have some success using the selfie mode for close-up subjects, like the pup shot leading the gallery below (which was shot in a very dark room).

$ (document).ready(function() { SampleGalleryV2({“containerId”:”embeddedSampleGallery_1269539701″,”galleryId”:”1269539701″,”isEmbeddedWidget”:true,”selectedImageIndex”:0,”isMobile”:false}) });

Conclusion

Ultimately, the Instax Mini 11 is for those seeking the easiest-to-use instant camera for the most popular instant film format. The addition of more reliable auto exposure is appreciated. And though I have hesitations about the selfie mode, my guess is most folks who didn’t read the instructions will never even find it. And that’s just fine.

The Instax Mini 11 is for those seeking the easiest-to-use instant camera for the most popular instant film format

For those desiring something with more creative control, we highly recommend spending a few more bucks and getting the Instax Mini 70, which is more feature-rich and our choice as the best Instax Mini camera, for the most people.

What we like:

  • Very easy-to-use
  • Powered by two AA batteries
  • Improved auto exposure over predecessor

What we don’t like:

  • No creative modes or exposure compensation
  • Easy to accidentally hit shutter before installing accessory button
  • Mechanism to engage ‘Selfie Mode’ feels fragile
  • Flash always fires

Articles: Digital Photography Review (dpreview.com)

 
Comments Off on Fujifilm Instax Mini 11 review: the best easy-to-use Instax Mini model

Posted in Uncategorized


Joby Mobile Vlogging Kit Review: A Great Deal for Vloggers

16 Oct

The post Joby Mobile Vlogging Kit Review: A Great Deal for Vloggers appeared first on Digital Photography School. It was authored by Suzi Pratt.

As smartphones advance, mobile vlogging and filmmaking continue to rise in popularity. Thankfully, camera accessory brands have come up with whole systems to support phone vloggers. The Joby Mobile Vlogging Kit is the latest system to hit that market, and it is chock-full of accessories that you can use with your phone (or with other camera setups).

But what’s in the Joby Mobile Vlogging Kit? And how does it perform?

In this Joby Mobile Vlogging Kit review, you’ll discover the pros (and cons) of this product.

And you’ll leave knowing whether the Vlogging Kit is right for your needs.

Joby Mobile Vlogging Kit review

What’s in the Joby Mobile Vlogging Kit?

Here’s what’s included in the Vlogging Kit package:

Tripod

First off, Joby is the brand behind GorillaPods, the bendy-arm tripods that have been popular with vloggers and photographers for many years.

The base of this kit is the GorillaPod Mobile Rig: a small version of the GorillaPod that perfectly complements the size of modern smartphones. I used my copy with a Samsung Galaxy S10 and it fit perfectly.

The GorillaPod has a standard 1/4″ tripod screw, so you could also use it with another camera if you chose to.

Smartphone clamp

The Joby Mobile Vlogging Kit also comes with a smartphone clamp that has two extra bendy arms attached. The clamp is very sturdy and adjusts to fit just about any smartphone out there. The bendy arms are great for attaching accessories such as a light and/or an external microphone, but the arms can be removed.

One of the best features of the smartphone clamp is its ability to easily flip between portrait and landscape orientations. All you have to do is loosen the lock and the clamp swivels. This is especially helpful for those wanting to shoot vertical content for Instagram Stories or TikTok.

Joby Mobile Vlogging Kit review

Another great addition to the smartphone clamp is a cold shoe mount on top for mounting an accessory. Truth be told, I prefer using the Joby Mobile Vlogging Kit without the extra bendy arms; I simply attach my main accessory (usually the microphone) via the smartphone clamp cold shoe.

LED light and microphone

With this vlogging kit, Joby is branching out of the tripod market and debuting two other camera accessories: the Beamo Mini LED light and the Wavo Mobile microphone.

Both products are incredibly solid and perform very well. The Beamo light is reminiscent of other rugged light competitors such as the LitraTorch 2.0. It’s waterproof and rugged, has two cold shoe mounts to attach accessories, charges via USB-C, has multiple brightness settings, packs a magnetic attachment, and comes with a silicone diffuser to produce a flattering beam of light.

Joby Mobile Vlogging Kit review

The Wavo microphone looks like a clone of the Rode VideoMicro. But the nice part about the Wavo mic is that Joby includes two different cables: a TRRS cable so that the mic can be used with a smartphone, and a TRS cable for use with a regular camera.

Note that you have to use the correct microphone cable. Otherwise, sound will not be captured properly.

Using the Joby Mobile Vlogging Kit in practice

This vlogging kit comes with a lot of camera accessories.

But how do they perform?

The GorillaPod is as steady as ever, although parts of the legs can sometimes snap off if they are bent in one direction too forcefully. It’s easy to snap the legs back into place if that happens, but it’s just something to be aware of.

If you like to use multiple compact cameras, it’s very easy to take off the included smartphone clamp and stick another camera on the GorillaPod. I did this a lot with my GoPro when I wanted to change my filming style.

Joby Mobile Vlogging Kit review

Sound-wise, it’s tough to trust a microphone not made by a reputable sound company. Cheap mics often show their true colors via bad sound quality. However, the Wavo mic has very clear sound, and the windscreen does an excellent job of blocking out wind. The Rode VideoMicro has a slight edge in sound quality, but for the price and the fact that the Wavo mic is included as part of a kit, it’s a great deal. Plus, it can be used with a regular camera, which is even better.

After the sun went down, the Beamo light came out to play. After using similar light products made by Litra and Lume Cube, I have to declare the Beamo my favorite compact rugged light. It has a solid feel that is still lightweight, and the light quality is incredibly strong.

In fact, you must use the silicon diffuser if you plan to vlog with the Beamo light. Otherwise, the light is so powerful that it will wash out the video (and strain your eyes).

Joby Mobile Vlogging Kit review

Joby Mobile Vlogging Kit review: Conclusion

Now that you’ve finished our Joby Mobile Vlogging Kit review, you know all about the power of this handy little kit.

Overall, the Vlogging Kit is a great deal that gives you three high-quality products in a single package. You can use them together with a smartphone, or you can trade the phone for another compact point and shoot or action camera. You can even mix and match each accessory with different camera setups.

So whether you intend to vlog or simply want a good deal on three awesome camera accessories, you can’t go wrong with this kit.

To see the Joby Mobile Vlogging Kit in action, check out my video review:

The post Joby Mobile Vlogging Kit Review: A Great Deal for Vloggers appeared first on Digital Photography School. It was authored by Suzi Pratt.


Digital Photography School

 
Comments Off on Joby Mobile Vlogging Kit Review: A Great Deal for Vloggers

Posted in Photography


DPReview TV: Fujifilm X-S10 first impressions review

16 Oct

The Fujifilm X-S10 may have a less retro design than some of its siblings, but it’s a very capable camera for both stills and video. Watch our review to find out why Chris and Jordan think this camera hits the sweet spot.

Subscribe to our YouTube channel to get new episodes of DPReview TV every week.

  • Introduction
  • Complaining about the weather
  • Sample images
  • Controls
  • Stabilization
  • Grip
  • AF-on placement
  • Displays
  • Film simulations
  • Burst shooting and autofocus
  • Video capabilities
  • Video overheating test
  • Video autofocus and stabilization
  • Waterfalls!
  • Who's it for?

Sample images from this episode

$ (document).ready(function() { SampleGalleryV2({“containerId”:”embeddedSampleGallery_3208755826″,”galleryId”:”3208755826″,”isEmbeddedWidget”:true,”selectedImageIndex”:0,”isMobile”:false}) });
Articles: Digital Photography Review (dpreview.com)

 
Comments Off on DPReview TV: Fujifilm X-S10 first impressions review

Posted in Uncategorized