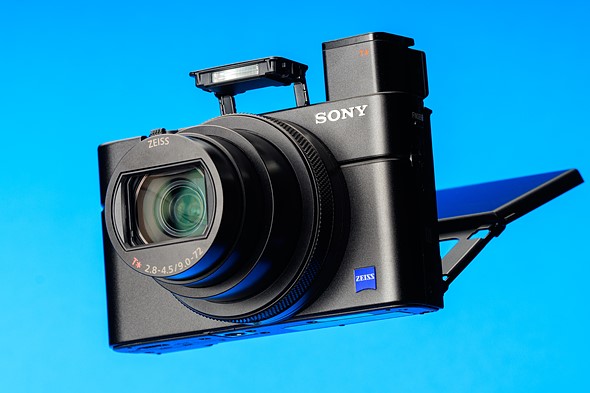
RSS
 

Posts Tagged ‘REVIEW’

Review: Vuze+ 3D Stereoscopic 360 Camera

09 Sep

Vuze+ VR camera
$ 995 | vuze.camera

As someone who has been involved in the 360 video community for what is (too) quickly approaching half a decade, the rate at which the medium has evolved in recent years, from both the hardware and software perspective, continues to blow my mind, and the Vuze+ is just another reason why.

The Vuze+ is an upgraded version of HumanEyes Technology’s flagship Vuze stereoscopic 3D 360 camera. For the unfamiliar, the original Vuze was perhaps the most consumer friendly entry-level and affordable stereoscopic (3D) option. The main difference between the original and the Vuze+ are the IP65 instead of IP64 dustproof/water-resistant rating, the addition of spatial 360 audio, upgraded lenses, and the ability to livestream.

While there are a few aspects not to like, and I’ll get into those a bit below, those are almost negated (depending on your intended use for the camera) by the aspects that are very much to like, including the quality, the build, and the ease-of-use, especially at the impressive price point. After all, the original Vuze was good enough for National Geographic to film the first 3D VR footage in space and Discovery VR used the Vuze+ to capture VR footage for Sharkweek (with the optional underwater housing case).

Key features:

  • Eight F2.4 fisheye lenses
  • Stereoscopic (3D) at 4K/30p or monoscopic (2D) at 4K/60p
  • 4-microphone spatial audio
  • Livestreaming at full resolution
  • IP65 (dust tight, water jet proof)

Design

The Vuze+ is very well-designed. I was immediately surprised by how hefty a piece of quality machinery this was, especially for what is essentially a portable stereoscopic rig.

The camera has two buttons, one for power/mode and one to start/stop capture, as well as two LED lights to help indicate camera status such as photo, video, and recording. Hidden behind a thick rubber flap between two of the lenses is the slot for the microSD memory card, the mini-USB 2.0 input/output plug, as well as a battery charge status LED and Wi-Fi on/off and status indicator LED. There is a standard 1/4″ 20 tripod thread on the bottom of the unit.

The Vuze+ ships with a small handle, lens cloth, USB charger and cable, and a quite trustworthy thick padded hard-shell case.

Though the battery is not swappable, it does provide a respectable 90-120 minutes of recording power, and you can attach an external battery pack if needed. The internal battery charged from empty to full in a little under 2 hours. The app displays both battery levels and memory card space remaining.

The included hard-shell case for the Vuze+ is compact and protects the camera very effectively.

One of the main attractions of the Vuze+ is its capability to livestream in full resolution to various platforms that support 360 video including Facebook, YouTube, Periscope and any Real-Time Messaging Protocol (RTMP). It should be noted that in order to livestream, the camera needs to be connected to a computer, which acts as the stitch-box. This also allows you to save the out-of-camera video while you stream. Currently the livestream feature is available for Windows PC only.

Also, brownie points to the manufacturer, HumanEyes, for including mini VR glasses for a mobile phone and an international plug adapter, which as any media professional will be quick to tell you is a much appreciated touch.

In the field

Overall, the Vuze+ is very easy and fun to use. The camera records onto a single microSD card and there is a companion app for both iOS and Android that gives you control over ISO, shutter speed, and exposure. You also have record setting options that include choosing between 80 or 120Mbps bitrate, 50Hz or 60Hz anti-flicker, and 3D 30fps or 2D 60fps recording. The app also has an incredibly convenient digital bubble level to ensure an even horizon for every shot.

The Vuze app has a very convenient digital bubble level – very helpful when setting up a shot.

You also have the option of adjusting exposure settings for each of the four sets of lenses independently, a fantastic feature typically reserved for much higher end rigs like the Insta360 Pro 2. It worked great for automatic exposure adjustments but, unfortunately, more often than not, the app crashed when I tried to manually change the exposure settings on a Samsung Galaxy Note 8. It’s worth noting that others I spoke with did not have this problem.

Exposure can be adjusted independently for each of the four sets of lenses on the Vuze+, a feature typically reserved for higher end VR cameras.

With all that being said, my main, and perhaps only, gripes with this camera lie in two glaring omissions in the app’s functionality.

One, there is no live view on the app while recording. As the nature of 360 video is such that you have to be out of view during capture, not having an option to be able to preview what the camera is recording is borderline mind-boggling.

Two, while you can preview still 360 photos on your mobile device, the mobile app will not stitch 360 video files, so in order to preview video footage, you need to offload and stitch using the computer software.

Overall, the Vuze+ is very easy and fun to use.

While the image quality is pretty good for a stereoscopic camera at this price point, not being able to see or preview video captures in the field are sure to make for an inefficient video production. For this reason, I’d be more than comfortable using this as a B-camera on a professional job, but not as my main camera for principal footage.

Finally, it’s worth mentioning that the Vuze+ only records in h.264/mp4 format, and as of this writing, you do not have access to the raw, uncompressed individual camera files. You can however, output from the provided HumanEyes VR Studio software in ProRes.

Post processing / Desktop app

The Vuze+ workflow is fairly straightforward: once you connect your camera or offload the footage to your hard drive, you launch HumanEyes VR Studio software, which has 3 tabs – Import, Preview & Edit, and Render.

The Vuze desktop app, Vuze Studio, is used to process and stitch your footage, and is organized into three basic functions: Import, Preview & Edit (shown), and Render.

The software is easy to navigate and offers some pretty handy and effective features. Anytime you work in stereoscopic 360 you’re going to run across some stitching issues, and Vuze Studio gives you decent tools to fine tune those stitches. Often times, simply choosing reference frames in parts of the video where stitches are most apparent produces very acceptable results.

Other times, be prepared to spend some time refining stitches using the provided sliders to adjust the four stitch points, especially for moving subjects within a couple meters (6 feet) of the camera.

Vuze Studio software provides some powerful tools to fine tune stitching between cameras.

Vuze Studio does have something called ‘adaptive stitching’ (beta), which works quite well as it seems to analyze the scene and movement and adjust its stitching to accommodate for those variables. However, you’ll need to render the video in order to see the results of this adaptive stitching. In the samples below, watch the woman walking in the center of frame to see a short example of before & after stitch refinements. The second set of videos show how well it did in both standard and adaptive stitching from 3, 5, 7 and 10 feet (1m to 3m) away.

Editor’s note: For the best experience, we recommend viewing the 360 clips below using either a mobile device or a head mounted display like Google Cardboard.

Samples: standard vs. adaptive stitching

The first video above was created with standard stitching, while the second was created using adaptive stitching. Watch the woman walking in the center of the frame to see an example of standard vs. adaptive refinements.

Samples: standard vs. adaptive stitching at different distances

The two videos above show the effect of standard vs. adaptive stitching at 3, 5, 7 and 10 feet (1m to 3m) away. The closer an object in the scene is to the camera, the more challenging the stitching becomes.

Finally, if you so desire, you always have the option to employ a proven near-perfect optical-flow stitch using a third party software like Mistika VR (which has a Vuze+ preset).

One thing to be aware of is that the on-board mics are quite sensitive to wind noise, so if there’s a slight breeze and audio is important to your shot, I’d recommend a spatial recorder like the Zoom H2N with a windscreen to record audio separately.

Horizon stabilization works quite well for static captures. If there is excessive walking or movement without using a gimbal or stabilizer, don’t expect to be able to remove all of the shake and jello-ing as well as, say, the GoPro Fusion or the Rylo Camera, which, to be fair, were designed as action cameras and are just two-lens monoscopic cameras, making this sort of stabilization much less cumbersome. Alternately, as mentioned above, you can use third party software like SGO’s Mistika VR for more advanced software stabilization options.

Samples: walking video without stabilization vs. stabilization with adaptive stitching

The two videos above illustrate the camera’s video stabilization. The first video has no stabilization and standard stitching, while the second has stabilization enabled and uses adaptive stitching.

Since the camera already has an internal accelerometer and gyroscope, I wouldn’t be surprised to see future firmware/software updates remedy these issues.

The ability to easily add a nadir logo on the bottom (as well as on the top if desired) is a huge plus, as anyone that has had to format their own equirectangular logo in a program like PT Gui knows it’s typically an obscenely tedious process. VR Studio also makes it very easy to select your center field of view by simply dragging the video to your preferred focal point before rendering. Furthermore, Vuze Studio has a built-in tool to crop to 180? stereoscopic VR, a format Google is pushing heavily to help further immersive content adoption.

Vuze Studio makes it easy to select the default center for the field of view, ensuring that your viewer will be initially directed to your recommended point of view.

In the advanced Blending tool, you can choose from ‘none,’ ‘low,’ ‘medium,’ and ‘high’ to choose the amount of blending applied between the 4 sets of lenses. I found that ‘medium’ seemed to provide the best all around blend.

Vuze Studio has an advanced blending tool that allows you to apply different levels of blending between lenses. I found that the medium setting generally provided the best all around results. The fluctuations seen between lenses in this view are less noticeable when viewing the content in 360 format.

In the advanced Color Matching tool, you have the choice of ‘none,’ ‘by neighboring lenses,’ or ‘entire sphere.’ All work very well to tone down the image so that there are no extremely noticeable exposure fluctuations, especially in a headset.

Vuze Studio also provides an advanced color matching tool that lets you specify how color matching is performed between lenses. As with blend modes, the fluctuations visible in this view are not as noticeable when viewing the content in 360 format.

You also the get the option to adjust basic settings like exposure, highlights, shadows, temperature and saturation.

Finally, you have several options for output, including presets for YouTube, Facebook, Google Maps (360 stills), Vimeo and HumanEyes Zone, a proprietary platform to share VR sites through a single website link. Additionally, you can manually set output parameters, which gives you a choice of h.264 or ProRes, monoscopic (2D) or stereoscopic (3D), 4K or 2K resolution (or custom), spatial or stereo audio, cube map or equirectangular projection, as well as aspect ratio and video bitrate.

The image quality and dynamic range is pretty good for a rig this size and, especially, at this price. The one thing that was apparent in certain conditions, especially in scenes with high contrast, say through tree branches or rooftop edges, was chromatic aberration – noticeable purple fringing was introduced.

In some scenes with high contrast some purple fringing is noticeable.

Conclusion

While it may not fit the bill as a primary camera for most professional stereoscopic 360 shooters that are already accustomed to higher-end 3D rigs, there is still a place for the Vuze+ in many 360 shooters’ kits. Coming in at around $ 1000, aside from the original Vuze, there is no better deal for a stereoscopic rig. It’s easy to use, does a very decent job, and for those either jumping from monoscopic 360 video/photo to stereoscopic, or those that want to experiment with stereoscopic, it’s a good option considering the next cheapest 3D option would run almost 3x the price. This is a great way to dip your toes in without breaking the bank.

The Vuze+ can also serve as a great B-camera and as an option for shooters in specialty markets such as real estate and journalism where they may forego many of the above issues that might plague a more produced shoot.

While there are a few drawbacks, between the acceptable optics, the software, and the user experience, what this gives you, for the price, is quite impressive. Keeping those things in mind, you can’t really go wrong with the HumanEyes Vuze+.

What we like

  • Good price point for a stereoscopic rig
  • Well designed, heavy and sturdy
  • Live-streaming capabilities
  • Approachable and functional software
  • Built in optimized presets for Google Maps / YouTube / Facebook outputs

What we’d like to see improved

  • No Live Preview while recording video
  • Can’t preview video files in app – need to offload and stitch.
  • No optical-flow stitching
  • Software stabilization
  • Chromatic Aberration in certain high-contrast conditions
  • No uncompressed recording

Articles: Digital Photography Review (dpreview.com)

 
Comments Off on Review: Vuze+ 3D Stereoscopic 360 Camera

Posted in Uncategorized


Review: Mikme Pocket wireless microphone with audio-sync

01 Sep

Mikme Pocket
From $ 387 | mikme.com

The Mikme Pocket Pro and App, a simple high quality wireless audio for your smartphone?

There are a lot of lapel microphones out there, and a lot of recorders to plug them into, so any new product designed to compete in this space either needs to have standout performance or do something unique. In the case of the Mikme Pocket, it does a bit of each.

A common challenge with wireless microphones is signal dropout, usually as a result of moving out of range or working in areas with a lot of radio congestion. This is where the Pocket has a trick up its sleeve. It uses Bluetooth to connect to your smartphone (using your phone as the receiver/recorder) and records to both the phone and its own internal memory. If you experience a dropped connection during recording, the Pocket automatically syncs and uploads any missing audio as soon as it comes back within range.

It works with a companion app which allows quick and easy setup. However, you can use the main functions of the Pocket without the app. (At the time of writing it’s only available for iOS; an Android version is promised for later in the year.)

The company is squarely targeting video shooters who use smartphones as their camera, although because it records internally it can also be used with mirrorless cameras and DSLRs to sync audio in post production.

The Pocket is available in two versions: a more expensive Pro variant that includes a higher quality microphone and lifetime subscription to its PRO app ($ 719) as well as a less expensive version with a standard microphone and no app subscription ($ 387). Mikme initially launched the Pocket on Kickstarter, and after a successful campaign have launched on Indiegogo as well (where discounted crowd-funding prices remain in effect).

Key Features

  • Simultaneous internal and wireless audio recording via Bluetooth
  • Automatic wireless sync of audio if the connection is dropped
  • Lapel microphone with locking connection
  • Choice of app or direct device control
  • Auto or manual audio level control
  • 16GB internal storage for 30+ hours of recording
The large central button enables multiple functions and encompasses a multi color status LED.

The Mikme Pocket offers features I’ve not seen before and I was keen to test it out. This little box, measuring 78 x 66 x 22 mm, includes a lapel mic. The pre-production version of the Pocket Pro I tested included the somewhat smaller pro mic option.

The unit I had for testing records .m4a files (at 44.1Khz) or uncompressed .wav files (44.1, 48 or 96Khz at 24bit) to its built-in 16 GB storage. At the highest quality this allows just over 30 hours of audio to be stored. The higher quality WAV files are only available if you’re using it with with a device that doesn’t have Bluetooth. If you’re using a smartphone you are limited to m4a files.

The mic connection is via a locking mini XLR

When using the Pocket with a smartphone over Bluetooth the auto sync function is enabled. This ensures that even if you manage to move out of range (approximately 10 m, or 30 ft.), the audio will automatically be downloaded and synchronized when the connection is re-established. This feature means that transmission range is not a problem as it is with traditional wireless mics, although you do lose the ability to monitor the audio on your phone when the Pocket is out of range.

The bottom edge houses most of the controls (not final labeling).

As with a lot of things these days it’s an app based product. However, I was pleased to see that you could achieve some functionality without the need to use the app all the time. The main button on the body of the pocket serves several functions. You can use it to start and stop recording, start playback of the last recorded file and switch between auto and manual audio levels. It houses a multi-color status LED that blinks when the audio level is clipping so that you can adjust it, which is achieved either using the 2 buttons on the body of the pocket itself or in the app. The body of the pocket also has a built in 3.5mm headphone jack for monitoring.

If you experience a dropped connection during recording, the Pocket automatically syncs and uploads any missing audio as soon as it comes back within range

The preferable way to control the unit is with its associated app as it adds a lot more functionality. You can select 3 recording modes: audio, video or remote. You can use it to select sample rate and set recording levels. It also lets you monitor battery life and remaining storage capacity, which is updated live as you record.

It’s early days for the app and I’ve been using the Pro version in beta that includes some extra functionality that will only be available by subscription. This will include the ability to use more than one Pocket at the same time as well as the ability to add pre- and post-roll videos and watermarks. It will also offer movable windows to select areas used for exposure metering and auto focus points as well as some other features.

There is also basic version of the app which includes what you would need for day to day operation, missing out on some of the extras above.

The included mic and adapter protrude quite a bit, which might cause issues when worn next to the body.

Recording Quality

When I tested audio quality I was pleasantly surprised; the sound of the included microphone in the pro package was very good. It’s an omni directional mic with a drop in high frequency sensitivity to the rear (cable entry side), which is to be expected, and very useful for inverted mounting to reduce sibilance and plosives.

It’s not quite up to one of the industry standard Sanken Cos-11 mics, but to have something like this included for the price was a real bonus. The mic itself uses a Micon to mini 3 pin XLR adapter to connect to the Pocket and the main body connection is a mini 3 pin XLR.

I’m pleased to say that the killer function of this mic – the auto sync function – worked perfectly every time I tried it

Unfortunately, I don’t have the ability to give you accurate figures for the noise floor of this microphone as my anechoic chamber is only in the planning stages. My room tone currently bottoms out around -56 dB and the self noise was not evident above this level (this is without any filtering). The self noise seems to be below about 180Hz and a configurable high pass filter will tame it. Mikme told me that this is something that will be selectable in a future version of the app. The low end response is great for some vocals but will prove a problem with wind noise if the capsule isn’t properly protected. It may also cause issues when used in vehicles due to subsonic resonances.

All this is subject to change, however, as the final version of the hardware and software has not yet been confirmed.

The included pro lapel mic is high quality and a lot smaller than some of it’s competitors.

I’m pleased to say that the killer function of this mic – the auto sync function – worked perfectly every time I tried it. Not only that, but the audio syncs faster than real time, although I would think that if you are in a high traffic area for wireless signals this might slow things down a bit.

When recording, I thought I’d spotted a bug with the audio while I was testing. If I stopped a recording using the button on the pocket I would end up loosing about 0.2 seconds off the end. Not a big issue but I did report it, and it turns out that this is deliberate so that the mic itself doesn’t record the click of the physical button. Nice thinking.

The supplied Pro lavalier mic uses a Micon to XLR adapter.

The Pocket also has some wider appeal as it offers the ability to offload the files via USB. It can even be used as a USB microphone if required. It was immediately detected in Windows once the Pocket had been switched into USB Audio device mode by a combination of connecting it without the Bluetooth transmitter enabled.

The Pocket can even be used as a USB microphone if required

It takes about three hours to charge the built-in battery via micro USB and a full charge lasts approximately 2 hours and 15 minutes in my tests. This was with Bluetooth switched on; without it you can get around an additional 15 minutes, but then you loose the key selling point of this mic. I’d really like to see longer battery life, although you can use it while charging with an external battery pack.

Minor issues

I encountered a few niggles in testing, which is to be expected with pre-production units. There’s a small issue with the fact that the included foam wind shield does not locate snugly onto the microphone capsule itself and it’s sure to go missing while shooting. I also saw a little bug in the app regarding the update rate for the amount of storage left on the device. It was not updating as quickly as I would like, causing some alarm when it reported 0% and I had only been recording for 20 minutes.

I contacted Mikme about these test results, and I’m assured that most, if not all, of my observations are being looked at – after all, that’s what beta testing is designed for.

Conclusion

Having a wireless lav mic that records to itself is not new, and that function has been available for a few years, albeit at different price points and feature sets with products from Zaxcom and Sennheiser.

What Mikme has achieved with the Pocket is the integration of a number of useful features not seen before in a single product. The internal recording together with auto-syncing of audio, manual and auto level control and the additional app functions all work well together. This makes recording good wireless audio much easier than with traditional products, especially with a smartphone or tablet.

What we like

  • Easy to use
  • Audio syncing prevents audio loss that sometimes occurs on lavalier mics
  • Included high quality mic (Pro version)
  • Comprehensive control via app (not always required)
  • USB microphone function
  • Headphone monitoring on device and on smartphone

What we’d like to see improved before shipping

  • Improved reporting of remaining memory
  • Addition of a switchable high pass filter
  • Addition of level control in app in Remote mode
  • Addition of strain relief to mic capsule
  • Lower profile connection between mic and body

(Based on a pre-production model)


Disclaimer: Remember to do your research with any crowdfunding project. DPReview does its best to share only the projects that look legitimate and come from reliable creators, but as with any crowdfunded campaign, there’s always the risk of the product or service never coming to fruition.

Articles: Digital Photography Review (dpreview.com)

 
Comments Off on Review: Mikme Pocket wireless microphone with audio-sync

Posted in Uncategorized


Canon EOS 90D initial review: What’s new and how it compares

29 Aug

$ (document).ready(function() { SampleGalleryStripV2({“galleryId”:”3453035806″,”isMobile”:false}) })

Sample photoSample photoSample photoSample photoSample photo

The Canon EOS 90D is a midrange DSLR that replaces the 3.5-year-old 80D. It fits between the EOS 77D and the ‘yes, it still exists’ EOS 7D Mark II, and offers Canon’s latest processor and a brand-new sensor.

The 90D is essentially the DSLR version of the EOS M6 Mark II mirrorless camera, which was introduced alongside it. Since the specs are nearly identical, Canon is letting potential buyers choose what type of shooting experience they want: a midsize DSLR with an optical viewfinder and more physical controls, or a smaller and lighter mirrorless model with a removable electronic finder. And, of course, the difference in native lens lineups between the EF and M mounts could attract different types of users, as well.

Key features:

  • 32.5 Megapixel APS-C CMOS sensor
  • Dual Pixel autofocus (live view/video)
  • 45-point all cross-type AF (through the viewfinder)
  • 220k-pixel metering sensor w/face detection
  • 7 fps burst shooting w/continuous AF
  • Fully articulating 3″ touchscreen display
  • Optical viewfinder w/100% coverage
  • 4K/30p video capture with no crop
  • USB 2.0 port with Micro USB connector
  • Wi-Fi + Bluetooth

While the outer design of the 90D doesn’t dramatically depart from the 80D’s, the guts are quite a bit different, which we’ll cover on the next page.

The 90D will come in several kits when it becomes available in mid-September. The body alone is priced at $ 1199. When bundled with the EF-S 18-55mm F3.5-5.6 IS STM lens the price is $ 1349, while the kit with the more versatile EF-S 18-135mm F3.5-5.6 IS USM lens is $ 1599.


What’s new and how it compares

Find out more about the 90D’s new sensor, updated metering system and video capabilities.

Read more

Body and controls

The design of the 90D has barely changed since the 80D, with one exception.

Read more

Sample gallery

See how the 90D’s photo quality looks in our sample gallery.

Read more

Articles: Digital Photography Review (dpreview.com)

 
Comments Off on Canon EOS 90D initial review: What’s new and how it compares

Posted in Uncategorized


The Highline Ballhead Review: The Best Bargain Ballhead in 2019?

28 Aug

The post The Highline Ballhead Review: The Best Bargain Ballhead in 2019? appeared first on Digital Photography School. It was authored by Rick Ohnsman.

The Highline ballhead is billed by its creators, Colorado Tripod Company, as “ultralight,” with an “increased range of motion.”

But does the ballhead live up to the hype?

That’s what this Highline ballhead review is all about. I recently received a ballhead of my own, and I’ve been putting it through its paces.

In the next few sections, I’m going to take you through my experiences with the Highline ballhead. And I’ll let you know if it’s something you should consider purchasing.

(Spoiler alert: It’s a bargain worth checking out.)

Highline ballhead review

Two views of the Highline ballhead.

The Highline ballhead overview

First things first:

Where does this new ballhead come from?

The Highline ballhead is produced by the Colorado Tripod Company (CTC). The CTC caught the attention of photographers when they announced on Kickstarter they would be producing the “world’s first titanium tripod system.”

For the purposes of this article, I will focus on the aluminum version of the Highline Ballhead, as that is the product I received for review. However, a titanium version is available from CTC.

As for the specs:

The Highline ballhead is has a 70 lb (32 kg) load capacity, though the ballhead itself weighs just 16 oz (0.45 kg). The head is cut out of aluminum. The ball itself is 1.89 in (4.8 cm) in diameter.

My first impressions of the Highline ballhead

The Highline ballhead makes a great impression from the get-go.

Opening the box, I found a quality neoprene drawstring bag with the Colorado Tripod Company logo printed on it. Inside the bag was the ballhead, as well as a plastic zip bag containing two Allen wrenches for working with the hex-head screws on the head. The bag also contained an adapter so the head can be mounted on tripods with 1/4-20 screws (without the adapter, the head mounts on the larger 3/8-16 screw used by most tripods).

highline ballhead out of box

I was impressed with the quality right out of the box.

I was immediately struck by the appearance of the ballhead, both in the quality of the parts and the beautiful gunmetal-gray finish. The design is clean and uncluttered, the knobs well-placed and sized for easy operation. All the components are metal; you won’t find a plastic piece on the entire ballhead.

My first thought?

This is a well-designed and well-built piece of photo equipment.

The CTC describes the Highline as a traditional ballhead but with some special features. Striking is the large 48mm hollow ball and the ability of the locking mechanism to provide a 54-pound load capacity, much greater than most tripod heads of this size.

The CTC indicates the Highline head is made for photographers with large camera equipment. I mounted my Canon 6D and my Canon 70-200 lens, but the head had no problem at all holding it right where I wanted.

highline ballhead with camera and lens

With a DSLR (the Canon 6D here) and a large lens (the Canon 70-200), the Highline was more than up for the job.

Photographers want a tripod head that can lock in place with little droop or movement. The Highline satisfies this requirement, even with a full-sized DSLR and large lens.

This is how things look when the camera is mounted from the photographers POV:

highline ballhead review

Note the clamp-lock knob at the top left, main ball adjustment knob on the left side, and the pan-lock knob at the rear. The drag adjustment knob is at the front and is not seen in this shot.

Camera mounting, knob placement, and performance

CTC engineers designed the Highline so the camera can be held and controlled with your right hand and the tripod head knobs worked with your left hand.

The largest knob is used to release and tighten the ball. Its large size and knurled grip makes it easy to use, even with gloves.

On the rear of the head is the smaller pan-lock knob. This knob releases the head to be rotated around its vertical axis, such as when doing panorama shots. The base of the head is also marked out in degrees, which is helpful for pano shots.

On the opposite side of the head is the drag control. Adjusting this knob changes how freely the ball can be moved. This is a great aid in setting up the feel and control of motion while compensating for the size of the camera and lens used.

Once the camera is mounted and the drag knob is adjusted, you’re free to use the large knob for moving/locking the ball position.

At the top of the head is the clamp and camera mount plate. I was very pleased to see an Arca-Swiss type mount being used. This has become a standard mount in the photo world, so you don’t need to worry about mounting incompatibilities.

The mounting screw has a D-ring on it for tightening without tools. Open the clamp knob fully and tip the plate into the clamp, then tighten the knob most of the way. The camera can be moved forward and back, but will not fall out of the clamp. Balance the camera and then fully tighten the clamp knob.

d-ring for tightening

The monogramming was a nice touch. And note the D-ring for tightening the mounting screw when you don’t have tools.

What to like about the Highline ballhead

The Highline ballhead is a great piece of photo equipment, so there’s a lot to like.

As I’ve mentioned above, the Highline ballhead features excellent build quality, fit, and finish.

The control knobs perform smoothly, are easy to grasp and operate, and the mechanism allows the ball to move smoothly and lock exactly where you want it without any droop.

drop slot on head

Using the large drop slot, shooting straight up or straight down is very easy.

For a head its size, the Highline is also quite light. Even the aluminum version comes in at 18 oz (510 g). And the titanium version of the ballhead shaves 40% off that weight, coming in at just under 12 oz (340 g).

portrait orientation

The Highline had no problem locking and holding the camera just where I wanted in portrait orientation.

The head also performs beautifully even with a good-sized DSLR and big lens. My current tripod is an aluminum MeFoto Globetrotter Classic, but while the MeFoto stock head isn’t bad for the money, it feels a little wimpy. Switching out the MeFoto head for the Highline made a world of difference: The Highline head worked great with the same camera/lens combo and fit very well on the Globetrotter tripod.

In fact, I will be using this combination as my new everyday camera support system. (Or at least until I consider the CTC Centennial tripod!)

Finally, the price is the best part of the Highline ballhead.

Though I can’t say I’ve tried every comparable ballhead out there, I’ve never found a better ballhead at this price point. The aluminum version of the Highline sells for just $ 129.00 USD. I consider that a screaming deal for a product of this quality.

Note that the titanium version of the Highline ballhead is $ 499.00 USD. If shaving six ounces off the weight is important to you and the cost is no object, go for it.

As for me?

I’m gonna be quite happy with my aluminum Highline!

What’s not to like about the Highline ballhead?

The Highline ballhead is nearly perfect, but falls short in a couple of areas.

What don’t I like about it?

First, I prefer a lever lock to the Highline’s twist-knob lock. However, the twist-knob lock should be fairly easy to switch out. And I spoke with Eric Ellwanger of CTC; Eric said CTC is already working on their own lever-lock clamps and should offer them as an option for new ballhead buyers before long. If CTC makes one with the same quality shown in the Highline head and at a decent price, sign me up!

(For those who have already purchased a head, CTC will allow those users to send in their clamps for a rebate if they’d like to switch to the lever-lock style.)

Another small nit: CTC touts the large elongated slot on the right side of the Highline head as a great feature, because it allows the camera to be flipped over into portrait configuration and gives extended motion. But I, like many other photographers, have mounted an L-bracket to my camera to allow easy switching from landscape to portrait orientation. I like that the L-bracket allows me to keep the center mass of the camera over the center of the tripod regardless of orientation. It also better supports panorama work, keeping the nodal point of the camera more centered over the rotation axis.

ballhead in portrait orientation

I still prefer using an L-bracket, which keeps my camera centered over the center axis of the tripod. Because the Highline clamp is an Arca-Swiss type, my L-bracket mounts with no problem.

In other words, for photographers like myself, the elongated slot is a bit redundant. It’s not a big issue, but I thought I’d bring it up.

What is the availability of the Highline tripod head?

The Highline was originally a Kickstarter product. This means that the first orders go to Kickstarter backers, which potentially limits availability for consumers. However, CTC says they are about caught up with Kickstarter orders and are now taking orders on their website as well as Adorama Camera.

If you check the CTC website, you may see that the Highline heads are available to purchase. Alternatively, the heads may be on backorder. Regardless, CTC says their machines are running 24/7 now. So if you want a Highline ballhead, place your order on Adorama or on the company website, and you will be billed when it ships.

Highline ballhead review: conclusion

There’s nothing I like better than a quality product at a great price, and the Highline tripod ballhead absolutely delivers.

Also, note that CTC is working on two other versions of the Highline: a smaller version and a larger version. I can see a smaller version being more practical for smaller mirrorless or bridge cameras. As for a larger version, I have trouble imagining a camera that needs more stability than what the current Highline ballhead can provide!

So if you’re in the market for an excellent ballhead at a bargain price, go have a look at the Highline tripod head.

It may be the right product for your needs.

The post The Highline Ballhead Review: The Best Bargain Ballhead in 2019? appeared first on Digital Photography School. It was authored by Rick Ohnsman.


Digital Photography School

 
Comments Off on The Highline Ballhead Review: The Best Bargain Ballhead in 2019?

Posted in Photography


Canon EOS M6 II initial review: What’s new and how it compares

28 Aug

$ (document).ready(function() { SampleGalleryStripV2({“galleryId”:”0757003519″,”isMobile”:false}) })

Sample photoSample photoSample photoSample photoSample photo

The Canon EOS M6 II is an enthusiast-targeted 32.5MP APS-C mirrorless camera built around the company’s EF-M mount. In many respects it’s a more compact mirrorless variant of the EOS 90D DSLR that was announced simultaneously.

Physically, it closely resembles the original M6 but brings a host of speed and feature upgrades. These include a higher resolution sensor, the ability to capture 4K video and a mode that shoots bursts of Raw files at up to 30 fps.

Key features:

  • 32.5MP Dual Pixel AF CMOS sensor
  • 14 fps continuous shooting
  • 30 fps Raw Burst mode (with AF Tracking and pre-shot buffering)
  • UHD 4K video at 30p and 25p with no crop / full width
  • 3.0″ rear touchscreen flips up by 180° or down by 45°
  • Optional electronic viewfinder
  • USB 2.0 port with Type-C connector

The EOS M6 Mark II will be available in a series of kits. The official body-only price will be $ 849. Adding the retracting 15-45mm IS STM lens and EVF (pictured) will boost the price to $ 1099, while an 18-150mm IS STM and EVF kit will set you back $ 1349.


What’s new and how it compares

The M6 II brings 4K video and 30 fps Raw bursts. We look at the new features and how it stacks up against its peers.

Read more

Body, handling and controls

The M6 II gains some direct controls over its predecessor and features the latest iteration of the Canon menu system. There’s also a good degree of customization available.

Read more

Sample gallery

We had the chance to shoot with the M6 Mark II and have some sample images to show what it can do.

Read more

Initial impressions

The M6 II has a couple of nice improvements over the original version, but it’s the state of the EF-M lens range and the future of the EF mount that change out perspective the most.

Read more

Articles: Digital Photography Review (dpreview.com)

 
Comments Off on Canon EOS M6 II initial review: What’s new and how it compares

Posted in Uncategorized


Panasonic Lumix DC-S1H review in progress

28 Aug

$ (document).ready(function() { SampleGalleryStripV2({“galleryId”:”7340148154″,”isMobile”:false}) })

Sample photoSample photoSample photoSample photoSample photo

The Panasonic S1H is a full-frame mirrorless camera designed specifically with videographers in mind. It includes advanced video features such as 6K resolution, 4:2:2 10-bit internal recording, V-Log gamma, video scopes, anamorphic support and numerous small details a videographer would love. As a bonus, it’s also a very competent 24MP stills camera.

Panasonic has long been at the vanguard of mirrorless cameras aimed at videographers, and its popular GH-series of Micro Four Thirds cameras has consistently led the way with class-leading video performance. It would be easy to assume that the S1H is simply an extension of the GH line into a full-frame body, and there’s certainly a bit of truth to that, but, as you’ll discover, the S1H is equally an extension of Panasonic’s highly regarded VariCam line of cinema cameras.

Key features:

  • 24MP full-frame CMOS sensor
  • Dual native ISO
  • 4:2:2 10-bit internal recording
  • 4K/60p 10-bit recording
  • 6K video with full-frame capture
  • Full V-Log gamma profile (matches Varicam)
  • Unlimited video record time
  • H.264 and H.265 internal recording
  • Dual-SD card slots w/ V90 card support
  • Anamorphic capture with de-squeezed preview
  • Variable frame rate (VFR) and High frame rate (HFR) video
  • In-body image stabilization (with support for Panasonic Dual-IS 2)
  • Hinged and fully articulated rear screen

Pricing and availability

Panasonic says the S1H will be available in late September at a retail price of $ 3999.

DPReview TV first look

Jordan Drake from DPReview TV takes a first look at the Panasonic S1H.


What’s new and how it compares

The S1H may look a lot like Panasonic’s other ‘S’ series cameras, but there are some big differences both inside and out.

Read more

Body and handling

The S1H introduces a number of useful features such as a novel type of articulating display and a fan to keep the camera cool when shooting video.

Read more

User interface

The S1H features several improvements aimed at video shooters, some from Panasonic’s Varicam cinema cameras.

Read more

Video specifications

The S1H introduces a number of useful features such as a novel type of articulating display and a fan to keep the camera cool while shooting video.

Read more

Initial thoughts

What sets this camera apart, why it’s so interesting to videographers, and how it fits into the market.

Read more

Articles: Digital Photography Review (dpreview.com)

 
Comments Off on Panasonic Lumix DC-S1H review in progress

Posted in Uncategorized


Firecrest 77mm 16-Stop Stackable Neutral Density Filter Review

26 Aug

The post Firecrest 77mm 16-Stop Stackable Neutral Density Filter Review appeared first on Digital Photography School. It was authored by John McIntire.

There is something about long exposure photography that is just, for lack of a better word, appealing. Blurring moving elements (like water, clouds, tourists and moving cars) in your images can create an ethereal or even surreal aesthetic that many photographers, myself included, are drawn to. Formatt-Hitech’s Firecrest 16-stop neutral density filters take long exposure photography to the extreme. By allowing ten-minute exposures in the middle of the day, these filters open up long exposure techniques to normally impossible times. And it does it with fantastic results. In this article, I’ll review the Firecrest 77mm 16-stop Stackable Neutral Density Filter.

What is it?

Firecrest-77mm-16-Stop-Stackable-Neutral-Density-Filter

A neutral density filter is a piece of material (glass or resin in most cases) that you affix to the front of your lens. What they do is cut down the amount of light hitting your sensor, increasing the amount of time you need to expose for. Doing this allows you to get longer exposures than you would normally be able to, making it easy to blur water and clouds in a satisfying way.

Most ND filters come in a range of one to three stops. However, five and ten-stop filters are also very popular amongst landscape photographers. During golden hour and blue hour, when light levels are generally quite low, these strengths of filter make it easy to achieve exposures that last for several seconds.

Image: An exposure time of 408 seconds in the middle of the day is impossible without a specialist f...

An exposure time of 408 seconds in the middle of the day is impossible without a specialist filter such as this one.

What a 16-stop filter allows is extremely long exposures even in the brightest of lighting conditions; including midday sun. For example, with a 16-stop filter, an exposure of 1/2000th of a second becomes 30 seconds. In comparison, with a 10-stop filter, that 1/2000th of second exposure becomes 1/2 of a second. You can probably already see the advantage that the denser 16-stop filter provides.

To drive it home, look at the sunny 16 rule, which says that on a bright sunny day, an exposure of f/16 at 1/125th of a second should give you close to a correct exposure (it usually does). With a 10-stop filter, that becomes 8 seconds.

That might be good enough in many cases, but it also won’t completely blur anything other than the fastest moving elements. With 16 stops, that 1/125th of a second becomes 8 minutes and 44 seconds, ensuring anything moving in your frame is either blurred or disappeared.

What is this good for?

Firecrest-77mm-16-Stop-Stackable-Neutral-Density-Filter

A 16-stop ND filter allows you to blur moving objects in your frame, which can lead to more pleasing images.

Being able to blur details out of clouds and water allows you to remove details that might detract from your subject. This lends itself well to minimalist styles of photography. If that fits your taste, the results can be stunning.

Exposures of this length not only blur moving elements within your frame but can also completely remove other moving things. Boats in rivers, tourists in front of landmarks, and anything else that might move through your frame during the exposure time disappears.

A filter of this strength is also good for things like star trails at night.

Before you consider

Image: You may need some extra specialist equipment before you get started, such as the trigger that...

You may need some extra specialist equipment before you get started, such as the trigger that allows the control of your camera with a phone.

The one thing that you need to know before you consider purchasing a filter like this is that you will need some extra equipment you may not already have. A high-quality tripod is an absolute must as you will need to keep your camera absolutely still during the long exposures.

The other thing you need to take into account is some way of controlling your camera. Because many cameras are limited to exposures of 30 seconds, you will need a way to keep the shutter open in bulb mode for the duration of the exposure without touching the camera. There are many options out there, including remotes and cable releases. I used the Pulse time-lapse trigger from Alpine Labs, which lets you control your camera with your phone. There are others available too, like the MIOPS trigger.

An exposure calculator is also an absolute must as you will need to be able to calculate how long your exposures need to be. There are plenty of free options available for both Android and iOS.

The Filter

Firecrest-77mm-16-Stop-Stackable-Neutral-Density-Filter

After shopping around for a bit, I decided on Formatt-Hitech’s circular screw-in Firecrest 77mm 16-Stop stackable neutral density filter. This filter has a few features that make it stand out.

Since I knew that I would not be using any other filters in conjunction with this one, I wanted a circular screw-in variety. That’s because I thought that the length of the exposures might create the opportunity for light leaks with my normal filter system. I might be wrong on this, but it’s not a chance I wanted to take.

Formatt-Hitech claims their filter is truly neutral (including in the UV and infrared spectrums) and that there are no color casts. This is important to me as my Lee Big Stopper (10-stops) always adds a strong blue cast that is painful to deal with. I won’t go into details about the coatings as you can find them on the product listings.

Does it do the job?

Image: The Formatt-Hitech Firecrest 77mm 16-Stop stackable neutral density filter is certainly a cap...

The Formatt-Hitech Firecrest 77mm 16-Stop stackable neutral density filter is certainly a capable piece of kit.

That’s an emphatic “yes” from me. While there are some downsides to the filter, it provides all of the quality you could expect. The few places it does fall short are all easy to overcome and well worth the little effort to do so.

Pros

Exposure times

Image: The exposure difference between a 10-stop and 16-stop filter can be a bit staggering at first...

The exposure difference between a 10-stop and 16-stop filter can be a bit staggering at first.

Just as the exposure calculator said, the 16-stops of ND filter provides really long exposures even in daylight. 1/125th of a second becomes nearly nine minutes, while 1/15th of a second becomes nearly one hour and thirteen minutes.

Attaches well

Image: It still takes care, but the filter attaches easily enough.

It still takes care, but the filter attaches easily enough.

It’s easy enough to attach the filter to the filter thread of your lens. It does require care as it is easy to slip (I’m sure that’s more me than the filter), but with this technique, there’s no reason to go fast anyway.

Color casts

Image: The color represented without the 16-stop filter.

The color represented without the 16-stop filter.

Firecrest-77mm-16-Stop-Stackable-Neutral-Density-Filter

Color represented with the 16-stop filter.

I won’t say there is no color cast, but they are very minimal if they appear. Comparing shots with and without the filter side by side, it does seem that there is a slight, slight shift towards blue and green. However, I am not sure if that’s an optical illusion. Either way, it’s easy to deal with.

Cons

There are some downsides of both the filter and the technique. However, their effects are minimal and easy to overcome.

Extra equipment

Firecrest-77mm-16-Stop-Stackable-Neutral-Density-Filter

As mentioned, to get started with this technique, it’s not just the cost of the filter you need to take into account. If you don’t have a good enough tripod or some variety of release to trigger your camera, you will have to shell out for those.

Light leaks

Firecrest-77mm-16-Stop-Stackable-Neutral-Density-Filter

Circled is a pair of light leaks that appear at either edge of the frame.

Despite opting for the circular filter to avoid light leaks, they did appear in my images at the left and right of the bottom third of the frame. They were minimal and easy to deal with in post-production, but they are there.

I have done some research, and it seems there’s a chance these leaks are coming from where the lens attaches to the camera body. If that’s the case, you can fix it by covering the join with black material. Formatt-Hitech also sells an accessory that fits around the front of the lens and filter to help prevent light leaks.

Exposure times in low light

When it comes to shooting later in the day when the exposure times get longer, and the light changes rapidly, it’s likely your required exposure time will change partway through your exposure. For example, if your metered exposure when you start is 1/125th (8 minutes and 44 seconds), and the light levels drop to 1/30th (if the sun moves behind a cloud for example) during that exposure, the new time is 36 minutes and 24 seconds. This means that your image will be quite underexposed.

Because of this, I’ve found this technique works better in the middle of the day when light levels are consistent.

Noise and hot pixels

Image: Here, you can see a combination of noise and hot pixels after an 8-minute and 44-second expos...

Here, you can see a combination of noise and hot pixels after an 8-minute and 44-second exposure.

Noise and hot pixels have little to do with the filter itself. Extremely long exposures with digital cameras open you up to problems with noise. The longer your shutter is open, the more noise appears in your frame.

Software is very good at dealing with this, but you do need to be aware of it.

This is especially true if you opt to up your ISO in lower light levels to keep the exposure time in the minutes rather than in the hours.

Direct light

Image: Taken in overcast conditions, the technique has emphasized the flatness of the light.

Taken in overcast conditions, the technique has emphasized the flatness of the light.

Image: In direct sunshine, contrasty conditions get emphasized.

In direct sunshine, contrasty conditions get emphasized.

What I’ve found with this technique is that it works best with direct light on your subject. If the conditions are overcast, or the light is otherwise dull, the long exposure tends to emphasize the flatness of the scene.

Of course, that won’t always be the case and please don’t take that as a rule of any sort, it’s just an observation. If you live somewhere that is sunny and bright most of the time, this won’t pose you much of a problem. However, I live in Yorkshire and overcast days are the rule rather than the exception.

Price

I do not include the price of the Firecrest 77mm 16-Stop Stackable Neutral Density Filter as either a pro or a con. At $ 125, it’s probably not going to be an impulse buy for most photographers. However, for what it is, what it does, and how well-made it is, it is well worth that price. It’s also roughly the same price as filter offerings from companies like Lee Filters.

Overall experience

Firecrest-77mm-16-Stop-Stackable-Neutral-Density-Filter

Overall, the Formatt-Hitech Firecrest 77mm 16-Stop Stackable Neutral Density Filter does exactly the job I bought it for.

In the end, the Firecrest 77mm 16-stop Stackable Neutral Density Filter does exactly what I wanted it to when I bought it, and it does it well. The complications aren’t hard to overcome, and it is well worth the extra effort. At $ 125, it is well within reach of anyone who wants to have a serious attempt with the techniques it offers.

I also found that I really appreciate the side effects of the technique. Because the exposure times are incredibly long, you can spend a couple of hours on location and come away with only a handful of images. This slow-treacle approach to photography is enjoyable and turns the whole experience into a mindful one.

If you like the effect of streaky clouds and flat water, or you are into minimalist photography, this type of filter may be indispensable for you.

Do you do long exposure photography? Do you use a 16-stop filter? What are your experiences? Share with us in the comments!

Firecrest-77mm-16-Stop-Stackable-Neutral-Density-Filter

The post Firecrest 77mm 16-Stop Stackable Neutral Density Filter Review appeared first on Digital Photography School. It was authored by John McIntire.


Digital Photography School

 
Comments Off on Firecrest 77mm 16-Stop Stackable Neutral Density Filter Review

Posted in Photography


DPReview TV: Lensbaby Omni review

25 Aug

Photographers used to do crazy things like smear petroleum jelly on their lenses to create interesting photos, but thanks to the Lensbaby Omni you can get those same effects without plopping goo on your glass. Join Chris and Jordan for some creative photography.

Get new episodes of DPReview TV every week by subscribing to our YouTube channel!

  • Introduction
  • How it works
  • Wand options
  • Using the Omni for video
  • Useful tool or novelty?

Articles: Digital Photography Review (dpreview.com)

 
Comments Off on DPReview TV: Lensbaby Omni review

Posted in Uncategorized


Sony Cyber-shot DSC-RX100 VII Review

23 Aug

$ (document).ready(function() { SampleGalleryStripV2({“galleryId”:”9588852492″,”isMobile”:false}) })

Sample photoSample photoSample photoSample photoSample photo
Gold Award

85%
Overall score

The Sony RX100 VII is the company’s latest pocketable 1″ sensor compact. It uses the same 24-200mm equivalent F2.8-4.5 lens as its predecessor but features a more capable, easier-to-use autofocus system.

This comes in addition to the already impressive capabilities we saw in the Mark VI, including very fast continuous shooting and high-quality 4K video capture. And, for the first time in the series, the Mark VII has a mic socket for improved audio recording.

The Mark VII can shoot at up to 20 frames per second with no viewfinder blackout: specs that are a match for the company’s flagship a9 sports camera. And it’s this capability, along with the enhanced AF, that prompts Sony to talk about ‘the power of an a9 in your pocket.’ To be clear, though, it does not share its hardware with that model.

Key Specifications

  • 20MP 1″-type stacked-CMOS sensor with phase detection and built-in DRAM
  • 24-200mm equivalent F2.8-4.5 zoom
  • 20 fps continuous shooting with full autofocus and auto-exposure, and no blackout
  • Seven frame, 90 fps ‘single burst’ mode
  • Retractable 2.36M-dot EVF with 0.59x equiv. magnification
  • 3″ touchscreen LCD (flips up 180° or down by 90°)
  • Oversampled UHD 4K video (up to 5 min clips in standard temperature mode)
  • Combined lens and digital ‘Active’ stabilization mode in video
  • High speed video at up to 1000 fps
  • Intervalometer
  • Wi-Fi with Bluetooth and NFC

The RX100 VII will be available in August 2019 at a recommended price of $ 1200. It’ll sell for around €1300 in Europe and £1200 in the UK, with both figures including tax. These are around the same prices as its predecessor was launched at, so we expect to see the Mark VI get re-positioned, to make room.


What’s new and how it compares

The RX100 VII looks like its predecessor but borrows know-how (though not hardware) from the pro-sports a9 model.

Click here to read more

Body and handling

The RX100 VII is an evolutionary product but somehow finds room for a mic socket, as well as that massive lens.

Click here to read more

Operation and controls

The control layout and logic is unchanged from previous models (for better or worse). There’s a good degree of customization available.

Click here to read more

AF and video performance

The RX100 VII offers one of the best autofocus implementations of any compact on the market, video impresses too.

Click here to read more

Image quality

Image quality from the RX100 VII is slightly improved over the VI. Check out our studio test scene to see how it compares to the competition.

Click here to read more.

Conclusion

The RX100 VII receives our gold award and recommendation. Here’s why.

Click here to read more.

Sample gallery

We’ve been shooting with a pre-production RX100 VII for a few days now. Have a look at what the new sensor can do.

Click here to see the gallery.

Articles: Digital Photography Review (dpreview.com)

 
Comments Off on Sony Cyber-shot DSC-RX100 VII Review

Posted in Uncategorized


Sony FE 35mm F1.8 Review

21 Aug

$ (document).ready(function() { SampleGalleryStripV2({“galleryId”:”7486847777″,”isMobile”:false}) })

Sample photoSample photoSample photoSample photoSample photo
Silver Award

88%
Overall score

As Sony’s full-frame mirrorless lens lineup has grown, there is a certain irony that as the company started on churning out some really, really good lenses, like the 12-24mm F4, the 24mm F1.4 and the eye-searingly sharp 135mm F1.8, a large portion of Sony’s customer base was yearning for something much simpler. And much smaller. And cheaper. For a couple of years, “I just want a 35mm F1.8!” was one of the most oft-posted comments underneath our Sony lens coverage.

Finally, on July 9th in the year of our Lord 2019, Sony answered those users’ prayers and released the FE 35mm F1.8. And peace did fall across the land, and there was much rejoicing – for about five minutes until we all found something else to complain about.

Product images by Dan Bracaglia, all other photographs by Rishi Sanyal unless otherwise noted.

Key specifications:

  • Compatibility: Sony E-mount (full-frame and APS-C)
  • Focal length: 35mm (52mm equiv. on APS-C bodies)
  • Maximum aperture: F1.8
  • Minimum focus: 22cm (8.7″ – max magnification 0.24X)
  • Construction: 11 elements in nine groups (incl., one aspherical)
  • Weight: 280g (10 oz)
  • Dust and weather-resistant
  • Diameter / Length: 66mm x 73mm (2.6″ x 2.9″)

The FE 35mm F1.8 joins the FE 20mm F2 and FE 85mm F1.8 in the non-GM, non-G lineup, and shares some similarities with both earlier lenses. You won’t find any fancy exotic glass inside the 35mm F1.8, and Sony doesn’t claim that these lenses are up to the GM standard of durability when it comes to weather-sealing, but they’re sharp, small-ish and relatively affordable primes, all coming in at under $ 800 MSRP.

You’ll find just one unconventional piece of glass inside the FE 35mm F1.8 – an aspherical element, towards the rear of the lens.

Placing the focusing optics at the rear of the lens allows optical designers to greatly reduce focus breathing.

The FE 35mm F1.8 is the priciest of the bunch, at $ 750. This is noticeably more expensive than the film-era 35mm F1.8 lenses of yore, but as we’ll see, just like the recently-reviewed Nikon Z 35mm F1.8 S, it belongs to a new generation in more ways than just one.

The Sony FE 35mm’s size, weight and cost make it a perfect companion to the A7 III, but it’s equally at home on the higher-resolution sensor of the A7R III and A7R IV. In fact, – spoiler alert – we’d recommend it over the costlier Sony Distagon T* FE 35mm F1.4 ZA for almost every use-case.

Articles: Digital Photography Review (dpreview.com)

 
Comments Off on Sony FE 35mm F1.8 Review

Posted in Uncategorized