RSS
 

Posts Tagged ‘Reflectors’

Side-by-side comparison between reflectors and diffusers for portraits

07 Oct

Comparison between reflectors and diffusers for portraits

If you’ve been looking into portrait photography, whether it be a casual read, in depth, as a hobby, to improve your portraits, or as a pro, you would have come across the use of reflectors. Reflectors come in various sizes, shapes and colours. My favourites are the 5-in-1 circular foldaway reflectors and the rectangular panels you can lean on or clip to a stand.

Have you ever wondered what a side-by-side comparison using different reflector colors would look like? Wonder no more. Below, you can see the different types I used. These photos all share the same white balance and editing as I wanted the colors to be as true a reflection of the effects of the reflectors used as much as possible. I’ve also kept the edits as clean as possible.

#1 Three reflectors, light shirt

dps-comparison-between-reflectors_0000

Top left is a natural light portrait lit only by window light, half-clear and half-frosted (diffused) but with no other reflectors used. The window is large enough for a big spread illuminating both face and background. The portrait on its right shows a rather obvious warm glow all over. I used two gold reflectors: camera right and in the front underneath the face. This setup warmed everything up – shirt, teeth, face and even the background.

Compare the effect of the gold reflector to the bottom left. This one had two silver reflectors positioned in the same places. Notice how cool the color temperature has become. Next to it on the right I once again had the same setup, but this time using two white reflectors. Notice the color temperature is still cool but softer, less sharp and less edgier than the silver one. Look carefully and this difference is more apparent on the teeth and skin tone being just a touch warmer.

#2 Two reflectors, dark shirt

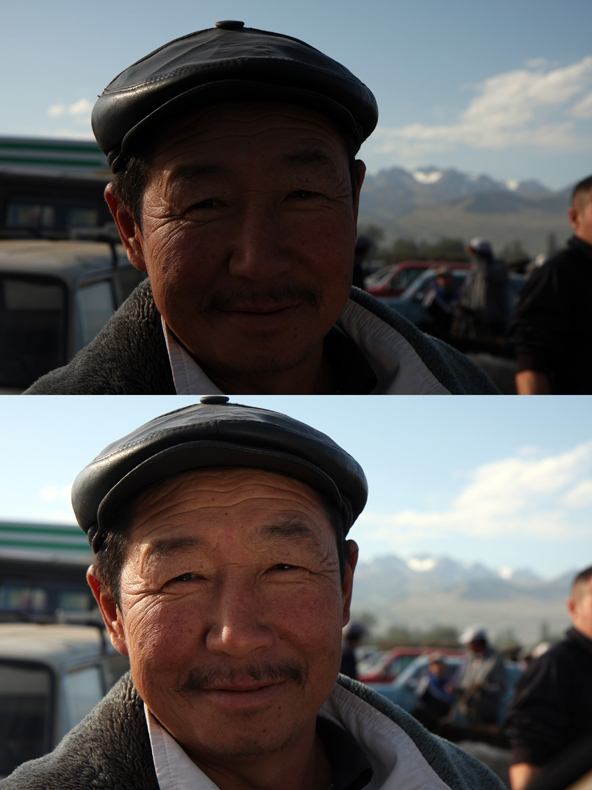
I thought I’d do the same comparison, this time with the subject wearing black. The difference is more dramatic. With the gold reflector, the black is richer and darker, whereas with the silver it’s a little more washed out.

For me these are both a bit extreme, with the gold reflector being too warm and the silver being too cold. If I were to edit these photos without considering the true effects of the reflector I’d tone down the warmth of the gold reflector by half and I’d be good with that. Similarly, I’d warm up the one with the silver reflector in post, both using the white balance slider. I’d then get the happy warm tone that I’m after.

#3 Diffuser reflector and flash

If you’re familiar with the 5-in-1 reflector, you’ll know there are four colored sides: white, silver, gold and black. These sides are made of fabric all stitched together as one zipped wrap. This fabric wraps around a middle standalone piece that’s translucent. This is the diffuser and a super versatile tool. Strictly speaking, the black side doesn’t actually reflect light but rather absorbs it, and is good for cutting light out or using as flags.

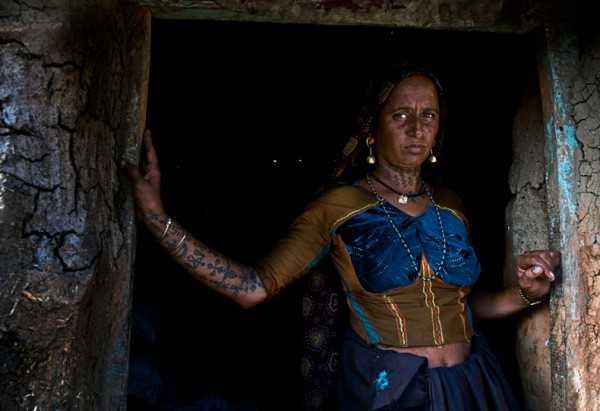
This diffuser is great when shooting in harsh outdoor sunlight and you just want to cut the light down or tone it down by placing the diffuser between the sunlight and the subject. In effect, you are creating a slightly shadowed area for the subject, which makes it ideal for portrait lighting outdoors.

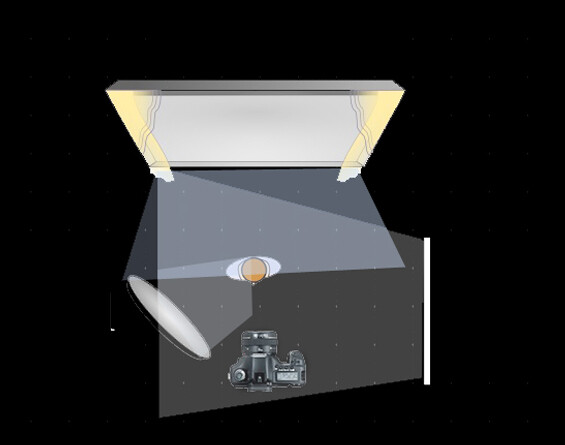
I thought I’d try this same technique for my indoor portraits by using this diffuser to cut down light from a flash, thereby acting like a big softbox but without the bounce.

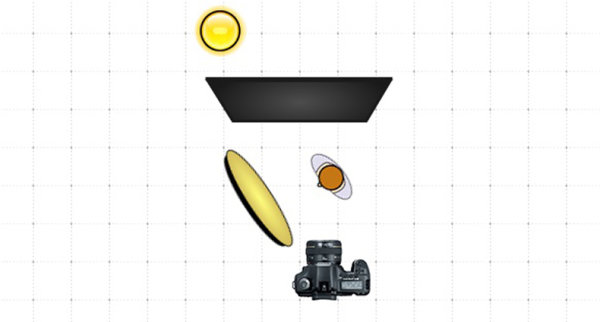
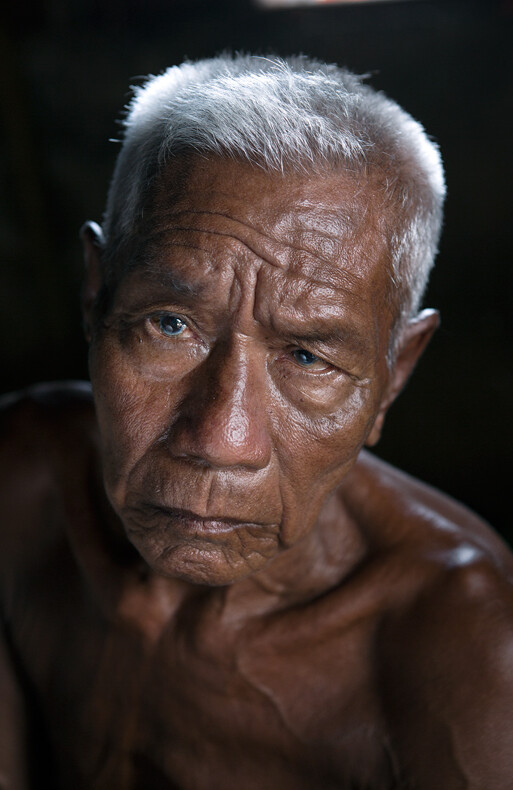
Here are the results. The left photo was lit with one flash on camera right positioned behind the diffuser, which was pretty big and placed close to the subject for a smooth, soft light. The right photo had two flashes, again diffused, with one light overhead to provide hair light and light the background for more separation.

#4 Diffused natural light vs diffused flash

The final comparison is between diffused window light on the left photo and one diffused flash on the right photo. Window light produced softer shadows here, with less contrast and a bigger spread of light. In contrast, the diffused flash had more defined shadows. It’s smaller than the window with less spread of light, but sculpted the face better.

If I were to mimic the higher contrast and shadows produced by the diffused flash, one trick would be to cut out the light by using the black reflector side as a flag. I wasn’t able to do this, however, as I didn’t want my subject to be waiting too long for my experiment. (He only came in for one headshot.)

I hope you found this little comparison exercise fun and enlightening. It’s amazing what the 5-in-1 reflector, a small and inexpensive tool, can do to your portraits.

The post Side-by-side comparison between reflectors and diffusers for portraits appeared first on Digital Photography School.


Digital Photography School

 
Comments Off on Side-by-side comparison between reflectors and diffusers for portraits

Posted in Photography


How to Find and Use Natural Reflectors for Portraits

01 May

Natural light is one of the simplest ways to create beautifully lit portraits, without having too much equipment or worrying about setting up extra gear. However, it limits beautiful light to certain hours of the day and for you to work in the shade. This is where finding and using natural reflectors comes into play.

With natural light reflectors, you can photograph at any time of the day without having to carry any extra gear. It’s really easy to find and use to help give your portraits that extra boost of light.

Natural light reflector for portraits

Here we can see that the natural reflector is the path at the park.

What is a natural reflector?

A natural reflector is using already built-in or found materials to bounce light back onto your subject. This rids you of having to carry more equipment on location. 

It also helps immensely when you are photographing your subject during not so great hours of the day, like say, noon. When the light is harsh, it makes for great big natural reflectors to bounce that light back onto your subject.

Natural reflector for portraits

In this portrait, the subject is in direct sunlight at midday and the pavement helped to bounce light back onto her face.

Natural reflectors can come in many different forms, the most useful are big light-colored walls, the pavement, buildings with silver or light colored walls, white/silver cars in parking lots, mirrors, windows, even your white t-shirt. 

They are all found naturally occurring on location and all of them bounce light back onto your subject.

Natural light reflectors for portraits

This family is being lit by the sidewalk as a natural reflector, bouncing light back onto their faces.

The bigger your reflector, the more dispersed and diffused (soft) the light will be. Keep this in mind when photographing big groups or families, as you want the light to be evenly spread over all of your subjects’ faces.

How to use a natural light reflector

Natural reflectors are used a lot like real man-made or handheld reflectors. Position your subject in front of the natural reflector, for example, a large white wall. 

How to Find and Use Natural Light Reflectors for Portraits

The sidewalk directly in front of this couple is naturally reflecting light back onto their faces. The natural light reflector is large and therefore disperses light evenly on both of them.

Parking garages make for great portrait locations, especially for headshots. Make sure to position your subject behind the edge of where the sun is hitting the pavement and the shadowed area. This will keep the lighting on your subject even while maintaining an even background as well.

Using buildings is also a great way to reflect light on to your subject and compete with the sun, offering a different style of portraits. As light is reflected off a big silver wall, the light reflected creates more drama. Adding to the overall effect of your photographs!

How to Find and Use Natural Light Reflectors for Portraits

The silver paneling on the building serves as a natural reflector competing with the sun in the background.

If you are out in a field or more of an open space, you can still find natural reflectors. Fields reflect a beautiful golden hue as does the sand on the beach when the sun is brightest.

Natural reflectors can also add a little more drama to your photos if you use them strategically. Placing your subject away from the light can create interesting shadows. Same with reflectors below your subject. Experiment to see which types of natural reflectors work best for you.

How to Find and Use Natural Light Reflectors for Portraits

Here the light reflected creates a little bit of drama in the portraits of this young man.

Best time for natural light reflectors

The best time to use natural reflectors is anytime the sun is shining bright! 

On cloudy days you may get some bright light, but when the sun is out, that is the best time for maximum reflection. It’s a good rule of thumb to go to the portrait location before your session and observe when is the best time and which natural reflectors will be useful.

How to Find and Use Natural Light Reflectors for Portraits - maternity portraits in natural light

Use natural light reflectors in both brightly lit backgrounds or in shaded areas.

To get the most out of a natural reflector, it’s best to photograph your subject between 11 am and 2 pm so that the sun hits these natural reflectors evenly and you can move your subject around to get the best background, angle, and of course, lighting.

How to Find and Use Natural Light Reflectors for Portraits

Fields are great for naturally reflecting onto your subject’s face during a session.

If you are photographing in a cityscape or urban area with a lot of buildings, the best time is a couple of hours before sunset. The sun will reflect against the windows of buildings and offer the best strength. 

Don’t stop photographing though. You’ll want to catch the sunset reflecting in the windows as well after the sun goes down a little.

beach family portrait - How to Find and Use Natural Light Reflectors for Portraits

Using the sand as a natural light reflector is a perfect way to evenly light your subjects at the beach.

Another example of beach photos and using the sand as a natural reflector.

You can also become a natural reflector

Wearing white can bounce some much-needed light off you and back to your subject if you need a bit more light. A simple white t-shirt can do the trick and give you a little boost of light. It especially makes for great catchlights in your subject’s eyes.

How to Find and Use Natural Light Reflectors for Portraits

Using white can help reflect light. Take precaution when photographing in really bright sunlight as it can sometimes wash out details in the shirts. However, if you use a white shirt, it has the same effect of bouncing light.

White shirts can give your subject a soft dewy look. Just be mindful that you will have to be relatively close to your subject so that enough light can bounce back onto the subject’s face.

In conclusion

portrait of a girl - How to Find and Use Natural Light Reflectors for Portraits

When you’re photographing in natural light, these natural reflectors can help make for interesting, beautifully lit portraits of your subjects. The boost of light can get you out of shaded areas and allow you to shoot at all hours of the day without having to carry additional gear other than your camera. 

Have fun and experiment with different types of natural reflectors to add drama to your portraits.

The post How to Find and Use Natural Reflectors for Portraits appeared first on Digital Photography School.


Digital Photography School

 
Comments Off on How to Find and Use Natural Reflectors for Portraits

Posted in Photography


How to Make DIY Reflectors for Tabletop Photography

15 Dec

The use of reflectors in photography is just a way of taking advantage of the existent light, and bounce it to different places in your image. This can be done with virtually any surface that reflects light, like a wall, a mirror, cardboard, styrofoam, aluminum foil, etc.

Dedicated photography reflectors come in many different colors, shapes and sizes. Silver, gold, white, and sometimes mixes of these three colors commonly know as zebra reflectors are the most common colors. There are also 5-in-1 reflectors that include a black surface to absorb light, and a translucent surface to soften light.

What shape?

The shape of the reflector depends on the subject you are trying to photograph. Usually collapsible round reflectors are the most used because they are easier to handle on location, and also easier to fold, but triangular and rectangular reflectors are very popular too.

01

The size of the reflector depends on the area you are trying to illuminate, and when it comes to small subjects like tabletop photography, things get tricky because standard reflectors are usually too big to produce small spots of light. In this article, I will guide you through the steps of building your own customized small reflectors for tabletop photography like the ones above.

Materials

Even though you can use simple paper sheets with some kind of object as a stand to hold it in place, this simple folding technique will for sure give you more control on the way you place your reflectors.

To start you will need some metallic paper sheets. The ones I’m using here can be found in office supply or craft stores, and exist in various sizes and colors. I bought 50×70 centimeters sheets, that are about 20×28 inches, and that allowed me to make a nice set of reflectors of different sizes and shapes.

A useful feature of this type of paper is that the back side is white, so you can use the metallic side or just flip to the white side to have different types of reflections. Beside the obvious silver and gold, you can also buy metallic textured papers for special effects of light reflection.

02

Cutting to size

Now it’s time to cut the paper to size. This depends on the reflector size you want to create; in this case I’m making a 8x13cm (3×5 inch) reflector.

03

Now mark the lines with a ballpoint pen and fold the paper on those lines. You will end up with something like this.

04

To keep the overlapping folds on the back together, I used small magnets. You can use tape, velcro or even re-usable adhesive, but magnets give you more choices of repositioning the angle of the reflector when you are looking for the right spot.

05

Magnets are also very useful if you use a gooseneck or a magic arm to hold the reflector instead of placing it on the table.

06

Positioning the reflectors

Now that we built some nice reflectors it’s time to try them out.

I have used some high end lighting equipment along my career as a professional photographer, but I must say that it always amazes me what is possible to do with the light of a window or a tabletop lamp and a couple of reflectors. The following image is an example.

07

Here is how it was made:

08

Start with Tabletop tungsten lamp with a diffuser as a back light.

09

Now the same tabletop tungsten lamp with a diffuser, plus a reflector on the left side.

10

Now AND another reflector on the right side.

So, there it is, a simple and highly effective setup that is guaranteed to give more control over the way you light your images for tabletop photography.

Give it a try!

googletag.cmd.push(function() {
tablet_slots.push( googletag.defineSlot( “/1005424/_dPSv4_tab-all-article-bottom_(300×250)”, [300, 250], “pb-ad-78623” ).addService( googletag.pubads() ) ); } );

googletag.cmd.push(function() {
mobile_slots.push( googletag.defineSlot( “/1005424/_dPSv4_mob-all-article-bottom_(300×250)”, [300, 250], “pb-ad-78158” ).addService( googletag.pubads() ) ); } );

The post How to Make DIY Reflectors for Tabletop Photography by Ivo Guimaraes appeared first on Digital Photography School.


Digital Photography School

 
Comments Off on How to Make DIY Reflectors for Tabletop Photography

Posted in Photography


Reflectors: Your Secret Weapon for Amazing Portrait Photography

23 Oct

By: Oded Wagenstein

There is no doubt that using natural light in portrait photography can get you the best results.

However sometimes, as you all probably know, natural light does not do what he’s told. So here comes into action what I like to call my secret weapon in outdoor Portrait Photography.

It is cheap, easy to carry and especially does not frightens my subjects, who themselves can be a little intimidating at times.

Reflector

 
It is just that! It reflects light. There are hundreds of different types of reflectors, which differ in sizes and colors (i.e. white, silver, gold, etc.). A reflector is usually a reflective fabric, stretched over a bendy ring, allowing it to fold, and easy to carry.

With so many types of reflectors on the market, I cannot review them all. This mini-guide will focus on the main reflector I use for my work.

12 ” in size, and costs less than a movie theatre ticket.

I sometimes use other larger reflectors (mainly in cinematography productions), but this 12? reflector suits my needs in travel photography; mainly because it is small enough, allowing me to hold it with one hand and the camera with the other.

To Fill up Shadows:

We all love taking pictures at sunrise and sunset. But when dealing with the harsh mid-day light, a reflector is almost a must.

Fstop of 2.8, shutter speed@ 1/100 and ISO 200

Fstop of 2.8, shutter speed@ 1/100 and ISO 200

In the above picture, taken in the western Indian Rabari tribe, for the National Geographic Traveler magazine (Israeli edition), our model was sitting in a dark mud house. He was sick; therefore it was not an option to move him outside.  On the left wall of the house, there was a small window (as can beautifully seen illuminating in the background), My trusty camera assistant Hardik Pandaya, held a silver colored reflector below the subject ‘s face in order to fill any shaded areas such as under the eyes.

reflectors portraits 2

The above picture was taken on the border of Afghanistan and Tajikistan. Please note that although the woman is standing in the shade and the background is bright, the woman is not a black silhouette and the background is not burned out.  I measured the light from the background (using spot metering). In such a situation, without using a reflector, the character will turn out completely black (silhouette) but with a reflector held on my left hand, I was able to light up her face.

Fstop of 8, shutter speed@ 1/250 and ISO 100

Fstop of 8, shutter speed@ 1/250 and ISO 100

reflectors portraits 4

Below is 80 years old Getho. A fisherman from the small community of Sea Gypsy living in, Thailand. This image is a little bit complex in terms of lighting, because there are three sources of lighting here. Just like in the studio, my main light source (key light) was the house door (right side of the frame). The light was coming from a 45 degree angle, creating this dramatic volume on Getho’s face (you can read more about “sculpturing” with 45 degrees light in this post here).

In my left hand I held the small Silver color reflector, filling the shadows (fill light) on his face? and behind him was an open window for additional  light on his beautiful white hair (back light).

Fstop of 4, shutter speed@ 1/100 and ISO 320

Fstop of 4, shutter speed@ 1/100 and ISO 320

refectors portraits 6

Sometimes a reflector is the only option to shoot under strong sunlight, as you can see in this picture.

reflectors portraits 7

Choose the Right Color

Most reflectors come in multiple colors. In this picture, taken in Western India for the National Geographic Traveler magazine (Israeli Edition), I wanted to preserve the golden- brown color which was dominate in this scene. So I asked Hardik to hold the reflector on its golden side giving the woman’s face a golden glow.

Fstop of 4.5, shutter speed@ 1/80 and ISO 100

Fstop of 4.5, shutter speed@ 1/80 and ISO 100

reflectors portraits 9

Choosing the right distance

It is important to keep in mind that the closer the light source is to the photographed subject, the stronger and less soften it will appear. Thus, a small reflector is easier to carry and hold; however it will be not as soft as a large reflector.

A “catch light” is an interesting spark in the eyes of the subject, “pulling” the audience to look straight at them. There are lots of methods to create a catch light in the subject’s eyes. For example using a flash or a flashlight. However, as we are discussing on the usage of natural light, a reflector can become a great tool for creating a catch light. Just place the reflector under the person’s face.

You can see some catch light examples here:

Fstop of 3.5, shutter speed@ 1/640 and ISO 250

Fstop of 3.5, shutter speed@ 1/640 and ISO 250

reflectors portraits 11

Fstop of 2.8, shutter speed@ 1/200 and ISO 100

Fstop of 2.8, shutter speed@ 1/200 and ISO 100

One of the most useful techniques, in order learn how to work with natural light in my opinion, is by observing the images of other photographers. Try to guess the direction of the light and the position and color of the reflector in the images below:

Fstop of 2.8, shutter speed@ 1/320 and ISO 3200

Fstop of 2.8, shutter speed@ 1/320 and ISO 3200

Fstop of 4.5, shutter speed@ 1/160 and ISO 100

Fstop of 4.5, shutter speed@ 1/160 and ISO 100

Fstop of 3.5, shutter speed@ 1/320 and ISO 1000

Fstop of 3.5, shutter speed@ 1/320 and ISO 1000

Fstop of 2.8, shutter speed@ 1/15 and ISO 200

Fstop of 2.8, shutter speed@ 1/15 and ISO 200

Fstop of 3.5, shutter speed@ 1/320 and ISO 160

Fstop of 3.5, shutter speed@ 1/320 and ISO 160

Fstop of 2.5, shutter speed@ 1/1000 and ISO 250

Fstop of 2.5, shutter speed@ 1/1000 and ISO 250

The diagrams were created by http://www.lightingdiagrams.com

Oded Wagenstein is a Travel photographer and writer. He is a regular contributor to the National Geographic Traveler magazine (Israeli Edition) and he is known for his intimate portraits from around the world. You can join his Portrait & Travel Photography Facebook page and continue to discuss on travel and people photography and get more amazing tips! –

Post originally from: Digital Photography Tips.

Check out our more Photography Tips at Photography Tips for Beginners, Portrait Photography Tips and Wedding Photography Tips.

Reflectors: Your Secret Weapon for Amazing Portrait Photography

The post Reflectors: Your Secret Weapon for Amazing Portrait Photography by Guest Contributor appeared first on Digital Photography School.


Digital Photography School

 
Comments Off on Reflectors: Your Secret Weapon for Amazing Portrait Photography

Posted in Photography


Scrims, Reflectors and Natural Light Photography! Lightenupandshoot.com

26 Dec

Sign up for free membership at lightenupandshoot.com We go over some different techniques to use with natural light in this video. Scrims, what aperture to use, reflectors, using your environment, our look away technique, location hunting, shadows, white balance and some headshot tips. Music by: Jeremy Buck and the Bang www.jeremybuck.com
Video Rating: 4 / 5

www.adorama.com Adorama Photography TV Presents the reDefine Show with Tamara Lackey. Join Tamara as she speaks to Photography Legend Bambi Cantrell about her journey from point & shoot photographer’s assistant to one of the most decorated photographers in the industry. Sharing her trials, errors, and takeaways from a longstanding career in shooting and education, Bambi offers some excellent advice to anyone looking to improve their craft and business. AdoramaTV features talented hosts including Mark Wallace, Gavin Hoey, Joe McNally, Joe DiMaggio, Tamara Lackey, Bryan Peterson, and Rich Harrington. Related Products Featured items from this episode bit.ly AdoramaTV related episodes bit.ly Canon EOS-1D X Digital SLR Camera www.adorama.com Canon EF 50mm f/1.2L USM Ultra-Fast Standard AutoFocus Lens www.adorama.com Tamara Lackey’s Capturing Life Through (Better) Photography, 100 Page Book www.adorama.com Workshop on DVD: Inside Contemporary Children’s Photography with Tamara Lackey www.adorama.com Kubota Artist Series Style Book and DVD Tutorial by Tamara Lackey www.adorama.com Tamara Lackey’s Capturing Life Through (Better) Photography Deluxe Kit with 90-Minute DVD www.adorama.com The Art Of Children’s Portrait, 128 Pages Softcover Book by Tamara Lackey www.adorama.com If you have questions, share them with us at: adotv@adorama.com