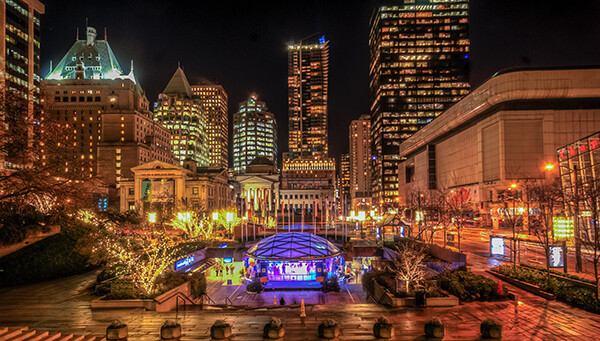
Reducing noise in your images can make a huge difference to their quality
We have all seen it in our images, that uneven grainy look that makes our images look a little unappealing. In the days of film, noise was called grain and it looked better (even the word grain sounded better) but the digital equivalent of noise can often make a good image look bad. The first question we need to answer is:
What is noise?
Generally speaking, noise is defined as aberrant pixels. That means pixels that are not representing the colour, or the exposure of the scene correctly. The next question is:
When does noise happen?
Noise is introduced into your images when you shoot a long exposure image or shoot at a high ISO setting. Does mean you should never go over ISO 100 or do long exposures? No, there are times that you may need, or even want, to shoot in those conditions. Landscape photographers shoot in low light all the time. The important things to know are; how to avoid getting too much noise in your image and, how to deal with it in your post-production.
Let’s deal with how you can get less noise in your images first.
1. Reduce noise in-camera:
Shoot at lower ISO settings
If your camera is three years old or newer, the ISO functionality will be great. You shouldn’t see too much noise creeping into your images, even up to ISO 1000. However, there might still be some noise at the higher ISO numbers, so be aware of your exposure. Shooting at a lower ISO means you will have less noise in your image. Higher ISO settings tell your camera’s sensor to group pixels together to capture more light. This grouping effect can make your image look gritty and noisy.
So, how do you avoid shooting at a high ISO? If possible, open your aperture to its widest setting i.e. f/2.8. If you are shooting in low light, use a tripod if possible, or you could use a flash. If none of these options give you the correct exposure, then you will need to push the ISO up higher. Also, do some test shots to find out at what level the ISO settings on your camera start to degrade image quality. For many years I shot on a Nikon D80 and I knew that anything above ISO 500 was really difficult to use afterwards. This was because the noise became difficult to remove, even in third party software, and if it was removed, the image looked like a watercolour painting as a result of over processing of the noise. So I got to know the limits of my camera and worked within those constraints.
Shoot in RAW format
I know you may feel daunted by shooting in RAW, but you don’t need to be. RAW is a great way to get the best out of your images, so be sure to use it. You don’t have to shoot RAW all the time, but when you notice that the light is becoming a little too dark, switch over to RAW. The reason is that JPEG images already have compression applied to them. This means that there is already some noise, and what is known as JPEG artefacts, in the image. If you are using a high ISO with JPEG files, the noise can become even worse. Also, in post-production, you have much more flexibility removing noise, and increasing exposure, with a RAW file than a JPEG.
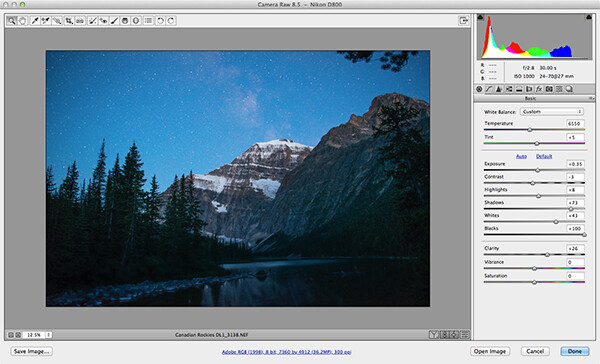
Adobe Photoshop Camera Raw has some powerful noise reduction tools
Check your exposure
When digital cameras first hit the market, they were really bad at rendering highlights correctly. Many photographers (myself included) would slightly underexpose the images in order to retain detail in the highlights. This meant that the shadow areas were really dark and when you tried to pull them up in Photoshop, the noise would become evident. This has been largely sorted out now and the new generation of digital sensors does a great job of handling highlights and shadows. As a result, you can expose correctly without fear of having noise in the shadows, or problems in the highlights. In fact, you can now overexpose slightly so that the shadows are a little brighter than normal and then you can pull the highlights down in Photoshop. I have been doing this for a while now and it is amazing how much detail the new sensors can capture in the highlights. Be careful not to overexpose too much, watch that you don’t clip the highlights as the details may then be lost for good.
Be careful when doing long exposures
Long exposures make some of the most dramatic images, but if the exposure is too long, the sensor of the camera can begin to heat up and the pixels will render incorrect colours and exposure. You can still do long exposures, but again, be aware of how you camera handles the long exposure time. Does the image look too grainy? Test it out and experiment to see where your camera begins to struggle. Then make sure that you don’t shoot a long exposure for longer than whatever works on your camera. The key point here is to know the limits of your gear and shoot within those limits. This will ensure great images and easy image editing.
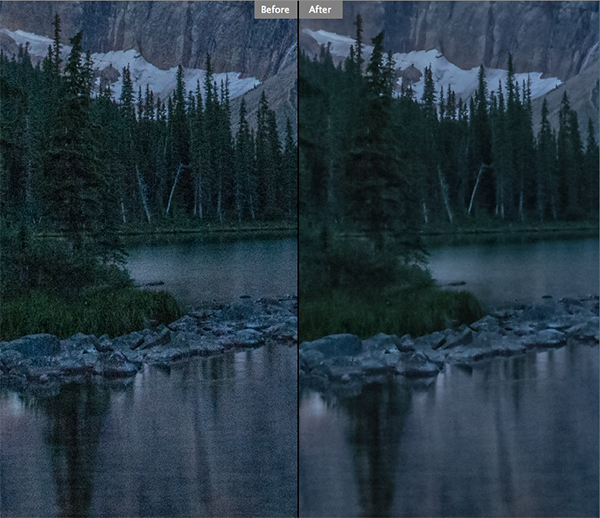
Long exposure images can accentuate noise in a scene
Use in-camera noise reduction
In most cameras there will be a function called High ISO Noise Reduction or Long Exposure Noise Reduction. It’s a good idea to turn this on if you are shooting at a high ISO or doing long exposures. The reason is that after the image has been shot, the camera will analyse the image and look for any pixels that are incorrectly rendered. It will then fix the pixels that are not properly rendered. This takes some time, usually as long as the exposure time. So if you shot an image that was 30 seconds long, the camera will do an analysis and correction that will take up to 30 seconds. This may become impractical if you are doing 10 minute exposures, but it is worth doing on shorter exposures. If you have the time, do it on the very long exposures too, as it can improve the image quality.
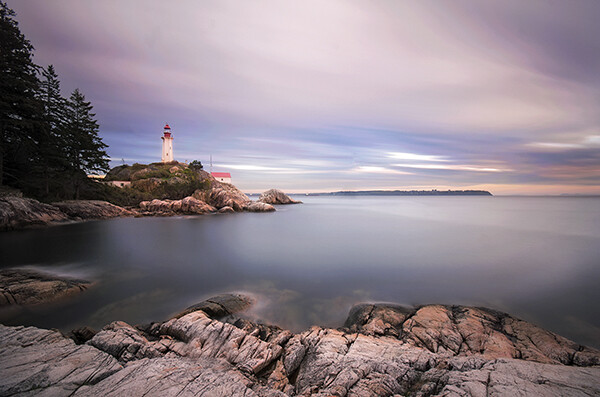
Use in camera noise reduction for long exposures and lowlight images
2. Fixing noise in Lightroom or Photoshop:
Once you have captured your image, you will want to open it up in Lightroom or Photoshop to see how it looks. It is a good idea to zoom your image to 100% to see the actual details of the noise in the image. When you make any adjustments, be sure to zoom in to 100% (1:1 in Lightroom), but also zoom out to see the full image to make sure that the whole thing looks good.
Noise reduction workflow in Lightroom and Photoshop Camera Raw
The controls in Lightroom and Photoshop Camera Raw are pretty much the same, so below is a quick overview of what each slider does and how to use them. In Lightroom you will find the Noise reduction tools in the Develop module and in Camera Raw you will find it as the third tab on right hand side of the screen, it is the Detail tab.
The sliders do the following:
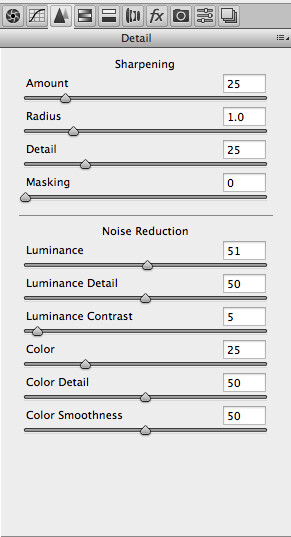
The noise reduction sliders in Photoshop Camera Raw, are identical in Lightroom
Luminance
Reduces luminance noise which is noise coming from over or underexposed pixels, this can be quite prevalent in long exposures.
Luminance Detail
Controls the luminance noise threshold. This is good for noisy photos. Higher values preserve more detail but can produce noisier results. Lower values produce cleaner results but also remove some detail.
Luminance Contrast
Controls the luminance contrast; useful for noisy photos. Higher values preserve contrast but can produce noisy blotches or mottling. Lower values produce smoother results but can also have less contrast.
Colour
Reduces color noise. This is often noticed in the underexposed shadow areas of an image.
Colour Detail
Controls the colour noise threshold. Higher values protect thin, detailed color edges but can result in color specking. Lower values remove color speckles but can result in colour bleeding.
Colour Smoothness
This slider controls the smoothness of the colours in the image. This is useful if you still have some unusual colour noise in your image after you have made all your adjustments above. Use this to finish off the noise reduction workflow.
Conclusion
There are no standard settings here that will work for every image. You will need to slide each adjustment around until you find the desired result and see how the changes interact with each other. I tend to slide Luminance and Colour to about 50 and then work from there, I slide each slider up and down, carefully watching how this is affecting the image. Once I am happy with the adjustment, I then move onto the next slider until I am done. I do this while I am zoomed into the image at 100% and after each change, I zoom out to see the effect it is having on the overall image. This may sound a little tedious, but if this is done properly, you will be able to eliminate most of the unsightly noise in just about any image. Practice is also important here, try this on as many images as you can and pretty soon you will be able to predict the effect of each changes.
Do you have any other experiences or tips for noise avoidance and removal? Please share in the comments below.
The post How to Avoid and Reduce Noise in Your Images by Barry J Brady appeared first on Digital Photography School.

Digital Photography School

You must be logged in to post a comment.