RSS
 

Posts Tagged ‘Profiles’

Loupedeck’s latest software update adds new Profile Creator tool for custom profiles

28 Mar

The company known for its video and image editing consoles, Loupedeck, has announced a software update that enables users to create custom profiles for third-party applications. With the new Loupedeck Profile Creator, Loupedeck CT owners can create various custom profiles for all of the software they use, including for applications like Davinci Resolve, Logic Pro X, Capture One and more.

According to Loupedeck, creators don’t need any programming skills to create custom profiles for their favorite applications. Profile Creator can be used for adjustments and actions using everything from mouse movements to shortcuts, macros, keys, run applications, links and text. The new capability is found in software version 3.2 and higher.

Users can find a series of custom profiles for popular applications available to download on the Loupedeck website here. The company’s Founder and CEO Mikko Kesti explained, ‘The possibility for all users to create custom profiles is an important step in delivering an increased level of functionality and flexibility the digital creator community requires with their editing tools.’

In addition to announcing the Profile Creator’s Custom Profiles feature, Loupedeck has also revealed that its Creative Tool now has native integration for Streamlabs, a live streaming app that is popular with creators. Going forward, Loupedeck CT owners will be able to use the console to directly control their stream, including the ability to adjust audio, quickly mute and skip content, hide and unhide sources, and more.

Kesti calls the native integration a ‘natural addition’ to the company’s Creative Tool, which is available to purchase for $ 549. Users who are new to the device can download its companion software from Loupedeck’s website, where the company also offers User Guide downloads for everything from general usage to using Loupedeck CT with specific photo and video applications like Photoshop and Lightroom.

Articles: Digital Photography Review (dpreview.com)

 
Comments Off on Loupedeck’s latest software update adds new Profile Creator tool for custom profiles

Posted in Uncategorized


10 Top Creative Photography Instagram Profiles you Should Follow

08 Jan

The post 10 Top Creative Photography Instagram Profiles you Should Follow appeared first on Digital Photography School. It was authored by Jackie Lamas.

instagram-profiles-you-should-follow

Want to add a little more inspiration to your Instagram feed? We’ve compiled the 10 top creative photography Instagram profiles you should follow that will make scrolling much more inspiring!

Listed in no particular order, these profiles can inspire creativity and imagination as they photograph the world around them, either real or created. Check it out!

1. Paul Nicklen

First, in the top creative photography Instagram profiles you should follow is Paul Nicklen. Paul is a wildlife photographer whose work has been featured in National Geographic as well as many other exhibitions throughout the world. Most known for his exploration and documentation of polar bears and arctic wildlife, Paul is a suburb fine art photographer and one to follow on Instagram!


View this post on Instagram


A post shared by Paul Nicklen (@paulnicklen) on


View this post on Instagram


A post shared by Paul Nicklen (@paulnicklen) on


2. Laura Zalenga

A creative photographer that combines reality with imagination and great storytelling, Laura Zalenga is one to follow along through her creative journey. She is also an Adobe Creative Resident giving followers an insight into what it means to have a residency at Adobe.


View this post on Instagram


A post shared by laura zalenga (@laurazalenga) on


View this post on Instagram


A post shared by laura zalenga (@laurazalenga) on


3. Humans of NY

Part documentary, part humanitarian, Humans of NY is an account that inspires us to tell stories about the most unlikely of people. The photographer also travels and tells stories of people from all over the world. Sharing lots of different perspectives of ordinary people who sometimes don’t show their faces and whose stories connect with many followers.


View this post on Instagram


“My husband hasn’t been home in 153 days. There’s a legal case right now, so I can’t say exactly what happened. But he suffered a catastrophic brain injury in July. And so many of his memories are gone. Some days I’ll go visit him and it just won’t stick. He still remembers my name, but his memories about me are all wrong. Or the details are mixed up. But he’s one hundred percent convinced they’re true. He can’t be corrected. He’s steadfast in his memories. Right now I feel like we’re on two different tracks. I’m just trying to find the places where they merge. He recognized our wedding ring yesterday, even though it was around my neck—that was big for me. It was a moment when our realities came together. Our 45th anniversary is this Saturday. I’m just hoping it will be as normal as possible. I’m going to cook him dinner. Hopefully he’ll eat. And maybe we can share some of the same memories. I’m not sure if that’s enough for me, but it has to be. It has to be enough. Because he’s not going anywhere. And neither am I. We’re in this together.”

A post shared by Humans of New York (@humansofny) on


View this post on Instagram


“I vividly remember watching cartoons as a kid and seeing Bugs Bunny standing on a lily pad, playing ‘Hello My Darling,’ with a banjo in his hand and a drum on his back. I’ve always wanted to play music myself. But it’s so hard to make a living at it. For awhile I was playing the banjo in restaurants. But I couldn’t make it work. So I thought I’d try the Bugs Bunny thing.”

A post shared by Humans of New York (@humansofny) on

4. Minh T (thismintymoment)

Minh T is a superb photographer combining geometric architecture with a clean portrait creating a style all of his own. Minimalistic in nature but drawing the eye to the focal point using negative space and clean lines. This is a profile on Instagram worth following.


View this post on Instagram


Lost in an Escher dream ?

A post shared by Minh T (@thismintymoment) on


View this post on Instagram


A new set of images inspired by the bold diagonal lines of the most provocative letters of the alphabet, the letter X, which happens to be the namesake of this seductive scent from the house of @clivechristianperfume. Spicy and woody, it leaves a strong impression — full of strength and sensuality . #CliveChristianPerfume #DiscoverClive #CliveChristianX #sponsored #architecture #icons

A post shared by Minh T (@thismintymoment) on


View this post on Instagram


A post shared by Minh T (@thismintymoment) on


5. Tropicophoto

This duo brings color, creative imagination, and narratives that tell stories to a whole different level. Their entire feed is an explosion of color.


View this post on Instagram


A post shared by Forrest & Michelle (@tropicophoto) on


View this post on Instagram


A post shared by Forrest & Michelle (@tropicophoto) on


View this post on Instagram


A post shared by Forrest & Michelle (@tropicophoto) on


6. Eva Kosmas Flores

Eva is a food stylist, cook, and photographer that brings moodiness and a bit of warmth to her photography. She also gives workshops on how to better your food photography even if you’re not a photographer. Her presets also set her photos apart giving them that dark and inviting feel.


View this post on Instagram


A post shared by Eva Kosmas Flores ? Photo Food (@evakosmasflores) on


View this post on Instagram


A post shared by Eva Kosmas Flores ? Photo Food (@evakosmasflores) on


View this post on Instagram


A post shared by Eva Kosmas Flores ? Photo Food (@evakosmasflores) on


7. Peter Hurley

Peter Hurley is a renown headshot photographer giving workshops all over the world to photographers helping them master headshot portraiture. He is down to earth and fun to follow along in Insta Stories for behind the scenes of his shoots, travels, and life.


View this post on Instagram


A post shared by Peter Hurley (@peter_hurley) on


View this post on Instagram


A post shared by Peter Hurley (@peter_hurley) on


8. Stormy Solis

Stormy is a portrait photographer who has carved her own style creating beautiful images of connection, love, and intimacy among families and couples. Truly captivating her imagery inspires her followers to take a more intimate approach to portrait photography.


View this post on Instagram


A post shared by Stormy Solis (@stormysolis) on


View this post on Instagram


A post shared by Stormy Solis (@stormysolis) on


View this post on Instagram


A post shared by Stormy Solis (@stormysolis) on


9. Reuben Wu (itsreuben)

Reuben Wu is the creator of the Aerogliph. Using the light from drones and slow shutter speed, he light-paints in mid-air creating the most interesting and thought-provoking images.


View this post on Instagram


A post shared by Reuben Wu (@itsreuben) on


View this post on Instagram


A post shared by Reuben Wu (@itsreuben) on


10. Donatella Nicolini (donatellanicolinistudio)

And finally, in the top creative photography Instagram profiles you should follow is Donatella Nicolini. Donatella is an Italian portrait photographer focused mainly on fine art maternity. Her images are paint-like and breathtakingly timeless!


View this post on Instagram


A post shared by DONATELLA NICOLINI (@donatellanicolinistudio) on


View this post on Instagram


A post shared by DONATELLA NICOLINI (@donatellanicolinistudio) on


View this post on Instagram


A post shared by DONATELLA NICOLINI (@donatellanicolinistudio) on

In conclusion

Instagram is a great source of inspiration and there are some great photographers making incredible photographs! Add these Instagram profiles you should follow to your list of inspiring photographers on Instagram!

Do you have others to add to ‘Instagram Profiles You Should follow’? If so, please share in the comments!

The post 10 Top Creative Photography Instagram Profiles you Should Follow appeared first on Digital Photography School. It was authored by Jackie Lamas.


Digital Photography School

 
Comments Off on 10 Top Creative Photography Instagram Profiles you Should Follow

Posted in Photography


Instagram tests redesigned profiles that emphasize user bios, shrink follower count

27 Nov

Instagram has introduced redesigned user profiles that will be rolling out to users over the next several weeks. The company describes the rollout as a test that retains common profile elements, but rearranges them to provide a new look emphasizing bios and taking the focus away from follower counts.

Though user content posted to the grid remains unchanged, Instagram has repositioned buttons, icons, and other profile elements. User bios are given the most focus with a prominent right placement, whereas follower counts are now listed in small text beneath both the bio and links. Total post counts have been eliminated.

The company hopes its redesigned profiles offer easier navigation and a cleaner look. Testing will take place in multiple phases and “combinations,” Instagram said last week. User feedback on the new look will help shape the experiment and potentially the final design. It’s unclear how many users will see the new profile.

Articles: Digital Photography Review (dpreview.com)

 
Comments Off on Instagram tests redesigned profiles that emphasize user bios, shrink follower count

Posted in Uncategorized


Understanding Creative Profiles in Lightroom Classic CC

26 Jun

In April of 2018, Adobe took a much-anticipated advance in the way it allows users to process their images in Lightroom. Beginning with the version 7.3 release of Lightroom Classic (and ACR 10.3) Adobe now offers the use of something called “Adobe Profiles” as well as “Creative Profiles”.

For us photo nerds, this is a BIG deal.

Understanding Creative Profiles in Lightroom Classic CC

Image courtesy Adobe Blog https://theblog.adobe.com/april-lightroom-adobe-camera-raw-releases-new-profiles/

But exactly what are these new “profiles” and how can you use them in your everyday image processing? Well, sit back and relax because I’m about to tell you all about the brand new creative profile section in Lightroom Classic. If you can’t tell…I’m really excited about this!

What are Creative Profiles?

Before we go too far it’s important to note that you’ve probably used profiles before either in Lightroom or right inside your camera. All those settings in your camera for things like Vivid, Standard, Landscape or Portrait are all considered profiles.

Understanding Creative Profiles in Lightroom Classic CC - camera profiles landscape

All of those modes found in your camera are just a way that your camera’s tiny internal computer can process your images. When you shoot RAW, those profiles are simply bypassed in favor of more control in your editing later. The new creative profiles in Lightroom Classic work in essentially the same way.

Think of the profiles as ways to “cook” your RAW files while not needing to sacrifice any editing power. Furthermore, Lightroom’s new profile feature harnesses the user-friendliness of develop presets and integrates that creative simplicity with the power and flexibility of what’s called a color LUT (look up table). I won’t go too far into explaining LUTs in this article but just know that they are used extensively to color grade images.

The great thing about the creative profiles is that they allow you to use custom made LUTs in your editing.

How to Use Creative Profiles

Making use of the new profiles feature in your editing is extremely easy. These profiles can be applied just like develop presets…only not. What I mean by this is that a profile is similar to a develop preset in that it instantly performs edits for you with simply a click of the mouse. But this is where the similarity between profiles and presets end.

The difference comes down to how the nature of the profiles and how they apply their edits. Develop presets are simply saved blueprints of adjustment slider settings. This means that develop presets override the current setting of each adjustment slider and set each slider according to the saved value on the preset.

Understanding Creative Profiles in Lightroom Classic CC - LR preset settings

While develop presets are a powerful tool for any workflow, you can still run into trouble when you begin to use multiple develop presets while editing the same image.

Applying Profiles

A creative profile works differently from a preset in that it does not rely on the adjustment sliders to make changes. This means that a profile can be added at any time during your processing workflow without affecting the edits you might have already made. Let me show you.

This image has had some basic processing and now I’m going to apply one of my presets.

Understanding Creative Profiles in Lightroom Classic CC - scene of a desert and dark blue sky

Have a look at the adjustment sliders before…

Understanding Creative Profiles in Lightroom Classic CC - sliders in LR

…and now after the develop preset is applied.

Understanding Creative Profiles in Lightroom Classic CC

The preset will automatically change the respective sliders that I saved when I made the preset. This can cause some problems especially if you choose to apply the preset at the end of your editing. It can be one big post-processing headache.

Next, we’re going to take that same image and apply a creative profile.

Just look at the image and the sliders as compared to before we applied the profile. The profile has applied edits without affecting those we already have made.

Understanding Creative Profiles in Lightroom Classic CC

I don’t have to tell you how extraordinarily convenient it is to be able to impart a certain look to the photo without disrupting the things I’ve already adjusted.

Adjusting Profile Density

Not only can profiles be used completely autonomously of the current image adjustments, but you can also control how much of the profile is applied. Think in terms of opacity and intensity.

You can now determine how much or how little of the effect you need and then dial in the desired setting using the amount slider.

Understanding Creative Profiles in Lightroom Classic CC

Here’s the profile effect at approximately 75%…

Understanding Creative Profiles in Lightroom Classic CC

…and now with about 25%

Understanding Creative Profiles in Lightroom Classic CC

Something to keep in mind when using profiles is that even though they are more flexible than develop presets that doesn’t mean they don’t come without their limitations.

The main one being that you can only apply one profile at a time. So don’t get any ideas of stacking profiles…at least not yet.

Final thoughts on Creative Profiles

I love presets. I love making presets. In fact, a good bit of my work revolves around the developing and constructing of develop presets for Lightroom. So when I say that I love the direction Adobe is heading with the profiles feature in their latest versions of Lightroom Classic CC hopefully you’ll want to give them a try as well.

Profiles are extremely similar to develop presets in that they allow you to perform a lot of processing in the fraction of the time it might normally require. The difference between profiles and presets is not in their outcome but rather in the little detours each one takes to reach the final destination.

Will profiles ever totally replace develop presets? I don’t think so, at least not for a while. And why should they? Like most aspects of photography, each small link in the chain serves to pull together a greater whole; it’s in this way that presets and profiles complement each other.

Once you understand the basics of using Adobe’s new creative profiles each one of them will serve you extremely well. As always, use presets and profiles up to and never beyond the point of your own creative vision for your images. Less is usually more. Have fun and enjoy shooting!

The post Understanding Creative Profiles in Lightroom Classic CC appeared first on Digital Photography School.


Digital Photography School

 
Comments Off on Understanding Creative Profiles in Lightroom Classic CC

Posted in Photography


How to Make Custom Camera Raw Profiles for Lightroom & Photoshop

29 Apr

Adobe just released a huge update to Camera RAW for Lightroom and Photoshop, which includes the ability to make creative custom camera RAW profiles!

Above is a video tutorial showing you how you can make your own creative RAW profiles for Lightroom and Photoshop, and below I’ve also detailed the process with photos so you can follow along and get started making your own RAW profiles.

Here’s a closer look at the process detailed in the video.

Getting started

To start, you need to open a RAW file into the Camera RAW Plugin for Photoshop. To do this, copy a RAW file to your desktop, and then either right-click the file and choose to open with Photoshop, or while in Photoshop, use the File > Open menu option to locate and open the RAW file (or just double-click it inside Bridge).

Custom camera raw profiles 001

Custom camera raw profiles 002

Ideally you’ll want to choose an image that’s appropriate for the type of look you’re going to create for your profile. For example, if you plan to make a profile for your landscape images, use a RAW file of a landscape for this process.

Make your desired adjustments

Regardless of the image you choose, once you have the image open into Camera RAW you need to create the look you want for your profile.

Custom camera raw profiles 003

You do this using any/all the tools and sliders available in Camera RAW. In the example in the video, I made some adjustments to Split Toning and the point Curve.

Custom camera raw profiles 004

Custom camera raw profiles 005

So my image now looks like this:

Custom camera raw profiles 006

Create your profile

Your look will, of course, be different. But regardless of that, once you’ve created the look you want for your profile, go to the “Presets” tab of Camera RAW.

Custom camera raw profiles 007

At the bottom of the Presets tab is a little icon for creating a new preset.

Custom camera raw profiles 008

To create a new profile, hold down either the Option key (MAC users) or the ALT key (WINDOWS users) while clicking the new preset icon.T his will open the New Profile dialog box.

Custom camera raw profiles 009

You’ll want to name your new profile, just type into the first box at the top.

By default, any sliders/adjustments you’ve made in Camera RAW will be checked in the list below (notice in the example that Split Toning and Point Curve are pre-checked to be included in the profile.)

If for some reason you don’t want an adjustment included in your profile, you can just uncheck that adjustment.

After naming your profile and making any changes to included adjustments, click the “OK” button to save your profile.

How to find and use your new profile

Custom camera raw profiles 010

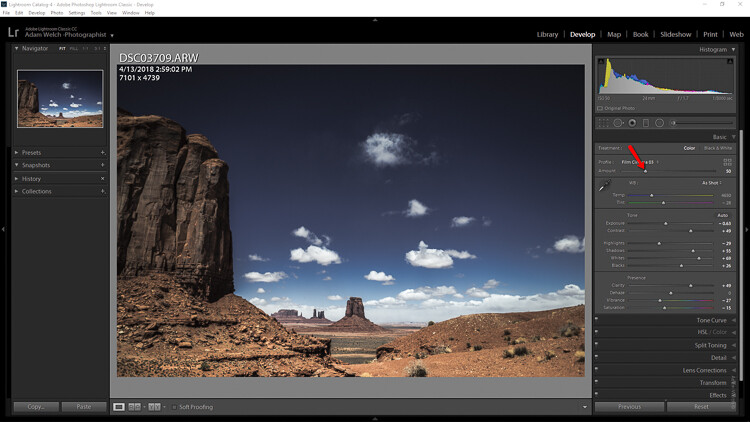
Back in Camera RAW in Photoshop, you can now navigate to the Basic panel and click the “Browse” icon (circled in red above) to expand the profile browser.

Custom camera raw profiles 011

At the bottom of the browser, you’ll find your new user profile!

The new profile will also be available in Lightroom. However, if you had Lightroom open while you made the new profile, you’ll need to close and relaunch it to reload the profiles.

Once Lightroom is open, go into the Develop Module, expand the Basic panel (if it’s not already expanded), and click the same browse icon that you saw in Photoshop.

Custom camera raw profiles 012

That will expand the profile browser which will look nearly identical to the one in Camera RAW for Photoshop. Then just click to select your new profile when you want to use it on an image.

In either Lightroom or Photoshop, just click that browse icon again to close the profile browser after you’ve made your profile selection.

And that’s it. You’ve now made your very own RAW profile!

Take it a step further

Now, you can stop here, and use this process to create as many profiles as you need to streamline and speed up your editing workflow. But there’s more you can do when creating your custom profiles, and this has to do with LUTs.

If you already don’t know about them, LUT is an acronym for Look Up Table, and it’s a way of manipulating the colors in your image. What LUTs do is remap the colors of your image according to the instructions in the LUT.

For example, you might have a LUT that remaps all instances of the color blue into the color red. When that LUT is applied to your image, anywhere the color blue appears, it will now be red. That’s a very simplified explanation of LUTs, but it gives you the general idea of what they do.

If you don’t care about LUTs and you don’t plan to use them, you don’t need to go any further. But if you do use LUTs and want to include them in your profile, here’s how to do it.

Using LUTs

First, you need a LUT. You can either include a LUT you get from somewhere online or create your own. I can’t go into detail on creating LUTs here, as that’s an entire topic on its own, and there are too many methods for creating LUTs to cover. If you’d like to see one example of how to create a LUT, I’ve included an example in the video above.

Regardless of where you get your LUT, it should be a “.CUBE” file

With your LUT file ready and saved somewhere you can find it, open a RAW file into Camera RAW as detailed above.

With your image open in Camera RAW, the very first thing you need to do is change the RAW profile. The default new is Adobe Color, so you need to change that to Adobe Standard (the previous default profile before this latest update).

Custom camera raw profiles 013

The reason you have to do this is that you need a profile that doesn’t already have a LUT so that you don’t have two different LUTs in a profile conflicting with each other. Prior to this update to Camera RAW, profiles didn’t include LUTs, so using Adobe Standard makes sure there is only one LUT in the profile you are about to create.

With Adobe Standard selected, you can now make any other Camera RAW adjustments you want to include in your profile, just as you did above. After making those adjustments, go to the presets panel and open the New Profile dialog by holding Alt/Option and clicking the “New Preset” icon at the bottom of the window (as detailed above).

With the dialog open, name your preset, and then down near the bottom, click the “Load Cube File” option. With the option highlighted, click it again to open the file browser.

Custom camera raw profiles 014

Find your “.CUBE” file and load it. Once it’s loaded in, you’ll notice some options in that section are now available to edit. The most important options are the Min, Amount, and Max options.

Custom camera raw profiles 015

These options correspond to the Amount slider you get with a creative/user created profile applied to an image.

Custom camera raw profiles 016

This amount slider is ONLY available for creative/user-generated profiles, and this slider changes how intensely the profile is applied to your image.

The slider always defaults to 100. This is the baseline whenever you apply a creative profile. To adjust the intensity of the profile on the image, you can decrease the slider down to a minimum of 0, or increase it to a maximum of 200.

Moving the slider up increases how intensely the profile is applied to your image, and decreasing it, in turn, decreases how intensely the profile is applied.

Now, back to the Min, Amount, and Max settings. These three values correspond to the values of the amount slider.

  • The Min value corresponds to the Amount Slider value of 0.
  • The Amount value corresponds to the Amount Slider value of 100.
  • The Max value corresponds to the Amount Slider value of 200.

What this means is that you can set the intensity levels of the Amount Slider for applying the LUT to your RAW file by adjusting the Min, Amount, and Max values.

Here’s an example. Let’s say I have a LUT, that when applied to an image with no adjustments, makes the image look like this:

Custom camera raw profiles 017

When creating the profile using this LUT, if I leave the Min, Amount, and Max values at their defaults (0, 100, 200), then when I click to apply that profile, by default, my image will look very similar to what you see above.

Custom camera raw profiles 018

If however, I want to change the intensity of the LUT so that when the profile is applied that it looks like this by default:

Custom camera raw profiles 019

I would change the “Amount” value in the “New Profile” dialog to 30. (I’ll explain how I arrived at the value of 30 in a moment.)

When changing the “Amount” value, you’ll also want to consider changing the “Max” value. If you leave the “Max” value at 200, the Amount slider will still work for the profile, and when set to 200, the look will be twice as intense as when the LUT is applied with no changes to intensity (as detailed above).

Custom camera raw profiles 020

If you change the “Max” value to 100, then when the slider is at 200, it will look similar to having the LUT was applied with no changes to intensity.

I know this is a little confusing. What’s important to understand is that by adjusting the Min, Amount, and Max values, you’re setting the default for how the LUT is applied to the image with the profile, and the range of how the LUT will be applied to the image with the Amount Slider.

Now, I came up with the value of 30 by experimenting when creating the profile and the LUT that I used to include in that profile (the process is detailed in the video).

Unfortunately, the process in the video won’t be very helpful unless you create a LUT using the exact same process.

Instead, what I recommend to determine the value you’ll want to use, is to first just create the profile with the LUT and leave the Min, Amount, and Max values alone.

Then, apply that profile to one of your images. If by default the look is too intense, use the Amount slider to reduce the intensity until it looks the way you’d like it to look by default.

Once you’ve found a slider value you’re happy with, make note of that number. For instance, if you reduce the Amount slider to 25, write that down.

Then, go through the process of creating the profile again. This time, when you include the LUT, set the Amount value to 25, and the Max value to 100.

Now, with this new profile applied, by default, it’ll look like you want it without having to make adjustments to the Amount Slider. (This will, of course, vary from image to image, and you’ll likely make some Amount adjustments, but this will give you the baseline you want to start with.)

With this done you can then delete the profile and continue on using your now optimized profile with embedded LUT!

Conclusion

That’s how you create your own custom Camera RAW profiles, and how to include LUTs in them! If you have any questions let me know in the comments below.

The post How to Make Custom Camera Raw Profiles for Lightroom & Photoshop appeared first on Digital Photography School.


Digital Photography School

 
Comments Off on How to Make Custom Camera Raw Profiles for Lightroom & Photoshop

Posted in Photography


Video: Adobe shows you how to make your own Profiles in Camera Raw

26 Apr

The latest major release of Adobe Camera Raw, Lightroom CC, and Lightroom Classic CC unveiled all new “Profiles” to the world, including six new Adobe Raw profiles, over 40 Creative Profiles, and the ability to create your own Profiles if you want to lock your personal style into a preset.

This video addresses the last of those options, showing you how to use Adobe Camera Raw to create your own custom Creative Profiles for use in ACR, LR CC and LR Classic CC. The tutorial was created by Josh Haftel, who cautions users from the get-go on Adobe’s blog:

Keep in mind that creating a profile is rather complex, includes many steps, and should be considered rather advanced: proceed with caution.

If that doesn’t scare you away, the 23-minute video shows you exactly how the process works: step-by-step. And if you’re feeling even more courageous, you can download this free Software Development Kit (SDK) that contains more information and some sample files as well.

Finally, if the original description of Profiles wasn’t detailed enough for you—or if you really want to get into the nitty gritty of how Adobe designed its new profiles system for both Adobe Raw and Creative Profiles—check out this detailed white paper. The paper explains each of the six Adobe Raw profiles in great detail for those who really want to understand what’s going on behind the scenes.

Articles: Digital Photography Review (dpreview.com)

 
Comments Off on Video: Adobe shows you how to make your own Profiles in Camera Raw

Posted in Uncategorized


Adobe releases ‘massive update’ to Camera Profiles in ACR and Lightroom

03 Apr
The new Profiles panel in Lightroom CC. Credit: Adobe

Earlier today, Adobe launched a major update to Camera Profiles (now known as just “Profiles”) in Adobe Camera Raw (ACR), Lightroom Classic CC, Lightroom CC, and both versions of Lightroom Mobile. The update brings six new Adobe RAW profiles, over 40 new Creative profiles, a new profile browser, and a bunch of new features and feature enhancements across both mobile and desktop.

The most significant update here is obviously Profiles.

Camera Profiles has now been renamed “Profiles”, and the whole panel has been moved so it’s easier to find. In Adobe Camera Raw and Lightroom Classic CC, Profiles have been moved from the Camera Calibration panel into the Basics panel; in Lightroom CC, they’ve been added to the top of the edit panel.

But this update isn’t just about adding Profiles to Lightroom CC and moving them around a bit. There are now six new Adobe RAW profiles to work with.

Six New Adobe RAW Profiles

In addition to the tried and true Adobe Standard, you now have Adobe Color, Adobe Monochrome, Adobe Landscape, Adobe Neutral, Adobe Portrait, and Adobe Vivid. Credit: Adobe

Previously, the only Adobe RAW profile you had at your disposal was Adobe Standard. Now, you’ve got six more to choose from:

  • Adobe Color: designed to improve the look and rendering of warm tones, improve the transition between certain color ranges, and slightly increase the starting contrast of your photos. As the new default, it was designed to work with the widest range of photos.
  • Adobe Monochrome: Tuned to be “a great starting point” for any black & white photo. Results in better tonal separation and contrast than Adobe Standard converted to B&W.
  • Adobe Landscape: Produces more vibrant skies and foliage tones.
  • Adobe Neutral: Provides a starting point with very low contrast. Adobe claims this one is most useful “for photos where you want the most control, or that have very difficult tonal ranges.”
  • Adobe Portrait: Provides “more control and better reproduction of skin tones.” This means less contrast and saturation applied to skin tones throughout the photo, so you have more control over how those tones turn out.
  • Adobe Vivid: A “punchy, saturated starting point.”

The point of each of these profiles (and Adobe Standard) is to give your images a unified “look and feel” regardless of the camera you’re using. But now, rather than a single profile, you’ve got six “starting points” to choose from depending on your genre and photo editing style.

Adobe Color replaces 10-year-old Adobe Standard as the default profile for newly imported photos, but you’ll still have access to all of them in the new Profiles section of the Basics panel.

New Creative Profiles

Creative Profile comparison. Credit: Adobe

You now have 40+ Creative profiles to choose from, split up into four groups: Artistic, Modern, Vintage, and Black & White. These profiles can be applied to both Raw and non-Raw photos, and come with a 3D Lookup Table (LUT) for a level of control that was previously reserved for Photoshop.

Creative profiles also come with an Amount slider, so you can increase or decrease the effect.

Black & White Creative Profiles comparison. Credit: Adobe

Additionally, Adobe has also been working with some popular Lightroom preset creators to create a range of 3rd Party Profiles, some of which are already available today. These include profiles by photographers Brian Matiash and Matt Kloskowski, and companies like RNI Films and Contrastly.

You can find links to all of the 3rd Party Profiles on the Adobe blog post about this update.

Updates to Lightroom CC on Android and iOS

The new Detail tab in Lightroom CC for Android. Credit: Adobe

In addition to the Profiles update described above, Lightroom CC for iOS, Android and ChromeOS all got some feature updates and upgrades as well.

On the Android/ChromeOS front, a new Details tab provides Sharpening and Noise Reduction options, Grain options have been added for “realistic film grain,” and some additional control for sharing images over Lightroom CC Web have been added as well.

For iOS users, the new Geometry tab will help you straighten crooked and skewed photos using new Upright, Guided Upright, and Geometry sliders; the same Grain options mentioned above have been added, and Adobe has introduced a Left-Handed Editing Mode on the iPad. The company has also done some iPhone X layout optimizations to take advantage of the dreaded notch.

The new Geometry tab in Lightroom CC for iOS. Credit: Adobe

A Few More Things

Finally, in addition to everything mentioned above, a few minor improvements have been made to Lightroom CC and Lightroom Classic CC on the Desktop.

In Lightroom Classic CC, the Dehaze tool has been made more accessible by moving it to the Basics panel, the Tone Curve panel has been expanded for better/more precise control, and the face-tagging algorithm has been improved.

In Lightroom CC, support has been added for Network Attached Storage (NAS) devices, and a new filter option has been added that allows you to sort your images by “sync status.”


To learn more about all of the updates detailed above, and particularly if you want to dive deeper into the new Profiles features, head over to the Adobe blog or update your Adobe Camera Raw, Lightroom CC and/or Lightroom Classic CC to the latest version. This update went live about 15 minutes ago, and should be available to all Creative Cloud subscribers.

Articles: Digital Photography Review (dpreview.com)

 
Comments Off on Adobe releases ‘massive update’ to Camera Profiles in ACR and Lightroom

Posted in Uncategorized


How to Use Adobe’s DNG Profile Editor to Make Custom Camera Profiles

04 Mar

Have you ever heard of Adobe’s DNG Profile Editor? No? It’s okay if you haven’t because up until about a month ago I had no idea it even existed. It’s a little bit of an Adobe secret.

Despite being a relatively unknown piece of software the DNG Profile Editor (no easy way to abbreviate) is somewhat of a necessity when it comes to editing infrared images. Not only that, it is extremely useful if you like being a complete photography nerd and you enjoy creating your own unique flavor of processing.

Think of the DNG Profile Editor as a way to make presets that are something more just your run of the mill develop preset. Enough of introducing it, this is the DNG Profile Editor in all its glory:

How to Use Adobe's DNG Profile Editor to Make Custom Camera Profiles

Just kidding, it’s not very impressive but it serves to facilitate a very useful function. What function do you ask? It allows you to create your own custom camera profiles for use inside Lightroom’s Adobe Camera Raw.

Camera profiles are the silent weapon of post-processing but they don’t get a lot of press. I won’t go too far into explaining the usefulness of camera profiles here, but there is an excellent article by Andrew Gibson here on dPS if you want to learn more about camera calibration and profiles in Lightroom.

For the purposes of this article, I will focus on how you can make your very own custom camera profiles using Adobe’s little secret, the DNG Profile Editor. Oh, and did I mention the software is available absolutely FREE from Adobe? If you want to follow along with me then click one of the links below to download the latest build of the DNG Profile Editor from Adobe.

  • DNG Profile Editor for Windows
  • DNG Profile Editor for Mac

Adobe DNG Profile Editor Geography

Finding your way around the DNG Profile Editor is alarmingly straightforward because the majority of the controls are nestled on the right-hand side of the window.How to Use Adobe's DNG Profile Editor to Make Custom Camera Profiles

This is where you will make your custom camera profiles. As you’ll notice there are a number of tabs at the top. I’ll briefly explain what each one of them does.

Color tables

The color table is just the color wheel and it is laid out for you to pick colors from your image (more on this later) to adjust their hue and saturation as well as lightness. You can also control the temperature of the color table in degrees Kelvin just as you would in Lightroom.

How to Use Adobe's DNG Profile Editor to Make Custom Camera Profiles

This is all birthed from the embedded profiles (or downloaded) from the camera used to make the image being used as a reference. Base your custom camera profile on existing profiles of your particular camera by using the “Base Profile” drop-down.

Tone Curve

This is the familiar face in the DNG Profile Editor. The Tone Curve is a long-standing staple in not only Lightroom but many other post-processing software offerings. Here, it operates exactly the same as it does elsewhere by allowing you to adjust luminance values.

How to Use Adobe's DNG Profile Editor to Make Custom Camera Profiles

Color Matrices

Through 99% of your work, you will likely use the Color Matrices tab of the DNG Profile Editor more than any other section. This is a boiled down version of the color table and is extremely useful for adjusting the global white balance of your image as well as RGB hue and saturation.

How to Use Adobe's DNG Profile Editor to Make Custom Camera Profiles

As I mentioned earlier, if you are a practitioner of infrared photography the Color Matrices tab will become your best friend.

Options

In the Options section, you can name your custom camera profile and add the copyright information.

How to Use Adobe's DNG Profile Editor to Make Custom Camera Profiles

The Options tab is incredibly simple but don’t let that fool you. It is perhaps the most important part of the DNG Profile Editor as far as the way you will eventually be able to locate and apply your custom camera profiles.

Chart

In a program that is already geared towards more advanced manipulation of RAW files, the Chart tab is the Jedi level of the DNG Profile Editor. It is used for making color profiles based on the use of a color chart to fine-tune accurate color renditions based on different natural and artificial lighting scenarios.

How to Use Adobe's DNG Profile Editor to Make Custom Camera Profiles

I seldom find myself in portrait, product, or other situations when light-based color rendition is needed. However, if you are a studio or location shooter who uses speedlights or constant artificial lighting the Color Chart option is a valuable tool.

How to make a Custom Profile

Next, let’s walk through the making of a custom camera profile using the DNG Profile Editor.

Make a DNG file

You’re going to need a DNG (digital negative) RAW file to base your profile adjustments upon. The great thing is that Lightroom offers a super simple way to convert any RAW image file to a DNG.

How to Use Adobe's DNG Profile Editor to Make Custom Camera Profiles

To get started, right-click on a RAW file in Lightroom. Select Export > Export to DNG (under the Lightroom Presets section). I usually just send my DNG base files to the desktop for quick access but feel free to place yours anywhere you choose.

Next, open the DNG Profile Editor program and select File > Open DNG Image from the drop-down menu.

How to Use Adobe's DNG Profile Editor to Make Custom Camera Profiles

Locate the DNG file you just exported from Lightroom and it will open automatically in the editor.

How to Use Adobe's DNG Profile Editor to Make Custom Camera Profiles

Using the DNG Profile Editor

From here, the world is your oyster as far as creating your custom camera profile. You can adjust the color tones and hues of colors within the photo based on your needs. The possibilities are virtually limitless so I will show a few examples to demonstrate the effects.

In the Color Tables section, I select three separate colors within the leaves in the image and they now appear both on the color wheel and in the color picker table at the right. You can choose as many colors as you like. I’ve based my profile on the Faithful profile from my Canon 5D MK3.

How to Use Adobe's DNG Profile Editor to Make Custom Camera Profiles

You can select each color from the table and adjust their individual hues, saturation, and lightness. Toggle the on/off of your edits using the black boxes and completely remove the selection with the minus (-) sign. Here is the photo after some fairly drastic hue and saturation adjustments from the color table.

How to Use Adobe's DNG Profile Editor to Make Custom Camera Profiles

Moving on to the Tone Curve, you can adjust the image just as you would anywhere else by changing the curve. For our example, I’ll add contrast by implementing a classic S-curve.

How to Use Adobe's DNG Profile Editor to Make Custom Camera Profiles

In the color matrices section, you can further manipulate the colors and white balance of the RAW file. I’ve made some radical changes here just for the sake of example (plus it’s fun).

How to Use Adobe's DNG Profile Editor to Make Custom Camera Profiles

Keep in mind that when using the DNG Profile Editor you are free to use as many or as few of the tools it offers, either together or singularly.

Saving Your Custom Profile

From here it’s just a matter of naming and saving the custom profile you just made. Switch over to the Options tab.How to Use Adobe's DNG Profile Editor to Make Custom Camera Profiles

Enter a name for your custom profile so you can easily identify it later in Lightroom. Also, it is here where you can add in copyright information and other options.

Unless you’ve chosen to use a custom color chart, it’s time to export and actually put your freshly made camera profile to use. Exporting the profile is incredibly easy. Click File > Export (your camera name) Profile.

How to Use Adobe's DNG Profile Editor to Make Custom Camera Profiles

Yes, Adobe calls these profiles recipes, which is fitting in an odd kind of way.

How to Use Adobe's DNG Profile Editor to Make Custom Camera Profiles

Make sure the export was successful and then click OK (see below).

How to Use Adobe's DNG Profile Editor to Make Custom Camera Profiles

And you’re done! (Unless you’d like to also save your recipe for editing later in which case just select Save As in addition to the export.)

There’s no locating the new profile or trying to remember where you placed it on your computer. The DNG Profile Editor does everything for you and will park it exactly where it needs to be for use in Lightroom. Speaking of which, let’s use the new profile in Lightroom. Here’s how.

Applying Your Custom Profile

If you had Lightroom open while you made your new profile, be sure to restart it for the changes to take effect. Next, scroll down to the Camera Calibration Panel of the Develop module. Click on the Profile drop-down.

*Unless you’d like to also save your recipe for editing later in which case just select ‘Save As’ in addition to the export.

Boom. There is your newly minted camera profile. Remember, these profiles are camera exclusive. For example, the profile I just made will only work with a Canon 5D MK3. It won’t work an image from my Sony A7R, for example.

Some Final Thoughts on Adobe’s DNG Profile Editor

Is the DNG Profile Editor a piece of software that is intended for everyone? Well, not exactly. That isn’t to say that even non-professional shooters can make great use of its tools.

It allows you to customize exactly how Adobe handles its RAW files and enables you to save new camera profiles to fit different situations. If you regularly employ artificial lighting on location or in the studio you will love the DNG Profile Editor. Oh, and remember, as I mentioned before these profiles can also be used in Adobe Camera Raw (inside Photoshop).

*Unless you’d like to also save your recipe for editing later in which case just select ‘Save As’ in addition to the export.

Just select your custom profiles from the Camera Calibration section of ACR and continue as usual.

Thanks for sticking with me all the way to the end. I hope you at least give the DNG Profile Editor a test drive. After all, it’s free and could potentially open up new creative possibilities for your work.

The post How to Use Adobe’s DNG Profile Editor to Make Custom Camera Profiles by Adam Welch appeared first on Digital Photography School.


Digital Photography School

 
Comments Off on How to Use Adobe’s DNG Profile Editor to Make Custom Camera Profiles

Posted in Photography


500px adds support for wide-gamut color profiles and Google WebP format

23 Aug

Photography sharing and community website 500px has announced support for both Google’s WebP format and wide-gamut images, as well as the ability to search based on color profile. According to 500px, the additional support reportedly reduces bandwidth usage by up to 25% while simultaneously enabling the service to offer images that are “truer to the photographer’s original vision.”

Until now, 500px’s image hosting service worked by converting uploaded images, when necessary, from their non-sRGB color profiles to sRGB. The rise of wide-gamut displays, though, has paved the way for expanded color profile support. As of this update, 500px can deliver photos in sRGB, Display P3, Adobe RGB and ProPhoto RGB.

“Though sRGB has been standard in our industry for many years,” said 500px VP Kelly Thompson, “with today’s broad adoption of iPhones and wide-gamut displays, we can finally showcase each image in a more true-to-life way and allow searching by color profile.”

As far as WebP support goes, 500px explains that it has been rolling out support for this format on Chrome browser over the last month. The format reduces file sizes while offering comparable or improved image quality. The newest version of the 500px Android app features WebP support.

Articles: Digital Photography Review (dpreview.com)

 
Comments Off on 500px adds support for wide-gamut color profiles and Google WebP format

Posted in Uncategorized


Picktorial’s new X-Pack lets you add Fuji’s film simulation profiles to X-Trans raw files

17 Aug

When Picktorial 3 debuted back in April, it offered “superior support” for Fujifilm X-Trans RAW files, including compressed and uncompressed RAF. This was a big deal, and it has been so well received that Picktorial Innovations, Ltd. has announced another major addition for Fuji users this week: they’ve added Fuji Film-Simulation color profiles.

Released as a $ 15 “X-Pack” add-on to Picktorial 3, the preset pack is described as, “a package of pitch-perfect film simulation color profiles for Fujifilm RAF files.”

With this unique add-on to Picktorial 3, the simple yet powerful non- destructive RAW photo editing platform for Mac, Fuji photographers can enjoy the renowned look of the Fujifilm Film-Simulation yet retain the capability and latitude of the X-Trans sensor output.

The X-Pack features 14 color profiles, which accurately reproduce the much-loved Fuji Film-Simulation modes you find in-camera when shooting JPEG. The difference here being, of course, that you can apply these profiles to raw RAF files to achieve the same looks without losing the editing latitude of raw.

Here are a few before and after images of the X-Pack in action:

$ (document).ready(function() { SampleGalleryV2({“containerId”:”embeddedSampleGallery_3405492424″,”galleryId”:”3405492424″,”isEmbeddedWidget”:true,”standalone”:false,”selectedImageIndex”:0,”startInCommentsView”:false,”isMobile”:false}) });

The add-on requires Picktorial version 3.0.4 or newer, which will cost you $ 40 to buy new as of this writing. The X-Pack itself costs $ 15, and can be purchased at this link.

Picktorial’s new X-Pack film simulation color profiles offer further appeal for Fuji RAF users

Jerusalem, Israel – August 16, 2017 – Picktorial Innovations, Ltd. is excited to announce its latest offering to the Fuji community with X-Pack, a package of pitch-perfect film simulation color profiles for Fujifilm RAF files. With this unique add-on to Picktorial 3, the simple yet powerful non- destructive RAW photo editing platform for Mac, Fuji photographers can enjoy the renowned look of the Fujifilm Film-Simulation yet retain the capability and latitude of the X-Trans sensor output.

Already a favorite within the Fuji community due to its superior X-Trans RAW support, Picktorial has added the X-Pack with 14 color profiles reproducing the Fuji Film-Simulation modes found in- camera when shooting in JPEG format. These profiles, based on the original films, are considered one of the most beloved features in the Fuji X-series digital cameras.

Picktorial continues to develop new features in line with its mission: providing intuitive, pro-level tools to every photographer, expanding creative opportunities while saving editing time. Since its launch in April 2017, Picktorial 3 has received rave reviews from both leading publications and users alike.

Included in the X-Pack are the following profiles:

  1. Camera CLASSIC CHROME
  2. Camera ACROS
  3. Camera ACROS+Ye
  4. Camera ACROS+R
  5. Camera ACROS+G
  6. Camera Velvia/VIVID
  7. Camera PROVIA/STANDARD
  8. Camera PRO Neg. Hi
  9. Camera PRO Neg. Std
  10. Camera ASTIA/SOFT
  11. Camera MONOCHROME
  12. Camera MONOCHROME+Ye
  13. Camera MONOCHROME+R
  14. Camera MONOCHROME+G

The camera profiles are compatible with Fujifilm X-Trans(TM) RAF files.

Requirements:

Picktorial 3.0.4 or later

Availability and Pricing:

The X-Pack is now available for download at www.picktorial.com/xpack for $ 15.

More tutorials and resources can be found at www.youtube.com/picktorial

Articles: Digital Photography Review (dpreview.com)

 
Comments Off on Picktorial’s new X-Pack lets you add Fuji’s film simulation profiles to X-Trans raw files

Posted in Uncategorized