RSS
 

Posts Tagged ‘Posing’

Tips for Posing People in Outdoor Portraits

25 Mar

Whether you’re photographing an individual or group, having sessions on location can add a lot of variety to your images. Most locations offer natural or built-in elements that are great for posing people without having to move too much.

Almost all outdoor locations have natural or built-in elements that can give you options for where to place your client and add more variety to the session. These can include rocks, walls, trees, benches, bridges, cars, lamp posts, columns, archways, fences, fountains, and staircases. Walls also make for great poses. All of these elements are terrific posing props that make your photos interesting. Use them as much as you can.


Start with a good foundation

After you have chosen the elements with which you want to pose your client, begin your session with a simple foundation pose. This could simply be your client standing still, arms at the hips. From there, you can build upon that pose and make subtle changes to add variety.


Another foundation pose might be having your client stand in the middle of a city walkway, as they would if they were alone. From there you can ask them to bring one arm up to fix their hair while standing still. Then, have them fix their hair while walking toward you. Next, have your client do the same with their arm as they walk, but now looking toward the street. Finally, have them do the same, but this time take two steps, freeze their pose and look at you, as you get close for a portrait shot.

You now have five different poses all in the same location built on the same foundation pose.


Good foundation poses will also help with the dreaded question a lot of photographers get, “What do I do with my hands?” By building from simple poses and keeping your client moving with subtle changes, it helps them to use their hands more naturally.

Keep them moving

Many great poses involve having your clients moving. Have your client’s walk, run, jump, sit, stand, turn around, or spin. When you keep them moving you are allowing for lots of different types of shots all while letting your client walk off the nerves.

You don’t even need to move from the spot you’ve chosen. You could have them walk toward you, walk away from you, sit down, crouch down, lie down, or jump all within 15 feet of where you are standing. Have them use their hands while they move around for more dynamic photos.


Tips for Posing People in Outdoor Portraits

Open spaces without posing elements

If you find yourself at a location, perhaps a beach, where there are no elements to use for posing, it can be difficult to pose hands or keep your client moving.

One way to pose hands in open spaces outdoors is to have your client use them. By this, I mean, have your client play with their hair, adjust their clothing, put on and take off their jacket, glasses, watch, etc. Keeping the hands busy relaxes your client and you’re able to make more natural looking photos without having the pose look too rigid.

Tips for Posing People in Outdoor Portraits


Use the light

Shooting on location can offer lots of changes in light since you are outdoors. Use this to your advantage! Experiment with full sunlight, shadows, found pockets of interesting light shapes.

If you shoot your subject in full sunlight, for example, one pose you can try is to have them look up with their eyes closed, arms folded on their head. Another great pose you could try in full sunlight is to use shadows to create an interesting patter either on your client or behind. Have your client looking down or straight at your camera.

Using the different changes in light around you can give you new ideas on where to put the hands, legs, and other elements of your client to create a more compelling or dynamic photo.

Tips for Posing People in Outdoor Portraits


The same can be applied to the basic compositional rules in photography. Using lines, shapes, patterns, and colors in your background to frame and pose your client as part or to stand out may result in a really interesting photo.

Tips for Posing People in Outdoor Portraits

Conclusion

I feel that posing a client on location is much easier than posing in the studio because you have many elements available to use as props. And remember, shooting many different poses also increases your chances of getting the great shots that will build your amazing portfolio.

The post Tips for Posing People in Outdoor Portraits by Jackie Lamas appeared first on Digital Photography School.


Digital Photography School

 
Comments Off on Tips for Posing People in Outdoor Portraits

Posted in Photography


How to do Gentle Posing: A Collection of Prompts to Get You Started

22 Mar

Let’s face it, getting in front of a camera feels uncomfortable to most people! As photographers, it’s our job to help guide the people in front of our cameras in ways that will allow them to feel more comfortable and also allow you to capture genuine emotion and interactions. In my experience, one really effective way to do this is through what I like to call “gentle posing”.

In other words, you give the people you’re photography some basic prompting that allows for emotions and interactions to unfold. This usually includes some posing instruction without being so specific that it starts to feel especially awkward and unnatural to them.

How to do Gentle Posing: A Collection of Prompts to Get You Started - portrait of a young man

In this article, I’m going to share some of my go-to prompts and gentle posing instructions for different ages and groupings. Obviously, you’ll want to tailor these to the people you’re photographing, not every suggestion will work for every family or child.

That said, this collection of prompts will definitely get you started thinking about how you can begin to incorporate these techniques with the people that you find in front of your lens!

Babies & Toddlers

Here are a few ideas to use with your younger subjects:

  • Ask the child, “Can you give mommy a snuggle?”
  • “Can you kiss daddy’s cheek?”
  • Have dad stand behind you and play peek-a-boo with their kiddo.
  • Have mom stand next to you and mime that she’s going to come tickle the child.
  • Start loudly singing a song from the child’s favorite movie or TV show (I usually ask parents about favorites in advance so I can look them up if needed).
  • Bring a bubble machine and set it off nearby.
  • Say, “Now everybody give Jane a kiss!” (using the child’s name)

Read more for other tips on photographing young kids here: 6 Simple Tips to Capture More Expressive Images of Your Children

How to do Gentle Posing: A Collection of Prompts to Get You Started - mom and baby

How to do Gentle Posing: A Collection of Prompts to Get You Started - parents and child

Children (Ages 3-10 ish)

Here are some suggestions for slightly older kits:

  • “Show me your best princess face! Great! Now show me your best monster face! Love it! Now show me your surprised face!”
  • Tell a knock-knock joke, then ask them to tell you one.
  • “Would you rather eat three worms, or a peanut butter and pickle sandwich?”
  • Spin around twice and then sit down as fast as you can.
  • Point to your camera lens, and ask them if they can see what color your eyes are through the lens.
  • Ask them to show you their best trick or dance move.
  • “Okay, whatever you do, DO NOT SMILE!”
  • “Your turn to choose – what do you want me to take a picture of you doing?”
  • For younger children, sometimes I’ll give them a “magic” rock or leaf and tell them that whenever they push it, the camera will take a picture. Invite them to try it out! (Make sure you have a hidden remote trigger to make this work.)
  • “What’s your favorite part of school? Can you tell me about the funniest thing that happened at school recently?”
  • “What’s the silliest song you know? Can you sing it for me?”

Also read: 5 Non-Posed Ideas For Photographing Kids

How to do Gentle Posing: A Collection of Prompts to Get You Started - young girl grinning with missing tooth

How to do Gentle Posing: A Collection of Prompts to Get You Started - portrait of a young girl

Teens and Tweens

This age group can get a bit tougher:

  • “Give me your best Smize/Blue Steel!” If they don’t know what either is, spend a minute showing them YouTube clips and then demonstrate it for them. Trust me, this is priceless!
  • “Who’s your favorite athlete/author/band? Great! Channel them for a minute and pose like they would for the cover of a magazine.”
  • “What do you think you want to do after high school?”
  • Ask them to give you their best Santa Claus laugh. Then demonstrate out loud with a hearty “Ho! Ho! Ho!”
  • Tell a really lame joke.
  • “Okay, start with your arms crossed in front of your body. Every time I say ‘Go!’, I want you to strike a different pose. Ready, go!”
  • Compliment them! Tell them that they look fantastic, or that you think their accomplishments/ambitions are so amazing. Make sure your words are genuine – kids are perceptive and can tell when you’re just giving them lip service. That said, this generation continually gives me hope for the future of our world, so it should be easy to find something to commend them for.
  • Joke around that when you’re photographing younger kids, this is usually when you break out into song, and start singing “Let it Go” or another popular children’s song.
  • “Your mom is hysterical. Tell me about the last thing she did that was hilarious.”
  • “What was the last book/TV show that made you laugh out loud? What was the last one that made you cry? What was the last one that you absolutely hated?”
  • “If you could get on a plane RIGHT NOW and go anywhere you wanted, where would you go?”
  • “What’s one thing you’re really proud of?”

Also read: Capturing Unenthusiastic Teens: Forget the Perfect Pose and Get Photos You Truly Love

portrait of a teenager - How to do Gentle Posing: A Collection of Prompts to Get You Started

a young man posing on a baseball field - How to do Gentle Posing: A Collection of Prompts to Get You Started

Families

  • “Group hug! Smush even closer! Closer! Get as close as you can! Now nobody fart, okay?”
  • “Everybody tickle John!”
  • “Okay, everybody look right here at me. Now, everybody look at the person that snores the loudest! Now everybody look at the person that burps the loudest!”
  • If the family has younger children, I’ll often have them play a game like Ring Around the Rosy or use a quilt like a parachute for the kids to run under.
  • Sometimes I’ll ask families to hold hands and run towards an object (this works best if they’re running in front of/behind one another rather than side-by-side)

Read more here: 8 Tips for Getting Great Expressions in Family Portraits

family portrait - How to do Gentle Posing: A Collection of Prompts to Get You Started

family photos - How to do Gentle Posing: A Collection of Prompts to Get You Started

Siblings

  • For siblings holding an infant, I often ask them to look at and/or touch a specific body part (i.e. “Do you see baby sister’s nose? Can you look at it?”
  • “Give each other the biggest bear hug you can!”
  • “Hold hands and look at each other. Now, look at me!”
  • “Can you tell your sister a secret?”

siblings - How to do Gentle Posing: A Collection of Prompts to Get You Started

young kids - How to do Gentle Posing: A Collection of Prompts to Get You Started

Couples

  • For couples, sometimes I’ll ask one person to use their nose to draw something on the second person’s cheek. The second person should close their eyes while the first person is drawing, and then has to guess what they drew.
  • “When I say go, I want Joe (the guy’s name) to whisper his favorite vegetable in Jane’s (the girl’s name) ear in his most seductive voice. Ready? Go!”
  • On occasion, I’ll have couples hold hands and walk towards me. If possible, I’ll secretly give one person instructions to use their hips to bump the other person as they walk.
  • Everybody say “Coffee!” (This usually gets a laugh from couples at morning sessions, but it also results in a more natural smile than asking someone to say “cheese”).
  • “What was your first dance song at your wedding? Hang on, let me find it on Spotify! We’re totally re-creating your first dance right now! Let’s see it!”
  • “Wrap this blanket around yourselves. Now, touch noses. NO KISSING!”

Read more here: 5 Tips for Creating Romantic Portraits of Couples

couples portraits - How to do Gentle Posing: A Collection of Prompts to Get You Started

couples portraits - How to do Gentle Posing: A Collection of Prompts to Get You Started

Other Groups

  • Some variation of “Sally, tell me the funniest story you know about Amy!” or “Joe, tell me about one time when Zack totally saved your butt!” are usually the best options for genuine reactions.
  • For wedding parties, I sometimes ask the bridesmaids to give me their best groomsman pose and vice versa.
  • I’ll often ask big groups to do a big group hug, and then tell them to get closer…and closer…and closer until they all can’t stop laughing.
  • “On the count of three, give me your best model pose!”

Read more here: How to Pose People for Group Portraits

wedding group photo - How to do Gentle Posing: A Collection of Prompts to Get You Started

wedding photos - How to do Gentle Posing: A Collection of Prompts to Get You Started

Conclusion

Whew, that was quite a list! Hopefully, it will give you some ideas of different ways to prompt the people you’re photographing that will elicit genuine emotions and expressions from them.

What about you? Do you have any go-t0 prompts for the people you’re photographing? If so, please chime in down below in the comments.

The post How to do Gentle Posing: A Collection of Prompts to Get You Started by Meredith Clark appeared first on Digital Photography School.


Digital Photography School

 
Comments Off on How to do Gentle Posing: A Collection of Prompts to Get You Started

Posted in Photography


5 Quick Portrait Posing Tips to Flatter Your Subject

15 Mar

Being in front of the camera is daunting, to say the least, not to mention staring at a big black lens in front of you. I understand how my subjects feel because I totally hate being photographed. In this article, I’ll give you five portrait posing tips to help flatter your subjects.

1. Relaxed posture

5 Quick Portrait Posing Tips to Flatter Your Subject

Getting your subject into a relaxed posture is easier said than done! But relaxing for portraits is definitely not synonymous to slouching. I tell my subject to close their eyes and take some deep breaths, give their arms and hands a good shake, breathe out, and then open their eyes.

It’s easier for men. I tell them to relax into their normal stance and give them instructions from there. For men, it is generally a slouching issue. I tell them to straighten their spine and not to slouch. This makes them look taller and leaner and gives them square shoulders rather than droopy. However, this posture can look a bit stiff too so I ask them to gently breathe out as this releases the tension on the shoulders.

Relaxing for women is a little bit trickier but the above is a good start. Sometimes it helps them to imagine that a string is attached to their spine and I am pulling it gently upwards. The key word here is gently!

2. Weigh distribution

5 Quick Portrait Posing Tips to Flatter Your Subject

I get women to stand with one leg slightly behind the other and to put their weight on the back leg. With the weight distributed more on the back hip and leg, I get them to lean their upper body forward toward me to balance the weight distribution and slightly twist their body to either the left or right.

It’s a very subtle chest-forward-booty-back pose and you really want it to be subtle. It is important to make sure that you are not looking up at your subjects but that your camera is ever so slightly looking down at them. This pose and your camera angle combined gives your subject a more flattering and leaner look. Don’t overdo the looking down angle, a slight camera tilt will do. This is not the bird’s eye view pose.

Men don’t need to redistribute their weight backward and forwards like women. I find that an even central distribution of weight works better for them. Getting them to put their thumbs in their pockets helps achieve this. If I feel they need to slightly loosen up, I just tell them to gently breathe out.

3. Leaning

5 Quick Portrait Posing Tips to Flatter Your Subject

With their spines straight, find a wall or structure your subjects can lean on. I usually start with having them lean with their backs flat against the structure and I instruct them to pull away from one side until I feel the right angle is achieved.

Sometimes, this pose ends up as just one shoulder leaning. The important thing is that the resulting image does not look like your subject is missing a limb or shoulder as can happen sometimes if you are not careful with the angles.

4. Chin forward

5 Quick Portrait Posing Tips to Flatter Your Subject

Women are extremely conscious about double chins and their faces not looking as lean as they’d like in their images. A bad habit that many women do instinctively when they are photographed is to tilt their chins upwards thinking this removes any double chins.

This looks very unnatural and awkward and gives them a longer neck and a shorter face. When you speak to people, you don’t stick your chin up at them, do you? Instead of chinning up, I get them to push their chins forward and down a touch. This gives them a slight stretchy pain on the back of the neck and feels unnatural, but looks really flattering.

The forward action eliminates the double chin and tipping the chin slightly downwards makes the face look leaner.

You can modify this pose slightly by asking them to point their chins towards one shoulder and if the shoulder is droopy, they can lift the shoulder bone up a touch. This not only gives them a taller and leaner posture but adds angles as well to improve the composition of the image.

5 Quick Portrait Posing Tips to Flatter Your Subject - chin out

5. Connection

On any of the above and at any point during the session, breathing out helps your subject be more at ease so just remind them to do so. You also want them to always have a connection, just like the direction of the chin connecting to the direction of the shoulder for some angles.

Their gaze also needs to connect to either their body or their environment. You don’t want your images to look like the subject is in a vacuum. Looking straight at the camera connect them to the viewer. If you are shooting outdoors, you could instruct your subject to look at the horizon in the far distance or a tree nearby.

If they are holding something like flowers or a coffee mug, you could ask them to look down at what they have in their hands. Check that they don’t look asleep though so adjust your position and take a few images.

5 Quick Portrait Posing Tips to Flatter Your Subject

Conclusion

I hope these 5 quick portrait posing tips are helpful for you when you do your next photo session. If you have any other posing tips please share them in the comments below.

The post 5 Quick Portrait Posing Tips to Flatter Your Subject by Lily Sawyer appeared first on Digital Photography School.


Digital Photography School

 
Comments Off on 5 Quick Portrait Posing Tips to Flatter Your Subject

Posted in Photography


Video Tutorials – Portrait Posing Tips

23 Feb

Taking portraits is a challenging genre of photography, but add in posing and it can seem insurmountable if you’re just starting out in photography. Here are three videos I found to help you with some portrait posing tips. Practice with a friend and see tell us how it goes.

How to pose a single portrait

In this video excerpt from a Lynda.com class, you’ll see how the photographer works with a single model. She helps him get comfortable in front of the camera and create poses that are flattering to him.
?

How to pose (direct) couples

In this video from Mango Street, you will see how to gently direct a couple in how to pose. Giving them a few suggestions and tips and letting them fall into their own comfortable pose makes the images look more natural.

?

How to pose people to get rid of a double chin

Finally, in this last video, photographer Joe Edelman shows several tips for posing to flatter your subject and get rid of or minimize a double chin. Where you position the camera is also important, taking a higher position can be helpful for posing.

?

The post Video Tutorials – Portrait Posing Tips by Darlene Hildebrandt appeared first on Digital Photography School.


Digital Photography School

 
Comments Off on Video Tutorials – Portrait Posing Tips

Posted in Photography


Posing Tips for the Groom on the Wedding Day

27 Jul

Wedding photography is often thought of as one of the most challenging genres to document. On any given weeding day you need to be a fashion photographer, product, documentary and family photographer all in the space of a few hours. Of these genres, one the hardest aspects to master is photographing the groom pre-wedding while trying to make him feel at ease and relaxed about the experience, while offering posing tips and advice to him.

Posing Tips for the Groom on the Wedding Day Posing Tips for the Groom on the Wedding Day

On the morning of a wedding, have you ever walked into a groom’s house and felt like you could cut tension with a butter knife? Often the groom is nervous knowing that he is about to be the center of attention, so he may find the whole experience daunting and uncomfortable. Your job is to make him feel at home and comfortable so you can create some amazing shots of him for the couple to cherish for years to come.

As a male, I can attest to being nervous about being in front of the camera. So what can you do and say to make your groom, his groomsmen, and family, feel comfortable on the big day? Here are a few general and specific posing tips that will help you break the ice and build some rapport with your groom.

Your approach

Posing groom 03

When you first arrive at the house, walk in without your camera out and do what you would do if you were going out to meet new friends at dinner. Walk in, say hello, introduce yourself, shake hands, and just be nice to everyone. You’d be amazed at how this first simple step will break the ice and help establish rapport.

Remove the groom from the room

If you’re shooting in a house which is full of family and friends it can be somewhat noisy and distracting, especially if you want to create a certain look with your groom. He may be embarrassed or self conscious having photos taken in front of everyone.

Posing Tips for the Groom on the Wedding Day

So when it’s time to photograph him alone it is a good idea to find a quiet space in the house and take him there away from all the distractions. This way you’ll be able to get the kinds of photos you want of him without having to try and silence 10 people who are talking in the background.

Make your groom feel like The Fonz

When it comes to photographing the groom, or any male for that matter, you need to make him feel cool like The Fonz on Happy Days! If you give your groom masculine things to do, you’ll never have issues getting him to cooperate and participate.

Posing groom 01 Posing groom 09

Ask him to sit on a chair and lean forward with a glass of scotch in his hands or lean against a wall with his hands in his pockets while bringing his chest off the wall. What guy wouldn’t feel cool doing that? Once you have his trust, he will do anything you ask. He just needs to feel strong, cool, and confident.

Give him something to do with his hands

Men can sometimes feel and look awkward if they have nothing to do with their hands. So give him something to do with his hands like buttoning up his jacket, holding a glass of whisky, putting his hands in his pockets, holding a hat on the brim or holding his jacket. Whatever you ask him to do just make sure it’s something he would normally do with his hands so it looks natural and unforced.

Posing Tips for the Groom in Wedding Photography

Always show the groom what you want him to do

Explaining what you want your groom or subject to do can sometimes be confusing for them, especially if they’re a visual person. If you want him to sit or look a certain way, show him by doing it yourself first. This method is called mirroring, and 99% of the time you will get what you want after demonstrating how to do it.

Make him laugh

There’s usually a joker in every wedding party or group. So once you find out who he is, give him a few cues and watch him get all the boys laughing naturally without being prompted to do so. This will bring out everyone’s real character.

Posing Tips for the Groom in Wedding Photography

Conclusion

Once you have built trust with the boys, you will see it come through in your photos. Suddenly everything will be real. If you’re not confident posing or directing men, grab a friend and practice on him so when it comes to the real deal you’re 100% confident.

Do you have any other posing tips for working with groom on the wedding day? Please share any tips or questions you have in the comments section below.

The post Posing Tips for the Groom on the Wedding Day by Andrew Szopory appeared first on Digital Photography School.


Digital Photography School

 
Comments Off on Posing Tips for the Groom on the Wedding Day

Posted in Photography


6 Tips for Posing Hands in Wedding and Portrait Photography

18 Jul

One of the most challenging and misunderstood elements in posing hands and how to use them correctly. Hands are so important in an image because they can say so much. They can convey masculinity, femininity, strength, softness and between couples, they can show love and affection.

6 Tips for Posing Hands in Wedding and Portrait Photography

So the big question is what can we do with hands? How can we make them look elegant and soft? Where should they be placed to convey the most realistic emotion and feeling? Here are a few helpful tips and ideas to keep in mind for your next wedding, portrait, or fashion shoot that may help correct the most common hand posing issues.

#1 – Avoid showing the widest part of the hand

To help make hands look elegant, simply avoid having the back of the hand facing towards the camera as that is the widest part of the hand. This is important because the hands in proportion to the subject’s face can make the hands look larger than they actually are, or can make feminine hands look quite masculine. A simple twist of the wrist, so the smallest part of the hand is showing, is all it takes to change the look and feel of an image from average to wow.

Tips for Posing Hands in Wedding and Portrait Photography

#2 – Soft hands

Female hands need to appear soft, delicate, and elegant. To achieve this, it’s a matter of conveying to your bride or model to relax or soften their hands. A simple way of demonstrating how to do this is to hold your hand out then fully tense it up and then allow it to drop and relax slightly even wiggle the fingers so they are loose. Think of it like a big balloon, you’re just letting out a little air so they don’t look so hard and stiff.

Tips for Posing Hands in Wedding and Portrait Photography

#3- Bend the wrist

Bending the wrist (a slight bend so it’s not straight) is such a simple method to break a straight line and create more shape and texture in a shot. Remember the female form looks best when we can see beautiful natural curves, this includes the wrists.

Tips for Posing Hands in Wedding and Portrait Photography

#4 – Have the hands doing something that appears natural

People often ask, “What can I get my model or bride to do with her hands? I’m stuck for ideas.” This one is one of the simplest issues to address. You could have her holding the flowers, her veil, her dress, fixing her headpiece, adjusting her engagement ring, putting on perfume, touching her man softly, the list goes on. Just make sure it’s something she would normally do so it appears natural, otherwise, it may look a little posed and stuffy.

Tips for Posing Hands in Wedding and Portrait Photography

#5 – Posing hands with couples

When photographing the bride and groom, think about where you would place your hands if you were cuddling your wife, husband, boyfriend, or girlfriend. Have the bride’s hands touching the groom’s hand, forearm, chest, or face in a way that says, “I love you”.

Have the groom’s hands on the bride’s waist or on her hands while saying, “I love where your hands are”. This can really change the feel and emotion of your photos.

Tips for Posing Hands in Wedding and Portrait Photography

#6 – Don’t amputate hands or fingers

When you have two hands overlapping each other it can appear that a hand is missing due to your angle and/or crop. This can happen when the bride has her hands around the back of the groom’s neck or you’re shooting a portrait side-on (as pictured below). The hand closest to the camera is on the other hand making her look like she has no hands or the fingers are amputated. To avoid this just switch hands over so you can see finger tips from one of the hands.

Tips for Posing Hands in Wedding and Portrait Photography

Conclusion

With all these tips in mind, the most important thing to remember is that hands should be placed in a natural realistic location doing something they would naturally do. So I suggest getting a friend or model and going out and just practicing for an hour or so to see what works and what doesn’t. This way you’ll have confidence on your next the wedding day or portrait shoot.

6 Tips for Posing Hands in Wedding and Portrait Photography

The post 6 Tips for Posing Hands in Wedding and Portrait Photography by Andrew Szopory appeared first on Digital Photography School.


Digital Photography School

 
Comments Off on 6 Tips for Posing Hands in Wedding and Portrait Photography

Posted in Photography


Announcing…our mid year sale! Starting with ebooks and posing guides for $9

28 Jun

If you’ve been eying off one of our photography eBooks, courses or presets packs – this week you’re in luck because today we kick off our mid year sale where we’ll be offering you some amazing discounts on dPS products as well as some special offers from our partners.

If you’re subscribed to our newsletter you’ll get notified of each of the deals as they come out but while you’re reading this – let me tell you about todays deal.

DEAL 1: All dPS eBook are just $ 9 USD

To get our mid year sale started, we’re offering all our ebooks and posing guides at just $ 9 each.

That’s up to 80% off what yo’d normally pay!

There are 23 eBooks and posing guides to choose from on everything from understanding the basics of your camera to portrait lighting as well as how to use natural light and improving your post production of your landscapes and much more.

Here are 3 of our most popular ebook guides:

  • Going Pro. Normally $ 49, get it today for just $ 9 (USD)
  • Living Landscapes. Normally $ 19, today just $ 9 (USD)
  • Portraits: Making the Shot. Normally $ 19, today just $ 9 (USD)

But that’s just scratching the surface of what is on offer – be sure to checkout all 23 titles here to find the guide that will take your photography to the next level.

Whether you pick up just one of our titles or pick the whole library – this is a fantastic way to invest in your photographing learning – but don’t wait long – this deal only lasts another 30 hours so don’t delay.

The post Announcing…our mid year sale! Starting with ebooks and posing guides for $ 9 by Darren Rowse appeared first on Digital Photography School.


Digital Photography School

 
Comments Off on Announcing…our mid year sale! Starting with ebooks and posing guides for $9

Posted in Photography


A Guide to Newborn Photography – Preparation, Posing and Post-Processing

09 Oct

Newborn photography is, in my opinion, one of the most rewarding (and difficult) branches that a photographer can get into. I’ve shot numerous hectic weddings where I was physically exhausted afterwards, and had lifestyle sessions where nothing went right, but nothing has even come close to the process involved when taking photos of a precious newborn baby!

Over the years, I’ve learned some insightful tips from interacting with parents, to posing newborns safely, and also my philosophy when it comes to editing. I want to give all of these tips to you, to hopefully fast-forward your newborn photography aspirations and take you to the next level.

DPSimage 1

Before I dive right in, I want to give you some insight on my background and techniques, so that you can evaluate your style compared to mine, and make adjustments to my tips to suit your photography.

LIGHTING AND SHOOTING PACE

First, I’m a natural light newborn photographer. I will use a continuous lighting system in my studio on the darkest of days, but 99% of the time the only light in my photos is coming from that big fiery ball in the sky. Speaking of studio, I exclusively shoot newborn sessions at my in-home studio space. I’ve converted one of the bedrooms in my home to my shoot-space. You don’t need a huge studio for newborn photography – my small 10×10′ (3×3 meters)room with two windows gives me enough natural light and room to do everything I need to do.

DPSimage 2

SAFETY

Safety is my absolute number one priority for taking photos of newborns, which I’ll talk more about later in the article. It scares me how many pros and amateurs alike don’t make this step important. While on my soapbox, if you don’t make safety an absolute priority, then you have NO business photographing newborns. Whew – I feel better now.

PREPARATION

Whether you’re a photographer inviting newborns and their parents in, or you’re a parent yourself trying to capture beautiful images of your baby, the steps for preparation are virtually the same.

Here are some great tips to keep in mind when you prepare for the session:

  • Warm it up! I close the door to my studio and use a space heater in the corner to warm the room up to about 80-85 degrees F (26-29c). This is usually a great temperature to keep the baby happy, especially if they aren’t swaddled. Be sure to give any clients a heads up about the warmth, and suggest they bring light clothes for themsleves.
  • Wash your hands. Take every precaution not to spread germs, especially for a newborn with a weak and developing immune system.
  • Do NOT wear jewelry. I always take off my rings, bracelets, earrings, and necklaces. While the likelihood of your jewelry falling off is low, it’s not a zero chance. Keep it simple to keep the baby safe.
  • Avoid fragrances. While a newborn’s vision and hearing senses are not too keen, their sense of smell is very sensitive. Don’t wear perfume/cologne, fragrant lotions, or strong hand sanitizers. This can upset the baby quickly.
  • Try to create some white noise. Having some white noise can dull any thuds, shuffles, or the sound of the shutter on the camera that may otherwise wake a baby. My space heater serves to not only provide heat, but also gives me plenty of white noise. You may want to consider an app on your phone if the space heater is too far away, or too quiet.
  • Get all your props, backdrops, blankets, etc., ready before you take any photos. The less you have to move the baby to set up a new shot, the better.


DPSimage-3b

Another aspect of preparation for photographers working with clients, that isn’t talked about as much, is preparing for newborn parents. As a photographer myself, I have met hundreds of parents who are swelling with pride for bringing life into the world, but who are also completely exhausted. I offer my clients coffee when they arrive to let them know that this is a haven for comfort, and to trust me because I know what they are going through.

You’ll also run into two types of parents while photographing newborns: “hover” parents and “passive” parents. Hover parents may clutch and grab for their baby at the slightest sign of a whimper (which is natural human instinct, by the way), and it can impede your ability to take great photos for them. Passive parents are typically those that are the opposite of hover parents, and I’ve found are usually associated with parents who’ve had multiple children and are pretty laid back about the whole process.

The best solution for interacting with all parents is to make sure they’re properly informed before the session begins. Reassure them that their baby’s safety is your number one priority, go over your process with them, and make sure you openly communicate about their baby during the session. This will help ease any concerns a nervous new parent may have.
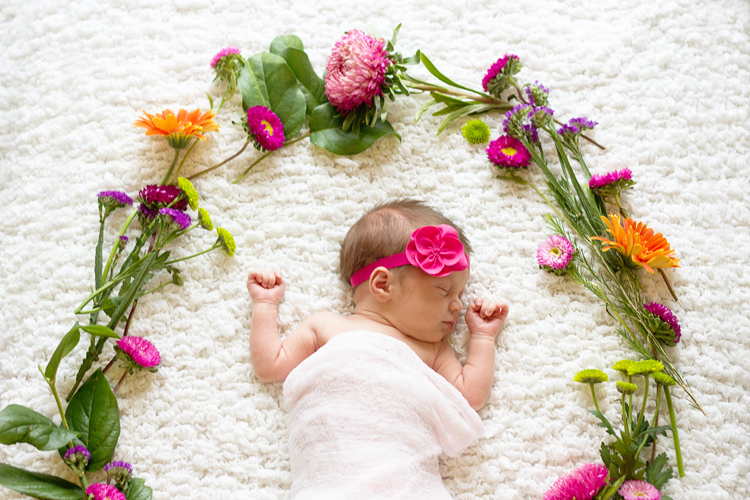
POSING

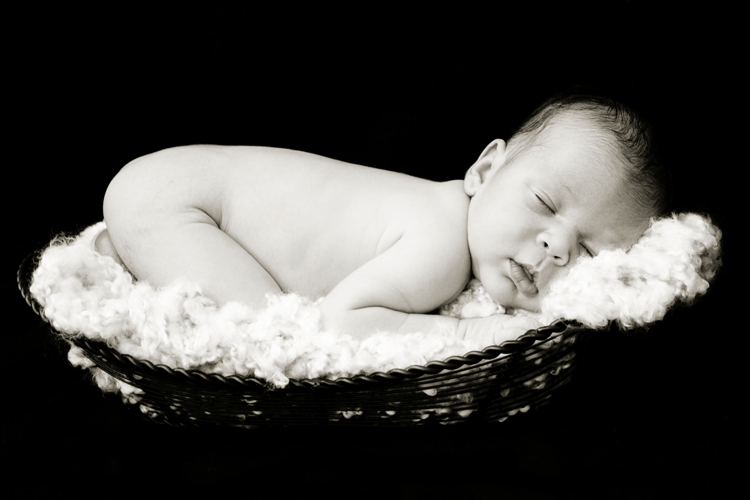
I LOVE natural newborn poses, and I try my best to capture the precious little miracle, and show how they are naturally. I do own a newborn posing beanbag (which I highly recommend purchasing) that has curves, allowing me prop the baby up, or lay them down. There are literally hundreds of guides on the internet about how to pose a newborn, so I won’t go into the different specific poses and setups here. However, I will go over the basics, and get into some more in-depth and technical aspects. If you have no idea how to start posing a baby, start with those guides before you ever (read: ever, ever, ever) actually take photos of a newborn!

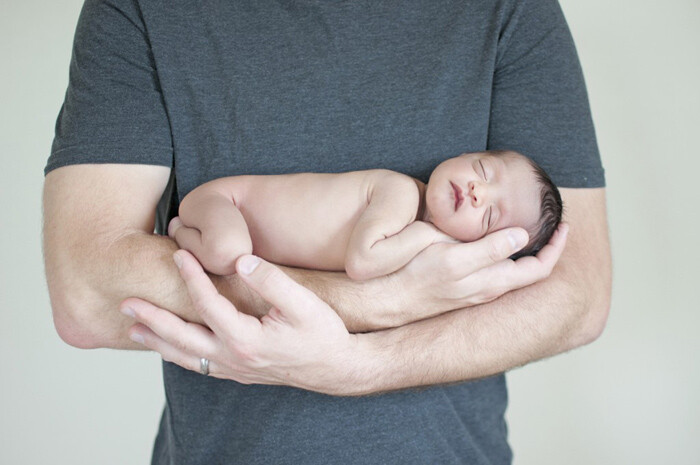
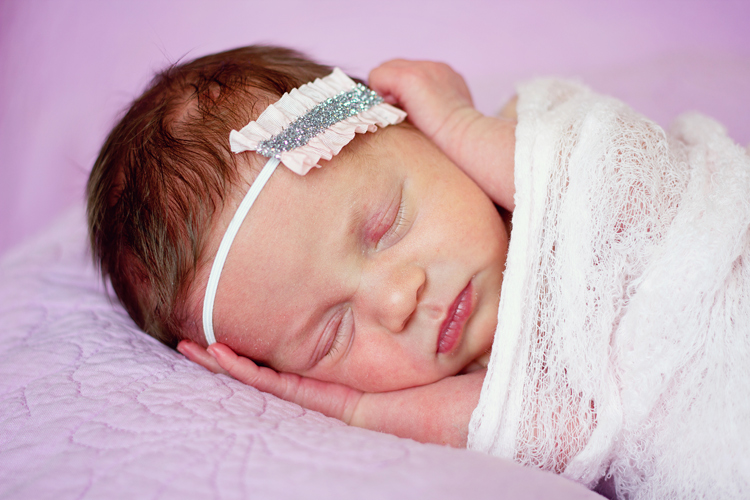
Like I’ve stated numerous times already, MAKE SAFETY FIRST! Natural poses are also safe because there’s very little risk involved if the baby twitches or moves spontaneously. While the baby is posed naturally, I’ll also snag some macro feature shots of the baby’s unique features like their cute little noses, tiny feet and toes, and the adorable little lips they have. Posing the baby naked, or swaddled with blankets, is something that you’ll decide, hopefully after a conversation with the baby’s parents to see what they prefer, and what photo theme they want.

DPSimage 4

You WILL eventually run into a fussy baby at times while posing during the session. It’s pretty rare to have a newborn that gives you no issues at all. That being said, you can prep the baby beforehand to increase your chances of successful posing. I always ask the parents to plan a feeding right before the session begins. Full belly = a happy baby most of the time. However, this isn’t the be-all-end-all solution for some newborns. I’ve been affectionately called the “baby whisperer” by many of my clients because I can typically sense what the baby wants, but I do so by using cues that the baby provides.

A hungry newborn will cry and root, sometimes shaking their heads back and forth and opening their mouths (kind of like a fish) as they look for a food source, i.e. Mommy. Another symptom of being fussy can stem from being cold. Look for tiny goosebumps on their skin to see if they’re too cold. The newborn baby may also be gassy, which can be tough to detect many times, but usually happens in a delay after a feeding. Sometimes it feels impossible to detect what may be causing the baby to be upset. I’ve found that often this is due to the newborn being just slightly uncomfortable or restless. You can calm a a fussy little one by doing some very soft rubs on their forehead or back, or some very light taps on their bottoms. Every baby is different in what they like so it may take some trial and error.

DPSimage-5b

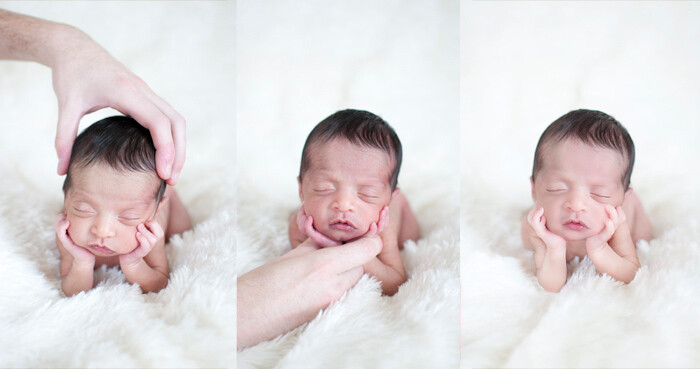
Photo one (left) holding the baby’s head for safety. Photo two (middle) holding the baby’s head from below for safety. Photo three (right) the two combined to make it appear that the baby’s head is resting on its hands.

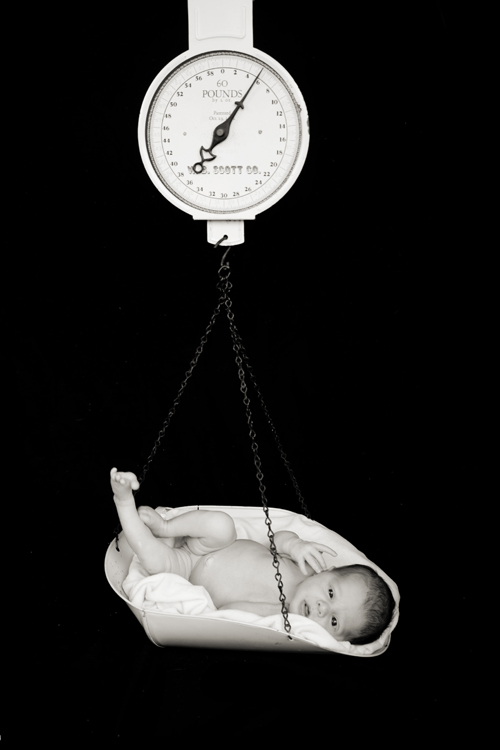
While I prefer to naturally pose the baby, I will also do a few “risky” shots for variety, and that artistic touch. I put risky in quotes because these photos would be completely unsafe normally, but with composite editing in Photoshop, you can merge safe images together to create the artistic illusion you may be going for. Classic examples of this would be the head propped on hands photo (see above picture), hammock photos, or anything where the baby is perched on some object. By the way, you should never do these photos in one take – use the composite route! Just do a quick Google search for “composite newborn images” for step-by-step instructions on how to pull this off.

POST-PROCESSING

As a natural light photographer, I don’t typically manipulate the light in too many of my photos in Photoshop. I’ll make some tweaks here and there, but my biggest adjustments are typically associated with skin smoothing (although I also do some touching-up in post-processing). Slightly overexposing images helps with smoothing the baby’s skin, and shooting in RAW can help you correct any exposure or color issues along the way.

DPSimage 6

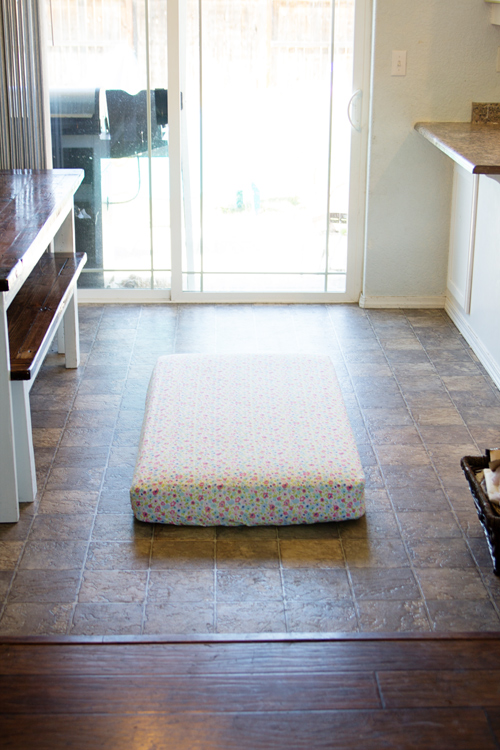
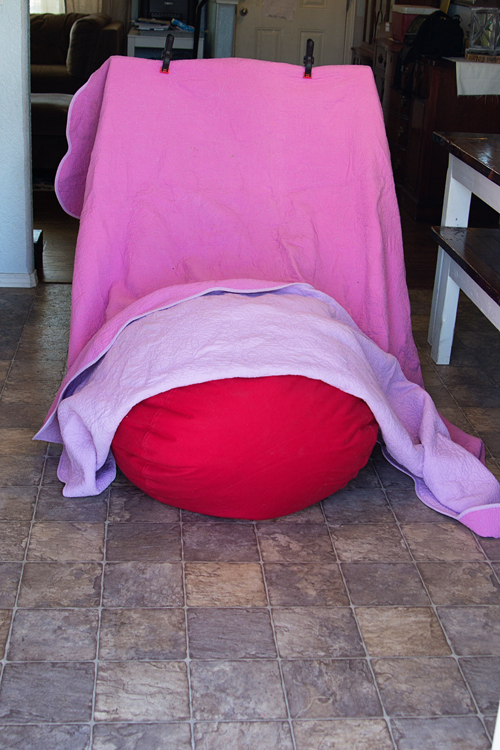
Here’s a tip – you don’t need a massive studio with a huge backdrop to create gorgeous images from far away. Take the example before/after photo above (sans newborn baby) – some minor editing and blending can create fabulous images you’ll be proud of. Just search for some floor/backdrop fading tutorials online for details and step-by-step instructions on how to do it.

Using the clone tool, the blend tool, and creating/manipulating layer masks in Photoshop, you can create exactly what you are after in a “look”. Digital Photography School has some basic Photoshop tips that are fabulous!


DPSimage-7b

In the end, you’ll need to decide what your style is, and what you want your photos to look like. My style includes editing out the skin imperfections on the newborns, but leaving certain features on macro shots (like skin flakes, birth marks, some baby acne, etc.), but there are others in my area that leave the images as they are, with very little touching up. It’s up to you. If someone has hired you, it’s because that person loves your images and the way you edit your photos – stick with it, or try to appeal to a different base.

googletag.cmd.push(function() {
tablet_slots.push( googletag.defineSlot( “/1005424/_dPSv4_tab-all-article-bottom_(300×250)”, [300, 250], “pb-ad-78623” ).addService( googletag.pubads() ) ); } );

googletag.cmd.push(function() {
mobile_slots.push( googletag.defineSlot( “/1005424/_dPSv4_mob-all-article-bottom_(300×250)”, [300, 250], “pb-ad-78158” ).addService( googletag.pubads() ) ); } );

The post A Guide to Newborn Photography – Preparation, Posing and Post-Processing by Elizabeth Moore appeared first on Digital Photography School.


Digital Photography School

 
Comments Off on A Guide to Newborn Photography – Preparation, Posing and Post-Processing

Posted in Photography


3 Newborn Posing Setups Anyone Can Master

06 Oct

newborn-posing-setup

Are you interested in trying newborn photography, but just aren’t sure where to start in terms of posing? Have you ever looked at a newborn photo and been totally unsure how the photographer set it up?

In this article, I’ll walk you through three easy newborn posing setups. We’ll start with pull-backs (behind the scenes shots) of each posing setup, along with brief instructions as to how you can recreate it at home. Then I’ll show you what the final images might look like from that setup. All three setups are simple, versatile, and I promise that absolutely anyone can master them. All three also have the benefit of being setups that you can typically use even in small spaces, which is a huge benefit if you ever shoot in clients’ homes, and don’t know what you’re walking into until you get there.

Setup #1: The Crib Mattress

newborn-posing-setup-1

This setup really could not be any easier. Simply take a crib mattress, find a fun fitted sheet for it, and put it on the floor near a window, or sliding glass door. My preference is always to set up the crib mattress at about a 60 degree angle to the window. Sometimes the space may easily allow you to set up exactly as you would prefer, and sometimes like in the case of my very small kitchen above, it may require thinking outside the box.

For this particular session, I kept the mattress at a 90 degree angle to the window, as mom walked over and placed the sleeping baby on the mattress. Once baby was warm and settled, I sat on the floor and pivoted the mattress just enough so that I’d be able to achieve some shadows and depth in the photo.

newborn-posing-setup-2

This is also the setup that I typically use whenever I am incorporating flowers, greenery, or sports equipment into the photo because it gives me a nice flat surface to work with, and it’s also low to the ground, so it’s easier to shoot from above.

newborn-posing-setup-3

Setup #2: The Black Sheet

newborn-posing-setup-4

Next, try taking a twin or full sized black sheet and clamping it to the back of some chairs. I prefer to use bar stools whenever possible, but a regular high backed chair will also work. If you can’t track down a chair, simply have mom and dad hold the sheet up in the air, and let it pillow at the ground. Again, place yourself near a large window. Then you can place the baby in a basket on top of the sheet on the floor, or even have mom or dad stand in front of the sheet and hold the baby in his or her arms.

Bonus Tip: Use a lint roller on your black sheet before you start taking photos – it will save you a ton of time in post-processing!

newborn-posing-setup-6

I find this particular setup to be really versatile, and it’s an easy way to create a high-contrast photo that has a more formal look, compared to the first setup which usually tends more towards lifestyle images. This setup does require a bit more time in post-processing to get that nice uniform black background, but it is absolutely worth the investment!

newborn-posing-setup-5

From a safety perspective, this is a great setup to use any time you want a shot where it appears that the baby is hanging in the air. In the above photo, the scale that the baby is on was actually sitting directly on the black sheet on the floor. I had grandma hold the hook of the scale taught as I took the photo.

Even as newborns, babies are wiggly and will sometimes try to shoot themselves off a prop, so I just don’t think it’s worth the risk to actually allow a newborn to hang from something in the air during a session. This particular setup is a nice alternative for parents who would like to achieve that look, while also greatly minimizing the risk involved.

Setup #3: The Beanbag

newborn-posing-setup-7

The beanbag is by far the most common approach for newborn photography. You’ll want either a beanbag specifically designed for photography, or extra “beans” to over stuff a standard beanbag. Trust me on this one! Place the beanbag on the floor and drape a large blanket over it, once again clamping to some tall-backed chairs near a light source. If you think that you’ll primarily be using this setup for a session, you can also layer multiple blankets over the beanbag before clamping.

Bonus Tip: If you layer blankets on the beanbag, I highly recommend putting diaper changing pads (or piddle pads for pets) in between each blanket on the bean bag just to be safe!

newborn-posing-setup-8

This setup is a great option if you have a baby that’s having a difficult time settling, and can be very versatile in terms of the number of photos you can achieve from just one pose. You could easily swing a portrait, closeup of fingers and/or toes, and a full-body pullback without moving the baby at all using this set.

newborn-posing-setup-9

The world of newborn photography is so nuanced, and there are so many tips, tricks, and safety precautions to know, and be aware of. This particular post is really just the tip of the iceberg, but will hopefully give you a good starting point in terms of understanding how to execute three newborn posing setups, as well as what types of images you may be able to achieve with each one.

Have you tried any of these newborn setups before? Which is your favorite? Share your images and any other posing setups you’ve used in the comments below.

googletag.cmd.push(function() {
tablet_slots.push( googletag.defineSlot( “/1005424/_dPSv4_tab-all-article-bottom_(300×250)”, [300, 250], “pb-ad-78623” ).addService( googletag.pubads() ) ); } );

googletag.cmd.push(function() {
mobile_slots.push( googletag.defineSlot( “/1005424/_dPSv4_mob-all-article-bottom_(300×250)”, [300, 250], “pb-ad-78158” ).addService( googletag.pubads() ) ); } );

The post 3 Newborn Posing Setups Anyone Can Master by Meredith Clark appeared first on Digital Photography School.


Digital Photography School

 
Comments Off on 3 Newborn Posing Setups Anyone Can Master

Posted in Photography


3 Posing Tips for Young Siblings

17 Sep

posing-young-siblings-1

Have you ever tried to pose an elementary-age set of siblings, only to have one or more of them dissolve into a crying mess before you’re able to capture a single frame? When it comes to posing young siblings, I’ve discovered that things run more smoothly when I take a slightly more relaxed approach to posing, and I’ve compiled a few posing tips that will hopefully help you capture meaningful photos of young sibling groups a little more easily.

1. Get them close together

posing-young-siblings-2

Over the past few years, I’ve noticed that when I’m photographing groups of siblings, the favorite images are almost always ones in which the kids are closer together than they might usually sit, or stand, in day-to-day life. So now I usually begin every session that involves young siblings by asking them to hug each other, or put their arms around each other. If one sibling is very young, I have them sit down with the younger sibling on the older one’s lap. It’s a simple direction, but one that young children understand, and it really makes a big impact.

These images are most often family favorites, and are usually the ones that I see gracing Christmas cards and photo canvases in their living room. Most parents usually request at least one photo of both kids looking at the camera and smiling, and this is also where I most often try to fulfill that request.

posing-young-siblings-3

However, as a mom I can tell you without a doubt that the amount of time that elementary age siblings will stay this close together before they start bickering or crying is usually pretty limited, and it’s in your best interest as a photographer to have them move on to something different before they totally dissolve into chaos. So, get them close, and then pay attention – if you notice that either sibling starts getting a little aggressive with their love, and starts squeezing the other sibling’s waist or neck, it’s time to move on to something else.

2. Give them something to do

posing-young-siblings-4

Once it’s time to move on from hugging, I usually give the kids a small instruction that will keep them close together, but will also keep their hands occupied at the same time. For example, in the above photo I asked my girls to stand back-to-back, and hold hands. This kept them close physically, but also prevented some of the aggressive tickling that was starting to happen just before the photo was taken. I also often ask kids to stand facing me and hold hands, which achieves the same effect, and seems to be a favorite among parents as well.

posing-young-siblings-5

Another thing to try is to have the kids lay down. I usually keep a few quilts in the back of my car for this exact purpose, and you would be surprised how quickly this simple suggestion can calm rambunctious kids down and allow them (and you) to refocus. Once they’re laying down, try asking them to look up at you, hold hands, close their eyes, give each other butterfly kisses, or to touch their noses together. Again, pay attention to both the subtle, and not-so-subtle, cues that either child may be giving that they are ready to move on to something new.

3. Let them be themselves

posing-young-siblings-6

As nice as it is to have a perfect photo of everyone looking at the camera and smiling, I also know that some of my favorite images of my own girls are the ones in which their personalities really shine through. So, give the kids you’re photographing an opportunity to show you their personalities as well! Ask them to sing for you. Ask them to pose like their favorite superhero or princess. Tell them a knock-knock joke, then ask them to tell you one. I’ve yet to meet a kid who wasn’t totally game to give me a silly face, and usually the most genuine smiles and laughs quickly follow the silliest of photos.

posing-young-siblings-7

You can also combine tips 2 and 3 – give them a small suggestion like “sit on the ground with your feet touching each other”, and then sit back and watch the way that they interact with each other naturally. Hand them each a flower or a leaf, and ask them to tell you a story about it. These are great opportunities to capture images that are more candid, while still allowing you as the photographer to have a bit of control in terms of posing.

Sometimes, I cycle through some variation of these tips two or three times in the course of a session, and I’ve found that the variety is really helpful in preventing the kids from getting restless and bored. Overall, the key to posing young siblings is realizing that you simply can’t approach posing in the same way that you would with senior portraits or formal wedding portraits. Elementary age kids simply won’t hold a pose that they find to be the slightest bit awkward or uncomfortable, no matter how good it might look. Instead, give young siblings gentle direction that allows them to relax and be themselves, and watch their little personalities shine!

googletag.cmd.push(function() {
tablet_slots.push( googletag.defineSlot( “/1005424/_dPSv4_tab-all-article-bottom_(300×250)”, [300, 250], “pb-ad-78623” ).addService( googletag.pubads() ) ); } );

googletag.cmd.push(function() {
mobile_slots.push( googletag.defineSlot( “/1005424/_dPSv4_mob-all-article-bottom_(300×250)”, [300, 250], “pb-ad-78158” ).addService( googletag.pubads() ) ); } );

The post 3 Posing Tips for Young Siblings by Meredith Clark appeared first on Digital Photography School.


Digital Photography School

 
Comments Off on 3 Posing Tips for Young Siblings

Posted in Photography