RSS
 

Posts Tagged ‘Portrait’

How to Use Lighting and Gels for Modern Portrait Photography [video]

12 Oct

The post How to Use Lighting and Gels for Modern Portrait Photography appeared first on Digital Photography School. It was authored by Caz Nowaczyk.

In this video from Lindsay Adler Photography, Lindsay deconstructs an image that she has lit using colored gels to make it look as though she photographed it in a nightclub or bar.

?

Inspired by a red velvet couch that she has in her studio, Lindsay decided to make her studio look like it was a nightclub or bar. She takes us through the process to teach us exactly how she achieved this look.

When choosing the color of her gels, Lindsay chose red to unify the subject with the color of the couch. She then used color wheel theory and used contrasting/complementary colors, so she went with a color close to green – teal.

Lindsay uses three strobes with fairly basic modifiers – bare bulbs and umbrellas.

Lindsay states that “The shot as lit overhead by a small white umbrella (no gel). The right-hand side of the frame was lit by a large deep umbrella with diffusion and a red gel to wrap around most of the frame. Finally, a bare bulb with a teal/green gel was used to light the shadows on the left of the frame. The colors selected helped create a sense of atmosphere to the otherwise static black environment.”

During the video, you’ll find out why these choices were made to combat particular issues that arose, including the wall being a slightly reflective surface.

You’ll also see some post-production choices that Lindsay makes with the image, as well as discovering why Lindsay chose to have the model posed in this particular way.

But more importantly, you’ll learn how to make a photo like hers!

What did you think of Lindsay’s video? Did you find it helpful? Let me know in the comments!


You may also find the following helpful:

Your Guide to Studio Lighting Equipment

Understanding Broad and Short Lighting in Photography

5 Creative Portrait Lighting Tricks Using Only Phone Light

How to use Off-Camera Flash to Create Dramatic Images with Cross Lighting

5 Lighting Setups You Can Do Using an Octabox

How to do Clamshell Lighting: A Reliable Two Light Setup

The post How to Use Lighting and Gels for Modern Portrait Photography appeared first on Digital Photography School. It was authored by Caz Nowaczyk.


Digital Photography School

 
Comments Off on How to Use Lighting and Gels for Modern Portrait Photography [video]

Posted in Photography


How to Choose Urban Landscapes for Portrait Photography

10 Oct

The post How to Choose Urban Landscapes for Portrait Photography appeared first on Digital Photography School. It was authored by Matt Murray.

dps-urban-landscapes-for-portrait-photography

Are you bored of doing portrait shoots in the studio or the local park? Try mixing things up with an urban portrait shoot. The city streets, the buildings, the laneways – this is your cinematic backdrop. All you need is a little bit of planning and a lot of imagination. If you’ve never done a shoot like this before, you might be wondering how to choose locations. In this article, I will run you through my process of choosing urban landscapes for portrait photography. 

urban-landscapes-for-portrait-shoots

Bailey in a window, Brisbane. I took this shot with some off-camera flash outside my local library. Fujifilm X-T3 with a 23mm f1.4 lens.

An urban portrait shoot in my city? No way!

You may think that your city or your town has nothing of interest, but it does. You just have to look with a fresh perspective. Sometimes I’ll be on a photo walk with another photographer, and they don’t seem to see the potential that their town has to offer. “Wow, look at that doorway!” I’ll say. With a puzzled face, they reply, “It’s just a doorway!” 

No, it’s not just a doorway – it’s a potential scene in your next urban portrait shoot. 

Image: Sasha, Brisbane. I used these old street lamps as an element in the shoot. Fujifilm X-T3 with...

Sasha, Brisbane. I used these old street lamps as an element in the shoot. Fujifilm X-T3 with a 56mm f1.2 lens.

Every town or city I’ve ever been to has its charms and a unique look: from modern glass and steel skyscrapers to historic buildings to run-down industrial areas. There are so many aspects of urban locations that you could include in your shoots: laneways, street art, doorways, neon signs, steel shutters, and traffic trails, just to name a few. 

There’s also the unique way that light falls in urban environments: harsh beams of light that fall between buildings, beautiful soft light that you find in doorways and under bridges, and in Brisbane, dazzling light reflecting off skyscrapers. The possibilities are endless.

The best time for an urban portrait shoot

The best time for an urban portrait shoot is whenever you and your client or model are both available. Regardless of the light, the weather, or the locations. The success of the photoshoot is ultimately in your hands. 

My favorite time for doing urban portrait shoots is just before dusk. This allows you to get a good mix of golden hour photos with sunlight, blue hour photos as the city lights come into play and nighttime shots with artificial light. 

urban-landscapes-for-portrait-shoots

Alyssa in an industrial alleyway, Brisbane. Fujifilm X-T3 with a 60mm f2.4 lens.

Location scouting

I usually run portrait shoots for around 90-minutes, allowing me to shoot in 6-8 locations. 

It’s best to do your location scouting at the same time of day that your shoot will take place. This is so you can look at the light, see how it falls, and plan accordingly. In practice, though, I usually end up doing my scouting during the day. 

Before I arrange the shoot, I take some time to wander about the city to find 8-10 locations close together. The reason I look for more places than I’ll need is to be flexible on the shoot. Cars or trucks can block alleyways, big crowds could move through the area at the time of the shoot, or the lighting could be all wrong. There’s a whole lot of things that could make the location unsuitable when you arrive at the scene.

Although it’s tempting to plan to shoot in two locations at opposite ends of town, unless you have easy access to transport on the day of the shoot, it will be impractical. Photoshoots can be tiring for everyone, so asking your client or model to walk several city blocks and back again to shoot in one location may not be the best idea. 

What to take during location scouting

When you’re scouting for locations, have a notepad and pen ready along with your smartphone. When you see somewhere that you like, take a photo on your phone for reference and jot down some notes. I always draw a map of the city streets in my notebook. Then I plot the locations on it and plan a direction for the shoot.

What I’m looking for during my walk is a cool urban location in which to place the client or model. Some locations will leap out at you, and you will know that you should take some photos there. Others may not reveal their charm until later when the lights are low. 

Image: Natasha, Brisbane. I like the very subtle reflection in the polished stone wall behind her. F...

Natasha, Brisbane. I like the very subtle reflection in the polished stone wall behind her. Fujifilm X-T3 with 56mm f1.2 lens

As you’re wandering around, there’s a couple of things you need to keep in mind:

Imagination

What is this place going to look like at dusk or nighttime? Remember that for many shots, you will be shooting with a wide-open aperture, or close to wide open, so many of the details in the background will be blurred. 

Potential risks

It may look cool, but is this place dangerous in any way? Think of how you will place the model or client in this scene – are there any risks that you need to be mindful of? Is there a lot of traffic? Is it a dangerous neighborhood? You should consider all of this when you’re planning, as safety should be your top priority for these shoots.

Below are some of my go-to shots when I plan an urban photoshoot. I took all of these within a few blocks of each other in central Brisbane, Australia. 

Neon lights

Neon shots are a favorite with the Instagram crowd, and it’s easy to see why. They are so much fun and a great image idea to have up your sleeve.

Neon signs are something that, quite honestly, I never usually notice. However, as soon as you start looking for them, you’ll be amazed at how many your town has.

urban-landscapes-for-portrait-shoots

Alyssa, Brisbane. This neon light is outside a takeaway shop in central Brisbane. I was attracted to the three different colors the sign had.

Beer kegs outside a pub

As soon as I saw these beer kegs in a laneway outside a pub, I knew I wanted to incorporate them in a shoot. I’ve used them as both a background element and also as a prop for models to sit on.

In this shot of Anne, I struck gold. By chance, it was one of the busiest days for pubs in the year – Melbourne Cup Day. There were a few dozen kegs in a laneway all stacked on one another. I lit this shot with an LED video light.

urban-landscapes-for-portrait-shoots

Anne in front of beer kegs, Brisbane. I love the shape, color, and reflection of the kegs in the background. Fujifilm X-T3 with an 8-16mm f2.8 lens lit with an LED video light.

Laneways

Many Australian cities are blessed with alleyways. In many ways, they are the perfect place for photoshoots. Expect atmospheric lighting, an industrial look, street art – and best of all – little traffic. While Melbourne may be the laneways capital of Australia, Brisbane has many too.

Image: Natasha in a laneway, Brisbane. I like the color and bokeh that some tiny blue fairy lights p...

Natasha in a laneway, Brisbane. I like the color and bokeh that some tiny blue fairy lights provided in this shot. Fujifilm X-T3 with a 56mm f1.2 lens.

Telephone booth

This is a really fun place to use for some shots – if you can still find one these days. You may also have to take some time to explain to younger clients or models on how to use a public payphone!

urban-landscapes-for-portrait-shoots

Alyssa in a phone booth in Brisbane. Fujifilm X-T3 with a 35mm f1.4 lens.

Reflections

Reflections are a go-to image idea for urban portrait shoots. Many buildings provide you with glass or reflective surfaces.

Image: Anne looking into a mirrored surface, Brisbane. Fujifilm X-T2 with a 56mm f1.2 lens.

Anne looking into a mirrored surface, Brisbane. Fujifilm X-T2 with a 56mm f1.2 lens.

Old signage

I love history and nostalgia, but sadly there isn’t much left in my city. One day I noticed this sign and thought I’d love to do some shots here.

Image: Sasha in front of a sign, Brisbane. Fujifilm X-T3 with a 16mm f1.4 lens.

Sasha in front of a sign, Brisbane. Fujifilm X-T3 with a 16mm f1.4 lens.

Take your next portrait shoot to the streets

Urban portrait shoots can be a lot of fun. If you’ve never done one before, I hope that this guide has inspired you to look around your city for urban landscapes for portrait photography.

For your first time, you can always ask a friend to be your model if you want to try things out and see how the images look. Practice makes perfect.

Remember, safety is a very important factor in a shoot like this – both for your client or model and for yourself.

Urban shoots have helped me grow as a photographer. I feel more creative, I see possibilities for images in the mundane, and they’ve also helped me to think on my feet and improvise. ­­­­

So what are you waiting for? An endless array of scenes is right on your doorstep. Take your next portrait shoot to the streets.

Do you have any other tips for scouting urban landscapes for portrait photography? Share with us in the comments!

The post How to Choose Urban Landscapes for Portrait Photography appeared first on Digital Photography School. It was authored by Matt Murray.


Digital Photography School

 
Comments Off on How to Choose Urban Landscapes for Portrait Photography

Posted in Photography


Getting to Grips with Fill Light in Portrait Photography

08 Oct

The post Getting to Grips with Fill Light in Portrait Photography appeared first on Digital Photography School. It was authored by John McIntire.

Image: Using fill light is an essential skill that will allow you complete control over the contrast...

Using fill light is an essential skill that will allow you complete control over the contrast and tonality in your images in any type of lighting situation.

It should be no secret to any photographer that one light is all you need to achieve great results. While one light setups (in this context, specifically those that don’t involve the use of a reflector) are both well discussed and incredibly useful, sometimes it’s good (or even essential) to go beyond the basics. The next step in your progression is probably going to be to add fill lighting.

Fill light is one of those essential skills that every photographer should have a good grasp of no matter what type of light they are using.

Image: One light setups are powerful, and the results can be great. However, sometimes it’s us...

One light setups are powerful, and the results can be great. However, sometimes it’s useful to be able to take even more control over the contrast in your images.

This article will help to get you started with two types of fill lighting. The first of these is the use of the humble reflector. The other is to use a second dedicated light source. Both of these methods are very different in how they are implemented and what they can achieve. Mastering both will give you a more complete skill set with which to use in your photography.

What is fill lighting and what does it achieve?

Image: In the image on the left, the lack of fill lighting has left most of the details in the back...

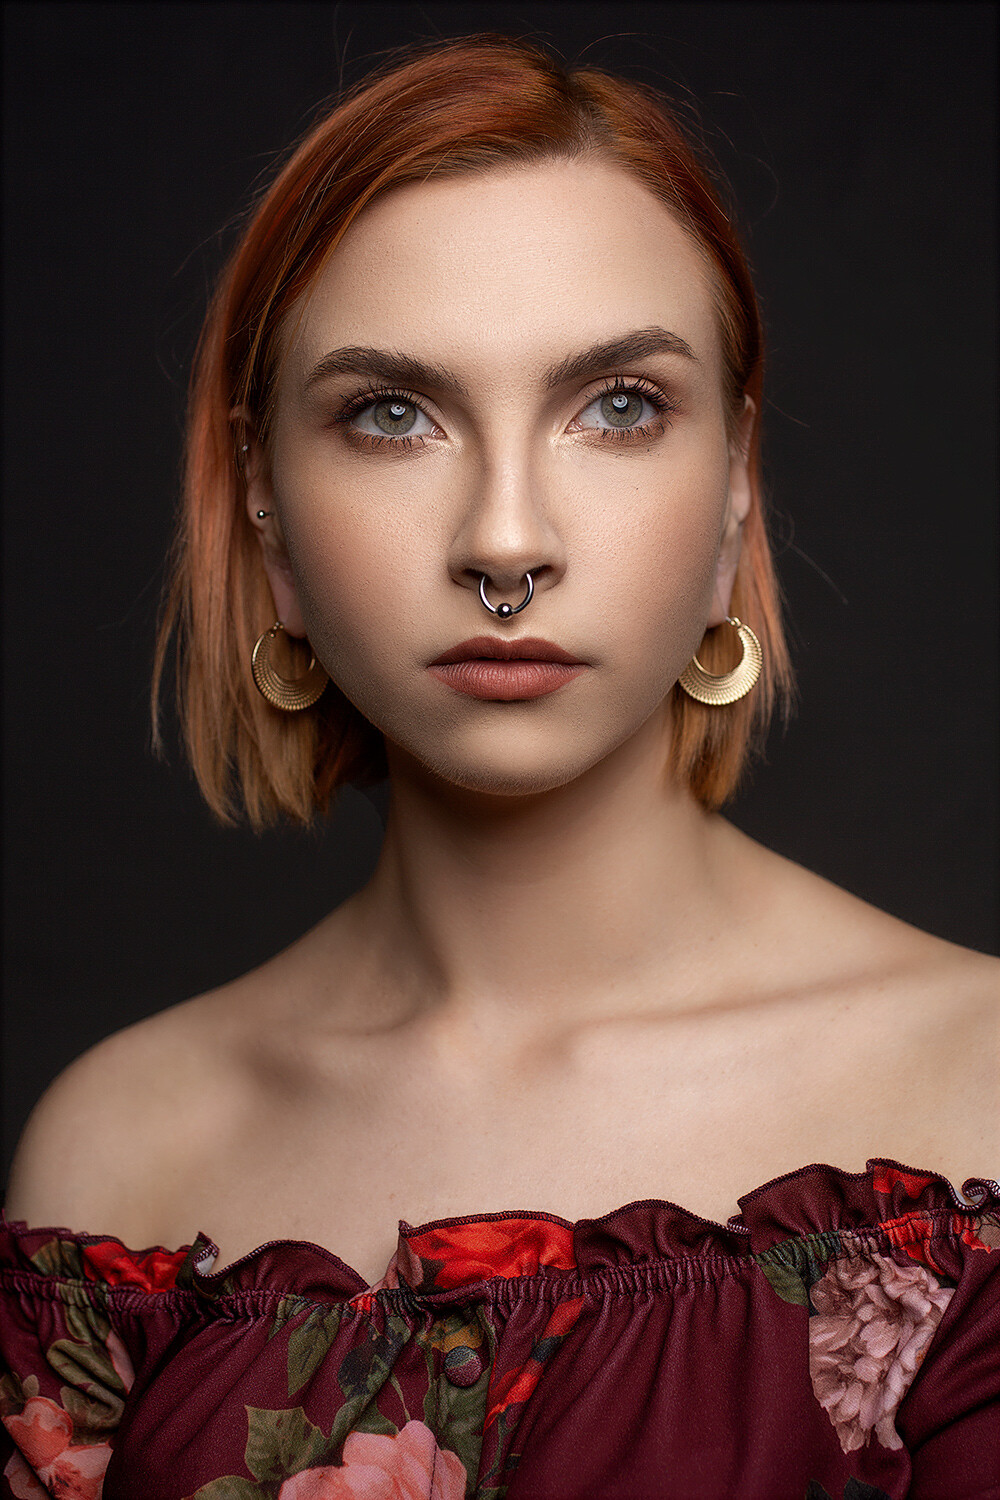
In the image on the left, the lack of fill lighting has left most of the details in the back of the subject’s dress as pure black. Adding fill light (right) has brought those details back.

The concept of fill lighting is quite simple.

The idea is that you use it to light the shadows in your frame. What this does is:

  • Brings up the exposure of the shadow areas in your image.
  • Reduces overall contrast in your frame (much like landscape photographers use graduated ND filters to reduce contrast in their images).
  • Brings your final images more in line with how the eye sees the world, rather than the limited range of your camera’s sensor.

While really dark and contrasty images definitely have their place (I love them myself), images (especially portraits for clients) will benefit from a more even contrast ratio. I once heard it described (I’m sorry, I don’t remember where) that in lighting for TV and cinema, the shadows are always lit. This was a lightbulb moment for me as I had always wondered how cinematographers seemed to show a lot detail while still retaining a good amount of contrast. The answer was controlled fill lighting.

Two types

Reflectors

Image: Reflectors are a powerful and versatile tool that allows you to be as subtle or as bold as yo...

Reflectors are a powerful and versatile tool that allows you to be as subtle or as bold as you like with your fill lighting.

The most basic type of fill lighting is that provided by the ever so basic, yet powerful, reflector. You probably have at least one of these already (or you’ve made a few). Reflectors provide fill light by reflecting light (go figure) from your key back into the shadows of your frame. In a lot of cases, reflectors will be your first foray into fill lighting. However, they will also be one of your most-used pieces of kit altogether.

Secondary lights

Image: Using a secondary light source as fill is going to be your most versatile option.

Using a secondary light source as fill is going to be your most versatile option.

You can also use a second light (or third and beyond) as your fill light. A dedicated fill light will do the same basic job as a reflector, but it is infinitely more controllable. You can fine-tune the exposure and shape of your fill light with a precision that reflectors just don’t allow.

Contrast ratios – The very basics

Image: Left: The shadows are filled heavily and the fill light is metered one-stop below key. This r...

Left: The shadows are filled heavily and the fill light is metered one-stop below key. This results in a low contrast image with shadows retained. Right: the fill here is four stops below key. The contrast is high and the shadows are deep, but all of the detail is present.

The very concept of a contrast ratio can seem technical and daunting, I know. However, it is not at all that difficult of a concept and it’s just not that technical. At the most basic level, a contrast ratio simply tells you how bright one light is in relation to one another in terms of the aperture of your camera.

If your key light is metering at f/8, that means that if you set your camera to f/8 and an appropriate shutter speed (lower than your camera’s max sync speed) you will achieve a correct (subjective) exposure in-camera.

Fill lighting will always be underexposed in relation to your key light. If it’s even to your key light, you will get flat, no-contrast images as a result. For a contrast ratio that provides low contrast, you will want your fill light to be at least one stop darker than your key light. Since our hypothetical key light is f/8, that means the key light in this instance needs to meter f/5.6. This is a ratio of 2:1 (which is more advanced and you definitely don’t need to know to get started).

In short, if you want less contrast, your fill light should be one to two stops under your key light. If you want more contrast, try three to four stops.

Metering

If you want to be as precise as possible with these ratios, you will want to consider a light meter. That way you can measure any light falling on the scene with the press of a couple of buttons. This is the easiest way to go about it and works in the studio and natural light. You can also meter the light bouncing off a reflector.

Image: A light meter is the easiest and most accurate way to read what your light is doing. However,...

A light meter is the easiest and most accurate way to read what your light is doing. However, they don’t tend to be cheap.

That does not at all mean that you have to use a light meter, though. While more difficult (especially if you’re new to lighting like this), you can do it with your histogram on the back of your camera. Take a test shot with just your key light on. Now take one with only your fill light on. (Note: you won’t be able to do this if you are using a reflector.) Because fill lighting should be raising the exposures on your shadows, the shadow area of the histogram of your fill light test shot should be further to the right than that of your key light test shot.  If the shadow areas on both histograms line up, you need to increase the exposure of your fill light. If the shadow areas of your fill light’s histogram line up with the mid-tones or highlights of your key light’s histogram, you need to decrease the exposure of your fill light. (I did say it was trickier.)

Image: Left: Without fill light, you can see the shadows are underexposed. Right: With subtle fill l...

Left: Without fill light, you can see the shadows are underexposed. Right: With subtle fill light, you can see the shadows are brought up quite a lot.

Of course, you don’t have to do either of these things. You can always eyeball the whole setup and try to adjust things on the go. I would say this is perfectly fine with experience, but as you start out, I encourage you to at least have a go with the previous methods. It will drastically reduce the amount of time it takes you to get to grips with the technique and fully understand what is going on with your light. The more you understand, the easier you will find it to adjust things on the fly. You will also be able to learn new techniques faster.

Fill light with reflectors

Image: Reflectors can be subtle or bold when used as fill and are pretty versatile for what they are...

Reflectors can be subtle or bold when used as fill and are pretty versatile for what they are.

Reflectors are:

  • Cheap
  • Easy to setup
  • Easy to use
  • Very effective

Getting started with reflectors as fill lighting

Image: Reflectors are powerful, yet accessible, tools for fill lighting.

Reflectors are powerful, yet accessible, tools for fill lighting.

Before you start to think about fill, you will want to decide what your key light (main light source) is going to do. Set up your key light so that it is shaping and lighting your subject the way that you want. Meter so that you have the exposure settings that you desire.

Image: A small(ish) softbox placed in front of and above the subject creates soft light with shadows...

A small(ish) softbox placed in front of and above the subject creates soft light with shadows underneath the subject’s features.

Now, evaluate the shadow areas that your key light is creating. If you’re using natural light, or strobes fitted with modeling lights, you can do this by eye. Alternatively, you can take a test shot and review it on the back of the camera.

Image: Here you can see that while the light is soft, the shadows are a prominent part of the image.

Here you can see that while the light is soft, the shadows are a prominent part of the image.

Place your reflector so that it is roughly opposite your key light. Evaluate what the reflector is doing (either by eye or test shot again).

Image: Adding a reflector beneath the key light serves to raise the exposure in the shadow areas of...

Adding a reflector beneath the key light serves to raise the exposure in the shadow areas of the image.

What you are aiming for is for you shadows to be brought up in exposure, but not eliminated altogether. If you want low contrast, bring your reflector in as close as possible. If you want more contrast, move it away.

Image: With the reflector used as fill, the shadows are still present, but the overall contrast in t...

With the reflector used as fill, the shadows are still present, but the overall contrast in the image has been reduced.

It can take quite a lot of practice before you learn to see the subtle changes a white reflector provides. The key is to get as much practice in as possible.

Set up an object and light it. Put your reflector wherever you want and start taking shots, being sure to move the reflector into different positions each time. Review each shot and try to notice the behavior of the light in each instance. This exercise will give you a pretty good idea of how a reflector is going to behave in any given situation. Do this exercise often and you will find you can see even the most subtle shifts in light where it was difficult before.

Another quick tip to help you see the difference in contrast in a scene is to squint. It sounds ridiculous, but squinting reduces your vision to blocks of value and you will be able to see the contrast in the scene more easily.

A second light

Image: A second strobe serving as fill gives you the most control over how you manipulate your shado...

A second strobe serving as fill gives you the most control over how you manipulate your shadows.

Like reflectors, using extra lights as fill is a fundamental skill, albeit one with a slightly steeper learning curve. That said, unlike reflectors, using a dedicated light source allows you full control over the power output, making it much easier than a reflector to control how the light is going to behave.

Image: Varying degrees of contrast between your shadow and highlight tones are possible just by adju...

Varying degrees of contrast between your shadow and highlight tones are possible just by adjusting the power of your fill light.

To get started using a dedicated fill light, place your key light in your desired position and set the power for your desired aperture. Let’s return to that hypothetical of f/8.

Image: Here, a softbox is placed at 45 degrees to the subject.

Here, a softbox is placed at 45 degrees to the subject.

Knowing your aperture, place your fill light where it will affect the shadows in the manner you would like and set the power output so that it will be underexposed in relation to your aperture. How much you underexpose for is entirely up to you. If you want, say, two stops of fill in this scenario, then you will want your fill light to meter at f/4.

Image: A 7′ parabolic umbrella with diffusion was added about 10-feet away to serve as fill. I...

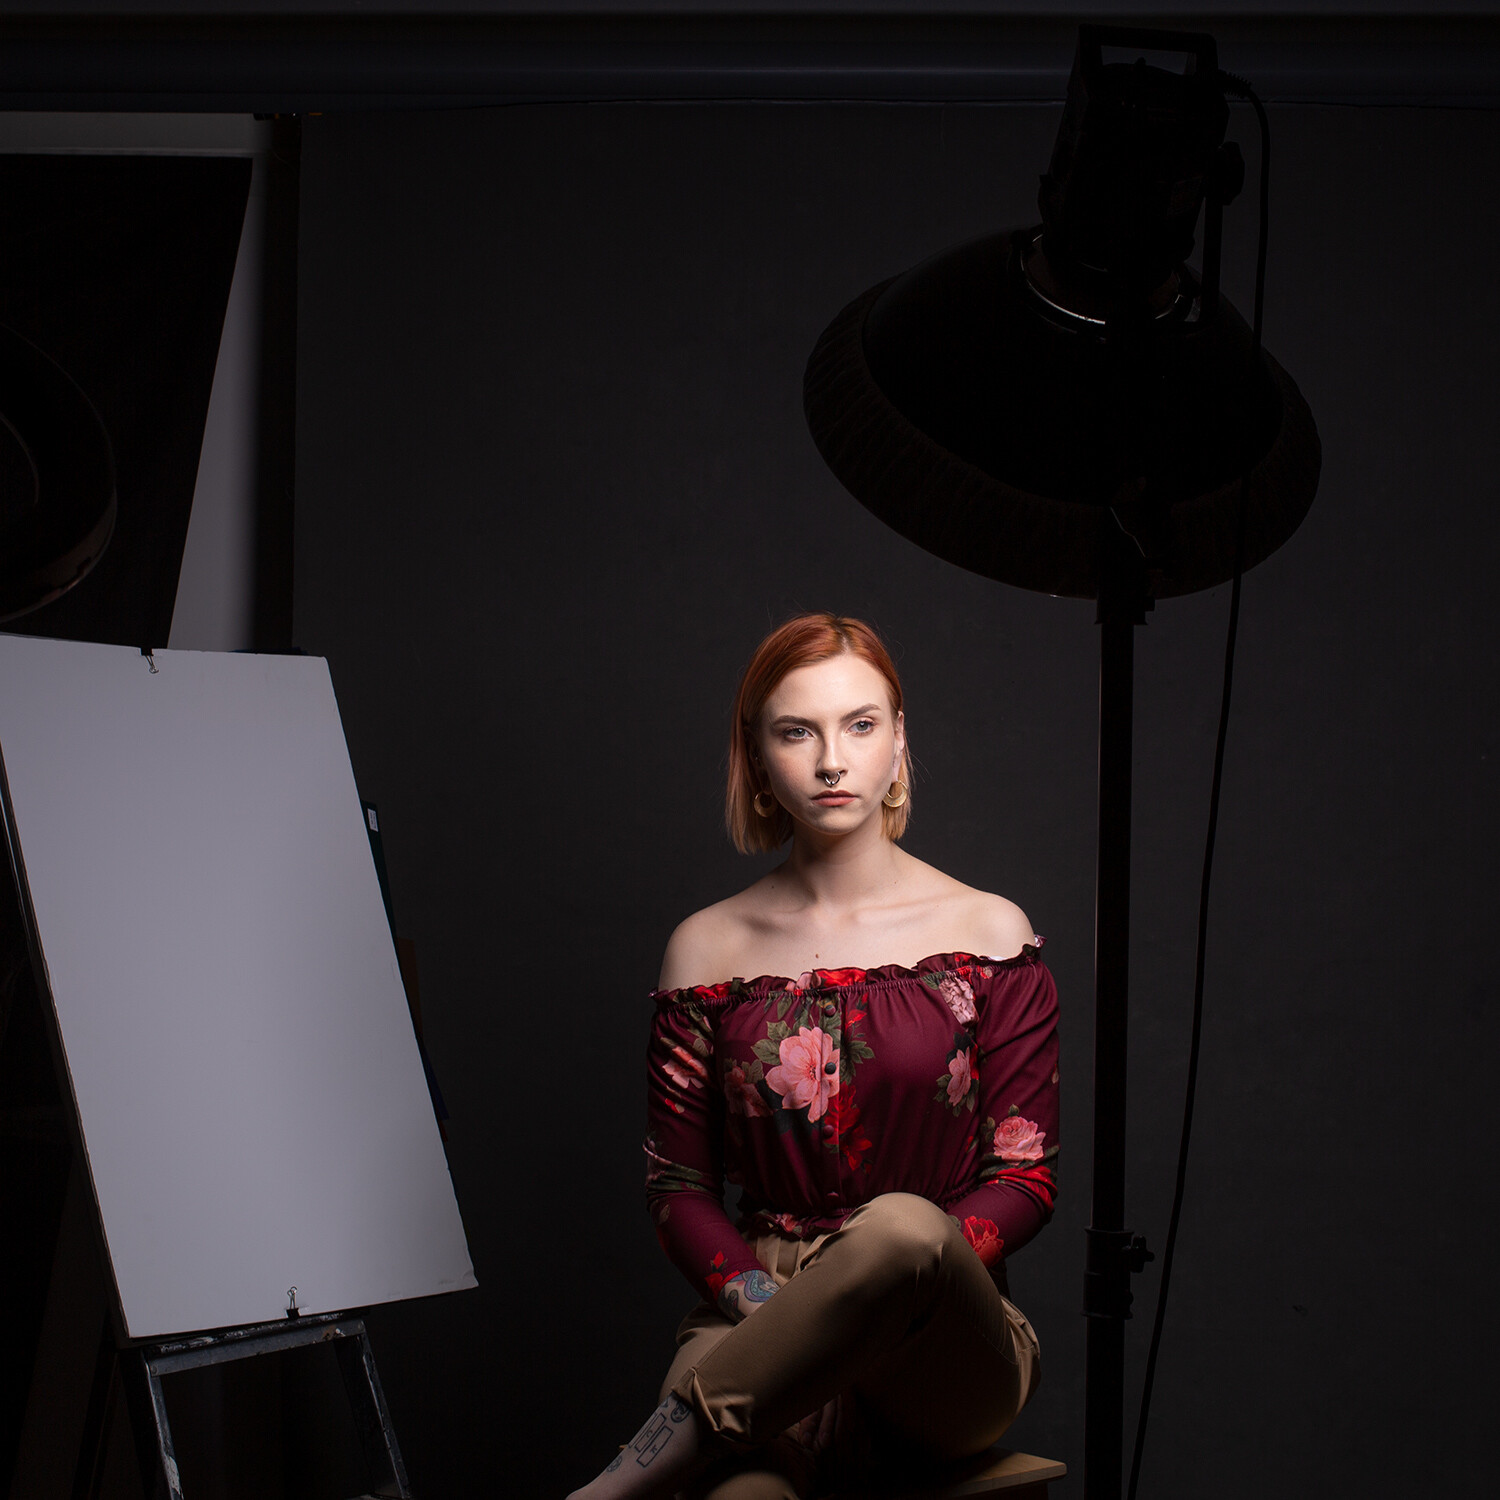
A 7′ parabolic umbrella with diffusion was added about 10-feet away to serve as fill. It was set to meter 2-stops under the key light.

Take a test shot and see if you have your desired effect. Adjust as required and there you go.

Image: In this before (left) and after (right) you can see how the shadows on the right side of the...

In this before (left) and after (right) you can see how the shadows on the right side of the image are lifted and filled in with the fill light.

Taking it further

Image: You can design fill lighting however you like. Feel free to use multiple sources of different...

You can design fill lighting however you like. Feel free to use multiple sources of different sizes and shapes if it works.

Of course, you are not limited to a single fill light. You can have multiple fill lights lighting your subjects from both sides. You can also mix lights and reflectors for different strengths of fill lighting from various angles. You can pretty much do whatever you want in terms of designing a light set-up. You are only limited by the equipment you have at hand and what you can dream up.

Image: Using multiple fill lights allows you to control every aspect of contrast in your images.

Using multiple fill lights allows you to control every aspect of contrast in your images.

An idea is only crazy if it might work and you don’t try it.

Tips for fill lighting

1) It’s often better to retain the shadows rather than fill them in completely. This is not a rule, but images that retain some amount of contrast are often more natural and pleasing to the eye.

2) Pay attention to the catchlights in portraits – Extra light sources mean extra catchlights. When you are setting up your lights (reflectors included), be sure to watch the catchlights in your subjects’ eyes. Catchlights can make or break a portrait, so make sure you are controlling them as much as you are the lighting itself.

3) Big light sources at a distance work very well as fill light.

Image: This is by no means a rule, but big light sources (like the 7′ umbrella to camera right...

This is by no means a rule, but big light sources (like the 7′ umbrella to camera right) from a distance work really well as fill lighting.

4) Don’t be a slave to the ratios – While using the ratios as a starting point can, and will, be a useful springboard, that doesn’t mean you should adhere to them rigidly. If something isn’t right, adjust as you see fit. Nobody cares in the end if your ratios are exactly 4:1, but they do care if your photos look right. Use your best judgment and change things up if you need to. Sometimes only the tiniest of power adjustments will completely change the end result.

5) Think outside the box – Any light source can be your key and your fill. You’re probably aware that you can use flash to fill-in shadows in natural light, but you can also use natural light as fill where your main lighting is provided by flash.

Image: Here, the key light is a large window to the camera right. The fill light is provided by a st...

Here, the key light is a large window to the camera right. The fill light is provided by a strobe. You can mix light sources however you want to achieve your fill lighting.

That’s it

Hopefully, that’s served as a primer to get you started and demystify fill lighting. Being able to control the contrast in your images with lighting is a fundamental skill that you will be able to use across multiple disciplines. It will allow you to bring a new level of depth to your images straight out of the camera.

Get out and practice, start simple and go slow, and you will master the basics in no time at all.

Try out some of these tips, and share your photos with us in the comments!


fill-light-in-portrait-photography

The post Getting to Grips with Fill Light in Portrait Photography appeared first on Digital Photography School. It was authored by John McIntire.


Digital Photography School

 
Comments Off on Getting to Grips with Fill Light in Portrait Photography

Posted in Photography


Leaked Pixel 4 photos show new and improved astrophotography, portrait and Night Sight modes

03 Oct

The Google Pixel 4 is just around the corner, expected to be announced at the Made by Google Event on October 15. We’ve already seen what the Pixel 4 will look like, thanks to both Google and third-party leakers, but today we’re getting more than a hardware leak. 9to5Google has obtained exclusive images that it claims Google will use to promote the new camera capabilities of its impending device.

9to5Google has kindly given us permission to share the full-resolution images directly from their source and only saved once with a watermark over them. The images, as you’ll see below, are a combination of images captured with the front-facing selfie camera and the rear-facing cameras (rumors point to there being a 12-megapixel main camera and a 16-megapixel telephoto camera). The images appear to include photos shot in multiple camera modes, including the improved Night Sight mode and a new star-shooting mode that’s been rumored for some time now.

First up are a few photos that appear to show off the portrait mode of the front-facing camera onboard the Pixel 4. Interestingly, these photos measure in at 4.5-megapixels, nearly half the resolution of the 8-megapixel onboard the Pixel 3, so we’re not sure whether these are simply resized or from a larger sensor that’s been supersampled, but whatever the case is, they look impressive. The faked bokeh looks both realistic and smooth, while the outline, even around hair, seems to be precise, with only a few notable exceptions (specifically the arm on the white jacket).

Next up are more portrait mode shots with what we presume to be the rear-facing camera on the Pixel 4. These shots measure in at 7-megapixels and were taken with the main camera (the Pixel 4 will feature multiple camera modules). Like the previous shots, the fake bokeh appears to be incredibly accurate, even on difficult subjects, such as a long-haired pet and flyaway hairs.

Moving along, we have three photos (two 9.2-megapixels and one 5.2-megapixels) that appear to be taken with Google’s Night Sight mode. Based on the EXIF data embedded in some of the images, the photos were taken with the main 27mm (35mm equivalent) F1.7 camera onboard the Pixel 4. The actual lighting scenario in the scene isn’t known, but the images appear both bright and vibrant with nice dynamic range, even in the images that have multiple light sources at different color temperatures.

Along the lines of Night Sight, it appears a pair of photos showing off the much-rumored night sky camera mode expected to be onboard the Pixel 4. Based on the EXIF data, these images (the header image of this article and the below image) were also captured with the main camera unit and the GPS data reveals the shots were captured at Pinnacles National Park in Central California along State Route 146. For being captured with a smartphone, the amount of detail captured in the night sky is absolutely incredible. It seems as though stars get lost around the silhouette of the trees in the frames, but the rest of the sky showcases countless stars in the Milky Way.

The remainder of the photos showcase a number of scenes, but it’s not clear what specific camera modes are being used to capture these images. As noted by 9to5Google, it’s been rumored there will be a ‘Motion Mode’ with the Pixel 4, but that’s not yet confirmed, even though a few action-style shots are seen in the following images.

$ (document).ready(function() { SampleGalleryV2({“containerId”:”embeddedSampleGallery_6823414838″,”galleryId”:”6823414838″,”isEmbeddedWidget”:true,”selectedImageIndex”:0,”isMobile”:false}) });

Plenty still remains to be seen, but with the Made by Google Event less than two weeks away, it won’t be long before we know just what the Pixel 4 is capable of. 9to5Google has also detailed a new ‘Dual Exposure’ mode that’s believed to be avaialble on the Pixel 4.

Articles: Digital Photography Review (dpreview.com)

 
Comments Off on Leaked Pixel 4 photos show new and improved astrophotography, portrait and Night Sight modes

Posted in Uncategorized


Skylum teases Luminar 4 AI Skin Enhancer and Portrait Enhancer filters

18 Sep

Skyulm software continues to tease new features of its Luminar 4 software that is scheduled to be released this fall. Like the AI Sky Replacement and AI Structure filters we have already heard of, AI Skin Enhancer and Portrait Enhancer make use of machine learning to automate tasks like selections, masks and layers stacking, reducing the time it takes to get your retouching projects completed.

Modifications can also be synced across a series of photos and the technology is capable of adapting to each individual frame and make the right adjustments in order to maintain a coherent style across all images.

Skin Enhancer uses AI technology to automatically detect faces and skin in a photo. Photographers can then easily remove skin imperfections and smooth the skin. At the same time, textured detail, such as hair or skin pores are preserved to maintain a natural look.

Portrait Enhancer offers a collection of tools to modify your subjects’ faces in order to enhance or highlight certain features:

  • Face-aware Lighting adjusts the lighting for the face only, emulating a flash or reflector that is aimed at the face
  • Eye Improvement sharpens and whitens the eyes
  • Dark Circle Removal does what it says on the tin and removes dark circles or shadows below the eye.
  • Red Eye corrects the red issue effect that is caused by flash use
  • Face Contouring can make a face appear slimmer
  • Eye Enlargement gently increases the size of your subject’s eyes
  • Eyebrows thickens and darkens eyebrows
  • Lips and Teeth Enhancement enhances color of the lips and can whiten teeth

Most tools are controlled by simple sliders and built-in presets can make the process even faster.

Luminar 4 will run as a standalone application or a plugin for Adobe applications like Photoshop, Lightroom Classic and Photoshop Elements, or Apple software like Photos for macOS and Aperture.

Articles: Digital Photography Review (dpreview.com)

 
Comments Off on Skylum teases Luminar 4 AI Skin Enhancer and Portrait Enhancer filters

Posted in Uncategorized


Which Way? When to Photograph in Portrait or Landscape Orientation

06 Sep

The post Which Way? When to Photograph in Portrait or Landscape Orientation appeared first on Digital Photography School. It was authored by Megan Kennedy.

The standard camera sensor is rectangular in shape – a configuration that allows for both portrait and landscape orientations.

But is landscape orientation crucial to the execution of a landscape photograph? Must portraiture always be photographed in portrait orientation?

Plus, what if you’re photographing a subject that’s neither a portrait nor a landscape? What orientation works best?

In this article, we’ll have a look at how to choose between a portrait or landscape orientation in photography.

portrait and landscape orientation examples

A bit of history

Landscape orientation

Portrait and landscape designations likely stem from the orientations of canvasses used in art.

The dimensions of a horizontal rectangle best accommodate the wide vistas depicted by landscape artists. This earned the format its landscape title.

However, the landscape orientation is not restricted to landscape photos. Yes, landscape masterpieces by Vincent Van Gogh, Hokusai, and Monet have been in a landscape format. But artists like Sandro Botticelli and Wassily Kandinsky have created non-landscape art using landscape orientation. Frans Lanting, Andreas Gursky, and Gregory Crewdson all depict photographic subjects with the landscape orientation.

It’s the same for portrait photography. Photographers such as Robert Frank and Annie Lebovitz have approached portraiture in a landscape format.

horizontal orientation leaf

The landscape orientation of this image of a leaf conveys a more relaxed viewing approach

Portrait orientation

A canvas taller than it is wide has become known as portrait orientation.

Leonardo da Vinci’s Mona Lisa or Johannes Vermeer’s Girl with a Pearl Earring are famous examples of portraits depicted in the traditional format. And Dorothea Lange’s Migrant Mother and Steve McCurry’s Afghan Girl are well-known examples of portrait photography executed in a portrait format.

But portrait orientation isn’t limited to depicting people. Painters like Rachel Ruysch and Claude Monet worked in a portrait format to accommodate non-human subject matter.

And Edward Henry Weston used a portrait format to lend a formal quality to his investigations of organic materials, while the Bechers made hundreds of portrait-oriented images of urban landmarks.

vertical leaf abstract

The portrait orientation of this leaf abstract lends a more formal quality to the image.

Should you use portrait or landscape orientation?

Fitting the subject

One of the deciding factors in choosing between a portrait or landscape orientation is the dimensions of the subject itself.

In terms of framing the face and body of a human, a portrait format can be ideal. The vertical nature of the human body works well with a portrait orientation.

Vertical subjects like tall buildings, trees, and waterfalls may also require a portrait orientation to be captured in their entirety.

vertical orientation flower

Subjects made up of horizontal elements (like aircraft and landscapes) can fit better in landscape orientation.

Landscape orientation can also provide more room for incorporating additional elements into a photograph.

This is particularly useful in genres of photography like environmental portraiture, where the setting of the photograph is as important as the subject.

horizontal or vertical horizontal airplane

Because of the dimensions of aircraft, aviation photography is often carried out in a landscape orientation

Emphasis

The orientation of an image contributes significantly to visual emphasis.

A portrait orientation exaggerates the upright extension of subjects in a photograph. But a portrait orientation also speaks to our associations with tall subjects, emphasizing a sense of independence, wonder, modernity, and even superiority or unease.

In contrast, a landscape orientation places extra emphasis on space, illustrating ease and immersion.

In the simple example below you can see the different emphasis being placed on the floral silhouettes.

The portrait example emphasizes the energetic, upright quality of the flower. The landscape orientation creates a more relaxed perspective.

flower silhouette example

Cropping

Every photographic situation is different and sometimes an element in a potential image is less than ideal.

If there are elements present within a photo that you would rather omit, switching camera orientations might help achieve a more polished image, either in-camera or in post-processing.

Cropping out excess information with a portrait orientation will simplify an image and minimize distractions.

Switching from a portrait to landscape orientation will decrease image height, prioritizing the horizontal flow in a photograph instead.

abstract horizontal of water

Formality vs relaxation

Over time, our historic use of image orientation has associated specific visual qualities with both portrait and landscape formats.

Portrait orientation is associated with the formality of historic portraiture. It is also associated with being upright, which is attached to wakefulness, sociability, and energy.

A landscape format, on the other hand, can lend a more relaxed, organic impression to a photograph. So a horizontal orientation is associated with laying down, lending a more tranquil quality to an image.

woven mat

Conclusion

Choosing between a portrait or landscape orientation isn’t easy. There are many aspects to consider, and the orientation of an image depends heavily on the situation.

But if you understand the benefits and drawbacks of different orientations, you’ll be in a good position to decide which orientation to use!

Do you lean towards portrait or landscape orientation? Share with us in the comments!


portrait-or-landscape-orientation

The post Which Way? When to Photograph in Portrait or Landscape Orientation appeared first on Digital Photography School. It was authored by Megan Kennedy.


Digital Photography School

 
Comments Off on Which Way? When to Photograph in Portrait or Landscape Orientation

Posted in Photography


NASA shares new portrait of Jupiter captured by Hubble Space Telescope

31 Aug

The aging Hubble Space Telescope has produced a new full portrait image of Jupiter, our Solar System’s stormy gas giant. NASA shared the image earlier this month, though it was captured by the space telescope on June 27. The portrait features Jupiter’s colorful bands, as well as its iconic Giant Red Spot, a massive storm that has been raging on the planet for hundreds of years.

According to NASA, the new image features ‘a more intense color palette’ related to the clouds visible in Jupiter’s atmosphere, exceeding that of past portraits. The space agency explains that this new image was captured in visible light using Hubble’s Wide Field Camera 3.

NASA describes the importance of the image in a post, pointing out various bands and colors that hint at changes in the gas giant’s atmosphere. The two cloud bands visible below and above the Great Red Spot, for example, are moving in opposite directions, NASA explains, each separated by winds moving up to 644km/h (400mph).

The portrait comes amid ongoing work with the James Webb Space Telescope, which will eventually replace Hubble, offering newer technology and improved camera capabilities, among other things. The new space telescope is scheduled to launch in 2021.

Articles: Digital Photography Review (dpreview.com)

 
Comments Off on NASA shares new portrait of Jupiter captured by Hubble Space Telescope

Posted in Uncategorized


How to Shoot a Self Portrait to Support your Brand Identity

30 Aug

The post How to Shoot a Self Portrait to Support your Brand Identity appeared first on Digital Photography School. It was authored by Charlie Moss.

Personal branding has become more and more important over the last few years. As photographers, we often carefully curate the image that we present to the world, even as amateurs. Our brand and image are usually closely linked to the kind of photographs we shoot.

Photographers will often carefully curate the look of their website. They’ll spend hours contemplating the images and text that they use to express their photographic hopes and dreams. They want their websites and online portfolios to give people an insight into their creative working process and the kind of photos that they intend to take.

How-to-Shoot-a-Self-Portrait-to-Support-your-Brand-Identity

I often start with natural light when shooting self-portraits. It’s how I prefer to shoot most of the time!

And yet, I often look at the ‘about me’ page on a photographers website, portfolio page, or social media, and front and center is a photograph of them taken by someone else. The image on your “about me” page, or your portfolio profile picture, is a great piece of marketing real estate. You can use this space to express yourself and tell a story. So why let someone else take that photo?

So what’s the solution? Shoot a self portrait! Put your own work in that valuable space, and express yourself and your photographic style clearly and coherently – even on your “about me” page.

What is a brand identity?

Now more than ever, photographers are the face of their brand. Almost everywhere you go on the internet, you’ll have the option to upload an ‘avatar’ image that represents you in digital format. This avatar image is a space to tell the world something about you and your photography.

A brand identity is the way you present your work to the world. It’s the visual and textual elements that differentiate you from other people in the minds of your audience. Since photographers are usually the main (and often only) person in the creative process when it comes to image-making, they are often the embodiment of their brand.

Image: A single large beauty dish for this portrait reflects one of my usual lighting styles.

A single large beauty dish for this portrait reflects one of my usual lighting styles.

Generally, for a photographer, their brand identity will be heavily tied up with their style in which they usually work. A photographer who creates beautiful fine art portraits inspired by the Old Masters may have a brand identity that embodies timelessness, heritage, and classical values. On the other hand, someone creating cutting edge contemporary portraits may embody qualities such as innovation, diversity, and courage.

The key is to get your values into the images you’re shooting. You’ll probably find it happens naturally once you’ve been shooting a while and have developed a style. However, creating a self-portrait for your “about me” page and avatars is a good time to brainstorm what your work is about. The challenge is to see if you can capture these ideas in a single shot.

Got a fear of shooting self-portraits?

Self-portraits are hard. They’re hard technically, creatively, and emotionally. It’s no surprise really that photographers often shy away from self-portraiture. Portraits can be hard enough to get right when you’re shooting other people, let alone when you’re photographing yourself!

How-to-Shoot-a-Self-Portrait-to-Support-your-Brand-Identity

Experimental tricks like this shallow depth of field combined with fairy lights can add an artistic side to a self-portrait while covering up any perceived flaws in the way we look.

That aside, a self-portrait or two is also a great way to improve your skills, try new things, and make sure that the entirety of your personal branding works together coherently. You are likely to be your most patient subject, and if you set aside a day to create your self-portrait then you have time to get it exactly right – even if you’re trying something new.

Go light on the retouching. When you’re working on a self-portrait in post-processing, it’s easy to be super-critical of everything you don’t like about yourself. Stick to your usual workflow and only retouch as much as you normally would.

Start simple

If all else fails, start like you would any other portrait. If you’d usually start with a simple two-light headshot in your studio, then give that a go first. Review your images and then make adjustments. Once you’ve found a shot that works then try something a bit different. You might find a completely new direction for your work!

Image: This self-portrait was shot with natural light against a grey paper background. Often simple...

This self-portrait was shot with natural light against a grey paper background. Often simple pictures can be really effective!

It’s easy to think about self-portraits in the context of a studio, but don’t limit yourself! Take your camera outside into natural light if that’s a place you enjoy taking portraits usually. You can even buy stands to hold reflectors so that you can take advantage of all the usual light modifiers that you’d use.

But if you’re going out on location to shoot self-portraits, consider taking someone with you. It’s easy to get distracted while shooting self-portraits out and about. Having an extra pair of eyes can help protect you and your equipment. You can also get your assistant to hold the reflector or a flashgun too!

And if you want to really show off what you do, consider an environmental portrait in your own studio and surrounded by your tools of the photographic trade.

Think about the context

Where is your self-portrait going to be placed? Will it be on your own website or will it be on social media?

In traditional media, you usually want to have the subject facing the viewer or looking towards the center of the book or magazine. There’s a reason for this. It helps direct the readers focus back to the content rather than off the edge of the page into the wider world. It’s a simple trick to help keep the readers’ attention where you want it.

Image: The “about me” page on my portfolio website showing my self-portrait in relation...

The “about me” page on my portfolio website showing my self-portrait in relation to the text block.

You can apply this to your website too. Think about the placement of your self-portrait on the page of your website. Does it fit better on the left or the right of the “about me” text? When you’re working out your poses, keep this in mind and make sure you’re either looking straight ahead or towards the text block.

It’s possible to break the rules, of course, but make sure you shoot both options if you’re going to be adventurous!

What about the practicalities of self-portraits?

If your camera connects to a phone app that can assist with exposure and focusing, then make sure you take full advantage of that. Self-portraits used to be a lengthy process that involved sitting my mannequin on a chair in my studio to get the focus and lighting right.

Now I can see everything in real-time, including exposure and focus adjustments, using the Fujifilm Cam Remote app that connects to my camera.

Image: Using the Fujifilm Cam Remote app to set up the lighting and exposure, and the resulting self...

Using the Fujifilm Cam Remote app to set up the lighting and exposure, and the resulting self-portrait a few minutes later. (Lighting was a single large beauty dish).

If you don’t have a camera that connects to your phone, get yourself a remote trigger and consider shooting tethered to a laptop so that you can see the images as you trigger the camera. You can look at software such as Lightroom or Capture One Pro for tethering. That way you can make small adjustments to your pose and settings as you go along to make sure that you really nail everything and create your best work.

Using a good tripod will also save you some frustration when you’re shooting portraits. Balancing the camera on a stack of books can work (believe me, I’ve done it before), but a tripod will help you compose a shot more effectively. Don’t forget to try unusual compositions too. Raising the camera up above your eye level can be very flattering while shooting from down low can create a powerful pose.

How-to-Shoot-a-Self-Portrait-to-Support-your-Brand-Identity

A profile self-portrait recalls the kinds of images that you often see historically on coins and medals. Don’t be afraid to experiment with unconventional poses when photographing yourself.

Keep your standards high

And lastly, be as thorough and rigorous with your standards as you would when shooting a portrait of anyone else.

Make the effort to do your hair, press your clothes, and get a great expression. Just because it’s a self-portrait it doesn’t mean it’s an excuse to be lazy and “fix it in post.”

I’d love to see how you get on with shooting your self-portrait to support your brand and expressing your values through them. Drop a comment below with the results, and don’t forget to update your avatar with your new portrait!


How-to-Shoot-a-Self-Portrait-to-Support-your-Brand-Identity

The post How to Shoot a Self Portrait to Support your Brand Identity appeared first on Digital Photography School. It was authored by Charlie Moss.


Digital Photography School

 
Comments Off on How to Shoot a Self Portrait to Support your Brand Identity

Posted in Photography


What Size Beauty Dish is Right For Your Portrait Photography?

03 Jul

The post What Size Beauty Dish is Right For Your Portrait Photography? appeared first on Digital Photography School. It was authored by John McIntire.

What Size Beauty Dish is Right For Your Portrait Photography?

Beauty dishes are common and well-loved lighting modifiers. They are particularly useful for portraits (beauty is in the name after all). They also tend to be a lot cheaper than decent sized softboxes. Years ago, your choice of beauty dish was quite limited. Nowadays, if you try searching for beauty dishes, you will be presented with a multitude of options that greatly vary in size and even how they set up.

2- What Size Beauty Dish is Right For Your Portrait Photography?

Although the numbers don’t seem to be that different, the actual sizes of these beauty dishes vary greatly, and they all have a distinct effect on the light in your images.

What do you do when faced with this kind of choice and how do you know what size beauty dish you should buy? This article discusses three common sizes of beauty dishes and shows you what effect they have on your images. All of the beauty dishes discussed here are silver, and none of them are collapsible. As long as they are of decent quality, the fact that a beauty dish is collapsible should have no impact on your images.

What is a beauty dish?

Three different size beauty dishes. Left: 16″ Middle: 20″ Right: 27″

Beauty dishes are bowl-shaped modifiers that are known for the contrasty light they provide. The quality of light is usually somewhere between hard and soft (when brought in close to your subject). This sets them apart from other modifiers, like umbrellas and softboxes, where the goal is to achieve the softest light possible. This allows you to achieve well-defined edges and shadows, but still retain a flattering light on your subject.

This image shows an unmodified beauty dish on the left. A gridded beauty dish in the middle, and a beauty dish fitted with a diffusion sock on the right.

Often, you will find that beauty dishes come with grids and diffusion socks to help modify them further. Grids alter and increase the directionality of the light, while diffusion socks diffuse the light further, softening it a bit and altering the shape.

What sizes are there?

Any search for a beauty dish should reveal a huge amount of results these days. You can find tiny beauty dishes that are only a few inches across that are designed for flashguns and you can find massive beauty dishes that would be ideal for lighting groups of people. This article compares three sizes that fall more into the normal sized category. These are a 27″, 20″ and 16″.

All three beauty dishes were positioned the same distance from the subject to clearly demonstrate the differences in the effect they provide.

1. 27″

At 27-inch in diameter, this beauty dish is at the upper reaches of what you can expect to find in terms of size. When it’s in close, the light it provides is really soft and is comparable to a medium-sized softbox, but with a bit more contrast to it. It also provides large catchlights in your subject’s eyes.

Because of its size, it’s easy to bring the light further away from your subject to achieve a similar effect to that of smaller beauty dishes, while giving you more room to work. This beauty dish would also be great for lighting multiple people, whereas smaller dishes might struggle.

The 27″ beauty dish provides really soft light when placed in close. Pay attention to the shadow and highlight transitions as well as to how the light wraps around the subject.

There are a couple of disadvantages to a beauty dish this big. The bigger the light source is in relation to your subject, the less bright your subject’s eyes are going to be. If you want bright, clear eyes, a smaller beauty dish may be the way to go. It is also harder to control the light fall off (without a grid) as the bigger source will cast more light behind your subject.

2. 20″

The second beauty dish we’re going to discuss comes in at 20 inches. This is pretty close to what may be considered a standard size for a beauty dish (if there is such a thing). Placed a few feet (1-4) away from your subject, the qualities of light it produces are great for all sorts of portraiture and for a wide variety of subjects.

It is great for male and female subjects, though for flattering portraits of older people you may want to consider not using a beauty dish. Instead, opt for large softboxes and umbrellas. As the beauty dish isn’t a great deal bigger than your average subject’s head (from an appropriate distance), you also have good control over the light fall off, and you have even more control when you introduce a grid.

The 20″ beauty dish also provides good, soft light but the edges of the transitions from shadow to highlight are more defined. You’ll also note the light wraps around the subject less and results in darker shadows toward the back of the subject’s head.

3. 16″

This last beauty dish is 16-inches in diameter. This is the size that I have used the most ever since I bought it well over a decade ago. You can see in the images just how battered and well-used it is.

Because it is quite small, it is easy to control and great to bring in really close to your subject. This beauty dish clearly lights and defines your subject’s eyes. The harder light source also provides clearly defined edges between shadows and highlights but in a flattering manner.

If you want to reduce light fall off as much as possible, this size is definitely the way to go. However, if you want to increase it, you are better off with a larger modifier. This is because moving this beauty dish any distance from your subject will result in really hard light that you might find unflattering to most subjects.

The 16″ beauty dish also provides excellent light. Here you can see the transitions from shadow to highlight are clearly defined. Also, the rapid light fall off means the areas towards the back of the subject’s head are more in shadow.

In terms of portability, this size beauty dish is great. It doesn’t weigh very much at all and just carrying it in your hand takes minimum effort.

When used as something other than a key light, this size beauty dish is really effective. Its small size makes it unobtrusive and easy to position anywhere you need, whether that’s for use as a hair light or fill.

What size should you get?

Left: 16″ Middle: 20″ Right: 27″

Some of the differences between these three modifiers can be subtle and hard to spot if you’re new to lighting. If you’re still wondering which you should opt for, my best advice (which is by no means gospel) would be to evaluate what you need it for.

Do you need portability? Get a small one or consider a collapsible one.

Will you be shooting groups of people often? Go for the largest one you can.

Are you shooting in a small space? Go for the small one again.

Are you shooting in a large space where you can’t get the lights very close to your subject? Again, go for the biggest one possible.

Whichever you choose, make sure that it comes with both a grid and a diffusion sock for the most control possible.

No matter which way you choose to go, you are going to find yourself with a versatile and useful modifier that will last you for years.

Have you used these modifiers? Share your thoughts with us in the comments below.


what size beauty dish

The post What Size Beauty Dish is Right For Your Portrait Photography? appeared first on Digital Photography School. It was authored by John McIntire.


Digital Photography School

 
Comments Off on What Size Beauty Dish is Right For Your Portrait Photography?

Posted in Photography


Adobe Research and UC Berkeley create AI that can find and undo portrait manipulations

15 Jun

Researchers with Adobe Research and UC Berkeley are working together on the development of a method for identifying photo edits made using Photoshop’s Face Aware Liquify tool. The work is sponsored by DARPA’s MediFor program, which funds researchers who are working to ‘level the digital imagery playing field’ by developing tech that assesses the ‘integrity’ of an image.

Both DARPA and Adobe highlight the issue of readily available image manipulation technologies, including some tools that are offered by select Adobe software. The company says that despite being ‘proud of the impact’ these tools have had, it also recognizes ‘the ethical implications of our technology.’

Adobe said in a blog post on Friday:

Trust in what we see is increasingly important in a world where image editing has become ubiquitous – fake content is a serious and increasingly pressing issue. Adobe is firmly committed to finding the most useful and responsible ways to bring new technologies to life – continually exploring using new technologies, such as artificial intelligence (AI), to increase trust and authority in digital media.

As such, Adobe Research and UC Berkeley researchers have published a new study detailing a method for detecting image warping edits that have been applied to images of human faces. The technology involves a Convolutional Neural Network (CNN) trained on manipulated images that were created using scripts with Photoshop and its Face Aware Liquify tool.

To ensure the method can detect the types of manipulations performed by humans, the image dataset used to train the AI also included some images that were altered by a human artist. ‘This element of human creativity broadened the range of alterations and techniques used for the test set beyond those synthetically generated images,’ the study explains.

To test the deep learning method’s assessment skills, the researchers used image pairs featuring the original unedited image and the image that had been altered. Humans presented with these images could only detect which had been altered with 53% accuracy, whereas the neural network was able to pick the manipulated image with accuracy as high as 99%.

In addition, and unlike the average Photoshop user, the technology is able to pinpoint the specific areas of a face that had been warped, which methods of warping had been used, and calculate the best way to revert the image back to as close to its original state as possible.

Adobe researcher Richard Zhang explained, ‘The idea of a magic universal ‘undo’ button to revert image edits is still far from reality. But we live in a world where it’s becoming harder to trust the digital information we consume, and I look forward to further exploring this area of research.’

The research is described as still in its ‘early stages,’ and is only one part of Adobe’s body of work on image integrity and authenticity. The results come amid the growing sophistication of artificial intelligence technologies capable of generating highly realistic portraits and performing complex edits to images.

Articles: Digital Photography Review (dpreview.com)

 
Comments Off on Adobe Research and UC Berkeley create AI that can find and undo portrait manipulations

Posted in Uncategorized