RSS
 

Posts Tagged ‘Portrait’

PortraitPro 21 Review: A Comprehensive Editor for Portrait Photographers

14 Jan

The post PortraitPro 21 Review: A Comprehensive Editor for Portrait Photographers appeared first on Digital Photography School. It was authored by Carl Spring.

PortraitPro 21 review a comprehensive editor for portrait photographers

It was only a few months ago that I reviewed Anthropics PortraitPro 19, where the ease of use, the speed, and the AI technology really impressed me. Here we are only a few months later, and Anthropics has introduced PortraitPro 21. I was lucky enough to get my hands on a copy to see what has improved, what is new, and whether the updated software is worth the investment.

Also, spoiler alert: We have a special offer at the end of this PortraitPro 21 review, so make sure you take a look!

PortraitPro 21 review

What’s new in PortraitPro 21

As always with Anthropics, there’s a long list of new features that really make PortraitPro 21 stand out. These include:

  • Sky replacement
  • Lighting brushes
  • Clone tool
  • Denoising/Sharpening
  • History tool
  • Color styles
  • Color copying
  • Hair highlights

There are actually even more new features, including a master slider for skin lighting and coloring, layer presets, optimized color-space handling, the ability to move catchlights, SVG backgrounds, new layers, backgrounds and overlays, free stock photos, and new tutorials from the creators.

If I offered an in-depth discussion of every new feature, you would probably be reading this for days. Instead, why not go and download your free trial of the software on the website? That way, you can check out the program for yourself. 

In the meantime, let’s look at some of the new PortraitPro 21 features in greater detail.
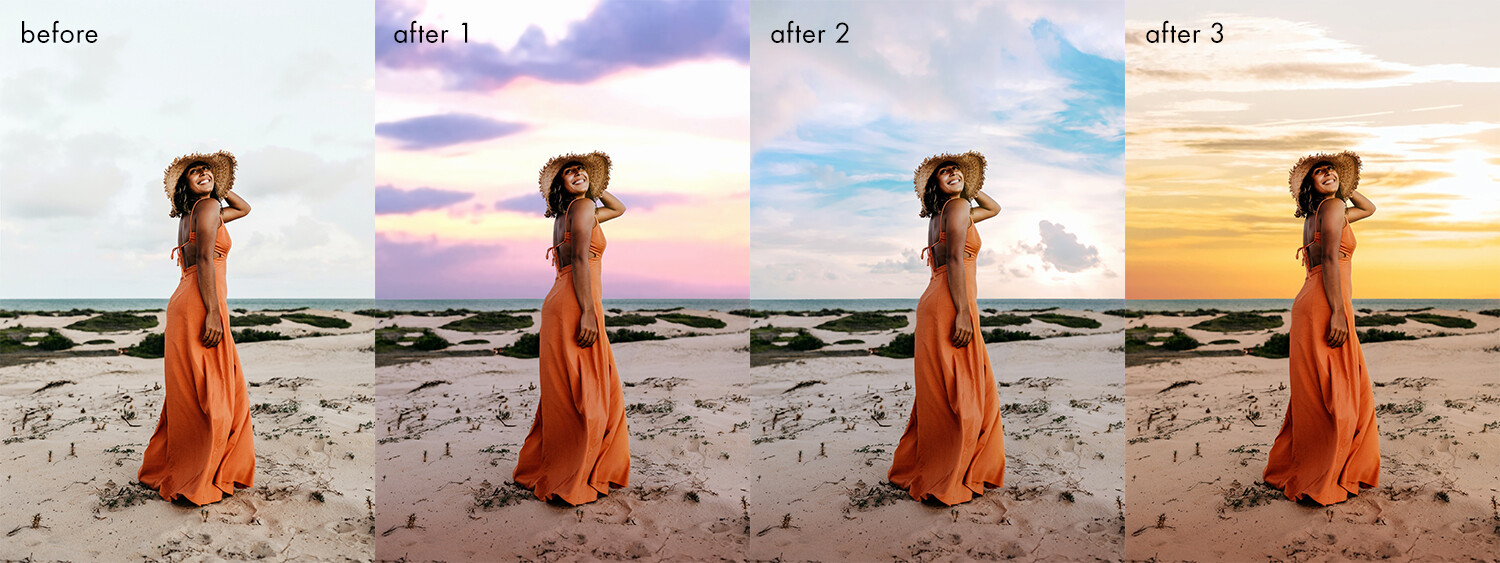
PortraitPro 21 review before and after

Sky replacement

This feature is one that portrait photographers will love. There is nothing worse than capturing amazing shots against a blank sky, knowing you will need to edit them later. Swapping the sky on multiple images can be laborious and time-consuming. But in PortraitPro 21, replacing skies can be done with the click of a button.

Using technology from Anthropics LandscapePro software, this feature does not simply mask and drop in the new background. It also changes the color and tone of the image to match the new sky, giving a more natural result.

PortraitPro has quite a few skies for you to choose from, but if you are looking for something specific, you can always add in your own. 

Sky replacement examples

Lighting brushes

PortraitPro 21 includes a series of lighting brushes. These can be used to create specific effects such as light streams or realistic relighting elements. 

You are able to select exact colors and alter the strength of the brushes, which allows you to quickly get the perfect effect. These brushes are able to separate the background and foreground for you, so you can really get creative. 

Lighting brush effects PortraitPro 21

Clone tool

The addition of the Clone tool means you can remove troublesome areas from your photos. And the presence of the Clone tool means there is no reason to use other software to perfect your edits.

As with all tools in PortraitPro 21, the Clone tool is easy to use and allows completely adjustable precision so you can get the exact result you want.

Ultimately, it’s a great addition to the feature set of PortraitPro. And while it is a tool that most will recognize and is not as groundbreaking as others, it’s one that will be hugely appreciated by all users.

Using the clone tool in PortraitPro21

Denoise/Sharpening

Denoise and sharpening tools are another new addition to this version of PortraitPro.

Yes, these tools are available in other editing programs. But as you are probably beginning to see, the addition of these features to PortraitPro 21 means that you have no real need to switch between programs to get your final result – making PortraitPro 21 a more all-in-one editing solution for portrait photographers.

PortraitPro 21 review

History tool

The History tool continues the trend of the Clone tool. It’s a feature that users of other editing software will be well aware of, and it’s highly valuable.

Specifically, it allows you to move back to a specific point in your edit so you can rework an image without needing to start over. 

The history brush in PortraitPro 21

Color styles

Filters will be familiar to everyone who reads this, because we frequently have these in our social media apps.

PortraitPro now includes a series of color styles that can dramatically change your image in just a few clicks.

Color styles examples in PortraitPro 21

Hair highlights

PortraitPro 21 features a variety of new tools for working with hair.

These include tools that add highlights, as well as change hair color and vibrance. And you can fine-tune these to achieve “salon-level” results.

Hair highlights in PortraitPro 21

PortraitPro 21 review: Performance

As always, I spent some time getting to grips with PortraitPro 21. Having used previous versions, I was familiar with the interface. But as with PortraitPro 19, I was amazed by Anthropics’s excellent tutorials. 

In fact, there are many more tutorials in PortraitPro 21, which give new users confidence right away. Even as a previous user of PortraitPro, it was good to go through a series of tutorials on the new features. These allowed me to immediately understand what is possible in PortraitPro 21. 

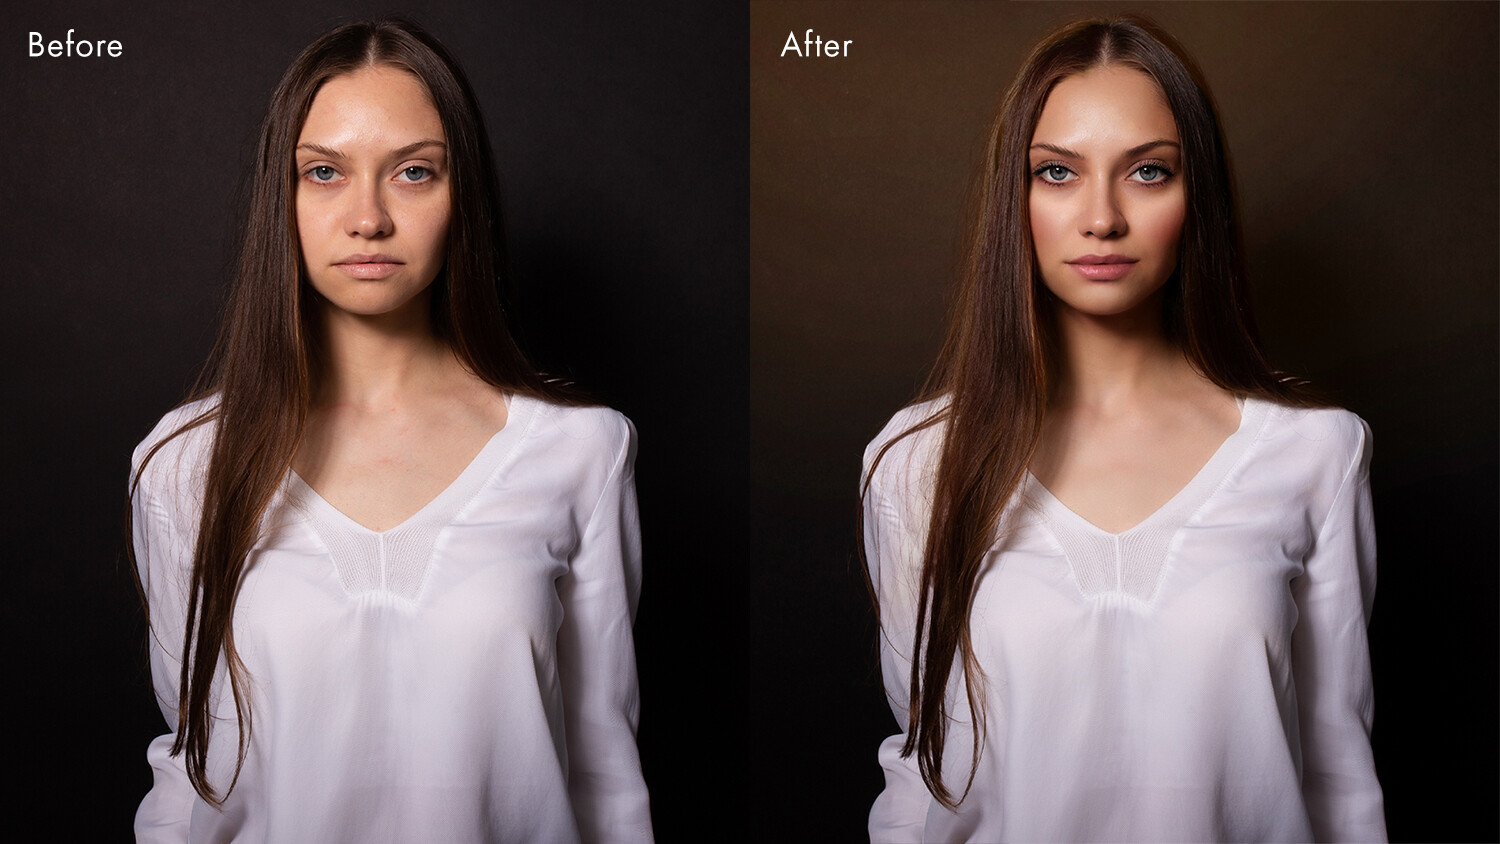
I started with the hair tutorial, which gave convincing results quickly and easily. From there, I fine-tuned to my liking. 

Hair features
I loved how the tutorials helped me get started, but then I fine-tuned to my own taste.

After that, I experimented with the new sky replacement feature. Due to my lack of outdoor photography over the last 12 months, I used the tutorial image as a starting point for this feature, and the results were impressive.

Changing the sky on the test image highlighted the importance of choosing your replacement sky wisely. Certain skies won’t work on certain images.

However, Anthropics has included so many different skies for you to choose from that, for every situation, there will be a replacement sky that matches your scene. Again, the ability to fine-tune really allows you to dial in the detail and increase the realism. 

Sky replacement in PortraitPro 21
There are so many different sky options built into the software.

Using TIFF files

After working on the many image tutorials, I wanted to use some of my own images. I always feel this is the real test.

And I was hugely impressed.

My images worked exactly the same as those in the tutorials. Everything was fast, and the software’s AI technology picked features out flawlessly. The highest compliment I can pay the software is to say that I didn’t notice any slowdown between the images I used myself and those in the tutorials. 

Face selection AI demo in PortraitPro 21
Even with a shallow depth of field, PortraitPro 21 picked out the face almost perfectly.

To push the software, I used 16-bit TIFF files in the Adobe RGB color space. The images opened fast, and PortraitPro 21 picked out the features flawlessly. Applying presets took a little longer than the test images, but considering I was working on 16-bit TIFF files, I was really impressed. 

I loved the fact that little tips popped up in the bottom corner of the screen, reminding me of how to tweak things. I used an image with an incredibly shallow depth of field to test the feature-finding abilities, and again, I was very impressed.

For the first image I tested, I used the Clone tool to remove a couple of small blemishes. Even though I was editing TIFF files, the software worked perfectly.

With the blemishes cloned out, I simply added a preset and tweaked it to taste. I had a finished image in less than 5 minutes. This was much quicker than when I edited the image manually. One quick and simple export later, I had a beautiful image ready to go.

Before and after retouch
This full retouch only took 5 minutes.

The only thing I will say is that some of the presets are a little more extreme than my personal style. However, the great thing about PortraitPro is that you can create your own presets simply and easily.

In fact, I tend to do this on a shoot-by-shoot basis, starting with a preset and tweaking it to suit the shoot I am working on. I can then apply these presets quickly and easily to the whole set of images from the shoot before sending proofs to a client.

Working with presets is taken to a whole new level with the Studio Max version of PortraitPro 21, where you can batch process several images in seconds.

Batch processing

Setting up a batch of images in PortraitPro
Import images, select your style, and click Go. Batch processing is an incredibly powerful feature in PortraitPro 21.

For a working photographer, the batch processing in Studio Max is a huge timesaver when you need a consistent retouch across a range of images. PortraitPro’s face recognition means that you can trust the software to pick up the face and apply the retouch for you automatically.

To test this feature, I exported full-sized JPEGs from a styled shoot. After creating a look with a single image, I used the batch feature of Studio Max to apply this style to a group of ten images. In less than one minute, all the images had saved and were ready to go. I simply clicked two buttons.

This feature alone changes how I deliver portrait and headshot proofs to clients. For so many working photographers, batch processing is going to be a game-changer. Imagine being able to deliver headshot proofs to clients with such little effort.

batch of images from a wedding photoshoot
A variety of poses didn’t fool the software. Everything was ready to deliver in under a minute.

Who is it for?

In my last review of PortraitPro, I said, “PortraitPro is an amazing tool for those who are new to retouching portraits. It is simple yet incredibly powerful, and gives you pleasing results within seconds. However, it offers much more and encourages you to go back to the software and personalize your retouching.“

So much has changed since then. In fact, PortraitPro 21 has more features that make it even easier for me to recommend. It is possibly the most feature-rich portrait editing software out there. 

If you’ve loved previous versions of PortraitPro, then you will love this even more – especially with the special offer for dPS readers (see below!).

Note that there are three PortraitPro 21 versions: Standard, Studio, and Studio Max.

PortraitPro 21 Standard is great for many people. It is a standalone software that allows you to work with JPEG or 24-bit TIFF files. For many photographers, this will be perfect. 

By upgrading to PortraitPro Studio, you get the Photoshop/Lightroom plugin that so many of you will love, as well as the ability to work with RAW, DNG, and 48-bit TIFF files. It also has color-space conversion. 

Finally, for those who shoot professionally or need the ability to retouch a batch of images in a few clicks, the Studio Max version of PortraitPro 21 will save you so much time (and professionals all know time is money!) that I cannot help but recommend it. 

Sounds amazing! How do I get it?

You can download your free trial of PortraitPro 21 right here.

But if you’re thinking about purchasing the software, note that there is a 50% off launch offer, plus dPS readers get an extra 15% off with the coupon ZC1990. So click here to grab your discounted copy of PortraitPro 21!

Anthropics is a paid partner of Digital Photography School.


The post PortraitPro 21 Review: A Comprehensive Editor for Portrait Photographers appeared first on Digital Photography School. It was authored by Carl Spring.


Digital Photography School

 
Comments Off on PortraitPro 21 Review: A Comprehensive Editor for Portrait Photographers

Posted in Photography


dPS Top Portrait Photography Tips of 2020

26 Dec

The post dPS Top Portrait Photography Tips of 2020 appeared first on Digital Photography School. It was authored by Jaymes Dempsey.

top portrait photography tips of 2020

Over the next few days, we’ll be featuring the most popular dPS articles published in 2020 – starting with portraits.

So if you’re looking to improve your portrait photography, I absolutely recommend you check out these articles from the fantastic dPS writing team!

1. Posing Guide: 21 Sample Poses to Get You Started With Photographing Women

Posing Guide: 21 Sample Poses to Get You Started with Photographing Women – Part I

2. 6 Portrait Lighting Patterns Every Photographer Should Know

6 Portrait Lighting Patterns Every Photographer Should Know

3. Posing Guide: 21 Sample Poses to Get You Started with Photographing Men

Posing Guide: 21 Sample Poses to Get You Started with Photographing Men

4. 13 Tips for Improving Outdoor Portraits

13 Tips for Improving Outdoor Portraits

5. The Best Camera Settings for Portrait Photography

The Best Camera Settings for Portrait Photography

6. Dragging the Shutter for Creative Portraits

Dragging the Shutter for Creative Portraits

7. How to Create Dramatic Portraits in Your Garage

How to Create Dramatic Portraits in Your Garage

8. 10 Tips for Photographing Great Headshots

10 Tips for Photographing Great Headshots

9. Good Crop Bad Crop – How to Crop Portraits

Good Crop Bad Crop – How to Crop Portraits

10. Street Portraits vs Street Photography: What is the Difference?

Street Portraits vs Street Photography: What is the Difference?

11. 3 Lighting Setups for Photographing Headshots

3 Lighting Setups for Photographing Headshots

12. Starting with Off-Camera Flash in Photography: Techniques

Starting with Off-Camera Flash in Photography: Techniques

13. 3 Simple Ways to Create Stunning Eyes in Your Portrait Photography

3 Simple Ways to Create Stunning Eyes in Your Portrait Photography

14. 15 Quick and Easy Poses for Family Photographs

15 Quick and Easy Poses for Family Photographs

15. Tips for Finding Beautiful Portrait Light at Home

Tips for Finding Beautiful Portrait Light at Home

Conclusion

I hope you’ve enjoyed these popular portrait photography tips from 2020.

Tomorrow, we’ll be publishing the top landscape photography tips of 2020, so keep an eye out for that!

The post dPS Top Portrait Photography Tips of 2020 appeared first on Digital Photography School. It was authored by Jaymes Dempsey.


Digital Photography School

 
Comments Off on dPS Top Portrait Photography Tips of 2020

Posted in Photography


3 Simple Ways to Create Stunning Eyes in Your Portrait Photography

21 Nov

The post 3 Simple Ways to Create Stunning Eyes in Your Portrait Photography appeared first on Digital Photography School. It was authored by Gina Milicia.

portrait photography with beautiful eyes
Image model credits, clockwise from top left: Chris Milligan/Fremantle Media, Rachael Lever, Danny Spannerz/East Brunswick Tattoos, Tiffany Diaz

“Here’s looking at you, kid.”

Reclusive Hollywood legend Marlon Brando would always close his eyes when paparazzi tried to take his photo. He knew that without his eyes open the image wasn’t worth publishing.

The eyes are the single most important feature of any portrait. Beautiful eyes can make even the dullest portrait mesmerizing. Poorly lit, out of focus eyes, or eyes that lack connection, will weaken the impact of a portrait.

Here are my three favorite techniques to make eyes really stand out in your portrait photography.

1. Light

Light makes photography. Embrace light. Admire it. Love it. But above all, know light. Know it for all you are worth, and you will know the key to photography.” – George Eastman

Eyes look best when they are lit well, with beautiful catch lights. Catch lights are the reflection of a light source in the eyes. The size, shape, and brightness of your catch lights depend on the light source you use.

An eye lit by windows
Two large, frosted windows from my studio create beautiful catch lights. Model: Bryana Karanikos
Naked Flash on camera
Diffused on-camera flash creates a slightly softer, rectangular catch light.
Eyes lit by a medium softbox off camera
A medium softbox, off-camera and positioned at 2 o’clock, gives a soft, natural catch light.
Badly lit eyes
Poorly-lit eyes without catch lights look cold and a bit creepy.

2. Expression

You are what you think. All that you are arises from your thoughts. With your thoughts, you make your world.” – Anon.

Comparison of portrait photography with bad and good eyes
Model: Tiffany Dias

In the image on the left (above), Tiffany’s eyes are cold, and she looks nervous. After I gave Tiffany a visualization exercise, her eyes became warm, confident, and connected (see the right image above).

How you communicate, connect with, and direct your model is key to capturing a great expression in the eyes. If your model’s smile isn’t genuine, his or her eyes will appear cold and dull-looking. If your model is nervous or distracted, this too will be reflected in his or her eyes.

One technique I use to create a great expression is visualization. I ask my model:

If you could be anywhere right now, doing anything, where would that be? Tell me about that moment. Who is there? What does it feel like?

Once your model is in the moment of their visualization, their body language and expression changes.

3. Post-production

Be willing to give that extra effort that separates the winner from the one in second place.” — H. Jackson Brown, Jr.

Post-production can lift your portrait photography from good to great – when it’s done well. The key to great post-production is to avoid overdoing it. It’s easy to get excited with all the tricks and enhancements that post-production software offers. It’s addictive, and much like opening a jar of Nutella, it’s very difficult to control yourself once you’ve begun.

I try and use the overnight rule when it comes to retouching. Once I’ve worked on an image, I won’t look at it again for at least a day. I find that my eyes constantly adjust to the modifications I’m making, so it’s more difficult to see when I’ve gone too far (which is also what happened when I dressed in the ’80s).

Here’s a step-by-step technique to enhance eyes using Adobe Lightroom:

Before and after images of eyes
Before and after: I’ve used Lightroom to make the eyes sharper and brighter and to enhance their color.

Step 1: Import your image into Lightroom and use the Basic panel in the Develop module to edit your shot. In this case, I’ve used one of my own beauty presets.

Eyes edited in Lightroom
eye adjustments in Lightroom
Here are the basic adjustments I’ve used for this image.

Step 2: Zoom in on the eyes (“B” in the image below) and select the Adjustment Brush tool (“A” in the image below). You can also select the Adjustment Brush using the keyboard shortcut “K.”

Adjusting the eyes in portrait photography

Step 3: Next, you should adjust the eye color with the Adjustment Brush:

Adjusting the eyes in portrait photography
  • Increase the Temperature slider (A) to make the eyes appear warmer in tone.
  • Increase the Exposure slider (B) to brighten the iris.
  • Increase the Shadow slider (C) to bring more detail into the shadow area.
  • Increase the Sharpness slider (D) to make the eyes appear more detailed.

Adjust only the colored part (the iris) of your subject’s eye (highlighted in red in the image above) and set the brush to have a slight feather and a low flow so you can build up your adjustments slowly.

Step 4: Next, select a new Adjustment Brush (A, below), increase the Sharpness slider (B, below) by +22, and paint over the colored part of the eyes, eyelashes, and eyebrows. This will really make the eyes stand out.

Adjusting the eyes in portrait photography

Step 5: Finally, select a new Adjustment Brush. Set the Exposure slider to -29, and increase the Clarity to +10. Paint around the edge of the iris. This will darken the area slightly and give the eye more definition.

Here, the final portrait was imported into Adobe Photoshop, where I did a basic skin retouching to remove a few small blemishes.

Final image with beautiful eyes

And that’s it!

I’d love to hear about your techniques for enhancing eyes in portrait photography, and it’d be great to see some examples. So share them in the comments!


Gina is the author of several dPS eBooks, including Portraits: Making the Shot.

The post 3 Simple Ways to Create Stunning Eyes in Your Portrait Photography appeared first on Digital Photography School. It was authored by Gina Milicia.


Digital Photography School

 
Comments Off on 3 Simple Ways to Create Stunning Eyes in Your Portrait Photography

Posted in Photography


ON1 Photo RAW 2021 now available, includes Portrait AI, new selection tools and much more

03 Nov

After unveiling ON1 Photo RAW 2021 in September, ON1 has officially released the new software. ON1 describes the latest version of its flagship software a ‘hassle-free, professional photo organizer, raw processor, layered editor and effects app.’ ON1 promises its software is ‘perfect for those seeking an ultra-convenient all-in-one photo editing solution.’

ON1 Photo RAW 2021 includes numerous additions and improvements, including improved automatic AI adjustments, a new portrait editing workflow, improved color selection technology and much more.

The primary new feature is ON1 Portrait AI. This technology finds each face in a selected image and analyzes the photo to locate the eyes, mouth and skin to allow the user to make many quick adjustments, including frequency separation-based skin retouching and adjustments to lighting. ON1 states that ‘in a few simple clicks, you can quickly brighten up the eyes, whiten the teeth and make your subject glow with very little effort.’

Additional retouching tools added to ON1 Photo RAW 2021 include a new Spot Healing Brush tool. The non-destructive brush allows quick removal of dust spots, power lines and other unwanted objects from your image. With a new filter, you can also quickly change a specific color in your image. ON1 says you can use the new filter to change the color of objects such as eyes, flowers, buildings, clothes and more. A similar framework has been added to Photo RAW 2021 allowing you to quickly select a specific color to create a mask, allowing for very specific, localized edits to different parts of your image.

If you’d like to liven up your landscape images, AI Auto and new brush shapes allow the user to easily add clouds to a dull sky. Further, with the color selection technology in ON1 Photo RAW 2021, you can easily make selective edits to your sunrise and sunset images to bring out or add new colors to a scene.

The new version of the software includes workflow and usability improvements as well. With a new Full Screen Preview mode, you can view your image without any distracting user interface elements. You can also present selected images in a full-screen slideshow with user-adjustable settings. For users with large photo libraries, it is all too easy to accidentally import duplicate files or have a cluttered archive. With ON1 Photo RAW 2021’s new Smart Organize mode, the software can automatically locate duplicate images and clean up your files. You can also use this mode to track down all photos captured at a specific location. ON1 Photo RAW 2021 also includes the ability to batch process HDR and panoramic images provided the source image files are organized within subfolders.

ON1 Photo RAW 2021 can be used as a plugin across a wide range of supported software, including Adobe Photoshop and Lightroom, Affinity Photo, Capture One (coming soon), Apple Photos and Corel Paintshop Pro. Click to enlarge.

If Photoshop is an integral part of your editing workflow, you can also take advantage of ON1 Photo RAW 2021’s powerful portrait editing features inside of Photoshop by using ON1 Portrait AI as a plugin. ON1 Photo RAW 2021 can also be used as a plugin inside Lightroom, Affinity Photo, Corel Paint Shop Pro and Capture One (although this support is coming later).

ON1 Photo RAW 2021 includes support for new cameras and lenses as well. New camera support includes: Canon EOS Rebel T8i (850D), Canon EOS R5 (uncompressed image files only), Canon EOS R6 (uncompressed files only), Fujifilm X-S10, Leica M10-R, Nikon Z5, Olympus E-M10 Mark IV, Olympus E-30, Panasonic DC-S5, Panasonic Lumix DC-G100, Sony A7S III and the Sony A7C. New lens profiles include: Canon EF 85mm F1.4L IS USM, Canon G5 X Mark II, Canon RF 24-105mm F4 L IS USM, Nikon Coolpix P1000, Nikon Nikkor Z 50mm F1.8S, Nikon Nikkor Z 85mm F1.8S, Sigma 14-24mm F2.8 DG DN Art, Sony FE 35mm F1.8, Tamron 17-35mm F2.8-4 Di OSD, Tamron 18-400mm F3.5-6.3 Di II VC HLD and Zeiss Touit 2.8/50M.

ON1 Photo RAW 2021 is available now. If you are an owner of a previous version of ON1 software, you can upgrade to ON1 Photo RAW 2021 for $ 79.99. New customers can purchase a perpetual license to ON1 Photo RAW 2021 for $ 99.99. There is also a bundle that includes an annual membership to ON1 Plus for $ 129.99.

If you subscribe to ON1 Photo RAW 360, which has plans starting at $ 7.99 per month, you will receive ON1 Photo RAW 2021 automatically. This also includes ON1 Photo RAW for Mobile. ON1 Photo RAW 2021 is compatible for Windows and macOS. You can learn more about ON1 Photo RAW 2021 and check out purchasing options by visiting ON1.

Articles: Digital Photography Review (dpreview.com)

 
Comments Off on ON1 Photo RAW 2021 now available, includes Portrait AI, new selection tools and much more

Posted in Uncategorized


Google Photos Android app gets update with Portrait Light mode, one-tap editing and UI overhaul

01 Oct

Google has released an updated version of the Google Photos app for Android, bringing with it a few new features, including an after-capture Portrait Light mode, a one-tap editing feature and a slightly revamped editing interface.

As Google briefly demonstrated during yesterday’s Pixel 5 event, the new Portrait Light mode will edit the image to appear as though there’s light coming from a light source not actually in the image. While limited to Google’s new Pixel 4a 5G and Pixel 5 devices for the time being, this feature lets you apply ‘lighting’ in post-production by editing the image to appear as though it’s coming from a specific direction.

As noted by PetaPixel, it’s possible this new adjustable lighting technology is derived from a research project Google participated in back in 2019. Google says this feature will be coming to other Pixel devices, but doesn’t specify which ones or a definitive timeframe.

Also included in this Google Photos update is a one-tap editing feature that uses ‘machine learning to give you suggestions that are tailored to the specific photo you’re editing.’ In its current form, only three suggestions are available: Black and White, color Pop and Enhance, but Google says more options for landscapes, portraits and more will be available ‘in the coming months.’

Google has also changed the user interface (UI) of the manual editing tools. There’s now a scrollable toolbar at the bottom with round buttons and icons, akin to the interface of Apple’s Photo app, VSCO and others. This updated interface, in theory, makes it easier to quickly find the settings you need and make the appropriate adjustments.

This update will go live in the Google Play Store this week. If you don’t already have the Google Photos app, you can download it for free; if you do, be sure to keep an eye out for updates. Google hasn’t specified whether or not we’ll see these new features and redesign make their way to the iOS version of the app.

Articles: Digital Photography Review (dpreview.com)

 
Comments Off on Google Photos Android app gets update with Portrait Light mode, one-tap editing and UI overhaul

Posted in Uncategorized


Review of PhotoDiva by AMS Software: Can a Free Portrait Editor Be Any Good?

25 Sep

The post Review of PhotoDiva by AMS Software: Can a Free Portrait Editor Be Any Good? appeared first on Digital Photography School. It was authored by Carl Spring.

When I was asked if I wanted to review PhotoDiva, a completely free portrait editor, I was intrigued. I wanted to see if something that you can get for free would actually be worth using as part of your editing routine. 

Having now used the software, I can confidently say that (spoiler alert!)  Photodiva is an excellent editing tool for those who value their time and other resources.

A variety of looks from PhotoDiva photo editor

What can it do?

So what is the PhotoDiva portrait editor capable of? Well, whether you are looking to retouch a beauty shot or want to improve photos of your friends and family, this software will certainly do the job. 

Using AI technology combined with the ease of one-click retouching, this free portrait editor is perfect for those who are new to portrait photography. And PhotoDiva can certainly take a large burden off those who are constantly showered with tons of pictures to retouch; thanks to PhotoDiva’s technology, many of the editing processes are now a one-click thing.

Getting started 

The first thing to note is that PhotoDiva is currently Windows only. To download this portrait photo editor, you need to visit PhotoDiva’s website. One quick install later, and you will be ready to go. 

When you open the software for the first time, you are met with a tutorial video which guides you through all the features and functions of the software. This is a great introduction and shows you how powerful this software can be.

For those of you who like a good feature list (who doesn’t?), the key features of PhotoDiva are as follows:

  • Edit portraits automatically
  • Smooth the skin, remove oily glare
  • Erase unwanted objects
  • Change facial features
  • Apply digital makeup (Pro & Ultimate editions only)
  • Change or blur the background (Pro & Ultimate editions only)
  • Contour face & add dimension (Pro & Ultimate editions only)
  • 100+ photo filter effects (Ultimate edition only)

Importing your first image to the software is simple: just a click of the button in the middle of the screen. Once I’d done this, I began to work my way through the software, starting with the most common edit people do in portrait editing software: retouching the skin.

Photodiva review
This skin tone picker lets you experiment with the model’s complexion.

Automatic skin retouching

When it comes to retouching skin, you have several one-click options. I love the fact that these are quite restrained when compared to other skin smoothing presets I have used. The AI finds facial features effectively and the “Overall Enhancement” preset did a great job of smoothing out the skin without going over the top. 

For those who want a more natural approach, there is another preset called “Slight Enhancement” that is great for a lighter retouch that still enhances the skin. Going the other way: For those who prefer a glamour look, there is a “Glamour Portrait” preset that could be just what you are looking for.

When getting started, it is this type of simplicity that people look for in their portrait editing software. However, if you want to get more advanced, you can turn to custom skin retouching. 

Using PhotoDiva's skin retouching tool
One click instantly improves the skin and gives you a great starting point.

Custom skin retouching 

If you expect that custom retouching will be difficult, then PhotoDiva will subvert your expectations. Most of the custom editing is done with the use of intuitive sliders.

The way I found easiest when starting with the software was to turn each slider up to find out what portion of the image was being affected. I then reset the slider to zero and pushed it until I got my desired effect. Overall, it was simple and let me get exactly what I wanted from the retouch.

The ability to compare the before and after edit is great, as it allows you to easily check if you have pushed things a little far. 

Using custom skin retouching and a filter in PhotoDiva software
Applying a filter and adding a custom skin retouch gives you a great result incredibly quickly.

Other portrait beautifying features

 PhotoDiva doesn’t limit you to skin retouching, as it comes with a boatload of other prettifying tools. First off, there is the teeth whitening feature that works both as a preset and as a manually controlled instrument. There is also  an eye-circle remover, as well as other tools to highlight the model’s eyes, brows, and lips. 

Removing larger objects using the clone tool

In the free version of PhotoDiva, you have the ability to use a clone stamp tool to remove larger objects such as a facial piercing. Using this reminded me of more expensive editing software. When testing, I used it to get rid of a nose stud, and it worked perfectly.

using the clone tool in PhotoDiva to remove a nose stud
The Clone tool worked well for removing this model’s nose stud.

Face sculpting

The ability to reshape the face is a powerful tool in PhotoDiva. However, with great power comes great responsibility. 

The AI is great at finding facial features. You can sculpt not only the width of the face, but also the eyes, nose, lips, and chin. All worked really well in my testing, although I will say that you really need to keep these sliders low. Pushing them to the extremes leaves a really unnatural look and makes the images look fake pretty quickly. That said, you really can get a powerful result when working with restraint.

a before and after face sculpt retouch in PhotoDiva
A subtle use of the sculpting tool can give a great result. 

General editing

PhotoDiva calls this “common editing.” Basic correction works well and is simple to use. For those new to editing, the addition of these tools allows you to do the whole edit in one piece of software. The ability to tweak individual colors is great. The color tools are something that is more associated with high-end software, so it is nice to see them included. 

The ability to create black and white images using these advanced color controls is another great feature. There is also the option to create a negative which, while nice to see, is something that you may struggle to find a use for in day-to-day editing.

Adding vignettes is also easy. I know vignettes are a love-it-or-hate-it thing, but they are great for techniques such as bringing focus to the face. PhotoDiva has a variety of options for you to explore.

screenshot of editing features in PhotoDiva
There is a good range of general editing tools included in PhotoDiva. This allows you to edit from start to finish in the software.

Effects 

There are over a hundred photo filters within the software. As with all filters, some you will like, some you won’t. There are a good variety to choose from, though, including vintage looks, film based looks, and some more creative ones. 

When using the photo filters, most feel heavy-handed when applied at 100%. However, it is really easy to tone down the effect to get a great result. My personal favorite effect was a film simulation called “Fuji FP 100C.” With the variety of styles available, there is sure to be something for everyone. 

A screenshot showing a filter being applied to a photograph in post processing software
There are tons of filters included. You are bound to find one you like. 

Export options 

The exporting process is streamlined and effective. You click the “Save” button and set the picture parameters according to your needs. You can choose the file format, file quality, and even the output type for printing, further processing, social media, or viewing on an HD screen. The ease of this (as with many things in this software) makes PhotoDiva perfect for beginners. You are consistently given just what you need, with none of the options that confuse those new to photo editing.

Pro version perks

While the free version of PhotoDiva is great to get you started, there are also two paid versions of the software that offer you more options: Pro and Ultimate.

Virtual makeup is among those paid features. This is the Achilles’ heel of some portrait editors, since this effect comes out quite gaudy, but PhotoDiva shows remarkable restraint with the makeup tools. These makeup tools include lipstick, eyeshadows, blusher, highlighter, and bronzer. Once again, they are applied with a single slider drag, eliminating any need for manual selection. 

photodiva makeup tool
The makeup effects are subtle but still fairly impressive.

If you’ve ever shot with poor lighting, then you might be familiar with the flat face effect. There is a way to get rid of it using the Add Dimension tool. Despite the cryptic name, this instrument is just a highlight and shadow adjuster that gives the model’s face the much-needed depth and contrast.

To go above and beyond simple portrait retouching, PhotoDiva also comes with a semi-automatic background-changing feature. It only took me a few brush strokes to completely remove the picture background and add my own. If that is too drastic of an approach for you, then the background-blurring tool might catch your interest instead.  

Lastly, when it comes to photo editing, the upgrade gives you the ability to edit RAW images from over 450 different cameras, as well as remove noise and add haze.

These additions make PhotoDiva an even more powerful piece of software for portrait editing.

a comparison of before and after editing using PhotoDiva
Upgrading to the Pro version of PhotoDiva gives you even more control over what this software can do.

Is it worth it? 

Obviously. It’s completely free! What I will say, though, is that this software is more for those entering into portrait editing. There will be some of you out there who will have scoffed at this software from the moment you started reading this review. That’s fine; it’s not made for you.

PhotoDiva is made for those who want a less time- and effort-consuming way to retouch portraits, and those new to photography who have spent their hard-earned savings buying a camera and want to push their editing without the immediate expense of having to buy some high-end software. It is a great tool that allows you to get professional-level results with a few clicks. For those people, I cannot recommend PhotoDiva highly enough. In fact, if you own a Windows computer and edit photos, I would suggest you try this software. 

The fact that PhotoDiva gives away such a powerful set of tools for free is amazing! For those who love it and want to do even more, the upgrade is available to you at a very reasonable price (under $ 30 USD at the time of writing). If the software gets you hooked then you are in luck, since the vendor is offering the upgrade at 55% off for Digital Photography School readers.

Rather than tell you how good PhotoDiva is, I will leave you with this: Try it for yourself. It is free, and if you edit portraits, you have no reason not to try it out. I am pretty sure you will be surprised by how good it is. 

Where do I get it?

To download PhotoDiva, simply head over to https://photodiva.net and hit the Download Free button. Enjoy!

AMS Software is a paid partner of dPS.

The post Review of PhotoDiva by AMS Software: Can a Free Portrait Editor Be Any Good? appeared first on Digital Photography School. It was authored by Carl Spring.


Digital Photography School

 
Comments Off on Review of PhotoDiva by AMS Software: Can a Free Portrait Editor Be Any Good?

Posted in Photography


ON1 unveils ON1 Portrait AI, new ON1 Photo Mobile features and ON1 Photo RAW 2021

23 Sep

ON1 has unveiled new updates for its suite of software, including major upgrades to ON1 Photo RAW and new features in ON1 Photo Mobile. ON1 has also announced the all-new ON1 Portrait AI, which is available as a standalone application and as a plug-in for Adobe Lightroom and Photoshop, Affinity Photo, Corel Paintshop Pro, Apple Photos and Capture One (at a later date).

ON1 Portrait AI uses machine learning to locate and evaluate each face in portrait photos to retouch and process them without the need for manual adjustments. Dan Harlacher, VP of Product for ON1, describes ON1 Portrait AI as follows, ‘This product was created to solve the main problem portrait photographers face, spending way too much time editing individual portraits or entire shoots.’ Harlacher continues, ‘…ON1 Portrait AI is incredibly fast at getting through an entire shoot…’

The new software classifies individual faces in the frame, adds ‘realistic retouching’ to the skin, eyes and mouth without the use of global retouching. The software also includes other tools for manual skin retouching. Tools include frequency separation, skin shine reduction, blemish removal, face shape sculpting, eye and teeth whitening and more.

ON1 Photo RAW Mobile for iOS, iPadOS and Android devices includes new masking features, allowing users to make specific localized adjustments and effects. As part of the new masking functionality, ON1 Photo RAW Mobile includes ON1’s Perfect Brush. The brush includes edge detection features and allows the user to create a precise mask with just their finger. The new masking tools also support the Apple Pencil and Android Stylus. Further, local adjustments in ON1 Photo RAW Mobile utilize ON1’s proprietary raw processing engine.

The mobile version of ON1 Photo RAW includes new effects and filters, such as the Dynamic Contrast filter, which ON1 states is the ‘gold standard for amazing clarity and detail.’ Additional new filters include Curves, Glow and HDR Look. Organization and workflow are improved with the new update as well thanks to new built-in ways to search and sort photos within the app.

ON1 Photo RAW for mobile is available on the App Store and Google Play. Image credit: ON1

ON1’s president, Craig Keudell, says, ‘ON1 Photo RAW Mobile has been significantly enhanced in a short amount of time and there is more on the way. The addition of creative masking tools and filters helps make it a photography tool everyone will want to use.’

ON1’s autumn lineup is rounded out by ON1 Photo RAW 2021, ON1’s flagship raw photo editor. ON1 Photo RAW 2021 is available for macOS and Windows and includes pro-grade photo organization, raw processing, nondestructive editing, a layers-based workflow and more.

A key new feature in ON1 Photo RAW 2021 is the integration of ON1 Portrait AI. In addition to the new portrait retouching functionality, ON1 Photo RAW 2021 makes it easier for users to organize their images with a new Smart Organize mode. This feature makes it easier than ever before to identify image duplicates, locate groups of photos from the same day or location and the mode can even identify similar images. ON1 states that it is the ‘perfect solution for those who want to speed up their culling, improve organization, or even save on storage space.’

In terms of performing localized editing, ON1 Photo RAW Mobile is not the only new ON1 software with new features. ON1 Photo RAW 2021 includes a color range selection tool that integrates edge detection from ON1’s Perfect Brush to create flexible gradient masks. You can create color-sensitive gradient masks, which should allow for easier local editing when working with skies behind subjects such as trees and buildings.

Photo RAW 2021 also includes new custom brush shapes. You can select between hard-edge shapes, making it simpler to paint straight edges or opt for more organic brush shapes and textures, which will allow you to paint on something like snow or grass. Further, a new non-destructive healing brush has been added to help remove distracting elements from your images such as dust spots, cables and people from the scene. The new healing brush includes a content-aware mode and a clone stamp mode.

A new full-screen preview mode has been added to the software, allowing the user to view an image without any distracting user interface elements on the screen. When in the full-screen mode, you can still utilize some tools, such as brush tools. There is also a new Quick Slideshow mode so you can show off your images in a full-screen display.

When ingesting images, ON1 Photo RAW 2021 includes new camera-based presets. This means you can set specific editing presets for individual camera models and even individual serial numbers. ON1 says this feature is helpful for users with custom camera profiles or with cameras that have been converted to infrared.

ON1 Photo RAW 2021 includes new local and global adjustment features. Image credit: ON1

In terms of global photo editing tools, ON1 Photo RAW 2021 includes a new Color Replacement filter. It is precisely what it sounds like, meaning that you can select a color in your image and adjust it. For example, you can select the color of a subject’s eyes to change them, change the color of flowers in a scene and much more.

When it launches this October, ON1 Photo RAW 2021 will also add a new method to batch process HDR and panoramic photos, introduce color fill layers, present a refined user interface and add new camera and lens support.

ON1 Portrait AI is available now at a special introductory price of $ 59.99 (regularly $ 79.99). A free trial download of Portrait AI is available. When ON1 Photo RAW 2021 launches in October, ON1 Portrait AI will be integrated into the new software. For existing ON1 Photo RAW owners, you can preorder ON1 Photo RAW 2021 for $ 79.99. When you preorder, you will also receive the standalone and plug-in versions of ON1 Portrait AI. New users must pay $ 129.99 for ON1 Photo RAW 2021. Earlier this year, ON1 introduced a subscription service as well, ON1 Photo RAW 360, which includes all the new products mentioned in this article and is available as low as $ 7.99 per month. For more information, head to ON1’s website.

Articles: Digital Photography Review (dpreview.com)

 
Comments Off on ON1 unveils ON1 Portrait AI, new ON1 Photo Mobile features and ON1 Photo RAW 2021

Posted in Uncategorized


Weekly Photography Challenge – Self Portrait

12 Sep

The post Weekly Photography Challenge – Self Portrait appeared first on Digital Photography School. It was authored by Sime.

It’s been a long time since we pushed a ‘Self Portrait’ challenge in your general direction! These can be very confronting for many reasons, how we see ourselves, confidence, or something as simple as the lack of a tripod (You can put your tripod on a bench, or the floor, or in a tree!) but it’d be great to get as many of us to try this out as possible – it’s not about anything other than learning to photograph people, and who is your most readily available subject? YOU.

One of our resources on self portraiture

I’m one of those crazy (or not?) people that have participated in a 365, got the t-shirt, made a small book, it was fun! But it really goes a long way to showing you a lot about portrait photography, lighting (I used a desk lamp for the longest time!) and how your gear works… But we don’t want to see 365 of these, just one.

Simon Pollock Self Portrait

A self-portrait doesn’t need to JUST be of you, you can disguise yourself behind a coffee machine, or across a workbench. But set your scene and think about your lighting, and see what you come up with! Here are a couple of helpful resources on portraits for you to have a look at, grab a cup of tea and your camera and get started!
Self Portrait Tips & Examples and A Mirror Self-Portrait challenge from a few years back!

Simon Pollock Self Portrait

A little shout out to ‘Moncat‘ who submitted this photograph to last week’s ‘Spring’ challenge!

Weekly Photography Challenge – Self Portrait

Great! Where do I upload my photos?

Simply upload your shot into the comments field (look for the little camera icon in the Disqus comments section) and they’ll get embedded for us all to see. Or, if you’d prefer, upload them to your favourite photo-sharing site and leave the link to them.

Weekly Photography Challenge – Looking Up

Share in the dPS Facebook Group

You can also share your images in the dPS Facebook group as the challenge is posted there each week as well.

If you tag your photos on Flickr, Instagram, Twitter or other sites – tag them as #DPSSelfPortrait to help others find them. Linking back to this page might also help others know what you’re doing so that they can share in the fun.

Follow us on Instagram?

The post Weekly Photography Challenge – Self Portrait appeared first on Digital Photography School. It was authored by Sime.


Digital Photography School

 
Comments Off on Weekly Photography Challenge – Self Portrait

Posted in Photography


Anthropics Portrait Pro Editing Software Review

25 Aug

The post Anthropics Portrait Pro Editing Software Review appeared first on Digital Photography School. It was authored by Carl Spring.

A model before and after using Anthropic Portrait Pro

Anthropics Portrait Pro 19 is the latest version of its incredibly popular retouching software. This piece of software allows users to create professional retouches without needing to spend hours learning several techniques. Instead, Portrait Pro uses a simple, user-friendly interface that allows advanced retouching in a simple to understand and time-saving manner.

What’s New in Portrait Pro 19

Anthropics Portrait Pro 19 brings a host of improvements that make this software better than ever before.

Clearskin 5

Athropics Portrait Pro skin texture compared
There is a big improvement in the skin detail over previous versions of Portrait Pro.

The first I must mention is the Clearskin 5 technology. Based on state-of-the-art A.I., Clearskin 5 intelligently maps the contours and features of the face and retouches skin accordingly. It also replicates the face’s natural skin texture, allowing users to subtly remove blemishes while maintaining the subject’s natural appearance. When combined with the improved Fix Lighting tool, this new technology makes it even easier for photographers to achieve amazing results.

When compared to previous versions (which themselves were very good) this is a subtle but noticeable difference. For me, this alone is enough to recommend this version, but there is a lot more under the hood.

Let’s look at what’s new in Portrait Pro 19.

Advance Hair Retouching

Hair detection has been improved and gives users more options than ever before. After choosing a base shade for the hair, you can tweak this to create a variety of styles, from a subtle improvement of natural color all the way through to more extremes of pink and blue hair.

Choice of hair when using Anthropics editing software
A subtle tweak or a radical change? Both are possible in Portrait Pro.

Expression Sliders

This tool offers a variety of ways to subtly change the expression of your model, letting you get the perfect smile every time.

a photo retouched to show different facial expressions
It’s easy to get your subjects smile just right when using this software.

Accurate Lens Correction

Utilizing 3D modeling, the software accurately corrects for lens distortions created by wide-angle lenses such as mobile phone cameras.

Optimized Plugin (Studio exclusive)

This plugin allows you to harness the power of Portrait Pro directly from Photoshop and start editing right away. By updating the technology, the plugin returns to Photoshop up to five times faster than previous versions, which means less time processing and more time creating great portraits.

Improved Automatic Batch Processing (Studio Max exclusive)

PortraitPro Studio Max 19 allows photographers to automatically process batches of images simultaneously. The software detects faces and features in the image, applies your chosen presets and automatically saves the result. Again, thanks to PortraitPro 19, the software handles images 2x faster than before, allowing you to retouch a batch of images quickly and easily yet achieving amazing, tailored results.

This tool (exclusive to the Studio Max edition of the software) is something that I can see being amazing for sending proofs from a headshot session. Imagine the ability to send all of the client images to select from, all retouched to your specific style. Not only will it wow your clients, but it is effortless for you to do this. 

Portrait pro applied to a model not looking at the camera
You do not need your subject to be looking directly at the camera. In this example, which was part of a batch, it still picked up the features quickly and easily saving me time.

Interactive Tutorials

These tutorials are some of the best I have seen for any software – allowing you to follow along and improve images with a guide to hold your hand.

The tutorials allow users to get to grips with the features of the software quickly and easily. By the time you get through the first couple of tutorials, you will be itching to use the software on your own images, but when you want to push your skills a little more (or just can’t quite figure something), there are more advanced tutorials to help you upgrade your skills.

There are various tutorials, from retouching skin and face shaping (which are the two tools you will probably use the most) through to a series of advanced tutorials that go into detail on things like applying makeup, hair, eyes, and many more. Thus, allowing you to take advantage of the massive feature set on offer with this software.

Portrait Pro Tutorial
The built-in tutorials make it really easy to get started in Portrait Pro 19.

In Use 

After going through the first two tutorials, I wanted to put some of my own images through the software. The feature detection on the tutorials was quick, simple, and incredibly accurate. I wanted to see if this was as good in real life as it was in the tutorials. I was amazed that my own images imported quickly and found the models’ features perfectly the first time.

Showing how Portrait Pro defines facial features
Putting in my first image, I was surprised how quickly it found all the features of the face.

Presets

I thought I’d start by trying the built-in presets. I clicked the Standard Preset and almost instantly the image was good enough to give to a client. After trying the other presets, I found the Maximum Lighting worked really well for the shot below.

Within two clicks, I had an image that was retouched to a high standard. As someone who has spent hours learning retouching techniques in Photoshop, it was impressive. To those who are new to retouching, it will give you a set of tools that would normally take hours to master individually at the click of a button.

I’ll be honest, some of the presets were a little too much for me. However, I tend to go for a more natural look in my retouching. Yet, I can see that for some, they will be perfect. I think the presets have been created to give every style of photographer a great starting point that can be tweaked until they get their own style.

Using presets in Anthropic Portrait Pro gives you a great look in seconds
With a few clicks, you can get results like these. From L-R: Original image, Standard Preset and Max Light Preset

Starting From Scratch

It would have been easy for me to leave the review here, as the presets do a great job, but I wanted to dive deeper and see how the tools would work individually. I started over with the same image and worked my way through the panels.

The panels are laid out in a very logical order, starting with Sculpting the Face, which allows you to tweak everything from eye size to the length of the model’s neck. Everything is simple and uses a slider-based system.

I then worked through the skin smoothing (which looks a lot more natural than previous versions of the software) before continuing to work my way down the menu system.

Anthropics Portrait Pro Editing Software Review
I created my own preset for this shoot. Once I had it how I liked it, I could then save my style as a preset and apply it to more images from the shoot.

A small word of caution, though. Portrait Pro allows you to push the retouching levels to the extreme. You can get caught up in pushing all sliders to the max. This will not give you a great result and like adding salt to a meal, a sprinkle is always better than a handful.

Make use of the before and after function to check you have not pushed your image too far. I have heard complaints that Portrait Pro makes everything “Doll Like” or “Just Not Natural.” That is not true. Just like Photoshop, users can get carried away and push things too far in their edits. 

It was amazing that only 30-minutes into using a brand new piece of software, I was able to fully retouch a portrait to this level without needing a YouTube tutorial. What’s even better is that with a couple of clicks, I now had my own preset that I could apply to other images. This is something that really does create a massive time-saving option. 

I put my newly created preset to the test with another image from the same shoot. It literally took me 10-seconds to import and apply the preset and it was ready to export. If you are working with large amounts of images per shoot, this might just be a game-changer.

Applying a personal preset in Portrait Pro to a new image
Within 10 seconds, I had created this edit, in my own style without needing to press more than one button.

By the time I had finished, I had added makeup, added lighting, and changed both hair and eye color quickly and easily. The feature that stood out for me was the advanced lighting tool. 

For those who are new to working with light or those who don’t currently have a lighting system, you can add lighting effects that really enhance the image and make it pop.

Who’s it for?

Anthropics Portrait Pro is an amazing tool for those who are new to retouching portraits. It is simple, yet incredibly powerful and gives you pleasing results within seconds. However, it offers much more and encourages you to go back to the software and personalize your retouching. 

For those who are more advanced photographers, it allows you to really speed up your workflow and create signature styles. The Photoshop Plugin (Studio Exclusive) means you can use Portrait Pro as part of a larger project.

For Pro’s, there is a real benefit from the batch processing options found in the Studio Max Edition. If you are shooting several images and want to send clients a selection, by using a preset (either one in-built or your own signature style), you can retouch all images with a few clicks. This saves you a lot of time and allows you to focus on your business.  

If you retouch portraits, you really need to try this software out. Also, DPS has managed to get a special offer just for you. 

How Do You Get Portrait Pro?

You can download your free trial at https://www.anthropics.com/portraitpro/download/

Currently there is a 50% OFF sale everything + DPS readers get an EXTRA 15% OFF when you use the coupon JW9682

I look forward to seeing what you create in the comments below.

The post Anthropics Portrait Pro Editing Software Review appeared first on Digital Photography School. It was authored by Carl Spring.


Digital Photography School

 
Comments Off on Anthropics Portrait Pro Editing Software Review

Posted in Photography


Video: How to capture a 0.1MP portrait with a Game Boy Camera and 70-200mm lens

21 Aug

The Game Boy Camera was never meant to be a serious piece of photographic equipment, so what happens when you pair the Nintendo Game Boy peripheral with a serious piece of glass to take some portraits? Just ask Sam McKenzie, of YouTube channel 3D Printor, who took it upon himself to adapt a Tamron 70–200mm zoom lens to the 0.1MP Game Boy Camera.

Detailed in the above video, McKenzie 3D-printed an adapter he came across on Thingiverse and attached it to the front of the Game Boy Camera. With the adapter and lens in place, he went out for an ultra-low-resolution portrait shoot to see what the Frankenstein’d camera was capable of.

The modded Game Boy Camera mounted to a Manfrotto Pixi tripod next to a print of the 0.1MP portrait.

While capturing the image was simple enough, getting it off the Game Boy and turned into a canvas print was less intuitive. This process wasn’t featured in a video, but in an email sent to DPReview, McKenzie said:

‘The Super Game Boy for SNES allows you to play Game Boy games on your TV […] so I used an old VHS to DVD making software and USB capture card I had from the early days of DVD and thankfully it worked with the SNES.’

Once he had the image, he ordered a small canvas print and within the week it was at his front door.

The canvas print, in all its pixellated glory.

You can find more of McKenzie’s 3D printing projects on his YouTube channel.


Image credits: Photos by Sam McKenzie, used with permission.

Articles: Digital Photography Review (dpreview.com)

 
Comments Off on Video: How to capture a 0.1MP portrait with a Game Boy Camera and 70-200mm lens

Posted in Uncategorized