RSS
 

Posts Tagged ‘Photoshop’

Photoshop 13.0.3/13.1.1 Updates Now Available

09 Jan

Today we released Photoshop update version 13.0.3 (for Mac perpetual customers) and version 13.1.1 (for Creative Cloud members, Mac and Windows), resolving the following bugs:

    • Certain PSD files fail to open when they have layer FX applied to layers
    • The application crashes when opening certain EPS files
    • On Retina machines, the application crashes when the Navigator panel is displayed in some workspaces

How to get the Update

1. In Photoshop, choose Help > Updates.

2. The Adobe Application Manager will launch. Select Adobe Photoshop CS6 and choose Update.

How to confirm that the Update worked

1. In Photoshop, choose Help > About Photoshop (Win), or Photoshop > About Photoshop (Mac)

2. For Mac perpetual customers, the version at the top should be Version: 13.0.3

3. For Win/Mac Creative Cloud members, the version at the top should be Version: 13.1.1

Any suggestions, ideas? Feel free to comment on this article!

Back to Top

BlogPhoto

 
Comments Off on Photoshop 13.0.3/13.1.1 Updates Now Available

Posted in Equipment


Blending Exposures in Photoshop

07 Jan

Landscape photographer and instructor Robert Rodriguez Jr explains the process of blending exposures in Photoshop and Lightroom for greater dynamic range. Part of the Beyond the Lens Video Podcast.
Video Rating: 4 / 5

A few great tips on how to photograph infants by an expert photographer. photogaps.com has more stuff.
Video Rating: 4 / 5


ColorTime Out Photoshops Photoshop On Mobile

07 Jan

If you love mobile device camera filters and special effects, you need not keep reading. This post takes a look at a new photo app for iOS (sorry Android users, it’s not ported there yet) devices that got me to switch off of using Photoshop Express, my previously preferred image editing app.

The app is called ColorTime. Yes, a little campy, but it’s what’s on the inside that counts. At first ColorTime looked to me to be yet another gimmicky app to ‘play’ with photos and then share them to the world. I don’t need one of those so I ignored it….then kicked myself when I saw what it can do for my mobile photos.

How It Works

While a fine, free app in its own right, what I find most lacking with Photoshop Express is the ability to control different areas of the image differently. It’s an all or nothing proposition, much unlike all of Adobe’s programs for desktop/laptop computers. I can’t bring up shadow detail or tone down highlights. I also can’t adjust the color temperature in shadows, something Adobe introduce in its latest version of Lightroom 4.0.

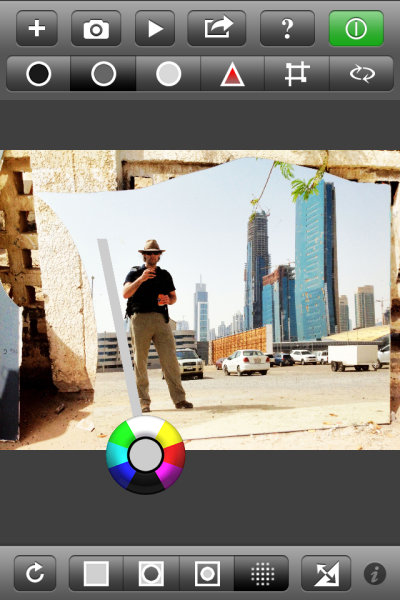
ColorTime achieves the ability to control different tonal areas while also attempting to simplify the process. A problem with adding too much functionality into a mobile app, especially for a phone, is the real estate available for controls. Think of all the icons for tools in Photoshop CS6, for instance, and then try to fit those on an iPhone screen. ColorTime skirts around this problem by allowing for multiple controls with one tool. It looked like this:

That circle allows for cooling or warming of colors as well as lightening and darkening of tones. It is fairly simple to use and once over the initial understanding of the function, it is fun to use. Tap once on the screen and then move around the circle to emphasize each color or tone. Drag away from the circle to increase that effect. Stack changed on top of each other with first applying one, then tapping and applying another effect.

The icons across the top allow users to adjust shadows, midtones and highlights. There is also “play” button where a range of changes will be shown as something of a movie and users can stop the show at any point when they see a rendition they like, without having to figure out all the enhancements to get there. Also on the top panel are tools to adjust saturation and to perform crops.

Along the bottom are icons to select the whole image, edges or just the middle areas. Photographers can also paint an area they want to change with the circle tool and it’s this function that has me switching sides away from Adobe. I can paint in an area where I want to increase the brightness, but leave the rest of the image alone. 
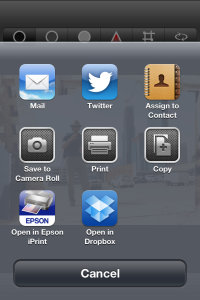
This is a more finite way to adjust than using only the Highlight tool at the top. I really like this feature and it is what I have been waiting for from Adobe.

The ‘camera’ part of the app simply uses the iDevices built in app to take pictures. Nothing ground breaking here and on par with Photoshop (although Photoshop Express does have some extra features that can be purchased). Sharing functions use the standard set of iOS tools to push your images onto the world.

In Real Life

I haven’t had a lot of time to shoot with ColorTime, just about a week, but I certainly have a large amount of photos to edit on my phone. And that’s the joy in using this app. I have been wary of most apps as they rely heavily on filters and flat out changing the original image toward anything that is not what appeared before the camera. That’s not ColorTime.

ColorTime fills my desire to edit images closer to what I saw when shooting. This is, of course, highly subjective territory but having that control to change just one area or the other, fixing what y iPhone’s camera didn’t get right the first time, is key for me. It’s not for every user. If you’re looking for more wonkiness, you can surely create it with ColorTime but that’s not where this app excels.

Some Gripes

Nothing’s perfect and there are some improvements I would like to see come to ColorTime.

1) The ability to undo. Right now, as far as I can see, I have to start completely over with the Reset tool. I can’t just take one step back after making a mistake.

2) I’m not always a straight shooter. I want the ability to rotate my images. Just a little. Or a lot.

3) Sometimes it’s easy to do the wrong thing. Such as, I don’t know what I want to change the very moment I put my finger to the screen, I end up waiting a fraction of a second too long and I activate the “Select” tool to paint in an area instead of using the selection I just had. This took some practice before I was accustomed to the flow.

Examples

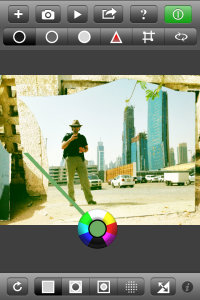
Now then, what can it do? All these shots are starting with the iPhone 4s camera. I will first show the original and then my edit. I used a mixture with every image; selecting one area for adjustment then changing saturation differently for different areas. Removing some blue or magenta color cast by selecting the opposing color to highlight.

At the Taj Mahal, Agra, India.

Waipio Valley, Hawaii, The Big Island

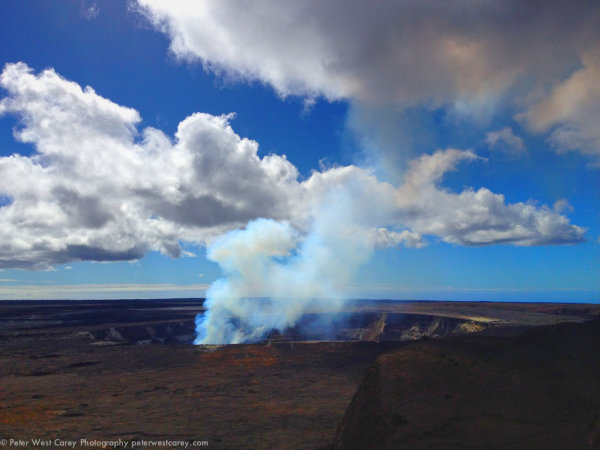
Kilauea Caldera, Hawaii, The Big Island

Conclusion

ColorTime is something I have been waiting for. Mind you, I’m the type of guy who doesn’t like 5,000 filters and effects. I want to adjust the light and dark areas differently and make somewhat finite changes. Colortime gives me control over my images on my iPhone in a way that is intuitive and useful.

You can find ColorTime for free at the Apple App Store.

Post originally from: Digital Photography Tips.

Check out our more Photography Tips at Photography Tips for Beginners, Portrait Photography Tips and Wedding Photography Tips.

ColorTime Out Photoshops Photoshop On Mobile


Digital Photography School

 
Comments Off on ColorTime Out Photoshops Photoshop On Mobile

Posted in Photography


How To Create a Motion Blur Effect in Photoshop

06 Jan

Motion Blur Original

The original image before the motion blur is applied

Motion Blur Filter

For the first technique I am going to start with this rather boring and cluttered image I made in a forest on Vancouver Island, British Columbia, Canada.

Maybe it wouldn’t be so boring if there was anything to show the scale of these enormous trees but it’s pretty hard to get away from cluttered in the dense forest there.

I decided to mimic the effect of in-camera panning by using the motion blur filter in photoshop to blur the image in the same direction as the strong lines of the trees.

Try this technique on your own forest scene or another scene with strong lines by following these steps. I am using Photoshop Elements but you can also do it in Gimp and some other photo editors.

1. Select Filter > Blur > Motion Blur

Photoshop Motion Blur Filter

2. Set the direction of the blur to match your image and amount of the blur to your taste. For my image I made the blur vertical and the amount maximum.

If you have a photo editor that supports layers, make a copy of the background layer and apply the filter to the new layer. This will allow you do have some fun in step #4 below.

Photoshop Motion Blur Filter Options

Motion Blur Applied

Image after motion blur is applied


3. Crop the tell-tale edges out of the image.

I find that you can always tell when the blur is done in photoshop, as opposed to in-camera, because the edges of the image don’t blur evenly. Why they don’t blur evenly I don’t know! But they don’t so I always crop the edges out.

See the 100% zoom of a portion of my image below where you will see how the edges of the image don’t look right.

Motion Blur Artifacts

4. To add a little something extra try revealing a part of the original image without the blur.

If you applied the blur to a copy of the background layer as I mentioned in step #2 above you can try this. Either using a layer mask or simply using the eraser tool, remove the blur effect from a portion of the image.

This is the final version:

Motion Blur Revealed

Here is a video I made that shows all the steps I took to make the final image using Photoshop Elements.

Zoom Blur Original

Original image before zoom blur is applied

Zoom Blur Filter

This technique is very similar to the motion blur effect but with a little bit of a twist.

As you can see the original image has a few problems. The trees are mottled with light and shadow and there are blown out highlights in the sky for a start. But I like the composition of the trees the way the wide-angle lens made them appear to lean in towards the centre of the frame.

I decided to try a zoom blur effect to emphasize the composition and even out some of the colours.

Try this technique on your own image by following these steps:

1. Duplicate the background layer (Layer > Duplicate Layer)

Duplicate Background Layer

2. Rename the layer to “blur” or something else that makes sense to you

3. In photoshop, select Filter > Blur > Radial Blur

Photoshop Radial Blur Filter

4. Change the option from “spin” to “zoom” and, in the section of the window named “blur center”, drag the centre of the zoom from the middle to the top of the frame to match the composition of the original image

Photoshop Zoom Blur Filter Options

5. Crop out the blown out highlights in the resulting image

Zoom Blur Final

Here is a video I made that shows all the steps I took to make the final image using Photoshop Elements.

Post originally from: Digital Photography Tips.

Check out our more Photography Tips at Photography Tips for Beginners, Portrait Photography Tips and Wedding Photography Tips.

How To Create a Motion Blur Effect in Photoshop


Digital Photography School

 
Comments Off on How To Create a Motion Blur Effect in Photoshop

Posted in Photography


Men Overestimate Performance, Photoshop Detection Program, A Boneless Robot

06 Jan

Today on The Daily Brief we take a look at a new Photoshop detection software now nothing can just ‘seem legit’, a crazy jelly robot that walks on boneless legs and men in the workforce are overconfident about their non existing performance: Photoshop Detecting Computer Program: goo.gl Freaky Boneless Robot Walks on Soft Legs: goo.gl Men overconfident in their performance: goo.gl Click here to watch yesterday’s Brief: youtu.be AskMen: www.askmen.com Follow us on Facebook: www.facebook.com Follow us on Twitter: twitter.com Follow us on Foursquare: foursquare.com Let us know know your opinions by commenting below!
Video Rating: 4 / 5


Photoshop tutorial – Fracture photo effect – splatter brushes (english subtitle)

19 Dec

www.flashstudioimmagine.com 220 tutorial inediti www.youtube.com Visita il mio canale youtube labottegadellafotografia.blogspot.it IL mio blog Download brushes:myphotoshopbrushes.com You can perform this process using splatter brushes. In this tutorial I explain step by step how to dissolve a photo and spread it like splashes of paint. Powered by Luciano Boschetti, photographer.
Video Rating: 4 / 5


Photoshop Elements 7 on Ubuntu GNU/Linux 9.04 x64

11 Dec

I’m a GIMP user. Period. Couple of days ago I’ve got Nikon D60 dslr camera (you can find unboxing clip in my videos) and UFRaw and GIMP could not do what I wanted them to. Instead of using Google to solve this issue, I tried Adobe Photoshop Elements 7 and it worked! Bad news is that I did not manage to do the same with Nikon Capture NX2, which fails to start after installation. Good news is, that even if you do not want to change Photoshop (Elements) you are currently using for (let us say) GIMP, you can still have dedicated photo processing machine which runs Ubuntu 🙂 Since I never used Elements before, I was little bit lost at first as you can see in the video. I had some expirience with older Photoshop versions, so I’ve managed to find my way around in the end. After some thinking about video size and youtube restrictions I’ve decided to record only RAW importing, a little bit of most basic postprocessing, resizing for web and of course, exporting to JPEG file. Remember that I am no professional photographer or Photoshop user in any way, so this was just a demonstration of how well Adobe Photoshop Elements can work under GNU/Linux operating system, NOT a tutorial for photo editing of any kind! Person depicted on a photograph is my neighbor. Photo is taken with his permission, and some version of it can be found on my Flickr account. Do not use it in any way, all rights are reserved. PSE7 trial version for Windows was downloaded from Softpedia. Ubuntu version is 9.04

 
Comments Off on Photoshop Elements 7 on Ubuntu GNU/Linux 9.04 x64

Posted in Nikon Videos


Matt Nicolosi Photoshop Texture Layering Tutorial

06 Dec

This is a tutorial showing how to take textures and apply them to images in Photoshop to create a rich, timeless, fine art print in just a few minutes.

Another 15 Minute Photo Challenge. This time I’m visiting Highley Manor in West Sussex. A walk around the outside of the manor yealds some interesting photo opportunities. For more details visit Web www.gavtrain.com Blog http Facebook www.facebook.com

 
Comments Off on Matt Nicolosi Photoshop Texture Layering Tutorial

Posted in Photography Videos


Fixing Images with Contrast Masks in Photoshop

05 Dec

contrast_masking.opener.jpg

Many of the fixes we commonly apply to images come from darkroom processes. Contrast masking is one of those fixes and it can be used to fix an image which is under or over exposed.

Contrast masking is a relatively simple process and it can work wonders with your images. I like it because it generally doesn’t require you to make selections and there is a lot to like about fixes that don’t involve selections.

Here’s how to use Contrast Masking to fix an under exposed image:

Open your image and duplicate the background layer. Target this duplicate layer in the Layers palette.

contrast_masking_1.jpg

Desaturate this layer by choosing Image > Adjustments > Desaturate. Right now the default convert to black and white is just fine.

contrast_masking_2.jpg

Alter the blend mode of this layer to Overlay.

contrast_masking_3.jpg

To invert this black and white layer choose Image > Adjustments > Invert – this gives a negative of the image.

Adjust the layer opacity to suit.

contrast_masking_4.jpg

Convert the top layer to a Smart Object by choosing Filter > Convert for Smart Filters.

contrast_masking_5.jpg

Now blur this layer by choosing Filter > Blur > Gaussian Blur. Adjust the Radius to adds some sharpening back to the image. Check the preview to get the best result for the image.

contrast_masking_6.jpg

Post originally from: Digital Photography Tips.

Check out our more Photography Tips at Photography Tips for Beginners, Portrait Photography Tips and Wedding Photography Tips.

Fixing Images with Contrast Masks in Photoshop


Digital Photography School

 
Comments Off on Fixing Images with Contrast Masks in Photoshop

Posted in Photography


Photoshop Digital Cosmetic Surgery 101 by Sean Armenta

03 Dec

In this episode, I share a very simple and easy way to achieve facial symmetry by cutting and pasting within the image. A lot of the times, the solutions for retouching are already in front of you. I will be offering a retouching workshop for photographers on June 25th. For more info and to register, visit www.preptopost.com Find me on Facebook – www.facebook.com/armenta.photo Follow me on Twitter – @armenta_photo
Video Rating: 4 / 5

The on your camera allows you to take control of exactly how much depth of field your camera has. What does that mean? Professional Photographer and digital expert Gavin Hoey www.gavtrain.com will explain how to achieve professional looking images with blurred backgrounds the set a small aperture. If you need a photo where as much as possible is in focus from front to back then set a large aperture.

 
Comments Off on Photoshop Digital Cosmetic Surgery 101 by Sean Armenta

Posted in Photography Videos