drowning, not waving Image by Sidereal
Nota Bene: I am not suicidal. xo
I bought this book of art from fellow Baltimore Flickie and deviantartist Lauren Simonutti.
The subtitle is, "31 visual attempts at a justification for suicide".
The word "justification" could possibly be misconstrued as advocation. It is not. Rather, it is a visual post-hoc exploration of wordless, unexplained self-termination, realized in iconic photography.
"Fewer than twenty percent of suicides leave a note"
These are Lauren’s visualizations of those silences.
Pages on the left quote the forensic determination of the incident. Pages on the right are Lauren’s photographic interpretation.
I have always been intrigued by the challenge of taking an idea, or a concept, or a mood, or a written passage, and representing it photographically, in a single image.
"She had taken off her hat and put it on the table" – Ernest Hemingway, "Hills Like White Elephants"
It’s a real challenge to portray that in a single image and deliver the full intent and meaning of the tableau. I think it can be done, if you’re good. Lauren chose 31 brief forensic reports and turned them into astonishing original photographs.
Lauren rejected some of her photos for particular cases because they were too coarse – a forearm with knife slashes, for example – when it could be expressed much more subtly by a piece of clothing, or a ring, or an ostensibly ordinary object. There are no wounds or blood in "drowning, not waving" – her photos are much more symbolic. I think it’s the subtlety of the photos that make it an extraordinary work.
Lauren does all her photography using large format film, and develops it in her own darkroom. It should be noted that she has nothing against digital photography, it’s just that film and chemicals are her chosen medium.
The construction of this work has also aided in Lauren’s personal development — but it’s probably best to let her explain that in her own words, in her book and in her blogs, so I shall not here.
Afterword:
I hope I’ve explained this book well. This book is not "fun" or "entertainment". This book is not for everyone.
[ By WebUrbanist in Technology & Vintage & Retro. ]
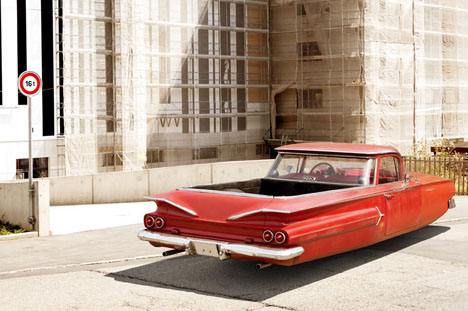
One of the most common concepts for the future has long been the wheel-free automobile, even before it was popularized in Back to the Future – but always, these looked almost shockingly familiar to our everyday rides.
Renaud Marion is well established in the realm of realistic photo editing, splicing everything from architecture to wild animals into ordinary city street scenes and letting the strange juxtapositions speak for themselves.
In this new series, he simply (albeit carefully) edits out all trace of wheels from various vintage vehicles, resulting in surreal portraits of apparently-flying cars. Even the dingiest rusting old 70′s-era auto seems somehow wonderfully otherworldly after he is done.
[ By WebUrbanist in Technology & Vintage & Retro. ]
[ By WebUrbanist in Technology & Vintage & Retro. ]
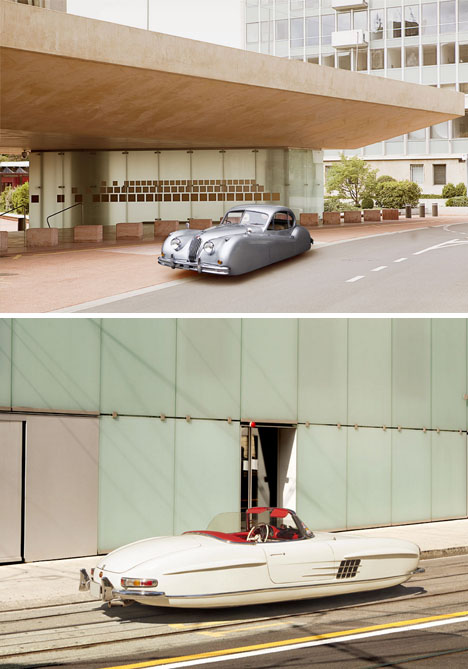
One of the most common concepts for the future has long been the wheel-free automobile, even before it was popularized in Back to the Future – but always, these looked almost shockingly familiar to our everyday rides.
Renaud Marion is well established in the realm of realistic photo editing, splicing everything from architecture to wild animals into ordinary city street scenes and letting the strange juxtapositions speak for themselves.
In this new series, he simply (albeit carefully) edits out all trace of wheels from various vintage vehicles, resulting in surreal portraits of apparently-flying cars. Even the dingiest rusting old 70′s-era auto seems somehow wonderfully otherworldly after he is done.
Want More? Click for Great Related Content on WebUrbanist:
So Retro: 15 Vintage-Inspired Website Designs
Who says websites have to be as modern as the medium itself? These 15 sites feature boldly retro typography, illustrations, photos and textures.
Click Here to Read More »»
Concept cars, dream machines and technology-packed prototypes give us hints of what the future holds. Here are 15 that have not, though they live on in our imaginations.
Click Here to Read More »»
[ By WebUrbanist in Technology & Vintage & Retro. ]
Findings by KRVIA Design Cell – Jan 12, 2013 Image by BMW Guggenheim Lab
Mapping Privacy in Public Spaces Project: Findings by KRVIA Design Cell
BMW Guggenheim Lab
January 12, 2013
Dr. Bhau Daji Lad Museum
Mumbai, India
Where do Mumbaikars find privacy in their city? The KRVIA Design Cell talked about their findings from the Mapping Privacy in Public Space research project, conducted through the Lab’s run. They discussed their methodology and their experience in data collection across the Lab’s six sites, and shared the visual imagery and maps they created from their research from over 200 participants.
The Beautiful Slime Image by michmutters
A visual study in 10 parts with iPhone 4S + Olloclip Macro.
Trying to find beauty in something that is not obviously beautiful. The snail survived the session.
Findings by KRVIA Design Cell – Jan 12, 2013 Image by BMW Guggenheim Lab
Mapping Privacy in Public Spaces Project: Findings by KRVIA Design Cell
BMW Guggenheim Lab
January 12, 2013
Dr. Bhau Daji Lad Museum
Mumbai, India
Where do Mumbaikars find privacy in their city? The KRVIA Design Cell talked about their findings from the Mapping Privacy in Public Space research project, conducted through the Lab’s run. They discussed their methodology and their experience in data collection across the Lab’s six sites, and shared the visual imagery and maps they created from their research from over 200 participants.
You’ve probably got a bag of them stashed away with old envelopes and Mr. Sketch markers.
Rubber stamps. The classic currency of Valentine’s Day and letters from your penpal.
Stamps don’t have to be boring or cheesy. They can be classy, and they can even be art.
Especially if you design them from your very own photos!
Follow along with our DIY stamp project as we take you from the pixel to the pad without breaking a sweat.
Make a Custom Photo Stamp!
p.s. Need Photoshop skillz? creativeLIVE is hosting a week of Photoshop classes. You can take over 40 different online classes taught by pros for free!
p.p.s. Happy V-Day! Sign up for Phoneography 101 and add your sweetheart (or pal) on us. TODAY ONLY!
Why it’s cool:
Remember that feeling of opening the mailbox and actually finding a letter addressed to you?
Give facebook a rest and show the world that snail mail isn’t dead!
Turn up the fun on your postcard with a stamp of your fat cat, or make that party invitation fancy with a stamp of people dancing.
The possibilities are endless so why not send someone a little love for the price of a stamp!
THE GOODS:
A stamp worthy photograph
A computer with Photoshop or similar
Some carving material, this Speedy-Cut rubber block is a great option
A cutting tool, this Speedball linoleum cutter is the stamp carvers weapon of choice
A No. 2 pencil
Tracing paper
An ink pad
An X-Acto knife or box cutter
A paint brush
Newspaper or a cutting mat
A block of wood or similar for mounting your stamp
Super glue
A NOTE ABOUT THE PHOTO:
When choosing a photo for your stamp aim for an image with high contrast and a plain background. The best designs will have strong lines and simple geometries.
STEP 1: GENTLEMAN, START YOUR STENCIL
Import your image into photoshop and turn up the contrast as needed. The more defined the lines of your photo the easier it will be to carve.
Now turn it black and white by going to Image>>Adjustments>>Desaturate.
STEP 2: ERASE THE EXTRAS
Use your eraser tool to get rid of any distracting background elements from your photo leaving a clean white backdrop.
Trickier portions you may want to select with your lasso tool and delete. When using the lasso just select, hit the delete key, and set the color to white.
STEP 3: SLIM IT DOWN NOW
To get that Banksy stencil effect go to Image>>Adjustments>>Threshold and adjust the toggle until you’ve got the prefered balance of black and white.
If you don’t get the perfect lines from your adjustment, you can always clean up your image with the brush and eraser tools.
Then you’re gonna tape your watercolor sheet of paper on top of the print out.
STEP 4: DE-DIGITIZE YOUR DESIGN
Pixels? Where we’re going, we don’t need pixels.
We’ve reached that magical time where we’ll take your pic off the computer and onto your carving surface. Start by printing your design in the size that you would like to carve, and grabbing your tracing paper and a No. 2 pencil.
Trace over your printed design using a dull pencil to give you thicker lines. Also, try and leave out any tiny details which will be too tricky to carve.
STEP 5: RUB IT IN
Now it’s time to break out a bucket of elbow grease for our transfer step. Place your tracing paper graphite side down onto a corner of your eraser and use the back of your cutting tool to rub over your design.
Make sure to hold down your tracing paper securely so it doesn’t slippity slide. Voilà! It transfers just that easy.
STEP 6: CUT IT OUT
Use your exacto knife or box cutter to trim down your stamp block to just the area surrounding your image. Be careful: These things are sharp!
Start with the smallest blade of your cutting tool, carving around the outside edges of your stencil. You may also want to carve any small details first just in case your lines start to smudge. Apply only light pressure when making cuts. You can always go back and cut deeper if you need to.
Once you have your outline carved, you can switch to a larger blade to carve out unfilled space. Your paint brush will help to clear off the dusty rubber bits that build up while carving.
Hint: If you’re not sure whether to cut something out or not, don’t! Wait until after you’ve tested your design to see how your stamp looks. Its a lot easier to take pieces off afterwards then to glue them back on!
STEP 7: TEST THE INKY WATERS
Ink up your carved creation with your ink pad and press it firmly into a piece of scratch paper. This will show you any stray dots or dashes that may need to be removed.
Excess rubber bits will show up black after you’ve tested your stamp and can be easily airbrushed out with your cutting tool.
STEP 8: MOUNT YOUR MASTERPIECE
A little super glue and a wooden block will work wonders to class up that already ravishing stamp of yours.
Don’t limit yourself though, mount your stamp however you like: on a domino, an oversized lego, a serving spoon, or on the back of an old pattern block.
KEEP STAMPING
Use your new cutting tools to carve the ultimate pumpkin!
Turn your stamp into a fashion statement! Use it to design t-shirts, make earrings, or decorate your kicks.
Use your stamp to create a custom iPhone case. Get yourself a clear plastic case, cut out a template, and stamp away.
Take your game up tp the next level with linoleum printing (think rubber stamps, just on a bigger scale).
Related posts:
Mykea: Photos + Ikea = Custom Furniture Art Darn you Ikea: so easy on the wallet, so hard…
Make Custom-Printed Fabric Using Your Photos Don’t miss our second New York Photo Safari this Sunday!…
Turn your photos into a custom sketch: The best $ 1 you will ever spend The almighty dollar doesn’t go as far as it once…
Findings by KRVIA Design Cell – Jan 12, 2013 Image by BMW Guggenheim Lab
Mapping Privacy in Public Spaces Project: Findings by KRVIA Design Cell
BMW Guggenheim Lab
January 12, 2013
Dr. Bhau Daji Lad Museum
Mumbai, India
Where do Mumbaikars find privacy in their city? The KRVIA Design Cell talked about their findings from the Mapping Privacy in Public Space research project, conducted through the Lab’s run. They discussed their methodology and their experience in data collection across the Lab’s six sites, and shared the visual imagery and maps they created from their research from over 200 participants.
All you need is love. But a little chocolate now and then doesn’t hurt. Charles M. Schulz Valentine’s Day is a great reason to take a set of fantastic “love story” photos. Also, it could be a gift for the occasion. Your sweetheart took part in this session and the gift would not be a surprise. However, these photos will Continue Reading
The post 101 Romantic Photos to Set Your Valentine’s Day Mood appeared first on Photodoto.
Flickr users may be alarmed to learn some of their private images could have been temporarily viewable publicly. Yahoo’s photo sharing site alerted affected users with an email message last week, detailing the error and explaining what steps to take. According to Flickr, a software bug resulted in some private images, uploaded between April – December 2012 becoming public for a short period from January 18th to February 7th this year. Are photos posted on the Internet ever really private? Click through for more details and analysis on connect.dpreview.com.


 When choosing a photo for your stamp aim for an image with high contrast and a plain background. The best designs will have strong lines and simple geometries.
 Import your image into photoshop and turn up the contrast as needed. The more defined the lines of your photo the easier it will be to carve.
  Use your eraser tool to get rid of any distracting background elements from your photo leaving a clean white backdrop.
  To get that Banksy stencil effect go to Image>>Adjustments>>Threshold and adjust the toggle until you’ve got the prefered balance of black and white.
  Pixels? Where we’re going, we don’t need pixels.
  Now it’s time to break out a bucket of elbow grease for our transfer step. Place your tracing paper graphite side down onto a corner of your eraser and use the back of your cutting tool to rub over your design.
  Use your exacto knife or box cutter to trim down your stamp block to just the area surrounding your image. Be careful: These things are sharp!
 Ink up your carved creation with your ink pad and press it firmly into a piece of scratch paper. This will show you any stray dots or dashes that may need to be removed.
  A little super glue and a wooden block will work wonders to class up that already ravishing stamp of yours.


You must be logged in to post a comment.