RSS
 

Posts Tagged ‘Photos’

The Best Way to Delete Photos From Your Memory Card

22 Jan

The post The Best Way to Delete Photos From Your Memory Card appeared first on Digital Photography School. It was authored by Meredith Clark.

the best way to delete photos from your memory card

When it comes to photography, we spend most of our time thinking about taking photos – lighting, composition, exposure, and posing. Then, once the photo is taken, we may start to think about post-processing, gently nudging the photo along until it becomes exactly what we’ve pictured in our mind’s eye. Once that’s accomplished, we do it all over again.

portrait of two girls how to delete photos from memory cards

Back in high school and college, I shot film. I can vividly remember running out, and sometimes having to wait weeks until I was able to buy more. Our public high school relied heavily on film donations, and sometimes when there wasn’t any left, our teacher would have us walk around campus with our pointer fingers and thumbs shaped into a rectangle, pretending to take photographs. Now that digital cameras are on the scene and we’re using memory cards in place of film, the number of photographs that we can take in any given week or month is nearly endless.

You may have noticed that I said “nearly” endless, and that’s because memory cards do have a lifespan and will not last indefinitely. That said, there are a few things we can do to maximize the lifespan of our memory cards, including deleting our photos off the memory card in the most efficient manner possible. This isn’t something that’s talked about all that often, but when it comes down to it, it is really simple.

So if you’re looking for the best way to delete photos from your memory cards, read on!

Less desirable ways to delete photos

If your memory card is full, you may be tempted to use one of these methods to delete your photos.

However, I recommend you avoid them if at all possible.

So here are the ways you should not delete your photos:

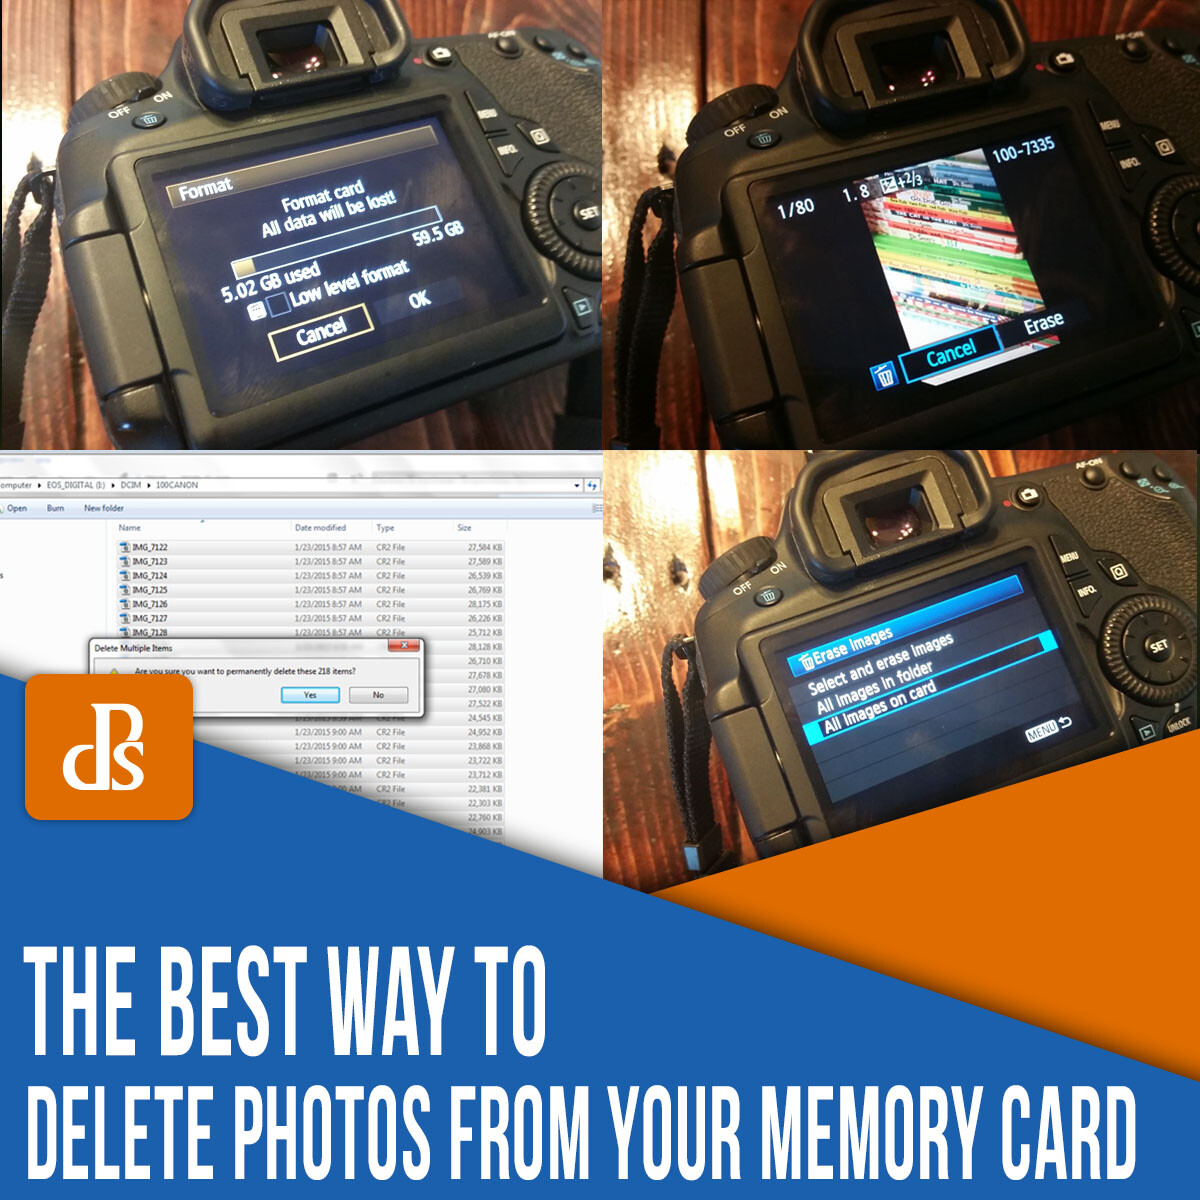
Getting rid of each photo individually through the camera by using the Delete or Erase button

If you’re in the middle of a shoot and you take a bad photo, you may be tempted to delete it right then and there with the Delete button.

But this is far from ideal. First, it’s always a good idea to check your images on the computer screen before deleting them forever, because you never know; your image may have some redeeming quality, one that you missed on your tiny camera LCD.

Plus, it’s just not the best way to get rid of your images from a card-health perspective, as I’ll explain in a moment.

deleting an image from your memory card directly on the camera LCD screen

Deleting all photos in-camera with the Delete All option

Once you’ve transferred your photos over to your computer, you can always pop the memory card back into your camera and hit the Erase all images on card button.

But again, this isn’t the best way to keep your card healthy.

Erasing all the images on your card via the LCD screen

Deleting via your computer

Here’s a third way to delete photos from your memory card:

Plug the camera or memory card into the computer, then drag all the photos into the Recycle Bin.

Is this a convenient way to delete images?

Absolutely.

But it’s not the most desirable way to get it done.

Deleting images from your computer

Most desirable way to delete photos

If you’re looking to delete photos off your memory card in the quickest, most efficient, least harmful way, then here’s what I recommend:

Delete with your camera’s Format function

In other words:

Transfer your photos to your PC or an external hard drive.

Stick the card back in your camera and head into the menu.

Find the Format option.

And hit OK.

This is my suggested way of deleting photos off your memory card, and I recommend you use it every single time you need to delete photos, without fail.

(It’s what I do!)

formatting memory cards in-camera is the best way to delete photos from your memory cards

Why are some methods better than others?

In the end, all of the above methods work toward the same end, in that they remove the images from your card.

However, the first three deletion methods are actually more taxing to the memory card than using the card’s Format function. I’ve heard it explained like this:

Imagine that your memory card has a shelf-life of 1,000 uses. Let’s say that you go out and take 500 photos; that’s 500 uses of your memory card. You then upload the photos to your computer, and then individually delete each photo using the Delete button on your camera. Deleting each photo individually counts as another 500 uses on your card. So in all, you’ve just spent 1,000 uses of your memory card, leaving you with no uses left on that card.

On the other hand, imagine that you’ve captured your 500 photos, but instead of deleting them with your Delete button, you use your camera’s Format function. Formatting works in a different way than deleting, because it only deletes the directory files rather than the images themselves. This allows the images to be overwritten the next time you take a picture. Therefore, formatting only counts as one use of your memory card, regardless of how many photos you’re deleting.

So in the scenario above, you’d have used only 501 of your memory card’s uses, as opposed to 1,000 when deleting manually. Certainly, memory cards available today will be able to handle far more than 1,000 uses, but the general logic still holds – formatting your card causes less wear and tear on your memory card than other ways of deleting images.

Additionally, because formatting only deletes the directory file instead of the images themselves, images on a card that has been formatted are typically much easier to recover (if needed) than images that are deleted manually, assuming you did not overwrite the formatted images by taking more photos.

Not a bad trick to have up your sleeve in case of emergencies, right?

I’d also like to add that I have personally seen a difference in the amount of corrupted images/cards that I’ve come across since I’ve been formatting cards.

These days, it’s pretty rare that I delete even a single image using any method other than formatting.

How often should you format?

Some people like to wait until their card is totally full and then do their formatting.

Personally, I like to format my card before each new photo session. It just makes sense to start fresh each time, because I can then upload everything on the card to one location and keep my files organized.

But this is really a matter of personal preference, at least as far as I’m concerned.

The one hard and fast suggestion I do have when it comes to formatting is simply to format the card in whichever camera you plan to use it in next. So if you’re going to be shooting with your Nikon body, make sure you’ve first formatted your card with that Nikon body. And if you’re going to be shooting with your Canon body, format with the Canon body before heading out.

Make sense?

How to delete photos from a memory card: Conclusion

Now that you’ve finished this article, you’re well-equipped to delete photos from your memory cards (the right way).

So make sure to always format in-camera.

Your photos and your memory cards will thank you for it!

Now over to you:

How do you typically delete images, and why? Share your thoughts in the comments below!

The post The Best Way to Delete Photos From Your Memory Card appeared first on Digital Photography School. It was authored by Meredith Clark.


Digital Photography School

 
Comments Off on The Best Way to Delete Photos From Your Memory Card

Posted in Photography


How to Avoid Blurry Photos by Choosing the Right Autofocus Mode

05 Jan

The post How to Avoid Blurry Photos by Choosing the Right Autofocus Mode appeared first on Digital Photography School. It was authored by Lynford Morton.

autofocus mode

Sometimes the light is perfect, the moment is right, but when you get home, you find that your photo is blurry. Arrgh!

Why are your pictures blurry? One obvious reason is that your camera isn’t focused properly.

You see, while today’s cameras and lenses can help you quickly take sharp images in a wide variety of situations, you must first choose the right autofocus mode.

So here are some questions to help you diagnose any blurry-photo situations – so you can choose the correct autofocus settings, consistently!

autofocus modes

Are you using the auto-area autofocus mode or the single-point autofocus mode?

Who gets to decide your focus points?

That’s what you’re deciding when you choose between the auto-area AF mode versus the single-point AF mode.

With an auto-area autofocus mode, your camera decides what it should use as your focal point. It usually decides based on what looks most prominent in the viewfinder or is closest to the camera.

Is this a bad thing?

Well, it can work if your subject is obvious and there are no potential distractions. But what do you do when you’re trying to focus on a smaller subject within the frame?

For more control, you choose a single point autofocus setting.

The single-point mode allows you to choose your specific autofocus point (check your camera’s manual if you aren’t sure how to do this).

After all, only you, not your camera, know where your subject is – and where you want to position it within your composition.

(Also, note that your camera offers several additional AF area modes – but it’s a good idea to start by choosing between the auto-area mode and the single-point mode.)

Is your subject moving?

Most DSLR cameras give you four basic options for autofocus settings: single, continuous, auto, and manual.

To help you choose the right option, ask yourself, “Is my subject moving?”

Then, based on your answer, read the relevant advice below:

No, my subject is not moving

purple orchid close-up

If your subject is not moving, choose “AF-S” on your camera (though this mode is referred to as “One Shot” on Canon cameras).

AF-S acquires and locks the focus as soon as you half-press the shutter button. If your subject stays at the exact same distance from the camera, your photo will be in focus (and you’ll be able to keep taking photos and can expect them to be in focus, too). If your subject moves, then your photos will be blurry.

In other words:

Your subject has to be stationary for AF-S to work. In fact, the shutter won’t fire if your subject is moving and your lens can’t acquire focus.

AF-S also allows you to recompose. Let’s say the autofocus point is in the center of the frame, but you want your subject positioned close to the edge. As long as you maintain a half-press on your shutter button, the focus will remain sharp on your subject.

Then you can move the camera slightly left or right, positioning your subject away from the center of the frame.

Yes, my subject is moving

tricolored heron

If your subject is moving, use continuous autofocus (“AF-C” on most cameras, though Canon calls it “AI Servo”).

With this mode, you can place your autofocus point over your subject, and the focus continues to adjust while you press the shutter button. This keeps your subject in focus as it moves.

For example, if someone is riding a bicycle, you can place the AF point on your subject and half-press the shutter button. As long as you’re half-pressing the shutter, the autofocus will adjust continuously, keeping your subject in focus as they move.

When you’re ready to take the photo, depress the shutter completely, and the camera will fire a sharp, in-focus image.

No, my subject isn’t moving, but it might

dog playing in the grass autofocus mode

A third option merges the functionality of the single autofocus and continuous autofocus modes. This hybrid mode (“AF-A” for Nikon or “AI Focus” for Canon) works differently depending on your camera.

However, AF-A always involves some sort of automatic switching between AF-S and AF-C modes, based on whether your camera perceives a moving subject or an unmoving subject.

With AF-A activated, you can focus on an unmoving subject exactly as if you are working in AF-S. But as soon as the subject moves, your camera will switch to AF-C and begin tracking.

Make sense?

For some photographers, this is the best of both worlds and allows you to deal with erratic subjects that repeatedly move and then stop suddenly (i.e., birds). However, you’ll often lose the ability to focus and recompose, because your camera may attempt to refocus based on the position of its autofocus point – so make sure to bear that in mind.

My autofocus just isn’t getting it right

You always have the option of turning off the autofocus function and choosing the manual focus setting.

When should you do this?

Well, if your camera is having trouble detecting your focus point, it might be more efficient to focus the camera yourself.

Note that you can turn off your autofocus on accident. So every now and then, when your camera can’t seem to focus, and you don’t hear the motor searching back and forth, check to see if you selected manual focus without meaning to. This can happen more frequently than you might think!

Other issues to consider

What if you set up your autofocus properly and the lens still won’t focus?

I’d recommend you consider these solutions:

  • You might be too close. Try backing away. If you are too near your subject, the camera may not be able to focus properly.
  • Your subject might not have enough contrast. Your image needs to have some contrast for most autofocus systems to work. If you try to photograph a solid sheet of white or any single-colored wall, most autofocus systems will struggle. Why? Cameras use differences in colors and tones to determine their focus. If a camera can’t find any contrast, it can’t focus.
  • You might have an extremely shallow depth of field. In this case, your autofocus is working, but the depth of field is so shallow, it’s hard to tell that your subject is in focus.
  • You have camera shake. When you depress the shutter, you move the camera. If the shutter speed is too slow, the camera picks up that movement, and it gives you a blurry photo. Make sure your shutter speed is faster than the equivalent of your focal length. For instance, if you are zoomed out to 100mm, your shutter speed should be 1/100s or faster to avoid camera shake.
  • You have motion blur. If your subject is moving quickly and your shutter speed is too slow, the photo will end up blurry – so make sure you’re using a fast-enough shutter speed to freeze all motion in the scene.

Choosing the right autofocus mode: Conclusion

Why are your pictures blurry?

If the answer is related to your autofocus mode, your fix could be as simple as choosing the right settings.

And to prevent any future blurry photos, make sure you use the process I’ve laid out above.

Do you have any other autofocus tips or tricks you’d like to share? Please do so in the comments below!

The post How to Avoid Blurry Photos by Choosing the Right Autofocus Mode appeared first on Digital Photography School. It was authored by Lynford Morton.


Digital Photography School

 
Comments Off on How to Avoid Blurry Photos by Choosing the Right Autofocus Mode

Posted in Photography


Cropping Your Photos In-Camera and in Post-Production: A Guide

25 Dec

The post Cropping Your Photos In-Camera and in Post-Production: A Guide appeared first on Digital Photography School. It was authored by Kevin Landwer-Johan.

Cropping your photos either in-camera or during post-production helps to create more interesting compositions. Capturing a strong composition as you take a photo is always satisfying, but can be difficult. 

Learning to compose well takes time and practice. However, you can often create better compositions by carefully cropping your photos as you are editing them.

woman out standing in a field for cropping photos
© Kevin Landwer-Johan

What is cropping?

Cropping is cutting or trimming parts of your photo. This is most often done to improve the composition or to alter the aspect ratio.

In the past, cropping involved a straight edge and a blade. These days, cropping happens on the computer and is much less aggressive; you can always hit “Undo” and try again if you make a mistake.

Cropping in-camera is a common term that’s not particularly correct. Cropping means a part of a photo is cut off. This alters the aspect ratio. You cannot do this when you are composing your images; you can only do this after you’ve taken them.

In other words:

You can compose your photos to include or exclude whatever you like, but this is not really cropping.

Some purists believe cropping your photos is wrong. They maintain that the image you capture should not be altered by cutting part of it out.

Other photographers are quite happy to leave excessive space around their main subject and crop to compose a better image as they are post-processing. 

I say, “Each to their own.” My preference is to compose well, then crop well when editing if I need to.

But only if I need to.

Cropping photos always reduces the number of pixels in an image. Cutting off a lot of a photo can affect its clarity and the ability to enlarge it (compared to an image that remains full and uncropped).

studio photo of a woman
© Kevin Landwer-Johan

When is it best to crop a photo?

Beginner photographers can benefit from cropping photos for two main reasons:

First, cropping your photos well can improve a poor composition. You can rescue a photo by reducing the amount of empty space or taking out distracting elements. When you have not taken the time to compose well, or are not yet sure how to create a good composition, cropping can help draw attention to your main subject.

Second, learning to crop well will help you better understand strong composition. It’s often easier to see how to improve a photo by cropping when you are sitting at your computer than when you’re trying to remember how to set an accurate exposure in the field. 

As you sit and look at a photo you’re editing, think about how it can be improved by trimming off the top or bottom. Or maybe by bringing the left or right edges closer to your main subject. 

farm landscape cropping your photos
© Kevin Landwer-Johan

When there’s no time pressure, you can experiment with how you want your compositions to look. You can make copies of a photo and try different crops to see which one you like best.

The main rule of composition I follow is to fill the frame. If I find that I have not done this well enough when I am taking a photo, it is my first consideration when I start to crop.

Maybe there’s something in the photo I had not noticed when I was taking it. Someone may have stepped into the edge of the frame as I pressed the shutter release. Sometimes, I’ll trim an edge so my main subject lines up with one of the rule of thirds gridlines, or sits at the intersection of these lines.

studio portrait of a man for cropping your photos
© Kevin Landwer-Johan

How do you know what to crop?

Will your photo look better if you crop it? That is the most important question to answer before trimming a photo. If you think your image will look better, go ahead and crop. But be purposeful about what you do.

Consider the lines in your photo. Often, lines in a composition will be affected if you crop. Part of the digital cropping process can include rotating your image. This allows you to straighten a crooked horizon or get vertical lines in your photo looking natural.

Think about the rule of thirds. Will cropping help your photo conform to this compositional standard? It can be much easier to apply this rule during post-processing than when you are taking a photo. You can often be much more precise when editing, depending on what your subject is.

forging brass
© Kevin Landwer-Johan

Look for distracting elements. Does everything fill the frame and support the main subject of your photograph? If not, think about how you could crop these elements out. Sometimes, it might be power lines at the top of your photo. Or a power pole or a person at one edge. 

Square framing will transform the composition into something completely different. For some subjects, this will be perfect. Not many of us use square format cameras, so to achieve this look we must crop during the editing process. 

Think about cropping as you compose. Sometimes, you’ll see that a square will frame your subject better than a rectangle. Or that a wide, panoramic style will suit your subject better. I’ll often think about how I will crop an image as I am taking it if my subject does not fit the 3:2 ratio of my camera’s sensor.

white teapot square cropping photo
© Kevin Landwer-Johan

How do you crop your photo to fit a specific aspect ratio?

Sometimes, you may need to fit a photo to a specific aspect ratio, such as when you want to update your Facebook or website banner image. 

Here’s how I do that:

First, I’ll do a quick search to find the current size requirements of the place I want to use the image.

Then I’ll make a new blank canvas in Photoshop or Affinity Photo, one that matches the aspect ratio I need.

Next, I’ll drag and drop the photo I want to use onto that blank canvas.

Then I’ll resize the image and position it to appear the way I want it to look. 

When changing the aspect ratio of a photo, you need to consider how it will look and what you’ll be cropping out. Often, banner images are wider than a 3:2 camera-sensor ratio, so the top and/or bottom of the image will be sacrificed. Profile photos often need to fit a square format.

Placing your photo in a blank frame that fits the correct aspect ratio allows you to move it around within the space to see how it best fits, or if it doesn’t. 

close-up of a woman with a chocolate ice cream
© Kevin Landwer-Johan

Cropping your photos: Conclusion

Cropping your photos can help you learn to create better compositions. When taking your time to ponder an image on your computer monitor, you can often see how you could have framed the shot better.

Aim to fill your frame. Experiment with copies of your photos. Crop each copy differently to see which composition you like best.

And by repeating this process with every image you edit, you’ll soon find that you’re cropping fewer of your photos.

The post Cropping Your Photos In-Camera and in Post-Production: A Guide appeared first on Digital Photography School. It was authored by Kevin Landwer-Johan.


Digital Photography School

 
Comments Off on Cropping Your Photos In-Camera and in Post-Production: A Guide

Posted in Photography


How to Merge Photos in Affinity Photo: A Step-by-Step Guide

16 Dec

The post How to Merge Photos in Affinity Photo: A Step-by-Step Guide appeared first on Digital Photography School. It was authored by Kevin Landwer-Johan.

merge photos in affinity photo

If you want to merge photos in Affinity Photo, the process is surprisingly simple. But there are a few tips and tricks that will help you merge two or more photos – and help you make adjustments so your final image looks just the way you want it.

Digital imaging allows for endless manipulation and combining of photographs. Having a clear idea of what you want to achieve will make for a more efficient workflow. If you’re more interested in messing around and experimenting with how you can merge photos in Affinity, give yourself some time to play around. The possibilities are endless.

Getting started with merging photos may seem daunting. But the tools in Affinity Photo are designed to help you merge photos easily. The process can be completed quickly or it can take ages, depending on the photos you choose and the degree of detail you want.

Merge photos in Affinity Photo
Here’s a Tuktuk driver leaning on his vehicle in Khao San Road, Bangkok. This part of the city is very popular with budget travelers and is known for its bars and cheap accommodations.

What is a photo merge in Affinity Photo?

A photo merge in Affinity Photo is the combination of two or more images to create a new one. You can merge similar or very different images. 

For instance, I love creating photomontages. This involves merging many photos to create a single, cubist-like picture.

Merging several near-identical photos with different exposure values is known as high dynamic range (HDR) blending. You can also take a series of photos to make a panoramic image and merge them in Affinity Photo. These are very specific merging techniques that will not be covered in this article – but you will notice there are options under the top File menu for these functions.

In this article, I’ll take you through a step-by-step workflow for how to merge two photos in Affinity Photo. This will be helpful if you have two similar images you want to combine into one final, great-looking result.

For example:

If you’ve taken some portraits and your subject has blinked in many of the photos, you can use this technique to select their eyes from a photo where they are open and merge them with photos where their eyes are closed. That way, you can combine the best pose and facial expression with the best shot of your subject’s eyes.

two photos merged of a woman blinking
© Kevin Landwer-Johan | Nikon D800 | 85mm | 1/800s | f/2.8 | ISO 400

How to merge photos in Affinity: A step-by-step guide

Now let’s take a look at how to merge two images in Affinity Photo, starting with:

Step 1: Select your photos

One of the most critical aspects of merging photos in Affinity is selecting suitable images. This depends on what your aim is. You may want to create a very realistic-looking merge, or you might want to make an image that is a complete fantasy. 

Knowing what you want to achieve with your merge project will guide you in selecting photos. Picking photos taken with the same or a similar focal length lens is important when you want to achieve a realistic look. Trying to combine one photo taken with a 20mm lens and another with a 200mm lens will not look natural.

Photos taken from a similar perspective are also easier to merge for a more natural look. If you have one image taken from a low angle and the other taken looking down from above, then it will be very difficult to merge them so the final image looks realistic.

Lighting is also an important consideration. Having one of your photos taken in the shade and the other in full sunshine will make it more challenging to combine them for a natural-looking result.

To keep things simple, I am using two photos taken with the same lens and at the same location from a similar perspective:

Tuktuk driver in Bangkok for merging
This Tuktuk driver photo will be used for the background.
Nikon D700 | 20mm | 1/250s | f/5.6 | ISO 400
© Kevin Landwer-Johan
guy with a flaming wallet for merging
This guy with a flaming wallet will be merged with the background image.
Nikon D700 | 20mm | 1/125s | f/4 | ISO 400
©Kevin Landwer-Johan

Step 2: Combine and size your images

Select the photo you want as the foreground. Copy and paste it onto your background image. 

If one of the photos is bigger than the other, you’ll need to resize it. Select the Move Tool from the Tools panel (or tap the “V” key to select it).

Then click on the layer you want to resize in the Layers panel. Click and drag a corner of the bounding box that surrounds the photo. If you are resizing the background layer, you’ll first need to check the padlock icon in the Layers Panel to unlock it.

You can reduce the opacity of your top layer as you resize and position your photos. Drag the slider in the Layers panel down to about 50%. This makes it easier to see when your photo is the right size and in the best location. Then turn the opacity level back up to 100% again.

Affinity photo screen grab

Step 3: Mask out unwanted content

Using the Selection Brush Tool (“W” on the keyboard), carefully select the areas of the foreground photo that you want to keep. This tool will auto-select based on contrast. So where there are elements with little contrast between what you’re selecting and the background, you may have to manually refine your selection.

Zoom in on problem areas and reduce the brush size, then select with precision. In places where the selection accidentally covers an area you don’t want to select, press and hold the Alt key (Option on a Mac) and paint over the area to deselect it.

Finally, look over the entire edge of your selection to ensure you’ve only selected areas that you want to be selected.

Once you’re satisfied with your selection, click the Refine button in the Tool menu above the image. A dialogue box will appear with various options, all designed to help you refine your selection. Use the various sliders to make adjustments. How much you need to move the sliders is somewhat based on the size and resolution of the photos you’re working on.

When you’re finished, click Apply.

At the bottom of the Layers panel, click on the Mask Layer icon. This is a light rectangle with a dark circle in it. The unwanted parts of your image will become masked out. You can make further alterations to this layer mask using the Brush tool. To remove more of the image, paint with a black brush. You can switch to a white brush to restore the areas you painted out.

Affinity photo screen grab illustrating refining a selection

Step 4: Make further adjustments

Now your two images should be merged and looking more how you want them to.

However, depending on the photos you’re working with, you may still want to make some changes. If the lighting in both photos is different, you can use a Linear or Radial Gradient filter to add light. 

In my example, I used a Blur filter on the background image to help create a sense of depth. To do this, select Filters>Blur>Gaussian Blur from the top menu. Move the slider until you have a satisfactory amount of blur.

I also used a Levels adjustment on my background layer so that it better matched the tones of my foreground photo.

This step can be endless. There are many adjustments you can make to get your two photos looking as similar or as different as you like.

merge photos in Affinity screen grab

How to merge photos in Affinity: conclusion

You can merge photos in Affinity Photo with great ease and effectiveness.

Note that having a clear idea of what you want to create helps speed up the process of merging images. When you are not sure of the final outcome, you can spend endless hours experimenting until you get a result you are happy with.

Practice with the various tools and learn how to use them well. Duplicating your layers and preserving the originals is a good safety step. If you’ve duplicated your layers and hidden them, you can always revert back to the original if you make a mistake or overwork a layer.

Have fun while you learn to merge photos in Affinity. Take your time, experiment, and be as creative as you like!

The post How to Merge Photos in Affinity Photo: A Step-by-Step Guide appeared first on Digital Photography School. It was authored by Kevin Landwer-Johan.


Digital Photography School

 
Comments Off on How to Merge Photos in Affinity Photo: A Step-by-Step Guide

Posted in Photography


Google Photos now syncs ‘liked’ images with Apple’s iOS Camera Roll

11 Dec

Apple and Google haven’t always gotten along, but there are times when the two work together to make life easier for end-users, regardless of what mobile operating system they’re using. One of the latest examples of this is a new feature baked into Google Photos that makes it possible to sync ‘liked’ and ‘favorited’ images between Google Photos and the iOS Camera Roll app.

Screenshots of the new settings in the Google Photos iOS app. Click to enlarge.

As visible in the below demonstration from Android Police, who first reported on the feature, a simple setting within the Google Photos app will make it so images ‘liked’ in the iOS Camera Roll app will become ‘starred’ in your Google Photos account.

We tested the new feature and can confirm we had a similar experience to Android Police; syncing happens slightly faster when ‘starring’ an image in Google Photos than it does when ‘liking’ an image in the iOS Camera Roll. This is likely because when ‘liking’ an image in the iOS Camera Roll, Google Photos is running as a background task, whereas when using Google Photos, the synchronization process can be triggered immediately.

The feature should be live for all Google Photos users and has worked seamlessly across both an iPhone XS and iPad Pro (11-inch) in our testing. If you don’t have it already, you can download the Google Photos app for free in the iOS App Store.

Articles: Digital Photography Review (dpreview.com)

 
Comments Off on Google Photos now syncs ‘liked’ images with Apple’s iOS Camera Roll

Posted in Uncategorized


dPS Roundup: The Best Photos of November

09 Dec

The post dPS Roundup: The Best Photos of November appeared first on Digital Photography School. It was authored by Sime.

We’re back with our second in the series of monthly roundups! November was a fun month, with Wheels, Down, Coffee, and Dark & Moody as our weekly challenges.

Join the challenges here!

For our Wheels challenge, I was really drawn to the unique red light in this photograph from Ira Papamalama:

light painting bicycle
© Ira Papamalama

The reflections in the photograph of the car wheels from Ivan Galic were quite good, too. (Plus, there’s a Porsche, and…well…it’s a Porsche!)

porsche wide-angle
© Ivan Galic

Moving swiftly on to our theme, Down, we had a handful of drone photographs along with some other great images; it was really fun to go through the photos posted in the Facebook group and on the blog and see how everyone interpreted the theme!

This image grabbed me – there’s so much going on:

cityscape looking down
© Cristina Salvacion

And our second choice in the Down challenge came from a regular challenge participant, Chinmoy Biswas. The shadow and action in the photograph is really great!

fishing boat on the water
© Chinmoy Biswas

The next challenge was dear to my heart…well…to my whole body? Coffee!

This first photograph from Jin Mamlouk is great! Beans, steam, and a unique mug – winning! Thanks, Jin.

coffee with steam
© Jin Mamlouk

And in the photograph below by Amal, it’s the light and shadow that really sets the shot apart! The layering (as my good friend Deanne Fitzmaurice always tells me) with the coffee, the light, and the newspaper, is all great. Well done, Amal.

coffee from above
© Amal

Another regular to our weekly challenge, Moncat, dropped a lovely photograph into the Dark & Moody challenge this month! I imagined rowing into the fog on an eerie morning – but maybe that’s just me. Great photo!

misty mountains
© Moncat

And rounding out our best weekly challenge photos of November is this photograph from matt93, another cracking photograph with all the makings of a dark and moody scene. Thanks, Matt!

misty sunrise
© matt93

Don’t forget, you can join all of our weekly challenges for free. To sharpen your skills, go ahead and submit a photo to all of the past challenges (click here). Or enter the latest challenge, Light Painting, which is still open (here).

Our weekly challenge isn’t about the best photographers showcasing their work. It’s about getting us all out to make photographs and to keep practicing so we get better at this fantastic medium that we’ve chosen! Come and interact and get feedback in the private Facebook group, and submit your photograph there if you’d like!

See you soon!

Simon

The post dPS Roundup: The Best Photos of November appeared first on Digital Photography School. It was authored by Sime.


Digital Photography School

 
Comments Off on dPS Roundup: The Best Photos of November

Posted in Photography


Stellar Photo Recovery Software Review: An Easy Way to Reclaim Your Precious Photos

07 Dec

The post Stellar Photo Recovery Software Review: An Easy Way to Reclaim Your Precious Photos appeared first on Digital Photography School. It was authored by Jaymes Dempsey.

Stellar photo recovery software review

Have you ever accidentally deleted photos or videos from your memory cards? Or, even worse, have you ever formatted your card, and only then realize it contained valuable photos or videos? 

It happens to the best of us. 

In fact, if you’ve never experienced either of the above situations, consider yourself lucky. Because while digital files are convenient, they’re all too easy to lose – and if you don’t have the right recovery software, those files will be gone forever. 

That’s where Stellar Photo Recovery comes in.

Stellar Photo Recovery software review

You see, Stellar Photo Recovery offers an impressive set of DIY recovery tools for photographers and videographers; according to the website, you can recover almost any file on almost any device. And you can purchase a package that lets you repair corrupted files, which is tremendously useful for situations where your photos or videos have been damaged. 

But how does Stellar Photo Recovery perform? Does it work as well as advertised? And how do you use it for file recovery? 

That’s what this article is all about. 

In it, I put Stellar Photo Recovery to the test, using some formatted memory cards of my own. 

And I share all my findings with you. 

So to find out whether Stellar Photo Recovery is a worthy purchase…

(Spoiler alert: The software works incredibly well!)

…keep reading.

Stellar Photo Recovery: Why might you need it?

Stellar Photo Recovery is a DIY recovery package, designed to help you find and recover lost photos, videos, and audio files.

But why, specifically, might you need Stellar Photo Recovery? 

Imagine you’re out taking pictures and fill up several cards. You go home, download all the photos to your storage drives, and then – as many photographers do – format every card in-camera. 

Moments later, you feel a dawning sense of horror, as you realize that you failed to transfer the photos from one of the now formatted cards.

At this point, your hard-earned photos are deleted, the card has been wiped, and your only real option is recovery software. 

That’s just one of the many ways you could accidentally delete photos and videos. You could also format a hard drive and realize it had photos you needed. Or you could stick a full memory card into your camera while out shooting, format it, then suddenly realize that you hadn’t transferred the previous photos over to your storage drives. Or you could clear a flash drive, then realize it had valuable media that you needed for a client. 

You could also end up with corrupted files thanks to faulty memory cards or old drives or viruses.

If you’ve been doing photography for a while, then you’re probably aware: 

This sort of thing happens all the time. If it hasn’t happened to you yet, then it will, because it’s just the nature of having lots of easy-to-wipe memory cards. You’ll make a mistake. 

And when you do, you’ll want to have software like Stellar Photo Recovery. 

Right off the bat, you’ll be impressed by the sheer volume of scenarios Stellar Photo Recovery can handle. You’ve got the option to recover: 

  • A whole host of image file formats, including Canon RAW files, Fujifilm RAW files, Sony RAW files, Nikon RAW files, Olympus RAW files, Pentax RAW files, Panasonic RAW files, JPEGs, TIFFs, GIFs, PNGs, and PSDs, plus quite a few others
  • Lots of video formats, including MP4, AVI, MPEG, AVI, 3GP, and so much more
  • Audio file formats, including MP3, WAV, MIDI, M4P, and AU

And you can do your recovery on a bevy of storage devices, including CF cards, SD cards of every kind, XQD cards, flash drives, HDD drives, and more (even if the drives are encrypted). 

Plus, it doesn’t matter whether you’ve deleted individual files or simply formatted the storage device, because Stellar Photo Recovery can deal with both.

Honestly, if you’ve lost any type of photo, video, or audio to deletion or corruption, Stellar Photo Recovery Software probably has you covered.

Using Stellar Photo Recovery: A simple, three-step process

Using Stellar Photo Recovery is incredibly easy. 

Once you have the software downloaded on your computer (you can grab your copy here), you’ll simply need to follow a three-step process:

Step 1: Select the drive in need of recovery, and hit “Scan”

When you first open Stellar Photo Recovery, you’ll see a list of all accessible drives:

Stellar Photo Recovery software review folders

By placing a checkmark next to the location you need to recover files from, you’re telling the software where to look. To save time on the scan, I’d recommend checking only the precise drive/memory card on which your files originally existed. 

Then hit Scan:

click on "Scan"

As soon as you’ve done this, the software will start checking your drive for any and all media. This might take a while, depending on the size of your drive; I used a 32 GB SD card for my test, and the scan lasted around 30 minutes. 

Waiting while the computer scans

You can minimize the window while you wait and leave it scanning in the background. 

By the way, if you’re in a hurry, you can always shorten the scan time by heading into the Advanced Settings menu:

click on the "Advanced Settings" icon

And clicking on File List:

Check the file type you're after

You’ll then see a list of all file types you can recover. By checking the files you’re after, you’re telling Stellar Photo Recovery where to focus its search.

Select the file types you'd like to see

 Neat, right?

Step 2: Go through your recoverable files and select the ones you’d like to restore

Once the scan is complete, the software will report the number and size of the files it found:

Stellar will show you what it found when scanning

Then you can go through the folders and preview files for recovery (not all file types will offer previews, but my Olympus RAW files showed up nice and clear). 

Stellar Photo Recovery software review RAW files

By putting a checkmark next to a file, you indicate that you’d like to recover it:

check off photos to recover

So make sure you do this with all relevant files.

Step 3: Hit “Recover” and watch as your images appear!

Once you’ve checked off all the files you want to recover, hit the Recover button:

Select "Recover" to get your photos

Then select the folder where you’d like to save the recovered files:

Choose where to save your recovered photos

Finally, click Start Saving

Click "Start Saving"

You can then watch (in the Saving Data window) as your files are recovered and saved. This isn’t a long process; each RAW image I recovered took about one second to save, which means that you can recover quite a few images in a minute or two.

Recovering images

Then, if you go to the folder where you’ve saved the files, you’ll see them completely intact and unharmed. 

Images I recovered

One nice additional feature here is the ability to go back and recover different photos, even once you’ve done one recovery sweep. So if you accidentally recovered the wrong files, you can just go back into the list of recoverable media and check off a different set of files – without having to scan the drive again.

What’s even nicer is that you can save your scan data when you exit Stellar Photo Recovery. So if you’re tired of recovering images and want to continue later, you can work from a previously-scanned drive without needing to go through the whole process again. 

Stellar Photo Recovery: Performance

Speaking as a longtime photographer, I’m always worried about losing my photos. 

Yet I’ve never managed to find any recovery software that I really, truly trust, especially because there’s all sorts of dodgy options out there that aren’t worth the money. 

But I am genuinely so impressed by Stellar Photo Recovery. It’s easy to set up, easy to use, and it works amazingly well. I tested it out on a 32 GB SD card that was full of Olympus RAW files. The card had been formatted twice in recent days – but Stellar Photo Recovery managed to bring back every photo from before the second wipe, and what appeared to be all 400+ photos from before the first wipe, all in perfect condition.

The most difficult thing about Stellar Photo Recovery is the waiting – as I explained above, the scan takes some time. But you don’t have to babysit the software, so you can easily get the scan started, go do something else, and come back in 30 minutes or so. 

Now, I do think it’s important to be up front, here:

I didn’t try to restore any corrupted files, and my sense is that Stellar Photo Recovery works here but won’t always do a perfect job. So it’s certainly worth using for that sort of thing, but while recognizing that repairing corrupt files is inherently difficult and might not happen.

Also recognize that the more you overwrite files, the more Stellar Photo Recovery will struggle to recover the originals. 

In other words:

Don’t take pictures, format the card, take more pictures, and only then try to recover the originals; instead, make sure any accidentally-formatted cards are immediately put aside for recovery. 

If you don’t do this, your results will vary, depending on the amount of new photos you took.

Make sense?

Ultimately, I’m now a huge fan of Stellar Photo Recovery. And I guarantee it’ll be the software I turn to the next time I lose images. 

Stellar Photo Recovery: Pricing

There are three Stellar Photo Recovery packages (all are available for both Mac and Windows): 

The Standard package, which costs $ 39.99 for a one-year subscription, and offers complete recovery capabilities, but cannot repair corrupted files. 

The Professional package, which costs $ 49.99 for a one-year subscription, and offers complete recovery capabilities plus the ability to repair corrupted photo files. 

And the Premium package, which costs $ 69.99 for a one-year subscription, and offers complete recovery capabilities, the ability to repair corrupted photo files, plus the ability to repair corrupted video files.

Stellar Photo Recovery software review pricing

Which should you get?

If you’re just looking to recover deleted files, the Standard package will work just fine. 

But if you have corrupted image files, then the Professional package is a must. 

And if you have corrupted video files, you’ll want to go for the Premium option. 

So make sure to grab your version of Stellar Photo Recovery software here.

Who should get Stellar Photo Recovery?

Stellar Photo Recovery is a fantastic option for photographers and videographers looking to recover files. 

It’s simple to use, its performance is impeccable, and I can’t recommend it enough. 

So the next time you find yourself needing to perform file recovery or repair…

…turn to Stellar Photo Recovery.

Stellar is a paid partner of dPS.

The post Stellar Photo Recovery Software Review: An Easy Way to Reclaim Your Precious Photos appeared first on Digital Photography School. It was authored by Jaymes Dempsey.


Digital Photography School

 
Comments Off on Stellar Photo Recovery Software Review: An Easy Way to Reclaim Your Precious Photos

Posted in Photography


Lightroom Color Grading: An Easy Way to Supercharge Your Photos

25 Nov

The post Lightroom Color Grading: An Easy Way to Supercharge Your Photos appeared first on Digital Photography School. It was authored by Simon Ringsmuth.

The October 2020 update to Lightroom Classic introduced a feature called Color Grading, which puts an advanced color-correction tool in the hands of everyone who uses Lightroom.

For newcomers who have never tried this technique, it can feel a bit overwhelming.

But with a bit of practice, you’ll get the hang of Lightroom color grading in no time at all. And you’ll be able to give your photos the Hollywood treatment you never knew you could achieve!

young man portrait
Nikon D7100 | Nikon 85mm f/1.8G | 85mm | 1/2000s | f/1.8 | ISO 200

What is color grading?

While color grading is often associated with film productions, it applies to photography just as easily.

Color grading refers to the process of changing global attributes of an image to give it a specific look or feel. It’s a subjective, stylistic process that can involve many different types of edits, but generally involves changing the appearance of the highlights, shadows, and midtones of a picture. This allows a photographer to create a mood or tone, and convey a certain emotion to the viewer.

In a strict sense, any stylistic adjustments to an image could be considered color grading. Adjusting the HSL/Color panel or tweaking the tone curve are both valid color grading techniques.

However, when most editors talk about color grading, they are referring to the way a specific tint is applied to the shadows, highlights, and midtones.

A common color grading technique in movies, for instance, involves giving shadows a teal color and making midtones more orange. This gives a more intense, cinematic feel to films and the same is true for photos.

kids walking without color grading
Nikon D750 | 200mm | f/2.8 | 1/250s | f/2.8 | ISO 220. Ungraded.
kids walking with color grading
The same image as above, but with color grading applied in Lightroom. The shadows are slightly more teal, the highlights are slightly more yellow, and the midtones are just a bit more orange.

Color grading vs split toning

The Color Grading tool replaces a tool called Split Toning, which was available as its own panel in the Develop module in earlier versions of Lightroom.

Split Toning was like a beta version of Color Grading, in that it let users adjust the tint of shadows and highlights, but not the midtones. While this was certainly useful, the omission of midtone editing was a frustrating sore spot that dramatically limited the value of the tool.

Lightroom color grading split toning
The Lightroom Split Toning panel, which let users adjust the hue and saturation of only the highlights and shadows. The Color Grading tool does everything that Split Toning did and much more.

Color Grading contains all the functionality of Split Toning – and much more. In fact, any photos that were edited using Split Toning will have their adjustments completely intact thanks to the Color Grading tool.

In addition to midtone editing, the Color Grading tool introduces the vastly more useful color wheels in place of linear sliders:

Lightroom Color Grading panel

The Lightroom Color Grading tool: a step by step guide

While the color grading tool has incredible depth, accessing it and getting started could hardly be easier.

Open Lightroom and click on the Develop module.

Then open the Color Grading panel on the right side, and you’re all set.

The Lightroom Color Grading panel consists of three color wheels in the middle, a line of icons at the top, and two sliders at the bottom. Each of the color wheels lets you change the tint of its respective range: midtones, shadows, and highlights.

Lightroom Color Grading panel

Click and drag anywhere on one of the color wheels and you will immediately see the edit applied to your image. As you drag the slider, note that the distance from the center adjusts the saturation of the color grade, while the position of the slider around the circle adjusts its hue.

You can also click and drag the inner circle to adjust only the saturation and use the outer circle to adjust the hue. The slider at the bottom can be used to change the overall luminance of the midtones, shadows, or highlights, depending on which color wheel you are using.

Lightroom Color Grading panel
You can also hold the Shift key to adjust only the saturation, or Ctrl/Cmd to adjust only the hue.

Click and hold the eye icon just below and to the right of a color wheel to temporarily remove the tint adjustment, and then release the mouse button to re-engage the adjustment. Double-click anywhere inside a color wheel to reset the tint if you want to start over.

The Blending slider at the bottom of the Color Grading panel lets you adjust how much the midtones, shadows, and highlights blend together.

The Balance slider lets you customize the overall balance of highlights and shadows; values greater than 0 make the highlight edits more pronounced, while values less than 0 increase the presence of the shadow edits.

Lightroom Color Grading blending balance
Move Blending to the left to keep your shadows, midtones, and highlights separate from each other. Move Blending to the right to make your edits blend in with one another. Slide Balance to the left to make your edits to the shadows apply to more of the image. Slide it to the right to make your highlight edits more prominent. Or just leave these sliders alone and you’ll probably be just fine.

Look closely at the top of the Color Grading panel and you will see a strange-looking row of circular icons. The first appears to be some kind of alien hieroglyph, while the rest look like circles with different shading patterns. These switch between the different modes within the Color Grading panel.

The first icon, with three small circles, shows all three editing options at once: Highlights, Midtones, and Shadows. The others let you adjust a single parameter at a time. The final icon is a global Hue/Saturation/Luminance adjustment.

Lightroom Color Grading panel
These icons let you switch between editing highlights/shadows/midtones at once and editing each one individually. The final circle is a global Hue/Saturation/Luminance adjustment.

If you want more fine-tuned adjustments, you can click on one of the icons that show a much larger version of any of the three adjustment parameters. This can help you select your adjustments with pinpoint accuracy and give you greater control over precisely how your edits are implemented.

How to use the Color Grading tool for great results

As you make adjustments, keep in mind that there is no one correct way to use the Color Grading panel. It’s merely another tool in your arsenal to help you get your images looking the way you want.

That being said, if you want to get your feet wet but aren’t sure how to start, let’s walk through a color grading edit so you can see firsthand how it can be used to give your pictures an extra bit of punch and visual impact.

kids running in an alley with no color grading
Nikon D7100 | Nikon 50mm f/1.8G | 50mm | 1/180s | f/4.0 | ISO 1250. Original photo without any color grading applied.

For a scene like the one above, with a lot of tonal variety, I like to start by editing the shadows first. Rather than using the all-in-one adjustment option with all three circles showing, I prefer to use the larger circles to edit each parameter individually. I like the fine-grained control this gives me.

I recommend you start by adjusting the Luminance slider, which will make the darkest portions of the image even darker when pushed to the left, or brighter when pushed to the right. For this example, I’m going to make shadows punchier by decreasing the luminance.

Lightroom Color Grading panel

Then click and drag on the color wheel to add a teal tint to the shadows; this will start to give the photo a more cinematic feel. Your shot might look a little weird with only the shadows adjusted, but it will come together after you customize the highlights and midtones.

kids running in an alley
Color grading applied to the shadows.

Next, click the Highlights option and adjust the Luminance slider to make the brightest portions of the photo lighter or darker. Some people prefer to adjust the Luminance before doing any color editing, but this is up to you.

Once you have the Luminance adjusted, click on the wheel to add a bit of orange. This will make the brightest portions of the image really stand out from the darkest portions of the image, since teal and orange are on opposite sides of the color wheel.

Lightroom Color Grading panel

At this point, the example image is starting to come together. It has a grittier, cinematic feel compared to the original, thanks to a touch of teal in the shadows and orange in the highlights.

kids running in an alley

After the highlights and shadows are edited, head to the Midtones wheel to give your image a warmer or cooler feel overall. Instead of changing the appearance of the brightest or darkest portions of your image, the Midtones wheel affects everything between those two extremes.

Midtone adjustments are useful for giving your entire picture more of a warm or cool feeling. Adjust the Luminance slider, then click and drag the dot to orange or red to make your photo warmer, or blue to make it cooler.

Lightroom Color Grading panel

At this point, the image is nearing completion, and you can see the results below. It’s a far cry from the original, which feels flat and boring by comparison.

Lightroom Color Grading kids running alley
The shadows, highlights, and midtones have been adjusted. But the image isn’t quite done yet.

After editing the shadows, highlights, and midtones, it’s time to tweak the Blending and Balance sliders.

As I explained above, blending refers to how much each of the three parameters stays within its own range. It has a default value of 50, which results in a relatively smooth color grade overall.

Sliding Blending to the left means the edits to shadows are confined almost exclusively to the darkest portions of the shot, and the edits to the highlights are confined almost exclusively to the lightest portions of the shot. A balance of 0 essentially makes each of the edits stay in its own lane and not affect the rest of the picture. And bringing the Balance slider to the right will increase how much each tonal area overlaps with one another. The result is often quite subtle, but can have a noticeable impact when applied carefully.

Lightroom Color Grading kids running alley
Blending set to 0 after the shadows, highlights, and midtones were edited. The difference is most noticeable in the sidewalk.

Now, the Balance slider determines how much of the picture is treated as shadows and how much is treated as highlights. Moving the slider to the left takes whatever adjustments you made to the shadows and applies them to more of the picture overall. The same happens to the highlight edits when you move the slider to the right.

If you have applied a certain tint to the shadows but want that tint to affect more of the picture, move the Balance slider to the left. Likewise, if you want your highlight adjustment to apply to more than just the brightest portions, adjust the Balance slider to the right.

kids running in an alley
Balance set to -54. The teal colors in the shadows now bleed over to much more of the rest of the picture.

Tips and tricks for Lightroom color grading

The key to color grading is to remember that there is no one magic solution. Don’t think of color grading as a search for the right way to adjust your image, but as a doorway to infinite possibilities that can be used however you see fit.

The best way to learn about color grading is to click around on the color wheels and experiment on your own. Lightroom is non-destructive, so you can always revert back to your earlier image. And in the meantime, you just might find a new way to edit your pictures that you never thought of before.

sunset on a lake without color grading
Fujifilm X100F | 23mm | 77 seconds | f/16 | ISO 200. Edited, but not color graded.

That being said, these tips will send you on your way to improving your color grading skills:

  • Edit your image to have an even exposure prior to using the Lightroom Color Grading tool. Use the Basic panel for highlights/shadows adjustments.
  • Give your shadows a richer look by adjusting them to be teal, blue, or purple
  • Contrast the highlights with the shadows by making them yellow, orange, or red
  • Adjust the midtones a little, but not too much. The midtones should complement the highlights and shadows, not compete by standing out.
  • For subtle tweaks, use the Blending slider to control how your graded colors meld together
  • Click the eye icon next to one of the color wheels to toggle between a before and after view
Sunset on a lake with color grading
The same image as above, but color graded. The shadows are blue, the highlights are orange, and the midtones are yellow-orange.

Lightroom color grading: conclusion

You should now have enough to get started with Lightroom color grading. Just remember that the goal here is the same as it is with most editing: You want to end up with an image you like! Color grading is just another tool you can use to make that happen.

Lightroom is a non-destructive editor. That means you can always undo your changes, so experiment with color grading as much as you want. And feel free to share your before and after images in the comments below!

The post Lightroom Color Grading: An Easy Way to Supercharge Your Photos appeared first on Digital Photography School. It was authored by Simon Ringsmuth.


Digital Photography School

 
Comments Off on Lightroom Color Grading: An Easy Way to Supercharge Your Photos

Posted in Photography


Google Photos — Bait Meet Switch

23 Nov

Google Photos blog post announcing their new Google Photos service.

In case you missed it recently, Google Photos has decided to end their free unlimited photo hosting service. Beginning in June of next year users will be limited to 15GB of space before being asked to pay for more storage. How much you’ll have to pay will depend on how much storage you use. Unfortunately for me, I have more photos than fit their top tier $ 100/year plan, so even if I wanted to pay I’d be capped out of the service.

While I don’t begrudge Google, a trillion dollar company that makes billions of dollars a year, from wanting to make even MORE money, I am offended by the bait and switch approach that they took with Google Photos. Offering a user the first hit for free is classic dealer marketing. A lot of time and energy goes into organizing your photos on ANY photo sharing site and when someone spends hundreds or even thousands of hours organizing their photos at a site only to be priced out of the site, those are countless hours that you will never get back.

Fortunately for me I’ve spent a lot less time using Google Photos for the past few years. Google’s consistent bad faith across photo hosting/sharing products has left me very skeptical of anything they do anymore.

Some of you may remember Picasa (Google killed it). I was a user of that. I also was a big user of Google Buzz (they killed that too). Then I put hundreds of hours into my photography on Google+ (once again RIP). We used to do photowalks and hangouts and lots of other fun things around photography with Google+. Here’s my old Google+ url.

Initially I was super excited about Google Photos, but that changed over time. I was disappointed that one of their early features, photo facial recognition, didn’t really work for me. It limited the service to 200 faces and unfortunately for me when the service launched it grabbed a bunch of faces of musicians I’d photographed performing at Coachella and chose those as the ones to tag. There was no way to delete those and have it choose people who were actually my family, friends, neighbors, etc.

I was also disappointed that the hours and hours and hours I’d spent keywording all my photos in Adobe Lightroom were stripped out of my uploads to Google Photos. I’m not sure why Google would want to remove one of the best ways for me to search my photos from their service but for whatever reason they strip this data.

Still, Google Photos was free (even though it downsized my photos). It’s hard to complain about free — until they locked my gmail. Last year I received a rather ominous message from Google threatening that unless I paid them for more storage they were going to turn my gmail off.

It turns out that even though Google Photos claimed to be able to convert my photos to high quality JPEGs with free unlimited storage, that TIFF files generated by the software program Analog Efex Pro (ironically a former Google owned product before they jettisoned that as well) were not being converted by Google Photos and were sucking up my gmail storage which was then demanding payment from me. They actually locked my gmail and I missed several important emails that were blocked during this fiasco.

By this point I was about ready to delete my Google Photos account — except I could not find ANY way to delete my Google Photos account. That’s right you can’t just delete Google Photos. You have to delete your entire Google account including your Gmail!

While this is my unhappy story and experience with Google Photos, many, many users were duped into signing up for a free service that they thought would protect, as Google put it, their “lifetime of memories.” Now Google is demanding money from these users.

To me it seems wrong (even evil — remember their old motto “don’t be evil” that they also abandoned?) that Google would bait and switch so many users on this product. You can’t/won’t get the many hours that you spent organizing your photos on Google Photos back. Some will just begrudgingly pay up. What I see is one of the world’s largest companies who used a classic monopolistic tactic to grab market share by pricing out and hurting smaller competitors and now wants to profit from their move.

Once burned shame on you. Twice, three times, four times, five times, six times burned, shame on me. I will never trust Google with another product again.

Thankfully there is an alternative to Google Photos, good old trustworthy Flickr. Here is a thoughtful analysis done by Jeremy Zero comparing Google Photos and Flickr.

I’ve been using Flickr since 2004 and as long as I can remember my Flickr Pro account has remained unlimited. Flickr/SmugMug CEO Don MacAskill even recently re-iterated Flickr’s commitment to honoring their unlimited service. While Flickr may not be a trillion dollar company or make billions of dollars every year like Google does, they are a small company that cares about photographers and your photography. They also do a great job storing and sharing your full high-res, uncompressed, high quality images (and they even retain your photo keywords when you upload them there). I feel much better supporting an ethical small business than a trillion dollar company using monopolistic bait and switch tactics to try to drive the smaller guy out of business.

You can find me on Flickr here. If you are an American Photographer come join the American Photographer Group I administer on Flickr and say hello.


Thomas Hawk Digital Connection

 
Comments Off on Google Photos — Bait Meet Switch

Posted in Photography


Product Photography 101: The Complete Guide To Perfect Product Photos

20 Nov

Online shopping is the wave of the future. Already, e-retail sales account for 14.1% of all retail sales around the globe. That’s expected to grow to 22%. Every online retailer from small businesses to global giants face the same challenge — how to get customers to buy a product they can’t see. That’s where compelling, true-to-life product photography comes in. Continue Reading

The post Product Photography 101: The Complete Guide To Perfect Product Photos appeared first on Photodoto.


Photodoto

 
Comments Off on Product Photography 101: The Complete Guide To Perfect Product Photos

Posted in Photography