RSS
 

Posts Tagged ‘Photography’

Quantum Flashes: Product Reviews: Adorama Photography TV

26 Nov

AdoramaTV presents Quantum Flashes. This week Mark will show you strobists how to get to the next level of strobist shooting with Quantum Flashes. For more information about the Quantum products reviewed in this video, and for related articles, audio podcasts and videos, go here: www.adorama.com Send your questions to: AskMark@Adorama.com
Video Rating: 4 / 5

 
Comments Off on Quantum Flashes: Product Reviews: Adorama Photography TV

Posted in Photography Videos


The Night Sky In Landscape Photography

26 Nov

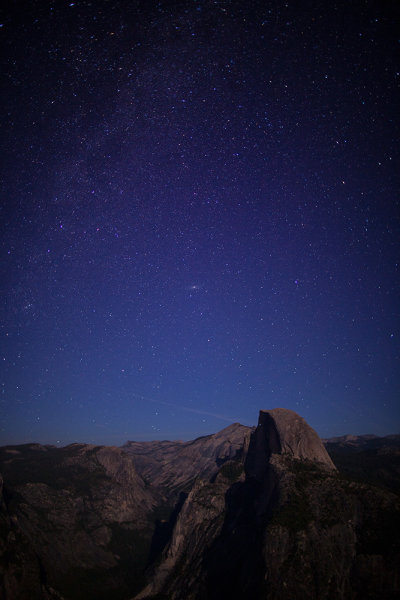
This shot was taken with an EOS 5D Mark II and EF 24mm f/1.4L II lens. Exposure was 15 seconds, ISO 800, at f/1.4. The exposure for star fields should not be much longer than 15 seconds. Beyond 15 seconds, movement begins to creep in and slight star trails get recorded. In order to get the star fields to be as prominent as they are, I had to wait until the moon set behind me. Light pollution of any kind, be it the moon, street lights, or buildings, will diminish the intensity of the light of the stars. Moonless nights are best for photographing the night sky.

As a landscape photographer, I typically liked to work at sunrise and sunset.  But the night sky holds its own magic, with countless stars, the moon, and the Milky Way all out there waiting to be photographed.

Obviously, all night landscape photography happens on a tripod.  What type of shots you go for will depend greatly on your patience.  Night sky exposures can range from 15 seconds to several hours, depending on your goals.  Star fields can be captured with exposures of about 15 seconds, with aperture and ISO varying depending on the lens in use.

One important thing to be aware of is the available light around you. Any ambient light will diminish the intensity of the stars.  This includes the moon, streetlights, a town or city with buildings that have outside lights on, or even just car lights.  All of these will have negative effects on the exposure of the night sky.  The best thing to do is to find a rural area where there aren’t any street lights, traffic, buildings etc.  The stars will be most intense and easily photographed.

Because the night sky is best photographed, well, at night, it will be important to have a flashlight or other illumination to light the way while you hike to your location or assemble your gear.  Headlamps work exceptionally well for this.  These lights also come in handy for “painting” the foreground with light, to add some extra depth to your images.

In addition to the camera and lens, a remote release, or even better, a time controller is a necessity.  The remote release will allow you to trigger your camera without touching it. A timer remote control (such as the Canon TC-80N3) does that and more.  When shooting star trails, the timer can be programmed to take as long an exposure as needed. It can also be programmed to take several exposures in sequence if needed. This is helpful for stacking images, a common technique when shooting star trails.

I previously mentioned having a flashlight handy for painting the foreground.  Depending on the type of flashlight used, color correction gels can be useful as well.  Newer, LED flashlights have a much cooler light source than traditional flashlights, so a warming gel will help make it more natural looking. For lights using traditional bulbs, a cooling gel may be desired. Experimentation is essential here.  Too much light will ruin the exposure, too little won’t help the foreground the way that was intended. Generally, a quick kiss of light is all that may be needed.  A neutral density gel over the flashlight will help regulate it so just the right amount of light is applied.

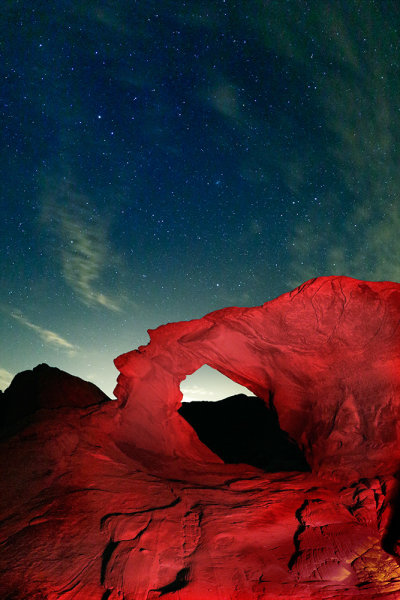
For this image at Valley of Fire in Nevada, the arch made for the perfect foreground. But it was silhouetted against the night sky. Using an LED headlamp and a warming filter, I was able to illuminate the red rocks and balance that illumination with the ambient exposure for the night sky. This image was taken with the EOS 5D Mark III with EF 8-15mm Fisheye Zoom. Exposure was 15 seconds, ISO 6400 at f/4.

One problem with night time photography is the long exposures.  Digital imaging sensors generate heat when they capture an image, and that heat manifests itself as noise in a long exposure.   Today’s digital SLRs all have settings for long exposure noise reduction.  This is generally done through a method known as “Dark Frame Subtraction”.  First, the camera takes the image at the intended exposure.  For this case, let’s say it’s a 30 second exposure.  When long exposure noise reduction is enabled, the camera then takes a second exposure, this one with the shutter closed. The imaging sensor is charged, for the same amount of time as the original exposure. This second, dark frame, is then compared to the first frame taken.  Since both frames were “exposed” for the same length of time, the heat generated on the sensor should be the same, and thus the noise generated should be the same. The camera then compares the two frames, and removes the noise that is consistent in both frames. While the camera does this, it is not possible to take another exposure, so this can become a very long process for star trail images that could be as long as an hour or more. Batteries are of paramount importance for this procedure, as the image won’t be recorded if the battery dies before long exposure noise reduction is complete.  If your camera has an AC adapter, and a generator or other power source is available, it will make the stress of wondering if the camera has enough battery power go away.  If you plan on stacking multiple images for star trails, this feature should be turned off, since continuous images are needed to keep the star trails continuous.

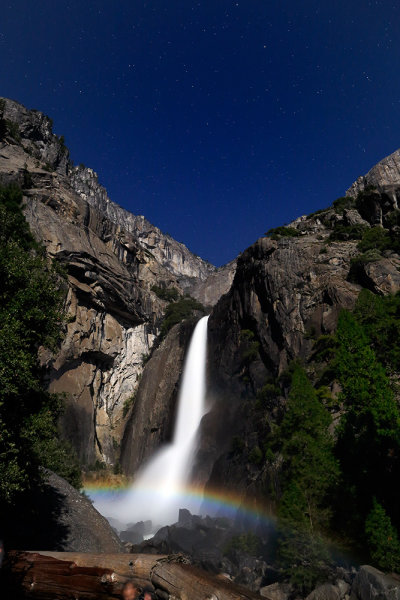
Every year in the spring, during the full moon, a moonbow is created by the mist at Yosemite Falls. Taken with an EOS 5D Mark III, EF24mm f/1.4L II lens. Exposure was 10 seconds, ISO 1250, at f/4. It is readily apparent that the presence of the moon in the sky reduces the intensity of the stars, as compared to the shot of Half Dome above.


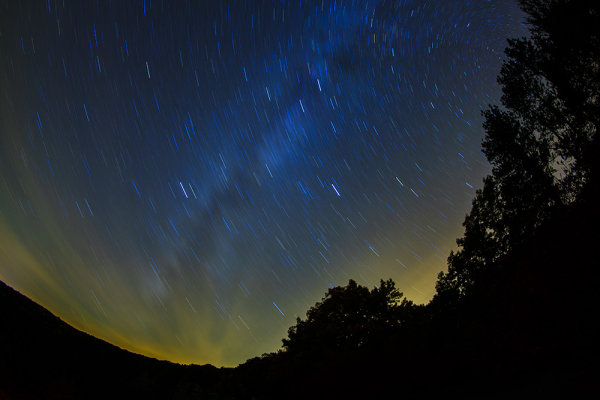
This image of the skies over upstate New York was made with the EOS-1D X with EF 8-15mm f/4L Fisheye Zoom. Exposure was 15 minutes, ISO 400 at f/4. One 15 minute exposure took 30 minutes due to the long exposure noise reduction setting. If longer star trails are desired, you can use a longer exposure and keep the long exposure noise reduction on, or you can take shorter exposures of about 5 minutes, in succession. Turn off long exposure noise reduction, and combine the images later on in Photoshop or other image editing software.

Post originally from: Digital Photography Tips.

Check out our more Photography Tips at Photography Tips for Beginners, Portrait Photography Tips and Wedding Photography Tips.

The Night Sky In Landscape Photography


Digital Photography School

 
Comments Off on The Night Sky In Landscape Photography

Posted in Photography


Digital Photography 1 on 1: Episode 58: Autofocus Points: Adorama Photography TV

26 Nov

Adorama Photography TV presents: Autofocus Points. The reason for all of these autofocus points is to make it easier for photographers to create off-center compositions and still get the focus right. In this episode Mark will give you tips on how to use the autofocus points. For more articles and videos about focusing your DSLR camera, go here: www.adorama.com Find the following cameras at Adorama.com: Cannon 5D Mark II www.adorama.com Cannon 7D www.adorama.com Nikon D3100 www.adorama.com Nikon D7000 www.adorama.com Visit www.adorama.com for more photography videos! Send your questions to: AskMark@Adorama.com
Video Rating: 4 / 5

In Part 6, Matt runs through 15 tips and custom settings that he uses when shooting a wedding. He also answers a few viewer questions, including how to get into the industry ,and how to get experience as an assistant. In this series ThatNikonGuy Matt Granger will show you all you need to know to get started in wedding photography. From planning, to gear, to shooting and editing tips, Matt will walk you through the process and help you avoid common pitfalls. Whether you are going in full time, or have been asked to shoot at a friends wedding – take the time to research and plan – it will avoid a lot of headaches down the track! Nikon gear – www.nikon.com.au Join our facebook and flickr groups to stay up to date with what’s going on: Join our facebook group HERE: www.facebook.com Flickr group HERE: www.flickr.com www.mattgranger.com

 
Comments Off on Digital Photography 1 on 1: Episode 58: Autofocus Points: Adorama Photography TV

Posted in Nikon Videos


Food photography – 5 simple ways to get stronger shot

26 Nov

Images by BananaGranola and SuperDewa.

1. Colour Values

Hinamatsuri sushi
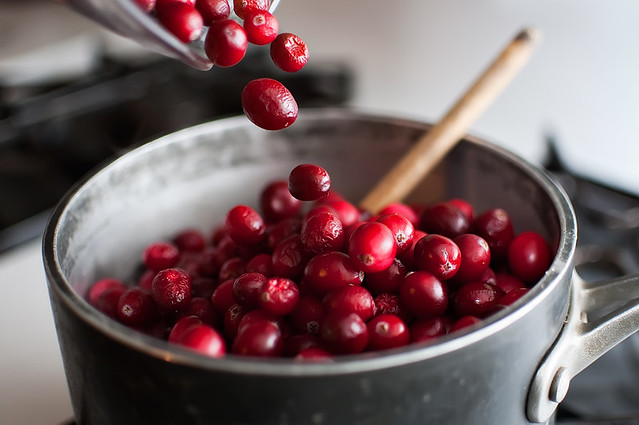
Part of the attraction of food is the way it looks, so making sure your images exude the correct colours associated with the product. Before you begin shooting always take a white balance reading from a grey card if you have one or if you’re using a compact set the White Balance to a preset that matches the lighting environment you are shooting in.

2. Look for the Best Light

The best light for shooting food is soft and even, which is why a lot of it is shot in studios with large softboxes. But if don’t have expensive studio equipment to hand, position food in front of a clean window for the same effect, or if it’s a particularly bright day and you are getting shadows on your captures, veil the window with a white sheet or net to diffuse the rays or simply move the food further from the light source to diffuse its brightness. Alternatively if the weather is fair, consider pitching up outside and shooting alfresco to add another element of interest to the frame.

3. Background

If you’re using a plate or work surface as the backdrop for your shoot, make sure it’s clean, tidy and no smudges of food plague the periphery. After shooting your first shot, zoom in during playback to be sure you haven’t missed anything that will result in hours of Photoshop cloning post-shoot. The backdrop and setting you use can ultimately enhance the message you want to achieve, so use this to compliment the food rather than detract from it; for example a wooden chopping board suggests rustic, an outdoor table says al fresco, square plates suggest minimalism, etc. Typically white backdrops carry connotations of image stock sites, so don’t be afraid to inject colour into the background using coloured sheets or card if item is small enough, for an added element of interest. When choosing the backdrop use a colour that compliments that of the food or reflects the vibe you want to portray, as darker colours can often influence thoughts of comfort and warmth, whereas lighter, brighter colours dictate ideas of freshness and frivolity.

Soba fusilli

4. Composition

Consider what makes the food look appealing and find a way to sell that feature. A wide aperture works well on products that are presented in rows or clusters and are easily identifiable such as; cupcakes, biscuits, and sweets etc.  If the product is small and plentiful, such as coffee beans or nuts for instance, consider cropping in close to fill the entire frame. Also consider your angle to add interest and sense of depth, scale and perspective. Make the most of interesting patterns and shapes by highlighting this as the focus. Including props to present the product can work well to convey a sense of scale or action, such as ladles, bowls, scales, pestle and mortar, or for drinks consider decorating the glass or backdrop with the fruit or flavours used in the ingredients.

Lunch

5. Action

As well as photographing the finished article there is a lot to be said for in-progress recipe shots that show food actually being prepared. Consider shots that feature motion such as chopping, blending, frying, rising in the oven etc and using a longer exposure to convey the sense of motion and speed. But don’t forget the tripod!

336/365: preparations

Post originally from: Digital Photography Tips.

Check out our more Photography Tips at Photography Tips for Beginners, Portrait Photography Tips and Wedding Photography Tips.

Food photography – 5 simple ways to get stronger shot


Digital Photography School

 
Comments Off on Food photography – 5 simple ways to get stronger shot

Posted in Photography


No Posing, No Costumes – children’s portrait photography by David Moore

26 Nov

A simple and powerful photojournalism approach to children’s portrait photography from Santa Fe, New Mexico photographer David Moore of Clearing the Vision. More details: www.clearingthevision.com

 
Comments Off on No Posing, No Costumes – children’s portrait photography by David Moore

Posted in Photography Videos


The Most Popular Digital Photography Books of 2012 [Among dPS Readers]

25 Nov

Over the last 12 months we’ve reviewed and mentioned a lot of great photographic books (real paper ones) here on dPS.

So today I thought I’d dig into the stats that Amazon give us as to what our readers have purchased after clicking through from our site to showcase the 15 most popular books bought by our readers. Hopefully it gives those of you shopping for presents for photography loving friends and family some ideas!

_wp-content_2012_06_Beyond-snapshots.jpg

  1. Beyond Snapshots: How to Take That Fancy DSLR Camera Off “Auto” and Photograph Your Life like a Pro (co-authored by dPS eBook author – Rachel Devine
  2. Understanding Exposure, 3rd Edition: How to Shoot Great Photographs with Any Camera
  3. The Digital Photography Book
  4. The Photographer’s Eye: Composition and Design for Better Digital Photos
  5. Understanding RAW Photography (The Expanded Guide: Techniques)
  6. HDR Photography (The Expanded Guide: Techniques)
  7. Digital Photographer’s Guide to Dramatic Photoshop Effects
  8. Visual Stories: Behind the Lens with Vincent Laforet (Voices That Matter)
  9. The Luminous Portrait: Capture the Beauty of Natural Light for Glowing, Flattering Photographs
  10. Speedliter’s Handbook: Learning to Craft Light with Canon Speedlites
  11. Scott Kelby’s Digital Photography Boxed Set
  12. Complete Digital Photography
  13. Learning to See Creatively: Design, Color & Composition in Photography
  14. Digital Wedding Photography: Capturing Beautiful Memories
  15. BetterPhoto Basics: The Absolute Beginner’s Guide to Taking Photos Like a Pro

Want more?

Check out the current best selling digital photography books on Amazon where they currently have most books at 30-50% off retail price!

Note: dPS earns a small commission if you purchase one of these books after clicking on one of the above links. This helps our site sustain itself – we appreciate your support!

Post originally from: Digital Photography Tips.

Check out our more Photography Tips at Photography Tips for Beginners, Portrait Photography Tips and Wedding Photography Tips.

The Most Popular Digital Photography Books of 2012 [Among dPS Readers]


Digital Photography School

 
Comments Off on The Most Popular Digital Photography Books of 2012 [Among dPS Readers]

Posted in Photography


Expensive DSLR/Lens vs a Speed Light for Indoor Low Light Photography

24 Nov

photographyequipment.yolasite.com (Budget Equipment) razzi.me www.facebook.com twitter.com In this video I talk about necessary equipment needed for indoor low light photography. I tested sample pictures taken with Nikon D3s and Nikkor 70-200 f2.8 VRII lens and compared it with inexpensive Nikon D7000 and 50mm 1.8 lens and Nikon SB700 to see which picture produces better results. Equipment used in this video. DSLR – Nikon D7000 and Nikon D3s Lenses – Nikon 70-200 f2.8 VRII and 50mm 1.8G lens
Video Rating: 4 / 5

www.dslrfilmnoob.com Just upgraded to a Zoom h4n and that it sync perfectly with the canon 7d, I ran this test to get an idea of what microphone configuration I’ll be using on my next project. The zoom h4n has no sync issues at all, and has a time and date stamp on each file which is great for matching up audio it will be replacing my zoom h4 as my most used field recorder. I have the Zoom h4n set in 4 channel mode so that i can use both microphones and the zoom h4n’s on board mic’s at the same time. Shot at 720p at ISO800 2f lens Nikon Nikkor 50mm 1.4f DFocus follow focus adapter and Indisystems square with 15mm rails
Video Rating: 4 / 5

 
Comments Off on Expensive DSLR/Lens vs a Speed Light for Indoor Low Light Photography

Posted in Nikon Videos


5 Uncommon Snow Photography Tips That Can Transform Your Winter Scenes.

24 Nov
Couple in Sheep Meadow, Central Park

Couple in Sheep Meadow, Central Park

It’s that time again when we get to burn off those holiday pounds by trudging through the snow to capture those stunning winter shots.  I’ve got a few extra ones this year, so you’ll see me out there a bit more than usual.

In this article, I want to share with you a few, fairly uncommon tips that I often use, which can make the difference between an average snow photo and an epic one.  Do you do any of these things?

1.  Use a Reverse, ‘White’ Vignette.

The purpose of a vignette is to keep the eyes from falling off the edge of an image and to lead the eyes back to the center of it.  With the amount of white and grey in snow photos, you generally can’t use a traditional dark vignette, since it will be too obvious and look out of place.

So use a white one!  White vignettes can add a magical quality to snow photographs and can further enhance the middle-of-the-storm effect.  Adobe Lightroom is the tool I use to add my vignettes and it works well.

This is such a simple tip, but it can make all the difference, as seen in the photo above.


Brooklyn Bridge at Sunset, During Snowstorm

Brooklyn Bridge at Sunset, During Snowstorm

2.  Colorize and Add Contrast (Lots of it).

I’m usually one to hold back a bit when retouching photos, but for winter captures I often throw all of that out the window.

When you photograph in the middle of a snowstorm, the photos will often come out grey and lack contrast and will have the streaks of snow that will give the capture a painterly texture and quality.  Use this quality to your advantage and enhance this look by increasing the contrast and saturation to help the photo become even closer to the look of a painting.  Over-saturating photographs is generally a bad idea, but for snowstorm scenes it can be a great one.

Compare the untouched negative below to the print at the top of the post.  Enhanced color, added contrast, and a white vignette were pretty much all that was needed to completely transform the scene.

Couple in Sheep Meadow, Original Negative

Couple in Sheep Meadow, Original Negative

3.  White Mat, White Frame.

If you’ve got a photograph with a lot of white snow and especially one where you have add a white vignette, further emphasize the look by adding a white mat and white frame to it.  The frame will merge to become part of the effect.

Couple in Sheep Meadow, Framed

4.  Photograph at Dusk and into the Night to Create Menacing Winter Scenes

Snow doesn’t only have to be portrayed as friendly, peaceful, and simple.  It can often have a dark and menacing feel when captured in the right way, particularly at dusk or night.

When the light levels go down, the contrast between the white of the snow and the dark of everything else becomes further emphasized.  This can lead things like tree branches to look like tentacles or mangled fingers swirling through the scene.  The contrast between the beautiful quality of the snow and the menacing quality of the scene is unique and different.

Lamppost at Dusk, Central Park

Lamppost at Dusk, Central Park

5. Use HDR

I’ll admit, I don’t typically do much HDR.  However, I do use it sometimes for black and white photographs and particularly for black and white snow photos.  I prefer to use HDR with black and white scenes because it can add that great, textural HDR quality, without the unrealistic HDR colors.  Depending on the lighting, snow can often lack texture, and the difference between the bright whites and deep shadows within these scenes can be so pronounced that it just doesn’t work well.  For scenes like this, HDR is the perfect tool to make them work.

Here is a before and after, made with Photomatix, to show you an example.

Central Park Tunnel at Night

Central Park Tunnel at Night, Original Negative

Central Park Tunnel at Night, HDR

Central Park Tunnel at Night, HDR

And don’t forget a sled!  Here are a few more snow photographs to take a look at.

Happy trudging!

Stuck Cab, 5th Avenue

Stuck Cab, 5th Avenue

Couple in Snowstorm

Couple in Snowstorm

Carriage and Trees

Carriage and Trees

Post originally from: Digital Photography Tips.

Check out our more Photography Tips at Photography Tips for Beginners, Portrait Photography Tips and Wedding Photography Tips.

5 Uncommon Snow Photography Tips That Can Transform Your Winter Scenes.


Digital Photography School

 
Comments Off on 5 Uncommon Snow Photography Tips That Can Transform Your Winter Scenes.

Posted in Photography


Family: Weekly Photography Challenge

24 Nov

This week your challenge is to take and share an image on the theme of ‘family’.

As we approach the end of the year and the holidays that come with it many of use are gathering to celebrate with family – and what better time to get your camera out.

Feel free to interpret the theme in any way that you wish. You might wish to take portrait of a family member – or attempt a family group photo – or photograph your family home – or perhaps be a little more abstract to do something symbolic about what family means to you or even to symbolise a family member who you miss.

Once you’ve taken and selected the ‘Family’ image that you’d like to share – upload it to your favourite photo sharing site or blog and either share a link to it or – embed them in the comments using our embed tool to do so.

If you tag your photos on Flickr, Instagram, Twitter or other sites with Tagging tag them as #DPSFAMILY to help others find them. Linking back to this page might also help others know what you’re doing so that they can share in the fun.

Also – don’t forget to check out some of the great shots posted in last weeks challenge – Portraits with Props challenge where there were some great shots submitted.

Post originally from: Digital Photography Tips.

Check out our more Photography Tips at Photography Tips for Beginners, Portrait Photography Tips and Wedding Photography Tips.

Family: Weekly Photography Challenge


Digital Photography School

 
Comments Off on Family: Weekly Photography Challenge

Posted in Photography


Do Good with your Camera Street Photography tips. John Free

23 Nov

To learn more about John Free: www.facebook.com To inquire about a John Free Street Photography Workshop email John directly to johnnienikon@yahoo.com

 
Comments Off on Do Good with your Camera Street Photography tips. John Free

Posted in Photography Videos