The post The Photography Skill Progression that Stunned Us appeared first on Digital Photography School. It was authored by Darren Rowse.
If you’re still stuck on auto mode and struggling with all the settings on your digital camera, this story of photography skill progression is for you. You may wonder, “Just how long does it take to become a better photographer? 3 days? 31 days? Two years?
In this feature of one of our students, the answer was all three.
Today I wanted to share with you the story of Marie Costanza. Marie grew up in Rochester, NY – the home of Kodak. So it’s no surprise she grew up taking photographs with her Kodak Instamatic camera.
Prior to starting our course 31 Days to Becoming a Better Photographer in February 2018, Marie described her experience being at the novice level.
“I was enthusiastic about taking photos and some of my images were decent, but I was not able to explain what I did to cause some of my images to be decent and many of them to be mediocre.”
Marie Costanza
She shared with us a sample of photos she took a few years before doing the course with instructor, Jim Hamel.
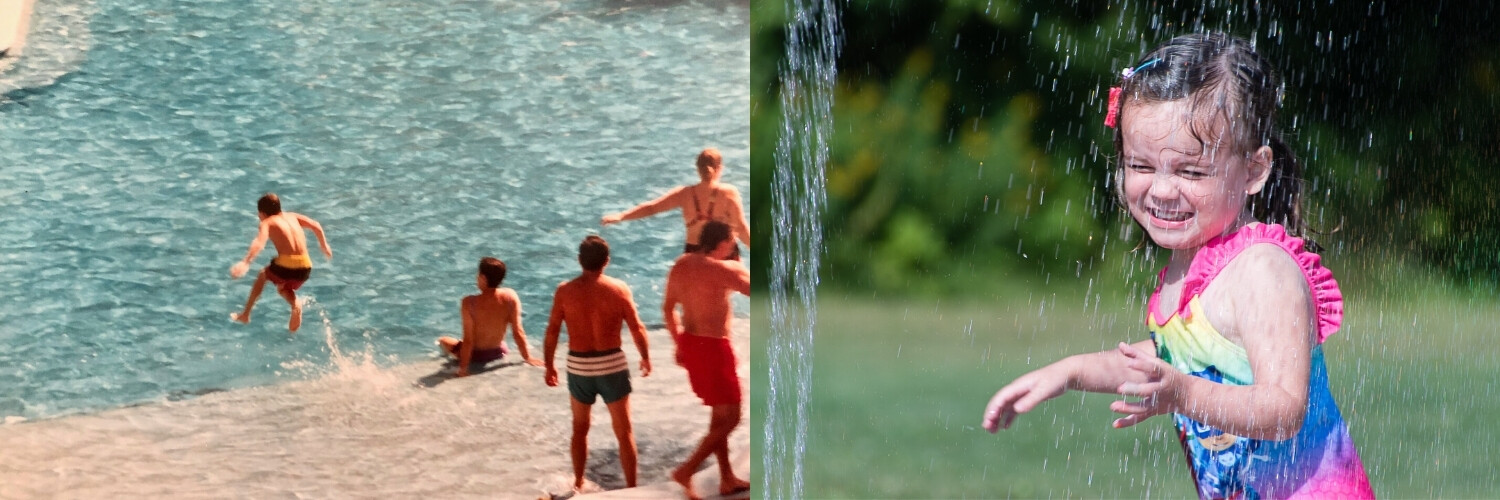
Children playing in water – Marie Costanza (before the course)
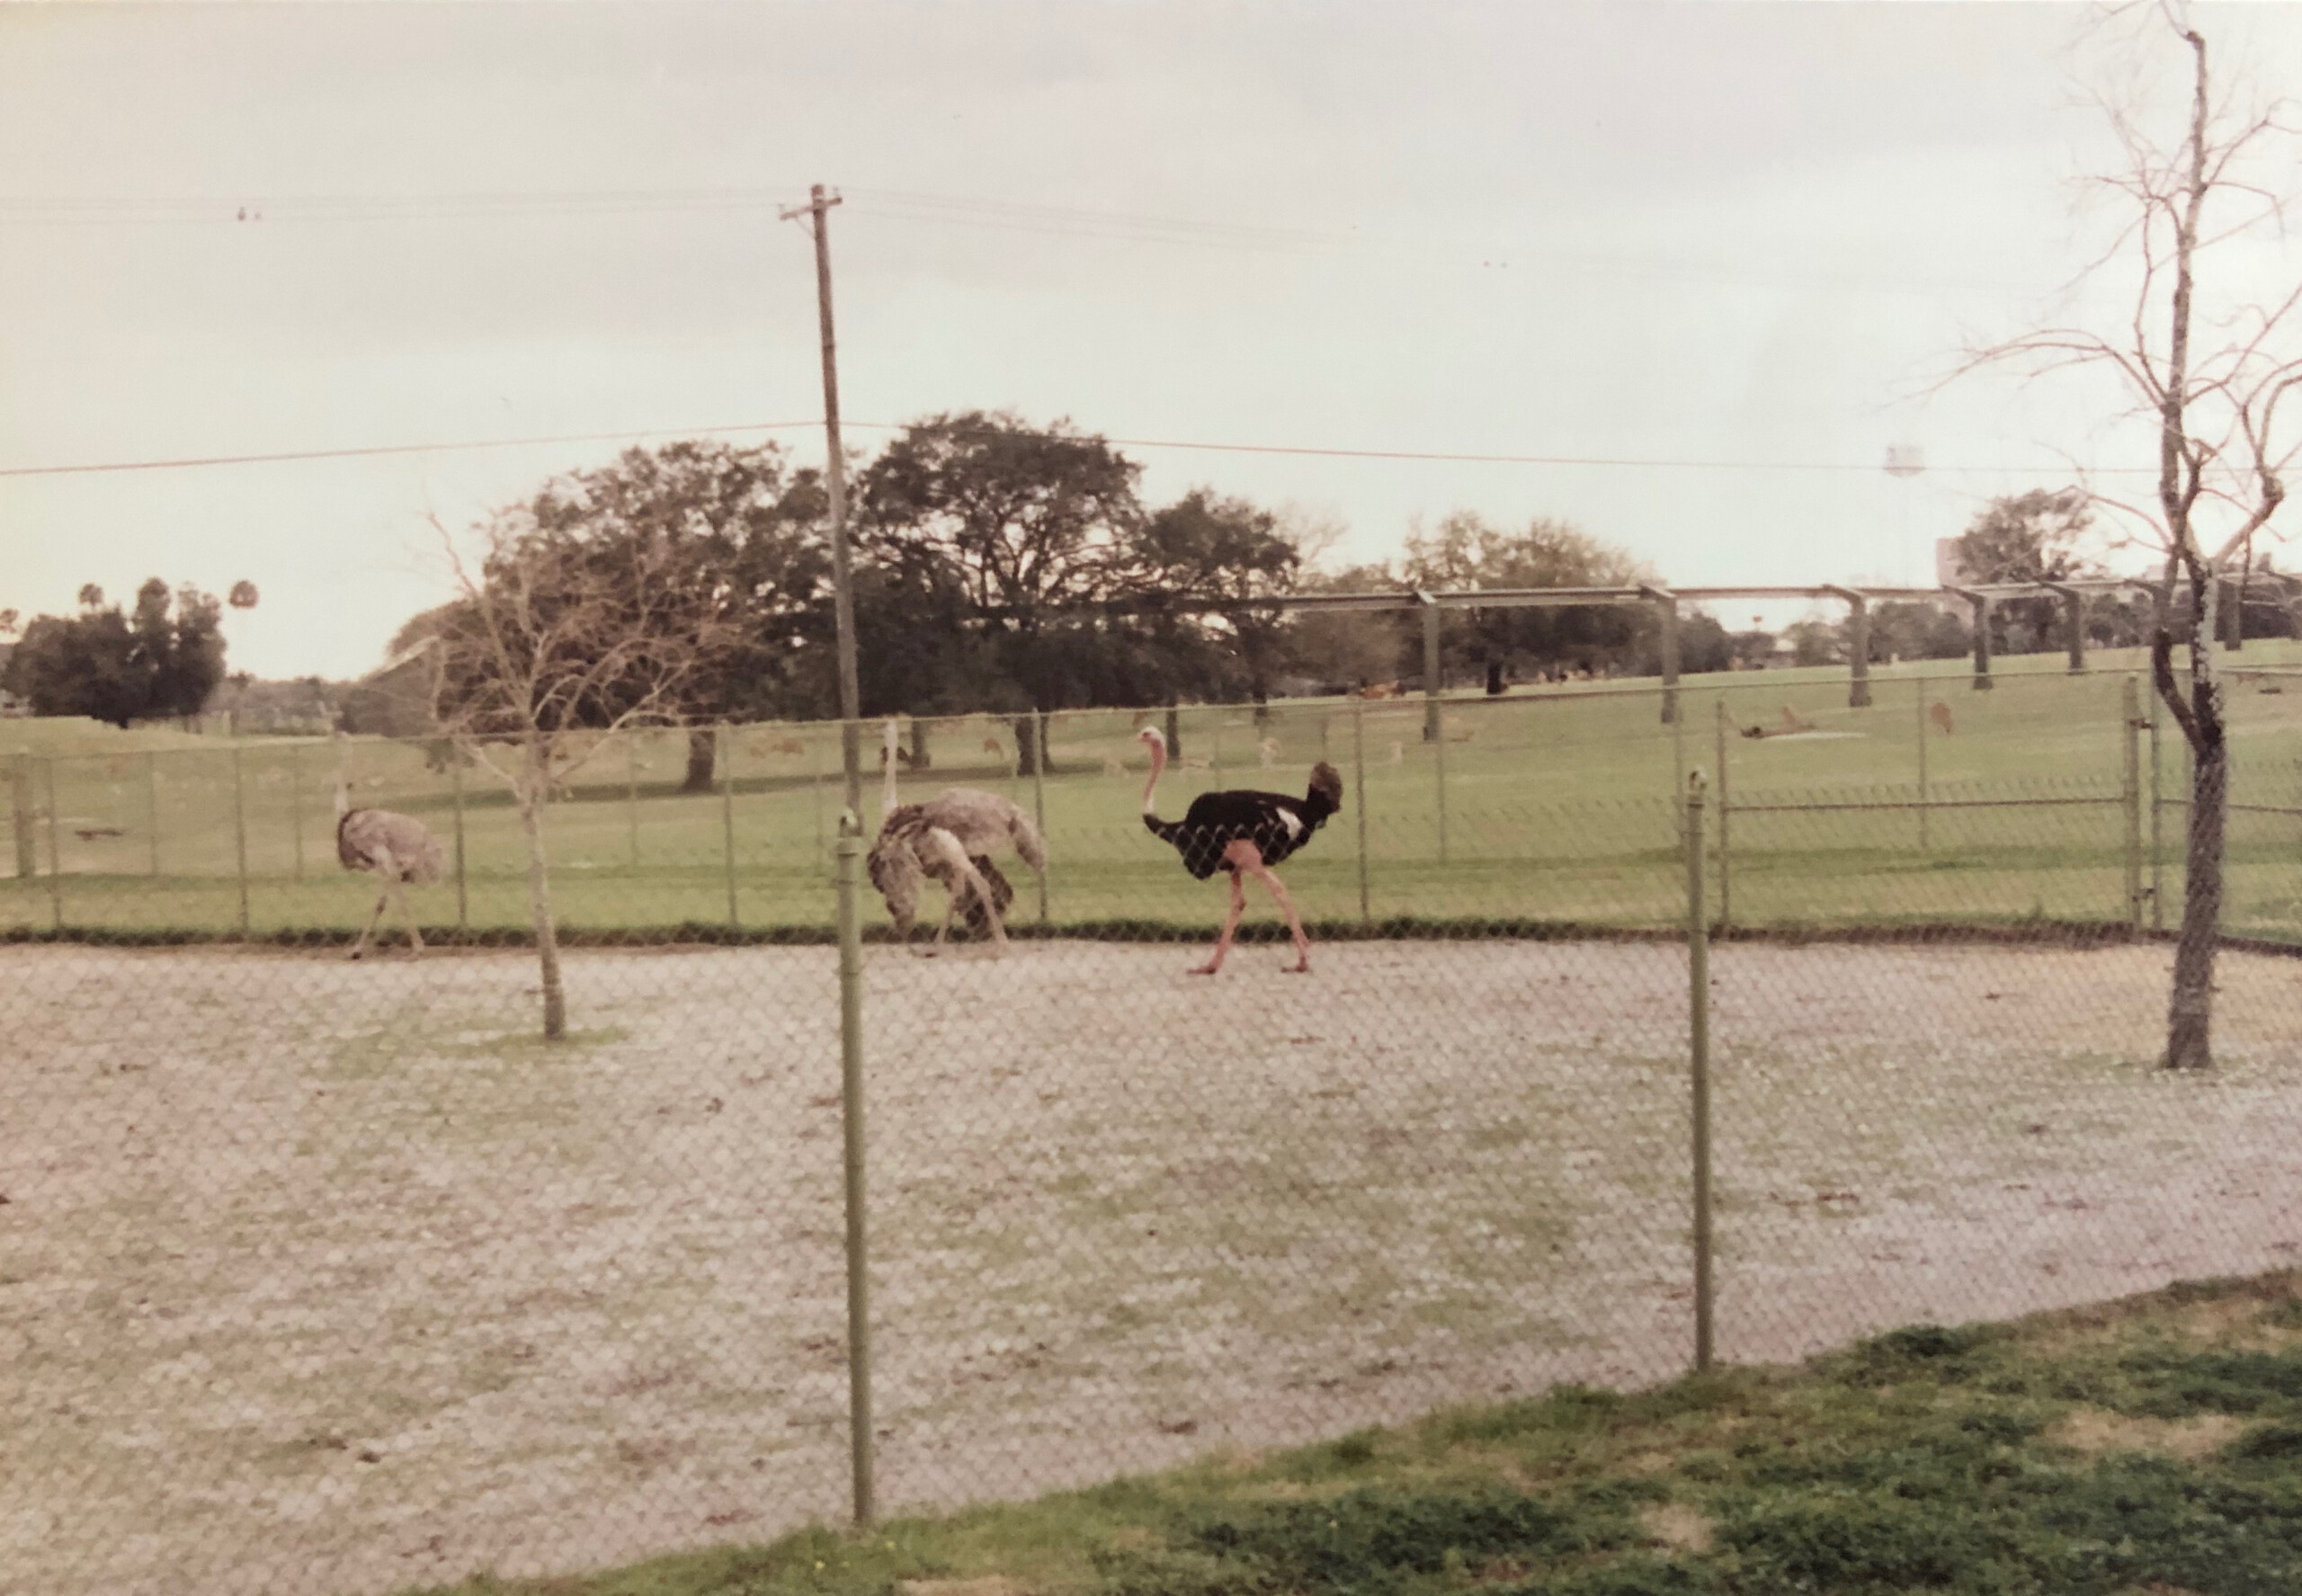
Birds at the zoo – Marie Costanza (before the course)
Sunset – Marie Costanza (before the course)
She wasted no time getting stuck into the course and extracting value from Jim. Here are the first images she shared with the group, after just 3 days.
And how right Jim was when he said . . .
Nice work. And this is only the beginning.
Jim Hamel
By “Day 7” Marie was experimenting more and starting to get shots like these:
And Jim’s response:
Prior to Jim’s course, I only shot on Automatic mode. I was completely intimidated by Manual and I did not fully understand the relationship among ISO, Shutter Speed or Aperture. I did use Aperture priority occasionally, and I was starting to understand that mode slightly. Jim’s Day 3 lesson was like a revelation for me. Being able to understand how to meter and how to use the Manual Mode opened up a whole new world of photography.
Let’s compare some of her more recent photos with the ones she shared earlier:
Children Playing in Water – Marie Costanza (Before and After the course)
Birds – Marie Costanza (Before and After the course)
Sunset – Marie Costanza (Before and After the course)
But by far our favourite progression has been what our team like to refer to as “Marie’s Duck Progression”! It certainly caught our attention and it’s the reason we wanted to feature her photography today.
Duck – Marie Costanza (Before the Course)
Duck – Marie Costanza (During the Course)
Duck – Marie Costanza (After the Course) Define the subject…for this challenge, I went back to my duck subject….those of you who have known me since we began the 31 Days course back in 2017…you might recall my original duck and then my post course duck. I love using ducks for my subject! This guy is called, “Late for an Important Date.” I used the following settings: ISO 1000, 380 mm, f6.0, 1/2000. I was using my Tamron 150-600 lens, hand held.
In addition to Day 3 (Metering), Marie also said Day 9 (Making Images Tack Sharp) was very beneficial in improving her duck photos because it helped her understand the impact of the shutter speed. Day 15 was helpful because learning about the importance of simplification helped her to understand that it’s important to eliminate distractions and to fill the frame with the subject. You can really see the impact of that in her second photo.
And the final photo, taken this year is a culmination of everything she has learned and practiced. Marie says, “Prior to the course I had just begun to play around a bit with Lightroom, so all of Jim’s lessons where he took us through the process of editing an image really helped me to understand the power of post processing.”
We asked what advice she’d give other aspiring photographers considering 31 Days to Becoming a Better Photography course.
The best part of this course was the fact that there was daily interaction between the student and instructor as well as all the new people we met in the Facebook Group. Anyone considering a course like Jim’s, should make sure this aspect is included. The helpful suggestions were invaluable and practical. Getting immediate feedback, which included positive elements as well as suggestions for improvement, made me eager to try the techniques.
Marie Costanza
And Marie and thousands of students since have received amazing attention from Jim like this reply to her very first post in the group:
Marie also had the following to say about Jim’s teaching style:
Having been an educator for over 37 years I am able to recognize effective teaching and the successful learning that is directly related. (For 15 years I was in charge of the Career in Teaching Program in the Rochester City School District, and I observed/provided feedback to countless teachers.)
Jim’s method of teaching is why the course is so successful. He teaches one concept at a time, has the student practice the new techniques, and then he provides feedback immediately.
The videos were the right length, which enabled me to effectively process the concepts/skills. When a teacher gives too much information or presents too many tasks/concepts, the learner has cognitive overload, resulting in the learner being unable to process the information.
Jim is highly skilled at knowing just how much information to present in order to challenge the student without forcing the student into cognitive overload. He is a highly effective teacher!
Marie Costanza
Marie’s photos star in our course promotions, along with photos from fellow students. Real photos, real students. Join them for the final class intake and save $ 100 when you sign up now.
Learn More
We love what Marie has achieved with her photography since doing the course. She has joined her local photography club and has even won some awards for her photos. Here are some more of our favourite photos she has taken – a world apart from her earlier snaps.
Moon Composite – Marie Costanza
Sunflowers – Marie Costanza
Pier – Marie Costanza
Bee – Marie Costanza
If you’d like to experience improvement in your photography like Marie, please check out our final class intake for 31 Days to Becoming a Better Photographer and save $ 100 when you join before 31 July.
The post The Photography Skill Progression that Stunned Us appeared first on Digital Photography School. It was authored by Darren Rowse.
Marc Levoy1, Google’s former computational photography lead and arguably one of the founding figures of computational approaches to imaging, has joined Adobe as Vice President and Fellow, reporting directly to Chief Technology Officer Abhay Parasnis. At Adobe, Marc will ‘spearhead company-wide technology initiatives focused on computational photography and emerging products, centered on the concept of a universal camera app.’ He will also work closely with Photoshop Camera, Adobe Research, and the machine-learning focused Sensei and Digital Imaging teams.
The imaging sphere was taken by surprise a few months back when Marc left Google where he helped spearhead a revolution in mobile imaging with the excellent success of Pixel phones and their stills and video capabilities. Marc and his colleagues at Google developed HDR+, which uses burst photography alongside clever exposure and merging techniques to increase dynamic range of capture and reduce noise. His work, in conjunction with Peyman Milanfar, also helped Pixel cameras yield visible photos in the dark using Night Sight, and even capture super-resolution data that captured far more detail in ‘zoomed-in’ shots than competitors, despite limited hardware. Google’s burst mode techniques even allowed its cameras to forego traditional demosaicing processes, yielding more detailed images than even competitive cameras with similar sensor sizes.2
Marc Levoy… [is] arguably one of the founding figures of computational approaches to imaging
Marc also championed the use of machine learning to tackle challenges in image capture and processing, leading to better portrait modes, more accurate colors via learning-based white balance, and synthetic re-lighting of faces. Marc helped push the boundaries of what is possible with limited hardware by focusing heavily on the software.
At its core, Adobe is a software company, and so Marc’s expertise is at once relevant. At Adobe, Marc will continue to explore the application of computational photography to Adobe’s imaging and photography products, with one of his focuses being the development of a ‘universal camera app’ that could function across multiple platforms and devices. This should allow Marc to continue his passion for delivering unique and innovative imaging experiences to the masses.
Marc has a knack for distilling complex concepts into simple terms. You can learn about the algorithms and approaches his teams spearheaded in the Pixel phones in our interview above.
More on Marc Levoy
Marc Levoy has a long history of pioneering computational approaches to images, video and computer vision, spanning both industry and academia. He taught at Stanford University, where he remains Professor, Emeritus, and is often credited as popularizing the term ‘computational photography’ through his courses. Before he joined Google he worked as visiting faculty at Google X on the camera for the Explorer Edition of Google Glass. His work early on at Stanford with Google was the basis for Street View in Google Maps. Marc also helped popularize light field photography with his work at Stanford with Mark Horowitz and Pat Hanrahan, advising students like Ren Ng who went on to found Lytro.
Marc also developed his own smartphone apps early on to utilize the potential of burst photography for enhanced image quality with apps like SynthCam. The essential idea – which underpins all multi-imaging techniques today employed by smartphones – is to capture many images to synthesize together into a final image. This technique overcomes the major shortcomings of smartphone cameras: their sensors have such small surface areas and their lenses have such small apertures that the amount of light captured is relatively low. Given that most of the noise in digital images is due to a lack of captured photons (read our primer on the dominant source of noise: shot noise), modern smartphones employ many clever techniques to capture more total light, and in intelligent ways as well to retain both highlight and shadow information while dealing with subject movement from shot to shot. Much of Marc’s early work, as seen in SynthCam, became the basis for the multi-shot noise averaging and bokeh techniques used in Pixel smartphones.
Marc is also passionate about the potential for collaborative efforts and helped develop the ‘Frankencamera’ as an open source platform for experimenting with computational photography. We look forward to the innovation he’ll bring to Adobe, and hope that much of it will be available across platforms and devices to the benefit of photographers at large.
Footnotes:
1Apart from being well renowned in the fields of imaging and computer graphics, Marc Levoy is himself a photography enthusiast and expert, and while at Stanford taught a Digital Photography class. The course was an in-depth look at everything from sensors to optics to light, color, and image processing, and is available online. We highly recommend our curious readers watch his lectures in video form and also visit Marc’s course website for lecture slides and tools that help you understand the complex concepts both visually and interactively.
2Our own signal:noise ratio analyses of Raw files from the Pixel 4 and representative APS-C and four-thirds cameras show the Pixel 4, in Night Sight mode, to be competitive against both classes of cameras, even slightly out-performing four-thirds cameras (for static scene elements). See our full signal:noise analysis here.
Winning photographs of the 2020 iPhone Photography Awards
The winning photos of the 2020 iPhone Photography Awards (IPPA) have been announced, showcasing incredible imagery from around the world captured on iPhone devices.
Founded in 2007, the IPPA was the first and is the longest-running iPhone-specific photography competition. This year marks the 13th annual contest, which drew images from thousands of photographers from across the globe.
In the following gallery, we’ve rounded up the the Grand Prize winner and the first place winners for each of the 19 categories (Abstract, Animals, Architecture, Children, Floral, Landscape, Lifestyle, Nature, News & Events, Other, Panorama, People, Portrait, Series, Still Life, Sunset, Travel and Trees). The Grand Prize winning photograph in the following slide, ‘Flying Boys,’ also adorned photographer Dimpy Bhalotia as winner of the Photographer of the Year award.
You can find the rest of the runner-up images on the IPPA website, as well as a collection of the winning photographers. You can also sign up for the 2021 iPhone Photography Awards contest.
Image credit: All photos used with permission from IPPA.
Grand Prize Photographer of the Year Winner
Flying Boys — Dimpy Bhalotia
Location: Banaras, India
Gear: Shot on iPhone X
First Place Abstract Winner
Untitled — Tu Odnu
Location: China
Gear: Shot on iPhone 7 Plus
First Place Animals Winner
Horses in the Storm — Xiaojun Zhang
Location: Iceland
Gear: Shot on iPhone X
First Place Architecture Winner
Duomo di Milano — Haiyin Lin
Location: Milan, Italy
Gear: Shot on iPhone X
First Place Children Winner
Cotton Candy — Ekaterina Varzar
Location: Vorontsovsky Park, Moscow
Gear: Shot on iPhone 6
First Place Floral Winner
Untitled — Peiquan Li
Location: China
Gear: Shot on iPhone 8 Plus
First Place Landscapes Winner
The Wave — Liu Dan
Location: Marble Canyon, Arizona
Gear: Shot on iPhone XS Max
First Place Lifestyle Winner
Culture Fusion — Audrey Blake
Location: Cancun, Mexico
Gear: Shot on iPhone X
First Place Nature Winner
The Surface of the Alien Planet — Lisi Li
Location: Skógafoss, Iceland
Gear: Shot on iPhoen 7 Plus
First Place News & Events Winner
Demons Lighting the Sky — Fernando Merlo
Location: Paterna, Spain
Gear: Shot on iPhone X
First Place Other Winner
Beach Chair — Danielle Moir
Location: Westhampton Beach, New York, USA
Gear: Shot on iPhone 6
First Place Panorama Winner
Plaza de Toros de Las Ventas — Bojan Pacadziev
Location: Madrid, Spain
Gear: Shot on iPhone 8
First Place People Winner
Knitting to Heal Wounds — Omar Lucas
Location: Ayacucho, Peru
Gear: Shot on iPhone 4
First Place Portraits Winner
Beautiful Isolation — Mona Jumaan
Location: Ouarzazate, Morocco
Gear: Shot on iPhone XR
First Place Series Winner
Tattooed Women — Liu Dan
Location: Mindat, Myanmar
Gear: Shot on iPhone 11 Pro Max
First Place Still Life Winner
The Wine Bottle and the Seven Chouric?os — Joao Cabaco
The post Beginners Tips for Night Sky and Star Photography appeared first on Digital Photography School. It was authored by Phillip Van Nostrand.
Star Photography
My favorite type of personal photography is taking night shots of the stars (long exposure pictures). I am often busy shooting pictures of people at weddings, or apartments, or models, and it’s important for me to make sure I take pictures for fun regularly. Taking pictures for no one other than myself is highly rewarding, soul filling, and fun! I also love taking travel photos and HDR photos, in this article we will take a close look at exactly how you can take your own epic star photographs.
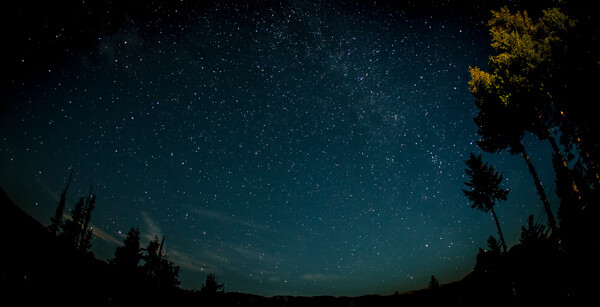
30 seconds at f/2.8, ISO 1250
What you need to take jaw-dropping pictures of stars
To take your star pictures, you only need three things:
a full-frame camera (for better ISO capabilities)
a fisheye lens (for the widest view of the sky)
a tripod (for stability during 15 second photos)
(Note: You can do this with a cropped sensor camera, without a tripod, and without a fisheye lens. It will just be a little harder and slightly less jaw-dropping)
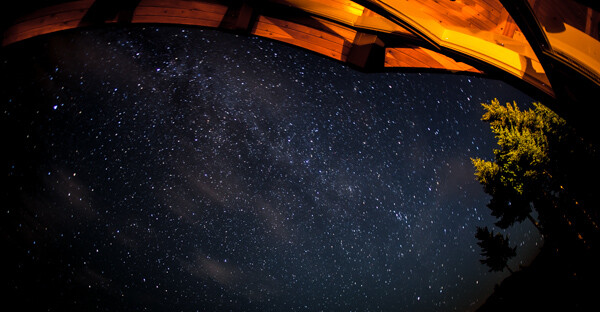
25 seconds at f/2.8, ISO 1600
Camera settings
You can nail this shot almost every time with these settings: 25 second exposure, f/2.8, ISO 1600
If your lens doesn’t open up to f/2.8 you can try 30 seconds at f/4 with ISO 1600.
Note: this kind of photography won’t work if there is a full moon out (or even a half moon). Don’t compete with large light sources, the stars will be over powered.The best location for star photography is way out in nature, away from city lights that cause “light pollution.”
13.0 seconds at f/2.8, ISO 1600
Why to use these settings
The most important component of these settings is the 25-second exposure. An exposure longer than about 25 seconds will start to show star trails. Photographing star trails is a legitimate type of photography on its own, but not the type of photography you are trying to do here. Since you are limited to about 15-25 seconds max shutter speed, you still need to let in more light.
The largest aperture you can find on a fisheye lens is f/2.8, and still, your picture might not be quite bright enough to look stunning. So this is where the ISO comes into play. On a full-frame camera like the 5D Mark III or the Nikon D800, you can bump the ISO up to around 2000 without seeing much noise.
You’ll learn how to reduce noise in Lightroom in the next section for a super clean photo.
Editing in Lightroom
I do extensive retouching in Lightroom after I take my photos. I’ll usually boost the exposure up by a stop or more, and I’ll use Noise Reduction under the Detail section to reduce any unwanted “noise” (those pesky extra white, red or blue pixels that show up when you push the ISO too high).
Here is a standard star photo of mine and the Lightroom settings I used to create it:
25 seconds at f/2.8, ISO 1600
Here are the Lightroom settings I used to edit the above photo:
1) You can see in the first panel that I bumped the whites up to +46 and brought the blacks down to -52. I really wanted to emphasize the stars against the dark sky and this is a good way to do that. Pushing the clarity up to +55 also helps define the stars against the sky, making them nice and crispy. I boosted the saturation to bring out any colors that are in the sky.
2) In the second panel, you can see that I sharpened up the image a bit, also to emphasize the stars. At the same time, I brought up the noise reduction to 33 to smooth out some of the noise that might show up, and I brought up the color to 25 for the same reasons.
Pro tips
Here is where you can have fun with the editing. Play around with the split toning sliders to make the colors in your sky appear magical. In the photo above you can see a little bit of turquoise in the lower part of the sky, and that comes from boosting that color in the Shadows of the Split Toning slider here:
You can also affect the color of the sky by playing around with the temperature and hue sliders to get some pretty magnificent looking star photos. Take a look at this one photo rendered three different ways:
Another pro tip that you may have noticed in all of the photo examples I gave here is this – shoot your stars in context. It really tells a great story to see a silhouette of a pine tree or a house in the background, and it shows the magnitude of the scene when you have an object in the foreground to compare to the stars.
Lastly, make sure you know which direction the Milky Way is. You can use an app like Sky Map to see exactly what stars are in the sky above you.
Have fun shooting, and please share your pictures below!
The post Beginners Tips for Night Sky and Star Photography appeared first on Digital Photography School. It was authored by Phillip Van Nostrand.
The post The Art of Freelensing for Creative Photography appeared first on Digital Photography School. It was authored by Karthika Gupta.
Photography has a great many rules and every once in a while, it is great to break all of them, don’t you think? For me, the art of freelensing for creative photography is the permission to play with both light and blur to archive a totally unexpected and magical image.
Freelensing works for almost any type of photography, but portraits get extra special love with the soft blur of the out-of-focus elements.
My first attempts at freelensing were just lucky shots among many more frustrated attempts. So, I gave up quickly. But as my photographer friends started posting beautiful dreamy images, I was tempted to pick up my camera and lens and try again.
I gave freelensing another try and I have been addicted ever since. It is a perfect way to get those creative juices flowing and add a little diversity to your photography portfolio and client work. Plus, you don’t really need any extra equipment to purchase or invest in other than what you already have in your camera bag.
What is freelensing?
Freelensing is a technique where the photographer shoots with the lens DETACHED from the camera body, creating a unique shot. With freelensing, you can manipulate your plane of focus to draw the eye of the viewer to a specific area. Alternatively, you can have an entire shot out of focus, creating a very dreamy frame.
It’s a great way to do creative photography play.
Here are some things to consider as you try freelensing for the first time:
1. Camera settings for freelensing
Before freelensing, you must get your camera settings right. With the lens still attached to the camera, set the aperture to the widest possible value, and adjust the shutter speed and ISO settings for the correct exposure.
You can figure out the widest aperture on your lens by looking at the lens specifics. Once the lens is detached, you can make adjustments to the settings on the camera. For maximum control, use the camera in the manual mode setting where you, the photographer, are adjusting all variables like ISO, shutter speed, and aperture.
Check your camera and lens settings. Some lens will automatically maintain aperture when detached while others won’t. With Canon, the aperture stays wide open, so you don’t need to do anything specific. With a manual lens, you might have to keep the aperture open manually.
Using live view can help you find the focus point in your image as you move the lens around. The dark edge on the lower left of the image is part of the lens (the final image is without the lens in the frame).
2. Focal distance for freelensing
Before detaching the lens, turn the focal distance dial of the lens all the way to the infinity symbol. This sets the focal distance to the farthest possible point. Then you can detach the lens and keep it as close as possible to the ring.
Keeping your eye in the viewfinder, start tilting the lens slowly – up, down, left, or right until you see a composition that you like. Remember that by its nature, freelensing is not perfection. You will not find a tack-sharp image with freelensing, but that adds to the magic of creativity with this exercise.
3. Finding focus
The beauty of freelensing for creative photography is that there are no rules. But one thing that can make or break a good creative image is the focus. While a completely out of focus image is still very beautiful, having a focal point in the image adds to the magic. Along with light, composition, and color, focus draws the eye into that element of perfection while the rest is imperfect.
As you move the lens around, try and get one area of the frame in focus. Landing focus in freelensing is hard, so give yourself some time to get used to it and be patient.
Try multiple frames to find the focus point. Play with the focal distance of the lens to help you determine that focal area. Also, try moving in and out of the scene until you’re happy with what you see.
As you decide on composition and focus point, consider the message, mood, and story you want to convey to the viewer.
4. Light and light leaks
Freelensing for creative photography can lead to all kinds of interesting images, but it’s the element of light that makes them work. It can add flares and light leaks to the frame and infuse the image with an extra-magical effect.
It’s better to work with good backlight when capturing light leaks and flares. I find the ideal time is during golden hour, when the sun is straight-on but slightly softer than other times of the day.
As you tilt and separate the lens from the camera, bits of surrounding light can spill into the sensor, adding some cool light-leak effects to the frame.
Play around with the light leaks and see how they affect the frame. You can control the direction and amount of light entering the frame by adjusting the size of the gap. Be aware that too much light can ruin the image too.
Light leaks add an interesting element to freelensing images that sometimes resemble a filter.When outdoors, freelensing can add beautiful sun flares without the use of extra filters and prisms.
Things to note with freelensing for creative photography
If you have an expensive lens and camera, try freelensing inside the house on a bed or soft surface as you try to manually hold the camera and lens in your hand. Perhaps that heavy 70-200mm lens is not the one to try freelensing for the first time
I always shoot with the camera strap around my neck. That way, if for some reason I lose my grip on my lens and camera, I focus on saving the lens since I know the camera is secure.
You can do freelensing with the camera on a tripod but that can limit the range of motion and creativity of the frame. But if you are just starting out, then this is a safer option.
I hold the camera around the camera grip with my right hand and manipulate the lens with my left hand. I am right-handed, so this plays well with the strength of my hands.
If your camera has live view, use that as you move the lens around to find the perfect frame to your liking.
The distance of the lens from the camera and the distance of the camera and lens from the subject will affect the plane of focus (just like it does in normal photography).
When you are closer to the subject, less of the subject will likely be in focus
When you are further away from the subject, more of the subject will likely be in focus
If you are far away from the subject, put the lens closer to the body of the camera
If you are close to the subject, you can get the lens further away from the body
As you move the lens away from the camera body, light leaks will enter the frame. Live view will help you find the light leaks that works best for the shot you have in mind.
Once you get the hang of it, you will find yourself trying freelensing anywhere and everywhere. The results are so unique that you cannot help but get creative.
The best advice for successful freelensing for creative photography is to leave all the rules behind and photograph with your heart. Find that creativity and let the magic unfold.
We’d love to see your freelensing images! Please share them with us in the comments section.
The post The Art of Freelensing for Creative Photography appeared first on Digital Photography School. It was authored by Karthika Gupta.
Grab your cameras and go out and take some interesting new shots of everyday objects. Play with line, color, shapes and blur to create some fabulous abstract images.
Alternatively, crop your photos at interesting spots and create abstracts from that. You could also try some post-processing to completely change the look of your images and make them more unique.
Check out some of the articles below that give you tips on this week’s challenge.
Tips for photographing ABSTRACTS
Creative Abstract Photography with Food Coloring and Milk
How Practicing Abstract Photography Can Influence Your Photography
Get Moving – Four Ways to Create Abstract Light Trail Photography
How to do Abstract Watercolor Photography
How to Make Interesting Abstract Smoke Photos
A Beginner’s Guide to Abstract Flower Photography
How to Create Abstract Photos with Fruit and Veggies
Simply upload your shot into the comment field (look for the little camera icon in the Disqus comments section) and they’ll get embedded for us all to see. Or, if you’d prefer, upload them to your favorite photo-sharing site and leave the link to them. Show me your best images in this week’s challenge.
Share in the dPS Facebook Group
You can also share your images in the dPS Facebook group as the challenge is posted there each week as well.
If you tag your photos on Flickr, Instagram, Twitter or other sites – tag them as #DPSabstracts2020 to help others find them. Linking back to this page might also help others know what you’re doing so that they can share in the fun.
The post Weekly Photography Challenge – Abstracts appeared first on Digital Photography School. It was authored by Caz Nowaczyk.
The post How to Use Photography Filters for Amazing Long Exposure Landscapes appeared first on Digital Photography School. It was authored by Simon Bond.
One of the most competitive genres in photography is landscapes. In this article, you’ll learn how to add creativity to your landscapes by using filters. The use of filters will allow you to create masterpiece long exposure landscapes, and you’ll learn what’s needed to do this. So read on and discover tips and tricks to get the best results.
Using the correct exposure length meant an interesting foreground from the movement of water.
What is long exposure photography?
One of the key settings on your camera is the ability to control the exposure length. If you’re new to photography, the chances are you’ll not have tried long exposures yet. You’ll need a tripod, but once you begin taking long exposure photos, the creative potential is massive.
Long exposure photos are those that last for over one second in length, and typically don’t last more than thirty seconds. There are some situations where even longer long exposures can be taken. These can last minutes. To take these photos, you need to use bulb mode on your camera.
Filters come in varying strengths.
How to use filters for long exposure landscapes
The use of filters to produce these long exposure landscapes will increase your options. They allow you to take long exposure daytime photos (where there is lots of light), and, if you wish, even longer night time long exposures.
You can use different grades of filters to give you the ability to take photos of different exposure lengths. Of course, the time of day is a massive factor as well, with night time an easier time to take long exposures.
Filters you can use during the day
The filter you’ll need to use to take long exposure landscapes during the day is the ND filter. These are neutral density filters, which are abbreviated to ND filters.
These filters work by blocking out the amount of light that comes into the camera. They should do this without changing the color tone of your image, which is why the filter is considered neutral. The strength of these filters range.
Filters can be used to lengthen the exposure, and produce “silk water”.
Weak ND filters
These are the ND2, ND4, and ND8 filters. They’re more often used with flash photography, but you can use them to extend exposure length during the day. In low light situations like under tree canopies, or as the evening draws in, using one of these filters may allow you to take a long exposure.
Circular Polarizer (CPL) filter
In a similar fashion to the weak ND filters, you can use a CPL filter in a low light situation to turn a half-second exposure to a one or two-second exposure. This can be long enough to dramatically change the nature of moving water during an exposure.
Strong ND filters
These filters are designed for longer exposures, the typical filters you can use are the ND110 and the ND1000. Filters like this will allow you to take exposures longer than five seconds or more even during the middle of the day.
Using an infra-red filter is an interesting way of creating landscapes.
Infrared filters
Infrared filters block out all light except infrared.
The exact light they block comes with the name of the filter. The Hoya R72 filter blocks all light except the light of a wavelength of 720 nanometers. This translates to a filter that’s even stronger at blocking out light than the ND1000.
You will, of course, be taking an infrared photo, but this will then be a long exposure that can often be minutes long.
Filters you can use during the night
The need to use filters for night time long exposure is not as extreme.
You’ll almost certainly be able to carry out long exposures with no problem, except perhaps during the transition from day to night. Here, the filters you’ll likely use are the weak ND filters or the CPL filters, with the intention of turning a medium-length long exposure into a longer long exposure.
However, the need to use a strong ND filter can occur. This happens when you want an exposure that lasts several minutes. Usually, you would not take an exposure of this length, but in order to get cloud motion across the sky, this length of exposure can be needed.
Flattening the water makes for a serene landscape.
Stacking filters
The more extreme long exposure landscapes will require filter stacking. Stacking filters means placing one filter on top of another to combine their strength.
Those wanting to take an ultra-long daytime long exposure, that produces cloud motion, often need to stack an ND110 filter with an ND1000 filter.
Stacking filters gives you an extra level of control over the length of your exposure. This happens by blocking more or less light. One thing to be careful of when stacking is vignetting. When using screw-on filters, there is a greater risk of this, caused by stacking too many filters on the front of your lens.
How long to expose for?
The aim of adding a filter to the front of your lens is to lengthen the exposure. Learning the correct strength of filter you need to apply is therefore important.
To know how strong the filter should be, you will need to decide what type of long exposure landscape you wish to take. The following is a list of photo types you could take during the daytime.
Silky water – An exposure of one second is long enough to produce the silk water effect at places like waterfalls.
Water motion – The motion of water and the length of exposure is a sliding scale. At half a second, it’s long enough to capture motion from waves going in and out at a beach. A longer exposure can then be used all the way up to the exposure length needed to flatten the sea. It’s not always desirable to completely flatten water, as some turbulence can look nice.
Flattening the sea – An exposure longer than ten seconds will be enough to flatten the sea.
Cloud motion on a calm day – With slow-moving clouds, an exposure of minutes will be required.
Cloud motion on a windy day – On a windy day, an exposure of over 15 seconds is likely to be long enough. However, you will need to experiment with the conditions you have on the day.
Getting cloud movement across your landscape can take very long exposures.
Time for long exposure landscapes!
The take-home message is to know how long an exposure you need, and use the correct filter on your lens to allow this length of exposure.
Do you enjoy long exposure photography, or are you yet to learn about the genre?
If you have examples of your work you would like to share, please share them in the comments section. These could be from your archives or images you take after reading this article. So get out with your tripod, and create some long exposure magic!
The post How to Use Photography Filters for Amazing Long Exposure Landscapes appeared first on Digital Photography School. It was authored by Simon Bond.
The post 7 Things Van Gogh Can Teach Us About Photography appeared first on Digital Photography School. It was authored by Anthony Epes.
In keeping myself motivated as a photographer, I love to look for inspiration from all across the creative spectrum. Today I want to share some ideas with you from the painter Van Gogh that I hope will bring some exciting new ideas for your photography.
I love who I am when I am taking photos. It is one of my favourite things, and I would imagine it’s the same for you.
To have my camera in my hand, exploring, finding beautiful light, and capturing interesting people I meet along the way, is immensely satisfying and massively fun.
However, life often gets in the way (who’d have thought it!), and I get distracted and lose my creative energy.
For example, I have too many conversations with my accountant, or I am doing a lot of admin or rushing around doing the tasks that are super important to make my life function but aren’t conducive to creativity.
I have been a photographer for over two decades, and I know that making time for being creative is really good for me. Of course, it’s good for my career as a whole, but more than anything, it makes me happy!
And don’t we always need more things to be happy about?
These ideas are timeless because they remind us what we love to do, and why – take photos, be creative, and make things.
I’ve also included some ideas that are reassuring – offering guidance on some of the common challenges that we all face as creative people.
So let’s get started!
1. “I am always doing what I cannot do yet, in order to learn how to do it.” Vincent Van Gogh
One thing I regularly hear from people when they arrive on my photography workshops is how they can’t do things.
It could be: I can’t be creative! Or I can’t shoot on manual, it’s impossible for me!
To me, this is just a habitual way of thinking that is not based on facts. Just because we can’t do something now, does not mean we will never be able to.
It is therefore an uncomfortable and unfamiliar feeling for us to be faced with things that we don’t understand, and so we really struggle with learning.
Photography almost always shows us the things we have struggled in the past to do. Because photography is a unity of skills – the ethereal concept of creativity and the highly technical world of cameras, computers, and post-processing software.
Many of my students fall into two camps: those who are comfortable with the technical, but not the ‘arty/creative’ side of photography. Or the reverse: very intimidated by tech, gear, etc but very comfortable with the idea of being creative.
If, though, we want to get really confident in photography (and we should because otherwise, why would you be drawn to this medium?), we have to overcome the discomfort and look to learn about these things we struggle with.
Here I can offer some inspiration. It is possible for anyone to learn anything. No one is too far gone, too un-creative or un-technical. It just comes down to belief. Can you believe you can find ways to learn what you need to learn to become comfortable and confident shooting?
If you say yes, you are halfway there. Saying yes to learning is the first step.
“Men often become what they believe themselves to be. If I believe I cannot do something, it makes me incapable of doing it. When I believe I can, I acquire the ability to do it even if I didn’t have it in the beginning.”Mahatma Gandhi
And how about we just decide to be people who are learning new things? Be like Van Gogh and always be doing things we don’t know how to do.
2. “Seek only light and freedom and do not immerse yourself too deeply in the worldly mire.” Vincent Van Gogh
This talks about how much we need to detach ourselves from normal life, and the endless tasks of our lives in order to create. Being creative connects us to the world in a completely different way to how we normally live.
In ‘normal’ life, we are living on the surface. We are doing a lot, we are being busy, we are jumping from task to task. We are responding. And that’s all totally necessary to take care of our lives.
But it is not the only way to live. It’s the least enriching, and least satisfying way to live.
And it’s definitely not the mode to be in when you’re being creative.
When you are out shooting, when you are creating something, it has to come from a different part of you. Because taking photos is the work of the soul, not the mind.
It’s diving deep into yourself and using everything you are, everything that you’ve experienced, known and loved, and bringing that out in your images.
But real life knocks very loudly and getting yourself into your creative flow state can be challenging. Even I, a professional photographer who shoots all the time, find it hard sometimes to switch off my mind when it starts reminding me about my mundane daily tasks.
So what I do when I am finding it hard to connect to my inner creative spirit, the inspiration I seek when I am out shooting is finding other ways to stoke my creativity.
That either involves going out into nature, searching for beautiful light or looking at other artists and what they have created.
I also love to read about what my favourite artists have said about making things, because it helps inspire me and helps me leap into a state of wanting to go out and create beautiful photos.
When Van Gogh said “The only time I feel alive is when I’m painting,” feels mostly very true to me.
We are rarely totally living in the moment, totally alive to everything that is around us, connecting to the world that we see.
Totally normal of course, we all do it. But I also think it’s important to carve out time to have those moments of deep fulfillment, of connection, deep beauty, and joy. This is what photography brings into my life. The chance to slow down, to see and be present for what life is.
3. “If you hear a voice within you say ‘you cannot paint,’ then by all means paint, and that voice will be silenced.” Vincent Van Gogh
Photography is an inner game.
Taking good photos has nothing to do with your current skills or your ability to nail sharpness or your exposure. It’s everything to do with what you believe about yourself and what you believe is possible for you.
If you start with this idea of not being able to do something, you won’t be able to do it. You have to overcome that mind of yours that loves to remind you of your inadequacies.
But it is also to say that all people who create, have fear. You are not alone when your mind tells you you’re not much of a photographer, or you might as well as give up because your photos are boring.
Your job is to ignore whatever rubbish your mind is saying about your photography, as Van Gogh says, and silence your mind by doing.
Creativity comes from such a magical and mysterious place– you can’t just find it anywhere. You can’t quantify it or set an exam for it. The fact that there is often no way to quantify if your photos are any good can create some anxiety.
The way to overcome this is to just get started. Just go out and shoot. Don’t worry if it’s going to come out well or not. Don’t pre-analyze what you may or may not achieve or what you are or are not.
The mind is clearly an incredible organ, but it’s not always on your side. It can dissuade you from doing things you love before you’ve even got started, so regardless of the outcome, go out and shoot and love the experience.
4. “Be clearly aware of the stars and infinity on high. Then life seems almost enchanted after all.”Vincent Van Gogh
It’s really easy to get so familiar with our world that we stop seeing what is beautiful and awe-inspiring in the world around us. It’s normal to see your everyday environment and not be inspired by what’s there. Our eyes get dulled to the familiar world around us.
That’s often why we travel or go to new places, to see new things.
But here is a big change we can make right here and now in our photography. When we are prepared to really find the magical and beautiful in life, wherever we are; when we can learn to be impressed and excited about what is, we will see more and more opportunities for photos.
We don’t need to travel or find new things to be inspired to shoot, we just need to connect with what is enchanting in this crazy, wild, and incredible world.
5. “Painting is a faith, and it imposes the duty to disregard public opinion.” Vincent Van Gogh
In many ways, I think learning photography now is harder than in the past. And that’s not because there are so many photographers, or because of smartphones, etc. Instead, it’s because of the amount of information out there, and the multitude of opinions.
The internet has given us so much incredible access to information and to communities and groups where we can share our photos. But often, instead of it being an empowering experience, it can become disheartening. You can get into the habit of judging your photos on how many ‘likes’ they receive.
When you post your photos online, you can get a whole raft of opinion back that is often useless for your photography.
People who aren’t necessarily any more experienced than you will share their random thoughts. (And I can guarantee there are very few professional photographers hanging out online doing constructive criticism on photos.) It’s also so easy to get dissuaded by what other people say about your images.
To make something unique and interesting, and to shoot with creative freedom, you need to be very careful about where you get feedback and who is giving it. You need to give most of your time creating images. Then find people you really trust – whose photography you admire – and seek feedback from them.
That’s how you can learn to grow and get better as a photographer.
6. “It is looking at things for a long time that ripens you and gives you a deeper meaning.” Vincent Van Gogh
Photography often becomes viewed as a series of technical tasks that need to be learned. To learn the way of the camera is to unlock all the gifts of photography.
For me that couldn’t be further from the truth.
The camera is merely the tool to execute your vision. That’s not to say the tool doesn’t have lots of cool and exciting features. I mean, I love tech, and I love what it can do. However, all of that gear is not going to get you great shots if you don’t know how to see, use your imagination, and bring feeling to your photos.
The key to accessing amazing photos all around you is to start to really learn to see.
You might say – but of course, I can see what’s around me! But you would be wrong. There is so much visual information around us, that our brain blocks out most of what is there. What we end up seeing is a mere fraction (less than one percent) of what is going on around us.
What is even more surreal is that because of how our brains like to make our lives as easy and simple as possible and to create habits in how we think and do things, we often see the same things over and over. We don’t notice the different things in our environment.
If you think about a street you’ve maybe walked down hundreds of times and all of sudden you have the urge to look up to the tops of the buildings. And it’s like – wow, I don’t remember seeing that.
This happens all the time with everything in our world.
Therefore, it is a good job as a photographer, to learn to open our awareness. Learn to see beyond what our brains feed us. Learn to look for a long time, and pay attention to what is around us.
This helps to develop our patience too. Developing patience in looking for shots is a great skill to nurture as a photographer. I find people are usually too quick to move on from a scene or a subject.
When we are patient and take that extra time working on a scene or subject, we often find more qualities of the subject are revealed. More ideas spring to mind too. Perhaps things in the moment change; like the light or things moving around the subject, thus, changing the possibilities of the photo.
Learn to really look at the world and it will open up so many incredible facets to your photography.
7. “If you truly love nature, you will find beauty everywhere.” Vincent Van Gogh
Completely.
I don’t just mean nature in a traditional sense – the beautiful flowers, people, or landscapes. It’s when we bring the idea of beauty into our photography that we see that we can capture what is beautiful to us, in any guise.
For me, it’s often the interplay of cities and nature. The smash of orange fruit on the tarmac. The gorgeous colors of the sunrise above a housing complex. Or the dramatic, metallic grey of a sky before a storm.
I would actually expand this idea to say there is beauty in all things, you just need to develop your ability to see and find it all around you.
Conclusion
I hope you found these ideas from Van Gogh useful for your photography. I would love to know what you thought, and if any of these ideas felt like they inspired or taught you something valuable. Please let me know in the comments below. Thanks for reading!
The post 7 Things Van Gogh Can Teach Us About Photography appeared first on Digital Photography School. It was authored by Anthony Epes.
The post This Drone Photography Checklist will Ensure You Never Miss Your Shots appeared first on Digital Photography School. It was authored by Matt Murray.
Capturing stunning images with your drone is incredibly exciting. But with so many things to think about before you take off, there can also be some nervousness wrapped up with that excitement. The first few times I flew my drone, I struggled to remember everything. Did I put a memory card in the drone? How strong would the wind be? Did I charge all the batteries? Did I need permission to launch my drone at the beach? Trying to keep track of all these issues was exhausting, but the one thing that made my life much easier was keeping a drone photography checklist with my backpack.
A drone photography checklist can help you get the most out of every flight.
The process of checking through this list the day before a planned flight – as well as just before I left home – helped me to be calmer and better prepared.
Below is my drone photography checklist to ensure that you don’t forget anything and are flying as safe as possible.
1. Before you leave the house
Planning for your flight should start before you leave the house, preferably the day before the flight. There are three things I typically check: air space, location and the weather conditions.
Make sure you have permission from the landowner to launch your drone.
a. Airspace
This is quite possibly the most important check you’ll need to do: are you legally allowed to fly your drone in the airspace above your launch location? And if so, to what height can you ascend to? Do national limits apply or is there a local restriction?
Making sure you understand the laws that govern airspace where you fly your drone is incredibly important and can potentially save you a lot of trouble.
Even if you are allowed to legally fly in the airspace, it’s important that you keep watch for other aircraft.
If you are able to fly in that airspace, you also need to check who else could be flying there too. Take a look at your proposed launch location using Google Maps – are there any helicopter pads, airports or airfields in the vicinity? Are there any model aircraft clubs or paragliding locations nearby? Is it a popular place that other drone enthusiasts might use? You need to take all these issues into consideration when planning your flight.
b. Location
As well as considering the airspace where you plan to fly, you also need to take into account what local laws govern the flying of drones in the city, state, or region you’re in. Even if you can technically fly in the airspace, local laws or rules may ban drones flying at those locations. For example, many national parks in Australia do not allow drones.
Another factor to consider is if you need the landowner’s permission to take off at your proposed launch location. Many local councils publish information on their websites regarding places you can and can’t launch your drone from. It’s always best to check beforehand well ahead of time, especially if you need to apply or seek permission before your flight.
c. Weather conditions
It’s always a good idea to check the forecasted weather conditions ahead of time. Many weather websites predict wind speeds for the next few days – this is invaluable for drone owners. If the predicted wind speeds are too high, it may be necessary to delay your flight.
Weather websites can predict wind conditions for the next few days, which invaluable for drone owners.
Also, keep an eye on other weather conditions. For example, is there any rain on the radar map? Are thunderstorms predicted? For morning flights, what are the chances of fog limiting visibility?
Also, think about the possibility of bright sunshine impairing your ability to see your drone in the sky or view the device that controls your aircraft.
2. Equipment
A drone photography checklist is also very handy for keeping track of your equipment. A checklist can help you to remember to pack everything you’ll need, as well as making sure your equipment is ready for your flight.
Your drone photography checklist can also include a list of accessories you need to take with you such as launch pads and neutral density filters.
First of all, check that all of your batteries are fully charged the day before the flight. This can take some time, so doing it half an hour before you plan to leave the house is not a good idea.
Next, check your drone over to make sure that it’s in perfect working condition. This includes making sure the propellers are not damaged or have nicks in them.
Next, check that you have all of your accessories packed and ready to go. The accessories I pack include a set of neutral density filters, a launchpad, and, of course, at least one memory card.
Make sure your memory cards have enough space on them to record multiple videos and images during your flight. Also, check that you’ve copied the contents of the memory card to your hard drive if you decide to format it beforehand.
Keep your drone software up-to-date: check for any updates 24 hours before your planned flight.
Finally, check that the device you use to control your drone (smartphone or tablet) is fully charged and that you have the latest drone software updated on it, ready to go.
3. At your launch location
When you arrive at your launch location, it’s important to have a good look around and assess the area where you’ll fly. Even after you’ve done your homework about the airspace, the location and the weather, there still can be significant risks.
Take a look around when you arrive at the location: what risks are present? Are there any power poles? Are there groups of children playing nearby? Check if there are any dogs off leash in the vicinity. Here in Australia, we also have the possibility of birds swooping you or your drone.
Make sure you keep watch around you while flying for other distractions such as children and animals.
If you have a launch pad, set it up somewhere flat away from other people. Some people also carry bright cones to mark out a small area to warn other people that a drone will be taking off and landing in the vicinity.
Start your device and your drone. Make sure you calibrate your compass before the flight and that the drone records the home point at your launch location.
Double-check your memory card is inside the drone – there is nothing more annoying than going to take a photo or a video before realizing it’s in your bag on the ground. Take a look at the lighting conditions: do you need to use an ND (neutral density) filter? If so, which one is best suited to the light today?
Before you take off, also make sure your smartphone or device is set to “do not disturb’ mode.
Take into account that bright sunshine during your flight can impair your ability to see your device effectively.
As you fly your drone, keep an eye out for other aircraft in the airspace, the weather conditions, and people or animals on the ground near your location. If it’s safe to do so, try to take a range of different shots with your drone. If you need ideas, check out my article, 7 shots to incorporate for better drone photography.
4. Post-flight
After your flight is completed, ensure everything is turned off correctly in the right order. Inspect your aircraft and propellers for damage.
Have a checklist of the items you brought with you and tick them off as you pack everything away. Drone ND filters are very small – you don’t want to leave one behind at your launch location.
When you get home, have a regular routine of how you pack your kit away. If you plan on flying again soon, put your batteries on charge again.
Copy your images and videos from your micro SD card ready for your next flight. If you have two or three verified copies of the images, at that point, you may wish to format your memory card, ready for your next flight.
Have a shot list of images you’d like to capture during your flight.
Conclusion
A drone photography checklist is a great idea to keep you prepared and to ensure you are taking reasonable steps to fly safely and legally. Instead of worrying that I have forgotten to do something while driving to my location, I now head out confident that I have taken steps to prepare for the flight.
I start working through the checklist 24 hours before any planned drone activities. This gives me plenty of time to get things sorted, as well as providing me with some reassurance that I am a responsible drone flyer. My checklist is also a big help when packing my gear before the flight, and when packing up afterward.
I’d encourage you to create your own list to print out and keep with your drone backpack, ready to check before you take to the skies. What else would you add to your drone photography checklist? Tell us in the comments below.
Drone checklist summary
You can download the PDF drone photography checklist here to keep and print out. That way, you will never miss getting your shots. Alternatively, you can just refer to the list below.
Airspace
Am I legally allowed to fly my drone in the airspace above this location?
What is the maximum height I can fly my drone at this location?
Will other aircraft be in the vicinity? (planes, helicopters, hot air balloons, drones, model aircraft, paragliders).
Location
Do I need the landowner’s permission to launch my drone at this location?
Will there be a lot of people at this location? How will I keep my drone away from other people? Will there be distractions such as dogs, children or birds?
Equipment
Are all of my drone batteries charged?
Does my memory card have enough space for images and videos for my next flight?
Is my smartphone or device fully charged? Does it have the latest version of the drone operating software on?
Is my drone in perfect working order? Are the propellers clean with no issues?
Do I have all the accessories I need? E.g. Cables, launch pad, ND filters.
Weather
What is the estimated wind speed for the time of my flight? Will I need to take any extra precautions due to the wind speed?
Are any storms or extreme weather events expected? Will bright conditions make it difficult to view my device?
Ensure all items (drone, ND filters, propellers) are accounted for.
The post This Drone Photography Checklist will Ensure You Never Miss Your Shots appeared first on Digital Photography School. It was authored by Matt Murray.
The National Audubon Society (NAS) has announced the winning images for its 2020 Audubon Photography Awards competition, including the mesmerizing grand prize-winning photograph titled ‘Double-crested Cormorant’ by photographer Joanna Lentini.
The winning photographs, which include six prize-winning photographs and four honorable mentions selected from a panel of six judges, were whittled down from more than 6,000 photographs captured across North America. In addition to the grand prize winner and the three main divisions (Professional, Amateur and Youth), The NAS also selected two winners for its Plants for Birds Prize and Fisher Prize, both of which are explained in the NAS press release:
‘The Plants for Birds Prize highlights the essential role of native plants and the natural habitat and food sources they provide for birds. The Fisher Prize, named after former creative director of Audubon Kevin Fisher, is awarded to the photo that exemplifies a blend of originality and technical expertise.’
Below is a breakdown of the prizes each winning photographer will receive for their respective works:
Grand Prize: $ 5,000
Professional Prize: $ 2,500
Amateur Prize: $ 2,500
Plants for Birds Prize: $ 2,500
Fisher Prize: $ 1,000
Youth Prize: Six days at the Hog Island Audubon Camp in Maine to become a better birder or bird photographer during the 2021 season (transportation included)
Below are the judges that pored over the photographs, who selected the winning images based on technical quality, originality and artistic merit:
Steve Freligh, publisher, Nature’s Best Photography
Melissa Groo, wildlife photographer and winner of the 2015 contest’s Grand Prize
Sabine Meyer, photography director, National Audubon Society
Allen Murabayashi, chairman and co-founder, PhotoShelter
John Rowden, senior director of bird-friendly communities, National Audubon Society
Jason Ward, bird expert and host of “Birds of North America”
You can find out more about the National Audubon Society and its photo contests by visiting the Audubon.org website.
Grand Prize Winner: Joanna Lentini
Double-crested Cormorant by Joanna Lentini/Audubon Photography Awards/2020 Grand Prize Winner
Category: Professional Species: Double-crested Cormorant Location: Los Islotes, Mexico Camera: Canon EOS 7D Mark II with Tokina 10-17mm f/3.5-4.5 AT-X 107 DX AF Fisheye lens; 1/640 second at f/6.3; ISO 320
Story Behind the Shot: I’ve spent many hours underwater at this California sea lion rookery in the Bay of La Paz, but I had never before encountered diving cormorants there. Shifting my focus from the playful sea lions, I watched in awe as the cormorants plunged beak-first into the sea to snap at the sardines swimming by. Although I spent a long time admiring these birds, I didn’t see a single one catch a fish. Adding insult to injury, curious sea lion pups would zip by the hunting birds and nip at them from behind.
Bird Lore: Cormorants are superb divers, well adapted to rapid pursuit of fish underwater. Their bodies are heavy but streamlined, with dense plumage. When they dive, they hold their wings tightly to their sides, propelling themselves with their powerful legs and webbed feet, steering through the water with their tails. Some cormorants may be capable of diving more than 300 feet below the surface, but most of their hunting is done at shallower depths.
Fisher Prize Winner: Marlee Fuller-Morris
American Dipper by Marlee Fuller-Morris/Audubon Photography Awards/2020 Fisher Prize Winner
Category: Amateur Species: American Dipper Location: Yosemite National Park, California Camera: Canon EOS 70D with Canon EF 100-400mm f/4.5-5.6L IS II USM lens; 1/2000 second at f/5.6; ISO 800
Story Behind the Shot: I followed a little-known trail in Yosemite to the top of a small waterfall and sat at the edge of the pool. A moment later, a dipper flew in. The river was moving quickly, but it wasn’t too deep. So instead of diving, the bird stuck its head underwater in search of prey. I thought the spectacular splash would make an awesome photo. The bird kept getting closer and closer as I sat snapping hundreds of shots of that splash. I will treasure that afternoon as one of my favorite moments in Yosemite!
Bird Lore: The American Dipper lives on the edge—on the boundary between air and water, on the border between streams and their banks, and even on that vague margin between songbirds (it is one, technically) and water birds. Above the surface or below, it can either walk or fly, demonstrating a mastery of all its elements, and attracting the admiration of the most creative photographers.
Professional Winner: Sue Dougherty
Magnificent Frigatebird by Sue Dougherty/Audubon Photography Awards/2020 Professional Winner
Species: Magnificent Frigatebird Location: Genovesa Island, Ecuador Camera: Canon EOS 7D Mark II with Canon EF 100-400mm f/4.5-5.6L IS II USM lens; 1/1250 second at f/8.0; ISO 1250
Story Behind the Shot: The sun was setting behind a frigatebird breeding colony in the Galápagos. The birds were very active and stunningly close, and the experience was all the more special because I was with great friends who were equally mesmerized by the scene. We got on the sand, lying on our bellies and handholding our cameras, composing silhouettes and starbursts on birds’ wingtips. I noticed this male, with his throat pouch lit up by the sun, and zoomed in to capture his portrait.
Bird Lore: Frigatebirds are among the most aerial of all birds, by necessity: Seabirds that don’t swim, they are almost incapable of taking off from the water’s surface, so they soar on long, angular wings over tropical seas, sometimes for weeks. Males in courtship displays inflate huge, balloon-like red throat pouches, vibrate their wings, and make rattling noises to attract females.
Professional Honorable Mention: Gene Putney
Greater Sage-Grouse by Gene Putney/Audubon Photography Awards/2020 Professional Honorable Mention
Species: Greater Sage-Grouse Location: Jackson County, Colorado Camera: Nikon D500 with AF-S VR Zoom-Nikkor 200-400mm f/4G IF-ED lens; 1/400 second at f/5.6; ISO 1600
Story Behind the Shot: In spring 2019 I made my first venture to watch the Greater Sage-Grouse perform its courtship ritual. Late one afternoon I set up my camera at the edge of a rural road and used my car as a blind. This male was the first bird I saw, and he proved to be a great model. As he faced away from me, he provided a nice profile pose, and I thought it was a neat perspective to get his photo from behind.
Bird Lore: After their spectacular springtime courtship dances, Greater Sage-Grouse seem to disappear into the vast sagebrush steppes of the West. Studies have shown that they may move many miles with the seasons, often shifting to higher elevations in summer, lower elevations in winter, so they need large, continuous tracts of habitat to survive.
Amateur Winner: Gail Bisson
Bare-throated Tiger-Heron by Gail Bisson/Audubon Photography Awards/2020 Amateur Winner
Species: Bare-throated Tiger-Heron Location: Tárcoles River, Costa Rica Camera: Canon EOS-1D X with Canon EF 600mm f/4L IS III USM lens; 1/800 second at f/4.0; ISO 1600
Story Behind the Shot: After a torrential rainstorm, I went out on a late-afternoon boat trip on the Tárcoles River. It was still raining when we left the boat ramp, but once the sky finally cleared, we spotted this Bare-throated Tiger-Heron walking along the river. As the boat drifted by, the bird leaned over the bank to watch us. I raised my camera and quickly switched to a portrait orientation to capture the beautiful post-storm sky behind it.
Bird Lore: Stocky and chunky, suggesting bitterns in shape, the three species of tiger-herons lurk in mangrove swamps and along rivers in the American tropics. The Bare-throated Tiger-Heron is the northernmost of these species, found mainly from Mexico to Panama. It is often most active at dawn and dusk, but fortunate observers sometimes spot one hunting fish and frogs in bright daylight.
Amateur Honorable Mention: Bibek Ghosh
Anna’s Hummingbird by Bibek Ghosh/Audubon Photography Awards/2020 Amateur Honorable Mention
Species: Anna’s Hummingbird Location: Ardenwood Historic Farm, California Camera: Fujifilm X-T3 with Canon 600mm f/4L II lens and Fringer EF-FX Pro II Lens Mount Adapter; 1/4000 second at f/4.0; ISO 3200
Story Behind the Shot: Near my home in Fremont is a historic farm with a water fountain that’s a magnet for birds. I was by the fountain looking for warblers and other migrants when I saw this hummingbird, a year-round resident, exhibiting some very interesting behavior. It swooped in for a drink and then stuck around to play in the water, as if trying to catch a droplet. After several frames, I finally captured the bird succeeding at its game.
Bird Lore: Human activities aren’t always beneficial for birds, but Anna’s Hummingbird has taken full advantage of changes we’ve made to the landscape. Formerly a resident of Southern California and Baja, it has expanded its breeding range east, to Arizona, and north, to British Columbia. Planting of year-round gardens has allowed it to thrive across this vast new territory.
Youth Winner: Vayun Tiwari
Northern Jacana by Vayun Tiwari/Audubon Photography Awards/2020 Youth Winner
Species: Northern Jacana Location: New River, Orange Walk District, Belize Camera: Canon EOS 7D Mark II with Canon EF 100-400mm f/4.5-5.6L IS II USM lens; 1/320 second at f/5.0; ISO 1250
Story Behind the Shot: On a boat ride on the New River, I noticed a few Northern Jacanas on a patch of water lilies and asked the captain to stop. I hoped our vessel wouldn’t scare away the birds. I couldn’t believe my luck when one walked closer and closer to us. The boat was rocking, but when the bird stopped for a moment to peer into a water lily, I was able to set up and get this special shot.
Bird Lore: Distinctive marsh birds of the tropics, jacanas have very long toes, enabling them to walk across floating vegetation as they seek insects and seeds. The Northern Jacana is common from Mexico to Panama and the Caribbean, and sometimes wanders to Texas.
Youth Honorable Mention: Christopher Smith
Greater Roadrunner by Christopher Smith/Audubon Photography Awards/2020 Youth Honorable Mention
Species: Greater Roadrunner Location: San Joaquin River Parkway, California Camera: Panasonic Lumix FZ80 4K with 60X Zoom DC VARIO 20-1200mm f/2.8-5.9 lens; 1/500 second at f/5.6; ISO 200
Story Behind the Shot: While on a walk through a nature preserve in Fresno, I heard a roadrunner cooing to its mate. I followed the sound to find the bird clutching a gift for its partner: a really big fence lizard! The roadrunner perched on a post above me for nearly 10 minutes. The lighting was harsh and it was difficult to get the proper camera setting, but I managed to take this shot. I like how the photograph shows a small predator with its prey.
Bird Lore: Ritualized feeding is a part of courtship for many birds, from cardinals to gulls to hawks. For the Greater Roadrunner, it’s no challenge for the male to catch a lizard to give to the female. At times, though, he will present to her a large insect or a piece of nest material, or go through the motions of bestowing a gift with nothing at all. Apparently, it’s the thought that counts.
Plants for Birds Winner: Travis Bonovsky
American Goldfinch on a cup plant by Travis Bonovsky/Audubon Photography Awards/2020 Plants For Birds Winner
Species: American Goldfinch Location: Minneapolis, Minnesota Camera: Nikon D7100 with Tamron SP 150-600mm F/5-6.3 Di VC USD Model A011 lens; 1/160 second at f/10.0; ISO 320
Story Behind the Shot: Through frequent visits to North Mississippi Regional Park, an area restored with native plants, I became familiar with the cup plant and learned that its leaves can hold rainwater, as the name suggests. I read that birds and other wildlife like to drink from these plants, so I always keep an eye out for bird activity when I pass by them. Finally one late July day I was lucky enough to witness a female American Goldfinch plunge her head into a plant.
Bird Lore: Few birds are total vegetarians, but American Goldfinches come close. While other seed eaters feed their young on insects, goldfinches serve mashed-up seeds to their nestlings. The flowers on this cup plant will go to seed later, but in the meantime the plant acts as a watering hole for the birds: Its large, opposite leaves, joined at their bases, surround the stem and create the rain-trapping cup.
Plants for Birds Honorable Mention: Natalie Robertson
Tennessee Warbler on an eastern prickly gooseberry by Natalie Robertson/Audubon Photography Awards/2020 Plants For Birds Honorable Mention
Species: Tennessee Warbler Location: Point Pelee National Park, Ontario, Canada Camera: Canon 7D Mark II with Sigma 150-600mm f/5-6.3 DG OS HSM Contemporary lens; 1/1000 second at f 6.3; ISO 500
Story Behind the Shot: This warbler was difficult to photograph as it frantically hopped from branch to branch while foraging on a native gooseberry—one of the plants that flower in early spring in this part of Canada. Gooseberries are an important source of food for exhausted songbirds migrating north over the Great Lakes, and I was thrilled to get a clear image of this warbler drinking nectar from the tiny flowers.
Bird Lore: Warblers are mainly insect eaters, but some also have a taste for nectar. On their main wintering grounds in Central America, Tennessee Warblers often show splashes of bright color on their faces, the result of probing in red or orange flowers. Their attraction to nectar continues as they migrate north. In the open woods of southeastern Canada and northern states, the inconspicuous blooms of eastern prickly gooseberry appear in late spring, just in time for migrating warblers to seek them out.


You must be logged in to post a comment.