RSS
 

Posts Tagged ‘Photography’

Weekly Photography Challenge – Landscape

19 Sep
photography, tips, apps, landscape, iOS, Android, Pete DeMarco

Landscape image by  © Pete DeMarco

Weekly Photography Challenge – Landscape

Landscape is one of the most popular genres of photography. So it should be easy to participate in this week’s photography challenge. Show us your favorite landscape photos, use all your skills and techniques to make the best images possible.

Here are links to a few articles if you need help:

  • 6 of the Best Smartphone Apps for Travel and Landscape Photography
  • 5 Composition Tips for Landscape Photography
  • The dPS Ultimate Guide to Landscape Photography
  • Tips for Processing Landscape Photos – from Basic Edits to Artistic Interpretation
  • How to Process a Black and White Landscape Photo Using Lightroom

Share your images below:

Simply upload your shot into the comment field (look for the little camera icon in the Disqus comments section) and they’ll get embedded for us all to see or if you’d prefer, upload them to your favorite photo-sharing site and leave the link to them. Show me your best images in this week’s challenge. Sometimes it takes a while for an image to appear so be patient and try not to post the same image twice.

Photo by Rob Bates on Unsplash

Share in the dPS Facebook Group

You can also share your images on the dPS Facebook group as the challenge is posted there each week as well.

The post Weekly Photography Challenge – Landscape by Darlene Hildebrandt appeared first on Digital Photography School.


Digital Photography School

 
Comments Off on Weekly Photography Challenge – Landscape

Posted in Photography


How to do a Themed Photo Walk to Break out of a Photography Rut

19 Sep

In simple terms, the more photographs you take, the more experience you gain. As they say, “the more the clicks, the better the pics”. It seems like an inevitable formula, right? But like many things, it’s easier said than done. Maintaining a constant flow of photographic material, let alone inspiration is hard work.

The dreaded photographer’s block means you can find yourself shooting one minute and stuck in a creative lull the next. Fortunately, there are plenty of small tasks you can set for yourself to break out of a rut. Doing a themed photo walk is a great way to get those creative juices flowing, with the added bonus of getting your daily step-count up in the process as well.

What is a themed photo walk?

A themed walk is just that. First, you select a theme. Then, armed with a camera, allow yourself to be guided by wherever your photography legs may take you. When you see a subject that fits your theme, take a quick snap and move on. The goal is to accumulate a body of photographs pertaining to the theme you preselected before you set off.

While taking a few random shots to shrug off a creative lull works well. But pot-shots make it hard to build up a series to revisit later. By taking on a themed photography outing, you’ll quickly fall back into the habit of actively seeking details and subjects, focusing your creative energies into a body of work with greater substance.

How to do Themed Photo Walks to Break out of a Photography Rut

Themed projects are a great excuse to document the world around you. Under the theme “desire paths” I photographed this series of pebbles – unearthed on a well-worn trail I take home.

Choosing a theme

The first step in this exercise can prove to be the hardest. Selecting a theme will define what you’ll be photographing on your walk. There are so many options to choose from, it can be hard to settle on a single one. Good themes are built on a strong idea of the target subject. A single color, shape, or pattern are simple yet effective choices, as are subjects that you’ll encounter frequently on your walk.

You may be tempted to choose a few themes at once, but focusing on a single idea will help construct your series with much greater detail. Plus, this project is about easing back into photography, not racing around madly trying to photograph as much as you can in a day.

Themes I’ve chosen in the past include dumpsters, traffic lines on roads (look out for traffic if you choose this one), spent cigarette packets, and squashed aluminum cans. As long as you don’t choose subjects like rain on a sunny day, you can’t go wrong. Once you make your selection and set off, you’ll be amazed how quickly you develop a discerning eye for your topic.

How to do Themed Photo Walks to Break out of a Photography Rut

For this photo walk I initially planned to photograph trees, though I let the theme evolve into a study of tree trunks instead. To draw greater attention to the form in each unique profile, I converted the images to black and white. Having the images arranged in a grid highlights the subtle differences in the subjects photographed.

Setting Off

Once you’ve settled on a theme, you’re ready to go. Start by having a good look at your surroundings. Depending on your theme, you may encounter photographic subjects as soon as you step out the door. Others may take a little more searching. Take your time and enjoy the process.

There are no hard and fast rules here. If you realize you’ve chosen a difficult subject, select a different one and start on that instead. This process is for easing creativity-fatigue and taking the time to see detail in your environment. Although this exercise is rewarding when used to create a series, the action of taking some downtime to work on your personal photography is what matters most.

How to do Themed Photo Walks to Break out of a Photography Rut

If, like me, you often find yourself time-short, try taking just a few snaps over the course of the day. I put this brief “yellow” themed series together while getting some fresh air on a lunch break. Once I had decided on my theme, it was a lot easier to pick out subjects to photograph.

Pulling it together

After you feel satisfied you’ve taken a solid amount of photographs, you’re ready to head home. Once you get back to your computer, it’s time to check out your handy work. So far, this project may have seemed a little sporadic, especially if you’ve chosen a broad theme. But this part of the project involves pulling all the images together to form a cohesive body of work.

Upload your images to the computer as you would normally and have a look over them with your preferred viewing software. Open a new document in Photoshop, select a few of your favorite images from your themed photo walk and drag them onto your canvas. Carefully resize each image so that they fit together in a neat grid. Make sure you hold down the Shift key while resizing images to maintain the aspect ratio of your photograph.

How to do Themed Photo Walks to Break out of a Photography Rut

Select your favorite images from your themed photo walk and drag them onto a new document in Photoshop. Remember to hold the Shift key down to maintain the image’s proportions.

As you build up the images in your grid you’ll start to see how easily your hard work comes together in a series. Although you may want to experiment with the order of your photographs, your overreaching theme will make a big difference in tying your series together. It doesn’t have to be perfect, and you don’t have to use every image you took on your walk. Just pick whatever you feel works. Once you have your images sorted into the one canvas, you are ready to share and can post the results in the comments below for us to see.

How to do Themed Photo Walks to Break out of a Photography Rut

Experimenting with the order that your images are arranged highlights the subtlety involved in creating a successful series of images. Working on a particular theme simplifies this process, leaving you to focus on the details that make the layout work.

How to do Themed Photo Walks to Break out of a Photography Rut

Another variation of my road signage themed walk. Don’t be afraid to change up your layout and experiment until it feels right.

The benefits

Aside from the exercise, themed photo walks help channel your photographic energy into a body of work. No matter how broad or focused, taking photographs within a specific theme widens your photographic experience and enhances your eye for detail. Hunting down subjects within a deliberately selected theme will help you create images you might never have considered before.

This will also help you to visualize future projects and help you pick out elements in photographs that work cohesively in a series. It’s a great way to improve your practice and get your head back into the photography zone.

How to do Themed Photo Walks to Break out of a Photography Rut

I took these images under the theme “looking down”. I plodded around with my camera pointed toward the ground for a few hours just to see what I could find. The results made a unique series built upon an unusual perspective.

How to do Themed Photo Walks to Break out of a Photography Rut

Another themed walk collage.

The post How to do a Themed Photo Walk to Break out of a Photography Rut by Megan Kennedy appeared first on Digital Photography School.


Digital Photography School

 
Comments Off on How to do a Themed Photo Walk to Break out of a Photography Rut

Posted in Photography


How to Plan a Street Photography Shoot When Traveling

19 Sep

Street photography is normally a very open and free-form photography genre, but sometimes because we are traveling it’s better to plan a shoot rather than relying on luck.

Fortune, they say, favors the prepared, and when all you have is a few hours in a new land, better get ready to make the most of what you’ve got. Makes sense, no? Here’s how I prepare a street photography shoot when I know time will be limited.

What to do a few days before

A few days before your shoot you will need a few apps and tools.

The first is an offline map, Google Maps allows you to save chunks of the map but some areas are off limits (I tried to save a map of Osaka and wasn’t allowed). You need to find apps that have offline maps from the get-go and download the map of the area where you are going. It sounds stupid and you might be tempted to skip this part, but when I went to Hong Kong, I wasted an hour and a half trying to get out of the subway area into the main roads.

How to Plan a Street Photography Shoot When Traveling

The second app you need is called the Photographers Ephemeris (iOS / Android). It’s designed for landscape shooters but it’s also useful for street photographers because it allows you to know where and when the sun will rise and set. It tells you what to expect in terms of light. It is a paid app, but alternatively, you can get that information for free online.

This is very useful information that you can use to predict what camera/lens you may require also. No need to get your high ISO camera if you plan to leave before the sun sets, for example.

How to Plan a Street Photography Shoot When Traveling

Planning your shoot

Here’s the deal, if you had all the time in the world, you would stroll and go wherever you feel images are calling you. But you don’t, probably one or two days is all you have while traveling. So you need an idea of where to go while leaving things open to opportunity and chance as well.

1- Check the weather

Don’t miss this step! It may sound stupid but this not only allows you to plan ahead and might tell you to bring extra protective gear. I usually check the day before because the weather is very unreliable and the forecast can change quickly.

How to Plan a Street Photography Shoot When Traveling

2- What are your numbers?

You need to know when you are arriving and leaving. For example, imagine you are arriving at 8 pm and leaving at 4 pm the next day. What I recommend first of all is to set an alarm that tells you when to start and stop shooting, it usually takes an hour to get situated so I would set an alarm for 9 pm and 3 pm the following day. You need to figure out the amount of time it takes to get from the airport to where you are staying and to return again. I personally have an alarm for when to eat too.

While this might sound tedious, it gives you the freedom to shoot because it will tell you exactly when to start and when to stop, and you do not have to worry about it. When traveling you have no familiar bearings so the alarms get you grounded.

How to Plan a Street Photography Shoot When Traveling

Consider your arrival time

The other reason for knowing your numbers is knowing what you can expect. Remember the information you got from Photographer’s ephemeris or online. When are the sunrise, midday, and sunset?

Let’s say sunset is at  7 pm and sunrise at 7 am. If you are arriving at 8 pm you would know that you will arrive at night. So if you want to shoot the morning light, you need to wake up before 7 am and you know that you will miss the sunset. This kind of information will tell you what kind of light you can anticipate. But you also need to know where you are going.

How to Plan a Street Photography Shoot When Traveling

Where to go

When going somewhere new, I try to find the population centers and busy streets. So I google “[city name here] busy street” look at the results, and try to find the names of the busiest streets. It’s not magical, it’s probably overshot but where there are more people, usually there are interesting shots. Here are my results using Hong Kong as an example.

How to Plan a Street Photography Shoot When Traveling

Note: This is where you want to google according to your project and style. If you have a project with businessmen, you want to find out where the central business district is for example.

When looking for populated areas, there is usually a long stretch of road that is popular that provides great opportunities. For example:

  • Market Street in Philadelphia
  • Times Square in New York
  • Dotonbori in Osaka
  • Ocean Drive in Miami
  • Gangnam in Seoul
  • Nathan road in Hong Kong

Then I map out how to go there from the airport. When you know your times and where to go, you have a clearer idea of what you can expect. All of your energy is saved for shooting and not figuring things out when you arrive. Like I said above, after sweating like a pig trying to get out of the subway area in Kowloon, Hong Kong, it zapped my energy levels greatly. I doubled down on coffee.

How to Plan a Street Photography Shoot When Traveling

Use your gathered information wisely

It takes some experience but after a while, you start to know what to expect with all the information gathered. In the morning, you know what direction to be in to shoot the sun or have it at your back. You know when stores will start opening and people go to work. Knowing where you are going will help with your expectations. For example, if there are a lot of high-rises that will create shadow areas.

Knowing what time night falls will tell you when street vendors will start to close, the light from stores will create a new light source, or when to pull out a flash if that’s your thing.

How to Plan a Street Photography Shoot When Traveling

Protection

You have to be careful. What you believe is a camera is someone else’s next meal for a month. Population centers and busy streets are opportunities for street photographers but also for street thieves. It depends on where you are going, some places are safer than others. I like the anti-theft Pacsafe brand, but you can make yourself less pick-pocket friendly if you turn your backpack and hold it against your belly.

Also, don’t flaunt your camera if you know you are going somewhere there are lots of pick-pockets. You have to be careful not to damage the camera, but some tape is perfect to uglify the camera. And as much as you can, avoid backpacks and bags that scream “camera bag”. It immediately flags you as having a camera.

How to Plan a Street Photography Shoot When Traveling

Conclusion

There you have my system for how to prepare for a travel street photography shoot. I would be the first to say that it’s better to go somewhere and leave things open, but sometimes that’s just not a good use of your time when you only have a few hours or days to shoot somewhere. It’s better to prepare and then leave things open. Be yourself, stay focused and keep on shooting.

The post How to Plan a Street Photography Shoot When Traveling by Olivier Duong appeared first on Digital Photography School.


Digital Photography School

 
Comments Off on How to Plan a Street Photography Shoot When Traveling

Posted in Photography


Tips for Why and How to do Wildlife Photography at Eye-Level

18 Sep

Wildlife photography is all about creating a connection with the subject and with your audience. One of the key components of your wildlife images is how well they capture the audience’s attention. One of the most effective ways to do that is to try and get down and shoot at eye-level with the subject. Please note that eye-level need not necessarily mean ground-level always. You could have a subject on a tree, rock, etc., so it’s not always essential to be at the ground-level but being at eye-level really helps.

What’s the difference?

Let’s see what difference is in an image when you shot from eye-level of the subject.

Taken from a car.

Taken at eye level on the ground.

Purely from an attention grabbing perspective, this renders the background totally blurred thus restricting the number of points vying for attention. As is seen in the image above, the image when taken from eye-level helps in drawing attention directly to the bird. Why does this happen, though? What causes the background to blur out?

The background is affected

Often in my workshops and tours, I suggest people that they should ask “Why?” for all concepts and tips. For the eye-level approach to wildlife photography, I again ask, “Why does this result in getting a cleaner background?” The answer might be obvious to a lot of you but for those others who are just starting their journey as photographers, the following question might help.

Ever you ever searched for a tiny thing like an earring or a needle on the floor?

The obvious approach is to immediately get down to ground level and rest your head on the floor. But why does that help? It helps simply because by changing your perspective you change the distance between the subject and the background. The greater this distance, the greater the chance there is of the shallower depth of field coming into play and that of the subject standing out.

Take the images above for example. The following illustration will show the difference in terms of background for both..

Tips for Why and How to do Wildlife Photography at Eye-Level

In the illustration where the photographer is standing up, the background consists of the ground immediately behind the bird. The less the distance between subject and background, the lesser the blur of the background is achieved.

Where the photographer is lying down, the background is almost infinity (a significant distance away from the bird). The greater the distance between subject and background, the more blur of the background can be achieved.

With that rule understood, you will be able to apply it in the field that much better. Here are a few more examples of eye-level wildlife photography.

Tips for Why and How to do Wildlife Photography at Eye-Level

Tips for Why and How to do Wildlife Photography at Eye-Level

Tips for Why and How to do Wildlife Photography at Eye-Level

Tips for shooting wildlife photography at eye-level

Now that we have established the advantage of going to the eye-level of the subject, let’s take a look at a few ways to go about doing that.

Getting to the eye-level

#1 Get yourself flat on the ground

This is the easiest to do, as you just have to lie down, right? Well, I wish it was just that. If you are in a vehicle and are close enough to the subject, then try to get down on the ground with minimal to no noise and generally very slowly. Try and make moves only when the subject is looking away. Once you are flat on the ground, try not to make a lot of burst shots immediately. Let the subject get accustomed to you first.

#2 Get the vehicle at eye-level

Take a look at the image below. It is a pair of lions in the African savannah.

Tips for Why and How to do Wildlife Photography at Eye-Level

Quite often, wildlife photography is done in reserves or national parks, where getting down from the vehicle is not allowed. So what can you do in such scenarios? This is where your field-craft comes in handy. Know your subject and you will be able to predict its movement.

For example, take a scenario where you have a big cat walking on a road (they seem to like doing that don’t they?). You could either stop where you are and fire-off a few shots. OR you could take a moment to evaluate the animal’s potential path and wait at a location where the road is slightly lower than where you are currently situated. A lower elevation for the vehicle would ensure a better connection with the subject when it walks towards you. Take a look at the simple sketch below to give you an idea.

Tips for Why and How to do Wildlife Photography at Eye-Level

#3 Crawl

This one has to do mostly with shooting on the beach. If you are into shorebird photography quite often you will find yourself on a sandy beach because those are the areas where your subjects are found. It is generally not very easy to get up-close to these guys using your vehicle so you have to start crawling from a safe distance.

I have noticed that shorebirds allow you to get really close-up as long as you are willing to put in that effort to crawl and not rush in on them. Here is an example of the result of a 50-foot crawl.

Tips for Why and How to do Wildlife Photography at Eye-Level

Yes, get those elbow and knee guards ready because it isn’t the easiest thing to do. Especially if you are carrying a big lens around. A contraption like the ground pod helps a lot in this situation to push the gear easily.

#4 Standing up

Sometimes, when you are in a vehicle, getting to eye-level might simply mean standing up. Look at the following two images. Both clicked at the same spot, one while I was sitting down and the other when I decided to get up to eye-level.

Tips for Why and How to do Wildlife Photography at Eye-Level

Tips for Why and How to do Wildlife Photography at Eye-Level

It makes a world of a difference right? Now please remember that even when you are doing a simple thing like standing up, you need to be very cautious and slow in your approach. Wildlife does not like sudden movements, it spooks them.

Getting ready for eye-level

As with everything in photography, practice makes life much easier in the field, so here is my advice for the eye-level approach. Initially just try it without the camera. See if you can understand the mood of the subject. Remember, make no alarming or sudden movements and be as quiet and slow as possible.

Once you are able to do this with a certain degree of success, you are ready to then bring out the camera gear and give it a go. Remember, this is quite a lot like being a predator. You will not have a 100% success rate. Just make sure that when you succeed, you make full use of it. What I mean is, make sure that before you get down on the ground, you have chosen the spot well for a good background and you have taken into account the light on the subject.

So get out there, and practice and share your wildlife photography eye-level images.

The post Tips for Why and How to do Wildlife Photography at Eye-Level by Rahul Sachdev appeared first on Digital Photography School.


Digital Photography School

 
Comments Off on Tips for Why and How to do Wildlife Photography at Eye-Level

Posted in Photography


Tips for Minimalist Photography in an Urban Environment

15 Sep

Minimalism gained traction in America in the 1960s with links to the Japanese traditional culture of Zen Philosophy. As a reaction against the whims of abstract expressionism, artists like Sol LeWitt, Frank Stella, and Mark Rothko experimented with stripped back processes and imagery, exposing the bare bones of visual art.

The history of the minimalist photography movement is not dissimilar to that of their contemporaries. The scientific photography of Bernice Abbott is referred to as a marked pivot towards minimalism. Photographers like Robert Adams and Lewis Baltz also used reductionist techniques to explore composition in the natural and urban landscape.

Tips for Minimalist Photography in an Urban Environment

Like all visual art, minimalism is founded on the basic elements of design; line, shape, color, texture, form, and composition. The scope of interpretation within minimalist art is vast, with its proponents yielding a diversity of results and reasoning. Overall, however, minimalist art can be surmised within a single principle, the old adage of “keep it simple”.

Keeping it simple

Minimalism is about how little you can say without compromising meaning. Minimalist photography is a great opportunity to slow down and reevaluate your photographic process. Before taking a shot, take a breath. Think about your desired outcome. How does your knowledge of composition apply to the subject at hand? How would you like to approach exposure? Minimalism is a very meditative process, sort of like yoga, but for your photography.

Composing minimalist photography in an urban landscape

Often, the utilitarian components that make up an urban landscape are the same that serve as the best minimalist subjects. Minimalist depictions of nature tend to rely on the soft flow of organic structures. However, urban minimalist photography capitalizes on the bold lines of old buildings, fresh apartments, and upturned car parks.

Intermixed with bolts of color, texture, and juxtaposition, minimalist photography can be both subtle and loud at the same time. Photographers of minimalism capitalize on strong, stripped back elements to create both subtle and high-impact imagery. That’s why moving forward in minimalist photography often requires you to steep yourself in the very basics of photographic composition first.

Rule of thirds

The rule of thirds is a trick to help determine the overall composition of a photograph. Mentally divide an image up evenly into thirds both horizontally and vertically. The lines that intersect around the central rectangle indicate the points that capture the majority of a viewer’s attention. By offsetting important points in a photograph from the center rectangle, an image will feel more naturally appealing to your audience.

Minimalist photography relies equally on what has been included and excluded from an image. Composing a visually harmonious photograph with tools like the rule of thirds maximizes the short time a viewer has to engage with a photograph.

Tips for Minimalist Photography in an Urban Environment

This image is sectioned off into 9 even rectangles. The four central intersecting points indicate the focal points of the photograph.

Tips for Minimalist Photography in an Urban Environment

This image is an example of the rule-of-thirds in practice. No single component of the photograph lies directly within the center, guiding the viewer’s eye around the image rather directly to the center.

Color

Color has a language that establishes the atmosphere and emotional range of an image. Where traditional black and white highlights the form of an image, two or three highly contrasting colors can bring the facade of the urban environment to life.

Blocks of color convey vitality and hardness in an image, whereas a gradient is softer and more accommodating. Pastel color schemes depicted by many contemporary minimalist photographers deliver a surreal, dream-like quality to a photograph, while also alluding to childhood, disassociation and new-media aesthetics.

Tips for Minimalist Photography in an Urban Environment - color

Tips for Minimalist Photography in an Urban Environment

Isolated colors can add depth to an image and draw attention to details often overlooked in the urban landscape.

Tips for Minimalist Photography in an Urban Environment

Lines

Strong lines in minimalist photography carry the integrity of an image. Conveying depth and presence, bold lines leading in from the perimeter of an image grab a viewer’s attention and guide their eye through the artwork. Lines delineate the boundaries of different bodies within a space and can denote unrest at sharp angles or quiet emotion with organic ripples.

Horizontal lines are used as a device to indicate the horizon, perspective, or to completely upend a viewer’s sense of space altogether! When composing an image, follow each line through with your eyes. Adjusting the integrity of a line later in post-production can be extremely time-consuming. And the success of a minimalist photograph could (and probably will) count on it being exact.

Tips for Minimalist Photography in an Urban Environment

Leading lines reach the perimeter of the physical photograph and provide the viewer with a visual trail to follow into the interior of the image.

Shape

The compositional elements of line and shape often cross over in a visual plane. For example, the perimeter of a shape can be defined by its outer line, sectioning the interior of the shape off from the background of the image.

Sharp, inorganic shapes create unrest and action in an image, whereas smooth, organic shapes create a scene of peace, nature, and evenness. The urban environment consists of an inexhaustible array of sharp and smooth lines. Trying to bring the two spectra together creates a dynamic juxtaposition of design and emotion.

Tips for Minimalist Photography in an Urban Environment

Pattern and texture

Pattern and texture lift the image from the page. Texture is the physicality of an image, which engages with an audience by appealing to their sense of touch. Pattern, often combined with texture, adds detail to a photograph, revealing beauty the repetition of otherwise unobserved subject matter.

Minimalism and pattern can combine to emphasize size and number, delivering a feeling of sensory overload simply by the repetition of a single design. When limited to concentrated areas in an image, a pattern can serve as a disruption to the remaining landscape or as a contrast to emphasize negative space.

Tips for Minimalist Photography in an Urban Environment - texture

Textural images often depict the wear and tear of the urban environment in delightfully intricate detail.

Negative space

Negative space is what is not there which can be kind of confusing. It lends breathing room to an image. It allows the immediate subject matter to exist with little or no intrusion elsewhere in the frame.

As an example, an image of a single cloud, framed by blue sky neither intrudes nor detracts from the other, but the two exchange meaning nonetheless. The sharp contrast between vacant and overflowing environments means that urban landscapes are great for incorporating negative space into minimalist photography.

Tips for Minimalist Photography in an Urban Environment - negative space

The geometric pattern on the right of this image is offset by the negative space on the left. The relationship balances out the image overall and enhances the bold yellow streak down the middle.

Tips for Minimalist Photography in an Urban Environment

Conclusion

Minimalism has seen a considerable resurgence in recent years, especially in interior design and photography. A wealth of online curatorship means that tags like #minimal and #minimal_perfection unearth fresh, reductionist imagery by the second. Although the overwhelming volume of images may seem contrary to the principals of minimalism itself, the evolution of the modern landscape continues to create a wealth of opportunity for photographic artists looking to branch out or hone their skills in composition.

How do you use minimalist photography with your images? Please share in the comments below.

The post Tips for Minimalist Photography in an Urban Environment by Megan Kennedy appeared first on Digital Photography School.


Digital Photography School

 
Comments Off on Tips for Minimalist Photography in an Urban Environment

Posted in Photography


How to do Photography of a Funeral Tastefully and with Respect

14 Sep

For most of us, most of the time, photography is a fun and joyful activity, where we get to do something we enjoy and share it with others. Indeed, all the time and all over the world, professional photographers are asked to immortalize the happiest times of people’s lives: beginnings of families and lives, important rituals, celebrated accomplishments. Having someone ask you to photograph a funeral is obviously very different – on many levels.

 How to do Photography of a Funeral Tastefully and with Respect

Note: All the images in this article have been approved for use here by the families. No images have been used without written permission for this sensitive subject matter.

Photography of a funeral

Although a funeral may not seem like the kind of event people would seek to remember, it often is. After all, it’s an important ritual, a celebration of a life, and a gathering of people who may not know each other well but who are united in their mourning. In my experience, many people find it important to have their loved one’s funeral documented, even though it’s a photography service that isn’t advertised or discussed as much or in the same way as most others.

To some extent, preparing to photograph a funeral differs little from any other photography job. There are obviously some unique considerations, though, and in this article, I’ll go through both the similarities and the important differences.

How to do Photography of a Funeral Tastefully and with Respect

Remember, don’t photograph a funeral as your first photography job – or even your second. It’s something that calls for a professional and calm attitude, a lot of experience, and high-quality work.

Before the funeral

The funeral is a very important event to the person asking you to photograph it. However, funeral photography isn’t discussed as much as other kinds, there are no magazines or fairs about it, and there’s little sharing in social media. So good communication with the customer is even more important than usual. Remember that the person you’re dealing with may not be able to express exactly what they want and that they will naturally be stressed and upset.

How to do Photography of a Funeral Tastefully and with Respect

Note: If you can, taking some photos before the mourners enter the venue is a good idea. Always ask before entering, though.

The most important things you need to find out before the ceremony are:

  • When and where will the ceremony take place? If possible, visit the place beforehand to familiarize yourself with the venue and the lighting situation.
  • What kind of ceremony is it? If it’s one that’s unfamiliar to you, make sure you learn all you can about it.
  • Which photographs are particularly important to the customer? For instance, someone might want you to focus on the sermon, the eulogy, the mourners, or the religious details.
  • What kind of relation does the customer have to the deceased?


On the day of the funeral, wear something dark and shoes that will let you move around without causing a disturbance. Naturally, be sure to be at the venue on time, greet your customer and offer your condolences.

The ceremony

The biggest challenge when photographing a funeral is finding the right balance between getting beautiful photos and not disturbing the ceremony. Make sure to be quiet and to avoid blocking the mourners’ view, but remember that you have been paid to capture the event. They’ve asked you to help family and friends remember a momentous day and the life of a loved one.

How to do Photography of a Funeral Tastefully and with Respect

The photos you need to make sure to capture depend on the kind of ceremony in question, so these are very general points:

  • Mourners paying their respects.
  • The essential parts of the religious (if it is religious) ceremony.
  • The burial and final goodbyes.

You’ve been asked to photograph a very intimate event, so remember that photographing the guests needs to be done discreetly and with respect. To many, these are some of the most important photographs: they signify different parts of the deceased person’s rich life and represent the people in whose memories the deceased will continue to live on. Some might want a group photo of all the guests.

How to do Photography of a Funeral Tastefully and with Respect

Another important part is the details and specific parts of the ceremony, such as the flower arrangements, the lowering of the coffin, and the priest or leader of the ceremony.

After the funeral

When the ceremony (or the part of it you have been asked to photograph) is over, let your customer know you’re leaving, offer your condolences again, and compliment them on how beautiful the event was.

How to do Photography of a Funeral Tastefully and with Respect

Immediately afterward, go home, and back up your photos. Then, give yourself a breather and take care of yourself. Being a part of this kind of event might affect you more than you realize.

The processing happens the way it always does. Just remember to be very respectful and create the most tasteful pictures you can.

How to do Photography of a Funeral Tastefully and with Respect

Conclusion

Funerals are events of sorrow, of remembering, and of togetherness – it’s important to capture all of that, not only the darkness. What do you think?

Do you have any other tips or warnings for someone who has been asked to photograph a funeral? Please share your advice and opinions in the comments below.

The post How to do Photography of a Funeral Tastefully and with Respect by Hannele Luhtasela-el Showk appeared first on Digital Photography School.


Digital Photography School

 
Comments Off on How to do Photography of a Funeral Tastefully and with Respect

Posted in Photography


5 Top Value Lenses for Getting Started in Wildlife Photography

12 Sep

Getting started in wildlife photography is one of the more expensive genres of the photo industry. The lenses and cameras that are often in the bags of pros are more often than not in the higher tier price brackets. However, to get started you don’t need to spend a fortune to gear up with some great lenses for wildlife photography.

Lenses are the thing to invest in when starting out in wildlife or as any photographer for that matter. The glass you purchase can stay with you for many years, while often cameras are updated far more regularly. Meaning, if you spend your money wisely you won’t have to outlay again.

wildlife photography lenses

Now of course as you gain more experience and want to invest it into your work, you might outgrow some gear or wish for more pro features. But when you’re getting started, the lenses I’ve listed below are a great base to build on and invest in, that will not only provide excellent quality results but also hold their value within your gear bag. These lenses will cover a range of shooting situations so you can capture the natural world in all manner of ways to really follow your creative vision.

1 – The Telephoto Zoom 70-200mm

Firstly, we are going to start with the telephoto zoom. For most wildlife photographers this is one of the most used lenses in their arsenal, offering flexibility to compose portraits of wildlife to more landscape style images to put your subjects in the environment.

5 Top Value Lenses for Getting Started in Wildlife Photography

The 70-200mm zoom is an excellent investment.

As an investment, the 70-200mm is a key lens to get hold of as it offers so much in the way of performance and flexibility. Most people will feel that 200mm is a little shot for wildlife, but with practice and development of your stalking skills, especially when paired with an APS-C camera it’s a great place to start.

The f/2.8 is the most coveted version due to its fast aperture for gorgeous bokeh (out of focus areas) as well as its autofocus speed. The f/2.8 version is a higher cost lens retailing new at around $ 2000 but secondhand (especially a slightly older version) can be had at excellent prices. If they are still a little out of the price range, think about the f/4 version. Smaller and lighter they are also a lot cheaper, still offering top performance for getting into wildlife photography.

5 Top Value Lenses for Getting Started in Wildlife Photography

The 70-200mm is perfect for working with largest animals.

2 – The Prime Option 300mm F/4

If you want something a little longer think about looking into a 300mm f/4 prime lens. These fixed focal length lenses don’t zoom, so you have to move your feet to get the composition correct. However, due to their nature as primes they have excellent optical performance, offering wonderful sharpness as well as a reasonably fast aperture for creating pleasing portraits with your of focus areas as well as working in less than perfect light.

5 Top Value Lenses for Getting Started in Wildlife Photography

300mm f/4 lens.

The 300mm f/4 is a lens that has been on the market for a long time now and both Nikon and Canon lenses can be easily found for an excellent price secondhand even from dealers with included warranties. The 300mm f/4 was the telephoto that I used when I became more serious with my photography and it helped me on the path to shooting professionally. So I can vouch for its excellent qualities.

wildlife photography lenses

3 – Ultra Telephoto Zoom 100-400mm

If prime lenses aren’t your thing then the 100-400mm (or the Nikon 80-400mm) might be a better fit for your style of shooting. The excellent range makes it a very versatile lens for wildlife photography, giving you the ability to switch from close portraits to environmental shots in an instant.

5 Top Value Lenses for Getting Started in Wildlife Photography

80-400mm Nikon lens.

Buying new gives you the best options for getting a top spec lens, with the latest iterations having excellent sharpness, autofocus and image stabilization, whilst older models are slightly weaker in all aspects. If you are looking to invest in one of these I’d recommend trying to get hold of the latest model as it will last you a long time and really provide you with a top lens for getting some great wildlife images.

I would certainly recommend these as name brand lenses over third party manufacturers, as they are far better optically engineered. Often when starting out with wildlife photography, some people go for the longest superzoom they can find like the 150-600mm or 50-500mm. But these suffer from optical quality and often lead to frustrating results.

5 Top Value Lenses for Getting Started in Wildlife Photography

The 80-400mm is a great compact wildlife photography lens for travel.

4 – Wide Angle 10-20mm

When shooting wildlife photography, going wide a great way to create far more interesting images than super telephoto shots. Of course, as that isn’t always an option, spending a vast amount of money on a super wide especially if you are not focused on shooting landscapes as well can be overkill.

5 Top Value Lenses for Getting Started in Wildlife Photography

Canon 10-18mm lens.

Luckily both Nikon and Canon have excellent low-cost APS-C wide angle lenses that really offer great performance and functionality at decent prices. The new Nikon 10-20mm and the Canon 10-18mm are perfect candidates for wide angle wildlife shooting. Their ultra-wide view can pull the viewer into an entire landscape, while the close focuses of a mere 0.2m allow you to get up close and personal with your subjects (often wirelessly triggering) for impact filed images.

5 Top Value Lenses for Getting Started in Wildlife Photography

The 10-20mm is perfect for wide landscape shots or wildlife in the landscape.

wildlife photography lenses

Shot using the 10-20mm wide-angle lens.

These lenses cost around $ 300-500 so are brilliant options to give a wide scope to your shooting potential.

5 – Macro Lens 100/105mm

If you are interested in getting in close and looking at details as a wildlife photographer you’ll want to look into a macro lens for close up shooting. These specialist optics offer 1:1 life size reproduction ratios that are awesome for shooting insects and plants.

5 Top Value Lenses for Getting Started in Wildlife Photography

105mm macro lens being used in the garden.

The 100mm focal length is where you really want to invest as it offers the best in terms of performance, as well as a good working distance to help reduce the chance of your disturbing your subjects and getting in the way of your own lighting. The 100mm macro is a slightly more expensive lens but having been on the market for a while there are often many secondhand copies available offering discounts on the new price of around 30-40%.

It’s a truly great investment as these lenses are among the sharpest on the market with optical perfection that makes them a staple in many pros bags. The lenses are also great for a variety of non-macro tasks as well, with them often being used by portrait photographers for their flattering compression that makes beautiful backgrounds.

Conclusion

That’s a round up of a few of the top lenses to invest in if you are getting started in wildlife photography. They maybe slightly higher in price than some of the third party alternatives or lesser models, but these lenses will hold their own for many years, meaning the extra savings and investment will pay off with certainty in the long term.

wildlife photography lenses

If you do wildlife photography what lenses did you start off with? Which do you recommend? Please share in the comments section below.

The post 5 Top Value Lenses for Getting Started in Wildlife Photography by Tom Mason appeared first on Digital Photography School.


Digital Photography School

 
Comments Off on 5 Top Value Lenses for Getting Started in Wildlife Photography

Posted in Photography


DJI will let you rent a Mavic Pro for free so you can enter Nat Geo’s aerial photography contest

09 Sep

NatGeo and DJI have teamed up to offer Mavic Pro drone rentals to photographers who want to enter National Geographic’s #MyMavicContest, an aerial photography contest for photos taken with the Chinese company’s drone. Not everyone who signs up for the drone rental will be awarded one, but those who are chosen to receive the Mavic Pro will get to use the drone for two weeks.

National Geographic has detailed the rentals on its new contest page, explaining that anyone can sign up to get the Mavic Pro loaner device. For its part, DJI explains that it will randomly select people from the application pool for whom the drones will be provided; there are ‘hundreds’ of drones available, though an exact number wasn’t provided. Recipients will have to pick up the rental from their local DJI Store, as well.

When signing up for the rentals, applicants must provide information that includes name and email, photography interests, pickup city, and can optionally provide an Instagram ID and National Geographic Your Shot ID. The rental period is running from September 5 to October 31, though recipients will only get the drone for two weeks during that period.

Photographers who already own the Mavic Pro can enter their photos into the contest by posting them on Instagram with the hashtags #NatGeoTravel and #MyMavicContest. Five winners will be selected in November to received a Mavic Pro of their own.

Via: The Drive

Articles: Digital Photography Review (dpreview.com)

 
Comments Off on DJI will let you rent a Mavic Pro for free so you can enter Nat Geo’s aerial photography contest

Posted in Uncategorized


North Carolina has designated October 2017 ‘Photography Month’

08 Sep

Roy Cooper, the governor of North Carolina, has declared that October 2017 will be Photography Month in an official decree that “commend[s] its observance to all citizens.” That’s right, if you live in North Carolina and you love taking pictures, you now have an official month to celebrate your wallet-crushing hobby.

The Photography Month designation was issued for multiple reasons, not the least of which is that October is when North Carolina hosts a number of photography-related festivals and fairs. But it goes beyond this.

In addition to its large number of photography events, the proclamation points out that photography “enriches the lives of those who practice and appreciate the art form,” that the state’s photographers, “take great pride in sharing their accomplishments in the areas of photographic art,” and that the state, “recognizes those photographers who capture our diverse communities and landscapes.”

Check out a full copy of the proclamation below:

Articles: Digital Photography Review (dpreview.com)

 
Comments Off on North Carolina has designated October 2017 ‘Photography Month’

Posted in Uncategorized


More Lessons from the Photography Masters: David Burnett and Vivian Maier

06 Sep

The more you can learn about photography the better off you will be. Find out everything you can even if it doesn’t seem important to you at the time. The best way to do this is to have a close look at the masters, photographers who molded the photography world as we know it today.

Some of these shooters are still with us and some of them have passed. Whatever the case may be, their legacy remains here to teach us through their experiences. In this installment of the Master’s Series, we’re going to look at two of my personal favorites – David Burnett and Vivian Maier.

David Burnett

More Lessons from the Photography Masters: David Burnett and Vivian Maier

Image By Eric Smith (Own work) [CC BY 3.0 ], via Wikimedia Commons

“He’s been everywhere but only for an hour.” – American Photographer Magazine

David Burnett’s photojournalism career and creative output place him high in the ranking of some of the most influential camera jockeys of the late 20th century. Named one of the 100 most important people in photography by American Photographer Magazine, Dave has photographed it all. From the Vietnam War to the Olympics, from Obama to Bob Marley, his iconic images quite literally empower the viewer’s world to be seen from a different point of view.

Tips from the career of David Burnett

After shooting the world’s beautiful (and sometimes dark) moments of history for the larger part of a half century, Burnett shows us so many ways to improve ourselves as image makers, photographers, and general human beings. Here are a few things you can glean from the career of David Burnett that can help you develop (photo jokes never die) as a photographer no matter what type of photos you make.

See David’s work on his website here.

Go with your gut

So many times we get sidetracked by what is considered normal. As photographers, we rely heavily on the visual influence of other photographers which in turn shapes our own work. That doesn’t mean that we should replicate their work to the letter. Don’t always go with the photographic flow just because that’s what other photographers may be doing.

More Lessons from the Photography Masters: David Burnett and Vivian Maier

So many times you will see David Burnett at sporting events completely separated from the rest of the photo press herd. He shoots what feels right to him, as you should as well. Learn to trust your own artistic instinct. Make your image representations of a mixture of the moment and your own vision regardless of the current photo trends. Don’t be afraid to shoot a scene differently than it has been photographed before. Lay down. Stand on a chair. Shoot weird reflections. Do whatever you have to do to reach that lofty height called individualism. No memorable work has ever been ordinary.

Shun the worship of gear

I’m guilty of this at times. No matter what I do or even how much I might write about not allowing yourself to throw away money on the latest and greatest camera or lens, there’s still a little part of me that loves to read about new cameras and really eyeball that “one lens that could change everything”.

Then there’s Dave – one of the most celebrated photographers of all time, hauling around a 60-year-old Speed Graphic 4×5 with a lens ripped from an aerial reconnaissance camera and a plastic Holga 35mm (considered a toy). While he does shoot digital as well, a large chunk of Burnett’s most enduring photographs was made using film cameras that are essentially antiques and not considered tools of a modern photographic professional.

More Lessons from the Photography Masters: David Burnett and Vivian Maier

The takeaway here is that your gear is just an extension of yourself. Your camera, lens, tripod, are all just tools that perform a job. Don’t let them become something more than they are or even worse, begin to believe you are nothing without the newest piece of camera tech.

Focus (jokes again!) on cultivating your basic skills and creativity using whatever gear you may have and when it’s time, you’ll know when to upgrade. Or in the case of David Burnett, downgrade. Whatever the case may be, use the tools that allow you to produce your work in the way that suits you best.

Give back

It almost feels as if I’ve undersold the importance of David Burnett’s contribution to the world of photography and photojournalism. While his career speaks for itself, there’s one thing that usually isn’t mentioned. That is just how down to Earth, human, and unpretentious Dave has remained despite his success. I’ve been oddly fortunate enough to correspond with him personally on a few occasions over matters photo-related and otherwise (onions?). Each time, I’ve talked to a person and fellow photographer – not David Burnett: Preeminent Photojournalist.

More Lessons from the Photography Masters: David Burnett and Vivian Maier

No matter where your journey takes you as a photographer, always remember that awards or accolades may make you an authority on the photographic medium but they should not make you an elitist. Don’t shy away from sharing your knowledge when it can help someone make better pictures. It can mean a lot. I know it did for me.

Vivian Maier

Vivian, oh dear Vivian. Where to begin? Vivian Maier is something of a paradox. Even now, I’m unsure what personal information about her is fact and what is not. What I do know about is her work and the way it was serendipitously introduced to the world. Vivian Maier was a nanny, an eccentric, and one of the most prolific street photographers of the 20th century. As a child in 1930, she and her mother briefly lived with Jeanne Bertrand, who was an award winning portrait photographer of the early 1900’s. Whether Vivian was taught the craft by Jeanne isn’t certain but it’s quite possible.

Tips from the career of Vivian Maier

Her work was literally stumbled across in a storage unit in 2007. Vivian passed away in near obscurity in 2009 but her photographs continue to inspire and teach us even today. I first learned of Maier’s images through John Maloof’s excellent documentary “Finding Vivian Maier” which is currently on Netflix and really merits a watch if you want to learn more about Vivian Maier and her unbelievable life. Here are some things I learned from one of the best street photographers you’ve never heard of.

There is beauty everywhere

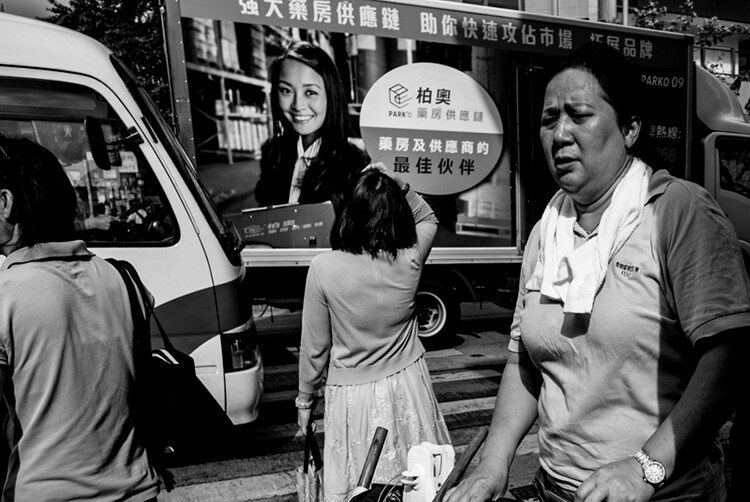
One of the wonderful things about photography is its revealing nature. A photo can portray an otherwise mundane or common scene in a way that shows that there truly is beauty in all things. Some of those things might even be tragic and sad, but the soulful connection and wonderment are there, too. Vivian’s photographs showed not only the scenes of the streets of New York and Chicago, but the unseen emotion to be found there.

More Lessons from the Photography Masters: David Burnett and Vivian Maier

The key to producing a strong photograph anywhere is to learn that there is in fact, meaning in everything. Look for interesting light, interesting people, anything that can bring out the hidden. It’s your job as a photographer to be able to capture those hidden gems into images that can be shared with others. So, if you find yourself in a slump or there seems to just not be anything to shoot, look closer. Find the beauty and make a photo.

Recognize the moment

This echos back to some teachings by the photographic titan, Henri Cartier-Bresson. You can see in some of Maier’s photographs that she waited. She waited until the instant the shutter should be released in order to capture the moment best. This is one of things that makes her photos so powerful.

Whether it was the exact instant the subject’s eyes met hers or when their footsteps were perfectly in sync, the opportune moment was patiently awaited. Also worth mentioning is the unobtrusiveness of Vivian’s technique. Lot’s of her images were made with a 120 Rolleiflex (among others). This type of camera isn’t held up to the photographer’s face but rather cradled below. This made her blend into the scene more and she was able to capture images which were less intruded upon by her presence.

More Lessons from the Photography Masters: David Burnett and Vivian Maier

Work to anticipate photographic moments before they happen. I know, it sounds extremely difficult. But the truth is that the more you practice, the more you shoot, the better you will become at “getting lucky.” You can train yourself to be present in the scene and intuitively recognize when photos will happen. The hard part? Putting in the shooting time to make this kind of skill manifest itself.

It’s okay to be weird

If there’s one thing you can learn about Vivian it’s that she was, for the lack of a better word, weird. Vivian Maier was a weirdo by the common views of her time. She dressed differently, acted differently, and made images that we’re different. In fact, it’s one of the very reasons she’s still being talked about today.

More Lessons from the Photography Masters: David Burnett and Vivian Maier

Even if she didn’t know at the time, her uniqueness would set her apart and lend a fresh perspective to her work and methodology. So, don’t try and hide your weirdness when you photograph things. Be different and celebrate all the little quirks that might make your images completely fresh. Much like the lessons learned from David Burnett, the real breakthroughs in your photography never come from falling into line with accepted norms. Relax, be different.

See her work on the official Vivian Maier Photography site.

Final thoughts

Knowledge is the cornerstone of most anything you will ever undertake. How do you gain knowledge? Well, usually it comes through experience (often mistakes) and it can take a while for us to learn our lessons. As photographers, those giants who came before us offer incredibly valuable teachings. Their lessons are here for us to scoop up if we just take the time to listen. Don’t just study the photographs of the masters but learn how and why they made them.

The post More Lessons from the Photography Masters: David Burnett and Vivian Maier by Adam Welch appeared first on Digital Photography School.


Digital Photography School

 
Comments Off on More Lessons from the Photography Masters: David Burnett and Vivian Maier

Posted in Photography