RSS
 

Posts Tagged ‘Photograph’

Removing facial flaws in a photograph | lynda.com tutorial

25 Oct

This Photoshop tutorial discusses how to clean up the small facial blemishes in a photograph using the Healing tools. Watch more at www.lynda.com This specific tutorial is just a single movie from chapter one of the Photoshop CS5: Athletic Retouching Projects course presented by lynda.com author Chris Orwig. The complete Photoshop CS5: Athletic Retouching Projects course has a total duration of 6 hours and 9 minutes, and covers removing blemishes from the subject and the background, adding motion blur, enhancing muscle tone, making adjustments to photos shot in an outdoor setting, and more. Photoshop CS5: Athletic Retouching Projects table of contents: Introduction 1. Outdoor Portrait 2. Simplicity 3. Strength 4. Speed 5. Gym Workout 6. Energy 7. Pushup 8. Indoor Track Sprint 9. Enhancing Strength 10. Surfer Portrait 11. Underwater Portrait 12. Jump 13. Father and Son Portrait Conclusion

 
Comments Off on Removing facial flaws in a photograph | lynda.com tutorial

Posted in Retouching in Photoshop


Tutorial – How to enhance a photograph in a few easy steps

22 Oct

Enhancing a photograph in a few easy steps!
Video Rating: 5 / 5

 
Comments Off on Tutorial – How to enhance a photograph in a few easy steps

Posted in Retouching in Photoshop


How to photograph an exploding water balloon – Freeze Frame

21 Oct

An in-depth, step-by-step video explaining how to capture and freeze nearly anything, led by 17-year old Nick Wagner. Camera: Nikon D7000 Speedlight: Nikon SB700 Lens: Nikon 60mm F2.8 Micro Transmitter/Receiver: Cowboy Studio Remote Trigger system: Aputure Pro Coworker Softbox, stand and flash mount: Cowboy Studio Balloons: Pop-a-lot Industries

This is the official behind the scene video for “You’re On” by EUZEN. The video is produced by NIKON Nordic. All Rights Reserved 2012 euzen.dk mortenrygaard.com nikon.dk nikon.se nikon.no nikon.fi nikon.ee nikon.com
Video Rating: 4 / 5

 
Comments Off on How to photograph an exploding water balloon – Freeze Frame

Posted in Nikon Videos


Top 5 Tips on How to Photograph Food

20 Oct

A Guest Post by Deidra Wilson.

Food Photographer Vegas Deidra Wilson DPS

Many of you may want to step up your food photography from iPhone to fabulous, but you’re sure that it’s quite impossible to do without a food stylist and ten grand worth of gear to help you make that dish look amazing. I am living proof that that’s just not the case. If you have a team that is willing to work hard and a location that allows for great lighting, you’re more than halfway there.

1. Work with a great Team – Even if You’re the Only One on it

Since you likely don’t have a food stylist, make sure you have a chef that’s willing to go above and beyond when it comes to plating the dish. You want everything to be brightly colored and placed neatly. Any garnishes should be super fresh (no wilted greens, please!). Sauces, when used as decoration, should be bright and shiny. Since you don’t have a stylist, you’re in charge of styling the food on the plate. Look through your lens and take a few test shots. Look at the images and determine what (if anything) is detracting from the image. If there is, fix it and try again!

2. Keep it Fresh

If you must photograph for an extended period of time, you may wish to replace parts of the dish as needed. For example – melted cheese will harden quickly and no longer appear appetizing. If you are photographing any type of meat, it will likely start to release juices that will mar the plate. Re-plate it and keep shooting! It’s better to take the time to redo something, rather than try to correct it in post-production.

3. Focus on the Details

For example, if you have a piece of meat that is grilled, make sure those grill marks are beautifully straight and perfectly criss-crossed. If you have a sushi roll, make sure the pieces are placed in an appealing manner and that any details like sauces or garnishes aren’t detracting from the image. Sometimes less is better when it comes to food photography. A plate with too much going on will easily detract from the star of the image.

4. Use an Abundance of Natural Light whenever Possible

Natural daylight tends to be the most flattering for any subject, food included! I love to shoot food right next to a big window. You can either backlight it by shooting into the light, or use the available light to light your image. If you must use lights, try to use daylight-balanced hot lights or strobes (around 5000K if possible). This will nearly replicate natural light and allow you to achieve beautiful results.

5. Use a Shallow Depth of Field

This creates interest and drama in the subject and allows you to make the best of the available light. When you shoot with a shallow DOF, you’ll want to keep the focal point towards the front of the image. So, if you’re photographing a sushi roll, don’t focus on the pieces furthest from your lens – focus on the piece closest to the front and let the rest of the roll elegantly fade into a beautiful bokeh.

Overall, have fun with it! I’ve been photographing food as a commercial photographer for more than a decade. Every shoot is different and I’ve worked under nearly every condition imaginable, including completely dark rooms. Be creative, be willing to think outside the box and get ready to experiment and have fun.

Deidra Wilson is a Las Vegas Photographer who loves to make the best out of any lighting situation and create incredible images from seemingly nothing. You can follow her on Twitter at @deidraphoto

Post originally from: Digital Photography Tips.

Check out our more Photography Tips at Photography Tips for Beginners, Portrait Photography Tips and Wedding Photography Tips.

Top 5 Tips on How to Photograph Food


Digital Photography School

 
Comments Off on Top 5 Tips on How to Photograph Food

Posted in Photography


What Makes A Great Street Photograph and How Do We Create Them

16 Oct

This post is written by James Maher – author of The Essentials of Street Photography – an eBook currently onsale at SnapnDeals (25% off).

Pushups, Rucker Park, Harlem

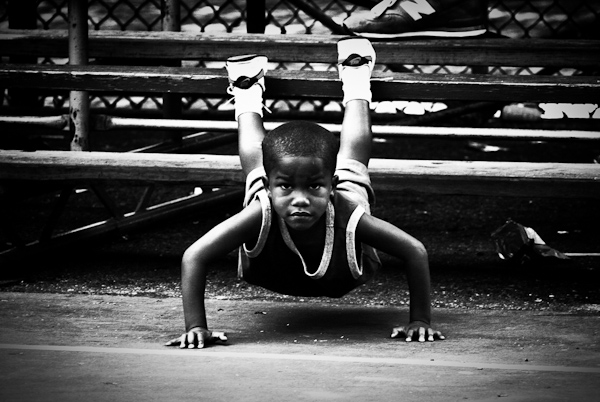
Pushups, Rucker Park, Harlem.

Growing up I obsessed with basketball.

I would skip school; I would play in light rain and sometimes snow; I occasionally failed classes and always fell asleep in them.  From age 8 until 22, it’s pretty much all I did and all I wanted to do.

The best players were often reserved, relaxed, and mentally tough and focused.  The intense look in the child’s eyes above explains it all and shows how innate this mentality and focus can be.

What Makes A Great Street Photograph?

So how does this story relate to you taking a ‘great street photograph?’

I want to share with you what I have learned, because it has nothing to do with tips, tricks, or techniques. The techniques are necessary to be able to take a technically good photograph but they are not the reason why you take great photographs.

Great street photographs say something about life; they speak to us; they fill us with an emotion; or they give us insight.

They are not about light; they are not about shapes or forms; they are not about faces.  Light, shapes, and faces can only aid in the success of a photo; they cannot be the reason for it.  When you look at a great street photograph you should not leave it saying, ‘Wow that light was amazing.’  You should leave it saying, ‘Wow the emotion or story in that photograph really hit me – AND the light was amazing.’

A great street photograph is one that makes a person think or one that brings up a specific feeling, story, or idea.

For a quick example, you shouldn’t be trying to capture a face; you should be trying to capture an expression.

If Only For A Moment

If Only For A Moment.

“If Only For A Moment” – A fleeting moment with a story.  No faces, subtle blue lighting, and no spectacular forms that stop you in your tracks.  What is here is the subtle body language of the pass and that split second ‘what if’ thought going through their minds.  This photo leads you on a mental journey through all of those ‘what if’ moments in your life and youth.  It makes your heart beat.

How Do We Create Them?

So how do we create these photographs with meaning?  Aren’t we at the whims of randomness and our surroundings in street photography?

Not necessarily.

The answer to this comes back to you and it is the reason for the personal stories in this article.

Street photography is a form of self expression.  We go out and we search for the type of content that means something to us.  When we are out there we are basically photographing ourselves, and searching for people, ideas, stories, and thoughts that we relate to and want to share.

Look at the body of work of any street photographer and you will be able to get some consistent insight into their personalities and how they see the world.  They, like us, were at the whims of their surroundings and everyday randomness, yet this meaning still broke through in their work.

That is why you cannot copy another photographer’s style.  You can only learn from them and their techniques and apply them to your own way of shooting and your own personality.  Style isn’t about a look; it is about meaning.

It is about you.

Street photography is about exploring the world through our eyes and sharing the insights and stories that we see and find.  It is showing the viewer how we see and think about the world.

The best photographers are not just interested in photography; they have an interest in people, in life, in social issues or cultural issues.  They read and they explore new places and new ideas.  They are curious both about others and about themselves.  They have a good eye for design, but more importantly they have a good nose for the ideas that are floating around them.

Guess in Red

Guess in Red.

“Guess in Red.” – I grew up with a serious case of Attention Deficit Disorder, which luckily subsided as I got older.  Even simple stimulations would lead my mind way off track.  Because of this and over time, I became very sensitive to advertising and how it intrudes on our attention, because it would break mine constantly.  Walking around the streets was like a sensory overload.  It’s led me to become fascinated with advertising and their intrusive nature and influence on our lives.

Is the above photo a coincidence or is it the result of influence?

If you want to take better street photographs, figure out why you are shooting and what you want to capture from it.  What do you relate to most?  Is there a specific type of content or person you are attracted to?  Are you attracted to specific emotions or are there cultural issues that you want to show us?  There are an infinite amount of ideas that you can go out and capture.

To better understand yourself and your work, study you archives and search for themes.  Group similar photographs together.  You might notice some ideas that you had previously missed.

It’s not easy.

Think about what your personality is like and how that relates to what you see out there.   Maybe you can start by photographing a specific aspect of what life is like in your town or street.

Just because you live in an unpopulated area doesn’t mean you can’t do street photography.  Give us insight into what it’s like to live where you are.  You don’t even have to leave your home and it doesn’t matter if people are in the photographs or not.  If you live in a town without a lot of people, then perhaps out of a series of twenty images, only 5 to 7 of them should actually have people in them.  Photograph that sparseness.  Let us into your world.

I can’t think of many things that sound more interesting than that.

Waiting in Grand Central

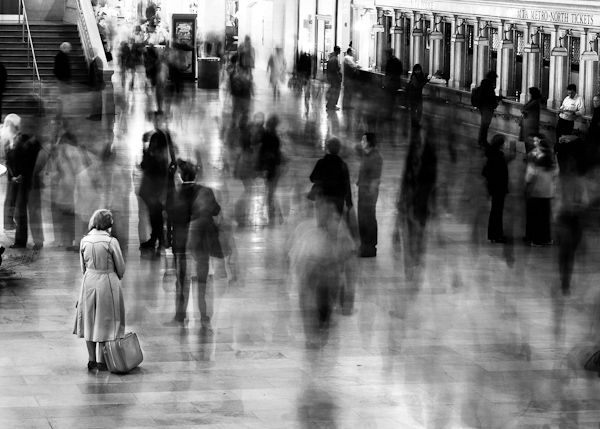
Waiting in Grand Central.

New York is a city where there are a lot of people, a lot of stimulation, and a lot of things happening all at once.  However, it is also a very lonely city.  Living here, you feel like everyone is competing with you and that everyone is moving so fast that you can barely keep up.  This shot was my way of portraying these feelings visually.

A great street photograph is one that comes from your soul and explains how you see the world.  Light, faces, composition, and forms are all part of the recipe but they are not the reason why you click that shutter.

And you can create better street photographs by better understanding yourself and your world.

What are your thoughts about what creates a great street photograph?

This post is written by James Maher – author of The Essentials of Street Photography – an eBook currently onsale at SnapnDeals (25% off).

Post originally from: Digital Photography Tips.

Check out our more Photography Tips at Photography Tips for Beginners, Portrait Photography Tips and Wedding Photography Tips.

What Makes A Great Street Photograph and How Do We Create Them


Digital Photography School

 
Comments Off on What Makes A Great Street Photograph and How Do We Create Them

Posted in Photography


How to Photograph Zombies

16 Oct

Zombiethierryehrmann

Halloween is my favorite holiday and one of the best bits is the undead. Zombies aren’t confined to Halloween but their Fall migration, called Zombie Walks, begin around September and numbers increase drastically until October 31st. Help track the spread of walking undead this season with some great photos!

Getting the Pose

Like any subject, your photos will improve tremendously if you get the right pose. In this case, that means getting shots that reinforce the idea of a zombie. In other words, the poses should reflect the walking dead. Bodies that are slumped, heads at odd angles, vacant stares, and feral snarls are the hallmarks of a zombie.

If your subject can’t relax and act like the dead thing he is, ask him to imagine that the only thing holding him up are marionette strings between his shoulders and at his wrists. If his eyes haven’t lost all color and turned milky white yet, have him roll his eyes upward so you can only see the whites of his eyes in the photo.

Zombierandysalgado

See Things in the Right Light

Think about every horror movie you’ve ever seen. The creatures wouldn’t be nearly as scary without the dim lighting, lots of shadows, and the generally dirty feel of the film. Don’t look for soft even light when photographing zombies.

Harsh directional lighting and high contrast brings out the shape of sunken cheeks and will add shadows. Also consider underexposing your shot by a 1/2 stop or full stop to add a more dangerous feel to your images in further intensify angles/shadows. If you are adding flash to your photo, either use off camera flash or turn your camera upside down and bounce the flash from the ground to light the zombie from below to add extra creepiness to the shot. A piece of white poster paper can be rolled up for easy transport and makes a great reflector for ground bounce flash. Swapping to black and white or sepia is also an excellent choice to help bring out details.

Nitty Gritty Photos

Zombies aren’t pretty and they aren’t nice. This is not the time to be looking for beauty shots. Grain and noise are a good thing with zombie photos. The distressed look of the film will add to the dangerous and distressing nature of your subject in the photo.

If you are shooting at night, go ahead and up your film speed. The added grain/noise will actually add to the atmosphere of the image. If you are shooting in the daytime you can still up your film speed to add noise. You’ll just need to increase your shutter speed to make up for the additional light or add a neutral density filter to your lens. You can also add noise/grain when you edit your photos if you prefer.

Zombieclauderobillard

Look Out Behind…the Zombies

Pay attention to what is behind your zombie subject(s). The vast majority of zombie migrations take place in urban settings so chain link fences, cars, and even garbage cans are fine in the background of zombie photos. However, one uninfected person smiling cluelessly in the background can completely throw off the feel of your zombie pic. Wait a moment or two until the zombies notice the prey in their midst and then capture the feeding frenzy.

Find Your Angle

Photographing zombies is one time that the straight horizons rule can be easily discarded. A tilted frame can help translate the lurching motion of a zombie in your photographs. Which direction you tilt the frame depends on how much the zombie is leaning and how much background is visible around the zombie. If you are filling the frame with your subject tilt against the lurch. If plenty of background is visible tilt with the subject angle. If you are unsure which angle to use, remember that when you are shooting over your shoulder while running from the horde you should get plenty of varying angles to choose from later.??Shooting upwards also puts the zombies in control visually in your photos because it makes the viewer feel like they are looking up. So don’t just give up when the zombies surround you, keep shooting until the last moment. You can take comfort in knowing that whomever finds your camera later will be surprised with a great final shot of the zombies closing in over you.

Zombiemunirhamdan

Liz Masoner is a long time photographer based in Alabama with experience ranging from freelance to photojournalist. She is widely published online and in print, including 5 years developing the photography content for About.com. Liz is a co-founder of the Phorum Photographic community and also maintains a personal blog chronicling her adventures and misadventures from behind the lens.

Post originally from: Digital Photography Tips.

Check out our more Photography Tips at Photography Tips for Beginners, Portrait Photography Tips and Wedding Photography Tips.

How to Photograph Zombies


Digital Photography School

 
Comments Off on How to Photograph Zombies

Posted in Photography


Nickelback – Photograph

06 Feb

© 2007 WMG Photograph Buy it on iTunes: bit.ly

During his month long artist in residency at the Ace Hotel in NYC, photographer Chase Jarvis explores and celebrates the art of the snapshot and invites the world to further pursue their own creative endeavors.
Video Rating: 4 / 5


Removing Blemishes from a photograph using Adobe Photoshop CS Extend

04 Nov

In this tutorial, you will learn “step by step” how to remove blemishes and dust from a photo using PhotoShop CS3 Lessons are available for download at Time Stop Studios for per lesson (Download) or you can purchase the DVD (10 lessons) for . You will be able to ask questions on my blog about anything you may not understand in the lessons. www.timestopstudios.com
Video Rating: 5 / 5

iceflowstudios.com Download the Action: vandelaydesign.com Facebook: www.facebook.com I take a look at a really neat 3D Photoshop action!


Fstoppers Original: How To Photograph Wakeboarding In A Studio .mp4

29 Aug

www.fstoppers.com FULL ARTICLE Fstoppers takes you behind the scenes with photographer Patrick Hall as he explains photographing wakeboarders behind a boat as well as a completely unique studio photoshoot. View the full detailed article at www.fstoppers.com Features Patrick explaining the Ewa-Marine DSLR Housing: www.bit.ly , shooting on an inner-tube, designing a studio shoot, and studio lighting. For more of Patrick Hall’s work goto www.patrickhallphotography.com

Photographer extraordinaire, Sterling Lorence, and freeride legend, Matt Hunter, go on the hunt for the next epic photo somewhere in the Utah desert. After days of looking they find the perfect drop to show off the Specialized Demo 8’s capabilities and nab another poster-worthy photo.
Video Rating: 4 / 5

 
Comments Off on Fstoppers Original: How To Photograph Wakeboarding In A Studio .mp4

Posted in Photography Videos


How to Photograph a Wedding

03 Jul

weddings.dexknows.com When photographing a wedding, it is important to capture the details of the event like the bride’s accessories, the flowers, the decorations, the food and close-up facial expressions. Concentrate on the key events of the day with advice from a professional photographer in this free video on wedding photography. Expert: Michael Graham Bio: Michael Graham is the owner and founder of Michael Graham Photography in Los Angeles, California. Voted among the top-10 best wedding photographers in LA by Citysearch.com, Graham’s photography philosophy is all about capturing the moments that mean so much to the wedding couple, their families, and friends. When Graham photographs a wedding, it’s about sensitivity to human emotions and interactions, good intuition to what really matters to the couple, and having a good understanding to what makes a great photo. His goal is always to create tasteful images filled with emotion–images that you want to cherish forever.

The story The story begins with the scene of a photographer who was taking a picture for an automobile magazine. He accidentaly took a picture of a girl who was walking across right in front of his camera. She excused politely and went away. One day, the photographer went to a salon which by accident was the the place where the girl worked at. He left his bini in the salon by accident, leaving the girl a chance to come by his workplace to return it. So she came to his studio and returned his bini. But before she left, he made her pose as a model. They found out that they shared a same passion. He was a professional photographer and she was a girl who dreamed to be a model. They became close and spent a lot of time together. He took a lot of pictures of her and published them. One day, an accident happened while she was trying to get something from a high rack in his studio. An unlid bottle of photographic product fell and spilled on her. She was immediately taken to a hospital. The chemical of the photographic product was so toxic, it damaged her eyes so bad that she was about to never be able to see again. A miracle happened, after a while being taken care in the hospital, the doctors took off the bandages on her eyes. She opened her eyes and saw the photographer’s co-worker holding a celebration cake with a candle on it. The co-worker took her to his studio, but he was not there to be found. She was so sad because she loved him so much, she thought that the photographer