Surreal, dreamlike and often haunting, databending creates digital or analog image errors for artistic effect. An art form in which corrupted files are either created or mimicked in photographs, paintings, sculptures, video or even audio, databending finds beauty in technology gone awry. Ranging from colorful pillows to uncanny oil paintings inspired by security footage, here are 40+ works by 12 notable glitch artists.
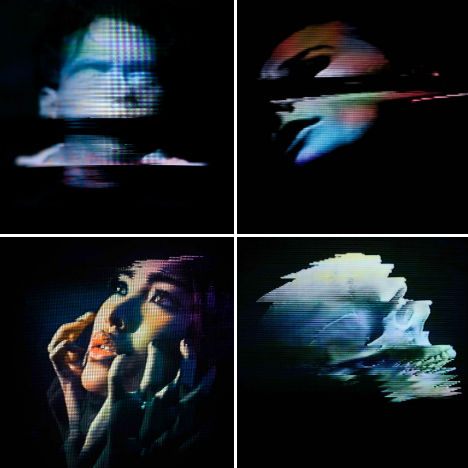
Security Footage Paintings by Regina Parra
Low-resolution security footage is translated into hazy watercolor paintings in a collaboration between Kon Trubkovich and Regina Parra. With this series, Parra immortalizes moments on film which already have somewhat of an eerie feel, rendering them even more fascinating.
Glitch Videos by Rosa Menkman
The Collapse of PAL from Rosa Menkman on Vimeo.
02: One Billion Steps aka The longer you sit on a bus, the smaller the world becomes from Rosa Menkman on Vimeo.
Dutch filmmaker and artist Rosa Menkman is an authority on the glitch art genre, producing events and written works as well as a ‘glitch manifesto’ and experimental work of her own. In fact, she completed her master thesis on digital glitch in 2009. “Glitches are the uncanny, brutal structures that come to the surface during a break of the flow within a technology; they are the primal data-screams of the machine,” Menkman told DINCA in a 2010 interview. “Glitch art is a practice that studies and researches the vernacular of file formats in exploitative manners to deconstruct and create new, brutalist (audio)visual works. However, glitch artists often go beyond this formal approach; they realize that the glitch does not exists without human perception and therefore have a more inclusive approach to digital material.”
Glitch Textiles by Philip Stearns
Artist Philip Stearns describes his collection of woven and knit wall hangings and blankets “glitches in the cold, hard logic of digital circuits transformed into soft, warm textiles.” The designs were taken from short-circuited cameras and other ‘unorthodox’ digital techniques.
Distortion by Nicholas Ballesteros
“This technique of altering or appropriating images is not for a desired outcome other than showing the found material’s sheer ability to be bent,” says artist Nicholas Ballesteros of his ‘Distortion’ series. Ballesteros uses a scanner and found images to produce these effects.
Glitch Art Pillow Covers by Benjamin Berg
Display colorful video glitches around your house with this series of throw pillows by artist Benjamin Berg. Also producing work under the alias stAllio, Berg discovered glitching by running the contents of his hard drive through music software. “Glitch art is a dance on the edge of a failing system,” he says.
Analog Glitches by Rob Sheridan
Artist Rob Sheridan created a series of visuals for the band How to Destroy Angels’ Welcome Oblivion and An omen EP, saying “these images were created by disrupting signals through analog tape and display equipment, not with Photoshop effects.”
Next Page: Image Hacking 40 Glitch Art Photos Paintings Videos
The three-day multi-site neighborhood-wide event is a one-of-a-kind art happening: where serendipity meets the haphazard and where the unpredictable, spontaneous and downright weird thrive. The now teenage D.U.M.B.O. Art Under the Bridge Festival® presents touchable, accessible, and interactive art, on a scale that makes it the nation’s largest urban forum for experimental art.
Art Under the Bridge is an opportunity for young artists to use any medium imaginable to create temporary projects on-the-spot everywhere and anywhere, completely transforming the Dumbo section of Brooklyn, New York, into a vibrant platform for self-expression. In addition to the 80+ projects throughout the historical post-industrial waterfront span, visitors can tour local artists’ studios or check out the indoor video_dumbo, a non-stop program of cutting-edge video art from New York City and around the world.
The Dumbo Arts Center (DAC) has been the exclusive producer of the D.U.M.B.O Art Under the Bridge Festival® since 1997. DAC is a big impact, small non-profit, that in addition to its year-round gallery exhibitions, is committed to preserving Dumbo as a site in New York City where emerging visual artists can experiment in the public domain, while having unprecedented freedom and access to normally off-limit locations.
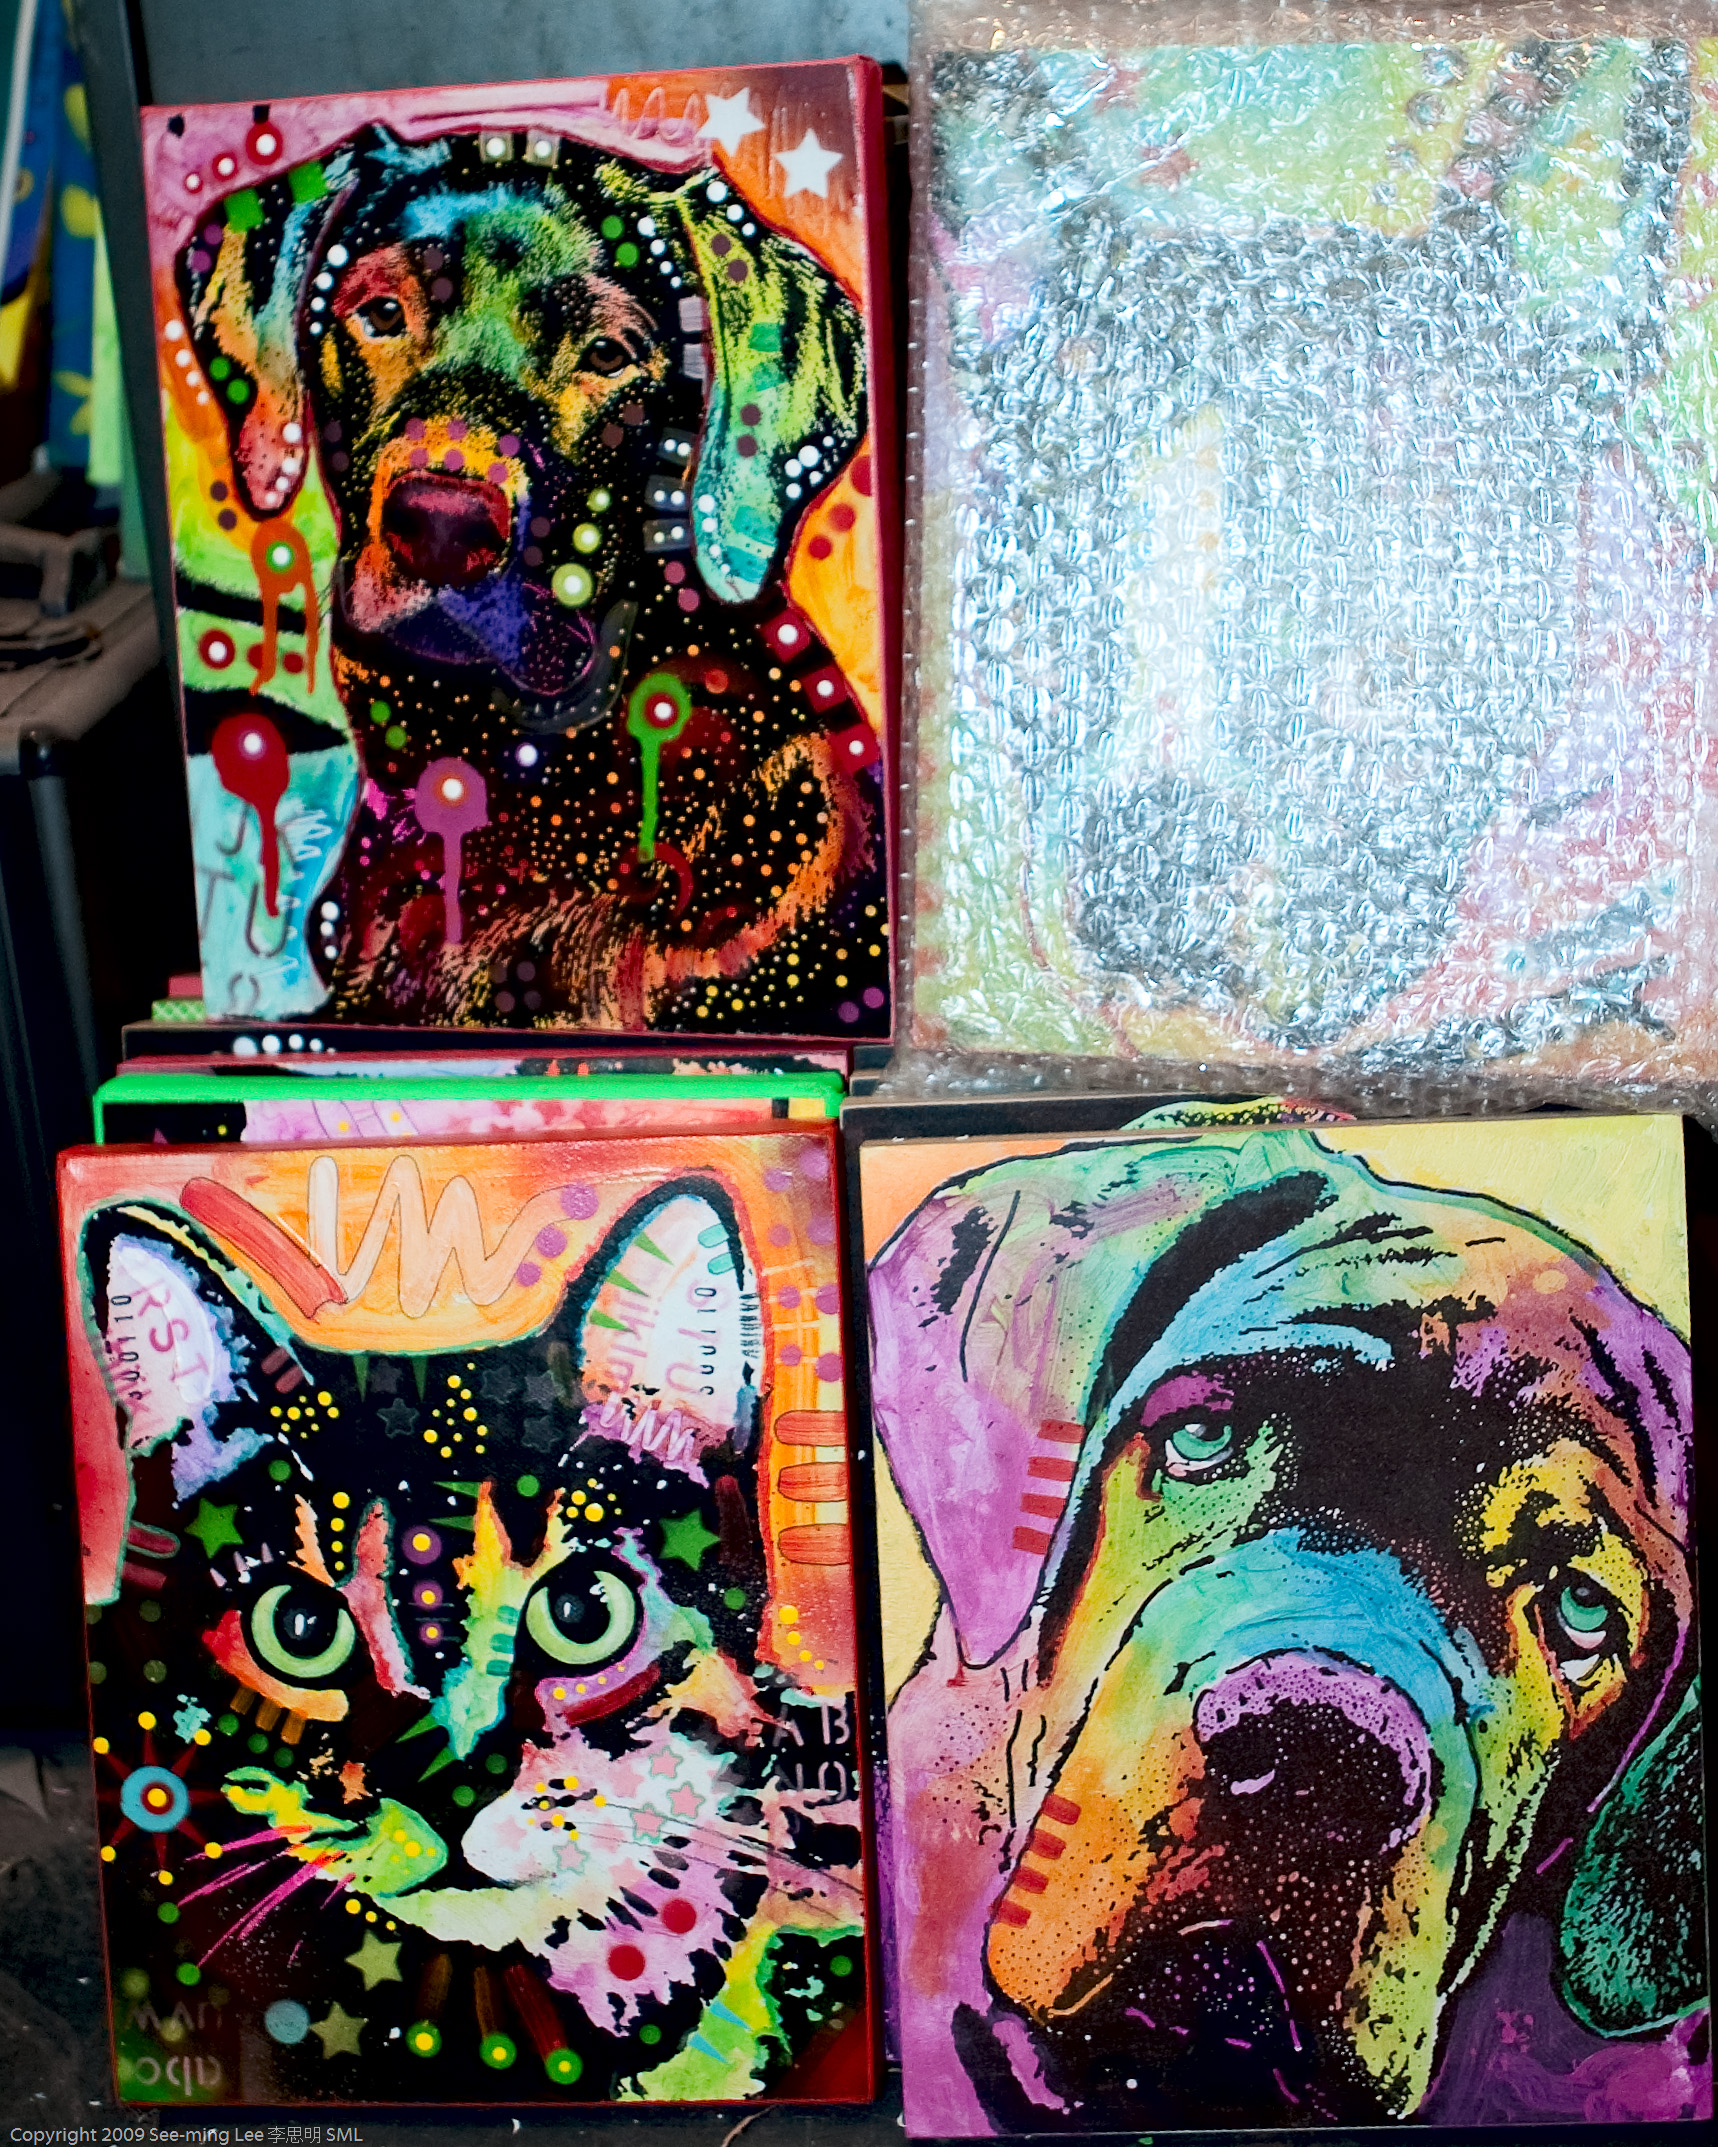
Comments Off on Paintings by Dean Russo at the Artist’s Studio / Dumbo Arts Center: Art Under the Bridge Festival 2009 / 20090926.10D.54876.P1.L1.C45 / SML
You seem to see them at every garage sale: a chipped and battered, faux-ornate, gold-colored frame containing a bland and boring landscape that only holds meaning for the original painter and perhaps its first owner. Others, however, see the same thing as a blank canvas of artistic opportunity, like Steven Leduc‘s contribution of a giant kraken to the calm tides of a sea scene found on the side of a street.
Or take Chris McMahon, who finds the most pastoral pastels and mundane scenes he can …then adds monsters to their midst, breathing new life into landscapes otherwise destined to gather dust or be discarded entirely.
Driscoll Reid of Portland, Oregon, in another form of more-abstract monster mashup, turns a large canyon small with disturbingly friendly-yet-dark giants. They step ominously through a tacky old forest and straddle the dull waterway in which they are reflected.
Want More? Click for Great Related Content on WebUrbanist:
Painted Alive: Boldly Brilliant Body Paintings
The human body can be and do so many things, but when it’s used as a canvas for fine art, truly magical things can happen.
7 Comments – Click Here to Read More »»
Light graffiti is uniquely ephemeral and inextricably intertwined with the art of photography, sometimes even invisible to the naked eye and apparent only on film.
15 Comments – Click Here to Read More »»
Ever tried painting with light but got an amorphous blob instead of the heart you meant to draw? Us, too.
That’s why light stencils are so so so great!
Instead of free-hand drawing with an LED light, you’ll use a cardboard box with a shape inside of it to shoot super detailed light paintings.
You don’t even have to cut out a stencil!
Just print out an old photo or a silhouette and slide it into your homemade lightbox. Pop the flash a few times, and create surreal dreamscapes even Salvador Dali would be envious of.
What better way to take advantage of those daylight savings hours?
How to Make Photo Light Stencils
p.s. Make a light stencil photo, and share it with us on Twitter! We’ll spotlight 3 winners on the Photojojo Tumblr. Just 1) Follow us @photojojo and 2) Hashtag it #photojojodiy. We’ll pick winners Monday morning 11/26 PST!
Why it’s cool:
Photoshopping people into your photos… meh.
Light painting people into your photos… YAY!
You can’t go wrong with this tutorial.
You’re essentially making a reusable, portable light box that can house any image you can dream of.
Combine that with sweet backdrops around your neighborhood, and your light painting possibilities are endless.
Ingredients:
Medium Sized Cardboard Box
Cardboard Cutter
Black Duct Tape
Ruler
Pencil
Printed Images on a Black Background (Step 9)
9″x 12″ Self-Laminating Sheets from any office supply store
External Flash
Tripod
Your Camera
STEP 1: Cut Image Opening:
First, you want to make an opening on the bottom of your box for your image to sit.
If you’re printing on 8 1/2″ x 11″ paper, make an opening that is 1/4″ less on all sides.
That means you’ll measure and draw a rectangle that is 8 1/4″ tall by 10 3/4″ wide.
Use a cardboard cutter to cut out the rectangle.
TIP: You may have to pass through each cut a few times if your box is thick.
Step 2: Cut Sides:
Start with one of the sides perpendicular to the bottom of the box that now has a rectangle cut out.
Center your flash at the top of this side. The top is edge furthest away from the rectangle cutout.
Make diagonal lines from the sides of the flash to the bottom corner of that side of the box.
Repeat this step for all four sides perpendicular to the bottom of the box.
Remember: The bottom of the box is where you just cut out the image opening in Step One.
Step 3: Cut Away:
Using your utility knife, cut along the diagonal lines you drew.
This will remove the corner pieces from the four sides perpendicular to the rectangular image area cutout at the bottom of the box. By doing this, you will be able to tape the edges back together at an angle, creating a trapezoid.
When you have cut all four sides, they should lay flat in a star-like shape.
Step 4: Rebuild:
.Using black duct tape, line up the tapered sides you just made.
Make sure to leave an opening at the tapered end for your flash to slide in.
It’s kind of like building the pyramid, but with less work!
Step 5: Line Edges:
Once you have all the sides sealed together, use your black tape to line the edges of your image opening.
This will prevent any wild cardboard pieces from showing up in your image.
Do the same thing to the opening for your flash.
Step 6: Black it out:
Now, cover the entire box with black tape.
This will prevent it from showing up in your images.
If you prefer, you could spray paint it black instead.
Just make sure to let it dry completely before moving on.
Step 7: Make a handle:
Handles come in handy, eh?
You’ll be glad you added this step once you’re out taking photos.
Cut a scrap piece of cardboard into a rectangle that is 2″ wide by 10″ long.
Cover it with black tape.
Step 8: Attach:
Tape the ends of your handle to one side of the box close to the smaller opening.
Make sure it’s really secure and that your hand fits through it.
Remember, you’ll need one hand holding the box, and one using the flash.
Make your handle the most comfortable it will be for you.
Step 9: Prep Images:
So the trick is, you need to print your images with a black background.
This will prevent light from passing through, and help them integrate better with the rest of the scene you’ll be photographing.
Using image editing software, place your image on a black background.
These steps show you how to cut an image out of the existing background.
You could also make you image into a silhouette.
Step 10: Print:
Once you have your images the way you like them, print them out.
Make two copies of each image.
Line them up perfectly, and tape them together.
Step 11: Laminate:
Laminating the image will make them reusable.
We used self-laminating sheets from a craft store, but most local print shops can laminate for you as well.
Just peel of the backing sheet and lay your image down smoothly.
Place another laminate sheet on the backside to seal them together.
Trim off the excess, but leave a bit of a border around your image.
Step 12: Place Image:
Tape on your laminated image to the large opening at the bottom of the box.
Use black duct tape for this, too.
Make sure to cover up any borders on your image so extra light doesn’t creep through the edges.
Step 13: Set your Flash:
Manual mode on your external flash works best for this.
Start at 1/8 normal power.
You may have to adjust this while shooting.
Step 14: Place flash:
Put your flash through the small opening at the other end of your box.
Your flash won’t stay in this opening unless you’re holding it in place. Be sure not to let it drop.
Use the handle you created to hold the box with one hand, and your other hand to hold the flash.
Bam. Now, you’re ready to go photograph.
Step 15: Set up your scene:
Find your perfect location. Use a tripod and a long exposure.
If you have a friend willing to help you out, it will make this process smoother.
If not, practice makes perfect, huh?!
Step 16: Make Background Exposure:
Test out the exposure for the background first.
This will help you know how long you have to work with.
For this image, we used a 2.5 second exposure at f/8.
Step 17: Focus and Adjust:
Place your image where you want it in the scene.
Focus your camera on your lightbox image.
Start the exposure by pressing your shutter button. Pop the flash once by pressing the “test” button, then move out of the scene.
Take a look at your image, and adjust where necessary.
TIP: If you see your black background around your lightbox image, you need to adjust your settings. Turn down your flash power, or stop down your aperture, i.e., change it from f/8 to f/11 or f/16.
Step 18: Trial and Error:
Keep playing around with placement and exposure to get the perfect combination.
Your aperture settings will control the amount of light from your flash. The shutter speed will control the ambient light.
So, if your flash is too bright, stop down the aperture. If your background is too dark, increase your shutter speed.
TIP: Don’t forget your scarf and mittens! Oh, and a hot chocolate!
Take it further
Move around and pop the flash a lot during your exposure to create more stencils.
Check out this Flickr group pool for more light stencil ideas.
Try to make daytime light stencils
Thanks to Trevor Williams and Fiz-Iks for this amazing project idea! Check out his video.
Related posts:
Turn Your Laptop into a Photo Light Box Could you pick your laptop out of a lineup? We’ll…
Light Painting with Moth Trails Extra photos for bloggers: 1, 2, 3 OMG, it’s finally…
Jean Francois Rauzier’s Hyper-Detailed Photos, Creating a Dreamworld with Thousands of Shots A game!: Inception or Not Inception? Mad man constructs faux…
Here are a collection of some of my finest 3D Paintings in the Highest Quality You-Tube 3D Format. Put on your favourite 3D glasses, relax and be carried away to other worlds, as only 3D can do, all to a relaxing techno soundtrack. Each picture represents hours or work in 3D painting of 2D images, but if I didn’t love it so much, I would not have done so many…and I have saved the best while last…enjoy. See my photo-page on Flickr to download the original paintings www.flickr.com Video Rating: 4 / 5
Here are a collection of some of my best 3D Paintings, each painting takes 3-4 hours and is incredibly detailed, sometimes down the very last hair on there head, epic in effort, scale & detail, you wont believe these pictures started off as 2D Wallpapers, all rounded off with an epic soundtrack from the The Good The Bad & The Ugly, which is a metaphor for 3D today. This is The new artform of the 21st Century, you will all be doing this soon. Best Viewed in HD fullscreen, with red-blue 3D glasses. To see the orginal 3D images in greater detail see my photo-page on Flickr : www.flickr.com
goo.gl this is a 3d video.put on red and cyan 3d glasses.this is recorded in anaglyph 3d.with 2 cameras.this is me waving an Electric Knife out of your tv screen.so dont move or you will get cut.then i cut a potato in to pieces. LINKS Best 3D Video Made goo.gl Free 3D Glasses…goo.gl View 3D Photos…goo.gl Buy T-Shirt…….goo.gl FaceBook…….goo.gl Web site…….goo.gl Blogger…….goo.gl twitter…….goo.gl sub……..goo.gl Video Rating: 4 / 5
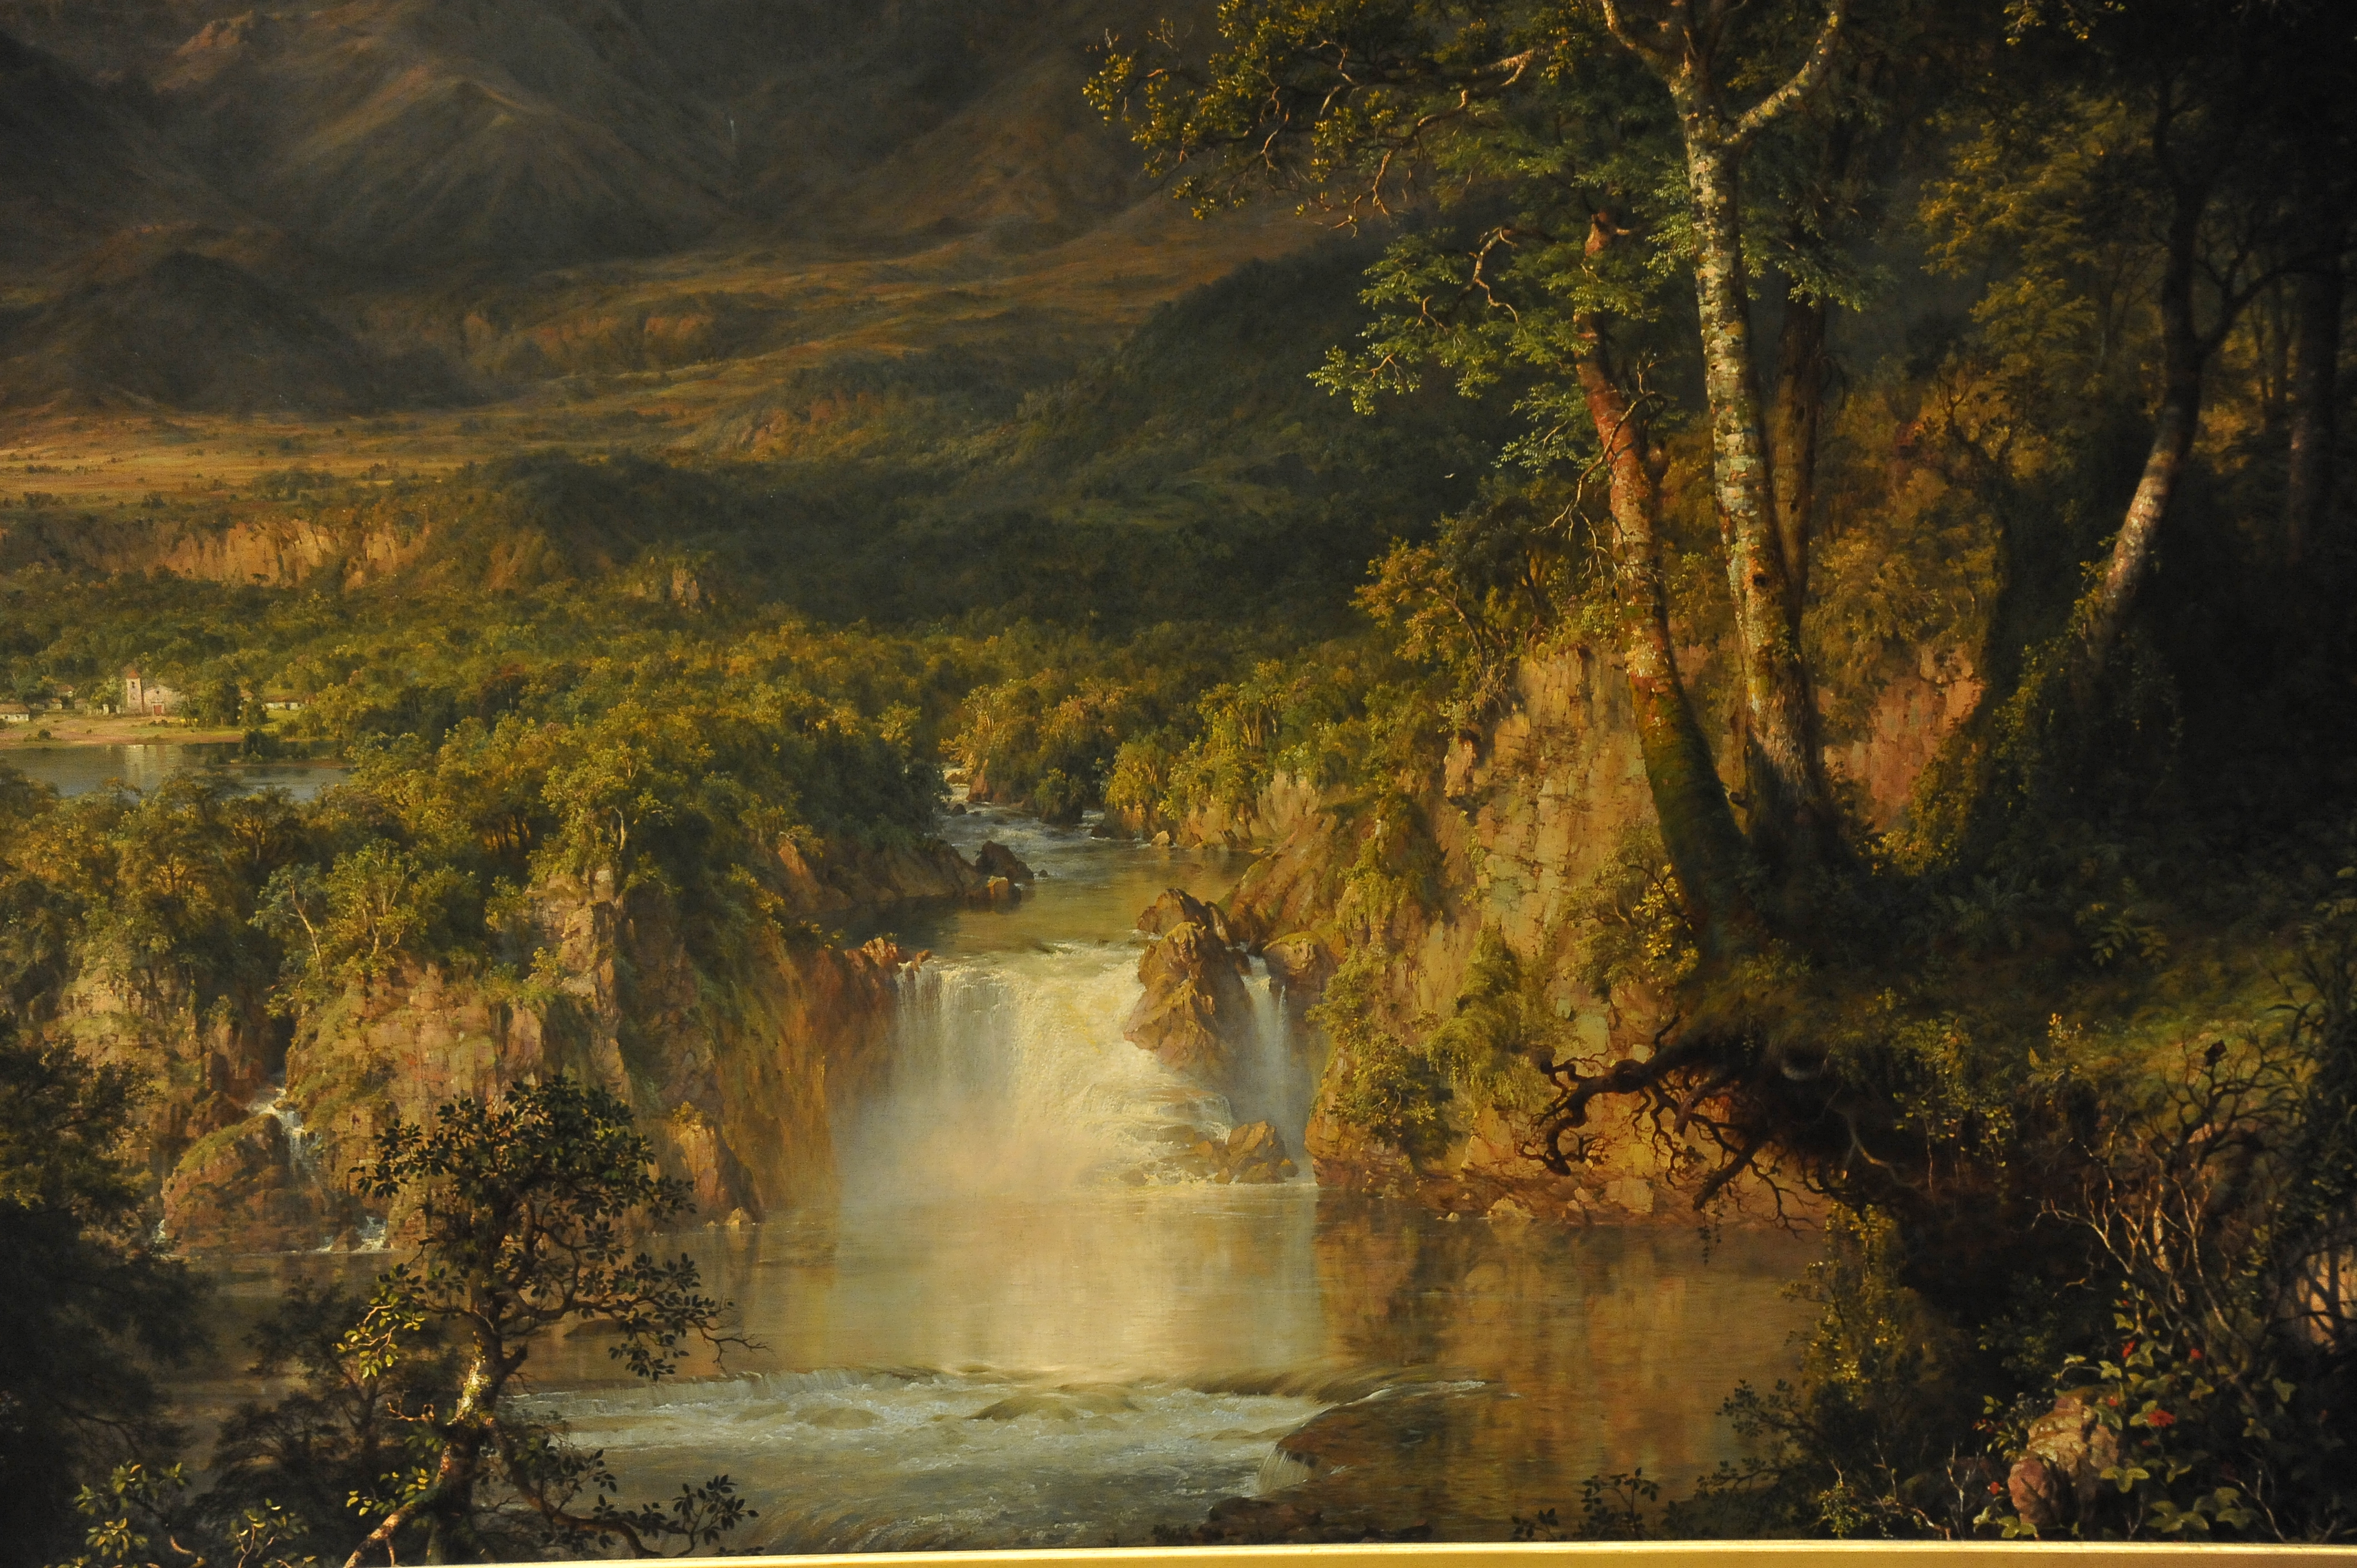
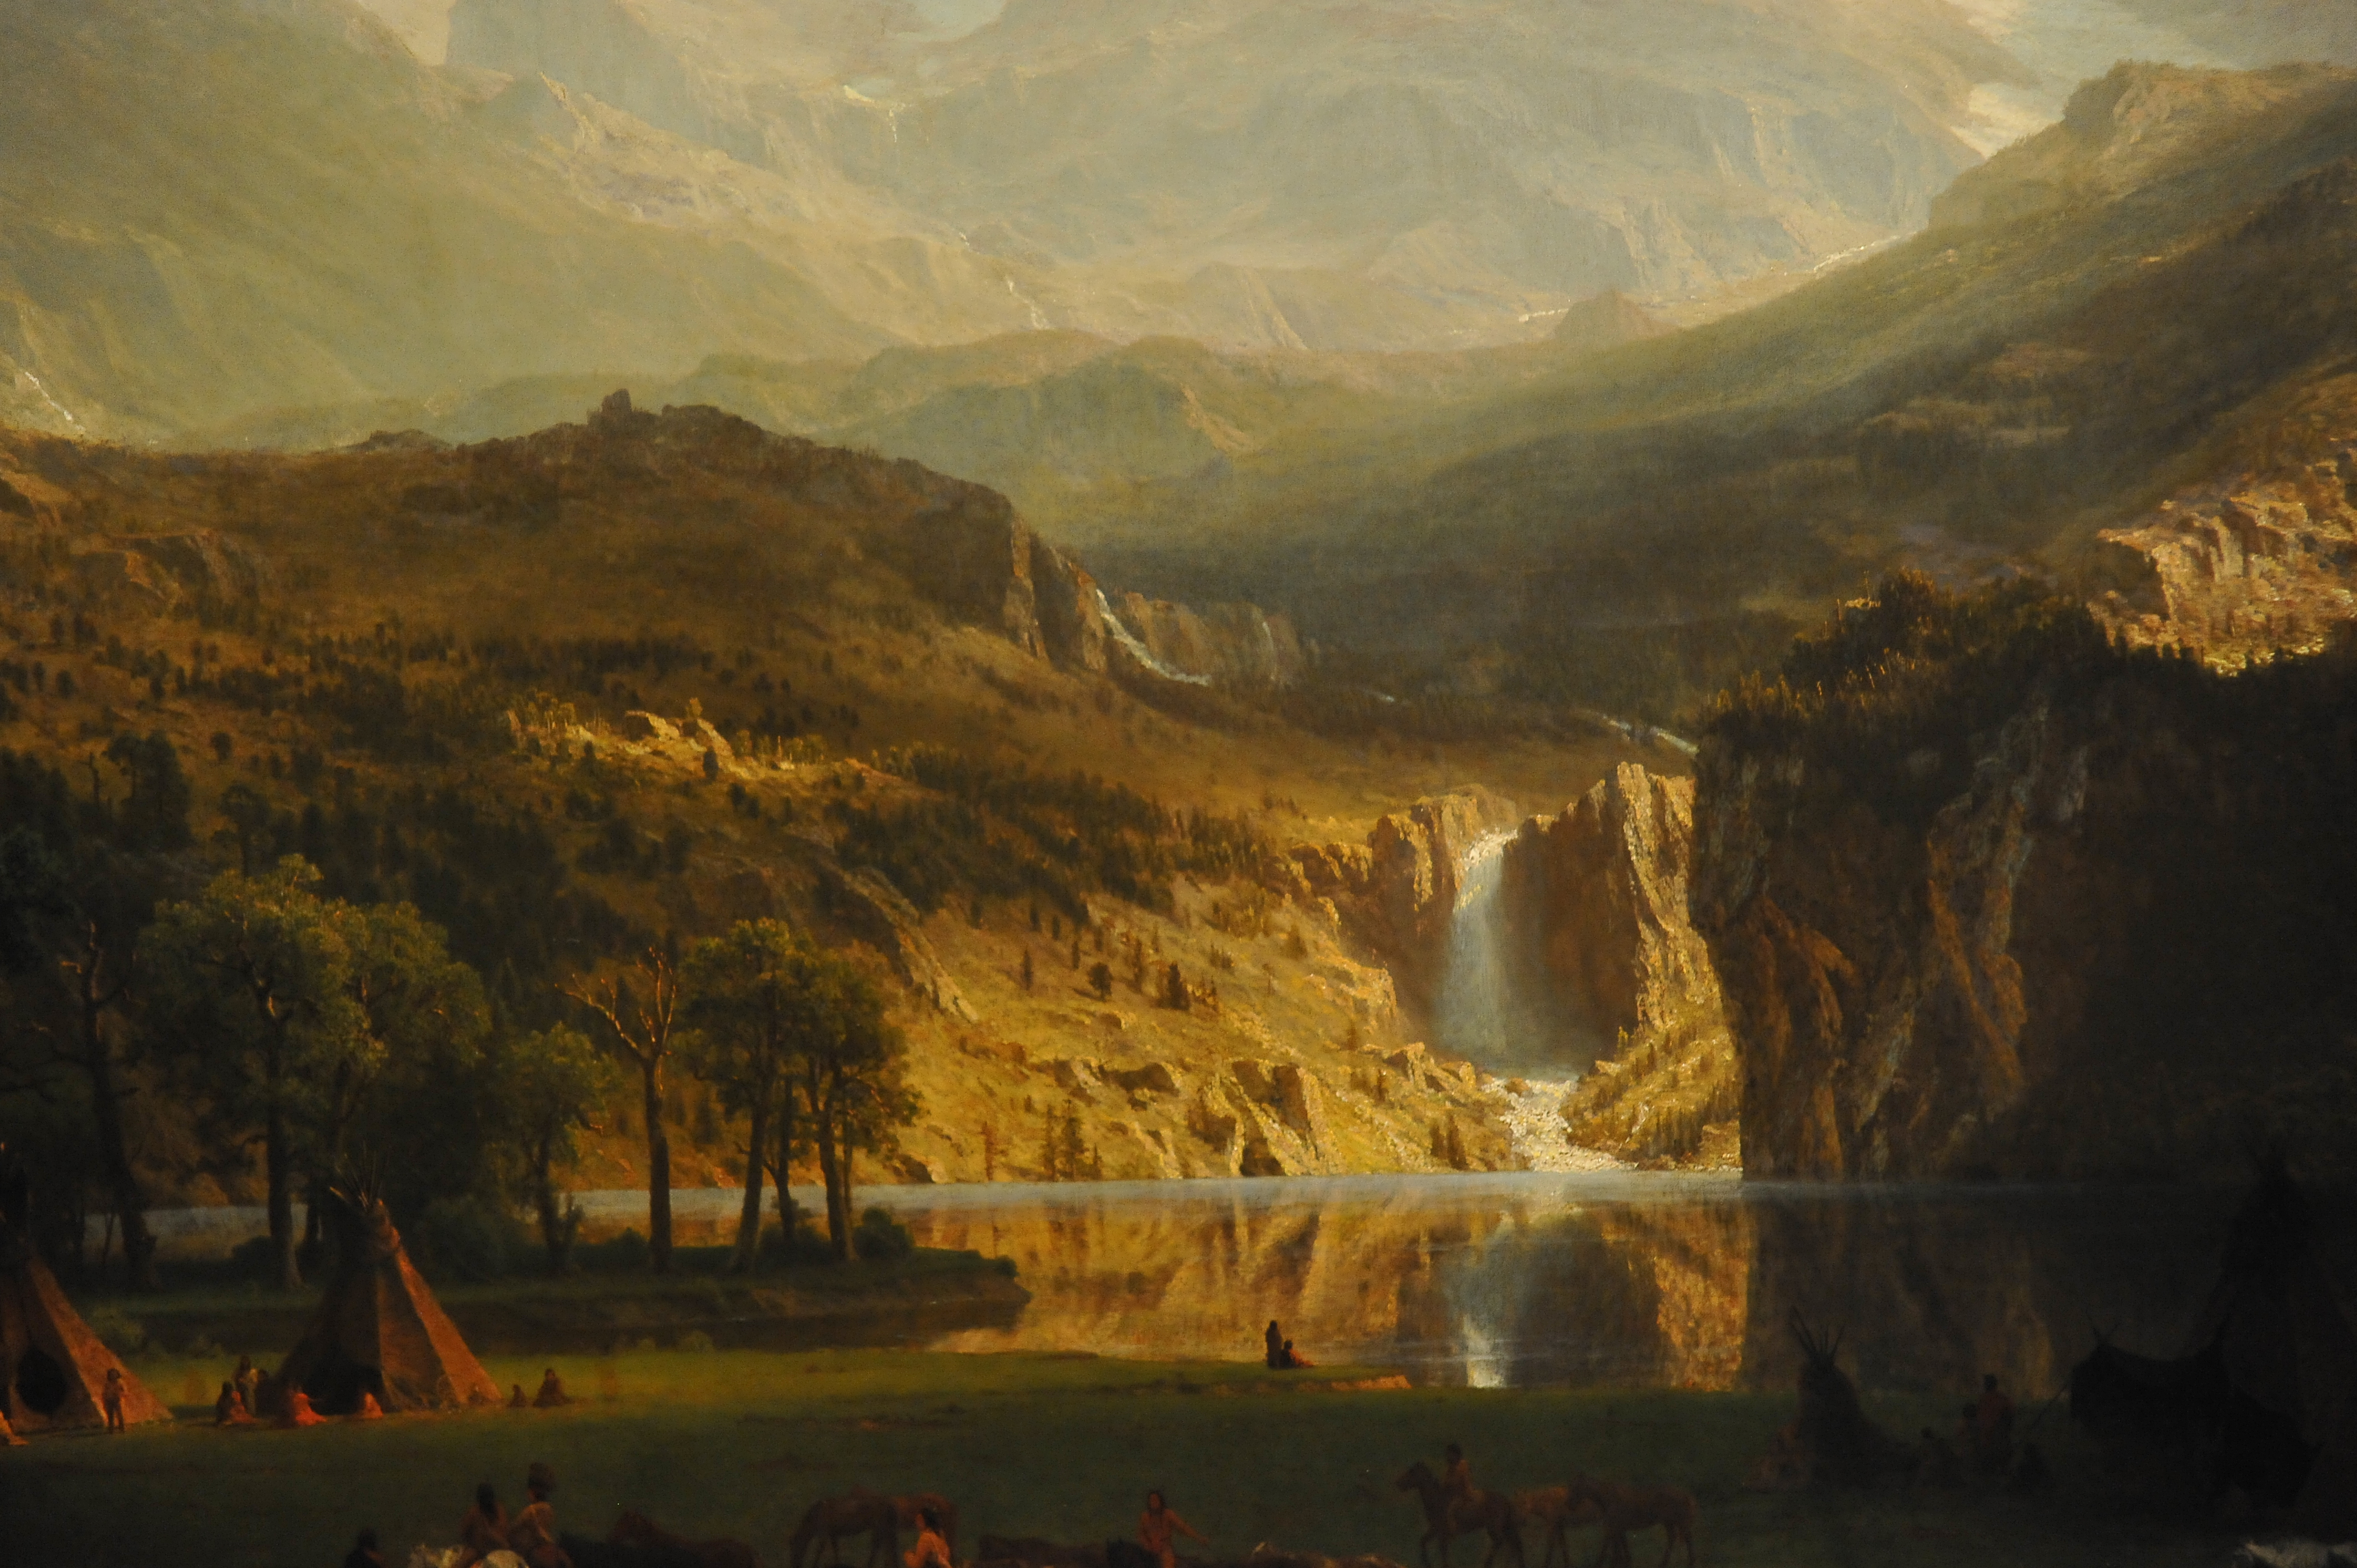
PAINTINGS FROM THE MET’s ART COLLECTION 2011 – Metropolitan Museum of Art, Manhattan NYC Image by asterix611
PAINTINGS FROM THE MET’s ART COLLECTION 2011 – Metropolitan Museum of Art, Manhattan NYC
PAINTINGS FROM THE MET’s ART COLLECTION 2011 – Metropolitan Museum of Art, Manhattan NYC Image by asterix611
PAINTINGS FROM THE MET’s ART COLLECTION 2011 – Metropolitan Museum of Art, Manhattan NYC
Comments Off on PAINTINGS FROM THE MET’s ART COLLECTION 2011 – Metropolitan Museum of Art, Manhattan NYC
PAINTINGS FROM THE MET’s ART COLLECTION 2011 – Metropolitan Museum of Art, Manhattan NYC Image by asterix611
PAINTINGS FROM THE MET’s ART COLLECTION 2011 – Metropolitan Museum of Art, Manhattan NYC
PAINTINGS FROM THE MET’s ART COLLECTION 2011 – Metropolitan Museum of Art, Manhattan NYC Image by asterix611
PAINTINGS FROM THE MET’s ART COLLECTION 2011 – Metropolitan Museum of Art, Manhattan NYC
Comments Off on PAINTINGS FROM THE MET’s ART COLLECTION 2011 – Metropolitan Museum of Art, Manhattan NYC


 Photoshopping people into your photos… meh.
 First, you want to make an opening on the bottom of your box for your image to sit.
  Start with one of the sides perpendicular to the bottom of the box that now has a rectangle cut out.
  Using your utility knife, cut along the diagonal lines you drew.
  .Using black duct tape, line up the tapered sides you just made.
 Once you have all the sides sealed together, use your black tape to line the edges of your image opening.
 Now, cover the entire box with black tape.
 Handles come in handy, eh?
 Tape the ends of your handle to one side of the box close to the smaller opening.
  So the trick is, you need to print your images with a black background.
 Once you have your images the way you like them, print them out.
 Laminating the image will make them reusable.
 Tape on your laminated image to the large opening at the bottom of the box.
 Manual mode on your external flash works best for this.
 Put your flash through the small opening at the other end of your box.
 Find your perfect location. Use a tripod and a long exposure.
 Test out the exposure for the background first.
  Place your image where you want it in the scene.
 Keep playing around with placement and exposure to get the perfect combination.


You must be logged in to post a comment.