RSS
 

Posts Tagged ‘OnLocation’

How to Build the Best On-Location Photography Lighting Kit

22 Mar

Digging around the Internet, there are tons of resources available for constructing the perfect studio lighting setup for photographers, but very little is written about the best travel photography lighting kits. As a result, this article is an entirely DIY approach, comprised of lots of sleuthing and trial and error, to create the ideal lighting kit, that’s compact and easy to travel with. Let’s start with the essentials: the lighting gear!

photography lighting equipment

Best Travel Photography Lights

Compared to studio lights, you really can’t go wrong with speedlights when you’re looking for portability. As a Canon shooter, this means having a Canon 580EXII as my main light, and two Canon 430 EXII Speedlites as my secondary lights. A possible lightweight and travel-friendly alternate light source is the Westcott Ice Light, which offers continuous LED lighting, although in general it doesn’t quite have the oomph and output that speedlights do.

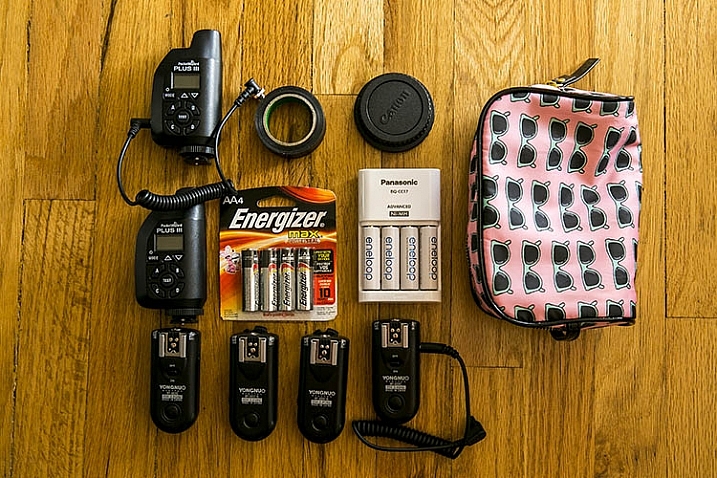
All flashes are powered by Panasonic Eneloop AA batteries, which have been a huge money-saver, thanks to the fact that they are rechargeable, and have all been extremely reliable to date. To sync all three speedlights, I have PocketWizards that I always carry as backups, but primarily rely on Yongnuo RF-603CII-C1 remote flash triggers for two reasons:

  1. They’re small and low-profile
  2. They’re incredibly cheap and affordable

Amazingly, the Yongnuos are also very reliable, and haven’t once failed in two years of constant usage.

Compact Light Stands

photography lighting equipment

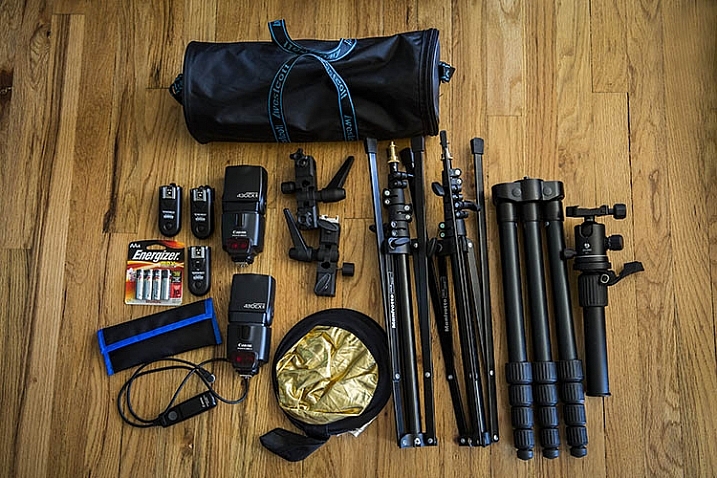
Next on the list are light stands in the form of Manfrotto 5001B Nano stands. Weighing in at just 2.2 pounds (1kg) each, these light stands fold down to a mere 19 inches (48cm), while still having a maximum height of 74.4 inches (1.9m). They aren’t the most stable or sturdy light stands out there, but they travel extremely well, and work just fine for simple speedlight setups. Two light stands gets their own umbrella adapter and accompanying umbrella, while one lucky stand is adorned with a Westcott Rapid Box lighting modifier.

Lighting Gear Extras

As with most photo shoots, you never quite know what extra accessories you might need when on location, so my lighting kit varies from shoot to shoot. Some common extras include a a Benro Travel Flat Tripod, Canon shutter release cable, mini gold/silver reflector, speedlight color gels, gaffer’s tape, spare batteries, and camera body and lens rear caps, in case of drops and spills (sad to say these have come in handy more than once).

Bonus tip: I recommend using a lightweight zippered women’s cosmetic bag to hold, and organize, your smaller items such as remote triggers, batteries, front and rear caps, etc. This is the easiest way to keep those items contained in one spot for easy access, with less chance of losing them while at a shoot.

photography lighting equipment

Lighting Gear Bags

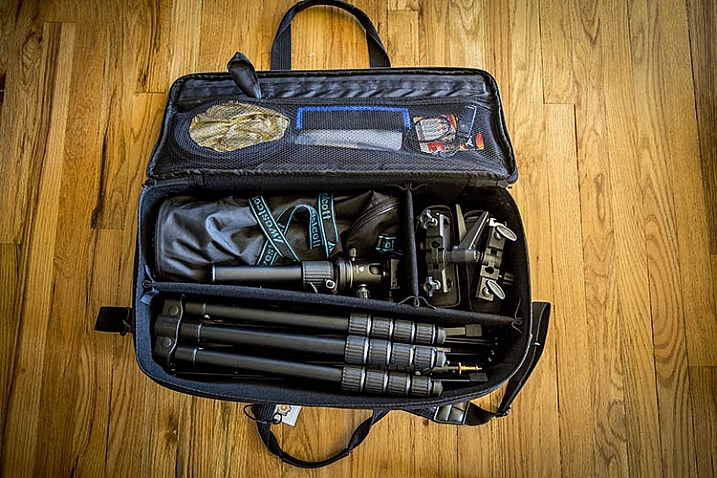
After a huge laundry list of items, you’re probably now wondering how to carry all of this stuff. Finding the perfect lighting gear bag was by far the most challenging part of assembling this DIY kit. But after lots of hunting, I found the best solution to be a Lowel Litebag, which come in a range of sizes.

With a thick and sturdy vinyl exterior and soft interior, this zippered bag has padded partitions that can be removed, or modified to suit a variety of needs. It has an adjustable, nicely padded shoulder strap and handles, making it easy to carry, even when heavy with equipment inside. It isn’t sufficiently padded to take a solid beating, but it will definitely protect your gear to a reasonable extent, without the added bulk and weight. Unfortunately, this bag isn’t the easiest to find, but it is incredibly solid, and holds all of the gear I mentioned above, with room for more!

photography lighting equipment

In Conclusion

As a traveling, or on-location photographer, it’s important to have a go-to travel photography lighting kit that is compact and flexible, while still keeping your gear safe from harm. If you’re searching for a flexible lighting kit, try out the above recommendations, and let me know what you think the comments below! Also, if you have another travel lighting kit setup, I’d love to hear about your own suggestions and modifications.

amzn_assoc_placement = “adunit0”;
amzn_assoc_enable_interest_ads = “true”;
amzn_assoc_tracking_id = “dpsgeneral-20”;
amzn_assoc_ad_mode = “auto”;
amzn_assoc_ad_type = “smart”;
amzn_assoc_marketplace = “amazon”;
amzn_assoc_region = “US”;
amzn_assoc_linkid = “6710d26f550e9793f41475ee806fee9e”;
amzn_assoc_emphasize_categories = “13900861”;
amzn_assoc_fallback_mode = {“type”:”search”,”value”:”digital cameras”};
amzn_assoc_default_category = “Photo”;

googletag.cmd.push(function() {
tablet_slots.push( googletag.defineSlot( “/1005424/_dPSv4_tab-all-article-bottom_(300×250)”, [300, 250], “pb-ad-78623” ).addService( googletag.pubads() ) ); } );

googletag.cmd.push(function() {
mobile_slots.push( googletag.defineSlot( “/1005424/_dPSv4_mob-all-article-bottom_(300×250)”, [300, 250], “pb-ad-78158” ).addService( googletag.pubads() ) ); } );

The post How to Build the Best On-Location Photography Lighting Kit by Suzi Pratt appeared first on Digital Photography School.


Digital Photography School

 
Comments Off on How to Build the Best On-Location Photography Lighting Kit

Posted in Photography


The Ultimate On-Location Storage Solution – ioSafe Rugged Portable SSD Review

26 Apr

That’s a big call really, isn’t it? “Ultimate on-location storage” what does that even mean, and do you need it? Well, dear reader, read on and we’ll get to the bottom of this relatively new, bomb proof storage device from ioSafe.com

The aptly named Rugged Portable is an external solid state drive that connects to your computer via USB 3.0 to store all of your files – in my case, raw images photographed on location. We have the 1TB version on a trial and that’s going to be (much) more than enough for most photography adventures.

slideshow_rugged-portable_3

Transfer speeds via USB 3.0 are usually more than enough under the two circumstances I’ve used the drive. The first being to copy from my 32GB Sandisk Extreme Pro CF card via a Lexar USB3 card reader, through the Macbook Air and out the other side into the compact ioSafe drive. I also use a couple of Thunderbolt drives at home, and the noted difference between Thunderbolt and USB3 transfer speeds isn’t actually all that noticeable under real world conditions.

The second scenario was while shooting for an agency that’s recently hired me to be the photographer for a series of shoots. When tethered, and shooting on location, I find myself importing the images to my WD Passport Pro and running a second copy off to the ioSafe – Why? This client takes my CR2 files at the end of each shoot and the designer handles the processing and editing, so I unplug the WD and hand it to the producer and he takes it away with him until next shoot, the ioSafe comes with me. You’re still sitting there scratching your forehead?

Six of the shoots I’ve done so far for this client, four of them have been of scenarios I can’t recreate for one reason or another. If those images are lost by me between location (sometimes on set for two days, away from home and the comfort of backing up to my Promise R8 – yes, I love storage) and the client has a mishap – well, frankly, we’re stuffed. Obviously this is a worst case scenario, but these are the ones that we like to avoid!

s123

Sure, you find a way to work around it – you’re a professional, and that’s why I think it’s nice to not have to “get around it” and to take as much risk out of your shoot days as possible.

When I say “if those images are lost by me” I’m hoping to never have a catastrophic failure that involves my gear melting down, drowning or being driven over, but human error involves dropping drives, spilling a glass of wine on your laptop – the list goes on.

I can see this drive being the perfect storage and transport for destination wedding photographers, commercial photographers travelling to shoot, pretty much anyone that really cares about their, or their clients’ images, between shoot and final delivery.

The ioSafe Rugged portable has some pretty impressive statistics and while I’ve not tested these personally* I know the ioSafe crew are pretty serious about their gear and have a data recovery guarantee attached to their products (more on that after the stats).

slideshow_rugged-portable_2

  • Crush Protection up to 5,000 lbs.
  • Drop Protection up to 10 feet
  • Immersion protection up to 30′ for three days
  • USB 3.0 SuperSpeed (like Superman, you know)
  • Data Recovery Service up to $ 5,000/TB
  • World’s best warranty
  • Mac or PC

Like I said, pretty impressive… But then, it’s not really impressive unless I test some of this stuff, right? (This was an afterthought and, now *I have tried some of them!)

Enlisting the services of Filmmaker and Educator, Lee Herbet of Capturing Passion We’re going to try show you what makes the ioSafe Rugged Portable the little beast that it is.

So, for some examples! In most of these examples I was either tethered shooting to the drive (crush test) or it was at least plugged in and powered up (water and drop tests)

1. Crush test

I’m on set, shooting the OutdoorTech van (Thanks to Blonde Robot!) when one of the directors glides in silently in his Tesla S… Clearly the Tesla has a great rear facing camera, but this one doesn’t have a front facing camera and well, you can see how that played out!

2. Submersion test

We’re back shooting some images for a water conservation company here in Melbourne, thankfully not into 30′ of water, but you get the idea!

3. Drop test

I’d forgotten to simply use my CamRanger with the 7.3m (24′) tall Kupo LookOut stand while shooting a lifestyle image… Watching this back almost reminds me of a Mr Bean sketch!

So, even though the shooting situations above were staged, the drive really did get run over, dropped, and drowned multiple times to make these short films. The footage was also saved onto the drive and the films edited together on location at my favourite cafe right after we wrapped the final filming. You can even see the drive data light flashing in the Tesla video as I was shooting to it just before it was run over!

In closing , do you need the ultimate on-location storage solution? Only your business requirements can answer that question for you, but if you’re after an easily portable SSD external drive for your photography, that will look danger in the face and laugh – this is it.

This drive leaves me nothing to complain about and so I give it five gold stars.

Thanks for reading! Hope you enjoyed my take on the ioSafe Rugged Portable!  –Simon

googletag.cmd.push(function() {
tablet_slots.push( googletag.defineSlot( “/1005424/_dPSv4_tab-all-article-bottom_(300×250)”, [300, 250], “pb-ad-78623” ).addService( googletag.pubads() ) ); } );

googletag.cmd.push(function() {
mobile_slots.push( googletag.defineSlot( “/1005424/_dPSv4_mob-all-article-bottom_(300×250)”, [300, 250], “pb-ad-78158” ).addService( googletag.pubads() ) ); } );

The post The Ultimate On-Location Storage Solution – ioSafe Rugged Portable SSD Review by Sime appeared first on Digital Photography School.


Digital Photography School

 
Comments Off on The Ultimate On-Location Storage Solution – ioSafe Rugged Portable SSD Review

Posted in Photography


10 Essential Little Items To Help You Shoot On-Location

29 Dec

In the past, we have talked a lot about the big, important items of gear every photographer needs- like a Camera or a proper case to transport it. Today’s post however is dedicated to all the items that don’t seem like they can make a big difference. But trust me, they do. A Good Backpack I cannot stress enough about Continue Reading

The post 10 Essential Little Items To Help You Shoot On-Location appeared first on Photodoto.


Photodoto

 
Comments Off on 10 Essential Little Items To Help You Shoot On-Location

Posted in Photography