RSS
 

Posts Tagged ‘need’

Video: Five reasons you still need vintage lenses in 2020

27 Jan

Photographer and filmmaker Mark Holtze has shared a video explaining ‘5 Reasons Why You Need Vintage Lenses in 2020.’

Throughout the eight-minute video, Holtze highlights five particular reasons vintage, manual lenses still make sense despite increasingly-impressive lenses manufacturers are making nowadays. Holtze says in a comment beneath the video ‘I could have made a list of top 100, but honestly…nobody is sitting through 90 mins of this,’ so eight minutes it is.

Not all of the reasons will make sense for all photographers or filmmakers, but each is valid in their own way. You can find more videos from Holtze on his YouTube channel and keep up with his work on Instagram and Twitter.

Articles: Digital Photography Review (dpreview.com)

 
Comments Off on Video: Five reasons you still need vintage lenses in 2020

Posted in Uncategorized


Irfanview – The Free Program You Need in Your Photo Editing Toolbox

19 Jan

The post Irfanview – The Free Program You Need in Your Photo Editing Toolbox appeared first on Digital Photography School. It was authored by Rick Ohnsman.

irfanview-software

You would typically expect an article on a photo editing/utility program to be about the new latest-greatest thing to come out.  Instead, this article will tell you why Irfanview, a program that has been around since almost the dawn of digital photography, is still as useful as ever and, as a photographer, it’s something you’ll want in your toolbox.

This is the main screen that will greet you on the Irfanview.com site.

This is the main screen that will greet you on the Irfanview.com site.

The “Swiss Army Knife” of digital photography

You no doubt have heard of Swiss Army knives, those pocket multi-tools that have all manner of flip-out gadgets to perform whatever task you might require. Need a knife, a corkscrew, scissors, screwdriver, bottle opener, saw, tweezers, you-name-it? You can get all those things in one pocketable tool.

The largest such knife made by the company Wegner is the model 16999, and it has 87 tools that can perform over 141 functions. It’s hardly pocketable, but probably more of a demo of what is achievable. More typical Swiss Army knives have about 15-30 functions and are very pocketable.

Sure, a dedicated screwdriver or saw might do a better job, but the idea of having an entire toolkit in your pocket is the attraction.

The Victorinox SwissChamp knife

Irfanview is like a Swiss Army Knife – Lots of tools in one compact package.

Such is the case with the utility program Irfanview.

This little do-all program is the brainchild of student Irfan Škiljan, from Jajce, Bosnia/Herzegovina, who first introduced the program in 1996. To put that into perspective, the first commercially successful consumer digital camera, the Apple Quicktake 100, was introduced in 1994. I would venture that some of the readers of this article weren’t yet born.

Not only has Irfanview been around for 23 years, like the Swiss Army knife, but it also is small, compact, can fit on, and even be run from a thumb drive and performs more functions than I’ll even be able to cover here.

If you could only have one digital photography tool to work with, I daresay this might be the one you’d want. (Providing you work on a PC, sorry Mac users, this one’s not available for you unless perhaps you use a Windows emulator).

If you have been involved in digital photography for a long time, you may already be familiar with Irfanview. (Especially considering that since 2003 it’s been downloaded over a million times each month.)

It could be that you’ve used it in the past, but have forgotten about it. If so, you might learn some new tricks it can do now that you didn’t know about.

If you’ve never heard of it, it’s time you did. Either way, the list of Irfanview tools, features, functions, and tricks is impressive.

And did I mention it’s all free?

Yes, Irfanview has always been free, though Irfan Škiljan does accept donations and sells the product when used for commercial use. He has pretty much been able to live off the program.

The Apple Quicktake, released in 1995 was the first consumer digital camera.

The Kodak-made Apple Quicktake, released in 1995 was the first consumer digital camera.

What can’t it do?

I bought my first personal digital camera in 1999, a Nikon Coolpix 950. One of the first tools I used to work with my photos was, yup, Irfanview.

Over the years, new features and functions have been added, many of those created by other contributors who’ve created “plugins.” Adding to the already impressive list of functions the native program can perform, there are now over 70 plugins for Irfanview, expanding its capabilities even further.

It might be easier to list what the program can’t do rather than what it can do, but I will attempt to give you an overview of its basic functions. This will not be a “how-to-use” Irfanview article. One of the great things is the program is very easy to learn, and there’s no end of support available.

Pick the 32 or 64-bit version of Irfanview for your particular computer.

32 or 64-bit versions of Irfanview are available. Pick the version (and the plug-ins) for your particular computer.

Acquiring, downloading and installing

The official site for Irfanview is what you’d expect, Irfanview.com. Once there, you will see there are now two main versions, one for 64-bit and the other for 32-bit versions of Microsoft Windows. It will run on Windows XP, 7,8, and 10. If for some reason, you need older versions, those are available too.

Pick the version suitable for your computer. I suggest downloading the versions with the installers build in (these will be .EXE files).

Once downloaded, just double-click the file, tell it where you want it installed, and let it do its thing. (I also mentioned if you want a “portable” program, you can download and install it to a flash drive. It can be handy to have the program with you when you may want to use it on someone else’s computer and not have to install it to their machine.)

The Installation menu for Irfanview

The installation menu for Irfanview.

The Plug-ins

You don’t have to install the plug-ins, but I don’t know why you wouldn’t, as they greatly expand the list of what Irfanview can do. 

The easiest way to do this is to download and install the All Plug-Ins Installer. Be sure to pick the one that matches the version of the main program you downloaded and installed, 32 or 64-bit

Run the .EXE file just as you did the main program. It will find Irfanview on your machine (install that first) and then put the plugin-ins where they need to go. The whole process is very easy and straightforward.

You can configure Irfanview as the default view for whatever filetypes you choose.

You can configure Irfanview as the default view for whatever filetypes you choose.

Exploring the functions

With so much capability, I think the easiest way to give you an overview of the features is to look at the kinds of tasks you might want to accomplish and how Irfanview can handle those. I’ll briefly describe common tasks, though this will not be an in-depth instruction on how to perform the functions.

You might find this website a good resource for that purpose. The beauty of Irfanview is it’s very easy to learn and quite intuitive.

Open, view, save and convert files

As a photographer, you will likely be working with image file types like JPG, TIF, PNG, GIF, or possibly raw files like Canon CR2 or Nikon NEF.  What’s great is Irfanview opens dozens of different file types, even things you probably haven’t even heard of.  Here’s a link to a full list.

Open a file and view information in Irfanview.

You can learn lots about your image when you open it and use the Information option in Irfanview.

Open and View

To open a file/image, go to the File dropdown, pick Open and use the next menu to browse to where your file is located.

Click it once and, with the Preview Active box checked, you will see a thumbnail below.  There will also be information on the width and height of the image in pixels, the color depth, the size in RAM, and the file size.

Click Open or double-click the image and it will open in Irfanview.  If you want to go to the next image in the same folder, just click the spacebar on the keyboard or use the arrows on the top menu bar.

File conversion is a real strength of Irfanview.

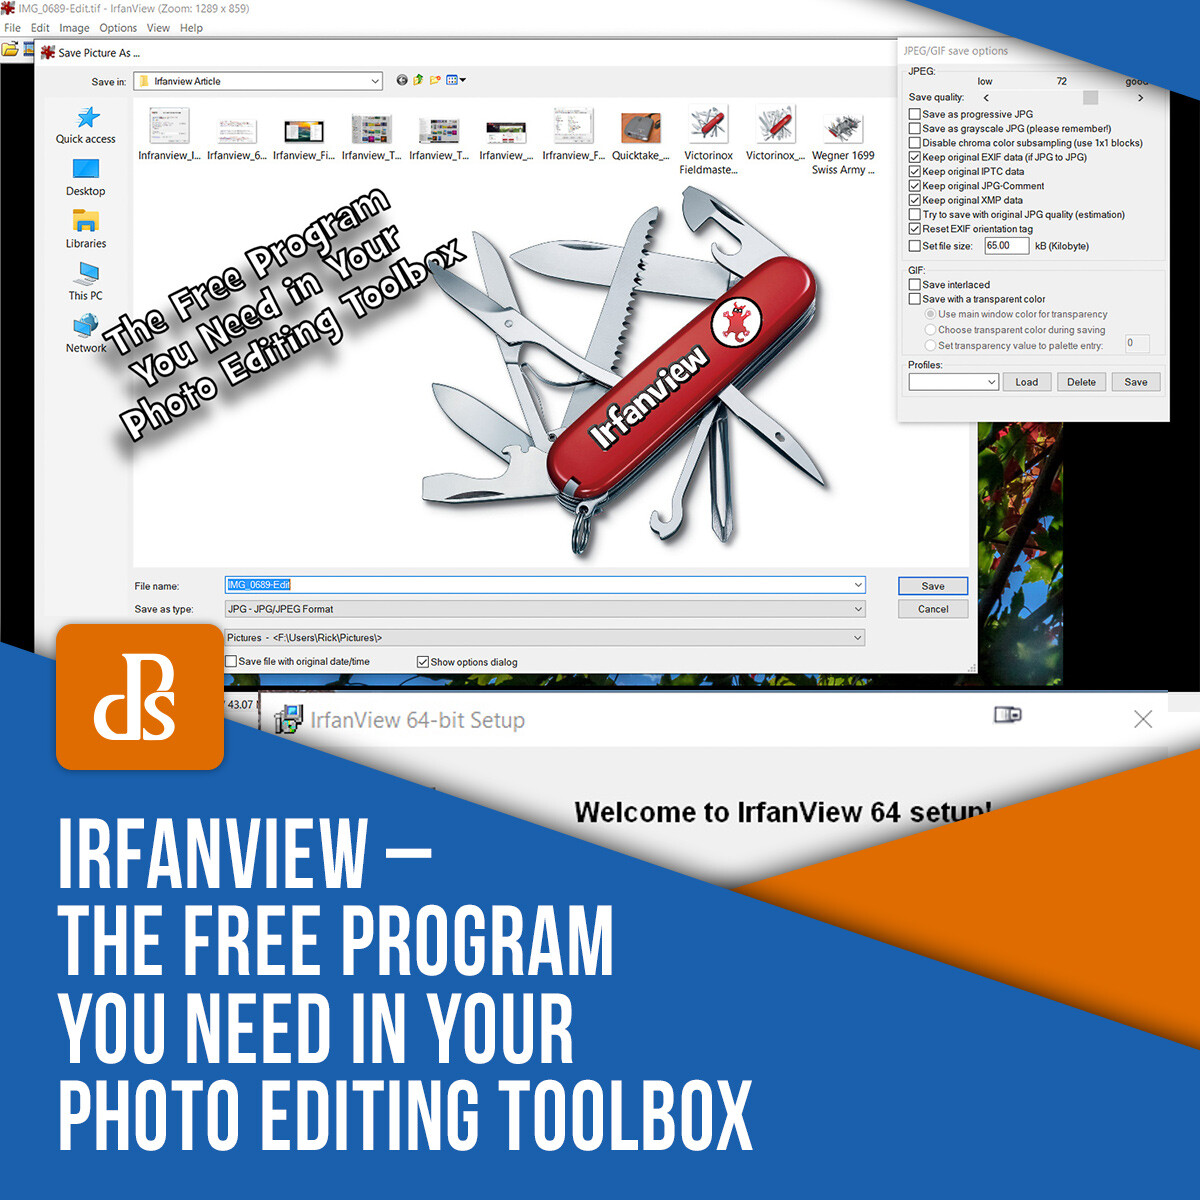
Open one image type and convert it to something else. Irfanview excels at this. Here a .tif is converted to a ,jpg.

Convert

A powerful feature of Irfanview is the ability to convert one file type to another. For example, open a TIF file and save it as a PDF file or maybe a JPG. It’s as easy as opening the file and then saving it as whatever else you like.

If you like keyboard shortcuts, Irfanview has many. For example, an open image, click the “S” key to Save and then use the menu to tell Irfanview the file name, type, and location you wish to save it.

Irfanview can run video files too, like this mp4 video file.

Irfanview can run video files too, like this MP4 video file.

Not just for image files, Irfanview can play mp3 and other audio files.

Not just for image files, Irfanview can play MP3 and other audio files.

Not just photos

Irfanview goes beyond just opening photos.  It can also load and play audio and video files.  Want to play an MP3 music file or maybe an AVI video file?   Irfanview can do!

Send Irfanview images to an external editor of your choice.

Setting up external editors allows you to send an image from Irfanview to another editor, Photoshop in this example.

Open with an external editor

If Irfanview can’t do what you need, you can have it send the image to an external editor of your choosing.  You can specify up to three different editors in the Properties/Setting Menu.

The Thumbnails menu is Irfanview gives you many ways to look at your image files in a folder.

The Thumbnails menu is Irfanview gives you many ways to look at your image files in a folder.

View Thumbnails

This is a useful option.  (The “T” key is the shortcut).  Pick this, a submenu will open, and you can then browse all the folders on your drives.  Find the image you want, double-click it, and it will open in Irfanview.  The Thumbnails feature is very robust, offering many ways to view your files and see information about them.

Irfanview is a great program for making slideshows.

Irfanview is a great program for making slideshows.

Make a slideshow

This is one of my favorite features of Irfanview.

You can create an impromptu slideshow from images on any drive – even a plugged-in flashdrive. You can have the images automatically or manually advance, set timings, add music, show text such as file name, or even complete EXIF data.

If you want to save and take your finished slideshow elsewhere, you can save it to a self-contained EXE file, burn it to a CD or DVD, or even create a Screensaver file (SCR). With your computer connected to a projector, Irfanview makes a great presentation program, even allowing you to do things on the fly.

The batch conversion-rename tool in Irfanview is very powerful.

A top feature of Irfanview is its powerful batch conversion-rename utility. I’ve found none better.

Batch conversion/rename

I have not found a better program for this kind of work than Irfanview. Say I need to convert 200 TIF images to JPG, resize them to 1200 on the long side, sharpen them slightly, and rename them all to the same name but with sequential numbering. Irfanview has many of these options. You can tell it exactly what to do, how to do it, and where to save the results.

Once set up, it can work with as many files as necessary and, when set in motion (Start Batch), will quite quickly perform the assigned task.

Yes, the menus are quite extensive in this portion of the program, and taking the time to prepare your batch command carefully is important. What’s great, however, is the extensive options giving you very precise control of what you want.

There’s only one caution I’d give (and the default settings will usually protect you from doing this); if you convert or rename your files, be sure to set Irfanview to make a copy of those instead of overwriting the originals. You don’t want an “oh no!” moment if you discover you made a mistake and overwritten your originals.

Irfanview is a reasonablly capable image editor.

It’s not Photoshop, but Irfanview is a reasonably capable image editor.

Editing images

I won’t suggest that Irfanview will replace your dedicated photo editors like Lightroom, Photoshop, or whatever editing tool you use. That would be like saying the saw on a Swiss Army knife is a fine substitute for a chainsaw when felling trees.

However, in a variation of the saying about the “best camera,” let me say that the best editor is… the one you have with you.

Since Irfanview can work from a thumb drive, if necessary, without even installing it to the host computer, it’s easy to have it with you.

It’s installed on my desktop and notebook computers, and I carry a copy on a thumb drive on my keychain. Don’t leave home without it!

So what can you do with Irfanview as an editor?  Here’s a quick list:

  • Adjust color, brightness, contrast, saturation, gamma,
  • Resize image, canvas size
  • Crop
  • Add text
  • Paint – adjust brush size, color, shape, type
  • Fill
  • Sample color
  • Replace colors
  • Flip, rotate, mirror vertically or horizontally, straighten
  • Draw lines, arrows, shapes
  • Add borders, frames
  • Convert to grayscale, adjust color depth, invert to negative
  • Show histogram
  • Fix Red-Eye
  • Sharpen
  • Clone Stamp
  • Plus more!
Create multi-image montages with Irfanview.

Use Irfanview to create multi-image montages.

Other editing/compositing functions

Irfan has other great tricks it can perform. Need to create a contact sheet? Make a montage image? Yes, Irfanview can do these things.

While it also has a “Panorama” creation function, this is not a stitching program that can detect and seamlessly merge multiple images. It works better for making horizontal montages with multiple images where the edges need not match.

For stitching panoramas, I would instead suggest another free program, Microsoft ICE, on which I wrote this previous article.

Irfanview can control your scanner, bringing the scanned image into the program for further work.

Irfanview can control your scanner, bringing the scanned image into the program for further work.

Scanning, copying, and printing

Irfanview can connect to scanners and other TWAIN devices to bring images directly into the program. Point Irfanview to the device, and it will allow you to scan single or multiple images.

If you need to make a quick copy of something and have both a scanner and printer connected to your computer, Irfanview has a Copy Shop feature that scans the image and immediately sends it to the printer.

Still more tricks

You will want to explore Irfanview on your own as there are more possibilities than I can possibly write about here. As with many things, the best way to learn is to experiment and get some hands-on experience.

Here a few other things you may wish to try:

Screen captures

Need a screenshot to save or send someone?  Use the Print Screen function on your keyboard to capture the screen.  Then open Irfanview and Edit->Paste the captured image.  Crop it as desired and save the image for attachment to your email, further editing, or printing.

Add your exposure data to your photo with Irfanview.

Want to have your exposure data show on your photo? Irfanview can do! Display any Exif or IPTC data you like.

Put exposure data (or other text) on photo

There could be times you might want to display Exposure data or other text on your photo.  Here’s a simple way to do it in Irfanview:

  • Open the photo of interest
  • Drag a box on the portion of the image where you want to display the text
  • Click Edit->Insert Text
  • Use the menu that appears to fill in the information you want to be displayed.
  • You can use the Exif data codes to pull data from the file (if you haven’t overwritten it with a previous edit to the file).  A list of all codes is available in the Irfanview Help menu. Click the Help button in the menu to see them.  See an example in the image above.
  • If you want to be able to save the “recipe” you created, you can save it as a Profile which you can then use later.  This same technique can be used within the Batch conversion tool to do multiple images.
Plug-ins offer many more options in Irfanview like this Effects option.

Plug-ins offer many more options in Irfanview like this Effects option.

Plug-ins and filters

When you really want to dig deep into what Irfanview can do, you can explore the plug-ins and filters option. Here you can do such things as OCR (Optical Character Recognition), which will allow you to scan in a page of text and then convert it to editable text.

There is Facial Recognition (which I’m still deciphering), and there are the Image Effects (with an image open in Irfanview, click Image->Effects->Effects Browser, to get an overview of the various looks you can achieve.

Want even more? There are plug-ins under the Effects Menu like Filter Sandbox or Filter Factory. Irfanview can also use any Adobe-compatible 8BF filters.

Conclusion

The Swiss Army Knife analogy is a perfect description of the way I use Irfanview. It may not be the tool I use routinely, and certainly isn’t my primary photo editor, but, like carrying a utility tool in my pocket, it is oh, so handy when I need it. It’s also easy to always have around.

For a few tasks, it even does things commercial programs can’t or does them in a simpler, better way.

I have used the program for over 20 years, and I can say even as I prepared this article, I learned some new things I’d not yet discovered. If you try it, you, too, will find a place in your photo-editing-toolkit for Irfanview.

Let me know in the comments how you found it useful in your work.

The post Irfanview – The Free Program You Need in Your Photo Editing Toolbox appeared first on Digital Photography School. It was authored by Rick Ohnsman.


Digital Photography School

 
Comments Off on Irfanview – The Free Program You Need in Your Photo Editing Toolbox

Posted in Photography


DJI agrees with the need for Remote ID, but not the FAA’s NPRM

16 Jan

Remote ID, the concept that a drone should have a digital license plate, has long been championed by industry leaders. Implementing it properly would enable remote pilots to safely perform complex flights including over people, at night, and beyond-visual-line-of-sight. The Notice of Proposed Rulemaking (NPRM) for the Remote Identification of Unmanned Aircraft Systems was released the day after Christmas by the Federal Aviation Administration (FAA) after numerous delays. Unfortunately, the 319-page document proposes rules and regulations that many feel would hamper a burgeoning industry, including DJI.

DJI’s Vice President of Policy & Legal Affairs, Brendan Schulman, posted a 2,100+ word call to action on the company’s main content portal, yesterday, explaining why there was a need for Remote ID while chastising the FAA for not ‘adopting good advice’ when drafting the NPRM. Since 2017, DJI has implemented Remote ID across all of their consumer drones in the form of AeroScope technology. The intention in taking this step is that both the government and industry would willingly adopt Remote ID.

Schulman and DJI ‘support a simpler, easier, and free version of Remote ID that doesn’t need a cellular connection or a service subscription.’ To illustrate why these ideals are important, Schulman presents the following analogy that anyone who drives an automotive vehicle can understand: ‘…what if instead of just a license plate, your car was also legally required to be connected via the internet to a privately run car-tracking service that charged you an annual fee of about 20% of your car’s value, and stored six months of your driving data for government scrutiny? Would you think the government had gone too far?’

‘What if instead of just a license plate, your car was also legally required to be connected via the internet to a privately run car-tracking service that charged you an annual fee of about 20% of your car’s value, and stored six months of your driving data for government scrutiny? Would you think the government had gone too far?’

The article goes on to explain how detrimental the Remote ID NPRM will be to everyone in the drone industry, except for those who stand to profit from it. The costs involved with compliance in everyday drone operations would cripple most commercial operators. Schulman hopes that every individual who will be adversely affected leaves a comment for the FAA to consider. As of this writing, over 5,300 have been posted. Comments will close on Monday, March 2nd.

‘Together, we can ensure that drone innovation is protected and that the safety and security of the skies are assured.’ Read Schulman’s post in its entirety, here.

Articles: Digital Photography Review (dpreview.com)

 
Comments Off on DJI agrees with the need for Remote ID, but not the FAA’s NPRM

Posted in Uncategorized


How Many Camera Bags Do You Need?

02 Jan

Camera bags. Who knew there would be so much choice? I certainly didn’t as I took my first steps into the world of photography. From small camera shaped bags which perfectly fit the contours of your camera to large wheeled suitcases designed to store and transport a whole range of photographic equipment the choice can be overwhelming. Then, after talking Continue Reading

The post How Many Camera Bags Do You Need? appeared first on Photodoto.


Photodoto

 
Comments Off on How Many Camera Bags Do You Need?

Posted in Photography


What you need to know about the Mavic Mini and drone regulations

13 Dec
DJI’s Mavic Mini weighs 249 grams, making it exempt for registration in the US and other countries with similar regulations.

DJI’s new Mavic Mini recently started shipping out to customers. When it was initially announced the Internet was ablaze with excitement about a drone that weighed under 250 grams, exempting it from registration with the Federal Aviation Administration (FAA) and government agencies in other countries where similar laws apply. Comments flooded into drone forums immediately, and a few were concerning.

Some people stated they felt there was no need to abide by airspace regulations and were free to fly anywhere, over people, and at night without a waiver amongst other violations. This, unfortunately, couldn’t be further from the truth. I called upon two of my respected friends and colleagues, one 30-year veteran, and one current employee of the FAA, and referenced a post from an industry expert, to help clear up any misconceptions.

What does ‘no registration’ really mean?

“Of course, sUAS under .55 lbs. (250 grams) do not require registration. However, if the sUAS is being used for commercial work in an effort to be compensated, the aircraft must be registered and FAA Part 107 regulations must be followed by the RPIC (Remote Pilot-in-Command),” said Samuel Nelson, who made it clear he wasn’t speaking on behalf of the FAA and was, instead, giving his personal opinion based on his understanding as the Boston regional FaastTeam STEAM (Science, Technology, Engineering, Applied Mathematics) Pro.

Some people stated they felt there was no need to abide by airspace regulations and were free to fly anywhere… this couldn’t be further from the truth.

Nelson adds “If flying as a hobbyist, you can avoid registration. However (remote pilots) still must abide to by FAA AC 91-57B AND Title 49 of the United States Code (49 U.S.C) § 44809. People must also remember DJI AeroScope systems can detect drones under .55 lbs. and the serial [number] can be identified to allow for a subpoena to identify the legal owner of the aircraft.”

Ryan LaTourette, who runs That Drone Blog and is and admin on the UAV Legal News & Discussion Facebook group pointed out the obvious: “The lesser weight does not negate that the Mavic Mini is still in the eyes of the FAA a drone, an aircraft… Mavic Mini operators are not given a free pass to fly wherever and whenever they wish. The only change at this point is the need to pay $ 5 to the FAA for a certificate of aircraft registration.”

Drones small enough to fit in the palm of your hand aren’t necessarily toys. They have a lot of beneficial uses.

What does this mean? A remote pilot flying recreationally must adhere to the following guidelines, including but not limited to:

  • The aircraft is flown within the visual line of sight of the person operating the aircraft or a visual observer co-located and in direct communication with the operator.
  • The aircraft is operated in a manner that does not interfere with and gives way to any manned aircraft.
  • In Class B, Class C, or Class D airspace or within the lateral boundaries of the surface area of Class E airspace designated for an airport, the operator obtains prior authorization from the Administrator or designee before operating and complies with all airspace restrictions and prohibitions.
  • In Class G airspace, the aircraft is flown from the surface to not more than 400 feet above ground level and complies with all airspace restrictions and prohibitions.

Commercial use

While others, including myself, didn’t feel the Mavic Mini was appropriate for commercial use, LaTourette pointed out that people shouldn’t be so narrow minded. He explains that drones even smaller than the Mini, such as Verity’s Lucie micro drone, have been used in professional scenarios for the past few years. Ryze’s Tello drone has been an instrumental tool in getting folks, especially children, excited about STEAM education. Intel drones, weighing in at 68 grams, are responsible for putting on the world’s most elaborate fireworks displays.

Verity drones weigh a mere 50 grams and have completed over 150,000 autonomous flights safely over people at rock concerts and other live events.

If you plan on using the Mavic Mini for commercial purposes in the United States, meaning you plan to receive compensation for work conducted with your drone, you will need to register the drone plus have your Part 107 certification. I personally recommend Remote Pilot 101 for straightforward, affordable training. There is, of course, a conundrum that comes with following the rules.

Loretta Alkalay, an aviation attorney who spent 30+ years with the FAA as Regional Counsel, had the following to say: “As far as the weight issue, the FAA’s drone laws are not rationally related to the potential safety impact of very small drones. That results in people either intentionally ignoring the laws because they are overly restrictive or failing to even realize that laws apply. Coupled with the lack of FAA enforcement, the people most penalized are those who do know the regulations and choose to comply with them. Of course, those who violate the regulations and get caught could face serious consequences, depending on the violation and circumstances.”

The people most penalized are those who do know the regulations and choose to comply with them.

Speaking of impact, lower weight gives potential to the criteria for the FAA’s latest NPRM on easement of the §107.39 regulation for flight over people. Flying over people is currently prohibited under the §107.39 regulation. No one may operate a drone over people unless they are directly participating in the operation or are shielded under a covered structure such as a car.

So why make a lightweight drone?

DJI is certainly proud of themselves for fitting some of their most advanced features into a drone that weighs 249 grams upon takeoff. So why stuff all those features into a tiny package? Safety and the impending ruling for allowing flight over people are two top reasons.

According to a DJI Hub article that was shared by the company’s Vice President of Policy & Legal Affairs, Brendan Schulman, “regulators in the United States, Canada, the United Kingdom, continental Europe, Australia, and other regions have agreed that drones weighing less than 250 grams (0.55 pounds) are virtually harmless. In a fall or a collision, a sub-250g drone is just not going to cause the same kind of damage as a heavier drone.”

The Mavic Mini is tiny compared to other compact drones like the Mavic 2 Pro, but you still need to follow the normal rules when flying it.

In spite of negative media coverage, drones have been proven to be safe while providing many benefits to numerous industries including healthcare, construction, mining, agriculture and more. As Samuel Nelson pointed out earlier, the Mavic Mini is also equipped with AeroScope for Remote Identification which allows safety and security officials to detect, identify, and locate the drone and its pilot during flight if necessary. Going lighter and more compact, to ensure safety when performing complex operations, is a logical trend that is taking hold of the industry.

To find out if a Mavic Mini is an ideal purchase for you, check out our comprehensive review.

Articles: Digital Photography Review (dpreview.com)

 
Comments Off on What you need to know about the Mavic Mini and drone regulations

Posted in Uncategorized


Hands-on: What you need to know about the new Leica SL2

07 Nov

Hands-on with the new Leica SL2

It’s been four years since the launch of the SL – Leica’s first full-frame mirrorless interchangeable lens camera (no, we’re not counting the M9). The new SL2 updates its predecessor in every important way.

We’ve been using one for a little while, and in this article we’ll give you a rundown of the most important features. Click through to learn all about the new Leica SL2.

New 47.3MP full-frame sensor and processor

The SL2 features a new 47MP full-frame sensor, and ‘Maestro III’ processor. One of the SL’s original selling points was a special microlens array, tweaked to deliver optimal image quality when shooting with adapted M-series lenses. The SL2’s sensor follows suit, making it potentially very appealing to M-series shooters looking for a practical mirrorless solution – especially for wide-angle lenses, which can vignette heavily when adapted to other systems.

Leica claims that the new sensor in the SL2 will feature 14 stops of Raw dynamic range. Assuming that performance will be similar to the sensor in the previously-tested Q2, this should mean that the SL2 is highly competitive with its full-frame peers, but around 1EV behind the absolute best of them. We certainly don’t have any complaints after our initial shooting, but we’ll be testing IQ in full once we receive a reviewable camera.

5-Axis in-body stabilization

As well as more pixels and those fancy microlenses, the SL2’s sensor is also mechanically stabilized – a first for the SL line. Leica claims a benefit of up to 5.5 stops (CIPA) which should greatly increase the SL2’s versatility in some shooting situations, particularly in poor light. This is in line with the figures quoted for Panasonic Lumix S1R, which it’s probably safe to assume features both a closely related sensor and suspension stabilization mechanism.

Redesigned body and ergonomics

The SL was a camera that probably looked great in a design program on someone’s computer screen, but which a lot of photographers found rather uncomfortable to shoot with, thanks to its preponderance of bare metal surfaces, its heavy weight and a lot of sharp edges. The SL2 looks enough like its predecessor not to represent a complete departure (and it’s not substantially smaller or lighter) but its an altogether more rounded, more comfortable camera, with a much nicer grip.

Leica has also refreshed the control logic of the SL2, to bring it closer to the Q2 and M10-series. As such, even though Leica has added several new customization options, the SL2 is a simpler camera to pick up and use straight out of the box. With an IP54 certification, it’s somewhat tougher than the original SL, too – at least on paper.

5.76M-dot EVF

Like its close cousin the Panasonic Lumix DC-S1R, the SL2 offers a high-resolution 5.76M-dot OLED viewfinder and a binoculars-style diopter control around the eyepiece. The EVF offers around a 25% linear resolution improvement over the 3.69M-dot panels used by most of its rivals, and in use it’s superb: bright, contrasty and very crisp.

3.2″ rear touchscreen

Another major upgrade compared to the original SL is the rear LCD, which has been increased in size and resolution. With a 3.2″ diagonal and an effective resolution of 2.1MP, the panel is a significant step up in terms of usability compared to the screen on the back of the original SL. Touch-sensitivity has also been improved over the SL, providing a fast and convenient means of adjusting settings during LCD shooting. During EVF shooting, you can quickly change your desired AF point using the small joystick at upper right.

Just like the SL, the SL2’s rear screen is fixed, something which is becoming increasingly rare among full-frame cameras, and which may bother some potential customers (especially videographers).

Twin UHS-II slots

The SL2 has two card slots, both of which support the UHS-II standard. As we’d expect, you can tell the camera to treat the second slot as overflow, backup, or split file types between the cards, recording stills on one and video files on the other.

Multishot mode

Leica has made use of that suspended sensor to add a ‘Multishot’ mode, which combines multiple exposures (up to eight) to create DNG files of up to 187MP. This feature will be added next year via a forthcoming firmware update.

In this picture you can see the small 1.3″, 128 x 128 pixel LCD status panel on the SL2’s top plate, which shows key shooting settings.

Continuous shooting and ‘Leica Object Detection’ AF

We’re not used to saying this about Leica’s cameras, but the SL2 is fast. While it probably won’t give the Sony a9 II or Canon EOS-1D X Mark III a run for their money, the SL2’s maximum continuous shooting rate of 20 fps in electronic shutter mode is very respectable, and 10 fps in mechanical shutter mode isn’t too shabby either. There are a couple of catches though: we’d expect image quality to take a hit in e-shutter mode under certain lighting conditions (specifically under some types of artificial lighting), and focus is locked in both 10 and 20 fps shooting. Autofocus tracking is available at 6 fps.

Leica Object Detection AF appears to be closely related to Panasonic’s face / eye / body-detection, and detects human subjects starting with their body shape, before narrowing down (if it can) to faces and eyes. There are a total of 225 autofocus points, and like previous Leica cameras (and the Panasonic S1-series), AF is contrast-detection.

Video

The Leica SL2 has a very respectable suite of video features, with a headline resolution of 4k/60p, captured from virtually the full width of its sensor. An even higher-resolution 5K/30p mode is available from a cropped region, but we’re still waiting for full details on exactly how much of a crop is employed.

Video can be shot in 8 or 10-bit modes straight to the memory card, or output as a 10-bit stream via the full-sized HDMI port. Three video gamma profiles are available: Rec. 709, L-Log Rec. 2020 and HLG Rec. 2020.

Meanwhile, the SL2 can of course also capture HD video, at up to 180fps. A new ‘Cine mode’ essentially switches the SL2 into fully manual operation (including focus) and translates key exposure settings into video-appropriate language: shutter angle, ASA and T-stop.

Ports, connectivity and battery

Alongside a full-size HDMI port, the SL2 also features a headphone socket and mic jack (both 3.5mm) as well as a USB-C 3.1 port. The SL2 can be charged over USB but cannot be powered solely by it.

Battery life from the included BP-SCL4 is a stated 370 images (CIPA) which is pretty standard for this class of camera (it’s actually a little better than the stated battery life of the Nikon Z7), but as usual we’d expect you’ll get a lot more shots per charge than that in normal shooting.

Pricing and availability

Bluetooth and Wi-Fi connectivity are also built-in and Leica has updated its Fotos app, which also now comes in a ‘Made for iPad’ version. This offers Lightroom integration and extra pro features available for $ 50 per year.

The Leica SL2 will be available in Leica stores and Boutiques starting on November 21st for $ 5,995. Let us know what you think in the comments.

Articles: Digital Photography Review (dpreview.com)

 
Comments Off on Hands-on: What you need to know about the new Leica SL2

Posted in Uncategorized


Lens Hoods: What Are They Really For, and Do You Need Them?

31 Oct

The post Lens Hoods: What Are They Really For, and Do You Need Them? appeared first on Digital Photography School. It was authored by Simon Ringsmuth.

lens-hoods-what-are-they-for

Most camera lenses come with something called a Lens Hood, which looks like a short circular tube that attaches to the front. These diminutive devices seem a little strange, but they can serve several very useful purposes. While some people might be tempted to toss them on the shelf and never give them a second thought, knowing what lens hoods are and how to use them can have a significant impact on your photography.

Lens Hoods: What Are They Really For, and Do You Need Them?

Why use Lens Hoods?

Imagine this: it’s a bright, sunny day and you are outside for a stroll. The sun is beating down hard and you’re having a bit of trouble seeing clearly, so you hold your hand up to your forehead in an effort to block the light. Congratulations, you’ve just made your very own lens hood for your face! I know this is a bit of an oversimplification, but the lens hood on a camera is about the same as using your hand or a ball cap to block a bit of light when it’s bright out.

Image: It’s kind of like putting a ball cap on your camera, but a lot more effective.

It’s kind of like putting a ball cap on your camera, but a lot more effective.

Why would this be beneficial for photography? Since you need light to make photographs, wouldn’t blocking the sunlight be counterproductive? It might seem so, but in reality, you aren’t making the scene any darker just as putting a cap on your head doesn’t make the sun any less potent.

Indeed, the primary reason to embrace your lens hood as an essential photographic companion is that it makes your pictures look better. Its purpose is to prevent your photos from developing a washed-out appearance that tends to happen under certain lighting conditions. They also offer other benefits mostly related to the protection of your camera gear.

Image: The lack of a lens hood gave this picture a washed-out appearance.

The lack of a lens hood gave this picture a washed-out appearance.

These types of pictures happen because harsh, intense light enters the camera lens and gets scattered across a portion of the image as a result. Lens hoods can mitigate much of this problem by acting as a shade over the front glass element.

Image: Attaching a lens hood gave the shot much more contrast and vibrance. Shadows can be brought u...

Attaching a lens hood gave the shot much more contrast and vibrance. Shadows can be brought up in post-production, but if a picture is too washed-out, it can be much more difficult to fix.

When I first got into digital photography many years ago, I didn’t understand the point of lens hoods. I kept them on a shelf at home because they mostly just got in the way and made my camera take up a lot more space in my bag than it needed to.

Or so I thought.

The nice thing about lens hoods is that they are a low-tech solution to what can often be a fairly major problem. Once you start to see the benefits of having a hood on your lens, you won’t see them as a useless waste of space, but essential components of your camera kit.

Image: I always use my lens hoods for portraits. I never know when I will be shooting a backlit scen...

I always use my lens hoods for portraits. I never know when I will be shooting a backlit scene, and if it happens, it’s good to have the hood to shade the lens.

One thing I have realized over the years is that you need to be prepared to meet the demands of whatever situation you are photographing. Few things are more frustrating than realizing you messed up a picture because of something you could have easily solved with a little pre-planning.

Lens hoods can indeed be a little awkward. However, it’s better to have one on your lens than realize afterward that many shots appear hazy and poorly-lit because you didn’t shade your lens properly.

Image: Lens hoods are particularly useful when shooting into the sun.

Lens hoods are particularly useful when shooting into the sun.

Additional benefits

Aside from protecting your pictures from harsh light, lens hoods can physically protect your camera gear too. This is one of the reasons I leave mine on at all times since I often bump and bang my camera. Having a hood protruding from your lens means it will absorb the brunt of most impacts.

If it does get broken, it’s far cheaper to replace than your lens.

Image: After years of use, my lens hoods are full of scratches and scuffs. I’d rather have the...

After years of use, my lens hoods are full of scratches and scuffs. I’d rather have these easily-replaceable plastic parts bear the brunt of any impacts instead of my actual camera lenses!

I try to be careful with my camera gear and I don’t intentionally abuse it, and I think the same is true of most photographers. But despite my best efforts, accidents certainly can happen. In the normal course of a photoshoot, my camera gets picked up, set down, bounced around, tossed into a bag, put in the trunk of my car, used, and maybe even abused just a little.

A protruding plastic ring isn’t going to save my camera if it gets run over by a dump truck, but it has helped avoid countless bumps and bruises over the years. Is it inconvenient to have the hood always sticking out of my lens? A little, but it’s a lot less inconvenient than having to buy new gear!

Image: I had to follow this cat for a little while and practically lay flat on the ground, to get th...

I had to follow this cat for a little while and practically lay flat on the ground, to get this shot. Having a hood on my zoom lens was a little extra peace of mind knowing that it wasn’t going to get scratched or dinged in the process.

If you do feel like your lens hood is a little too much to deal with, most of them have a simple solution. Reverse the hood and screw it on your lens backward. This might cover some of the knobs and switches on your lens, but it will keep the hood handy while simultaneously storing it in a convenient and easy-to-access location.

Image: You can attach most lens hoods backward for easy storage. This helps protect the barrel of yo...

You can attach most lens hoods backward for easy storage. This helps protect the barrel of your lens but can leave some controls covered up.

Drawbacks

There are a couple things to note about lens hoods that could be a factor in helping you decide whether to use them. The first and most important issue involves vignetting. Some lenses, particularly wide-angle lenses, can result in photos with darker corners with the lens hood attached. This isn’t a huge issue and can often be fixed on your computer, especially if you shoot in RAW, but it is something to keep in mind.

Additionally, there’s no getting around the fact that the added length of a lens with a hood attached can be inconvenient. This is especially noticeable on telephoto lenses and it can be annoying if you’re not used to it.

My solution has been to treat the hood as a normal part of any lens in my kit. If it means I need to find a larger camera bag or be a little uncomfortable shooting in tight spaces, so be it. For me, the tradeoff is worth it, but your opinion might be different. Regardless, it is something to keep in mind.

Image: Hoods on telephoto lenses can stick out quite far, but I have just come to accept this as a n...

Hoods on telephoto lenses can stick out quite far, but I have just come to accept this as a normal part of my kit. I don’t see it as an inconvenience in the same way that I don’t treat a seat belt in my car as an inconvenience.

Conclusion

Despite a few downsides, lens hoods can be an important part of your camera collection. I recommend using one at all times, even if you’re not entirely sure you will need it. I have found myself in more than a few frustrating situations where I know I would have gotten the shot if only I had a lens hood. As such, I rarely take them off my lenses now.

What about you? Do you use lens hoods, or have you learned to live without them? What other advantages or disadvantages do they have that I might have missed? Leave your thoughts in the comments below!

The post Lens Hoods: What Are They Really For, and Do You Need Them? appeared first on Digital Photography School. It was authored by Simon Ringsmuth.


Digital Photography School

 
Comments Off on Lens Hoods: What Are They Really For, and Do You Need Them?

Posted in Photography


Do You Need A Flash For Travel Photography?

31 Oct

Packing for a trip is arguably the worst part about travel. As photographers, not only do we have to choose which of our vast wardrobe of clothes to take with us, but we also have to decide which pieces of our ever-expanding portfolio of camera equipment to take with us. From picking which lenses and camera bag to remembering your Continue Reading

The post Do You Need A Flash For Travel Photography? appeared first on Photodoto.


Photodoto

 
Comments Off on Do You Need A Flash For Travel Photography?

Posted in Photography


Top 8 Affordable Quality Printers for Photographers And Do You Need One?

31 Oct

In this digital age, a large number of photographers submit digital copies of their work to their clients via digital storage devices, email or web based file sharing services. However, there are still some photography niches where clients usually expect physical prints to be delivered to them. For instance, if you’re into wedding, event or portrait photography, you may often Continue Reading

The post Top 8 Affordable Quality Printers for Photographers And Do You Need One? appeared first on Photodoto.


Photodoto

 
Comments Off on Top 8 Affordable Quality Printers for Photographers And Do You Need One?

Posted in Photography


What You Need to Know to do Successful Restaurant Photography

25 Oct

The post What You Need to Know to do Successful Restaurant Photography appeared first on Digital Photography School. It was authored by Darina Kopcok.

successful-restaurant-photography

If you want to be a food photographer, you’ll likely start your career shooting restaurant photography. This is how most food photographers get their start. Restaurants have smaller budgets, so they’re open to working with new photographers.

However, photographing for restaurants isn’t that easy. Not only do you have to be skilled at shooting food, but you also need to be able to shoot interiors and portraits of the chef and other staff.

Restaurant photography can be a lot of work, and there are a lot of ins-and-outs you should know to make sure you don’t end up getting burned by this very specific type of shoot.

What You Need to Know to do Successful Restaurant Photography

Ask for a shot list

Before you can give a potential client an estimate, you need to know what you’ll be photographing in order to estimate how long the shoot will take you. For example, beverages can take longer to photograph than a plate of food, as managing reflections in glass can take time and be challenging.

You should base your estimates on the project scope. If you can’t estimate how long the shoot will take you, you can’t price your services accordingly. Get a breakdown of how many food images will be required, how many drinks etc.

Some restaurants want you to bring in your own surfaces, dishes, linens etc. for a more magazine editorial feel. In this case, note that it will take longer to shoot this type of scene than it will shooting their own dishes on the restaurant tables.

Scout for the location and light

Check out the location beforehand so you know what you’ll be up against in terms of lighting. You’ll also need to figure out where to set up your equipment and workspace. This should be done with agreement from the manager or proprietor.

It’s important that if the restaurant is open when you shoot, that you’re as unobtrusive to the patrons as possible. See if the client can close off a section of the restaurant where you can work without bothering anyone, and vice versa. 

successful-restaurant-photography

Discuss styling the food

When shooting for restaurants, you should make clear on the outset that you’re not a food stylist and therefore are not responsible for how the food looks.

Food styling is a different occupation. It requires a separate skill set from photography. Your job is the lighting and image capture, not the plating of the food.

Of course, you should always be aware of garnishes and stray crumbs, and generally, make sure the food looks its best for the camera. I’ve been known to send back a sloppy looking burger or two.

The point is that clients need to make sure their chef is up to the task. Otherwise, they should hire a food stylist to guide them. A food stylist can be pricey and not feasible for an already tight budget. In the case that a client refuses to hire one, they should know that the look of the food on the plate ultimately falls on them.

Make sure you state this in your contract. You have a contract, right?

What You Need to Know to do Successful Restaurant Photography

Bring a food styling kit and some basic props

While you won’t be plating and styling the food, you should still bring along a basic food styling kit that includes items such as tweezers, cotton swabs, and small brushes to tame errant garnishes or clean unwanted crumbs and drips from the plate. You want to do the best job you can with what you’re given.

It’s a good idea to come prepared with some props as back up. Bring a stack of linens in various shapes, sizes, and colors, and maybe some cutlery. Sometimes clients want their own tables, flatware, and dishes shot as they are experienced by the patrons, but many have a branding direction in mind that requires a specific look or ambiance. 

For example, when clients wanted me to create dark and moody images for them, I bring in small, dark dishes and vintage cutlery – the opposite of the large, white dishes you see in most restaurants. 

successful-restaurant-photography

Use a tripod

If you shoot only in natural light, be aware that most restaurants are too dark for food photography.

You’ll need to shoot by a window and use a tripod so you can decrease your shutter speed and make a longer exposure. This won’t work for photographing people, however, as they will be blurry with a slow shutter speed.

If the images will only appear on the web or in social media, you can crank up the ISO and fix the noise in your images later in post-production.

When I scout the location, I try to take a few test shots and see how they look in Lightroom before making my lighting decisions.

successful-restaurant-photography

Shoot horizontally

Have a conversation with the client about how they would like the images shot. Most restaurants only need images for their website. Interactive web design often requires that images be shot in landscape orientation.

If the client will be printing some of the images on a menu, this may require a vertical format (and a higher resolution). Make sure to discuss the best picture orientation with the client. Make note that if they want both, it can take you up to twice as long to shoot the images, as not only will you have to adjust the camera, but you’ll have to recompose each image.

Shoot tethered 

I always hook up my camera to a laptop so the client can view the images captured by my camera. Shooting tethered allows you to see a larger, more accurate rendition of your shot than you can get from the screen on the back of your camera. You can use Lightroom or Capture One Pro for tethering. Make sure you have a high-quality tethering cord. 

What You Need to Know to do Successful Restaurant Photography

Work with the client

Ultimately, you want to produce good work that makes the client happy. For this, the client needs to be involved in the process. They must be present at the shoot to provide creative direction and approve the images that are captured. That way, they can’t come back and tell you they don’t like them, or that they don’t align with the branding or aesthetic they had in mind.

I have a clause in my contract stating that I will not begin a shoot without someone representing the restaurant present. Also that the client will forfeit the deposit if I need to pack up my things and leave. Believe me, you don’t want to get into this situation. 

Collaborate with the chef

Involve the chef in the process as much as possible. When you make an appointment to scout the location, ask if you could meet the chef.

Making the chef feel like an important part of the process can make a big difference in the outcome of your shoot. The shoots that end up being the most easy and fun are the ones where the chef is enthusiastic about working with you and making the food look its best for its moment in the spotlight.

What You Need to Know to do Successful Restaurant Photography

In conclusion

One more thing. Before you set foot in the restaurant with your camera, make sure you have liability insurance. Many restaurants won’t always think about this, but bigger clients will often ask for proof of liability insurance. If someone trips over an extension or tethering cord and decides to sue the restaurant, you can be included in that lawsuit. 

Shop around for the best insurance for you, and read the fine print carefully. You need insurance that is specific to the photography industry so you can make sure you’re covered in the types of situations you will be faced with.

You should also insure your equipment against theft, loss, and damage, including that from fire or flood.

Restaurant photography can be a great way to start building up your professional portfolio. Just make sure to do it right to avoid any headaches along the way, and to get your clients to hire you as their preferred photographer whenever they update their menu.

Do you have any other tips or experiences you’d like to share with us about Restaurant Photography? Do so in the comments!

The post What You Need to Know to do Successful Restaurant Photography appeared first on Digital Photography School. It was authored by Darina Kopcok.


Digital Photography School

 
Comments Off on What You Need to Know to do Successful Restaurant Photography

Posted in Photography