RSS
 

Posts Tagged ‘most’

The Five Most Essential Camera Settings and How to Use Them

14 Dec

Modern cameras, from phones to high-end DSLRs, are designed to make decisions for us. And for the most part, they do a pretty darn good job of it. Slap your SLR into AUTO mode and more often than not you’ll get images that are sharp with decent exposure. If you are just looking to document your world, then go for it, snap away. The drawback is that images taken in AUTO tend to look similar to one another, with a uniform depth of field and exposure. If you want to move beyond the automatic camera settings, you need to understand your camera, how to use it, and most importantly, what impact changing those settings will have on your final image. Here are five of the most essential camera settings, what they mean, and how they impact the photograph.

Five Most Essential Camera Settings

ISO

Five Most Essential Camera Settings

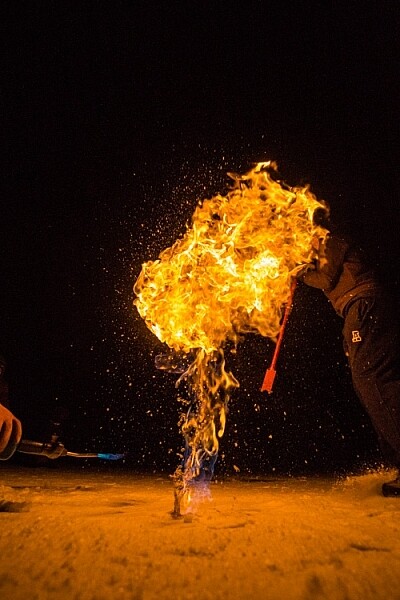
This night image required I use a fast shutter speed to retain detail in the flame, so I had to use a high ISO (3200). In the next detail shot, you can see the noise, in the original RAW file. (By the way, this image shows what happens when you free methane from a bubble in the ice of a frozen pond in the boreal forest, and then set it alight.)

First, the acronym ISO is terrible, because it’s basically meaningless in terms of photography. It stands for “International Standards Organization” a European non-governmental organization that makes sure industries apply the same standards. In the case of photography, they want to make sure that an 800 ISO on a Canon is the same as on a Nikon, Sony or Fuji. If that standard didn’t exist, then settings wouldn’t be applicable across camera brands. So if I set my Canon to make an image at 1/100th sec at f/2.8 and ISO 400, and you set your Nikon to the same setting, we wouldn’t get the same exposure. Thankfully all the major manufacturers do subscribe to the ISO standards.

Yeah, yeah, but what is ISO? It is the measure of the sensitivity of your camera’s digital sensor to light. The lower the number the lower the sensitivity, the higher the number the more sensitive the sensor becomes. If you are shooting in a low light situation, say a poorly lit room or a dusky evening, an ISO setting of 100 will require that more light reaches the sensor than if you were to use a setting of 400, 800, or 1600.

Five Most Essential Camera Settings ISO

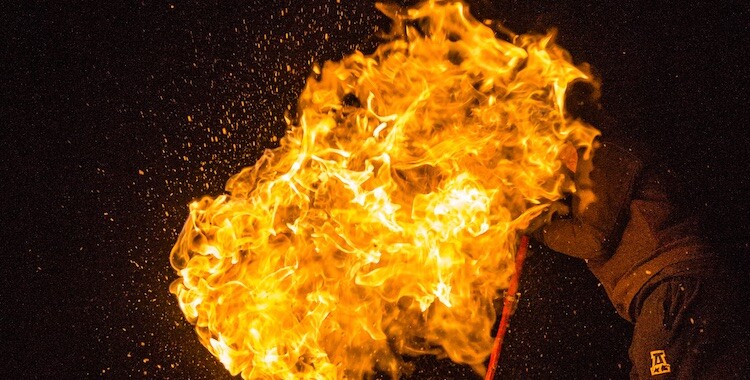
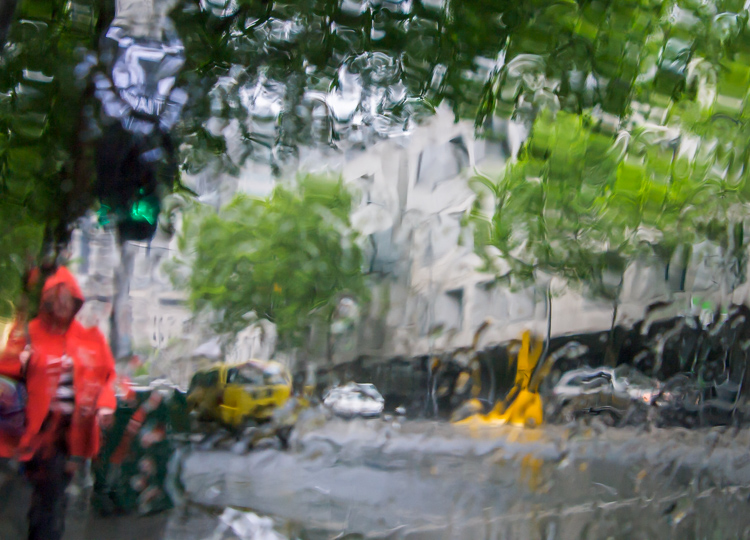
Note the noise in the detail of the person’s clothing and in other shadowed areas.

Drawbacks of high ISO

So why not shoot at high ISOs all the time? Two reasons: 1. High ISOs often create digital noise on the image, (though camera sensors are getting better and better) and 2. Sometimes you may want to force a slow shutter speed, in which case you want low sensitivity to light. This may be the case when you are trying to capture blurred motion such as water, wind or to create pleasing blurs in sports photography.

  1. High ISOs often create digital noise in the image, (though camera sensors are getting better and better)
  2. Sometimes you may want to force a slow shutter speed, in which case you want low sensitivity to light. This may be the case when you are trying to capture blurred motion such as water, wind, or to create pleasing blurs in sports photography.

In short, ISO is one of the three tools you have at your disposal to manipulate your exposure.

Shutter Speed

The length of time your camera’s sensor is exposed to light is the shutter speed. Many cameras have a mechanical shutter that snaps open and closed allowing light to reach the sensor, others use a digital shutter that simply turns on the sensor for the set period of time before switching it off again. Shutter speed has a huge impact on the final image. A long shutter speed will create blur in moving subjects. As a landscape photographer, I use long shutter speeds often to blur water, expose starlight, or capture wind motion.

Five Most Essential Camera Settings

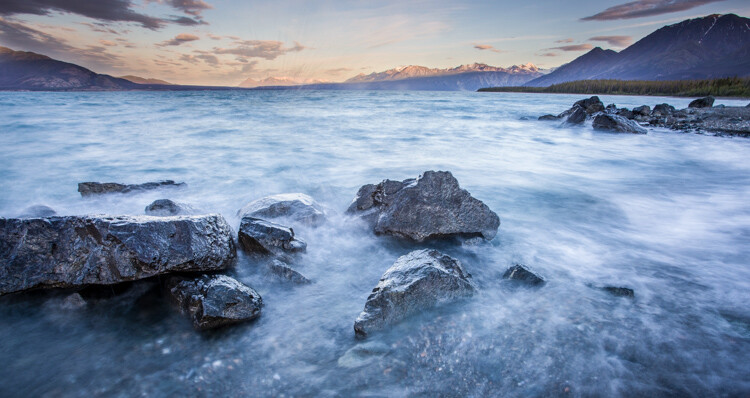
For this image, I used a 0.5 sec shutter speed to blur the waves somewhat, but retain detail.

Five Most Essential Camera Settings shutter speed

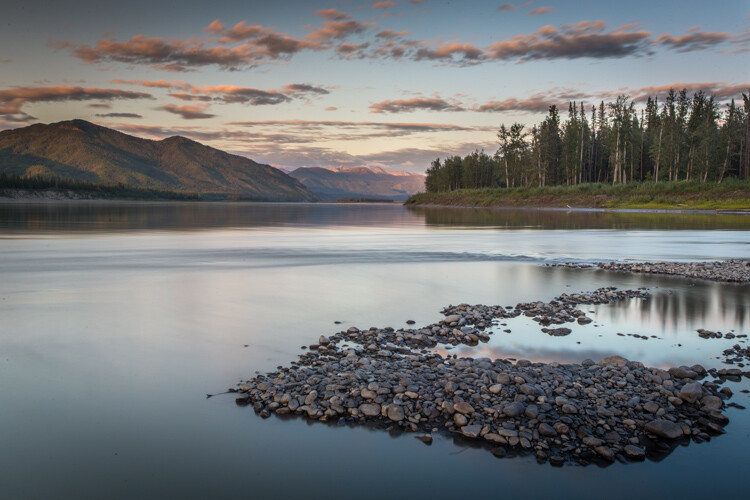
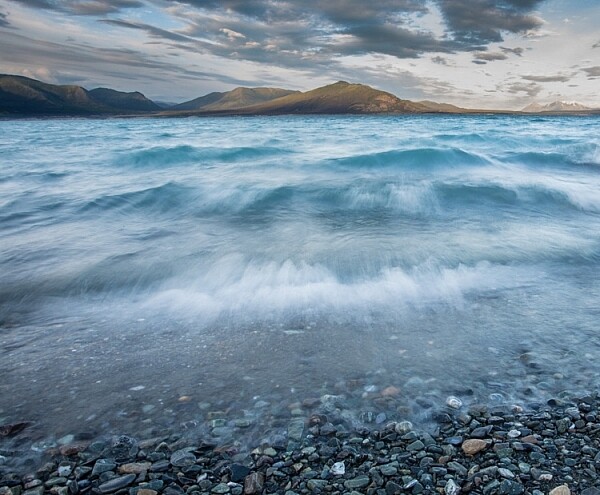
A 30-second shutter speed blurred the Yukon River in this image, into a mirror-like surface.

Short or fast shutter speeds have the effect of stopping motion. Use a shutter speed of 1/2000th of a second and the motion of a runner or a cyclist will be stopped dead.

Five Most Essential Camera Settings shutter speed

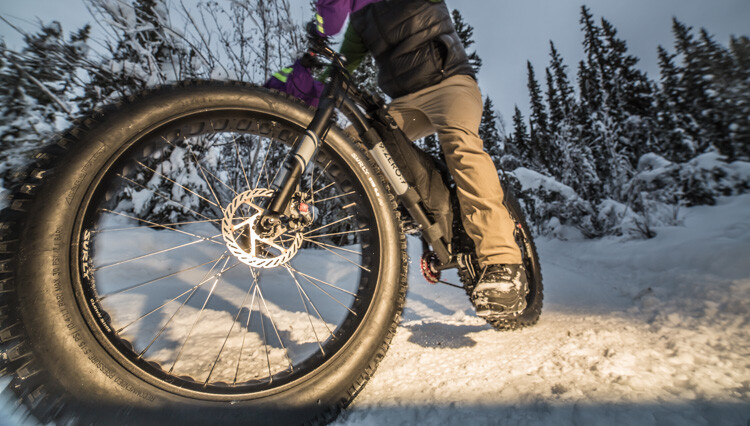
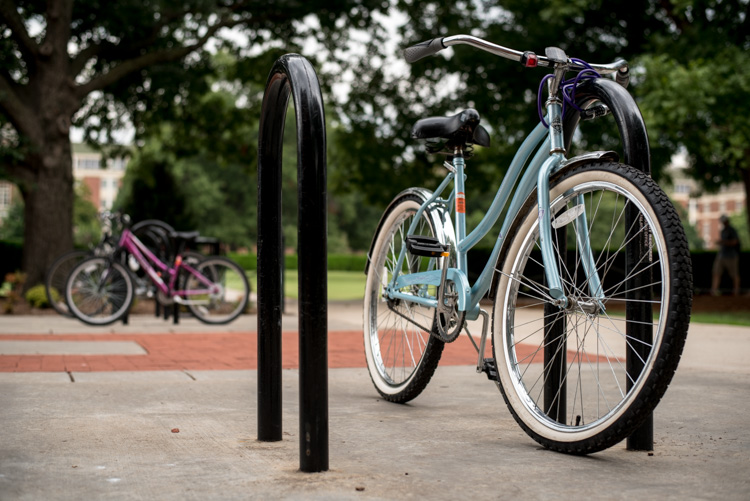
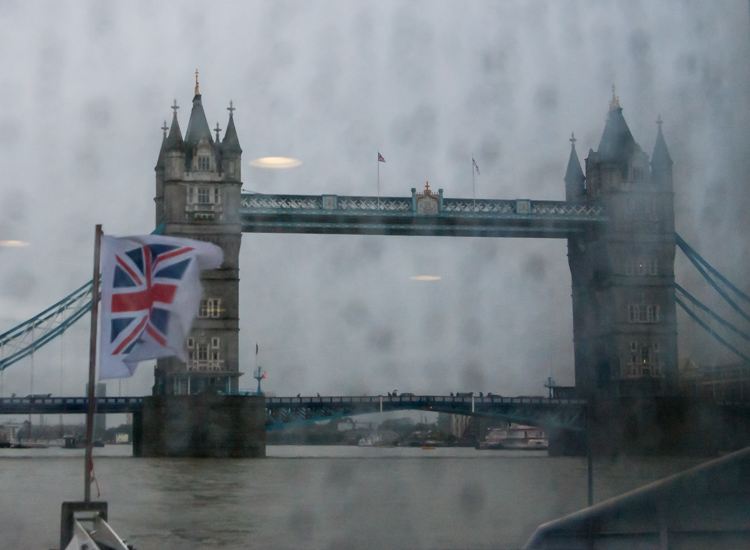
This image of a bike passing used a shutter speed of 1/500th of a second. It was just enough to be sharp overall while retaining some sense of motion in the spinning tire.

Your use of the shutter has to be thoughtful to create a good image. Think about the final image you want to create. Does it have blurred components or is it all sharp? Do you want to stop, or convey the sense of motion? Consider, experiment, then decide on your shutter speed.

Aperture

Five Most Essential Camera Settings aperture

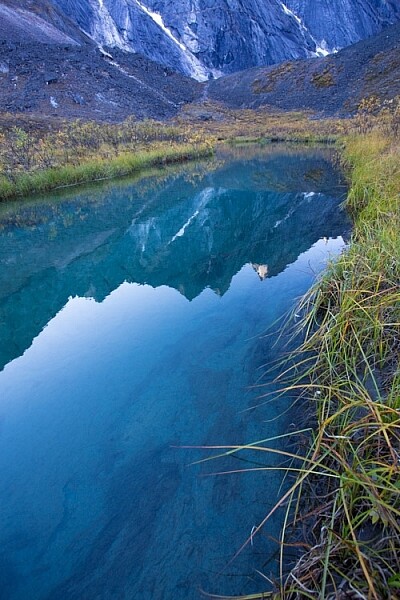
An f-stop of f/11 at 17mm was sufficient to make the entire image, from inches in front of the lens to the cliffs in the distance, sharp.

The aperture, or f-stop, may be the most confusing aspect of photography for many photographers because it affects images in unexpected ways. Essentially, the aperture is how big the hole in the lens is. The smaller the hole, the less light is allowed in, the larger it is, the more light gets through. What often confuses people is the numbering system: the smaller the number, the larger the hole. So f/2.8 is a larger opening than f/4, f/5.6, f/8, f/11 and so on. Lenses with a wide maximum aperture (a small number like f/2) are considered “fast” meaning they are capable of allowing in more light.

But it’s not just about light, and how wide a lens can open. The aperture also affects image sharpness. Most lenses (dare I say all?) are sharper, a few stops down (called the sweet spot). A lens with a maximum aperture of f/2.8 will create a sharper image at f/8, then at f/2.8. The higher quality the lens, the less this matters, but it is noticeable on most lenses.

Five Most Essential Camera Settings aperture

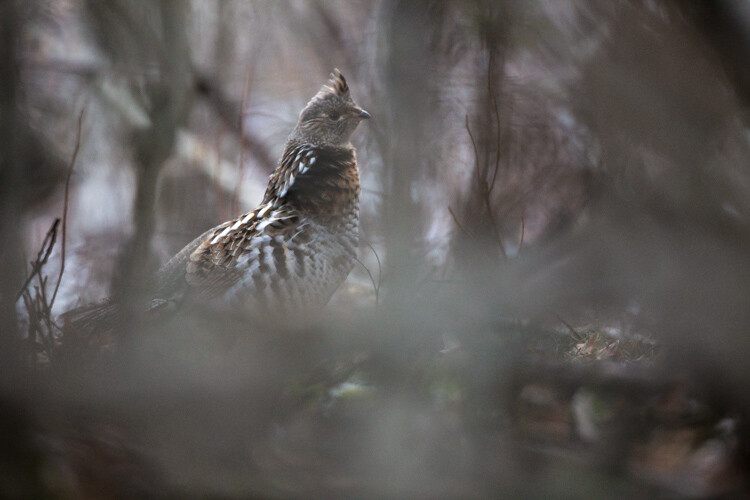
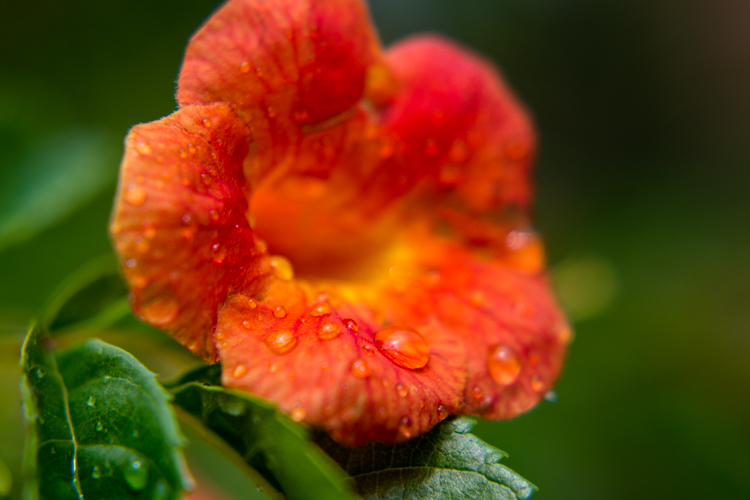
A very shallow depth of field in this image brings the grouse hiding in the brush into focus while the surrounding chaos of branches blurs into a haze.

Depth of Field and application

Next, the aperture also controls the Depth of Field. The DoF is the amount of the image from close to far that is in focus. A lens, when set wide open, say f/2.8, will have less DoF than when the same lens is set to f/11.

Like shutter speed, your use of aperture should be purposeful. Have a landscape image that you want in focus from front to back? You better select a high f-stop (like f/11). How about a portrait where you want a clean, soft background but a tack-sharp eye? Then use a small f-stop (like f/2.8 or f/4) and watch that focus point.

The aperture has a direct impact on shutter speed. A large f-stop will require you to use a longer shutter speed to attain proper exposure. Just as lower f-stop, will allow you to use a fast shutter speed. These two are completely interrelated, there is no escaping it, so you NEED a strong understanding of both.

White Balance

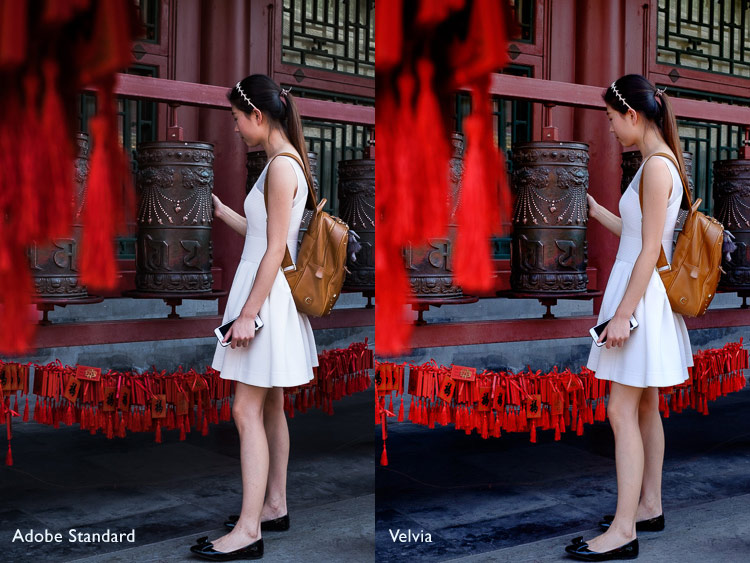
White balance, like ISO, relates to the sensor, but in this case, it has to do with the color of the light, rather than its brightness.

Different light sources have different color tones. Our eyes often don’t detect these differences, but you can bet your camera will. Have you ever seen a photo of a home interior lit by soft-white bulbs, but including a window? Usually, the interior of the room looks natural while the light outdoors looks artificially blue. That’s white balance. The camera (or photographer) decided to use the interior light (the warm-toned bulbs) as the natural color, but then the natural light

The camera (or photographer) decided to use the interior light (the warm-toned bulbs) as the neutral color, but then the natural light outdoors appears blue. When the white balance is set wrong, the colors are off. They look too yellow, blue, or orange. When it’s correct, everything looks natural, or as our eyes detect it.

Five Most Essential Camera Settings white balance

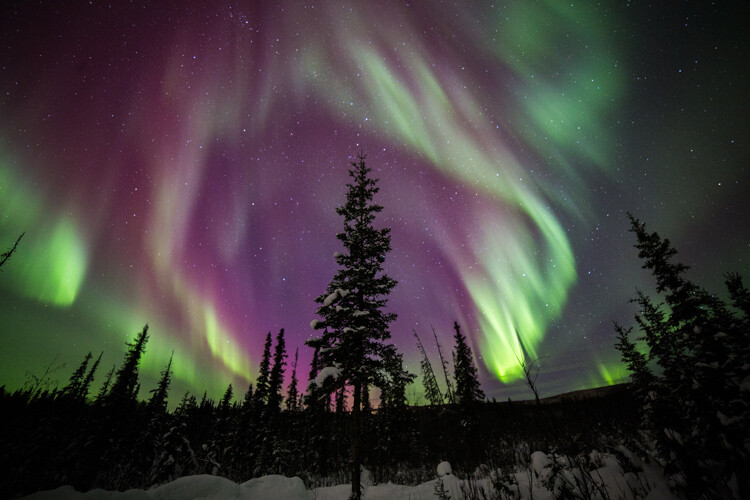
Here is the camera’s AUTO selection for the White Balance. The colors of the aurora borealis appear too purple and yellow.

Five Most Essential Camera Settings white balance

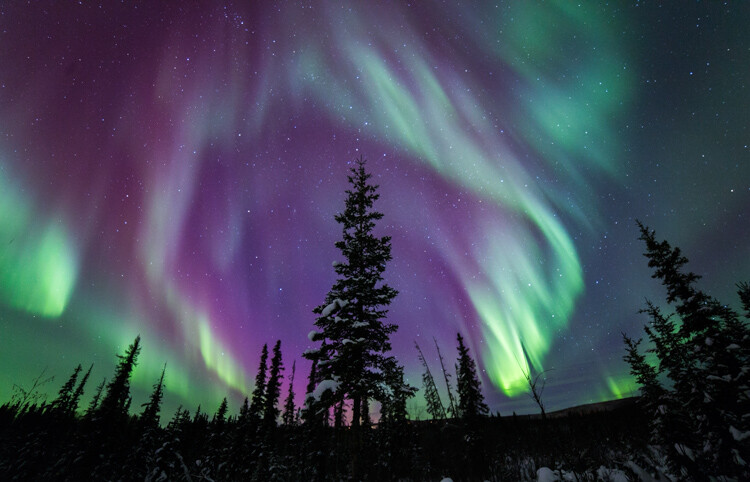
In this version, using the same post-processing for exposure, I adjusted the white balance further into the blue range, making the colors of the lights appear more natural and pleasing.

What about Auto White Balance?

I’ve got a confession to make here. I almost always use the AUTO white balance setting on my cameras. Cameras are pretty darn good at assessing color tones and deciding on the appropriate white balance. When it does get it wrong, I can check the image on the LCD and make the correction for the next shot. Second, I shoot exclusively in RAW format which means that I can make adjustments to the white balance in the computer. I trust the image on my computer screen more than I trust the tiny LCD on the back of my camera.

That said, there are times to adjust the camera’s white balance settings. The first is if you are shooting JPEGs. That image format will not allow you to effectively adjust white balance later, so it’s got to be right in the camera. The second is when stacking images either for high contrast scenes or for panoramas. When stacking images, slight changes in color tones will make combining them into HDR or panoramas much more difficult or impossible. You can also use White Balance if you purposefully want to make an image look cool or warm, or if you are using artificial lights. (Now THAT subject warrants an article of its own…)

Be mindful of your White Balance, know what it does and how it will impact your image, then decide how, or whether to use it.

Exposure Compensation

ak-homer-109266-sunset-139

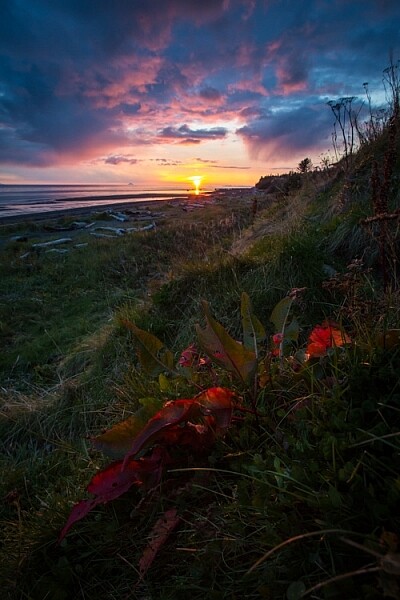
Here I used Exposure Compensation to make sure that the image was bright enough to show details in the foreground while assuring that the bright sunset in the background was not blown out.

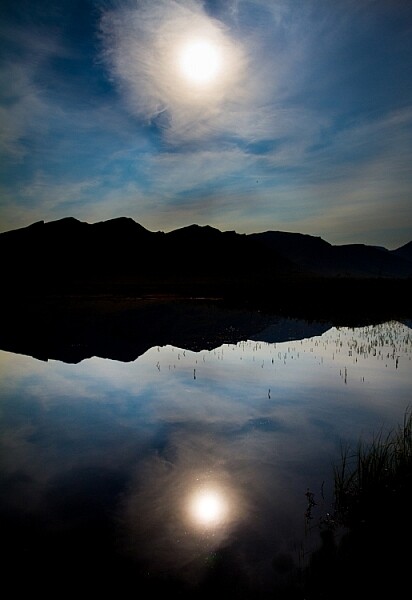
These two images show how useful Exposure compensation can be. The image below was made in bright sunlight, but a purposeful underexposure of three stops reduced the mountains to black but retained detail in the sky, making a surreal image.

Know your camera well

Exposure Compensation is a tool you should know how to adjust without even lowering the camera from your eye. Exposure compensation allows you to very quickly, add or subtract light from an image. Too dark? Use Exposure Compensation to add a stop of light. Too bright? Exposure Compensation can quickly reduce the exposure. How it is set depends on your camera settings.

I use Aperture Priority mode most often on my camera. That means I select the aperture, and the camera decides the shutter speed. If I adjust my Exposure Compensation, the camera will retain my chosen aperture and simply adjust shutter speed up or down to get the desired exposure. If I were to use Shutter Priority, as I sometimes do, the camera will adjust the aperture. In AUTO the camera will make that decision for me.

I use Exposure compensation constantly. It is my go-to method for fine-tuning my exposure in the field. On my Canon DSLR, I can adjust it with a simple twitch of my thumb on the rear wheel of the camera. Other cameras have their Exposure Compensation controls on the front, a wheel near the shutter button, or some other system of buttons on the back. Know how your camera works, and learn to adjust this quickly and efficiently. Understanding this important tool will mean you don’t miss your chance to get the shot right when you are working in the field or studio.

Conclusion

These five camera settings are the most important things to understand on your camera. Experiment with them so you know how they affect your final image, and know how to change each quickly and without fuss. Once you do, you’ll have taken charge of your photography, and be on your way to creating purposeful images.

If you have comments or questions please share post them below.

googletag.cmd.push(function() {
tablet_slots.push( googletag.defineSlot( “/1005424/_dPSv4_tab-all-article-bottom_(300×250)”, [300, 250], “pb-ad-78623” ).addService( googletag.pubads() ) ); } );

googletag.cmd.push(function() {
mobile_slots.push( googletag.defineSlot( “/1005424/_dPSv4_mob-all-article-bottom_(300×250)”, [300, 250], “pb-ad-78158” ).addService( googletag.pubads() ) ); } );

The post The Five Most Essential Camera Settings and How to Use Them by David Shaw appeared first on Digital Photography School.


Digital Photography School

 
Comments Off on The Five Most Essential Camera Settings and How to Use Them

Posted in Photography


Flickr says smartphones were the most popular device this year, iPhone tops list

08 Dec

Flickr has published its 2016 end-of-year report detailing the most popular devices and brands on its platform. Per the report, 48% of photos published on Flickr this year were captured using smartphones, and 47% of them were captured using iPhones specifically. The top three iPhone models were the iPhone 5s, the iPhone 6, and the iPhone 6s.

As far as brands go, Canon was the second most used at 24% and Nikon came in third at 18%. Device types, meanwhile, show DSLRs ranked second after smartphones at 25%, point-and-shoot cameras at 21%, and mirrorless models at 3%. Comparing the figures with last year’s report, smartphone uploads are up 9%, DSLR uploads are down 6%, point-and-shoot uploads are down 4%, and mirrorless uploads have remained steady.

Via: Flickr Blog

Articles: Digital Photography Review (dpreview.com)

 
Comments Off on Flickr says smartphones were the most popular device this year, iPhone tops list

Posted in Uncategorized


TIME releases 100 most influential images of all time

18 Nov

TIME has released its 100 Most Influential Photos of All Time, a multi-platform project that explores 100 images that have changed the world and shaped the human experience. Of primary interest is an interactive virtual museum of all 100 photos, which also includes essays, 20 original short documentary films, and the never before told stories behind many of the photos.

Along with the website, TIME is publishing a companion book with all 100 images, and will feature the project as its cover story in the November 18th issue of TIME Magazine.

Not only is this an impressive collection, but the stories and videos behind the photos are very interesting, so we encourage you to head over to the site.

Which images stand out to you? Share your thoughts in the comments.

Articles: Digital Photography Review (dpreview.com)

 
Comments Off on TIME releases 100 most influential images of all time

Posted in Uncategorized


Holiday Gift Guide 2016: Our Most Popular Gifts

15 Nov

The holiday season is swiftly approaching. So, we’ve rounded up our most popular gifts.

Gift for phoneographers, DSLR slingers and anyone who has ever enjoyed a photograph.

Snap them up for your photo loving pals … while we’ve still got ‘em.

(…)
Read the rest of Holiday Gift Guide 2016: Our Most Popular Gifts (0 words)


© laurel for Photojojo, 2016. |
Permalink |
No comment |
Add to
del.icio.us

Post tags:


Photojojo

 
Comments Off on Holiday Gift Guide 2016: Our Most Popular Gifts

Posted in Equipment


The range of light: what made one of Ansel’s most famous books so special

22 Oct
 
Continuing his video series, Marc Silber of Advancing Your Photography interviews Ansel Adams’ son Michael in Ansel’s home. In this episode they discuss Ansel’s book ‘The Range of Light’ which contains some of Ansel’s most famous images from Yosemite and the Sierra Nevada. They also discuss Ansel’s thoughts on how to develop your skill set as a photographer. Michael says that Ansel would have encouraged new photographers to ‘photograph, experiment and to try new things.’ 

Articles: Digital Photography Review (dpreview.com)

 
Comments Off on The range of light: what made one of Ansel’s most famous books so special

Posted in Uncategorized


4 of the Most Important Elements of the Lightroom Library Module

11 Oct

When I read through photography forums or talk to other photographers the topic of image editors often comes up. People give various opinions and thoughts about which one they prefer. Photoshop, Lightroom, Apple Photos, Capture One, GIMP, and a host of other options from companies like ON1 and MacPhun are all capable of doing various types of small and large edits to your images.

However, one advantage Lightroom has over some other programs is that it not only lets you edit your pictures but categorize them, sort them, tag them, even compare different pictures to see which one you prefer. All this happens in the Library module which is a key part of Lightroom’s workflow. It is essential to understand the Lightroom Library module if you want to get the most out of this program.

The Library module. No late fees here, just lots of ways to manage your images.

The Library module. No late fees here (library pun), just lots of ways to manage your images.

While the Library module does many different things, to get an understanding of the basics it’s good to narrow your focus down a bit. There are a few key areas of the photographer’s workflow that are served by this part of Lightroom; organizing, sorting and viewing…with a dash of editing thrown in just for fun. Let’s look at each one by one.

Organization of images in Lightroom

One aspect of Lightroom that is often misunderstood is how it handles your actual picture files, whether JPG, RAW, DNG, or any other format. Contrary to what some people think, it doesn’t actually do anything with your files whether you are categorizing them, sorting them, or editing them. Wherever your pictures are stored on your computer, that is precisely where they will remain when you import them into Lightroom. What you can do, however, is use the Library module to organize and manage your pictures within the program itself. The best way to do this is to put your pictures into what’s known as Collections, or virtual folders that contain sets of images.

Collections are a powerful and efficient method of sorting and organizing your pictures in Lightroom, while leaving them fully intact and untouched on your hard drive.

Collections are a powerful and efficient method of sorting and organizing your pictures in Lightroom while leaving them fully intact and untouched on your hard drive.

How Lightroom sees your pictures

When you import your pictures into Lightroom you are essentially just telling Lightroom where to look for the images that are sitting on your hard drive. Remember back in the days of using the card catalog in a public library? The books weren’t stored in the massive grids of tiny filing cabinet drawers. But those thousands of little cards did tell you where to locate each book as well as a bit of information about each one. That’s sort of how the Collections feature works in the Library module. You can use it to create virtual filing cabinets to organize the images on your hard drive without actually moving, renaming, or otherwise altering your original images.

For example, let’s say you shoot a wedding for your friends Jim and Pam Halpert and come back to your computer with over a thousand images to edit. You can copy all their images to your computer into one folder, and then use Collections in Lightroom to organize them in a way that makes sense to you. Then you can create a Collection Set called “Halpert Wedding” and then within that create additional collections such as “Ceremony,” “Reception,” and “Candids.” Because you are not actually moving the images into different folders on your computer or duplicating the actual picture files, you can put the same picture into multiple collections. You could have the same shot of Jim’s buddy Dwight in both the Reception and Candids folder.

This picture of a periwinkle flower could go into a collection called "Flowers," another one called "Nature," and another one with only pictures of periwinkles. All at the same time.

This picture of a periwinkle flower could go into a collection called “Flowers,” another one called “Nature,” and another one with only pictures of periwinkles. All at the same time.

Smart Collections

While Collections themselves are quite flexible, you can go a step further by utilizing Smart Collections which is a way of automatically putting pictures in various collections based on criteria that you specify. There are a staggering number of criteria at your disposal, and you can choose whether the Smart Collection should meet any, all, or none of them. These collections are updated dynamically so as soon as a picture in your Library meets the specifications for a given Smart Collection it is automatically inserted into that Collection.

lightroom-library-module-smart-collection


Collections remain one of the hallmark features of the Library module and serve to make Lightroom far more versatile than other programs that simply let you edit your pictures. They work hand-in-hand with the many sorting options as well to give you even greater control over your images.

Sorting images in Lightroom

Have you ever gone through your closet and wished that you could snap your fingers and instantly see all your red shirts, tan pants, or gym shorts that still fit? Better yet, what about immediately seeing only the red shirts you actually like? The Library module allows you to do just that. With the click of a button or press of a keystroke, you can hone and filter your images to see precisely the ones you want, then easily reset everything back the way it was. Pressing the “\” key (while in the Library module), or going to “View > Show Filter Bar” brings up a bar at the top of your screen that allows you to dynamically sort your images based on criteria you specify at will.

lightroom-library-module-filter-bar

Using the filter bar tools

The Filter Bar lets you sort by criteria such as whether photos are marked as Picks or Rejects, have a color or star rating, or are associated with specific keywords. Click any of the icons in the Filter Bar to see the results in real-time, and your images will be immediately pared down to reflect the criteria you want.

To remove any of the filtering criteria just click the button again and Lightroom turns it off. You can also change the type of filtering by clicking the “Text/Attribute/Metadata” options in the middle of the top of your screen which will give you additional parameters. If you don’t want to constantly turn the Filter Bar on and off there is also a persistent mini Filter Bar at the bottom of your screen with many of the options as the full-featured one. I use these filters constantly to sort through my images and find the ones I need for any given project.

Using Keywords to sort your images

lightroom-library-module-keywords

Keywords are a handy way to add sorting criteria to your photos.

The Keywords feature is another aspect of Lightroom that allows you to sort through your images. On the right side of the Library module is a panel that you can use to assign keywords to images such as “Birthday,” “Nature”, “Summer”, “Uncle Mike”, or any other words you want. To assign a keyword, or multiple keywords, to a picture, just start typing them in the Keyword box or select them from the Keyword Suggestions or Keyword Bank frames. To assign keywords to multiple images at the same time, select them first and then enter your keywords in the box.

Whether you have dozens, hundreds, or thousands of pictures to sort, the options in the Library module can help.

Whether you have dozens, hundreds, or thousands of pictures to sort, the options in the Library module can help.

Viewing images in the Library module

As your photo collection grows larger it’s essential that you have a way to actually view and manage all of the images. Thankfully Lightroom has a robust system in place to let you do exactly that. Of course, you can use collections and sorting criteria, but you also have some useful tools at your disposal to actually view the pictures too. The icons at the bottom-left of your screen let you change between four different views; Grid, Loupe, Compare, and Survey.

View modes

Click Grid to see a bird’s-eye view of all the pictures in the Collection you are currently viewing. Use the Thumbnail slider in the bottom-right (if it’s not visible tap the T key to hide/show the tools bar) to change the size of the thumbnails depending on your preference.

Grid, Loupe, Compare, and Survey let you view your pictures in useful and creative ways.

Grid, Loupe, Compare, and Survey let you view your pictures in useful and creative ways.

Loupe is a term borrowed from the days of developing pictures in a darkroom. It refers to the small glass viewer, sort of like a magnifying glass without a handle, that a technician would use to see a given image in greater detail. Click the Loupe view to see one image at a time and then click anywhere on the image with your cursor (which has now turned into a magnifying glass with a + inside) to zoom in closer. Hold [alt] or [option] on a Mac to click and zoom out, and use the zoom level options in the top-left corner of your screen to change the magnification level. This is particularly useful if you want to check if a given picture is sharp and in focus.

Compare and Survey view modes are related in that they let you see two or more pictures at a time in order to choose the one you prefer. These modes are especially handy if you have multiple similar images, such as after a portrait session, and are trying to pick the best one out of a bunch.

I had about two dozen nearly identical shots, but Lightroom's view and sorting options helped me find just the photographic needle in the memory card haystack.

I had about two dozen nearly identical shots, but Lightroom’s view and sorting options helped me find just the photographic needle in the memory card haystack.

Quick Develop in the Library module

I like to think of the Library’s Quick Develop options as extra credit for a class assignment. They are an added touch that lets you do a bit of editing with your pictures without going to the full-fledged Develop module, and will often give you just the right amount of editing that a picture needs. Nestled on the right-hand side of the Library module is a little toolbar called Quick Develop which does exactly what you might think. It allows you to quickly and easily adjust a few essential parameters such as White Balance, Exposure, Highlights, Shadows, and a few other settings.

lightroom-library-module-quick-develop

Clicking on the single arrow for any given parameter adjusts things just a little bit. While clicking the double arrow adjusts things a lot. For example, the single right-facing arrow for Exposure will increase the value by 1/3 stop, whereas the double arrows will increase the value by a full stop. You don’t get anywhere near the fine-grain control that you do in the actual Develop module, but if you need to quickly make some basic edits to an image you might find Quick Develop to be quite handy.

lightroom-library-module-rainbow

Conclusion

These four elements aren’t all that the Library module has to offer, but learning them will give you plenty to work with as you begin to expand your knowledge of this powerful program. Do you have any favorite tips you’d like to share? Are there features you think I missed that others should know about? Please leave your thoughts in the comments below.

googletag.cmd.push(function() {
tablet_slots.push( googletag.defineSlot( “/1005424/_dPSv4_tab-all-article-bottom_(300×250)”, [300, 250], “pb-ad-78623” ).addService( googletag.pubads() ) ); } );

googletag.cmd.push(function() {
mobile_slots.push( googletag.defineSlot( “/1005424/_dPSv4_mob-all-article-bottom_(300×250)”, [300, 250], “pb-ad-78158” ).addService( googletag.pubads() ) ); } );

The post 4 of the Most Important Elements of the Lightroom Library Module by Simon Ringsmuth appeared first on Digital Photography School.


Digital Photography School

 
Comments Off on 4 of the Most Important Elements of the Lightroom Library Module

Posted in Photography


Reader’s poll results: What was the most exciting announcement of Photokina?

26 Sep

What’s been the most exciting announcement of Photokina?

Every two years people flock to Cologne to find out what’s next in the world of photography. This year we’ve seen some announcements that left us very excited, but we wanted to know what you, our readers, think of what’s come out of the show this year. So we asked: what’s been the most exciting announcement of Photokina? With more than 5,000 votes counted, we have a pretty good idea.

Winner: Fujifilm GFX 50S development

Winning by a margin as big as its sensor is the announcement of the development of the Fujifilm GFX 50S and a selection of lenses to go along with it. Built around the 51.4MP 43.8 x 32.9mm sensor that is found in the Pentax 645Z and Hasselblad X1D-50c medium-format cameras, it lays claim to being the world’s first medium format mirrorless camera with a focal plane shutter. While Hasselblad stuck with leaf shutters built in to the lens, which is common in the medium-format world, Fujifilm claims using a focal plane shutter has allowed them to design a short flange back distance in to their new lenses, helping vignetting and sharpening.

There’s loads more to the new system, which you can learn more about in the official announcement, or our hands-on article.

Runner up: Olympus E-M1 II development

Trailing on the heels of the big Fujifilm with nearly 1,000 votes is the much smaller, but arguably a much more powerful, Olympus E-M1 II. Sure, the 20MP Micro Four Thirds sensor isn’t nearly as big, but this one has been tricked out with all sorts of technology.

First, it gains an array of 121 cross-type AF on-sensor phase detection points spread further than its predecessor. The new autofocus system and sensor work alongside the new dual quad core TruePic VIII Image Processor with four CPU cores and four image processing cores that achieve image processing speeds approximately 3.5 times faster than the TruePic VII Processor.

That means this little powerhouse can shoot Raw continuously at 18fps with continuous autofocus and auto exposure, or 60fps without autofocus. This all on top of a slew of other improvements, which you can learn more about in the announcement or our hands-on articles.

Runner up: Sony a99 II

Third place in our Photokina poll comes as no surprise, as it helped shed some light around the fate of Sony’s Alpha mount cameras. The Sony a99 II answers prayers with a 42MP BSI sensor from the Sony a7R II, complete with its 399 on-sensor PDAF points. These work in conjunction with the 79-point dedicated PDAF sensor to create what Sony calls ‘Hybrid Cross AF points.’ The a99 also receives an a-mount first: 5-axis in body image stabilization that should provide up to 4.5 stops of stability.

The improvements don’t stop there. Read the official announcement or look at our hands-on article for more information.

Runner up: Canon EOS M5

Another product our readers are excited about is Canon’s latest mirrorless camera: the EOS M5. It gains features fans of the EOS-M lineup have been begging for, namely an EVF and a sensor equipped with Canon’s marvelous Dual Pixel Autofocus system. What results is a small and responsive camera with a touch screen, digital image stabilization for video, and all sorts of other goodies.

For more information, check out the announcement or our First Impressions Review.

Runner up: Sigma 85mm F1.4 DG HSM Art

The Sigma 85mm F1.4 Art edged into the top five by just a single vote, and it’s easy to understand why our readers are excited about it – they’ve been waiting a while for this one. Starting with the 35mm F1.4 Art, Sigma started producing an excellent lineup of zooms and F1.4 prime lenses. After the 35 they made a 50, after which people logically assumed an 85 would come. Instead we got a 24mm F1.4, then an industry-first 20mm F1.4, which are both wonderful lenses.

Finally, they’ve focused all their optical prowess in to producing what they’ve billed as ‘The Ultimate Portrait Lens’, with a (de) focus on bokeh quality, and an improved AF motor. Our polls indicate that this is a lens many people cannot wait any longer to try, us included.

Honerable mention: Panasonic Lumix DMC-GH5 development

It only missed the top five readers’ picks by one vote, and while we only got a look at the new GH5 under glass at the show, Panasonic was able to provide us with some drool-worthy specs and capabilities of their upcoming flagship. It will offer 4K/60p capability for the first time in a consumer ILC, and will provide 4:2:2 10-bit 4K video. The GH5 will also provide a 6K Photo mode that will extract 18MP stills from burst footage, or 8MP stills from 60p 4K clips. These impressive specs are enough to keep us eagerly waiting for the GH5’s arrival.

Articles: Digital Photography Review (dpreview.com)

 
Comments Off on Reader’s poll results: What was the most exciting announcement of Photokina?

Posted in Uncategorized


Tips for How to Make the Most of Rainy Days

08 Jul

It isn’t always possible to get great weather when are out photographing. If you’re on a once in a lifetime vacation and you encounter rainy weather, then you have a couple of choices. You can pack away your camera and forget about shooting until the weather improves, or you can find a creative approach to make the most of the inclement weather. I suggest you attempt the latter, and when you encounter wet weather, look for opportunities to create great photos notwithstanding the rain.

In fact, if you compare a day with dull gray skies to one where there is plenty of rain, you might actually find that the rainy day is preferable, as there are more things of interest happening.

Melbourne Australia in the rain

There are, however, some things to consider when shooting in the rain. You will want to protect your gear from getting too wet, and you will want to know a bit about using your camera so that you can take great shots. Here are some tips for shooting on rainy days.

Preparing for rain

Invariably, at some time you will encounter rainy weather when you are out photographing. If you have a set of “go to” creative options that you have practiced, and you are familiar with, you can swing immediately into the mindset of taking advantage of the wet weather and capture some great shots. I’ll give you some ideas about what you can shoot.

You’ll also need to prepare yourself and your camera so you can stay as dry as possible. Wet weather shooting should still be fun, and staying dry is an important part of that.

What to shoot

When you encounter rainy weather you can try to minimize the appearance of the rain or capture it. If you try to avoid the rain you’ll often capture dull and uninteresting images. Whereas if you capture the rain in your photographs, you’ll likely achieve more creative and interesting images.

Shoot through windows

Here are two shots of Tower Bridge in London shot from a ferry on the Thames. For the first image I shot through a rain-splattered window and focused on the Tower Bridge. The result is, quite frankly, embarrassingly awful.

Tower Bridge London in the rain

This second image is shot from the same ferry, through the same window, but this time I focused on the raindrops instead of the bridge. The Tower Bridge is still recognizable, and the overall image is much more creative and pleasing. When you next get a chance, try focusing on the raindrops on a window, and not what you see through it.

Tower Bridge London in the rain

In this shot below , captured through a taxi window as it sped through Melbourne in a sudden downpour, the focus has landed somewhere between the window and the bike, and the result is a painterly image.

Tower Bridge London in the rain

Shoot puddles

Where there is rain, there are generally puddles. These puddles will reflect anything (and everything) from car taillights to buildings, and from people to trees. Look out for interesting objects reflected in puddles.

Rome - reflection of building in a puddle

Shoot water droplets

For a time after it has rained, raindrops will still cling to plants and other surfaces. Look for interesting objects dotted with raindrops.

raindrops on yellow flowers

Shoot the clouds

Before it rains you will typically see interesting formations of rain clouds. Sometimes they will enhance an otherwise spectacular landscape, and sometimes they are the subject a photo in and of themselves.

thunderous clouds

When there are gaps between rain clouds, you will often see shafts of sunlight piercing the clouds and highlighting small areas of a landscape or cityscape. This light is truly magical and it will give a sense of drama a scene. Keep an eye out for this light and shoot it quickly when you see it – because the clouds are moving, light that is there one minute, will be gone the next.

St Paul’s lit by shard of light

Camera settings

Some creative photography will require skills beyond using the automatic settings on your camera. For example when you opt to capture the raindrops on a window rather than what you see through the window you will need to experiment to find the best distance to stand from the window. Moving one or two steps closer or further from the window can totally change the image.

You will also probably need to manually focus your camera so you need to know how to set it to Manual focus mode. The reason for this is that most cameras in autofocus mode will try to focus on the distant building, and won’t focus on the raindrops on the window. Using manual focus will allow you to determine exactly what is in focus in your shot.

To capture raindrops on plants and other surfaces, you can use Aperture Priority mode and vary the aperture to achieve different results. A very large aperture (f/ 2.0 – f/5.6) will give you a shallow depth of field with only a small part of the scene in focus. A small aperture (f/8- f/13) will result in a much deeper depth of field, where more of the scene is in focus. It is up to you to decide how much of the image you want to be in focus – just be sure you know how to set your camera in Aperture Priority mode, what range of apertures are available for the lens you are using, and how to change the aperture setting.

Caring for you and your camera

When shooting in the rain you’ll want to keep your camera and yourself as dry as possible. I find it preferable to wear a raincoat with a hood because I find it impossible to juggle an umbrella and a camera at the same time. Whatever you choose, carry only what you need to have with you, so you have a better chance of keeping everything dry. It’s best to avoid changing lenses in wet weather, so stick with just one lens. Take care when moving from a cold, rainy situation into a warmer building. The heat combined with the damp will increase the humidity and you run the risk of condensation forming inside your camera lens.

Even if your camera has good weather seals, take care to protect it as best you can. There are plenty of good rain covers that you can purchase for your camera, or in a pinch, cover the camera and lens with a plastic bag, and cut a small opening for the lens. Duct tape or elastic bands will hold the bag securely on the camera.

Make sure to pack some clean, dry towels that you can use to wipe off your camera, but don’t use them on your lens – only use a lens cleaning cloth on the lens glass.

If your camera gets wet, dry it off as carefully as you can, and leave the lens open at full zoom until it’s thoroughly dry. A camera will dry best in a cool dry place, and you can use silica gel (an absorbent material sold in packets) in your camera bag to help avoid condensation forming.

Conclusion

Giving some thought as to creative options for capturing great photos in the rain, with some advanced preparation so that you and your camera stay dry, may turn the prospect of shooting on a rainy day from a sorry disappointment, into an exciting challenge.

googletag.cmd.push(function() {
tablet_slots.push( googletag.defineSlot( “/1005424/_dPSv4_tab-all-article-bottom_(300×250)”, [300, 250], “pb-ad-78623” ).addService( googletag.pubads() ) ); } );

googletag.cmd.push(function() {
mobile_slots.push( googletag.defineSlot( “/1005424/_dPSv4_mob-all-article-bottom_(300×250)”, [300, 250], “pb-ad-78158” ).addService( googletag.pubads() ) ); } );

The post Tips for How to Make the Most of Rainy Days by Helen Bradley appeared first on Digital Photography School.


Digital Photography School

 
Comments Off on Tips for How to Make the Most of Rainy Days

Posted in Photography


The 6 Most Important Things You Need to Know about Lightroom’s Develop Module

15 May

Lightroom is powerful, but it’s also complex and has a steep learning curve. If you feel overwhelmed by all the options, there’s great value in taking a simple approach and learning to use the tools that are most useful first. Leave the more advanced features until you have more experience.

With that in mind, I’ve put together this list of the six most important things you need to know about Lightroom’s Develop module. Learn these and you will be well on the way to Lightroom mastery.

1. Backup your catalog regularly

This is the most crucial thing to set up, as everything you do to your photos in the Develop module (not to mention metadata changes like Collections, flags and keywords) is stored in the catalog. It would be a disaster to lose your catalog (and consequently all your hard work) to hard drive failure, so you need to make sure that Lightroom is backing it up regularly to an external hard drive.

To do so, go to:

  • For Windows users: Edit > Catalog Settings > Back up catalog
  • For Mac users: Lightroom > Catalog Settings > Back up catalog

I have mine set to: Every time Lightroom exits – some photographers find that Once a week, when exiting Lightroom is enough.

When you exit Lightroom, a dialog window appears that shows you where Lightroom is going to save the backup Catalog. Click Choose to change the location if you need to. Note: this is the only time you can select the destination where the backup will be saved.

Make sure the Test integrity before backing up and Optimize catalog after backing up boxes are both ticked. This slows down the back up process, but it’s worth it because it helps ensure that your catalog remains free from corruption, and is optimized for speed.

Lightroom Develop module

Please note: The Catalog doesn’t contain any of your photos. Backing up your Catalog doesn’t back up your photos, only the information that Lightroom contains about them. Photo backups need to be managed separately.

2. Profile is the most important setting in the Develop module

The Profile menu is tucked away in the Camera Calibration panel, at the bottom of the right-hand panels in the Develop module. The default profile setting is Adobe Standard (circled below). This profile was created specifically for your camera by Adobe. Pick that one for accurate colors.

You will also find the color profile settings specific to your camera (Landscape, Portrait, and so on). You can pick one of these if you prefer the look to Adobe Standard.

Lightroom Develop module

The profile affects both color and contrast, so from a practical point of view it’s important to select the right one, before you start adjusting contrast and white balance in the Basic panel. Get the profile right, and it makes all subsequent processing steps much easier. Get it wrong, and it makes them more difficult.

For example, if you apply a profile intended for landscape photos to a portrait, then you could end up with over-saturated colors and unnatural skin tones. Then you might try and fix that by playing with the Basic panel sliders or other color controls. This approach rarely works, it’s far better to select the most appropriate profile from the start.

These two photos show the difference between the Adobe Standard and Velvia profiles on a Fujifilm X-T1 camera. The Velvia profile saturates colors, the Adobe Standard profile looks more natural.

Lightroom Develop module

3. Use Lens Corrections to correct distortion and eliminate chromatic aberrations

No lens is perfect, and most have at least a little distortion and chromatic aberration. One of the benefits of digital photography is that you can eliminate these in the processing stage, so they are not the problem they once were. Go to the Basic tab in the Lens Correction panel, select Enable Profile Corrections and Remove Chromatic Aberration in order to do so.

Lightroom Develop module

This comparison shows the result on a photo taken with a zoom lens producing barrel distortion.

Lightroom Develop module

Lightroom Develop module

4. You can carry out 80% of your processing in the Basic panel

Once you have selected a Profile, and applied Lens Corrections, you can go to the Basic panel to start making any adjustments required to the photo’s brightness, contrast, and color.

The sliders in the Basic panel are extremely powerful. Take the time to get to know what each one does, and how the settings affect your images. Once you get the hang of these sliders it’s quite possible that you can do all of your global adjustments (those that affect the entire image) here, and not have to touch the Tone Curve or HSL / Color / B&W panels at all.

This photo is a good example. Virtually all the processing was done in the Basic panel, made possible by selecting the most appropriate profile first. The only additional thing I did was add a vignette using the Effects panel.

Lightroom Develop module

My article Steps for Getting Started in the Lightroom Develop Module goes into this in more detail.

5. Learn to use local adjustments wisely

It wasn’t so long ago that many professional photographers would send their negatives to master printers who used dodging, burning, and other fancy darkroom techniques, to create a far better print than the photographer ever could. These local adjustments – those applied to only part of the image, rather than all of it – are often vital for bringing the best out of your Raw files in Lightroom.

Lightroom has three tools for making local adjustments – the Adjustment Brush, Radial Filter and Graduated Filter. They allow you to selectively adjust brightness, contrast, and other tone and color settings. Each tool has its own idiosyncrasies, so take the time to get to know each one in turn.

This example shows the difference that local adjustments make. I used a combination of all three of Lightroom’s tools to turn the image on the left, into the one on the right.

Lightroom Develop module

6. Don’t overlook the Clarity slider

The Clarity slider is extremely useful as both a local, and global adjustment. It’s primary use is to enhance texture, and it does so by increasing edge contrast (the spots where dark and light areas meet). You do have to be careful not to overuse it, but judicious applications of texture enhancement can help bring the best out of any photo. Clarity is also an ideal tool for enhancing black and white images, which often rely on texture to add impact.

The following photos show the effect of adding Clarity. I used the Radial filter to apply Clarity to the Buddha heads to bring out the texture.

Lightroom Develop module

Lightroom Develop module

These six items are not a comprehensive list of what you can do in Lightroom’s Develop module, but they will certainly get you started, and simplify the process of learning to use it.

What do you think are the most important tools to master in the Develop module? Do you agree with my selection? Please let me know in the comments below. And if you want to learn more about Lightroom then please check out my Mastering Lightroom ebooks.

googletag.cmd.push(function() {
tablet_slots.push( googletag.defineSlot( “/1005424/_dPSv4_tab-all-article-bottom_(300×250)”, [300, 250], “pb-ad-78623” ).addService( googletag.pubads() ) ); } );

googletag.cmd.push(function() {
mobile_slots.push( googletag.defineSlot( “/1005424/_dPSv4_mob-all-article-bottom_(300×250)”, [300, 250], “pb-ad-78158” ).addService( googletag.pubads() ) ); } );

The post The 6 Most Important Things You Need to Know about Lightroom’s Develop Module by Andrew S. Gibson appeared first on Digital Photography School.


Digital Photography School

 
Comments Off on The 6 Most Important Things You Need to Know about Lightroom’s Develop Module

Posted in Photography


TIME names Kodak and Polaroid cameras two of the ‘most influential gadgets’ in history

07 May

TIME Magazine has published its list of ‘the 50 most influential gadgets of all time,’ and included among them is the Kodak Brownie Camera (#8) and the Polaroid Camera (#27). According to the publication, the list is ordered by each gadget’s influence on subsequent technologies and devices, such as the Brownie camera that helped bring photography ‘into everyday use.’

The Kodak Brownie Camera, launched in February 1900, was priced at $ 1 and used inexpensive film, making it possible for anyone to capture snapshots of daily life. The low price and subsequent ease by which anyone could get into photography boosted film sales for Kodak, but that was only a small part of the Brownie’s role in our history and its influence on our future. Says TIME, the Brownie camera ‘helped capture countless moments and shape civilization’s relationship to images.’

Arriving later on (and further down the list) is Polaroid and its OneStep Land instant camera launched in 1977. This model holds the distinction of having been the first affordable and easy to use camera of its kind, says TIME, going on to become so popular that the influence of its ‘square-framed, often off-color snaps’ lives on today in apps like Instagram.

Are the Brownie and Polaroid cameras deserving of their spots on the list? Let us know what you think in the comments.

Via: TIME Magazine

Articles: Digital Photography Review (dpreview.com)

 
Comments Off on TIME names Kodak and Polaroid cameras two of the ‘most influential gadgets’ in history

Posted in Uncategorized