RSS
 

Posts Tagged ‘Loupe’

How to Understand and Use Lightroom’s Loupe Info Overlay

01 Dec

Lightroom Loupe Info Overlay intro image

The Lightroom Loupe Info Overlay feature provides valuable information about your photos. Used intelligently it can help you find your photos, and can even help you improve your photography skills. I’ll explain what it is, how to enable and disable it, how to configure it, and some reasons why the Loupe Info Overlay is such a valuable feature.

What is the Loupe Info Overlay?

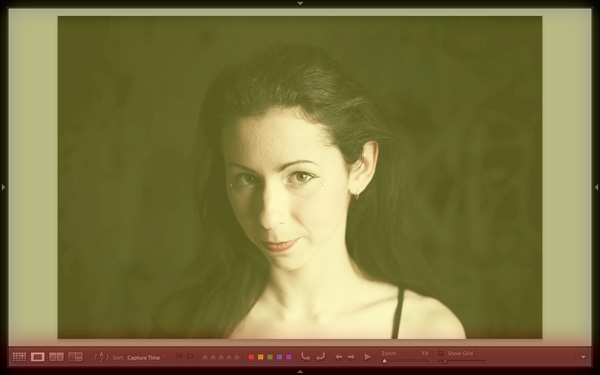
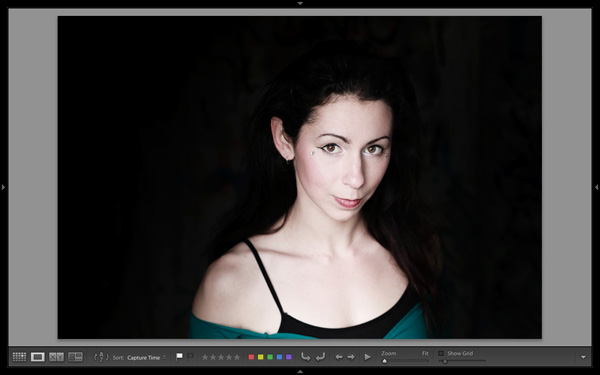
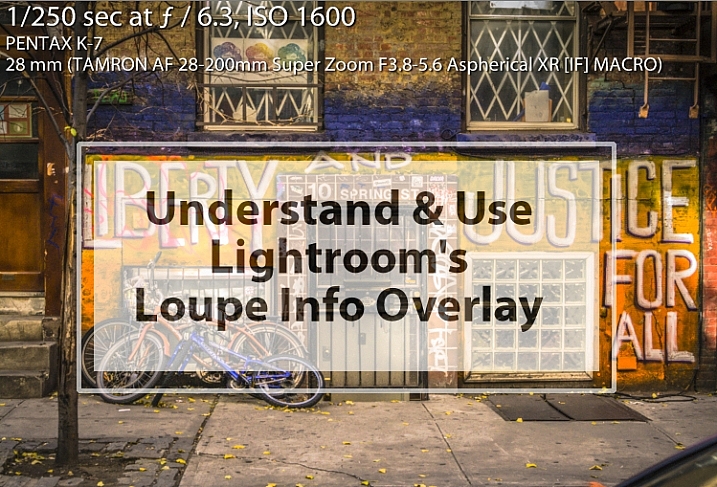
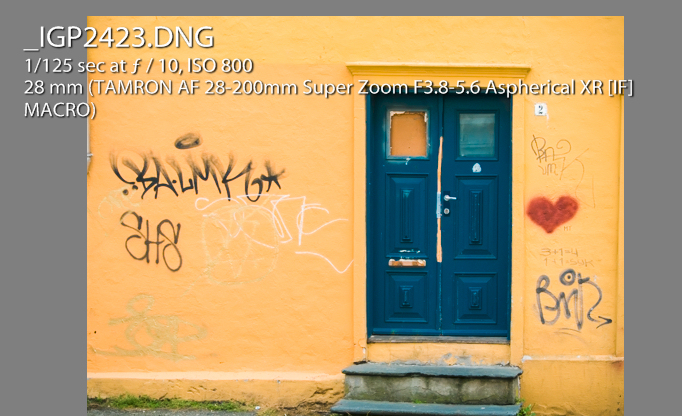
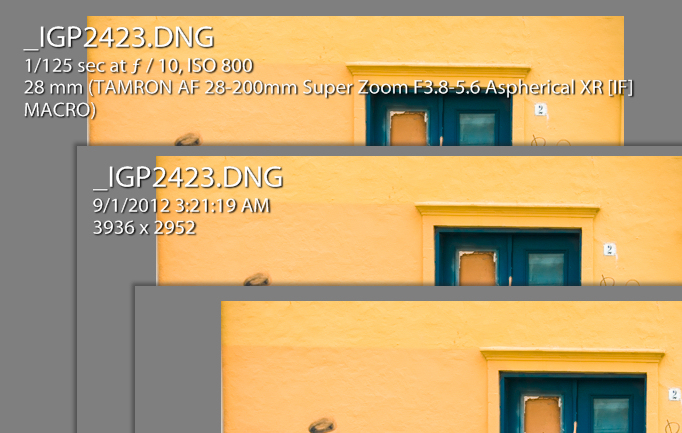
Loupe Info Overlay is a small text overlay which appears in the top left corner of your images in the Develop module inside Lightroom, and when you are viewing images in Loupe view in the Library module. The Loupe Info Overlay confuses many first time Lightroom users when they turn it on, often accidentally, and then struggle to turn it off again.

What Lightroom Loupe info overlay looks like

Turning the Overlay Off and On

To view the Loupe Info Overlay you must be viewing an image in the Develop module, or in the Library module in Loupe (or single image) view. To display the Loupe Info Overlay, tap the I (i) key on your keyboard. Tap the i key repeatedly (but slowly so you can see what you are doing) to rotate through the three options for the Loupe Info Overlay.

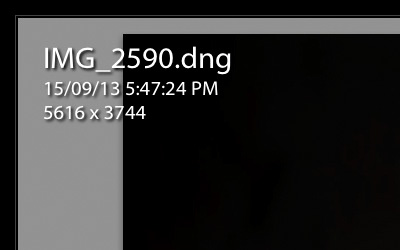
They are: (1) Loupe Info Overlay off; (2) Loupe Info 1; and (3) Loupe Info 2. You will see that there are two different overlays which can be separately configured to show a range of information about your images.

The three states of the Lightroom Loupe Info Overlay

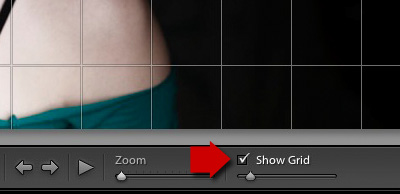
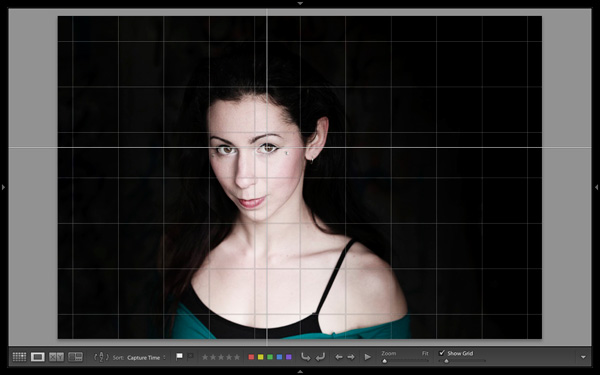
You can also display the Loupe Info Overlay using the Lightroom menus: choose View > Loupe Info and then select Info 1 or Info 2 to display one of the two overlay options. If Show Info Overlay is selected then selecting it again will hide the Loupe Info Overlay.

How to turn the Loupe Info Overlay on and off

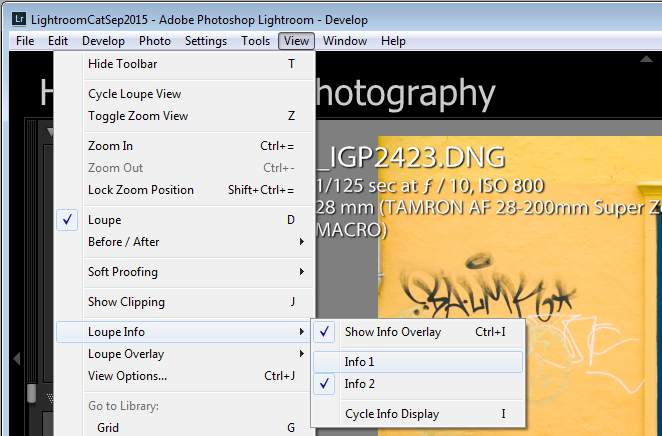
Each Info Overlay is comprised of three lines of information, and you can select only one piece of information from a list of options for each line. The defaults for the Loupe Info Overlays are:

Loupe Info Overlay 1:

  • File Name and Copy Name
  • Capture Date/ Time
  • Crop Dimensions

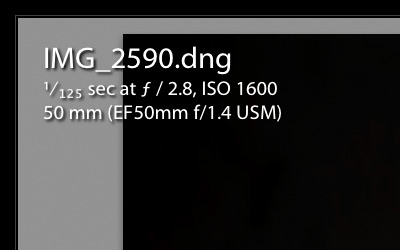
Loupe Info Overlay 2:

  • File Name and Copy Name
  • Exposure and ISO
  • Lens Setting

Default settings for the Loupe Info Overlay

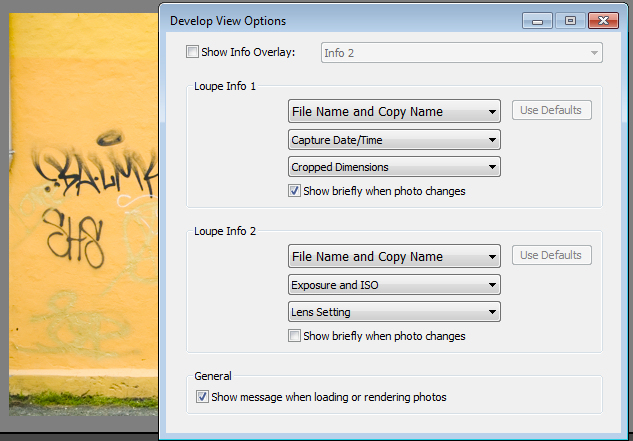
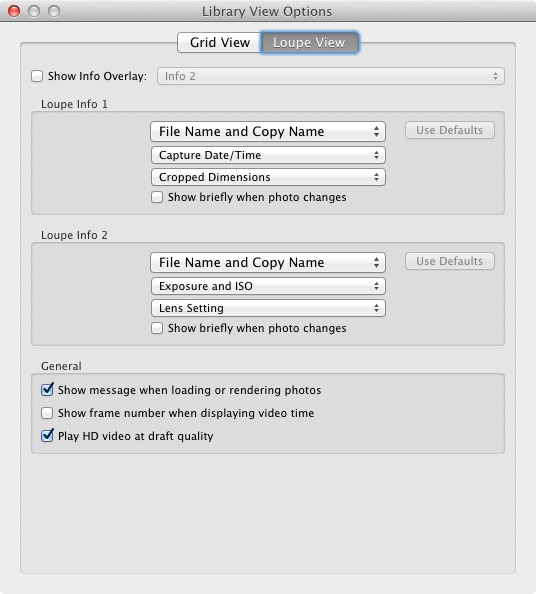
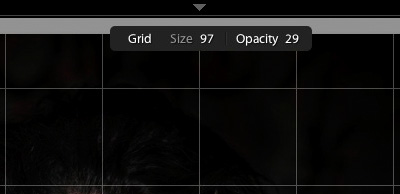
These items can be changed if you select View > View Options, and in the Library Module click the Loupe View tab. Select the Show Info Overlay checkbox and then choose the Info Overlay to show from the dropdown list – it’s a good idea to show the one you are going to change so you can see what it looks like and if the information you are seeing is what you want to see.

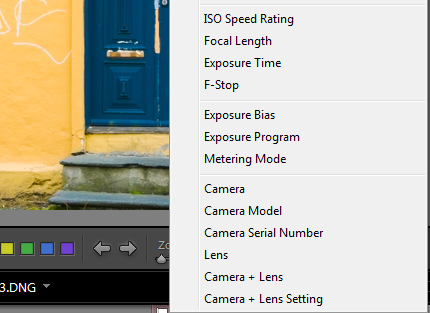
To change the information that appears in any of the three lines of the Info Overlay click the appropriate dropdown list – there are three for Loupe Info 1 and three for Loupe Info 2, all in the order they appear on your screen.

Some settings for the lines of information in the Loupe info overlay

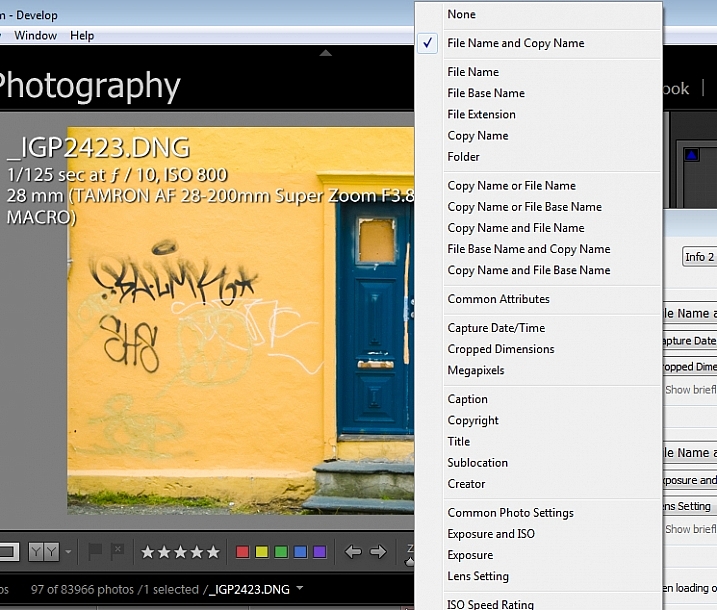
From any of the lists you can select None to turn that line off so nothing displays there, or choose from any of the options on the list. These include a range of file name options, Common Attributes (whether the image is flagged, rated, has a label, or is a virtual copy), the crop dimensions and megapixels.

Also in the list are various items which are extracted from the image metadata such as Copyright, Title, Creator, and Common Photo Settings which include Shutter Speed, Aperture, ISO, the Lens, and the Focal Length. These are also available as individual options so, if you don’t want to see all that detail, you can choose to see Exposure Time, ISO, F-stop, Exposure Bias, Exposure Program, Metering Mode, or Camera + Lens Settings.

More settings for the Loupe info overlay

Of the options available, Common Photo Settings is a good one to use if you want to see a lot of information about each shot.

How the Loupe Info Overlay can make you a better photographer

If you plan to use the information from the Loupe Info Overlay to improve your photography, then consider setting the options for one of the Loupe Info Overlays to include Common Photo Settings, Exposure Program and, for example, Metering Mode. This will give you valuable insight into your camera settings at the time you took each shot.

Suggested settings for loupe info overlay that can help you troubleshoot problem shots

I use the Info Overlay to help photographers who are having issues with their photos. If you set the Loupe Info Overlay to show the camera settings you can determine why, for example, an image is out of focus, too light, or too dark. An out of focus shot may be caused by a shutter speed that is too slow, so that the subject or camera has moved while the shot is being captured. Being able to see the shutter speed will help you determine if it is the reason your photos aren’t sharp.

If you are shooting in manual mode and the shots are too dark (underexposed) it may be that you’re using too fast a shutter speed, too small an aperture, or a combination of both. An overly light (overexposed) image can be caused by too large an aperture, too slow a shutter speed, or both. Displaying aperture, shutter speed and ISO may help you troubleshoot your exposure issues.

Overexposed and underexposed images can also be caused by an incorrect exposure compensation setting. It’s not uncommon for a beginner photographer to set an exposure compensation value without realizing the impact of what they have done. If you set the Loupe Info Overlay to display Exposure Bias you can see if exposure compensation is the cause of incorrect exposure.

The Loupe Info Overlay is a useful tool which can display a wealth of information, some of which can help you troubleshoot problems you are having with your photos.

Now it’s over to you: do you use the Lightroom Info Overlay and, if so, what information do you set it to display and why?

googletag.cmd.push(function() {
tablet_slots.push( googletag.defineSlot( “/1005424/_dPSv4_tab-all-article-bottom_(300×250)”, [300, 250], “pb-ad-78623” ).addService( googletag.pubads() ) ); } );

googletag.cmd.push(function() {
mobile_slots.push( googletag.defineSlot( “/1005424/_dPSv4_mob-all-article-bottom_(300×250)”, [300, 250], “pb-ad-78158” ).addService( googletag.pubads() ) ); } );

The post How to Understand and Use Lightroom’s Loupe Info Overlay by Helen Bradley appeared first on Digital Photography School.


Digital Photography School

 
Comments Off on How to Understand and Use Lightroom’s Loupe Info Overlay

Posted in Photography


Sigma announces dp1 Quattro and LVF-01 loupe

13 Sep

Sigma has announced that the dp1 Quattro, a large-sensor compact that will be available from mid-October. The dp1 Quattro marries a 28mm equivalent F2.8 lens to the latest generation of Sigma’s Foveon technology. The dp1 Quattro joins the 40mm equivalent dp2 Quattro in the company’s lineup, with the promise of a 75mm equivalent dp3 Quattro to follow. Read more

Articles: Digital Photography Review (dpreview.com)

 
Comments Off on Sigma announces dp1 Quattro and LVF-01 loupe

Posted in Uncategorized


SensorKlear Loupe Kit Review

07 Mar
sensor-klear-kit-review-dps-002

The SensorKlear Loupe Kit from LensPen.

A couple of years ago, I decided it was time to face my fears head-on. Since the day I had unboxed my first DSLR I’d fallen victim to all of the various doomsday warnings about the horrors that could befall me if something went wrong while cleaning my sensor. Don’t get me wrong– those warnings are all valid. Messing this up could scratch the sensor, push it out of alignment, or even break it, just to name a few. I’d always figured that if something was going to go wrong, I wanted it to be someone else’s fault– someone who would have to pay to replace the camera or repair the damage. Luckily, I have a great local camera shop that offers sensor cleaning twice a month and does a great job, but I finally got to that “how-hard-can-it-be?” point and decided it was time to learn.

DOOMSDAY WARNING: I would be totally remiss if I didn’t offer my own caution flag. If any part of cleaning your own sensor makes you the slightest bit uncomfortable, you should absolutely not do it. The consequences I mentioned above are only a few of the things that can happen if this delicate task is done incorrectly. There are a lot of products out there to help you clean your sensor, some better than others. You should thoroughly research any product before sticking it into your camera. Also make sure that it comes with clear, easy-to-follow instructions.

The SensorKlear Loupe Kit comes from the same company that manufactures the LensPen–one of my favourite lens-cleaning tools. The sensor-cleaning kit contains three components. The SensorKlear Loupe, the LensPen Hurricane Blower, and the SensorKlear II Pen.

The Loupe

For me, the biggest drawback to most sensor-cleaning products is that you really can’t see what you’re doing. The SensorKlear Loupe changes that, providing an illuminated, magnified view of the sensor. Being able to quickly and easily detect sensor dust not only makes the task of cleaning it easier, but also tells you whether your sensor even needs cleaning at all. There’s no sense sticking anything in your camera unnecessarily. The loupe is also designed with an opening on the side, allowing access for the cleaning tools while maintaining your view of the sensor. The loupe uses two AAA batteries (included) and fits perfectly over the camera opening. Be sure to check your camera’s owner’s manual for instructions on locking the mirror in the “up” position for sensor cleaning.

The loupe provides an illuminated, magnified view of the sensor, making dust removal easier.

The Blower

Chances are you probably already have a similar blower in your gear bag, so I’m not going to take up a lot of your time describing this one. It’s a blower–plain and simple. By now I’m sure you know to not let canned air anywhere near your sensor. The velocity of the air can blow the sensor out of alignment and the chemical propellant can permanently damage its surface. The hand blower is the most basic solution–and perfectly suited to the task–for removing dry dust particles from your sensor.

The SensorKlear Pen

Sometimes, though, you’re battling more than just dry dust. Every once in a while, sticky particles decide to make your sensor their new home. For those situations, the SensorKlear Pen has worked flawlessly each time I’ve used it. The tip is a smaller version of the LensPen tip and is impregnated with a patented carbon cleaning compound that removes and absorbs the more stubborn dust and other particulates that find their way into cameras and onto sensors. The adjustable angle of the pen works perfectly in conjunction with the loupe, allowing you to use it an angle that doesn’t block your view of  the sensor.

sensor-klear-kit-review-dps-005

Wrap-Up and Recommendation

As with anything, there is no one perfect solution to the challenge of maintaining a dust-free sensor. For me, though, the quality of the tools, their ease of use, as well as their results, make this kit a great choice if you are ready to start cleaning your own sensor. If you’re already one of the brave ones, share your recommendations in the comments.

The SensorKlear Loupe Kit is available on Amazon.

More on sensor dust and how to remove it:

  • Got Sensor Dust? Here’s How to Check.
  • Do you Clean your Own Sensor?
  • How to Remove Sensor Dust With Lightroom

The post SensorKlear Loupe Kit Review by Jeff Guyer appeared first on Digital Photography School.


Digital Photography School

 
Comments Off on SensorKlear Loupe Kit Review

Posted in Photography


The Hidden Secrets of Lightroom 5’s Loupe View

31 Oct

Lightroom 5 Loupe View

Last week I showed you how to use Lightroom’s Grid View. Once you have customised the Grid View to suit your needs, it is time to move on to the Loupe View. Getting there is easy. Just press the letter ‘E’ on your keyboard. This will take you to the Loupe View from anywhere in Lightroom. Alternatively, if you are in the Grid View, you can press the space bar.

On the surface, Loupe View looks simple. But there are a few things I’d like to show you that you may not be aware of. They are the ‘hidden features’ of Lightroom’s Loupe View, and will help you when you view your images, and assess their potential for creative processing.

Lightroom 5 Loupe View

This is what the Loupe View looks like, with all four side panels removed (use the Shift+Tab keyboard shortcut to hide them from view).

Lightroom 5 Loupe View

The Loupe View is divided into two parts. The Content window (yellow) occupies the main part of the screen. The selected photo is displayed here.

The Toolbar (red) lies along the bottom. Press ‘T’ to reveal it if it isn’t there. The same key hides the Toolbar if you press it again.

The main difference between the Loupe View and the Grid View is that you can only view one image at a time in the Loupe View.

The hidden features

Of course, these features are not really hidden. But if you are not aware of them they may just as well be. They are all useful, so it’s worth taking a few minutes to learn how to use them.

Library view options

When you press the ‘I’ key on the keyboard Lightroom displays some information about the photo you are looking at in Loupe View. Press the ‘I’ key again and the information changes. Finally, press it once more to hide the information:

Lightroom 5 Loupe View

The first information overlay displays the filename, the time and date the photo was taken, and the image size (in pixels).

Lightroom 5 Loupe View

The second overlay shows the filename, the exposure settings (shutter speed, aperture and ISO) and the focal length and lens used. This is handy for checking the camera settings when you are viewing your images.

Here’s the hidden feature: Did you know you can customise the information overlays to display the information that you want them to? Go to View > View Options to bring up the Library View Options window. Here you can tell Lightroom which information to display in each information overlay:

Lightroom 5 Loupe View

Mirror image mode

Wondering how your photo would look if it was back to front? Just go to View > Enable Mirror Image Mode to see:

Lightroom 5 Loupe View

Grids and guides

Lightroom 5 Loupe View

To reveal the grids and guides, tick the Show Grid box in the Toolbar. Use the slider to set the size of the squares. If you hold the Cmd key down (PC owners should use the Ctrl key) you can also alter the size of the grid and the opacity of the lines by mousing over the Size and Opacity settings displayed at the top:

Lightroom 5 Loupe View

Note: If you don’t see the Show Grid box, click on the white arrow on the right hand side of the Toolbar and select Grid Overlay from the menu. Lightroom removes any unticked options in this menu from the Toolbar.

Lightroom 5 Loupe View

Next, go to View > Loupe Overlay and select the Guides option. This turns the central horizontal and vertical grid lines into guides that you can move by holding down the Cmd (Mac) or Ctrl (PC) keys. They come in useful for checking things like the straightness of horizons and buildings.

Lightroom 5 Loupe View

Untick the Show Grid box to see the Guides by themselves.

The Loupe Overlay

The final hidden feature is something that is more likely to interest professional photographers than hobbyists. But it comes in handy as a creative exercise if you have any interest in submitting images to stock libraries or to magazines.

When buying images for editorial use, magazines often look for photos with empty space where they can lay out headings or text. The Loupe Overlay feature lets you display an overlay containing text over the top of your image so you can see whether the composition of your image provides enough space. While pros can obtain an official file from their client, there’s nothing to stop you making up your own.

Go to View > Loupe Overlay > Layout Image. Navigate to the folder containing your overlay and open it. The file must be saved as a PNG file, which supports transparency.

Lightroom 5 Loupe View

In this example, you can see that the portrait isn’t composed in a way that works with the sample text. It would have been better if the model was further to the right in the frame.

Mastering Lightroom Book One: The Library Module

Lightroom 5 Loupe View

My latest ebook Mastering Lightroom Book One: The Library Module is a complete guide to using Lightroom’s Library module to import, organise and search your photo files. You’ll learn how to tame your growing photo collection using Collections and Collection Sets, and how to save time so you can spend more time in the Develop module processing your photos.

Post originally from: Digital Photography Tips.

Check out our more Photography Tips at Photography Tips for Beginners, Portrait Photography Tips and Wedding Photography Tips.

The Hidden Secrets of Lightroom 5’s Loupe View

The post The Hidden Secrets of Lightroom 5’s Loupe View by Andrew Gibson appeared first on Digital Photography School.


Digital Photography School

 
Comments Off on The Hidden Secrets of Lightroom 5’s Loupe View

Posted in Photography