RSS
 

Posts Tagged ‘Little’

Long-term test: Domke F6 ‘Little Bit Smaller’ shoulder bag

13 Jun

Domke F-6 ‘Little Bit Smaller’ bag
$ 109 | Tiffen.com

The F-6 ‘Little Bit Smaller’ bag is a similar but more compact alternative to Domke’s iconic F-2.

Domke is among the most famous names in the pantheon of camera bag makers, and for good reason. The company makes some of the toughest and most practical bags on the market. Traditionally aimed at photojournalists, Domke’s bags are usually tough, somewhat on the heavy side, very accessible, and capable of accommodating a surprising amount of gear. I’ve been using an F-6 for about three years now, and it’s accompanied me on trips all over the world. This is my long-term test.

Key Features:

  • Weight: 740g (1.6lb) with second strap attached, including foam insert
  • Exterior dimensions: width: 11.5″ depth: 7″ height: 7.5″
  • Interior dimensions (main compartment): width: 11.25″, depth: 5.5″, height: 7″
  • One outer zipped pocket, one inner zipped pouch, one open rear pouch
  • Comes with one 4-compartment foam insert (removable)
  • Machine washable (non-Ballistic and non-RuggedWear versions only).

Design

The F-6, also known as the ‘Little Bit Smaller’ bag belongs to what Domke now calls the ‘Heritage’ range, and shares a lot of characteristics with the venerable (and a Little Bit Bigger) F-2. Most obvious are the F-6’s box-shaped main compartment and distinctive clamshell top, which is secured with two sturdy metal clips to the front of the bag. The bag isn’t really ever ‘closed’ as such (even with the clips secured, it’s still possible to slip your hand into the main compartment if you try hard enough) but this design has the advantage of allowing quick one-handed access to either end of the main compartment without fiddling with any zips.

A large front pocket is big enough for a small mirrorless or rangefinder camera, but is most useful for odds and ends like memory card wallets, snacks and spare batteries.

There are two zips on the F-6 for less often-accessed compartments: one on the large front pocket, and another one inside the top cover that secures a document pouch sewn into its underside. This pouch runs the full length of the top cover, and it’s perfect for instruction manuals, maps or a paperback book or two. Unlike the main compartment, prying fingers will struggle to find or get access to this compartment, so when I’m traveling this is usually where I’ll store my passport and wallet. I’m telling you that in confidence – please don’t spread it around.

The F-6’s main compartment is surprisingly roomy, and can comfortably fit a 2-camera, 3-lens outfit, along with extras like an iPad, and a flash or two.
With the foam insert removed, the F-6’s main compartment is basically box-shaped. The base is lightly padded, but I usually add a little extra foam padding just in case of accidents.

The F-6’s main compartment is deceptively capacious, and without the included foam inserts it can easily accommodate a full-size professional DSLR and standard zoom. That’s a lot of weight, though. Where the F-6 really shines is as a bag for smaller camera systems. With the foam insert added, I can fit two slim mirrorless or rangefinder bodies and up to three lenses inside without the F-6 feeling overloaded.

A full-height pouch on the back of the bag is large enough for a notebook, 9.7in iPad Pro, or a couple of paperbacks

Total storage space is augmented by the front pocket, which I generally use for batteries, rolls of film, memory card wallets and other odds and ends but which at a pinch could also house a small mirrorless or rangefinder camera body. A full-height pouch on the back of the bag is large enough for a notebook, 9.7in iPad Pro, or a couple of paperbacks.

While the clip-to-close design isn’t entirely secure, it has the advantage of allowing very easy access to the main compartment without needing to put the bag down.
The clips are easy to undo by feel, meaning you don’t need to take your eyes off the action to reach down and pull out a camera.

I was inspired to write this review after a recent trip back to the UK to visit family, during which the F-6 amply demonstrated its Tardis-like capacity. When I’m in transit, I tend to use the F-6 to store my most valuable and delicate gear, so that I can keep it all in one place on my lap or by my feet and I don’t have to worry about anything getting bumped around in overhead bins or baggage holds. Over the past couple of years I’ve abused my F-6 in almost every way possible, but I think my recent trip to Seattle to London was the high (or low, depending on how you look at it) point:

  • Fujifilm X100F with 28mm lens adapter (main compartment)
  • Leica M2 (body-only, tucked vertically into the foam insert)
  • Leica 35mm F2 (foam insert)
  • Leica 50mm F2 (foam insert)
  • reading glasses (foam insert)
  • Noise-cancelling headphones (sitting on top of main compartment)
  • Bag of nuts (roasted, salted, tucked alongside the headphones on the top of the main compartment)
  • Sunglasses (front pocket)
  • Memory card wallet (front pocket)
  • iPhone power adapter and 1m cable (front pocket)
  • Spare X100F battery (front pocket)
  • 4 rolls of film (front pocket)
  • Dramamine (front pocket)
  • 9.7in iPad Pro (inside Logitech keyboard case – rear pouch)
  • Paperback (Tom Collins’ ‘Another Roadside Attraction’, thanks for asking – rear pouch)
  • Passport (British – inner pouch)
  • Wallet (inner pouch)
  • Keys (inner pouch)

Clearly this is an insane amount of stuff to cram into a camera bag, but hopefully you get the point. The fact that the stitching has held up to several years of this kind of shameful abuse is also testament to the F-6’s strength and standard of construction, and I only wish I could say the same thing about my shoulder…

In use

In day to day use with a more realistic mirrorless or rangefinder kit, the F-6 is much more manageable. Of course, like all shoulder bags, it can still get pretty uncomfortable after a long day being carried around on my shoulder. The thick fabric strap is nicely textured and rubberized (so it never slips) but it’s unpadded and can dig painfully into my neck after a few hours. Alternating the bag’s position helps, and Domke also makes a dense foam shoulder pad for $ 30 which can be attached if you need a bit of extra padding. I have one and it works well, but it’s bulky and since I try not to overload my F-6 (despite what you might think from the list above) I prefer the way the bag handles without it.

Speaking of straps, the F-6 comes with a short, slim removable strap for hand-carrying the bag. It’s a nice idea, and does make the bag easier to pick up and carry if you’re traveling, but I find it gets in the way, so I relegated mine to the sock drawer – next to the shoulder pad.

A full-height pouch can be found on the rear of the F-6, which is perfect for an A4 notebook, or an iPad. This is my 9.7in iPad Pro, inside a Logitech keyboard case, pulled out diagonally for illustration.

In the years since I bought my F-6 I must have walked thousands of miles with it, but it’s held up remarkably well. The rubberized thread sewn into the strap is starting to break up in a couple of spot, the rear pouch has been buffed to a high shine against various (mostly blue, apparently) coats and jackets and there are small holes worn into its corners, but I reckon I’ll fall apart before the bag does. The more expensive F-6B (‘B’ stands for (B)allistic nylon) should theoretically hold up to the rigors of daily use even (B)etter. I should probably throw it into the washing machine at some point and re-wax the canvass but I’m not in any immediate rush.

Bottom line

Is the F-6 perfect? It is not. Although the main compartment has some padding on its base, it’s probably not enough to prevent damage to a heavy camera or lens if you drop the bag from any significant height. I’ve accessorized mine with extra padding from an old unused foam insert, and if I’m carrying a rangefinder, I usually add even more just to avoid any DIY roadside focus recalibration after a knock or fall.

If you’re outside in the wind and weather for several hours, you should expect water to make its way into the main compartment

The F-6 itself can take a fair amount of abuse, but there are limits. For one thing, it’s not particularly waterproof, even when brand new. The heavyweight waxed material does a good job of keeping light rain from getting in, but it soon gets soaked in heavier precipitation and if you’re outside in the wind and weather for several hours, you should expect water to make its way into the main compartment. Of course the older and more worn the canvass gets, the less effective it becomes at repelling moisture. On the plus side, it dries out remarkably quickly and doesn’t tend to retain dampness as long as you can air it out for a few hours.

This shot shows one of the F-6’s two main clips, which keep the top cover closed. As you can see by the chipped paint, they’ve already held up to a lot of heavy use. The downside of their sturdy metal construction is that they can scratch gear inside the bag if they’re allowed to dangle or fall into the main compartment.

I love the metal top cover clips for their sturdiness and the ease of access that they provide to the F-6’s main compartment, but because they’re metal they can (and do) scratch cameras and lenses if you let them flop into the main compartment when the cover is unsecured. Just another good reason to be strict about lens caps and protective filters.

I’ve already mentioned the included removable hand-strap – I don’t find it particularly useful, but as a keen cyclist, I wish the F-6 was compatible with a waist strap. When I’m riding my bike the F-6 flops around like mad. A waist strap would help keep it secure. It would also make me look a little bit like a bicycle messenger from the 1940s, and a little bit less like a man about to have a bicycle accident.

The final word

Despite these complaints, the F-6 is undoubtedly the most useful camera bag that I own for everyday photography. There are better options out there for large DSLR and multi-lens kits, but for day-to-day shooting with a compact system, the F-6 is hard to beat. With the foam insert removed, the F-6 is a useful bag for shopping, travel and daily use, too.

What we like:

  • Surprisingly capacious
  • Sturdy build, extra-tough stitching
  • Easy access to main compartment via clips
  • Large, secure inner pocket
  • Large, zipped front pocket
  • Well-sized rear pouch

What we don’t

  • Unpadded strap is uncomfortable when bag is fully loaded
  • Dangling clips can scratch gear if you’re not careful
  • Main compartment never entirely ‘secure’
  • Light padding on base of bag
  • Not waterproof

Articles: Digital Photography Review (dpreview.com)

 
Comments Off on Long-term test: Domke F6 ‘Little Bit Smaller’ shoulder bag

Posted in Uncategorized


How to Make and Fold a Little Photographic Zine

28 Jan

Basically, a zine (pronounced “zeen”) is a low-budget DIY booklet. The word stems from the shortening of the word magazine and was developed as a rejection of commercialism and mainstream publications. In stark contrast to the mass media industry, zine artists don’t seek to make a profit. Instead, they are designed to share ideas, stories, and artistic work.

Due to the fact that they haven’t gained much of a corporate backing, creators of zines pay homage to their own creative roots, carving an organic niche in visual arts for themselves. Originally churned out by hand, the prospect of a potential zine is an exciting one, with an endless amount of technology, media, and materials readily available.

The constant evolution of technology mixed with older, more traditional techniques means that zines continue to intrigue with highly individual and versatile methodology.

How to Make and Fold a Little Photographic Zine

The contemporary zine emerged alongside technology like the photocopier. The interest and creation of zines grew in popularity during the punk movement of the 70’s and quickly spread from the United Kingdom to Australia and America. Marginalized creatives sought a medium that wouldn’t leave them broke. Graffiti was one solution to the problem, and one of the others was zine-making.

Authors of zines soon developed the DIY magazines to incorporate new ideas, personal observations, poetry, concepts, and artworks within their limited pages. Let’s have a look at one of the predominant zine styles today – and how you can make simple and effective photography books with a printer and a bit of low-grade origami!

How to create your own zine

You will need

  • A few blank pieces of A4 paper
  • Photo editing and printing technology
  • A craft knife
  • A marker, pen, or pencil

Method

Zines are designed as a simple, accessible and low-cost project. With a couple of folds, a simple piece of paper can become a comprehensive creative space.

First, we’ll build a scaffold to get a hold on the zine’s layout. It’s important to visualize the construction of a zine to understand the folding process. The layout will also guide your images later.  Practicing the process will allow you to create work quicker, but also with greater efficacy.

For this project, I’ll be using a blank, A4 sheet of paper –  but different sizes and colors work well too! Let’s get started.

How to Make and Fold a Little Photographic Zine

Folding the paper

Step 1 – Folding

Fold your original paper (1) so the short edges touch and press down on the crease with a finger to create a neat line in the center of the page (2). Always fold the two smaller edges of paper together. Folding length-ways results in a paper fan instead. Fold 2 in half so that the shorter sides of the folded paper intersect. Press down along the center line to make a crisp edge on stage three. The next stage is…you guessed it! Double stage three over and crease at the fold to make stage four.

How to Make and Fold a Little Photographic Zine

Unfold the paper.

Now, open your paper. You’ll see 8 evenly divided rectangles.

How to Make and Fold a Little Photographic Zine

Labeling each of the sections of the paper.

Step 2 – Labeling

The next step is labeling each of the sections of your paper. Looking at the image above, you’ll notice that half of the pages are marked upside down. Folding the final stages of the zine can be tricky. Each image needs to be oriented in a specific way. The end result of the zine will be made up of different orientations of your paper, due to the final folding process. If you want all your images to be one size and right-side up, mapping our the zine’s final orientation like this is invaluable.

How to Make and Fold a Little Photographic Zine

Mark one line and make a cut.

Step 3 – Cutting

Next, you’ll need to put a neat horizontal line in the inner two pages of the layout. Mark a continuous line between page 1 and page 4 and between page 5 and the front cover (as shown above). With a sharp craft knife, cut along the mark you made. Just be sure the knife is sharp, otherwise, it will leave nasty edges all the way up and down your cut.

How to Make and Fold a Little Photographic Zine

Once you have finished cutting the marked horizontal line, you will have a result like this. with a pointed gap in the center of your paper.

Step 4 – Refolding into the zine

Hold onto the outer layers of the paper with your fingers and gently push the outer pages toward the middle slit, so that the slice opens up to accommodate the pages (see below).

How to Make and Fold a Little Photographic Zine

How to Make and Fold a Little Photographic Zine

As you push the push the outside layers of the paper, it will form together like a star.

How to Make and Fold a Little Photographic Zine

As you press the ends together, the other pages will form around the folded slit. Be sure to check that the front and back pages are in the right place with a little bit of fiddling.

How to Make and Fold a Little Photographic Zine

How to Make and Fold a Little Photographic Zine

Your complete layout has folded down into a neat zine. So what’s next?

Photographic Zines

Photographic books are one of the best ways to share your photography. But producing professional-grade art books is a seriously costly undertaking. They may be small, but zines are a powerful and fun way to present your work and build networks.

The DIY nature of zines adds an extra layer of physicality to a body of work. They emphasize tactility, size, and detail. As they are handmade, each zine is a personal, tailored body of work, with the care that can only be imbued by hand. Because they take on an informal appearance, people will be much more inclined to touch and interact with your work. The price of the copies doesn’t hurt the viewer’s hip pocket either. They can take your work and revisit it again later – at minimal cost to creator and viewer.

Making a photographic zine

Because we will be working on the computer, grab a template like the one below and open it in a new document in Photoshop. You can copy mine if you like. Open up a new document and paste the layout onto the page.How to Make and Fold a Little Photographic Zine

How to Make and Fold a Little Photographic Zine

Carefully transpose each of your images to the corresponding page on the layout. Refer to your test dummy zine to visualize each page in the booklet. Remember, each image has to be orientated in the same way as the layout. Otherwise, you will end up with upside down images on your final zine.

For the cover of this zine, I’ve decided to use a joint image that spans over both the back and front page so that the pages will correspond.

How to Make and Fold a Little Photographic Zine

Here is the final layout before I print my zine. I took the time to experiment before sending it off to the printer. Then,  printed in a matter of seconds, I have my zine layout ready for folding!

How to Make and Fold a Little Photographic Zine

Following through the folding instructions above, you’ll have your finished product! Now that you’ve made one, are you tempted to get started on a few more?

Here are a few examples of some recent zines I’ve made.

How to Make and Fold a Little Photographic Zine

This little character is a blood mascot tasked with recruiting more blood donors in Japan. I took a photo of her one day, and it was so cute I upped the contrast and used her as the front cover of a zine.

How to Make and Fold a Little Photographic Zine

To create this zine, I simply recycled an image I printed by mistake

How to Make and Fold a Little Photographic Zine

How to Make and Fold a Little Photographic Zine

I printed this photo which is a scan of an inky painting. I also added a blank white square to the back page section, for a little message to a reader.

How to Make and Fold a Little Photographic Zine

How to Make and Fold a Little Photographic Zine

How to Make and Fold a Little Photographic Zine

To make this zine I incorporated a few film photographs I took one night. Film makes great material for zines. Note that there is a white strip in the layout, due to a film end. I decided to leave it in the design as a testament to the original image.

Conclusion

Zines are all about sharing art and creativity, founding trades and friendships across the world. Please share your photographic zines below, I would love to see them. Perhaps we could set up a trade!

The post How to Make and Fold a Little Photographic Zine by Megan Kennedy appeared first on Digital Photography School.


Digital Photography School

 
Comments Off on How to Make and Fold a Little Photographic Zine

Posted in Photography


I Spy With My Little Eye: Macro Photo Gold

13 Oct

Warning: preg_replace(): The /e modifier is no longer supported, use preg_replace_callback instead in /home/forge/content.photojojo.com/content.photojojo.com/wordpress/wp-content/plugins/ozh-better-feed/inc/feed.php on line 134


Photojojo

 
Comments Off on I Spy With My Little Eye: Macro Photo Gold

Posted in Equipment


How to Make a Little Planet Quickly and Easily in Photoshop

12 Oct

Do you find your panoramas a bit flat? Would you like to create a whole little planet out of a single street or square? Do you want to make fun, eye-catching images in just a few minutes without any new equipment or apps? Then this article is for you!

What is a Little Planet

Maybe you’ve heard about the “tiny planet” or “little planet” effect but don’t know exactly what that is. Maybe you have seen them but don’t know how to do them. Well, let’s start by explaining that a tiny planet is a spherical panorama and is technically called a stereographic projection.

The result of this effect is that your traditional landscape will now be circular and thus look like a planet floating in space, water, or sky depending on the background of the panorama you’re using.

PlanetReggio - How to Make a Little Planet Quick and Easy in Photoshop

Little planets are very trendy since it became possible to capture 360 x 180 degree panoramic shots. However, in this tutorial I’m going to show you how to do them from any straightforward bi-dimensional rectangular photo. I’m using Photoshop for this, but you can do it in most post-processing programs, even the free ones like GIMP.

Subjects for a Little Planet

A landscape or a panorama are the best choices, however you can get interesting results applying this effect to other kind of scenes. For example, I used it in this photo from the interior of a library, see how the spiral lines add depth to the space?

Library How to Make a Little Planet Quick and Easy in Photoshop

Also, if you apply it to a portrait the result is like looking through a peephole.

Clown How to Make a Little Planet Quick and Easy in Photoshop

How to Make a Little Planet

Okay, back to the instructions. First you need to open your image in Photoshop and alter the proportions of your photo so that it becomes a square. To do this go to Menu > Image > Image Size. Once the Image Size pop-up window opens, make sure you deactivate the “constrain proportions” option or else the entire image will resize proportionally. Once you do that, make sure the width and the height values are the same.

Size How to Make a Little Planet Quick and Easy in Photoshop

Now you will see your image distorted, like stretched out. Don’t worry about it, that’s what we were looking for here.

Rotate the Image

Distortion How to Make a Little Planet Quick and Easy in Photoshop

Now that you have your square you need to rotate it. To do it you go to Menu > Image > Image Rotation > 180 degrees.

Rotation

Now you will see the image upside down.

Upsidedown

*Note: if you want your planet to be inside out you skip this step! At the end, I’ll show you the results with and without this rotation.

Apply the Effect

The final stage is to apply the effect. Go to Menu > Filter > Distort > Polar Coordinates. In the pop-up window you will see a preview of your little planet; make sure that the Rectangular to Polar option is marked and click OK.

PolarCoordinates

Voila a Little Planet

There you go, your own little planet! You can rotate the image (like you did in step 2) until you find the orientation that works best for your image. You can also use the clone tool if you need to blend the merging of the borders or iron out any final details. And of course, you can fix contrast and exposure, as you would do with any photo.

Final How to Make a Little Planet Quick and Easy in Photoshop

And here is the one inside out if you skipped the second step and didn’t rotate the image:

Insideout How to Make a Little Planet Quick and Easy in Photoshop

So you see, it was only a matter of three steps. However, to get better results, especially if it’s your first few planets let me give you some tips and tricks:

Tips and Tricks

Use a photo with a wider ratio, like 2:1 and more. If you don’t have that, a landscape (horizontal) photo will still do better than portrait (vertical) one.

StartLandscape How to Make a Little Planet Quick and Easy in Photoshop

Compose your photo with the rule of thirds leaving the top and bottom sections with minimal information and the details in the middle area. In this example, I have the sky on the top, trees in the middle, and ground on the bottom.

Make sure the horizon line is completely straight. If it wasn’t like that in the original shot, it’s very easy to fix. First, pick the ruler tool from the toolbox (if you don’t see it just press and hold the eyedropper and you’ll find it). Then click and drag a straight line from one side to the other. Finally, click on the Straighten Layer button on top.

Ruler How to Make a Little Planet Quick and Easy in Photoshop

The edges will merge better in the planet if the left and right edges of your panorama are similar. When possible, like it would be in the case of a forest, for example, you can copy the left side, flip it and paste it on the right side. That way they will match perfectly.

Edges How to Make a Little Planet Quick and Easy in Photoshop

Your Turn

Now you can create a whole universe of little planets from nature to urban landscapes, the possibilities are endless.

UrbanPlanet

I invite you to share your planets here in the comments section below.

The post How to Make a Little Planet Quickly and Easily in Photoshop by Ana Mireles appeared first on Digital Photography School.


Digital Photography School

 
Comments Off on How to Make a Little Planet Quickly and Easily in Photoshop

Posted in Photography


Book Box Bonanza : 12 Freaky Little Free Libraries

11 Sep

[ By Steve in Architecture & Public & Institutional. ]

Since 2009 over 50,000 Little Free Library book exchange boxes have sprung up on lawns worldwide, though some are worthy of a surprised second glance.

You’ve probably passed a Little Free Library during a recent walk, ride or drive though your neighborhood. Odds are you passed it off as a personal project of some local do-gooder or over-achieving parent but the so-called “Little Free Library Movement” is bigger, broader and more organized than anyone could guess.

The first Little Free Library was created by Todd Bol of Hudson, Wisconsin as a tribute to his mother, a former schoolteacher and lifelong book-lover. Bol’s pioneering concept was meant to look like a miniature one-room schoolhouse but that design isn’t mandated, even for those who register with the non-profit Little Free Library Ltd. website and receive an official sign they can affix to their box. Size isn’t de rigeur either though the above Tardis library box is larger than most… especially on the inside. Flickr member ap^ snapped the example above from Bloomington, MN on April 27th of 2013.

Bustsellers

If you’re calling your Little Free Library “Headless Books“, it follows that your book box be decorated to display that fact. Crafted from a disused bREADbox and topped by a headless (and topless, at the risk of being redundant) mannequin torso scrounged from a local garage sale, The Headless Library can be found in NE Minneapolis.

Since September of 2012 the torso-topped library shared yard space with Penny’s Childrens Library – another ex-breadbox topped with a plastic lawn-ornament penguin because why not? Sadly, this library was trashed and the penguin stolen by unknown assailants during a spring blizzard in April of 2013… at press time the penguin was still missing. We suggest looking for it on top of a British woman’s TV set.

Book To The Future

Dubbed the Little Free Library 3D X, this futuristic little library comes to us courtesy of designer and Flickr member Robert Sekula (ethno folk funk architects) in cooperation with Andrej Poliak. Never thought you’d see the words “futuristic” and “library” in the same sentence, did you?

Morel Of The Stories

What is it about Minnesota and odd Little Free Libraries? Flickr member Marie Janssen (jamuraa) snapped the above “Little Tree Free Library” in New Brighton, MN, on August 11th of 2012. Another source states it’s modeled on a mushroom of the morel family.

Next Page – Click Below to Read More:
Book Box Bonanza 12 Freaky Little Free Libraries

Share on Facebook


[ By Steve in Architecture & Public & Institutional. ]

[ WebUrbanist | Archives | Galleries | Privacy | TOS ]


WebUrbanist

 
Comments Off on Book Box Bonanza : 12 Freaky Little Free Libraries

Posted in Creativity


How to Create Abstract Photos with Oil and Water and a Little Dish Soap

03 Aug

Oil and water are like chalk and cheese. They just aren’t the same are they? But despite their seeming incompatibility, each brings out the qualities of the other. As photographers, we love a good juxtaposition. There’s nothing that creates balance better than imbalance – well, it’s definitely the case here, at least. So in this article we’re going to use that to create some abstract photos.

For this project, we are going to create a body of images that look as if they come straight out of a chemistry class instructional… or a 60s liquid light show. With two philosophically opposed house hold items, several more amicable components, and a camera. The process is simple and the results are abstractedly beautiful and a little trippy too. Intrigued? Check it out below.

How to Create Abstract Photos with Oil and Water and a Little Dish Soap

How to Create Abstract Photos with Oil and Water and a Little Dish Soap

Things you will need to do this:

  • Camera
  • Sheet of glass
  • Two objects to set your glass on (I used milk crates but chairs and even stacked books work too)
  • A macro lens or extension tubes (I used my Kenko extension tubes)
  • Tripod
  • Towel
  • Some colorful materials
  • Oil (it doesn’t really matter what type, I used vegetable oil)
  • Dishwashing liquid soap
  • Water
  • Eyedropper or spoon

Find a background material

First, you’ll need to gather a few materials for the background of your image. You are looking for colored cardboard, magazines, posters, cloth, scraps – anything with a bit of color that won’t be missed if it gets coated in a little oil or dish washing liquid. Duller toned materials like brown or black won’t reflect light as readily, so aim for brighter colors to begin with.

Don’t worry too much about intricate patterns or details as they wont show in the final image. While you are scouting for materials, grab an old towel too, it’ll come in handy later.

How to Create Abstract Photos with Oil and Water and a Little Dish Soap

For my abstract oil project I selected a cardboard gift bag I had around the house and a reflective folder I flattened out. The bright color combinations of the bag will create smooth, vibrant gradients. The reflective sheen of the folder will guide a greater amount of light up through the image, but the holographic flowers can yield surprisingly subtle results.

How to Create Abstract Photos with Oil and Water and a Little Dish Soap

The reflective cardboard I used for this image directs small speckles of light up into the splotches of oil. The overall grey tone of the cardboard contrasts with the flecks of colors to create a surrealistic, rainy atmosphere.

How to Create Abstract Photos with Oil and Water and a Little Dish Soap

This is an image with the Happy Birthday bag as a backdrop. None of the details are discernible, but a soft gradient separates the image into soft hues

Setting up

One you’ve assembled a neat pile of colorful bits and pieces, it’s time to set up. The aim here is to construct a bridge of sorts for your sheet of glass to sit on. To reduce the impact of a potential oil-spill, I set my rig up outside. Wherever you choose to setup just make sure you work on flat, even ground. Grab your milk crates (or chairs, etc.), set them down a little distance apart and set the glass between the two. Now take a few of the colorful materials you’ve selected, and position them on the ground, directly under the sheet of glass.

To set up your camera, I strongly recommend using a tripod. Because macro lenses and extension tubes can reduce the amount of light reaching your camera’s sensor, the tripod will steady the camera for longer exposures. A tripod will also cut down the handling of your camera with oily fingers. Once your camera is locked into the tripod, turn it on, select Live View Mode and focus the camera on an area directly in front of the lens. You’ll need to be able to watch what you are doing on the LCD screen in the next step.

How to Create Abstract Photos with Oil and Water and a Little Dish Soap

Positioning my pane of glass between two milk crates, I then set my cardboard birthday bag in the space underneath. Using a tripod is highly recommended as this project requires a fair bit of hands-on adjusting and fiddling both behind and in front of the camera. The lemon tree is not mandatory

Time to start cooking

Gather your water, dish washing soap, oil, spoon (or eyedropper), and towel and place them within reach. Begin by adding a small spot of oil to the glass. Keeping an eye on your LCD screen will help you position your drops within the camera’s field of view. To build up layers of liquid, add dots of water or dishwasher liquid to the center of the oil. As the liquids span out over the glass, add in new droplets of the different ingredients. Alternating between ingredients takes advantage of their natural resistance to each other, delineating shapes and patterns more readily. If you like, you can use the tip of your spoon or eyedropper to manipulate the shape of the growing bubble.

That’s about it really! The rest is totally up to you. You can’t mess up, so don’t worry if you aren’t getting perfect circular bubbles or patterns. Allow the medium to take shape as you cycle through your three ingredients. Try running a spoon through the middle of the concoction to create smaller clusters of bubbles. Or use a greater ratio of dishwasher liquid to oil to enhance the spiderweb look of the cleaning chemicals. Even spritzing mists of water over the glass can make fascinating reflections.

Experiment with the background and elements

While you are watching the details unfurl beneath the camera lens, don’t forget to experiment with your background too! Add or remove materials, layer new colors, add materials which have a greater or lesser reflective surface. Use a flashlight (torch) to illuminate different areas in the image or shine the light up into the bubbles suspended on the glass.

There are no hard and fast rules – the more you experiment the more you’ll discover. And, once all your liquids have inevitably pooled in a messy, semi-clear river of goo, grab your towel, wipe down the glass and start again! A word of caution, however, this project can become an addition in itself, not only because it looks good, but because each result is so illusive and unpredictable.

Have fun and share your abstract photos made from oil, water and dish soap in the comments below.

This smooth effect was created as the oil and dish washing liquid slowly spread over the surface of the glass

The delicate strands in this image is a result of the dish washing liquid being spread across the glass surface with a spoon


This image was photographed with a single color background. The consistent color illuminates the beads of oil and water in the light

The post How to Create Abstract Photos with Oil and Water and a Little Dish Soap by Megan Kennedy appeared first on Digital Photography School.


Digital Photography School

 
Comments Off on How to Create Abstract Photos with Oil and Water and a Little Dish Soap

Posted in Photography


How to do Night Photography With No Tripod – and a Little Photoshop Help

02 Jul

In this article I am going to show you how you can do amazing night photography with no tripod and not too much grain.

How to do Night Photography Without a Tripod

In this photo I was on the Academia Bridge in Venice, the place to be to catch the sunset. There were tons of photographers taking long exposure photos, so many that I couldn’t squeeze in to put my tripod down. So I put my camera at f/4, went to 1/10th of a second and shot at ISO 1250.

These settings froze the boat and the water is still nice and smooth. But the thing that I was really happy about was the light reflection in the water; it was not too strong. If I had done a long exposure the light reflection in the water would have made big blots of light which is very catchy to the eyes and creates a lot of contrast, which I don’t like.

Like on this photo below:

How to do Night Photography Without a Tripod

Extremes

Let me show you in this extreme case:

How to do Night Photography Without a Tripod

For the image above, I had a zoom lens on so the widest I could open up my aperture was f/5.6. My shutter speed was 1/25th of a second at 2500 ISO, and I set my camera on high speed burst mode, which allows the camera take several shots quickly. But unfortunately at 2500 ISO there is going to be a lot of noise. So to show how noisy this photo is, let me do my basic retouching.

How to do Night Photography Without a Tripod

How to do Night Photography Without a Tripod

As you can see it is very grainy/noisy.

How to do Night Photography Without a Tripod

Even if I try to use the noise reduction it doesn’t look that great:

How to do Night Photography Without a Tripod

The solution

So what you can do in this situation is to select all the photos you took in Continuous Shouting mode, I am selecting five here. Then click on sync, Check All, and select synchronize.

How to do Night Photography Without a Tripod

Once you have done that, right-click select Edit In > Open as Layers in Photoshop.

How to do Night Photography Without a Tripod

Now that we are in Photoshop, you can see that each photo has its own layer. Select them all, then go to Edit > Auto-Align Layers.

How to do Night Photography Without a Tripod

You can click on auto here. If you are shooting handheld it is important to have all the layers aligned. Here you can select all the layers again, right-click and select Convert to Smart Object.

How to do Night Photography Without a Tripod

Then you are going to select your layer and go to Layer > Smart Object > Stack Mode > Median.

How to do Night Photography Without a Tripod

What’s that is going to do is Photoshop will detect the common pixels from a photo to another and then remove the noise and any people that moved from frame to frame, which is pretty cool. You can see the before and after below.

How to do Night Photography Without a Tripod

After this technique has been applied, you can see that the water is nicer on the eyes and there is almost no noise in the image.

How to do Night Photography Without a Tripod

How to do Night Photography Without a Tripod

Before

How to do Night Photography Without a Tripod

After

Summary

So this is a good way to avoid noise in a low light situation where you don’t have a tripod. Let me review the important points for you:

  1. Set your camera on Continuous Shooting Mode (burst).
  2. Open your aperture as wide as you can to f/2.8 or f/4.
  3. Set your shutter speed to around 1/30th of a second and boost the ISO to between 2000 and 3000.
  4. Take at least five photos minimum.
  5. Take the first photo, retouch it and synch your edits to the others, using Lightroom.
  6. Open all the images as layers in Photoshop.
  7. Align the photos/layers.
  8. Select the layers and convert to Smart Objects.
  9. Got to Layer > Smart Object > Stack Mode > Median or see which setting works best.

And voila. See below for the video walk through of this technique as well.


photoshop for photographers
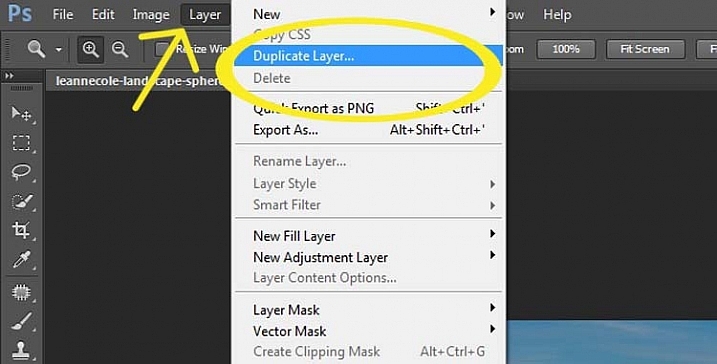
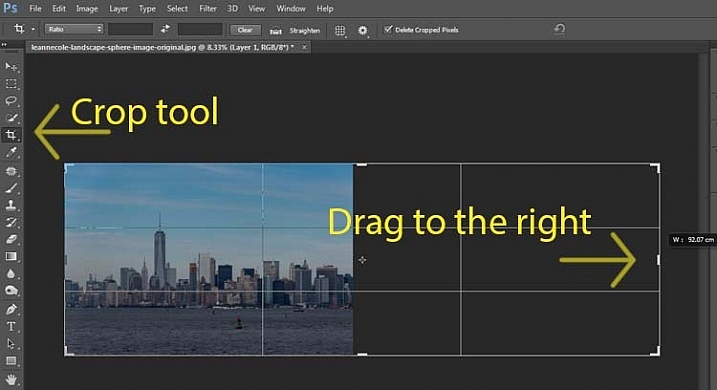
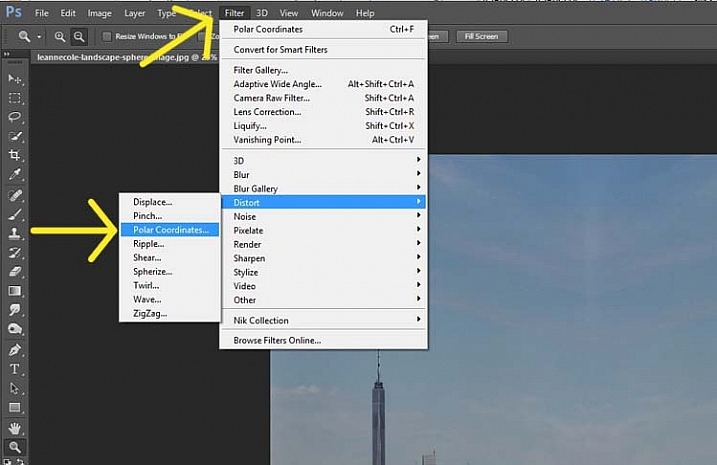
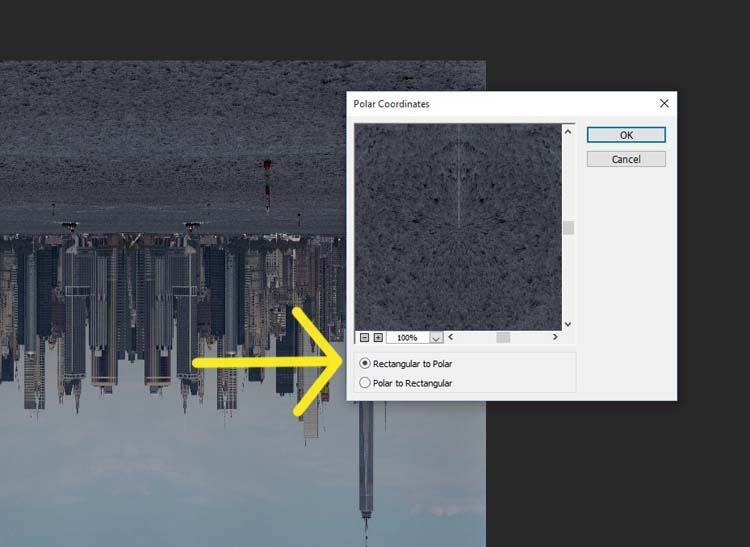
If you enjoyed this tutorial and want to learn more about how to use Photoshop, check out Serge’s course Photoshop for Photographers 2017. Use the special promotional code – DPS65 – to get 65% off as a dPS reader!

The post How to do Night Photography With No Tripod – and a Little Photoshop Help by Serge Ramelli appeared first on Digital Photography School.


Digital Photography School

 
Comments Off on How to do Night Photography With No Tripod – and a Little Photoshop Help

Posted in Photography


KitSplit: Shoot with Super Fancy Gear for Very Little Moola

12 Sep

We’re ‘bout to get you all geared up for photo-snapping funmazement.

We’ve teamed up with KitSplit for a great giveaway! (We’re kinda mad we can’t win ourselves).

Win $ 100 in Photojojo gizmos and $ 100 in gear rental from KitSplit.

What’s a KitSplit? We’re glad you asked. Read along for complete giveaway rules and a formal introduction to our pals, the KitSplitters.

(…)
Read the rest of KitSplit: Shoot with Super Fancy Gear for Very Little Moola (833 words)


© laurel for Photojojo, 2016. |
Permalink |
No comment |
Add to
del.icio.us

Post tags:


Photojojo

 
Comments Off on KitSplit: Shoot with Super Fancy Gear for Very Little Moola

Posted in Equipment


Air Bonsai: Magnetic Levitation Kit Lets You Float Little Trees

21 Feb

[ By WebUrbanist in Design & Furniture & Decor. ]

floating air bonsai plant

Taking bonsai approaches to the next level, a Japanese company based out of Kyushu has raised over half a million dollars so far for its levitating (and rotating) tree system.

floating tree collection

The fauna in question span quite a range, from flowering plants to pine trees to mosses. The magnetic levitation tech supports up to 250 grams of whatever species you prefer (up to a few inches in width), powered via a simple AC adapter.

floating plant diy kit

floating tree demo

Of course, you can further decorate your little floating worlds however you like, with ceramic figures, lava rocks or other scene-setting touches.

floating bonsai tree system

The system comes as a DIY kit priced starting at around $ 200, depending on whether you wish to get both the mechanical system and a starter plant or just the technology portion. There are also both modern and traditional-looking, hand-crafted bases, depending on your aesthetic preferences.

Share on Facebook


[ By WebUrbanist in Design & Furniture & Decor. ]

[ WebUrbanist | Archives | Galleries | Privacy | TOS ]


WebUrbanist

 
Comments Off on Air Bonsai: Magnetic Levitation Kit Lets You Float Little Trees

Posted in Creativity


How to Make a Little Planet Using Photoshop

06 Jan

Photography doesn’t always have to be serious, sometimes it is nice to do something just for fun. Making a landscape look like it is a little planet is one of those things. There aren’t any uses for it, and you wouldn’t spend your photography career doing this. It is, however, one of those photography tricks that a lot of people like to try.

LeanneCole-landscape-sphere-done-0033-dps717px

A Landscape turned into a sphere or little planet.

Landscape images work best. The photo should have a foreground, a horizon, and a sky. If you have trees or buidings in the image that go out the top of the image it may not work as well. It is all experimental, so you should try images like that, but it does seem to work best with images that look like the one below.

LeanneCole-landscape-sphere-done-0035-dps717px

This image was chosen because it has all of those elements; the river is in the foreground, there are buildings along the horizon, and there is a sky. There is also nothing going out the top of the image. As the photo is going to connect from one end to another, it has to be an image that has similar ends.

How to create a Little Planet

Open the photo you want to use in Photoshop.

1-leannecole-tutoria-photo-sphere

Open photo in Photoshop.

The first thing to do is to duplicate the layer by pressing Ctrl+J (CMD+J on Mac). It can also be done by going up the main menu, clicking Layers > Duplicate Layer.

16-leannecole-tutoria-photo-sphere

Duplicate Layer

You may need to make the image smaller on the screen using the magnifying tool. Make it small enough to only fill part of your current view, like so:

Screen Shot 2015-12-21 at 1.18.59 PM (2)

Turn on your rulers (Cmd+R on Mac, or Control+R on PC). Once they appear, right click on one and select percent to display on the rulers.

Make sure you are on the Background Layer, and select the crop tool (keyboard shortcut is C). Click on the image to bring up the cropping frame. Grab the right edge marker, and drag it it to the right to enlarge the frame to twice the size of the image (watch the number as you drag, go until you get to 200%). Look at the following image.

17-leannecole-tutoria-photo-sphere

Extending the Image

Next, highlight the duplicated layer in the Layers panel, by clicking on that layer.

4-leannecole-tutoria-photo-sphere

Select the duplicate layer

This duplicated layer needs to be flipped horizontally. Go to: Edit > Transform > Flip Horizontal.

5-leannecole-tutoria-photo-sphere

Use Transform to flip the duplicate layer.

Select the move tool (keyboard shortcut is: V) and move the duplicated image over to the right side until you have the two images touching in the middle.

6-leannecole-tutoria-photo-sphere

Use the move tool to put the duplicated, flipped image, into place.

Figure out where you want the images to meet in the middle. Sometimes overlapping them can make it look a little better. You will need to crop the image to remove some of the extra area that you created earlier.

7-leannecole-tutoria-photo-sphere

Crop the image to the edges of the image.

To make the sphere, the image needs to be square, so go to the top menu and click Image > Image Size. When the window pops up, you need to unlock the part that automatically changes the height when you change the width (maintains the proportions). Click the lock (chain) icon to unlock it. Make the width the same as the height, and press okay.

8-leannecole-tutoria-photo-sphere

In the Image Size window the height and width are locked.

9-leannecole-tutoria-photo-sphere

Click on the lock to unlock image to make width the same as height.

Before you can make the sphere you should combine the layers. Go up to: Layers > Flatten Image. An easier way is to press Shift+Ctrl+E (Shift+Cmd+E on Mac), this will make them one layer (it merges all visible layers).

10-leannecole-tutoria-photo-sphere

Combine the layers.

You will also need to flip the image vertically. Go back to the main menu, select Image > Image Rotation > Flip Canvas Vertical.

12-leannecole-tutoria-photo-sphere

Flip image vertically.

Next, go to Filter >Distort > Polar Coordinates….

11-leannecole-tutoria-photo-sphere

Select Polar Coordinates in the Filter, Distort menu.

When the popup window appears, select the option: Rectangular to Polar. Press OK.

13-leannecole-tutoria-photo-sphere

Choose rectangular to polar.

Voila, your landscape sphere, which now looks like a little planet.

14-leannecole-tutoria-photo-sphere-dps717px

The world turned around.

But, there is a gap where the images meet. This can easily be fixed with the Spot Healing Brush Tool. It is in the toolbox on the left side of the windows panel. Run the tool along where the images don’t quite connect.

LeanneCole-landscape-sphere-done-0033-dps717px

Landscape turned into a sphere or little planet.

There you have your landscape sphere, or little planet image.

You may want to crop it a little to make the planet bigger in the image, and to remove any things that have happened in the corners. You may also want to rotate it to get the view you want.

You can do this with other types of images as well. You could try it with a panorama, then you don’t have to do the part where you copy the layer. However, you need to be aware that it may not come out as you expect, it can come out distorted.

If you don’t flip the image vertically before applying the filter it will do the image in reverse. The image that I used for this article would then have the river on the outside, and the sky in the center (see image below).

LeanneCole-landscape-sphere-done-0034-dps717px

Result done the other way.

As you can see there are no real uses for this except as a fun project. Try it and see what you can come up with, and please share your images in the comments below.

googletag.cmd.push(function() {
tablet_slots.push( googletag.defineSlot( “/1005424/_dPSv4_tab-all-article-bottom_(300×250)”, [300, 250], “pb-ad-78623” ).addService( googletag.pubads() ) ); } );

googletag.cmd.push(function() {
mobile_slots.push( googletag.defineSlot( “/1005424/_dPSv4_mob-all-article-bottom_(300×250)”, [300, 250], “pb-ad-78158” ).addService( googletag.pubads() ) ); } );

The post How to Make a Little Planet Using Photoshop by Leanne Cole appeared first on Digital Photography School.


Digital Photography School

 
Comments Off on How to Make a Little Planet Using Photoshop

Posted in Photography