
Painting With Light
Video Rating: 3 / 5
Some cool visual art images:
Light Within

Image by Original Bliss
Work Wordle
Moleskine and Portfolio Water Soluble Oil Pastels
Saying of Jesus from the Gospel of Thomas
SOUL JOURNAL WORKSHOP LIVERMORE
Visual Journals: Romania 2/2

Image by massdistraction
Best viewed large. Or, better yet, in person.
Fantasmas (Phantoms) Red Filter

Image by chooyutshing
This public art display is at Raffles City Shopping Centre for the Singapore Biennale 2008. This work is created by Issac Montoya, a rainbow-coloured portrait of a young woman screams from a large scale photograph.
View from the red filter, the hidden image refer the tragedy present in other parts of the world.

Fujifilm has announced it is delaying the introduction of its XF 14mm F2.8 prime lens by a month so it can concentrate production on the XF 18-55mm F2.8-4 R LM OIS. The 14mm (21mm equivalent) prime lens is the first in the X-mount lineup to feature a pull-back focus ring that engages manual focus and reveals distance markings to allow use of its depth-of-field scale. It will now start to become available from late January 2013. Meanwhile we’ve been shooting with the 18-55mm zoom and will include a gallery of images along was an expanded XE-1 preview later this week.
News: Digital Photography Review (dpreview.com)

Awesome Two Light Clamshell Setup – A Real Beauty
Introduction
If your just getting started in off camera flash and studio photography then single light setups are a fantastic, uncomplicated way of getting to grips with lighting techniques. Despite the wide range of effects that can be achieved with a one light setup, working with multiple lights provides even greater range of creative options and my favourite multi light setup has to be the clamshell. This lighting setup can be used to produce a soft wrapping quality of light; a perfectly white background and stunning catch lights resulting in a classic beauty look ideal for photographing female models. Best of all its incredibly easy, so hopefully with the following guide you can also have a go at this great lighting setup.
Setup & Equipment
The basic idea behind this setup is to use a single large light source both as a backdrop and to provide wrap around light. The subject is then illuminated from above using a second light with any remaining shadows filled in using a flat reflector.
For this setup you will need two light sources; ideally strobe heads although speedlights are also fine but might take slightly longer to recycle given the higher power required. To achieve the soft quality of light both lights should be shot through large soft boxes, although if you don’t have these then you could us a large sheet as a background and something like an umbrella for the main light.
The basic setup is as follows; the key point to remember is to ensure the backlight completely fills the background.

Lighting Diagram – A Simple Two Light Setup
Metering
Metering for this shot is actually fairly simple and whilst a light meter can be helpful in speeding things up its easy enough to set the exposure for this shot by eye. The main steps are as follows:
Summary
Hopefully the steps above are simple enough to convince you to give this lighting setup a try. Not only is this a great way to try working with multiple lights but it also results in a really satisfying and flattering image and of course double the lights means double the creativity!
Post originally from: Digital Photography Tips.
Check out our more Photography Tips at Photography Tips for Beginners, Portrait Photography Tips and Wedding Photography Tips.
The Killer Clamshell – A Two Light Setup Guide
 Studio flash photography often appears to be complicated and confusing for the new photographer. The tangled, twisted mess of light size, power, angle, position, direction, etc… can be daunting to say the least. Not to mention the need for extra equipment such as backdrops, light stands, modifiers, reflectors and the lights themselves. Wow! Already seems like too much huh? You might find yourself thinking, “I can just use the giant light source in the sky that is available everyday and be done with all this other mangled mess of an armamentarium.” At times I would not disagree with you, as the natural light from the sun is hard to beat and is in great abundance, however, when I look at how much my understanding of light and shadow has improved from my many unsuccessful studio lighting shoots, the value of learning this sort of lighting is tremendous. And yes I did say “unsuccessful shoots!”
Strangely enough, when I got started with photography, studio lighting was one of the areas in which I was most interested. Not the easiest place to start I can assure you, but it definitely does not need to be as awkwardly bemusing as it first appears. Now this article is not meant to be a full on detailed description of what lights or modifiers to buy or an in depth scientific analysis of the inverse square law complete with physics equations and Einstein like theorems. It is more of a reason of why to get started with studio lighting and to break through any mental barriers that might be in your way. I promise you, once you get your feet a little wet and wild in the studio, you will not only love it, but also find that you have a better eye for light even when you are out at the wee hours of the morning trying to capture that perfectly beautiful sunrise.
To shoot my studio work, I use simple, durable yet economically feasible equipment. I currently use a set of Alien Bees strobes from Paul C. Buff. There are a lot of other brands of strobes out there, but these have worked well for me and fit within my budget. Now, you do not necessarily need to use strobes. Westcott has their Spiderlite TD continuous lighting system that also could suffice. Basically any system of lighting can work fine. You could use a couple of lamps with a shower curtain liner to diffuse the light if you want. Don’t get too hung up on the equipment at first, but try to understand how to position and control the lighting to get the desired results. I am trying not to get pulled into a discussion about equipment, but admittedly some equipment is required. In order to move on, I would recommend getting a good book or two on studio lighting to give you a thorough description of some lighting basics. Two that I have personally found useful are Master Lighting Guide for Portrait Photographers, by Christopher Grey or Basic Studio Lighting: The Photographer’s Complete Guide to Professional Techniques, by Tony Corbell. There was also a nice post here on DPS recently called One Light Portraits: Simple Elegance, by Rick Berk.
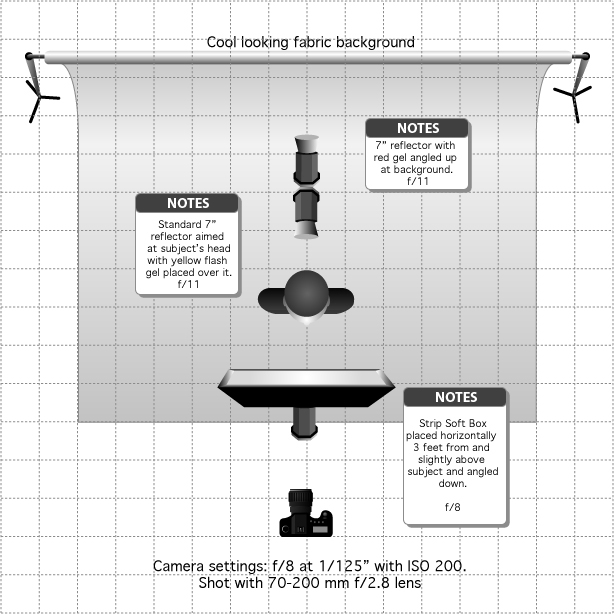
Whew! Let’s move on and get into some of the nitty gritty of setting up a studio portrait shoot. Lately, I have been working on some creatively themed portrait shoots as a personal project. The basics of what you need for a shoot are simple. You need a background and a willing model or subject. This can be a plain wall in your house and a close friend or even some fabric taped to the wall with a bowl of fruit on a table in front of it. My theme was fire, so first I went to the fabric store and found an interesting black/grey charred looking swath. A quick aside, if you want to find some really cool backgrounds in the U.S. go to a fabric store around Halloween and they will have some really great stuff. Next, I got a hold of a local model, the fabulous Brittney and set-up a time for the shoot. I also hired the amazing Dina Bree Nast a local make-up artist here in Denver, Colorado. I must say, and this is just my own opinion, but if you have never hired a make-up artist for a shoot, you have to try it as the results are spectacular and it will reduce your post-processing time tremendously.
Okay, the date, model, MUA and backdrop were set. Next and most importantly, how do I design the lighting set-up. A little planning goes a long way with a studio shoot. When you are just getting started you do not want to have to deal with moving a lot of lights around or having your subject face the wrong way and have shadows in places where you do not want them. A sure fire way to avoid this is to first give your subject a stool or a chair to sit on. This will keep them in one place at the same distance and proximity from your lighting set-up and your background. Secondly, stick to one lighting set-up and limit the shoot to it. You want to focus on getting the shot that you want and not be constantly worried about fumbling with the lights. If you are more focused on the lights and everything else going on with the equipment, you will not pay attention to getting a great pose and expression and let’s be honest, the lighting can be less then perfect if you capture the right moment. Finally, you would like to have an idea of what sort of depth of field at which you would like to shoot. If you want the background slightly blurred go with a wide open aperture of f/2.8-f/4. In my plan for this shot, I chose f/8 as I wanted to capture a bit of the look and texture in the background as I felt it complimented the shot. Additionally, I keep my ISO low which for my Nikon is 200 and my shutter speed I usually leave at 1/125 of a second. Thus, my camera settings are set already and I have not even taken a shot yet.
I always start my lighting set-up with the position and exposure setting of the main light or the one that will be responsible for lighting the subject. In this shot, I already know I want my aperture around f/8 so that I can capture that background detail. This already let’s me know where I want my main lights exposure to be set. Now, there are two ways to set the main light’s exposure. You can use a light meter or you can wing it by taking some practice shots and checking your histogram and adjusting accordingly. Either way works well even though many people have opinions about one way or the other. Personally, I use a combination of both. So what about position of the light?
 To start out with, I think using a glamour or butterfly lighting set-up (named for the shadow pattern created beneath the subjects nose) is very easy and is incredibly flattering for the subject. To achieve butterfly lighting the main light is set directly in front and slightly above the subject with the light angled down toward the subject. As a beginner, having the light directly in front of the subject is useful cause if the subject turns their head one way or the other they will still always be within the range of the main light. I used a 36-inch strip softbox in this set-up placed about 2-3 ft from the subject in the horizontal position to achieve a narrow, soft beam of light that would not spill onto the background very much. Then I took a few shots to see what it looks like.
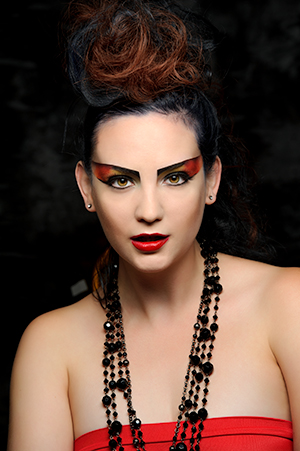
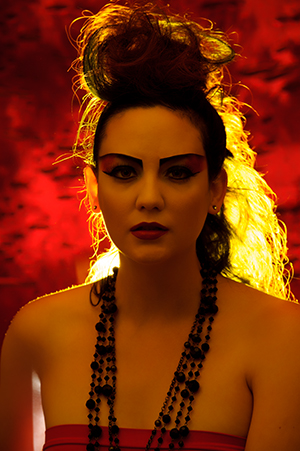
As you can see with just the main light, the subject is adequately exposed, however, I cannot see the background and the subjects dark hair blends in so much with the background that you cannot see the outline of her hair. What does this tell me? I need to light the background as well as the hair to separate her from the background and gain some depth to the image. Since my theme was fire, I wanted to incorporate some colors that would support the theme. This made me think of reds, oranges and yellows. So to light the background I set a strobe just up off the floor angled up at the background with a standard reflector attached, however, I decided to place a red acetate gel over the light to give a little color to the background and support my theme. To set the power of this light I turned off my main light and took a few practice shots with only the background light on to see how it looked and adjusted the power of the light until I liked the look.
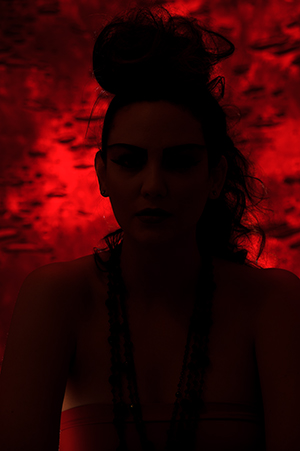
Here you can see with only the background light, I have a nice subtle red glow to the background that also brings out the interesting texture to compliment the fire theme of the shoot. The background light also wrapped around the subject just a little bit, likely bouncing a touch off the white surface of the softbox in front of her, giving a red tinge to the shadows. If I did not want this extra red in the image I could have moved my subject farther form the background, but I liked the effect so I left it alone.
Next, I needed to separate the subject’s hair from the blending into the background. I set up an additional light right behind the subject just below her shoulders and directed it with a standard reflector at the back of her head. I decided to add a yellow acetate gel over this light to hopefully give a bit of a fiery glow to the hair. Again I turned out the other lights and I took a few shots to see how it looked and adjusted it as needed.
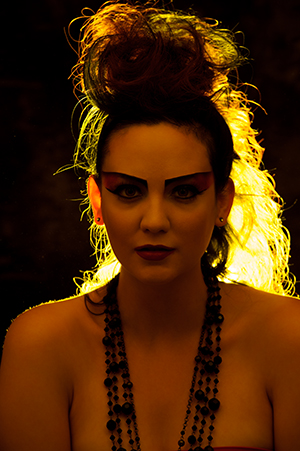
As you can see, I now have a nice burning glow that highlights the outline of the hair and separates the subject form the background adding some depth to the image. I also get a little more of the yellow light reflecting of the strip softbox and filling in the shadows of the face with a bit of a golden tinge. When I looked back at the photo of the main light by itself I decided that this slight tinge would add some warmth into the shadow area and really compliment the photo. I have to admit this was a happy accident as a result of the light set-up.
 Next, I took a few shots of just the background and hair light together to check how the two looked combined.
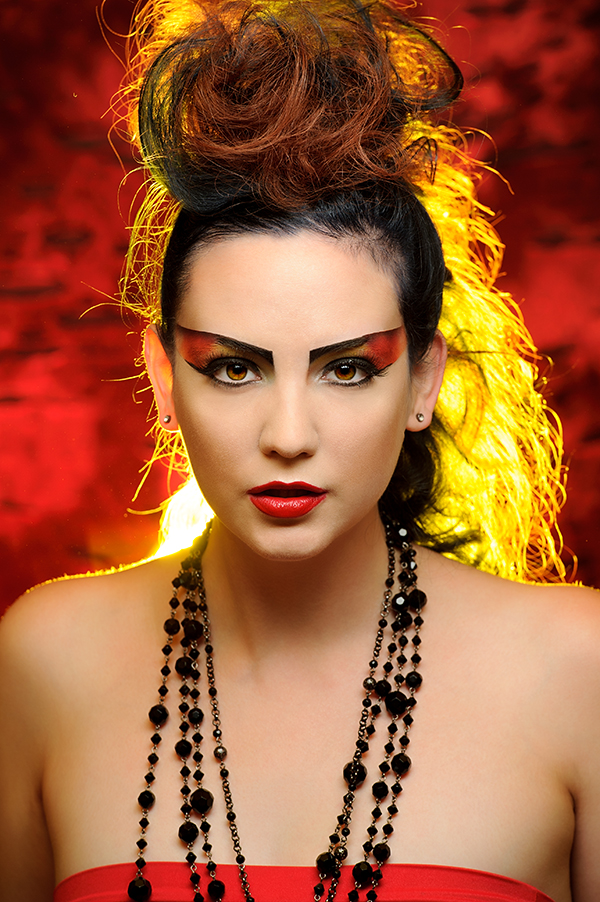
What do you think? A pretty nice combination that provided the shot with the fiery look I wanted, while also serving to bring out the background and help the subject stand out. To be critical, I was not pleased with the illumination of the subjects right ear, but I figured I could work with angles possibly to make it more subtle. Finally, I turned the main light back on and took a few more shots to see how all three lights looked together. I was very pleased with the result and felt that the little bit of red and yellow that spilled over into the shadows of the subjects face really helped to compliment the look and bring it all together. At this point the light and camera settings were never touched and all I had to do was shoot and make sure I got the pose and expression I wanted, which when working with someone like the experienced Brittney was super easy. Is the light perfect? Definitely not, but it all comes together to produce a nice unique portrait.
I hope by going through my thought process step-by-step for this shot and by showing the effects of each light separately that it gives you a little insight into working with studio lighting and how you can construct an image one light at a time. Having total control of the lights is a bit scary, but once you start taking some baby steps with it, I promise you it will make all aspects of your photography better. Studio lighting is all about the direction and intensity of light and how it transitions and compliments into shadow. Wait, isn’t that what all photography is about? So go ahead and jump in head first. Inevitably, you will make a lot of mistakes, have many over and underexposed images, and end up with plenty of shots of which you are not proud, however, you will also absolutely get some fantastically, fascinating photos and learn a lot about the the interplay and visualization of light and shadows. Plus, let’s be honest, don’t we have these same problems with any shoot? Any shot involves the light, background and subject and how we decide to capture and expose the image. Being able to control the light should actually make getting a great capture easier.
Post originally from: Digital Photography Tips.
Check out our more Photography Tips at Photography Tips for Beginners, Portrait Photography Tips and Wedding Photography Tips.
Studio Lighting: Building a Light Set-up
photographyequipment.yolasite.com (Budget Equipment) razzi.me www.facebook.com twitter.com In this video I talk about necessary equipment needed for indoor low light photography. I tested sample pictures taken with Nikon D3s and Nikkor 70-200 f2.8 VRII lens and compared it with inexpensive Nikon D7000 and 50mm 1.8 lens and Nikon SB700 to see which picture produces better results. Equipment used in this video. DSLR – Nikon D7000 and Nikon D3s Lenses – Nikon 70-200 f2.8 VRII and 50mm 1.8G lens
Video Rating: 4 / 5
www.dslrfilmnoob.com Just upgraded to a Zoom h4n and that it sync perfectly with the canon 7d, I ran this test to get an idea of what microphone configuration I’ll be using on my next project. The zoom h4n has no sync issues at all, and has a time and date stamp on each file which is great for matching up audio it will be replacing my zoom h4 as my most used field recorder. I have the Zoom h4n set in 4 channel mode so that i can use both microphones and the zoom h4n’s on board mic’s at the same time. Shot at 720p at ISO800 2f lens Nikon Nikkor 50mm 1.4f DFocus follow focus adapter and Indisystems square with 15mm rails
Video Rating: 4 / 5
Video featuring David McLain, Sony Artisan of Imagery. Visually demonstrates feature of the Alpha NEX cameras: Great shots with available light photography. Video Program Manager: Lisa Gonzalez. Live Action Production Company: Merge Group (www.mergegroup.com)
Video Rating: 4 / 5
Sports photography is a specialized field and requires some adjustment to your normal camera settings. Improve your photography techniques with this free video presented by a professional photographer. Expert: Julia Dean Contact: www.juliadean.com Bio: Julia Dean is a photographer, educator, and the founder of the Julia Dean Photo Workshops. Filmmaker: Max Cusimano Series Description: The secret to getting professional looking photographs is understanding your camera and equipment well. Expand your photography techniques with help from a professional photographer in this free video series.
Video Rating: 4 / 5
 Extra photos for bloggers: 1, 2, 3 |
|||
Ever tried painting with light but got an amorphous blob instead of the heart you meant to draw? Us, too.
That’s why light stencils are so so so great!
Instead of free-hand drawing with an LED light, you’ll use a cardboard box with a shape inside of it to shoot super detailed light paintings.
You don’t even have to cut out a stencil!
Just print out an old photo or a silhouette and slide it into your homemade lightbox. Pop the flash a few times, and create surreal dreamscapes even Salvador Dali would be envious of.
What better way to take advantage of those daylight savings hours?
How to Make Photo Light Stencils
p.s. Make a light stencil photo, and share it with us on Twitter! We’ll spotlight 3 winners on the Photojojo Tumblr. Just 1) Follow us @photojojo and 2) Hashtag it #photojojodiy. We’ll pick winners Monday morning 11/26 PST!
 Photoshopping people into your photos… meh.
Light painting people into your photos… YAY!
You can’t go wrong with this tutorial.
You’re essentially making a reusable, portable light box that can house any image you can dream of.
Combine that with sweet backdrops around your neighborhood, and your light painting possibilities are endless.

 First, you want to make an opening on the bottom of your box for your image to sit.
If you’re printing on 8 1/2″ x 11″ paper, make an opening that is 1/4″ less on all sides.
That means you’ll measure and draw a rectangle that is 8 1/4″ tall by 10 3/4″ wide.
Use a cardboard cutter to cut out the rectangle.
TIP: You may have to pass through each cut a few times if your box is thick.
 Start with one of the sides perpendicular to the bottom of the box that now has a rectangle cut out.
Center your flash at the top of this side. The top is edge furthest away from the rectangle cutout.
Make diagonal lines from the sides of the flash to the bottom corner of that side of the box.
Repeat this step for all four sides perpendicular to the bottom of the box.
Remember: The bottom of the box is where you just cut out the image opening in Step One.
 Using your utility knife, cut along the diagonal lines you drew.
This will remove the corner pieces from the four sides perpendicular to the rectangular image area cutout at the bottom of the box. By doing this, you will be able to tape the edges back together at an angle, creating a trapezoid.
When you have cut all four sides, they should lay flat in a star-like shape.
 .Using black duct tape, line up the tapered sides you just made.
Make sure to leave an opening at the tapered end for your flash to slide in.
It’s kind of like building the pyramid, but with less work!
 Once you have all the sides sealed together, use your black tape to line the edges of your image opening.
This will prevent any wild cardboard pieces from showing up in your image.
Do the same thing to the opening for your flash.
 Now, cover the entire box with black tape.
This will prevent it from showing up in your images.
If you prefer, you could spray paint it black instead.
Just make sure to let it dry completely before moving on.
 Handles come in handy, eh?
You’ll be glad you added this step once you’re out taking photos.
Cut a scrap piece of cardboard into a rectangle that is 2″ wide by 10″ long.
Cover it with black tape.
 Tape the ends of your handle to one side of the box close to the smaller opening.
Make sure it’s really secure and that your hand fits through it.
Remember, you’ll need one hand holding the box, and one using the flash.
Make your handle the most comfortable it will be for you.
 So the trick is, you need to print your images with a black background.
This will prevent light from passing through, and help them integrate better with the rest of the scene you’ll be photographing.
Using image editing software, place your image on a black background.
These steps show you how to cut an image out of the existing background.
You could also make you image into a silhouette.
 Once you have your images the way you like them, print them out.
Make two copies of each image.
Line them up perfectly, and tape them together.
 Laminating the image will make them reusable.
We used self-laminating sheets from a craft store, but most local print shops can laminate for you as well.
Just peel of the backing sheet and lay your image down smoothly.
Place another laminate sheet on the backside to seal them together.
Trim off the excess, but leave a bit of a border around your image.
 Tape on your laminated image to the large opening at the bottom of the box.
Use black duct tape for this, too.
Make sure to cover up any borders on your image so extra light doesn’t creep through the edges.
 Manual mode on your external flash works best for this.
Start at 1/8 normal power.
You may have to adjust this while shooting.
 Put your flash through the small opening at the other end of your box.
Your flash won’t stay in this opening unless you’re holding it in place. Be sure not to let it drop.
Use the handle you created to hold the box with one hand, and your other hand to hold the flash.
Bam. Now, you’re ready to go photograph.
 Find your perfect location. Use a tripod and a long exposure.
If you have a friend willing to help you out, it will make this process smoother.
If not, practice makes perfect, huh?!
 Test out the exposure for the background first.
This will help you know how long you have to work with.
For this image, we used a 2.5 second exposure at f/8.
 Place your image where you want it in the scene.
Focus your camera on your lightbox image.
Start the exposure by pressing your shutter button. Pop the flash once by pressing the “test” button, then move out of the scene.
Take a look at your image, and adjust where necessary.
TIP: If you see your black background around your lightbox image, you need to adjust your settings. Turn down your flash power, or stop down your aperture, i.e., change it from f/8 to f/11 or f/16.
 Keep playing around with placement and exposure to get the perfect combination.
Your aperture settings will control the amount of light from your flash. The shutter speed will control the ambient light.
So, if your flash is too bright, stop down the aperture. If your background is too dark, increase your shutter speed.
TIP: Don’t forget your scarf and mittens! Oh, and a hot chocolate!

Thanks to Trevor Williams and Fiz-Iks for this amazing project idea! Check out his video.
Related posts:
A lot of you have asked for lighting diagrams from my last post on One Light Portraits, so here they are- the finished shot, as well as the arrangement of lights, reflectors, and camera position. Enjoy!
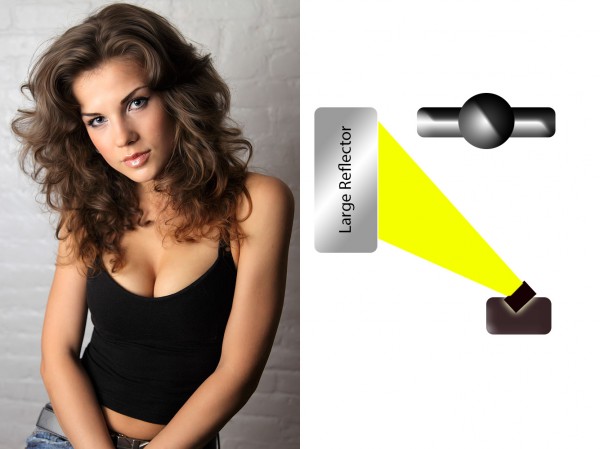
For this shot, the flash is on-camera, and bounced into a reflector at camera left.
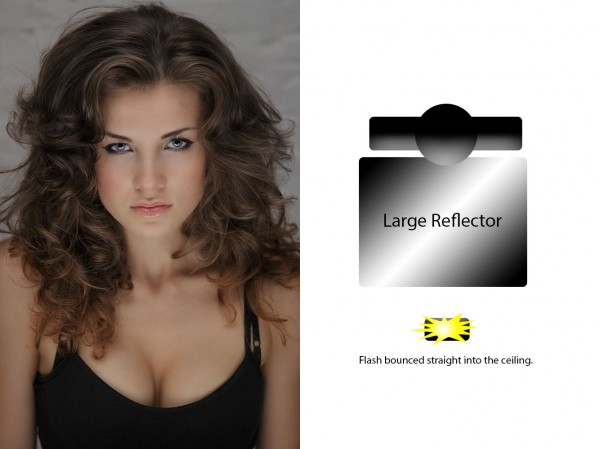
This is a variation on the previous shot. This time, the reflector is placed at the model's waist, facing up. The flash is bounced at the ceiling, and teh reflector then reflects that light up into the model's face.
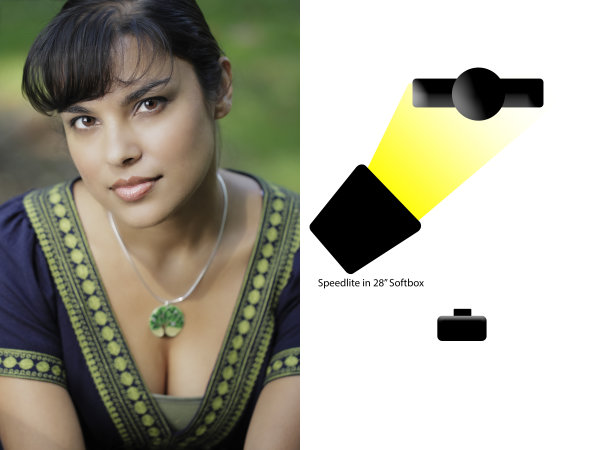
For this shot, a speedlite in a softbox was used. We are outdoors, and our subject is positioned under a tree for shade. The softbox then becomes the main light on our subject, and the daylight fills the background.
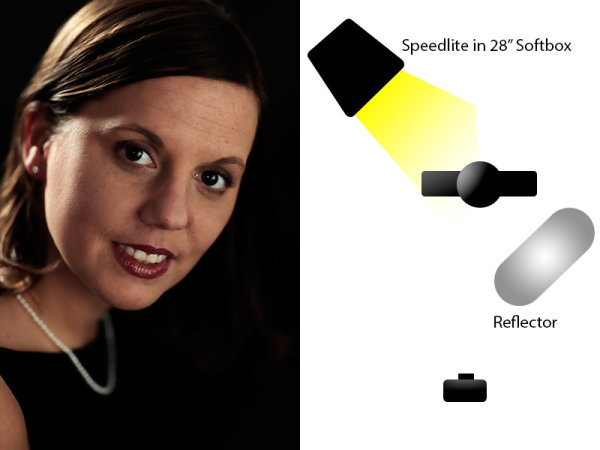
In this shot, a softbox is set up behind the subject, while a reflector is set up directly opposite to bounce light into the face. In this case, the silver side of the reflector was used.
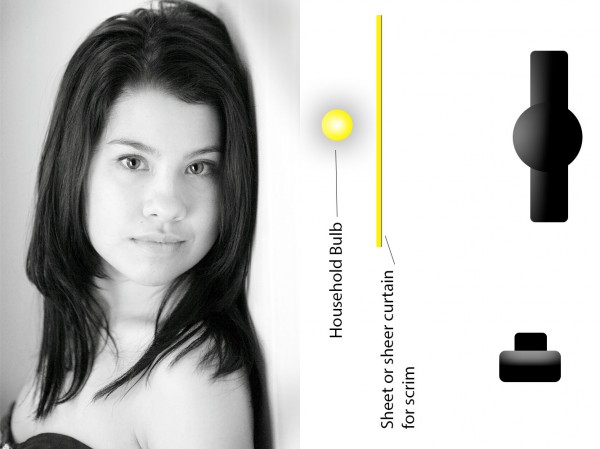
A household bulb can make a perfectly acceptable light source when nothing else is available. In this case, a household lamp was used, with the shade removed. To soften the light, a white sheet was used as a scrim to allow light to pass through. A higher ISO- ISO 2500 – was used. Keep in mind your white balance must be adjusted for the yellowish cast a household bulb creates.
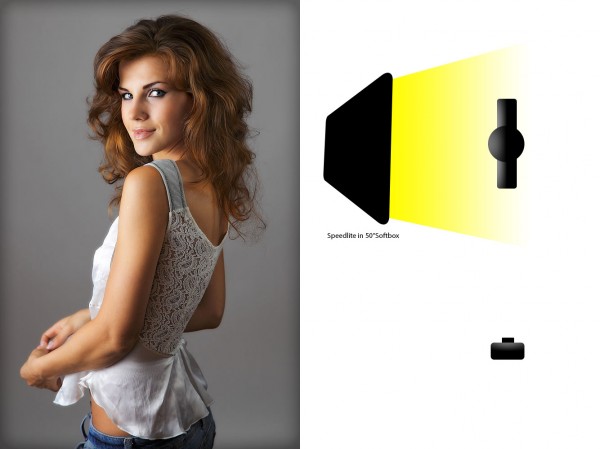
This shot uses one large soft box- 50 inches- to create a soft light.
Post originally from: Digital Photography Tips.
Check out our more Photography Tips at Photography Tips for Beginners, Portrait Photography Tips and Wedding Photography Tips.
One Light Portraits Part 2: The Diagrams
International superstar and iconic tough guy Charles Bronson stars in this gritty, action-packed TV series. Bronson portrays Mike Kovac, a New York City freelance photographer who specializes in getting difficult shots other lensmen cannot. Assisting law enforcement and insurance agencies, he invariable winds up acting as a private eye and gets himself into plenty of trouble!
You must be logged in to post a comment.