RSS
 

Posts Tagged ‘Leverage’

Simple Tips for Positioning Your Portrait Subject to Leverage Natural Light

06 Nov

When I’m on a photo shoot, I always carry two flash guns with me. However, when it’s a family outing or holiday, the flash guns are left behind in favor of kiddie stuff I need to lug around and I shoot using purely natural light, without even a reflector to help. It does help that I carry a prime lens that opens up to f/1.4 should I need or want to shoot indoors.

Here are my tips for making portraits using purely natural light.

On a sunny day, there is so much light that it makes it quite hard to take portraits, contrary to what many would think. I generally don’t like taking portraits with the sun directly hitting the face of my subject, so that makes the job even harder on such a bright day.

Simple Tips for Positioning Your Portrait Subject to Leverage Natural Light

The first thing to be mindful of is the direction of light – is it coming from overhead, at an angle of 45 degrees or higher or lower? As you cannot physically move the sun, you are going to have to move your subject instead. Think of positioning your subject as leveraging natural light to make a pleasing portrait.

Outdoors

Here are some outdoor scenarios where you can position your subject and avoid direct bright sunlight.

In the shade

My go-to (and easiest) spot is a shaded or sheltered area. Ideally, find a large enough shaded area so that your entire subject is covered in shade. You don’t want dappled light or parts of the body overexposed by being in the sun while the rest of the person is in the shade.

Areas of shade could be under a tree or in the shadow of a tall structure such as the wall of a building as in the photo on the left below. This gives you even lighting over a large area and even exposure too with no hard shadows.

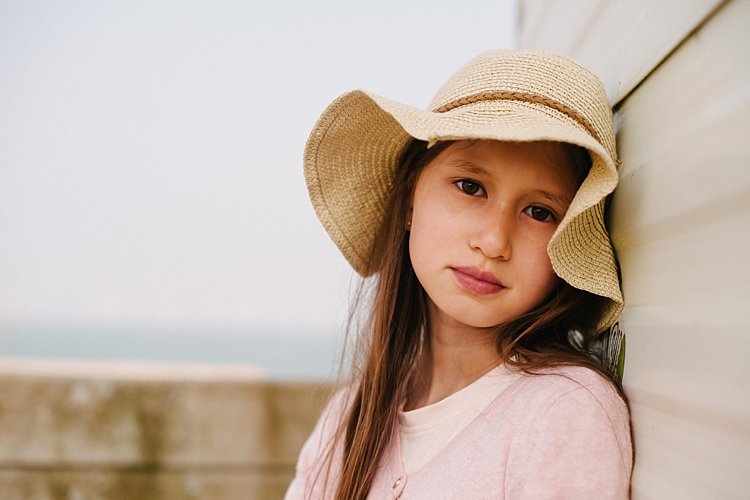
Compare the left photo to the right one where the subject is wearing a hat. I metered on her face and because she was furthered shadowed by the hat, the exposure increased a tad and the rest of the image then got brighter. This can be evened out quite easily in post-production by adding a soft vignette.

Simple Tips for Positioning Your Portrait Subject to Leverage Natural Light

With a very bright backlight

Sometimes you find yourself at a location that doesn’t offer enough shade or there is a lack of large structures to provide shelter. You would end up shooting in a bright wide-open space and your only option is to shoot backlit or at least provide shade to your subject’s face.

The difficulty with shooting backlit is that you would need to have ample fill light to compensate for the very strong backlight. You can either use your camera’s built-in flash or use some kind of reflector. That could be a light-colored piece of cardboard or a natural reflector in the vicinity, such as a bright path or wall that reflects strong sunlight back onto your subject’s face.

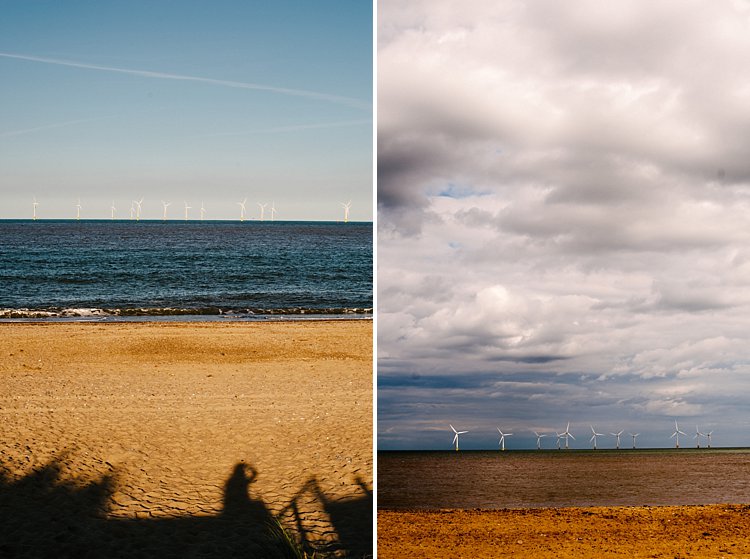
Shooting in an open or semi-open space, like the black and white photo above, where the backlight is a lot stronger than the light illuminating the subject it gets complicated. Unless you are using a flash to counteract the backlight, the background will be blown out. Even if you shoot with a small aperture, the difference in the amount of light between the subject and the background will be too great to get an even exposure without using a fill flash.

Natural reflectors

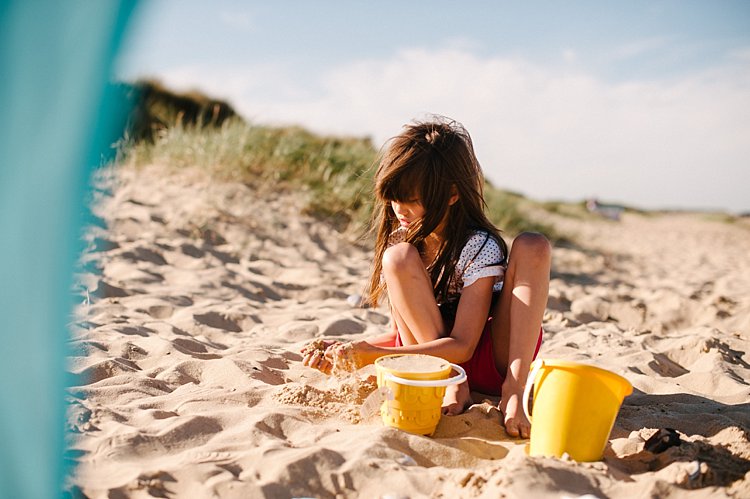
In the photo below, this was not taken in a fully open space but the shade there was weaker. The hat provided more shade to her face and you can see the left side is a little darker than the right. That makes for a nice gradation of light and shadow as opposed to a flatly-lit portrait.

I leveraged a natural reflector here which was just to camera right – a light colored parasol which reflected the sun onto the girl’s face. You can also see that the background was a lot brighter and more washed out compared to the first photo above left. But it is showing some foliage compared to the photo above right, hence there is more detail rather than just a white blown out sky.

When I find myself in situations like these, I make sure my main focus is the subject’s face and I don’t mind the background being blown or washed out. After all, I am after a portrait of the subject.

Simple Tips for Positioning Your Portrait Subject to Leverage Natural Light

Light from above

Compare the two photos below. The left photo is shot with fairly flat lighting on the face. I made sure the subject was in full shade and the light coming from both the right and left sides was even.

The photo on the right is different in that I asked her to look up a little, thus using the light coming from above and creating a slight gradation of shadow on the right side of her face. Simple positioning of the face in relation to the light source makes a big difference in how your photos look.

Simple Tips for Positioning Your Portrait Subject to Leverage Natural Light

Indoor lighting

In comparison to outdoors, there is usually only a fraction of the amount of light indoors, even with a window present. However, this works to your advantage. The light source is usually one-directional unless you have many windows, and therefore you can use this it to sculpt your subject’s face as it were, choosing where the shadows will fall and creating a moody portrait.

The light in the photo below left was coming from a big window, high up at about 30 – 45 degrees to the subject. You can see the shadow falling on the opposite side of her nose and cheeks creating a darker, moodier feel to the image compared to the photo on the right shot outdoors. Even with just a single light source indoors, you have enough light to play with and create the ambiance you want to portray.

Simple Tips for Positioning Your Portrait Subject to Leverage Natural Light

Over to you

Whether indoors or outdoors, it is always important to be mindful of where the light is coming from, how much light there is, and if there is any contrast of light and shade in the space. Knowing how to leverage the natural light allows you to create the type of mood you are after in your portrait.

Understanding this and practicing how to use available light will make you a better photographer.

The post Simple Tips for Positioning Your Portrait Subject to Leverage Natural Light by Lily Sawyer appeared first on Digital Photography School.


Digital Photography School

 
Comments Off on Simple Tips for Positioning Your Portrait Subject to Leverage Natural Light

Posted in Photography


4 Tips to Leverage Natural Light Using Just your Camera and One Lens

29 Nov

In photography light is everything. Without light, whether that be artificial or natural, there is no photography. The problem is that sometimes there is just too much or too little, and in both cases, artificial light may need to be added. But what if you don’t have any artificial light available to you? And what if all you have is literally a camera with a lens and nothing else? This article focuses on how you can leverage natural light using just one lens and working without a reflector or a speedlight.

#1 Position your subject in relation to the light

Let’s take a look at these photos below. It was a very sunny day and I wanted to capture the blueness of the sky and the sea as well as the people in the shots. I had a D700 which has a base ISO of 200 and the 50mm 1.4 lens. I have provided the settings below for each photo.

creative-ways-available-light-with-the-50mm_0000

f/5.6 ISO 200, 1/2000th

creative-ways-available-light-with-the-50mm_0000

f/5.6 ISO 200, 1/1250th

creative-ways-available-light-with-the-50mm_0000

f/6.3 ISO 200, 1/2000th

These settings are okay on a very sunny day if you shoot with the sun positioned behind you shining towards your subject. In this case the sea and sky, which also illuminated the people that I wanted to be in the photo.

Lighting position

While these photos are fine, there are a few issues. First, put simply, when this is the lighting position, anyone, and any camera can take these types of photos. You can shoot in automatic mode and the photos would look the same. Mobile phones nowadays can take even more amazing photos in this situation where there is a huge amount of light hitting the subject and the background directly.

I love these types of photos for travel photography, high contrast shots and snapshots that would make me remember such scenes. But if I am after portraits, would I hire a professional photographer who would give me photos that anyone can take? Definitely not! Sure, the occasional lifestyle snapshot in this lighting is acceptable such as this one directly below shot at f/2.5 ISO 200, 1/2500th. But I would not want proper portraits of my family to be taken in this lighting situation.

creative-ways-available-light-with-the-50mm_0000

creative-ways-available-light-with-the-50mm_0000

creative-ways-available-light-with-the-50mm_0000

Harsh shadows

The second issue is the harsh shadows. As a professional photographer, this would never be my lighting position for people or portraits. Even if the sun was coming in at a side-angle, undiffused sunlight directly hitting the subject still produces harsh shadows and hotspots. I would prefer for the sun to be behind the subjects, also known as backlighting, rather than directly in front of them.

If your intention is to take nicely lit portraits with a background that is not blown out, for backlighting to work, you would need to have a big enough flash or reflector to illuminate your subject to avoid silhouettes. Conversely, you can simply expose for your subject but you will have to blow out (overexpose) the background. Therefore, you end up with a white sky rather than a blue sky.

An example of backlighting is this sunset photo below. The houses and the boats were not illuminated. I was too far away for my pop-up flash to be of any help, and I didn’t have a tripod for a long exposure and smaller aperture. But I still wanted to capture some of the soft sky color along with the sunset. Balancing the exposure was tricky and I ended up shooting this image with the following settings; f/5, ISO 200, 1/320th. While the ambient light of the sunset was captured, the other elements in the photo were too dark and ended up almost like silhouettes.

creative-ways-available-light-with-the-50mm_0000

What if you have nothing else but a camera and lens with you? You do not want all your photos to be silhouettes when shooting backlit, or too dark when shooting in the shade. So what you can do is leverage your surroundings by positioning your subject carefully in relation to the light. If you have to shoot backlit portraits in a situation similar to above, shoot an intentional silhouette or use your flash for fill light (more on this below).

If you’re doing portraits where you want to focus on well-exposed faces, avoid positioning your subject where they are facing the sun which results in harsh light and shadows. On a very sunny day, you may want to wait for the golden hour – the time shortly after sunrise or before sunset –  when the sun is much lower on the horizon and the light is much softer. This yields a light that is much more flattering for portraits. If it is a bright but overcast day, the clouds act as a huge diffuser and the shadows are not as harsh so it is easier to photograph portraits in those conditions.

#2 Look for ideal light

Ideal light is often indirect, reflected, or subtractive light. This can take various forms:

  • Indirect lighting can be the soft diffused light coming from a window.
  • Reflected light can be that bouncing off a white floor, wall, bright sand, or from white or light-colored clothing you are wearing.
  • Subtractive light can be achieved by blocking the light with a diffuser, umbrella or a flag (any flat black object large enough to block any direct light hitting your subject).

Get out of the sun

As this article does not involve any equipment other than your camera and lens, instead of blocking the light, I positioned my subject in the shade. So that instead of subtracting light from my subject, I subtracted my subject from the light and put her in the shade.

In this example below, it was a very bright day and I did not want any direct light falling on my daughter’s face. I put her completely in the shade but deliberately next to the caravan wall which was light beige. There is some reflected light from the side that helps illuminate her face and the generally shadowed area we were in.

creative-ways-available-light-with-the-50mm_0000

In this photo below taken in the zoo, there was no natural light at all. A fluorescent light illuminated the box where the snake was. You can see this white light reflected on the top part of the snake’s eye (catchlight). I waited for the snake to get into this position and used the light which was bouncing from the ceiling onto him to get this shot.

creative-ways-available-light-with-the-50mm_0000

In this photo below, there was no ideal light! We were in a pretty darkly shaded area and the enclosure was mottled with spots of sun and shade. I positioned myself where I knew I could catch a good close up of the tiger in complete shade and waited for it to pass by.  The contrast between the light and shade was so strong that had I taken the photo of the tiger with his body in half sun and half shade, it would not have come out well at all.

creative-ways-available-light-with-the-50mm_0000

#3 Use your pop-up flash as fill light

Now I know that photographers are sometimes funny (and snobby) about using the camera’s built-in pop-up flash. I am one of those photographers, with good reasons. The camera’s pop-up flash blasts light directly onto your subject. It gives you a rather flat and unflattering light with a harsh shadow around the jaw and head to boot. Unless your intention is to shoot like this such as some fashion houses do (and they do it so professionally by the way), then this is a no-no in portrait photography. Ideally, you want the light bounced and angled – anything but aimed directly from the camera toward the subject.

However, I do use my pop-up flash quite a bit! In fact, I use it when I don’t have a flash gun (speedlight) and I’m shooting backlit, especially when the sun is strong. And I have no qualms using it as a direct light in this situation because the camera’s flash is not strong enough to overpower the sun anyway. So the most you get out of it is a little bit of fill light.

Take this photo of the monkeys below. Had I not used my pop-up flash, there would have been no detail captured on the monkey’s face at all. The sun was too powerful that the pop-up flash could never have flattened the face and created harsh shadows anyway, and I was also too far away from the monkeys for that to happen.

creative-ways-available-light-with-the-50mm_0000

Using the pop-up flash is a fast and easy way to add light. Just be mindful of the caveats and be circumspect when using it.

#4 Try long exposures to capture natural light

Shutter speed has everything to do with ambient light regardless of whether you are doing long exposures or using on-camera, off-camera, or pop-up flash. In fact, with regards to the latter three, flash exposure is completely unaffected by shutter speed.

With long exposures, you can take photos even when very little light is available. You need a tripod, or something steady and flat to rest your camera on like a table or chair, and you’re good to go. So why would you want to slow down your shutter speed and when must you do it? Do it when you want to capture the ambient light.

Armed with just a 50mm and the camera placed on a steady surface, I slowed my shutter speed right down to a few seconds using the bulb setting. I may have captured the moon rising but the sky is pitch black and not enough ambient light was captured. My shutter speed might have been slow but not slow enough. Ambient light was very crucial here because there were stars in the sky.

creative-ways-available-light-with-the-50mm_0000

In contrast to the above, the photo below is the same scene photographed with a much slower shutter speed so that the stars are visible.

creative-ways-available-light-with-the-50mm_0000

Even with just the 50mm you can photograph the starry sky such as below. However, don’t go over 10 seconds as you would then start capturing the star trails.

creative-ways-available-light-with-the-50mm_0000

Using shutter speed wisely and skillfully is a great tool for capturing mood, color, and ambient light, even when there is very little of it. There is some light you don’t ever want to kill such as the soft evening light just after sunset. These photos were taken simply with a camera with a 50mm lens at a slow shutter speed, a wide aperture, and a fairly high ISO (as I was on a slow moving boat). These images were shot at;  f/2.5, ISO 2500, 1/100th. A faster shutter speed would have killed this light and rendered the sky pitch black. Too slow I would have run the risk of blurry photos due to the moving boat.

creative-ways-available-light-with-the-50mm_0000

creative-ways-available-light-with-the-50mm_0000

creative-ways-available-light-with-the-50mm_0000

creative-ways-available-light-with-the-50mm_0000

googletag.cmd.push(function() {
tablet_slots.push( googletag.defineSlot( “/1005424/_dPSv4_tab-all-article-bottom_(300×250)”, [300, 250], “pb-ad-78623” ).addService( googletag.pubads() ) ); } );

googletag.cmd.push(function() {
mobile_slots.push( googletag.defineSlot( “/1005424/_dPSv4_mob-all-article-bottom_(300×250)”, [300, 250], “pb-ad-78158” ).addService( googletag.pubads() ) ); } );

The post 4 Tips to Leverage Natural Light Using Just your Camera and One Lens by Lily Sawyer appeared first on Digital Photography School.


Digital Photography School

 
Comments Off on 4 Tips to Leverage Natural Light Using Just your Camera and One Lens

Posted in Photography