The post 3 Creative Ingredients for Every Photo You Take appeared first on Digital Photography School. It was authored by Mat Coker.
We all look at our photos at times and think, “these just aren’t that great.” New photographers who aren’t sure what to do feel this way all the time. But so do seasoned photographers.
Sometimes, looking at the most basic elements of your photo can help you a lot.
I have a mental checklist that I use to help me take the best photo I can. When I review my photos I use this checklist to ask what I could have done better.
Whether you’re a new photographer trying to develop your style or a seasoned photographer wanting to revive a stagnant style, you can use these 3 ingredients to make dramatic changes to your photos.
- Moment
- Composition
- Light
All three of these ingredients are present in every photo you take, it’s just a question of what you do with them. Begin by understanding the moment you’re photographing and then build your composition and play with light.
We’ll look at moment, composition and light separately, but I’ll identify all three in each photo as we move along.

Moment: candid, action
Composition: high angle
Light: soft, backlight
When I first began using an old iPhone to take pictures I knew I couldn’t rely on camera settings to make my photos look good. Instead, I would have to focus on other elements such as gesture, angles, and light.
Moment
Most people would agree that the moment is the most important part of any photo. We won’t even notice the shortcomings in your photo if the moment is strong enough.
First, begin by considering what sort of moment you’re about to photograph. The first question to ask is whether the moment is one that you’ve set up (still life, food photography or posed portraits) or is it happening naturally (candid moments, photojournalism, lifestyle or street photography)?

Moment: posed
Composition: face to face angle
Light: soft, side light

Moment: candid
Composition: high angle
Light: soft side light
After photographing thousands of the same pose over and over, this candid moment was a breath of fresh air.
Whether it’s a natural or posed moment, there are further questions to ask. That moment may be packed with action (sports), or emotion (events) or mystery (portraits).

Moment: action
Composition: slightly higher angle
Light: soft, side light

Moment: candid moment combing two emotions; a loving embrace and a crying infant
Composition: face to face
Light: backlight
You can go even deeper into the moment. When the environment or background plays a role, the moment may be a season, a time of day, or a sudden storm.

Moment: a childhood moment at golden hour
Composition: face to face
Light: warm, soft, backlight
Types of moments to look for:
- Natural
- Posed
- Action
- Emotion
- Mystery
- Stage of life
- Time of day
- Season
- Weather
The type of moment that you’re photographing will influence your decision about composition and light too.
Composition – especially angles
Composition refers to everything your photo is composed of. Which means no matter what part of the photo you’re discussing, it’s all composition. However, photographers often use the term composition to refer to a specific type of element such as angle, background, framing, symmetry, lines, centering, rule of thirds, etc. So even though moment and light are technically part of the photo’s composition, they often stand on their own.
We’ll take a close look at angles because you must use an angle in every photo, whereas other elements such as lines, symmetry, or rule of thirds may not be possible or desirable in every photo.
Angles are easy to learn and fun to use. To change the angle you simply need to get your camera higher or lower or rotate horizontally from left to right.
There are five vertical angles to choose from, and each one changes the look and feel of the photo. You should choose your angle based on the type of moment you’re photographing.
- Bird’s eye view – when you get up high and look straight down (candid and still life moments).
- High angle – like a grown-up looking down at their kids (posed or emotional moments).
- Eye level – at the same level as the thing you’re photographing (emotional or action moments).
- Low angle – like a child looking up at the world of grown-ups (action moments).
- Bug’s eye view – looking straight up from down on the ground. (dramatic moments).
Experiment with angles and you will soon learn what works best for you.

Moment: setup, “posed”
Composition: bird’s eye view. Great for food photography because it mimics the angle that you use to look down at your food.
Light: soft, side light

Moment: posed
Composition: low angle
Light: soft, side light
Climbing a mound of dirt with your Tonka trucks is pretty epic for a little kid. So photographing it from a lower angle helps to exaggerate the size and how the moment feels.
Use angles and the other elements of composition to bring out the nature or essence of your moment.
Choose your angle well and then fill out your composition with other elements to draw the eye. Try negative space (also with portraits), centering, black and white, silhouettes, lines, framing and other unique approaches.
“One doesn’t stop seeing. One doesn’t stop framing. It doesn’t turn off and turn on. It’s on all the time.” – Annie Leibovitz
Light
There will be all sorts of moments that you have either orchestrated (posed) or discovered (candid). You respond to that moment with your composition, bringing out the meaning of the moment. Finally, you do your best with light to make the moment look better.
Sometimes you can control the light (strobes, off camera flash, or window light). In most other cases you can’t control the light. But no matter what light you’re given, you can always modify it with scrims and reflectors.
There are a few aspects of light to keep in mind since they dramatically affect your photo.
Color
Most light has a color to it. Perhaps it’s clean white light, or maybe it’s being reflected off a colored surface. Consider the temperature of the light. Is it warm or cool?

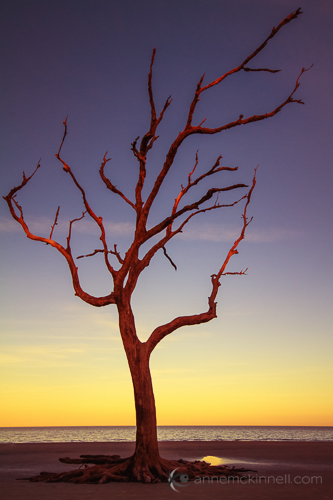
Moment: season, night
Composition: lower angle
Light: cool, backlight

Moment: posed
Composition: face to face angle, framed by the branches
Light: warm, backlight
Quality
When it comes to the quality of light, remember that a larger light source will produce softer light while a smaller light source produces harsh light.
So a large window is a source of soft light, while a bare light bulb produces harsh light. Photographers use umbrellas and softboxes to make the light source larger and produce a softer light.
An overcast sky is a source of soft light, while the sun is a source of harsh light.

Moment: posed
Angle: face to face
Light: harsh, side light

Moment: perfectly still, but not posed
Composition: bird’s eye view angle
Light: soft, side light produced by a window

Moment: posed
Composition: face-to-face angle, symmetrical composition
Light: soft light was produced by an overcast sky.
The orderliness of the photo is broken by the silly expression on her face.
Direction
Whatever the color and quality of light, it will always be coming from a particular direction. The direction of light changes the feel of your photo.

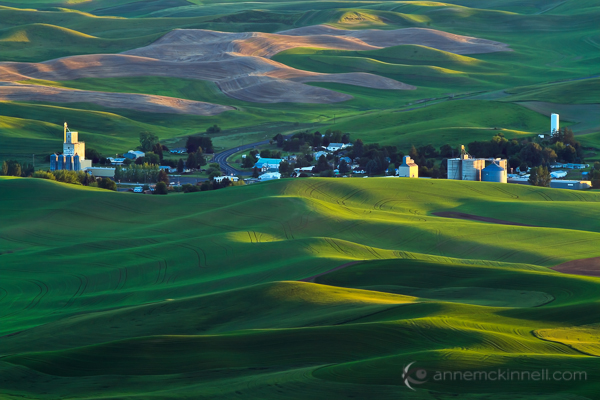
Moment: candid
Composition: low angle
Light: green, harsh, front light

Moment:action
Composition: high angle, centered
Light: harsh, side light

Moment: action
Angle: low angle
Light: backlight from the setting sun, producing texture in the sand
There is a lot to learn about light, but keep in mind these three big elements:
- Temperature, color
- Quality (large and soft, or small and harsh)
- Direction
Every creator uses ingredients
Photographers are no different.
None of the three main ingredients are optional, they’re going to be in every photo. The question is what you do with them and how they affect your photo.
There is going to be a moment, but did you think it through and capture it the way you hoped?
There will always be an angle (and many other elements of composition), but did you choose one that made the moment stand out better?
And, there will always be light, but did you use it in such a way as to make the moment look it’s best?
The post 3 Creative Ingredients for Every Photo You Take appeared first on Digital Photography School. It was authored by Mat Coker.

You must be logged in to post a comment.